CTS 2311 (Unix/Linux
Security) Lecture Notes
By Wayne Pollock
Lecture 1
Welcome! Introduce course. Review
syllabus, RSS, wiki. Your ua?? is active.
Review: Admin I and II
topics: Basic Sys Admin tasks, hardware types, terminology, and management; partitioning
and disk management; booting; system boot-up and shutdown; change management,
help desk, administrative policies and procedures; disaster recovery; basic
network configuration and trouble-shooting (ping,
route); starting and stopping
services; printing; managing users and groups and disk quotas; backups and
archives, file locking and basic security, cron and at, source code versioning
and building, open source and other licenses, the kernel and related concepts,
system and service monitoring, basic networking, time servers, time zones and
locales.
Discuss Project 1 (mention LVM not
required) install Linux, pass out Fedora DVDs (also available from DistroWatch.com). Discuss system
journal — Use wiki.
Have students use wiki to pick host
names and user IDs (need to be unique in class). Mention post install
tasks (on web).
Definition
of Information Systems Security (INFOSEC):
From the NSA (U.S. National
Security Agency): Protection of information systems against
unauthorized access to or modification of information, whether in storage,
processing or transit, and against the denial of service to authorized users,
including those measures necessary to detect, document, and counter such
threats.
Qu: what do we mean by “security”?
(Short Answer: CIA) We mean protection of valuable assets, not just from
people with malicious intentions (“black hats”, or attackers) but
protection from accidents including environmental disasters. You also must
consider how long you need to keep information secret; that can be anywhere
from a few minutes to over 70 years.
Attackers work in seven
steps: reconnaissance, weaponization, delivery, exploitation, malware
installations, command/control, and exfiltration. This model is sometimes
known as the kill chain. Lockheed-Martin
defines these steps this way:
1. Reconnaissance
- Research, identification and selection of targets, often represented as
crawling Internet websites such as conference proceedings and mailing lists for
email addresses, social relationships, or information on specific technologies.
(This is sometimes called footprinting.)
2. Weaponization
- Coupling a remote access trojan with an exploit into a deliverable payload,
typically by means of an automated tool (weaponizer). Increasingly, client
application data files such as Adobe Portable Document Format (PDF) or
Microsoft Office documents serve as the weaponized deliverable.
3. Delivery
- Transmission of the weapon to the targeted environment. The three most
prevalent delivery vectors for weaponized payloads by APT (advanced
persistent threat) actors (attackers), as observed by the Lockheed Martin
Computer Incident Response Team (LM-CIRT) for the years 2004-2010, are email
attachments, websites, and USB removable media.
4. Exploitation
- After the weapon is delivered to victim host, exploitation triggers
intruders’ code. Most often, exploitation targets an application or operating
system vulnerability, but it could also more simply exploit the users
themselves or leverage an operating system feature that auto-executes code.
5. Installation
- Installation of a remote access trojan or backdoor on the victim system
allows the adversary to maintain persistence inside the environment.
6. Command and
Control (C2) - Typically, compromised hosts must beacon outbound to an
Internet controller server to establish a C2 channel. APT malware especially
requires manual interaction rather than conduct activity automatically. Once
the C2 channel establishes, intruders have “hands on the keyboard” access
inside the target environment.
7. Actions on
Objectives - Only now, after progressing through the first six phases, can
intruders take actions to achieve their original objectives. Typically, this
objective is data exfiltration, which involves collecting,
encrypting and extracting information from the victim environment; violations
of data integrity or availability are potential objectives as well.
Alternatively, the intruders may only desire access to the initial victim box for
use as a hop point to compromise additional systems and move laterally inside
the network.
You can never guarantee 100% safety
no matter what you do. So there is a trade-off between how secure you make a
system (how hard you make it for attackers to damage or steal your assets, how
much protection you provide against power loss, floods, etc.), and how quickly
you can recover from an incident, versus how much money you spend, and what
sort of procedures you implement. (Your employees and customers won’t accept
just any procedure. I doubt a strip-search and full body X-ray for every
employee every day would be accepted!)
Security
involves protection, detection, and reaction. If there’s no alarm,
then sooner or later the protection will be overcome; if there’s no reaction to
alarms, you needn’t bother. Protection is only needed for the time it takes to
react. In fact, this is how safes are rated: TL-30 means resist a
knowledgeable attacker with tools for 30 minutes, and TRTL-60 means resist that
attacker with tools and an oxy-acetylene torch for an hour. You buy the safe
that you need, depending on (say) security guard schedules.
The balancing of costs and
protections makes security an exercise in risk management. First you need
to determine what needs protection, and what the threats are that you plan on
defending against. This is a threat assessment (and produces a threat
matrix). Next you define security policy that, if implemented
correctly, will reduce the risk of the identified threats, to an acceptable
level. The policy is implemented using various procedures and security
mechanisms.
Security raises issues, not just
of protection by technology, but legal, ethical, and professional issues as
well. (There is often a difference between personal and professional
ethics.) You need to worry about policies, assurance, and security design of
software (sadly neglected in programming courses and books!)
For any organization, there are
requirements for security. (Here we are concerned only with Information
Systems’ Security (IS security). Security requirements can be
self-imposed or can originate from an external source. For example, companies
that process any type of U.S. government information are subject to the
provisions of the Federal
Information Security Management Act (FISMA) and the associated National
Institute of Standards and Technology (NIST) Special Publications
(there are lots of these). Companies that process national security
information are subject to security requirements published by the Committee on National
Security Systems (CNSS). Other U.S. standards are Federal
Information Processing Standards (FIPS) and American National Standards
Institute (ANSI) standards. Organizations that process credit card
data need to comply with the payment
card industry (PCI) Data Security
Standard (PCI DSS). Note that many standards organizations
adopt each others’ standards, so a given standard may have an ANSI number, a
FIPS number, and ISO number, and so on.
There are other requirements at the
global, federal, state, or (regulatory) industry level for security of health
information, corporate financial data, protection of employees and customers,
etc. Nearly all these requirements have the same general security goals:
confidentiality, integrity, and availability (CIA), discussed later.
Not all organizations
take security seriously. Until a major public breach happens, that is. Some
of the organizations who fail to do a proper job get nominated for the annual pwnie awards.
Some notable nominees for 2012 include LinkedIn and Yahoo for the loss of
emails and passwords, MySQL for accepting any password for any username, and F5
for including the private SSH key in plain text in the device’s firmware (thus
allowing anyone root access to their Big-IP load balancer).
History of
Information Security
Thousands of years old:
·
Kings to other rulers (secret agreements)
·
Leaders to soldiers (military communications)
·
Finance (banking, trading, merchants to partners and branches)
·
More recently, expectations of privacy:
o
Medical records (including genetic data)
o
Employment and other records
o
Mail
o
TV viewing, web surfing
o
Computer communications: email, IM, ...
o
Location (GPS and other tracking via cell phones, cars, ...)
·
Computer transactions (i.e., buying stuff on-line, auctions, ...)
Early encryption: Julius
Caesar’ cipher: A->C, B->D, C->E, ...
Early bookkeeping: 8500 B.C.E.!
Double-entry bookkeeping:
About 1400 C.E. Every transaction is posted to two separate books, in one as a
credit and in the other as a debit.
Example: Accounts receivable
book and the cash account book: A customer pays $100 owed. That is a debit in
the Accounts receivable book (the company is now owed $100 less than before, so
that account balance goes down), and a credit in the cash accounts book (the
company now has $100 more than before).
The two books are maintained by
separate clerks. (A slip recording the transaction by some teller has one copy
go to each clerk, which is why bank forms used to be multipart carbons).
At the end of the month/week/day
(banks are daily), the owner/manager collects the books and compares the
totals, which must exactly balance each other.
This system of dual control
prevents any one employee from cheating the firm.
Sometimes, banks and
trading firms get sloppy. In the case of Nick Leeson, who famously brought
down Barings Bank in 1995 by losing $1.4bn, there was no proper separation
between front and back office. Mr. Leeson was processing the tickets for his
own trades. Jerome Kerviel, the Societe Generale rogue trader, is also
supposed to have used his intimate knowledge of the bank’s systems from his own
time working in the back office, and lost his firm 4.9bn euros, the current
record. Number two is Yasuo Hamanaka, who lost $2.6bn in metals trading for
Sumitomo Corporation in 1996, again by taking advantage of poor controls.
Recently (2011), Kweku
Adoboli at Swiss bank UBS, had conducted legitimate derivative transactions,
giving the bank heavy exposure to various stock market indexes. But he had
then entered “fictitious” hedges against these positions into UBS’ risk
management system, while in reality he had no hedge in place and was breaching
the risk limits that the bank required him to work within. This illegal
trading cost $2.3bn.
Seals
and Security Printing: In 2,000 BC Mesopotamia warehouse keepers
would take small marker objects or tables known as bullae, one for each
item a customer stored there, bake the bulla into a clay ball known as an
envelope and make an official seal on the wet clay. Later a customer could
reclaim items by presenting the envelope intact to the warehouse keeper, who
would break it open (after inspecting the seals) and allow the customer to take
away each item matched by the bulla.
Seals were and are used to
authenticate documents. (Ornate seals are supposed to be hard to forge.) For
example, a signet ring would be used to make an impression in
some sealing wax melted over a lock. This wax is brittle and if the seal is
broken it cannot be resealed without the original signet ring, without
detection.
Today seals have evolved into security
printing. Examples include currency (the Intaglio process and
others), watermarks (today, digital watermarks), and price stickers on
merchandise that can’t be lifted off without ripping.
Tamper resistance
means that something can’t be changed (or in some cases, examined) easily. Tamper
evident means no changing (or examination) without leaving evidence.
Examples include foodstuffs and medicine bottles, and computer cases that warn
(or reset) if the case is open (HCC uses these!) Modern versions include smart-cards.
Seals and security printing are mechanisms to provide data integrity (by being
tamper evident).
Side-channel Attacks:
Why attempt to break down the front door if the backdoor is open? Some
examples include:
Emission security
refers to preventing a system from being attacked using conducted or radiated
signals, known as Van Eck radiation. Examples include power
analysis (power consumption monitoring): writing a “1” to an EEPROM may
consume more power than writing a “0”, and analyzing RF signals given off by
monitors, cables, etc. allows an attacker to determine what data is written!
In WWI (1914), field phones were
used to talk to headquarters from the front lines. These were literally
grounded, but it was found the signals could be heard in other field phones
hundreds of feet away!
More modern military systems can
include TEMPEST hardening, to
prevent emission radiation vulnerability. This is not just radiation
shielding, but power isolation and timing obfuscation.
One form of attack is
called a timing attack. In devices such as computers and smart cards,
processing time varies depending on how much of a candidate password is
correct. By changing the first character of a password and timing the results,
you can see which one takes the least time. Once you have the first character,
repeat for the second, and so on.
Together, these non-direct attacks
are known as side-channel attacks. They can be extremely effective!
One such attack known as padding oracle attacks was recently
(6/2012) used to crack RSA SecurID (and other secure tokens), in
about 15 minutes! This attack extracts the private keys stored on devices that
use PKCS#11.
While you need defense against such
side-channel attacks, you shouldn’t neglect the front door — that is continue
to use proper procedures, audits, strong passwords, etc.
Modern information security
involves information stored in computers, and thus its history stems from early
computer security work done since 1950. Most innovations have been discovered
only in the past 30 years or so, making “InfoSec” a young
discipline.
The US military has
identified electronic communication networks as a new theater of war, and the
USAF clearly believes that America should have a robust offensive capability in
that theater. They have formed the AFCYBER Command at www.afcyber.af.mil. This was absorbed into a larger,
joint cyber command at defense.gov.
See www.24af.af.mil
for the new AFCYBER site.
Early on, computers were not
networked, but ran one batch job at a time. No security was
implemented, but having the next batch job read leftover data stored on disk or
RAM was a potential problem.
By the end of the 1960s,
multi-tasking computers permitted multiple users to run jobs concurrently. One
of the first information security related publications was in 1968 by Maurice
Wilkes, discussing passwords. Even today, people don’t heed that advice!
With the growth of networking
computers, security became a more difficult concept to fully understand, let
alone implement. For example, Internet protocols evolved from ARPAnet, which
was concerned that enemies might crash a vital computer. The protocols
invented (which later became TCP/IP) were designed to keep the network
functional even if a few nodes were knocked out. However, it was apparently
assumed that all users of the network were friendlies, and all nodes and users
would “play by the rules”. Clearly this assumption is no longer true, if it
ever was.
Points to keep in mind:
·
Install security updates.
·
Remove (or don’t install) unnecessary software.
·
Accept what you can and cannot secure.
·
Security management is a balancing act: If you do it wrong users
will try to find ways around it. If they can get around it you’re not
doing your job right! If they can’t get around it they might just give
up and leave for another company (or complain to your boss).
·
Keep an iron grip on access control. Don’t let developers ever
touch production servers. Doors that should be locked must have windows so you
can see who’s in the room.
Australian Signals
Directorate deputy director Steve Day says (2015) hackers have failed to
extract any sensitive information from Federal Government agencies for the last
two years despite successfully breaching several networks. Day chalks it up to
agencies following the lauded “Top 4 security controls” developed by ASD bod
Steve McLeod and colleagues. The “Top 4” are application whitelisting,
patching applications regularly, patching operating systems regularly, and
minimizing admin privileges.
See also SANS what works case studies.
Many of the security
controls designed to protect information systems are directly related to one of
the other security disciplines. FIPS
Publication 200 establishes 17 general categories of security
controls that must be applied to protect information and information systems.
They are:
·
Access control
·
Awareness and training
·
Audit and accountability
·
Certification, accreditation, and security assessments
·
Configuration management
·
Contingency planning
·
Identification and authentication
·
Incident response
·
Maintenance
·
Media protection
·
Physical and environmental protection
·
Planning
·
Personnel security
·
Risk assessment
·
System and services acquisition
·
System and communications protection
·
System and information integrity
Ethics,
Laws, and Customs
Laws restrict the availability and
use of various security mechanisms, and require the use of others in certain
circumstances. Laws and professional standards (legal and acceptable
practices) may require (or forbid) certain security policies. (Examples:
No encryption for email in France, must state privacy policy on commercial U.S.
websites, employers cannot require polygraph examinations of employees.) Note
it is legal for U.S. companies to require DNA and blood samples from all
employees, but it is not socially acceptable.
The U.S. (and the
others) government is concerned with criminals and terrorists using encryption
technology to defeat surveillance. Unfortunately there is no way to restrict
crypto to just non-criminals, so if the government plans succeed crypto may be
illegal in the U.S., or be crippled with “back doors” that would allow the
security compromised.
The Clipper chip
used a data encryption algorithm called Skipjack, invented by the National
Security Agency. This algorithm was initially classified SECRET so that it
could not be subjected to the peer review that was usual in the encryption
research community. The initial cost of the chips was said to be $16
(unprogrammed) or $26 (programmed), with its logic designed by Mykotronx, and
fabricated by VLSI Technology, Inc.
But the heart of the
concept was key escrow. In the factory, any new telephone or
other device with a Clipper chip would be given a “cryptographic key”, that
would then be provided to the government in “escrow”. If government agencies “established
their authority” to listen to a communication, then the key would be given to
those government agencies, who could then decrypt all data transmitted by that
particular telephone. In announcing the Clipper chip initiative, the
government did not state that it intended to try to make data encryption
illegal, but several statements seemed to point in this direction.
Organizations such as
the Electronic Privacy Information Center and the Electronic Frontier
Foundation challenged the Clipper chip proposal, but with little effect.
Then in 1994, Matt Blaze published the paper Protocol Failure in the
Escrowed Encryption Standard. It pointed out that the Clipper’s escrow
system has a serious vulnerability. The Clipper chip was not embraced by
consumers or manufacturers and the chip itself was a dead issue by 1996.
The U.S. government
continued to press for key escrow by offering incentives to manufacturers,
allowing more relaxed export controls if key escrow were part of cryptographic
software that was exported. These attempts were largely made moot by the
widespread use of strong cryptographic technologies such as PGP, which was not
under the control of the U.S. government.
15 years later and
the government hasn’t given up the idea of outlawing any encryption it can’t
easily hack. The FBI is currently pushing for encryption backdoors legislation
again. See the 9/27/10 New York Times story U.S. Tries to Make
It Easier to Wiretap the Internet.
Since the attacks on
the U.S. on 9/11/2001, the federal government has passed a large number of laws
given them authority to secretly spy on anyone. (See, for example, CALEA,
which allows for broad tapping of all communications including Internet use.) Even
when a court order is required, you may never know about the surveillance or
have any opportunity to challenge it. In a paper
published in 2012, A federal judge estimates that his fellow federal
judges issue a total of 30,000 secret electronic surveillance orders each year—and
the number is probably growing. Though such orders have judicial oversight,
few emerge from any sort of adversarial proceeding and many are never unsealed
at all. Those innocent of any crime are unlikely to know they have ever been
the target of an electronic search.
Security
Organizations and Certifications
CERT (cert.org, the computer
emergency response team, operates a security coordination center,
CERT/CC (hosted by the Software Engineering Institute of Carnegie-Mellon
Univ.). CERT now provides a certification for security incident handling.
www.cybercrime.gov
is run by the US Dept. of Justice (US-DOJ) and provides a way to report
phishing and other incidents, and advice on responding to incidents.
The Internet Crime
Complaint Center (IC3) is a partnership between the Federal Bureau of
Investigation (FBI), the National White Collar Crime Center (NW3C), and the
Bureau of Justice Assistance (BJA). UC3 receives, develops, and refers
criminal complaints of cyber crime. The IC3 gives the victims of cyber crime a
convenient and easy-to-use reporting mechanism that alerts authorities of
suspected criminal or civil violations. (www.ic3.gov)
www.securityfocus.com
hosts Bugtraq, vulnerability lists, alerts, and job information. A
security professional should monitor CERT/CC and Bugtraq (or sign up to the
alerting system, mailing lists, or RSS). See also GovInfoSecurity.com, which
provides news and other resources related to U.S. Government security issues
(run by a private security company).
Disa.mil (and DISA Information Assurance)
- The DISA is the U.S. federal agency charged with keeping all federal
government computers secure. The standards for this was the DOD Information
Assurance Certification and Accreditation Process (DIACAP). In 3/2014, the DoD
announced
a major change, dropping DIACAP in favor of a family of NIST standards called
the RMF (risk management framework). (See DoDD
8510.01_2014.)
After 9/11/01, the U.S.
DoD (and DISA) spent years drafting new security regulations. One of these,
released in 2006, is known as DoD directive 8570. This
states (in part) that all military, federal, contractor, and foreign national personnel,
in full or part time positions that are for jobs that pose an increased level
of IA (Information Assurance) risk are “privileged user”
positions. Directive 8570 requires these must be filled with personnel who
have been trained and hold appropriate certifications with documentation that
validates they are qualified for the positions they are hired for. It requires
that all users be trained by 2010. It also states that training will be
ongoing as positions are filled with new personnel.
Initially, new certifications
were created for DoDD 8570, but later, DISA decided to allow ANSI to certify
existing IT certifications as 8570-fulfilling, such as from GIAC/SANS.
Directive 8520 has been updated and renumbered to DoDD 8140, the Cyber
Security Workforce.)
The DHS
(Department of Homeland Security) runs many security programs (www.dhs.gov). (The
DHS, the FBI (Federal Bureau of Investigation), and the military, all play
roles in computer and network security for the U.S.)
The U.S. NSA also
provides security guides, under their information assurance program. See
the one for Red
Hat 5.
us-cert.gov is
run by the DHS, and provides regular advisories and incident reports which
are required reading for all SAs (subscribe now at www.us-cert.gov/cas/techalerts).
(These are summarized in regular bulletins,
with links to the National
Vulnerability Database for more details including fixes; show one
from a recent bulletin.) The site is also a rich source of
information about security in general.
The ENISA (European
Network and Information Security Agency) is roughly the equivalent of US-CERT
for the European Union. (They don’t produce regular advisories or incident
reports however.) In 2012, the EU created CERT-EU.
US-CERT also hosts ICS-CERT,
which provides information and alerts for industrial control systems, such as
those hacked by Flame and Stuxnet,
the 2010 worm designed to cripple Iran’s nuclear program (see 6/2012
NY Times story. Stuxnet and Flame were made and deployed by the
U.S. (and Israel) as part of a cyber-espionage (or terrorism) program known by
the code name Olympic Games. More recently (6/2012), ICS-CERT reported
a similar attack on the U.S. oil pipelines.
Cyberattacks are a
growing threat for all types of devices as they become linked to the Internet
or cell phone networks, including automotive systems, security systems,
industrial control systems, and medical devices. The security firm iSec
demonstrated that they could unlock and start a car by sending text messages to
the vehicle’s alarm system. A DHS official notes that protecting the devices
is especially challenging because they cannot easily be patched on a routine
basis.
A computer virus infected
the cockpits of America’s Predator and Reaper drones in 9/2011, logging pilots’
every keystroke as they remotely fly missions over Afghanistan and other war
zones. The virus has not prevented pilots at Creech Air Force Base in Nevada
from flying their missions. There have been no confirmed incidents of
classified information being lost, but the virus has resisted multiple efforts
to remove it from Creech’s computers.
The NICC
or National Infrastructure Coordinating Center, which replaced the NIPC
(National Infrastructure Protection Center), is also run by the DHS.
The FBI deals
with cybersecurity (security of computers and networks) with several
initiatives. (www.fbi.gov/cyberinvest/cyberhome.htm)
The FBI also runs Infragard, a
group that meets in Tampa and Orlando on alternate months. Coordinated by the
FBI, Infragard is a fellowship of federal, state, local, industry, and academic
cybercrook catchers and watchers. Infragard has about 33,000 participants in
almost 90 cities around the country, and you can apply to become a member
yourself. The point is to build an accessible community for the FBI to contact
on any given cyber-crime problem, especially in the private sector. One cool
activity is the cyber war games they conduct.
SANS, the SysAdmin,
Audit, Network, Security organization (sans.org) is a trusted and the largest
source for information security training and certification in the world. It
maintains the largest collection of research documents about various aspects of
information security, and it operates the Internet’s early warning system, the Internet Storm Center.
The certification offered by SANS, the GIAC (Global Information Assurance
Certification, giac.org)
is considered by many to be the toughest to get (and hence valuable).
IMPACT,
the International Multilateral Partnership Against Cyber-Terrorism is an
organization that aims to become a platform for international cooperation on
cybersecurity. Its advisory board features tech luminaries like Google’s Vint
Cerf and Symantec CEO John Thompson. The group’s forthcoming World Cyber
Security Summit (WCSS), which will be part of the WCIT (World Congress
of IT) 2008, is an effort to raise IMPACT’s profile as an international
platform for responding to and containing cyberattacks. (Quote posted on Ars
Technica about this: “Must be the on-line counterpart organization to the
Strategic Homeland Intervention, Enforcement, and Logistics Division. Who’d
they hire for names? Stan Lee?”)
CISSP
(Certified Information System Security Professional, cissp.com), ISSEP (Information
System Security Engineering Professional) are certifications granted by International
Information Systems Security Certification Consortium (ISC2) isc2.org.
Holders of these certifications must know the common body of knowledge that
defines the terms and concepts professionals use to communicate, and also
includes best practices (including security management), some relevant law (for
the U.S. anyway), ethics, and other knowledge and skills.
EC-Council (eccouncil.org)
provides “ethical hacking” training, resources, and highly regarded
certifications.
There are other certifications
for security (DoD-8140, security+, ...). HCC now offers AS/AAS/CCC in
this. (Prof. Ron Leake runs this program.) Other groups that offer
certifications: iapsc.org, ipsa.org.uk, ...
NIST’s ITL
(National Institute of Standards and Technology, Information Technology
Laboratory) publishes security related information. For example, see NIST-SP
(special publication) 800–27, which presents a list of 33 basic
principles for information technology security. CISSPs need to know many NIST
SP 800-X pubs, such as X=12 (Intro to Comp. Sec), 14, 18, 26, 27 (I.T. Security
Principles), 30 (risk management). Also OMB circular
A-130 (policy for federal government agencies to purchase,
manage, and secure IT systems; updated in 2015 for the first time in 15 years).
Another important standard is ISO-27002
(which replaces ISO-17799) Code of Practice for Information Security
Management.
ISO-27001
is part of a family of ISO/IEC standards (8 so far in 2009) often referred to
as ISO27K. This standard deal with InfoSec Management Systems (ISMS). It is
often implemented together with ISO-27002, which lists specific security
controls. Organizations that claim to have adopted ISO/IEC 27001 can be
audited and certified compliant. (ISO/IEC
27002 provides best practice recommendations on InfoSec management
for use by those who are responsible for initiating, implementing, or
maintaining ISMS, within the standard in the context of the C-I-A triad.)
The National Vulnerability Database (NVD)
is a repository maintained by the U.S. government of all known
vulnerabilities. This includes security related software flaws,
misconfigurations, and product names and versions. The NVD also includes an
impact statement for each vulnerability (uses CVSS). It keeps the
vulnerabilitity lists for various products (Windows 7, Fedora, etc.), known as checklists,
in SCAP format, allowing automated vulnerability scanning as well as compliance
reporting.
The Common Vulnerabilities and Exposures
(CVE) database (at Mitre.org) is the most comprehensive, internationally and
freely available database of known vulnerabilities and the malware that
exploits them. It assigns a unique identifier to each. These CVE numbers are
wildly used everywhere, including SCAP, NVD, US-CERT bulletins, etc. Every new
exploit is recorded here.
Security
Regulations for Credit/Payment Card Industry (PCI)
Many commercial
organizations handle electronic payment information, such as by processing
credit (also debit) card payments. In the past each brand of card (Visa, Amex,
...) had security regulations for handling customer names, addresses, and other
collected payment info. (For example: an un-encrypted log file is not allowed
to store a complete credit card number, but you can store the first 6 and last
4 digits.)
Merchants and payment processors
need to file notices of compliance with the PCI Data Security Standard
(PCI DSS), usually done by an internal audit. Recently all major banks have
agreed to a single set of standards. The PCI Security Standards Council
was founded by Amex, Discover, JCB, Visa, and MasterCard. Each organization
agreed to adopt the standards that the group decides on. See www.PCISecurityStandards.org
for more information.
See also www.linuxsecurity.com
(a good site for information, but not for certification), and mybulletins.technet.microsoft.com
(Security bulletins from MS, customized for your computer).
The number of payment
card data breaches and fraud (stolen card data from self-service gas stations,
Walmart, etc.) is huge and growing. Currently, the customer and retailer is
protected by law from liability; the bank associated with the card must pay.
One technology can help with this, smart cards, also known as chip
cards. The swipe stations that require both a chipped card and a user-entered
PIN are known as chip-and-pin.
As of October 1,
2015, liability for payment card fraud will shift from card companies to
retailers if the retailers have not upgraded their terminals to accept
chip-based payment cards. The cards have been used in Europe for 10 years, but
the US has been slow to adopt the technology, largely due to the associated
costs that merchants will have to bear. The Target breach is what drove the
industry to set a timeline for adopting the standard. — ComputerWorld
Live CDs /
DVDs
There are a number of
bootable Linux live CDs, that contain collections of useful security tools. (A
good list can be found at www.securitydistro.com/security-distros.)
Examples include Auditor, Phlak, Whoppix, and Pentoo, but most of these haven’t
been updated in several years. Some more recent examples include BackTrack
(a merger of Auditor and Whoppix), Network Security Toolkit (NST),
Helix,
DEFT,
and DVL (a
purposely broken distro, designed for learning and training).
The Black
Market for Malicious Hackers
[Adapted 10/17/07
from: en.wikipedia.org/wiki/E-gold and
www.cmu.edu/news/archive/2007/October/oct15_internetblackmarkets.shtml.]
Today there is a
thriving market where people can buy stolen credit card numbers, purchase
malware or spam software, even hire developers. This market even uses a reputation
system (think about e-bay or Amazon.com’s
Marketplace), so buyers can tell if a seller is reliable or just going to take
their money and run. The 2007 CSI survey reported that U.S. companies on
average lost more than $300,000 to cyber crooks.
“These troublesome
entrepreneurs even offer tech support and free updates for their malicious
creations that run the gamut from denial of service attacks designed to
overwhelm Web sites and servers to data stealing Trojan viruses,” said
Perrig, a professor at CMU. “...monitoring found that more than 80,000
potential credit card numbers were available through these illicit underground
web economies”, said a PhD student at CMU working with Perrig.
You can easily hire
hackers these days, say from the Hackers
List website.
As of 2012, LilyJade
malware is available on malware markets for around $1,000. This is a web
browser extension that works with IE, Firefox, Chrome, and other browsers, on
any platform. LillyJade appears to be focused on click fraud, spoofing ad
modules on Yahoo, YouTube, Bing/MSN, AOL, Google and Facebook. It also has a
Facebook-based proliferation mechanism, which spams users with a “Justin
Bieber in car crash” style message, complete with a link to a location
where a user can be infected. (Reported in The
H 5/23/12.)
Most personal
computers that get infected with malware are targeted by pay-per-install (PPI)
services, which reportedly (Technology Review 6/9/11) charge up to $180 per
1,000 successful installations. Typical installation schemes involve uploading
tainted programs to public file-sharing networks, hacking legitimate Web sites
to download automatically the files onto visitors’ machines, and quietly
running the programs on PCs they have already compromised.
Another “black”
market is called the Internet Water Army. In China, paid posters
are known as the Internet Water Army because they will “flood” the Internet for
whoever is willing to pay. The flood can consist of comments, gossip and
information (or disinformation). Positive recommendations can make a huge
difference to a product's sales but can equally drive a competitor out of the
market. [From TechnologyReview.com
blog post on 11/28/2011.]
Payments on the black market
Whatever the
purchases, a buyer will typically contact the black market vendor privately
using email, or in some cases, a private instant message. Money generally
changes hands through non-bank payment services such as e-gold, making
the criminals difficult to track. e-gold.com
(and others such as e-bullion)
provide accounts backed 100% by gold or silver deposits. These companies allow
instant transfers from one account (the buyer’s) to another (the seller’s).
Since these transactions are not part of the international banking system, they
are usually impossible to trace. E-gold is also known as private currency
as it is not issued by governments.
Opening an account at
e-gold.com takes only a few
clicks of a mouse. Customers can use a false name if they like because no one
checks. (Some such as GoldNow are more reputable and do require
security checks.) With a credit card or wire transfer, a user can buy units of
e-gold. These units can then be transferred with a few more clicks to anyone
else with an e-gold account. For the recipient, changing e-gold back to
regular money is just as convenient and often just as anonymous.
Note that e-gold
doesn’t convert the deposits to any national currency. E-gold does not sell
its e-metal directly to users. Instead digital currency exchangers such
as OmniPay (a sister company of e-gold) and numerous independent
companies act as market makers, buying and selling e-metal in exchange for
other currencies and a transaction fee. In this manner, e-metals can be
converted back and forth to a variety of national currencies.
Crypto-currency — Bitcoin
Since 2009, a virtual
(“crypto”) currency has become popular among hackers. Bitcoin is a
pseudonymous (that is, a fake online ID) cryptographic currency, used by the
hacker underground to buy and sell everything from servers to drugs to
cellphone jammers. Bitcoin is a real currency, once valued about 3
times higher than the US dollar; its value has fallen much lower in recent
years (between $4.50 and $5.50, in 2012), but has rebounded: over $950 as of
12/2016. It has become the standard currency on Silk Road (an
underground online market, mostly for drugs) and some porn and gambling sites.
(See BitCoincharts
or Preev for
current values.) Bitcoin is achieving some respectability of late, and some
legitimate vendors now accept Bitcoin. (Show EFF donation page.) Bitcoin
is not the only virtual currency; Litecoin and others are starting to show up
(2013).
In 10/2013, the
U.S. seized control of Silk Road, shut it down, arrested its sys
admin (who called himself “Dread Pirate Roberts”), and seized 3.6 million in
Bitcoin. Bitcoin fell 20% in response.
It didn’t take long
for Silk Road 2.0 to appear. Many other illicit, or “darknet” sites, including
Silk Road 2.0, were seized by a coordinated effort of 16 nations early in
11/2014. This was called “Operation
Onymous”.
One of the (now
fugitive) site operators has posted server logs, speculating how law
enforcement was able to break the Tor security. It is believed that the
government operates several Tor nodes, and launched a dDoS against the rest,
forcing most Tor traffic through their nodes. That allowed them to see where
the traffic originated, and act as a “Man in the Middle” attack to break the
encryption. However, this isn’t known for certain. (See Ars
Technica story.)
Unlike other currencies,
Bitcoin (and other forms of digital or crypto currency) is not tied to any
central authority. It is designed to allow people to buy and sell without
centralized control by banks or governments, and it allows for pseudonymous transactions
that aren’t tied to a real identity. In keeping with the hacker ethos, Bitcoin
has no need to trust any central authority; every aspect of the currency is
confirmed and secured with strong cryptography. Individuals earn Bitcoins by
selling stuff, or by mining (donating CPU cycles to organizations for profit)
and store them in their Bitcoin wallet — a data file containing private crypto
keys. User can cash in their Bitcoins for traditional currency at various
exchanges.
Qu: Are there legitimate
uses for anonymous digital cash? Ans: Yes! A company such as Apple
wouldn’t want a competitor such as Samsung to track its spending and thus gain
business intelligence. Regulations such as HIPPA and others require some
information to remain protected, something that anonymous digital cash can
guarantee even if a server’s data is stolen. Personal privacy is a concern in
the U.S. as well (although not a right in part of the world); a person might
want to buy an expensive item as a surprise gift to a spouse.
And yes, criminals
will also be able to use this technology for nefarious purposes.
Bitcoin Central,
a Bitcoin exchange that is popular in the Eurozone, claims it has secured
approval from regulators to operate as a bank under French law. (Paymium is
the French company that operates Bitcoin Centeral.) Euro-denominated funds
will be insured by the Garantie des dépôts, the French equivalent to the US
FDIC. The accounts will also be integrated with the French banking system, so
users can have their paychecks automatically deposited into their accounts and
converted to Bitcoins.
Update: many
governments are now beginning to recognize Bitcoin, and are deciding how to
deal with it. Since 2014, Germany decided that Bitcoins were subject to
capital gains taxes. At this same time, Bitcoin ATM machines, allowing one to
deposit cash (converted to Bitcoin) or withdraw cash (converted from Bitcoin)
are showing up; Canada has many of these.
Since 2014, the IRS
has decided Bitcoin
is subject to U.S. taxes. (That encourages many to use foreign
exchanges.)
For technical details
and information on how to use bitcoins, or become a Bitcoin miner, see Bitcoin.it
(especially the FAQ section) or this 22 minute Bitcoin video.
Fighting Back
In January 2006, Business
Week reported on the use of the e-gold system by Shadow Crew, a
4000-strong international crime syndicate involved in massive identity theft
and fraud. One person reportedly connected to Shadow Crew as an e-gold
customer and has moved amounts ranging from $40,000 to $100,000 a week from
proceeds of crime through e-gold.
To combat this type
of crime CMU researchers propose using a slander attack, in which
an attacker eliminates the verified status of a buyer or seller through false
defamation. By eliminating the verified status of the honest individuals, an
attacker establishes a lemon market where buyers are unable to
distinguish the quality of the goods or services.
The researchers also
propose to undercut the burgeoning black market activity by creating a
deceptive sales environment, by a technique to establish fake verified-status
identities that are difficult to distinguish from other-verified status sellers
making it hard for buyers to identify the “honest” verified-status sellers from
dishonest verified-status sellers. "So, when the unwary buyer tries to
collect the goods and services promised, the seller fails to provide the goods
and services. Such behavior is known as ripping.
I’m not sure if it
counts as fighting back, but a new Trojan horse program discovered in mid-2011
seeks out and steals victims’ Bitcoin wallets, the same way other malware goes
for their banking passwords or credit card numbers. The malware,
Infostealer.Coinbit, is fairly simple: it targets Windows machines and zeroes
in on the standard file location for a Bitcoin wallet. It then e-mails the
wallet to the attacker by way of a server in Poland, according to Symantec. The
first actual theft of Bitcoins was reported in June 2011 by a user who claimed
a hacker transferred 25,000 BTC from his machine, theoretically worth about
$500,000 at 2011 exchange rates. Another bit of malware called Stealthcoin
debuted in 2010 that’s designed for turning a botnet of compromised computers
into a covert parallel Bitcoin mining machine.
Zcash
Bitcoin is only pseudo-anonymous:
you can create false identities, but there is a danger those might be linked
back to you. A new type of digital currency attempts to address this flaw by
using modern, strong encryption as part of the protocol. In additional to truly
anonymous transactions, Zcash
has a group of humans to check and support the software and protocol.
With security baked
in, Zcash offers another benefit over Bitcoin: a user can remove some of the
anonymity if they wish, to selected 3rd parties. (Example: students can show
their parents (but nobody else) how they spent some of the Zcash on educational
expenses.)
(See these IEEE Spectrum
articles about Zcash for more information.)
In addition to Zcash,
there are many other crypto currencies in use, such as Ethereum.
These often depend on blockchain
technology.
Lecture
2 — Security Concept Definitions (in no particular order)
Define Layered
Security Architecture: multiple levels (or layers) of
protection, so that if one is compromised there are others to provide
protection. An example of this principle is to use proper permissions on
files, but also don’t allow root to remotely connect to your machine.) This
principle is also known as rings of security, and is related to defense
in depth (see below).
Question:
Which would you rather have, one virus scanner that is 95% accurate, or three
scanners from different providers, where each only offers 80% accuracy?
It turns out that
three independent virus scanners, each with only 80% accuracy, is better
protection than a single virus scanner offering 98% accuracy! Of course, the
same scanner run three times is not any more secure than running it once, so
you must be certain that each scanner operates differently to get the
protection level you desire.
The reality is worse
than this. Even if a virus scanner were 99% accurate, since the vast majority
of files (and network packets) are not malicious, you end up with mostly false
positives; maybe one positive in a thousand is real.
A related notion is defense
in depth. This refers sharing the security burden over many parts of a
system, rather than having a single system manage security:
·
An application should be written securely and deployed in a
secure fashion.
·
An application/process should manage security of its data.
·
A kernel should provide security services to applications, and
should enforce security for access to system resources (files, memory, network,
GUI, ...).
·
Every host should have firewall and other protections, based on
policies defined for that specific host.
·
Each LAN switch and router should implement security for each LAN
in the organization.
·
Different collections of LANs in an organization had different
security needs and policies. Routers should enforce these.
As you can see, if defense
in depth is adopted, no single firewall or other security product you can
buy is ever going to be sufficient. (No matter what the vendor promises! :-)
Defense in depth
applies to the big picture too, the overall information systems’ security
(IS security). Physical security controls access into the building,
keeps track of who comes and goes, detects and responds to potential
intruders. Personnel security vets individuals through suitability
criteria in accordance with company or government policies, and monitors
employee behavior and well-being. (Security and HR often have a close working
relationship based on the need to identify potential personnel security risks
and mitigate them before they have a chance to materialize.)
Program security
focuses on protecting the key elements of a company’s programs: intellectual
property (“IP”), customer information, or government secrets. Security
education and training works to earn true buy-in from employees, converting
them into miniature security watchdogs in their own right, dutifully monitoring
themselves and their workmates.
MAC and
DAC
Access controls
are designed to prevent unauthorized use of resources. Once a user is authenticated,
the system consults access tables to determine if some attempted access is
allowed.
Mandatory
Access Controls provide a policy based security system. This means
that if the policy says some resource (file, device, port number) can only be
accessed by XYZ, then not even the root user can change that! Such policy
changes must be made to policy files, which are usually human readable text
files that in turn get compiled into a more efficient form. The compiled
policies are loaded into the OS at boot time and can’t be changed without a
reboot.
The policy may allow
users and administrators some leeway in controlling access. Users typically
are allow to grant read, write, and execute (traditional Unix permissions) to
their files. An administrator may be granted the privilege of changing the
ownership of all but a few files and programs.
Discretionary
Access Controls don’t have the OS enforce any central policy. Instead,
the owner of a resource (or root) is granted total control over access of their
resources. This doesn’t mean there aren’t polices, however! PAM and other
ad-hoc mechanisms exist to enforce policy. However since the OS doesn’t make
you use these mechanisms, an attacker can bypass them.
Multi-Level
Security
A MLS (multi-level
security) system allows an administrator to assign security levels
to files, such as unclassified, secret, most-secret, top-secret,
read-this-and-die, ... A given user is also assigned a security level called
their security clearance. Then access is denied if your security level
is less than that of the file (the no read-up property). (Don’t confuse
MLS with multi-layer (rings of) security.)
The Bell-LaPadula
model is often used to describe MLS. It focuses on data confidentiality
and access to classified information. In this model, the MLS system prevents a
user with a high security clearance from creating files with a lower security
level (the no write-down property). For example, a process with secret
label can create (write) documents with labels of secret or top-secret,
and read documents with labels of secret, confidential, or unclassified.
(Note a process with a top-secret label still can’t access a document
when the DAC or other MAC policy forbids it.)
Special privilege is
required to declassify (assign a less-restrictive security level to)
files. Instead of declassifying documents, a higher-cleared individual can
create and share sanitized documents with less-cleared individuals.
A sanitized (or
redacted) document is one that has been edited to remove information
that the less-cleared individual is not allowed to see.
MLS is common in
military and some commercial data systems; each use has, over time, defined a
set of such levels. However, sharing documents between organizations or
nations is a problem, because each has different rules for labels such as
“secret” or “confidential”. MLS also requires a trusted computing base (TCB)
operating system. It is rarely enforced by operating systems today.
The Biba model
is related to the Bell-LaPadula model. However, instead of confidentiality as
the goal, data integrity is. The rules are the opposite: no write up (a less
trusted process can’t create/delete/modify higher-security resources; a captain
can read orders created by a major but not alter them) and no read down (a
high-trust process can’t access low-trust resources, since it shouldn’t believe
them anyway).
The Biba model is
what Windows UAC enforces. Each process and each file or other resource is
assigned a security level of low, medium (the default), high, or system. Protected-mode
IE (PMIE) can run at low, preventing it from modifying normal or system files.
User processes run at medium, and thus can’t modify system resources. (Admin
users have both a low (“filtered”) and a normal (“linked”) SID; if the
application requires more privilege than the filtered SID, the user is prompted
to elevate their permission to the unfiltered level.)
OpenBSD has a kernel
policy for this, mac_biba.
Related access control techniques
designed to prevent enemy access include weighted naval codebooks and
lead-lined dispatch cases that could be tossed overboard in the event of
immanent capture. Special papers could be used that instantly burn to fine
ash, or are water-soluble.
Hardware
Based Protection
Access controls are
not the only protection mechanisms available (but they are the most useful and
most used). Hardware based protection is available as well, limiting access to
resources in a hierarchical manner. Most CPUs define such levels and assign a
protection level (or domain, or ring) to blocks of
memory and I/O addresses. Intel x86 CPUs have four rings, 0 through 3.
The lower the number, the more access is allowed. The ring level of running
code is stored in a special CPU register. The level currently in use is called
the CPU mode. In addition to memory and ports, some CPU instructions
(about 15) are prohibited in higher numbered rings.
By default,
applications run in the highest ring (3) and have no access to resources marked
by a lower ring number. Instead, such code must request more privileged code
(the kernel) to access the resource on its behalf, allowing the system to
determine if access should be allowed, to log the request, to alert the user,
or some combination of these. An attempt to access a protected resource or run
a restricted instruction from a ring that doesn’t allow it, triggers a general
protection fault.
While different CPUs may
have many rings most OSes only use two: ring 0 (supervisor mode or kernel
mode or system mode) and ring 3 (user mode). Although
rings 1 and 2 are generally unused, they are considered part of system
mode if used.
While interest in
supporting more than two ring levels has been traditionally low, virtualization
has caused renewed interest. By running the hypervisor in ring 0 and the
various OS kernels in ring 1, the hypervisor can easily intercept resource
access attempts and fool the OS into thinking it is accessing the resources
directly. Without this feature, each OS requires modified device drivers (and
other changes) to invoke the hypervisor.
To allow fully
virtualized (unmodified) OSes to run, newer CPUs have special hardware
support. They provide two modes, root and non-root modes, each
with protections rings 0 to 3. The hypervisor runs in root mode and the
unmodified guest OSes run in non-root mode.
It may take hundreds of
CPU cycles to do a context switch; that is, to change the mode. For
this reason, there is a security-performance trade-off and some OSes include
application code in ring 0 to avoid the frequent context switches. (DOS, but
not modern Windows, used ring 0 for all code. Windows runs the GUI in ring 0.
Even Unix/Linux systems are not immune to the allure of faster performance;
whole web servers can be loaded as “device drivers” and run in ring 0!)
Many other
hardware-based protections can exist such as VTx, used for V12N. Many Intel
CPUs now support “TXT” (“Trusted eXecution Technology”), which (along with
“Trusted Platform Modules”, or “TPM”) can be used to validate parts of the OS
and boot loader (using public key technology), then lock them down (“seal”).
This means safety from many rootkits, but also allows for DRM enforcement. (So
some users will need to learn how to “jailbreak” their PCs, the way they do now
for smart phones.)
On Linux, the TPM (if
present) can only be accessed by a socket; that socket in turn is only accessed
by a daemon, tcsd. This daemon
listens on port 30003 for various commands, and is generally the only way to
access the TPM. (If running some host without a TPM, turn this off or you get
boot log error messages from it.)
False
Positives and False Negatives
These occur when checking
incidents against a security policy. A false positive occurs when the
security scanner reports something as suspicious when in fact nothing is wrong
or insecure. A false negative is when the scanner fails to report a
problem when in fact one exists.
Neither of these can be
completely eliminated in any real scanner, and there is something of a
trade-off between them. Most scanners opt for more false positives to generate
fewer false negatives. However this can lead to the BWCW (boy who cried
“Wolf!”) syndrome, leading administrators to ignore the scanners reports.
Add-on tools (usually Perl scripts) can attempt to filter log files and
reports to show the most important messages, to summarize, to spot trends
(dictionary or DOS attacks in progress), etc. (Example: logwatch.)
Hostids
A Unix host is assigned a
unique 32 bit ID number known as the “host ID”. These are supposed to be
unique, at least within a single administrative domain. The number could be a
serial number of the hosts motherboard or CPU, but today is often (part of) the
MAC address of the first Ethernet card. On Solaris boxes the host ID is set in
the firmware (NVRAM) when the OS is installed. (Note that re-installing may
not result in an identical host ID.)
You can view the host ID
with the hostid command.
Although POSIX defines a system call (kernel API) gethostid(), it doesn’t mandate any user command to
return this value. However most systems provide a hostid command. (If not it is trivial to write a C
program for this.) Linux provides commands to get and set this value (long
live open source!)
So why does this matter?
For one reason some Unix software requires the host ID registered with the
vendor to validate a software license; if none (or a dup) is found software may
not install (or work)!
There are far too many
software vendors who love proprietary lock-in, hardware lock-in, or a
combination of both (e.g., “Windows activation”). This can be called trusted
computing (in the sense of “we trust you to pay us big bucks if we give you
no choice”). A hardware-specific ID with software to query the host ID is
usually how it’s done, but the host ID is set in the kernel or firmware.
When updating systems or
when recreating virtual systems, you may need to “set” the host ID value. Naturally
details for doing this are not published (the vendors prefer you to buy another
license) but you can find directions in various places for different distros
such as in this blog
post for Solaris. (Here someone traces the obfuscated
Solaris code for setting the hostid.)
[Much of the following material
is from the excellent “Introduction to Computer Security” by Matt Bishop,
(C)2005 Addison-Wesley]
CIA
Security requirements, whether
self-imposed or mandated by an external agency or customer, are all designed to
address the three fundamental objectives of computer security: confidentiality,
integrity, and availability. These three concepts are often referred to as the
CIA triad. FIPS
Publication 199 defines these security objectives in precise terms,
but we can define them as:
·
Confidentiality Keeping information, resources secret
from those that shouldn’t know about them. This related to the concepts of authentication
(who is requesting resources?) and authorization (what resources
is a given person/program allowed to access?). A loss of confidentiality means
the unauthorized disclosure of information. You must also consider the
duration for which the information must be kept confidential; security measures
that can keep secrets for a few weeks or months, may not be good enough to
protect military secrets.
Correctly enforced, confidentiality
prevents unauthorized disclosure of information. The most common method of
enforcing confidentiality is with encryption. (But don’t forget other ways,
such as limiting access to the data.)
·
Integrity Keeping information and resources trustworthy
(preventing improper or unauthorized modification, deletion, addition, or
replacement, called corruption). This relates to the concepts of credibility,
authentication, and authorization.
It is also important to keep data externally
consistent (data in system accurately reflects reality) and internally
consistent (ledger books balance, totals match the sums, etc.) A common
risk with standard relational databases is losing internal consistency, which
is addressed by normalization.
Integrity mechanisms can prevent
corruption or detect corruption (that is, verify data hasn’t been modified).
Using message digests (hashing) is a very common way to implement
integrity.
·
Availability Keeping information and resources accessible
to authorized persons, whenever they are otherwise allowed access. This
related to reliability. One key method of availability is by
using redundancy: RAID, hot-standby servers (fail-over clusters), multi-homing,
and excess network capacity. Another way to keep data available is by using
backups.
There are other security concepts
however, beyond CIA. Networking router and switch vendors rarely worry about
confidentiality or integrity (perhaps they should). Auditors need to
know your systems correctly implement your security requirements and policies;
ensuring this is called information assurance. CIA
doesn’t address concerns about authentication (who you are), authorization
(who can do what), and accountability (who did what and when).
AAA
The three concepts of authentication,
authorization, and accountability are often implemented in network equipment
(such as routers), and is referred to as the AAA triad:
·
Authentication Representing identity: Users,
groups, roles, certificates
Authentication refers to
the process of establishing the digital identity of one entity to another
entity. An entity is a client (a user, process, host, etc.) or a server
(service, host, or network). Authentication is accomplished via the
presentation of an identity and its corresponding credentials.
Related is the
concept of identity proofing. This means verifying identity
before issuing credentials. Afterward, the user/process/system can usually
authenticate merely by presenting the credentials that were issued. (HTTP
authentication works this way, using a cookie. So does Kerberos.) Having an
HR manager introduce the new employee to a SA, in person, is another example.
Identify proofing is
sometimes used even after credentials have been issued, as an extra check on
identity. Zip-code checks at gas stations, using a PIN in addition to your ATM
card at the bank, or re-entering your password to run chfn, are all examples.
When accessing some protected
service or resource of some system you must authenticate yourself (prove
who you are) before the system can decide if you should be allowed access.
There are three common ways, or factors, to prove identity.
(Additionally, you can have someone known to be trustworthy vouch for you; this
is related to the notion of trust.) To prove identity, one or more
proofs are submitted; usually each is a different factor. A requirement to
present two factors to prove identity is called two-factor (or dual-factor or
TFA) authentication; with more than two, it is called multi-factor
authentication (MFA). The three factors are:
·
Something you know (such as a password or credit-card number)
·
Something you possess (such as a key-card, smart-card, dongle, or
key-fob)
·
Something you are (biometrics, such as a fingerprint)
The most common method used is by
providing information only you and the system know (i.e. a password, a.k.a. a shared
secret). Note the system doesn’t have to know the secret; it is enough if
they can verify you know the secret. (This is why plain-text passwords don’t
have to be stored on a server.)
Using a phone-based system (i.e.
providing a phone number that can be checked) can be used to call-back
the user trying to access a resource to confirm it really is them. Phone calls
are made to the (presumably real) user when someone attempts to log in as him
or her. The user can then punch in a code on the phone. Phones an also serve
as fraud alerts. Email call-back (“verification email”) systems are
also commonly used, especially when resetting passwords.
Another possibility is proving possession
of something only you (should) have, such as a smart card swipe card,
credit-card (using CVS number), dongle, or RFID. Using a key fob that displays
a number that changes every minute, that only the server and the fob know, is
another example (RSA SecurID, YubiKey).
Cell phone apps can take the place
of dongles or fobs. Note that since modern cell phones (2012) only run one app
at a time, you can’t use the AWS-MFA app (“virtual dongle”) and the AWS console
app!
Gmail has an option for two factor
authentication, but it had (1/2013) a back-door built-in that could be used to
not only bypass the extra step, but could be used to bypass authentication
altogether! Called application specific passwords, using these other
passwords would disable TFA, useful when fetching mail from, say, Thunderbird.
But since the password was sent in plain text, it could be intercepted and
used.
RFIDs are subject to
a number of security issues. U.S. passwords have RFID tags that transmit
sufficient information to enable an attacker with an RFID reader (they are
small) to steal your identity and create credit cards in your name. (You can
buy metal sleeves for your passport now.) The “low tire pressure” warning you
get with newer cars works by having RFID tags in the tires, which each broadcast
a unique ID (and the tire’s pressure) unencrypted. This can be read up to 40
meters away, so by having readers along highways and outside buildings, any
car’s location can be tracked at any time.
New types of RFID
devices require someone touching them to operate. So your passport, smart
card, etc., can’t be read while in your pocket.
Increasingly biometric
identifiers such as a fingerprint, eye print, handprint, voiceprint, or
even lip prints may be used. (Imagine having to kiss your computer to log in.)
Increasingly, ATM machines use vein prints of your hand. Biometrics have some
problems; they are not yes or no. Like spam scanners, they have
problems with false positives and false negatives. Depending on the situation,
you can tune the scanner to favor one or the other. Another problem is when
the biometric data on file for you has been stolen. The bank can’t just issue
you a new fingerprint! Another problem is fake biometrics: fake fingers (or in
one gruesome case, real fingers cut from a victim) or special latex gloves can
defeat advanced fingerprint readers, including ones with “liveness” tests such
as sweat, temperature, or pulse.
The next generation of biometrics
include continuous monitoring, making sure a living person is still there: pulse,
temperature, skin conductivity, heartbeat monitors, even ECGs (brainwave
monitoring).
In 2004, a ring of
thieves installed tiny cameras in the locker room of a golf club in Japan, to
record the PINs people used for their lockers. Then, when those golfers were
out playing, the thieves opened their lockers, scanned the magnetic strip of
any bank cards found. Later, they copied that data to blank cards, and guessed
to use the same PIN as the locker combo. By the time they were caught in
1/2005, they had stolen almost $4 million.
In response, the
Japanese government demanded safer ATMs, and the vein scanners
resulted. This biometric scanner has been very successful, and the technology
is being deployed world-wide.
As mentioned above, another
technique is to rely on (“trust”) another organization for authentication. You
present proof (a credential) that the organization has authenticated you, by
showing a valid passport, driver’s license, major credit-card, Kerberos ticket,
etc. Proving you have a valid email address or phone number falls into this
category.
Many of the most convenient
authentication schemes are weak and easily circumvented (spoofed). When using
such weak methods, users typically need to use a two-factor (or multi-factor) authentication
system. For example, entering something that only they would know, and use
something that only they would physically have on their person. This means
entering a login and PIN or password, along with the use of a USB
authentication key or smart card, for example.
The patterns that
bank customers typically follow when choosing a four-digit PIN code gives
hackers a 9 percent chance of correctly guessing their ATM code. Researchers
studied 1.7 million “leaked” PINs and found that 23% of users base their PIN on
a date, “and nearly a third of these used their own birthday.” (InformationWeek.com)
CAPTCHAs
— Proving you are Human
Some systems don’t care who you
are, as long as you are a person and not some “bot” or program. Services such
as web-based guest-books or the WHOIS database are available to anyone, but not
to automated programs (robots or bots). In these systems, you
must only prove you are human. Typically this is done by having the use do a
task easy for most people but difficult for machines.
A CAPTCHA (Completely
Automated Public Turing test to tell Computers and Humans Apart, if you can
believe that) is an obscured graphic of some text, shown on a web form. A
human can usually read and then enter the text, but a program has a difficult
time reading the text. (Captchas have become an incentive to improve OCR
systems!) Other tasks include picture recognition (e.g., “click on the one
picture above of a moose”), math problems stated in English (show Ars
Technica test, original URL:
http://contact.arstechnica.com/spammy/40706/), or audio CAPTCHAs. SANS
Institute (Chief Research Officer Johannes Ullrich, Sys Admin, V16 N4 (April
2007), “Minimizing Content Form and Forum Spam” pp.30–ff) reports that CAPTCHAs
are effective at reducing spam, but also reduce legitimate traffic by about 20%.
Ars Technica 9/1/08 -
Google’s Gmail CAPTCHA was broken in February 2008, followed by that of Hotmail
in April.
NetworkWorld.com
11/1/11 - Researchers from Stanford University have developed an
automated tool that is capable of deciphering text-based anti-spam tests used
by many popular websites with a significant degree of accuracy. With their
tool, the tests used by Visa’s Authorize.net payment gateway could be beaten 66
percent of the time, while attacks on Blizzard’s World of Warcraft portal had a
success rate of 70 percent. (The only tested sites where CAPTCHAs couldn’t be
broken were Google and reCAPTCHA.) Authorize.net and Digg have switched to
reCAPTCHA since these tests were performed. These researchers have also
successfully broken audio CAPTCHAs on sites like Microsoft, eBay, Yahoo and
Digg.
The Stanford researchers came up
with several recommendations to improve CAPTCHA security. These include
randomizing the length of the text string, randomizing the character size,
applying a wave-like effect to the output, and using collapsing or lines in the
background. Another noteworthy conclusion was that using complex character
sets has no security benefits and is bad for usability.
Researchers have
fought back by incorporating images into CAPTCHAs but this is only effective
against bot-driven CAPTCHA crackers, and while automated attackers may be
responsible for a majority of the CAPTCHA-breaking attempts that occur every
day, they no longer account for the entirety.
Dancho Danchev
(writing for ZDNet) reports on the emergence of CAPTCHA-breaking as an economic
model in India. He reports that large CAPTCHA-breaking companies often farm
work out to multiple smaller businesses. CAPTCHA-cracking (referred to as
“solving” in marketing parlance) is a booming sector of the Indian tech
economy. Danchev reports that CAPTCHA-crackers can earn more per day than
they can as legitimate data processing centers.
It’s hard to see how
researchers will find a CAPTCHA that legitimate customers can read that remains
illegible to humans paid to solve them. One recent (12/2009) attempt is a new mechanism
designed to stop computer algorithms programmed to beat current CAPTCHA
technology. Danny Cohen-Or led a research team that created video CAPTCHA code
that uses an emergence image, an object on a computer screen that only becomes
recognizable when it is moving. For example, an eagle or a lion in a pastoral
mountain setting. Humans are very good at identifying these types of images
while computers are not.
·
Authorization Policy stating who is allowed to do which
actions on what resources: ACLs, capabilities (tickets). Authorization refers
to the granting of specific privileges (including none) to an entity (e.g.,
process, host, AS, or user). This is based on their authentication (proven
identity), what privileges they are requesting, the current system state (e.g.
the service is available), or on restrictions such as time-of-day restrictions,
physical location restrictions, or restrictions against multiple logins by the
same user.
·
Accountability Keeping track of who does what and when.
Log files are an example, as is the tracking of the consumption of network
resources by users. The data generated is used for management, planning,
billing, auditing, or security (e.g., log monitored by an IDS). Typical
information that is gathered includes the identity of the user, the nature of
the service delivered, when the service began, and when it ended.
Information Assurance (IA)
Over the
years, it has become apparent that CIA alone (or AAA alone) is not sufficient.
The result of this has been a new acronym: IA. IA is the set of controls and
processes, both technical and policy, intended to protect and defend
information and information systems by ensuring their confidentiality,
integrity, and availability, and by providing for authentication and
non-repudiation (see below). IS (Information Security) is also known as Information
Assurance and Security (IAS); in U.S. government/military circles, the
new hot term for INFOSEC and SIGINT is “Cybersecurity”, but that is just
another term meaning “Information Assurance” (IA). Some U.S. Federal jobs now
require IA certification, and IAS is now (2013) a core knowledge area of a
four-year computer science degree program.
From an IA
perspective, there are five pillars (or core concepts): confidentiality,
integrity, availability, authentication, and non-repudiation. All but that
last were discussed above.
Non-repudiation is related
to accounting (and data integrity). This means you can’t convincingly deny
some action such as sending a message, receiving a message,
entering/changing/deleting data, etc. (Example: ordering an expensive item
on-line, then refusing to pay claiming you never ordered the item.)
Other
important concepts include:
·
Security Policies A security policy is a statement
of what is and what is not allowed. This is also called a specification.
Policies can be stated by mathematics and tables that partition the system states
into allowable (secure) and not allowed (insecure) states. More commonly,
vague descriptions are used, which can lead to ambiguity (some states are
neither allowed nor disallowed, or both).
When two or more entities
communicate or cooperate, the combined entity has a security policy based on
the individual policies. If these policies contain inconsistencies the parties
involved must resolve them. (Example: proprietary document provided to a
university.)
·
Polyinstantiation is the concept of creating a user or
process specific view of a shared resource. (So Process A cannot affect
process B by writing malicious code to a shared resource, such as /tmp.) The term refers to a similar
concept for databases, where different users get different views of a database
(think of a virtual table). (For cryptography, polyinstantiation means
to have a copy of a secure key in more than one location.)
The pam_namespace
module creates a separate namespace for users on your system when they
login. This separation is enforced by the Linux operating system so that users
are protected from several types of security attacks. Using this module, PAM
creates a polyinstantiated private /tmp
directory at login time. This is transparent to the user logging in; the user
sees a standard /tmp directory
and can read and write to it normally. However that user cannot see any other
user’s (including root’s) /tmp
space or the actual /tmp file
system.
The kernel supports polyinstantiation
too. /proc/self gives a private
view of kernel resources. SELinux also supports this, with special mount
options.
Security Mechanisms
A security mechanism
(or security measure or security primitive) is any method, tool,
or procedure used to enforce a security policy, or to reduce the impact (and
frequency) of threats. Not all mechanisms are tangible.
Security mechanisms can be used
to prevent an attack, to detect an attack has occurred (or is
occurring), or to recover from an attack. Often you will use
multiple mechanisms working together to meet all three of these goals.
Qu: what is the goal of a password
mechanism? (Ans: prevention, audit; there’s overlap.)
Prevention mechanisms
keep the system functioning normally and available during any attack. Such
prevention mechanisms include over-provisioning and fault-tolerance,
and can be used in safety-critical systems where the high cost is deemed
acceptable.
Detection mechanisms
are used (in addition to the obvious) to monitor the effectiveness of other
mechanisms.
Recovery mechanisms
are deployed when detection of an attack has occurred. The first part of
recovery is to repair the damage done by the attack and to restore normal
service levels. (Prior to that, you need to stop an on-going attact.) Recovery
is not complete until an assessment of the incident has been made and
preventative measures are put into place. This may include a change to
policy, design, or configuration of services, the addition of extra mechanisms,
or legal action. (There will likely be PR actions needed as well.)
Some of the
replacement measures might take a long time to implement, for example a change
in policy. It isn’t sufficient to simply reboot after (say) restoring a database
from an uncorrupted backup. The attack will simply repeat. You can temporarily
disconnect the attacker and/or reboot, but that’s like trying to fix a leaky
boat by lifting it out of the water; as soon as you put the boat back in it
will leak again (and probably worse than before).
When the time to analyze
the attack and deploy corrected prevention mechanisms is unacceptable, it is
common to redeploy a service in a read-only configuration. (That’s what
Facebook does, for example.) Providing some level of service is better than
none at all.
·
Dual Controls These are mechanisms designed to prevent
any single individual from violating a security policy. Examples include
dual-entry bookkeeping, safe deposit boxes at banks, and military
missile-launch protocols (require two persons to turn keys more than 10 feet
apart at the same time).
[Reported in Ars
Technica 7/29/10] Malware attacks were discovered on bank ATMs in
Eastern Europe [in 2009]. Security researchers at Trustwave, based in Chicago,
found the malware on 20 machines in Russia and Ukraine that were all running
Microsoft’s Windows XP operating system. They said they found signs that
hackers were planning on bringing their attacks to machines in the U.S. The
malware was designed to attack ATMs made by Diebold and NCR.
Those attacks
required an insider, such as an ATM technician or anyone else with a key to the
machine, to place the malware on the ATM. Once that was done, the attackers
could insert a control card into the machine’s card reader to trigger the
malware and give them control of the machine through a custom interface and the
ATM’s keypad.
The malware captured
account numbers and PINs from the machine’s transaction application and then
delivered it to the thief on a receipt printed from the machine in an encrypted
format or to a storage device inserted in the card reader. A thief could also
instruct the machine to eject whatever cash was inside the machine. A fully
loaded bank ATM can hold up to $600,000.
Earlier that year in
a separate incident, a Bank of America employee was charged with installing
malware on his employer’s ATMs that allowed him to withdraw thousands of
dollars without leaving a transaction record.
What dual
controls would you recommend to prevent these attacks?
More information:
Jack, director of security research at IOActive Labs, focused his hack research
on ATMs, the kind installed in retail outlets and restaurants.
The two systems he
hacked on stage were made by Triton and Tranax. The Tranax hack was conducted
using an authentication bypass vulnerability that Jack found in the system’s
remote monitoring feature, which can be accessed over the Internet or dial-up,
depending on how the owner configured the machine. Tranax’s remote monitoring
system is turned on by default.
To conduct the remote
hack, an attacker would need to know an ATM’s Internet IP address or phone
number. Jack said he believes about 95 percent of retail ATMs are on dial-up;
a hacker could war dial for ATMs connected to telephone modems, and identify
them by the cash machine’s proprietary protocol. Both the Triton and Tranax
ATMs run on Windows CE.
The Triton attack was
made possible by a security flaw that allowed unauthorized programs to execute
on the system. The company distributed a patch last November so that only
digitally signed code can run on them.
Using a remote attack
tool, dubbed Dillinger, Jack was able to exploit the authentication
bypass vulnerability in Tranax’s remote monitoring feature and upload software
or overwrite the entire firmware on the system. With that capability, he
installed a malicious program he wrote, called Scrooge.
Scrooge lurks on the
ATM quietly in the background until someone wakes it up in person. It can be
initiated in two ways—either through a touch-sequence entered on the ATM’s
keypad or by inserting a special control card. Both methods activate a hidden
menu that allows the attacker to spew out money from the machine or print
receipts. Scrooge will also capture track data embedded in bankcards inserted
into the ATM by other users.
To hack the Triton,
he used a key to open the machine’s front panel, and then connected a USB stick
containing his malware. The ATM uses a uniform lock on all of its systems—the
kind used on filing cabinets—that can be opened with a $10 key available on the
web. The same key opens every Triton ATM.
Two Triton
representatives said at a press conference after the presentation that its
customers preferred a single lock on systems so they could easily manage fleets
of machines without requiring numerous keys. But they said Triton offers a
lock upgrade kit to customers who request it—the upgraded lock is a Medeco
pick-resistant, high-security lock.
·
The meaning of trust and Assurance Trust
is a measure of trustworthiness of a system, relying on sufficient
credible evidence that a system will meet a set of given requirements. For
example, a system may be considered physically secure if the system is locked
up and only authorized people have keys. However, this assumes that those with
access to the system and who know how to pick locks (or copy keys), can be
trusted not to do so unless authorized. Bank managers are authorize to move
funds between accounts (up to some limit), but must be trusted not to move
funds into their private accounts. You pay for some goods on amazon.com, but
must trust them to actually ship them to you.
Another example is that you must
trust some installed server or other software not to allow violations of system
security policy. If the server has exploits (e.g., bugs, back-doors, viruses)
that cause the server to fail and break our security, our trust was misplaced.
Trust relationships exists
whenever there is some risk and uncertainty. One must weigh the risks of
granting trust against the expected gains. Another way to define trust is
“a positive expectation regarding the behavior of somebody or something in a
situation that entails risk to the trusting party”.
Assurance is the
measure of confidence that a system meets its security requirements, based upon
specific evidence gathered through various assurance techniques. While trust
can’t be precisely measured or even defined, circumstantial and anecdotal
evidence (assurances) can be accumulated that can be used to determine
how much to trust a system (or determine your insurance rates!)
Measures that can be taken to
provide assurance in a trusted system include security cameras in high security
areas to make sure no one is using lock-picks, extensive background checks before
hiring a bank manager, following standard best practices, obtaining
certifications, using vulnerability scanners, using referrals and
recommendations for software, and tamper resistance. For example, don’t trust
a bank manager if they have stolen before, or buy goods on-line from a vendor
with a poor reputation, or install software that has a history of problems
(e.g., MS IIS) or is from an unknown source (e.g., acme email server).
Consider installing a strict (SELinux
or other) MAC system. Now you don’t need to trust software as much, because
the (trusted) MAC system provides assurances that broken or malicious software
won’t compromise the security policy.
·
Design The design of a system is the process of
determining a set of components (mechanisms including procedures) and their
interactions and configurations, that will be used to implement the security
policy (specification). The design that results can be analyzed to determine
if it will satisfy the specification. While it may be difficult or
impossible to fully answer this question, assurance can be generated that the
design will satisfy the security policy.
The design can also
be considered a security protocol: exchange keys this way, encrypt data
that way, validate the parties this way, etc. Quite often, the individual
security mechanisms are secure, but their use in some protocol isn’t. (This is
what happened to the WEP 802.11 security protocol.)
Once this is done, the design can
be implemented. The implementation must satisfy the
design, much like the design must satisfy the specification. Proving an
implementation satisfies some design is difficult and involves proofs of
correctness.
·
Identity is the representation of some unique entity or
principal: a person, a website, an authorized meter-reader). Note a given
entity may have many identities. (How many login names do you have?)
·
Privacy is a complex notion, and not always a person’s
right — it depends on local laws and customs. Each person or entity
(corporation or government agency) has their own unique point of view on what
information is (or should be) under that person’s or entity’s control.
Medical records are a case in
point: Doctors don’t like to release records to a patient, in case there is
later any dispute. By U.S. law, some records must be released if a patient
wants them. In addition, medical records can be used for research purposes and
medical assurance purposes. In these cases, identifying information is
supposed to be removed first, in a process known as anonymizing
or sanitizing or blinding the data. But this is
extremely difficult to do right, and often impossible when only a few records
are involved. (The British Medical Association has the most comprehensive laws
and rules on patient privacy.)
EU Safe Harbor
Agreement
This was an agreement
between the United States and the European Union (EU) regarding the transfer of
personally identifiable information (PII) from the EU to the United States,
which is consistent with Fair Information Practices. Companies that registered
for Safe Harbor with the U.S. Department of Commerce and abided by the
agreement were deemed by the EU to provide adequate data protection for personally
identifiable information transferred from the EU to the United States.
In 2015, after some
complaints and evidence of PII being used inappropriately, the EU decided to
end the safe harbor agreement. In 7/2016, a replacement agreement was
approved by the EU, called Privacy Shield. It works similarly to safe
harbor. Note that Privacy Shield is not valid in the U.K. (no longer a member
of the EU).
Personal
information may be defined to include a person’s first and last name (or
first initial and last name) combined with any one or more of the following: A
Social Security number, a driver’s license number or state-issued
identification card, a financial (bank) account number or credit or debit card
number, with or without any required security code, access code, personal
identification number, or password.
Personal
information does not include information that is lawfully obtained from
publicly available information, or from federal, state, or local government
records lawfully made available to the general public.
Identity theft is merely one
problem. Credit reports are not only a pain over which most of us have little
control, but the failure of the reporting companies may in fact cost people
employment. An abusive ex-spouse, a company reviewing the movies you watch to
determine your employment prospects, etc., are all legitimate reasons to desire
privacy.
The European Union
established new Internet policies in 2009, including a right to Internet
access, net neutrality obligations, and strengthened consumer protections.
Under the ePrivacy directive, communications service providers will also be
required to notify consumers of security breaches, persistent identifiers
(“cookies”) will become opt-in, there will be enhanced penalties for spammers,
and national data protection agencies will receive new enforcement powers. —
reported by EPIC 1/7/2010
While privacy laws exist to
remove PII from publicly available information (including HIPAA and FERPA),
doing so is very difficult. [Much of this section was adapted from a post made
on Ars
Technica by Nate Anderson, 9/8/2009.]
The Massachusetts Group Insurance
Commission had a bright idea back in the mid-1990s—it decided to release “anonymized”
data on state employees that showed every single hospital visit. The goal was
to help researchers, and the state spent time removing all obvious identifiers
such as name, address, and Social Security number. At the time GIC released
the data, William Weld, then Governor of Massachusetts, assured the public that
GIC had protected patient privacy by deleting identifiers. In response,
then-graduate student Sweeney started hunting for the Governor’s hospital
records in the GIC data. She knew that Governor Weld resided in Cambridge,
Massachusetts, a city of 54,000 residents and seven ZIP codes. For twenty
dollars, she purchased the complete voter rolls (often used to link data
from anonymized data sets) from the city of Cambridge, a database containing,
among other things, the name, address, ZIP code, birth date, and sex of every
voter. By combining this data with the GIC records Sweeney found Governor Weld
with ease. Only six people in Cambridge shared his birth date, only three of
them men, and of them, only he lived in his ZIP code. Dr. Sweeney sent the
Governor’s health records (which included diagnoses and prescriptions) to his
office.
In 2000, Sweeney
showed that 87 percent of all Americans could be uniquely identified using only
three pieces of information: ZIP code, birth date, and sex.
When AOL researchers released a
massive dataset of search queries (2008?), they first “anonymized” the data by “scrubbing”
out user IDs and IP addresses. When Netflix made a huge database of movie
recommendations available for study it spent time doing the same thing. Despite
scrubbing the obviously identifiable information from the data, computer scientists
were able to identify individual users in both datasets.
In AOL’s case, the problem was
that user IDs were scrubbed but were replaced with a number that uniquely
identified each user. But those complete lists of search queries were so
thorough that individuals could be tracked down simply based on what they had
searched for.
As Ohm notes, this
illustrates a central reality of data collection: “Data can either be useful
or perfectly anonymous but never both.”
The Netflix case illustrates
another principle, which is that the data itself might seem anonymous, but when
paired with other existing data, reidentification becomes possible. A pair of
computer scientists famously proved this point by combing movie recommendations
posted on the Internet Movie Database with the Netflix data, and they learned
that people could quite easily be picked from the Netflix data.
Just because of high profile
commercial failures does not mean that anonymization is impossible. This is a
heavily researched area in computer science and statistics right now
(particularly in the database community; search for terms like “K-anonymity”
and “L-diversity”). The census bureau generates publically available anonymous
data, with no reported breaches of this data. However the data is of limited
use because of the intensive data scrubbing.
[From informit.com
article posted on 1/24/10] In 2007, Massachusetts joined 38
others states and enacted data breach notification laws. Chapter 93H
requires entities that own or license personal information of Massachusetts
residents to publicly report the unauthorized acquisition or use of compromised
data. However Massachusetts went much further; their regulations
“Standards for the Protection of Personal Information of Residents of the
Commonwealth” (Chapter 93H) are by far the most strident and far-reaching of
any information security regulations of any state to date (2010).
Chapter 93H also
mandates the adoption of detailed information security regulations for
businesses in order to reduce the number of security breaches and thereby the
need for data breach notifications. This establishes minimum standards by
which a company is required to safeguard the integrity of personal information
it handles. The regulations apply to any business, whether or not operating
in Massachusetts, if such business owns, licenses, receives, maintains,
processes or otherwise has access to personal information of Massachusetts
residents. Some items include:
Companies must
designate one or more employees to maintain and enforce a comprehensive
information security program, and the details of the security program must be
in writing. Companies must create security policies governing whether and how
employees keep, access, and transport records containing personal information
outside of business premises. Companies must also impose disciplinary measures
for violations of its comprehensive information security program rules.
Companies must impose reasonable restrictions upon physical access to records
containing personal information. Monitory for compliance must be done, and all
incidents must be documented. Companies must take reasonable steps to ensure
that third-party service providers with access to personal information have the
capacity to protect such information. There are many additional requirements
too.
Recently (9/2011),
California became the 45th state to enact strict data breach notification laws.
Pandora’s Android app
transmits personal information to third parties, at least according to an
analysis done by security firm Veracode. The company decided to do a follow-up
on the news that Pandora—among other mobile app makers—was being investigated
by a federal grand jury, and found that data about the user’s birth date,
gender, Android ID, and GPS information were all being sent to various
advertising companies. [Reported by Jacqui Cheng 4/7/2011 on Ars
Technica.]
There are some steps you can take
to help keep data anonymous:
·
Never use any part of the DOB. Use the person’s age, rounded to
a whole number of years, and modify that by a random factor of +/- two years.
The resulting data should still be statistically useful for most purposes.
·
Never use zip code. Use the person’s county or province. Better
approach: use a quad system by breaking the state(s) into 4 or more arbitrary
areas. Best approach: don’t use a system which targets user locations.
·
Never store a user’s account numbers, even blinded ones.
·
Read the reports on privacy that are available, such as those
from the BMA, and use the advice.
Case Study (adapted from How
to De-Identify Your Data by Angiuli et al, published in CACM
12/2015):
MOOC courses like to release their
student data to help researchers improve the courses. To allow this under
FERPA, the lawyers for edX decided to use k-anonymity with k=5
(based on advice from the U.S., DoE). This means every record must have the
same identity-revealing traits (quasi-identifiers) as at least four
other students in the data set. The first step is to identify which fields in
the records are quasi-identifiers. They decided on: course ID, level of
education, year of birth, gender, country, and number of forum posts made.
(Course ID because a given student might have taken a unique combination of
courses, and number of posts since the forums are public and by simple
counting, re-identification might be possible.)
There are two ways to achieve
this. One is by generalizing quasi-identifiers into groups, for example,
instead of the raw data years old, you group students into “buckets”
such as “18-21, 22-25, and 26-29”. If a three year bucket doesn’t result in
sufficient anonymity, you can increase the bucket range.
The second method to anonymizing
the data is to delete any records that aren’t sufficiently anonymous after
generalization is done for all quasi-identifiers.
Both generalization
and record removal can reduce the value of the dataset significantly, possibly
even skewing the results to provide false correlations. Recent research
suggests aiming for a fixed number of records per bucket, rather than fixed
bucket ranges, may help when generalizing and reduce the need for record
removal.
As you can see, de-anonymizing
data properly is a lot of work to do well.
·
Risk analysis (Sometimes referred to as Cost-Benefit
analysis or CBA, or trade-off analysis or TOA.) This means
to determine whether some asset should be protected, and if so to what degree.
You must balance the cost of an incident should it occur, the likelihood that
it will occur, and the cost of preventive measures. You must also consider mitigation
measures, which are mechanisms and policies designed to lower the cost
and/or likelihood of some type of security incidents.
Stephen Murdoch has
published a dissertation that observing the behavior of users of “covert channels”,
especially anonymity systems, may be enough to discover their intentions or
even their identity. The approach is similar to how card players in a game of
bridge are able to determine cards by observing the behavior of other players.
He adds that collusion between two partners can make the process easier. The
strategy can be applied to TCP/IP environments and the simple traffic analysis
of an “anonymous” network such as Tor. His findings are similar to those
presented at the Black Hat conference August ’07. Murdoch says that
anonymizing technologies might offer protection from casual scans or monitoring
but they are unlikely to withstand the scrutiny of dedicated attackers,
researchers, or law enforcement officials. He says “[There is] a wealth of
practical experience in covert channel discovery that can be applied to find
and exploit weaknesses in real-world anonymity systems”.
Risks change with time, and thus a
new risk assessment should be made periodically.
·
Audit trails and Logging Audit trails provide Accountability,
which prevents false repudiation (“I didn’t do it!”).
·
Intrusion Detection Host IDSs (e.g. file
alteration/integrity monitor, or FAM/FIM) and network IDSs seek to detect
when an intruder has been attempting (or successful) at compromising integrity.
IPA —
Identity, Policy, Audit
For efficiency, compliance, and
risk mitigation, organizations need to centrally manage and correlate vital
security information including:
·
Identity (hosts, virtual machines, users, groups, authentication
credentials)
·
Policy (configuration settings, access control information)
·
Audit (events, logs, analysis thereof)
Mid- and large-scale organizations
today need to set up centralized identity management. IPA is also known
as Identity Management (IdM).
Policy means a broad set of
things, including access control policy, MAC policy, security configuration
settings, which packages and patches are applied and running, and what system
configuration settings are set. Organizations want to be able to centrally
manage this information applying different policies based on machine group,
location, user, and more. Finally, organizations need to be able to gather and
analyze log and audit data and they need to meaningfully parse that data
without getting overwhelmed.
The problem is all three of these
aspects of security are inter-related. There are too many “ad-hoc”
implementations of each aspect to manage and administer easily. Often custom
shell scripts are needed to tie all the different systems together.
FreeIPA (FreeIPA.org) is an integrated security
information management solution combining Linux (Fedora), LDAP (Fedora
Directory Server), Kerberos, NTP, and DNS. It consists of a web interface and
command-line administration tools. This is essentially what Windows Active
Directory is: a collection (“domain”) of users and computers, trust
relationships to other domains, and authentication and authorization rules for
users. FreeIPA provides identity managment features, including single
sign-on, for modern Red Hat-like systems.
Sometimes identity
can be a bad thing. You can be tracked through the Internet if the web browser
you use has plugins, add-ons, and settings that make it fairly unique. Additionally,
the IP address you got from your local ISP can be used to place you
geographically.
To see how unique
your browser is visit https://panopticlick.eff.org/.
(The more unique you are, the easier you can be tracked.) You can see what
information is available to web servers (and ISPs) at browserspy.dk, and see all HTTP headers
from http-header-viewer
or web-sniffer.net.
You can mitigate this
with various browser add-ons, such as Secret Agent for
Firefox.
Lecture
3 — Security Issues of Backups, Installs, Updates, and Patches
Treat backup media
as very sensitive security. Ideally you need to destroy completely old
media, never just throw away (dumpster-diving). (See this YouTube
video of a disk shredder in action.)
A clever and cheap
way to destroy old CDs: List them on eBay as pirated copies of a popular album
or movie, then wait for the RIAA to confiscate and destroy them.
Never be the first
to install new stuff. (Policy should state how long to wait before
installing new packages.)
Always get
packages from trusted sources. If you really feel a need to install new
software not available from a trusted source, be very sure you really need
that software! Do not follow any links you find in public forums or in spam.
Instead lookup the software yourself with Google and go to the author’s
website. Check the DNS info for that site and make sure it wasn’t added
yesterday!
Verify the
download no matter where it came from (using gpg
or if not available at least md5sum).
If no verification is available, then try to download another copy of the
package from a completely different location (preferably from a different
country) and compare the packages with cmp.
Installing from
source code can be safer than installing a binary package, if you
have the skills and time to carefully examine the code (including any auxiliary
code such as makefiles and configure scripts). If you don’t have required
programming skills but the software is key to your organization, consider
hiring a consultant.
Never compile code
as root! After building, try testing the code as a non-root user before
becoming root and running make install. Make use of the “-n”
option to make to see what the make install
command tries to do.
When running
new/untrusted software, use tools such as strace
and ltrace (which traces
both sys-calls and library calls) and, additionally on Solaris and BSD, dtrace, truss
and sotruss:
ltrace -fS -n 2 -a 70 -- date 2>&1
>/dev/null |less
Look for odd
system calls (e.g., open a network socket when running the date program would be suspicious, as
are exec calls to /bin/login, ...), odd libraries
(.so files in non-standard
locations, or non-standard .so
files anywhere), and odd arguments to system calls (very long strings,
strange pathnames, etc.) Note these trace commands will show in plain text
everything passed as arguments, including usernames and passwords! Tracing
tools are invaluable learning and trouble-shooting tools; they are also great
security cracking and investigation tools.
To contain untrusted
code you should use virtual hosts VServer, VMware, ... if available. If not
then in addition to using the security features you do have (chroot, jail,
zones) you can use sandbox software, a.k.a. system-call censor
software, that intercepts each system call, inspects it, and then allows,
denies, or asks the user (useful for trusted but vulnerable software). You can
define a policy file for each program to run in the sandbox,
defining the minimum access required. Examples include Janus
(user-level censor) and Systrace (kernel-based censor).
seccomp (short
for secure computing mode) is a simple sandboxing mechanism in the Linux
kernel. When enabled, all syscalls made by a process must pass through a filter.
A process makes a one-way transition into a “secure” state when it enables
seccomp, where it cannot make any system calls except exit(), sigreturn(),
and read() and write() to already-open file
descriptors. (This is known as mode 1 seccomp.) Should a process
attempt any other system calls, the kernel will terminate the process with SIGKILL.
Beside this strict
filter, applications can define and use other (more permissive) filters. (This
is called mode 2 seccomp.) For example, Google Chrome web browser uses
this for plugins on Linux.
Enabling such filters
is done by the developers of the code in question, not by sys admins.
Accordingly, I consider seccomp to be discretionary, not mandatory, even though
it is enforced by the kernel once enabled.
Updates
generally replace one version of a package with a newer one. All files are
replaced with an update, so you must treat an update the same way as new
software, that is untrusted.
Patches come
in two types: binary and source. A source patch modifies the code and then
requires a re-build, so the same concepts apply as above. Binary patches edit
the machine code files directly. Never use binary patches except from your
system vendor! All patches (of either type) are installed according to your
patch management schedule.
Boot
Security
On *nix systems the
boot process is not secure by default. If an attacker can boot to single-user
mode on most systems they get a root shell with no password required. By inserting
a bootable disk (floppy, CD-ROM, DVD, flash) the attacker can bypass all your
security efforts. There are a few steps to take to make the system boot
procedure more secure:
A grub password is
important. This will ensure that the user can’t alter the kernel parameters
(say to boot into single user mode).
How to add password
protection in Grub2 (from help.ubuntu.com):
1) Generate a grub
password and encrypt it:
apg; grub2-mkpasswd-pbkdf2
2) Add the
following entries to the file /etc/grub.d/40_custom:
set superusers="John"
password_pbkdf2 John
grub.pbkdf2.sha512.10000.FC58373BCA15A797C41
8C1EA7FFB007BF5A5... this is very long!
export superusers
Superusers can do
anything at the grub prompt. Other users can be declared to have more limited
rights, to just the unprotected menu entries, and extra access so specified
protected menu entries. In the same file you add additional lines for each
user and password. (Those should be encrypted as well.) Next you must modify
each menu item, by adding the security information to the title part of each menuentry:
--unrestricted disables password
protection for that entry. This is needed since once a superuser has been
specified, all enteries are by default restricted to just the superuser.
--users name[,name…] enables
password protection for the specified users. The superuser always has access.
To restrict to just the superuser, use “--users ""”.
Note, having no extra security info should give the same effect, but better
safe than sorry.
The security info
must be added to each menu entry. There is no good way do to that. You can
edit the 10_linux script. Find
the line:
printf "menuentry '${title}' ${CLASS} {\n" "${os}"
"${version}"
And add the info
right after “${CLASS} ”. Then regenerate the grub.cfg
file with the command (on Fedora):
sudo grub2-mkconfig -o
/boot/grub2/grub.cfg
Set the system to
boot from the HD first. This prevents a bypass by inserting a bootable media.
Password protect the
BIOS. This can still be cleared by opening the case and setting a jumper, or
in some cases by removing a battery. But this is not easy, especially if you...
...Use a secure
(locking) case, and /or keep servers in physically secure and monitored
locations.
UEFI
Secure boot
UEFI Secure boot is a
feature that Microsoft got hardware vendors to support. It requires any boot
loader or kernel software loaded by EFI to be digitally signed; the hardware
(TPM) will refuse to load any code not properly signed.
A TPM is a
microcontroller that stores keys, passwords and digital certificates. It
typically is affixed to the motherboard of a PC. It potentially can be used in
any computing device that requires these or related functions. Since the TPM
is implemented entirely in non-updatable hardware, the information stored there
is made more secure from external software attack (since there’s no possibility
of malware in the TPM).
The idea is to prevent malware from
loading during the boot cycle, which is more complex (and harder to secure)
than older BIOS boot cycles. More likely, it will lock most users into
Windows8 with no choices at all. (X86 hardware has that “feature” enabled by
default, but there is supposed to be a way to turn it off for that platform. There
is no way to disable it on other types of CPU, i.e. ARM.)
Rather than challenge this
monopoly, Fedora 18 will pay Microsoft $99 to digitally sign Fedora, so that it
can be installed on such hardware.
Fedora since 18 allows
the verification of Grub and kernel binaries to be disabled by calling “mokutil --disable-verification”.
During the next system boot, the Shim bootloader will ask the user to confirm
this by entering a one-time password; the downstream Grub bootloader will
subsequently launch any Linux kernel, even if Secure Boot is active in firmware.
Secure Boot requires that the
hardware check a digital signature of the firmware used, and have that firmware
check the digital signature of the kernel it loads. To support Linux, Ubuntu,
SuSE, and Red Hat have developed a “shim” boot loader, signed by Microsoft,
which in turn loads grub.
This shim bootloader, called Shim,
contains a public key under Fedora’s control (or whichever vendor you use) and
is signed by Microsoft. The shim will only boot binaries signed with the
public key and allows the developers to build and sign all other binaries
themselves without going back to Microsoft to get bootloaders or other
components signed. (The Linux foundation has also developed a pre-loader
loader that is similar to the shim loader, only it doesn’t check the signature
of the full loader (grub).)
A locked-down boot environment and
signed kernel do block modified bootloaders and booting attack code. However,
this won’t prevent an attacker from using a booted kernel to launch another
kernel (or malicious LKMs). To ensure that doesn’t happen, direct hardware
access from userspace will be blocked. Utilities wanting to access hardware
must go through kernel modules that have been signed by a key that the kernel
trusts.
SUSE has assisted the process by
developing useful elements such as a simple mechanism to allow new keys to be
enrolled from within a booted operating system, avoiding reliance on what is
expected to be the variety of inconsistent user interfaces from PC firmware
makers.
Shim will also notice if the second
stage bootloader is signed with a key it doesn’t recognize. If so, users will
have the option of enrolling a new key from install media and having it added
to a trusted key list. Sysadmins can also deactivate signature validation in
the shim, so developers need not sign kernels they are developing. This
requires a reboot and a user generated password to be activated.
Dealing with
Secure Boot and Linux from Linux.com
post
If Secure Boot is
preventing you from installing or running Linux, The first step is to disable
the following from within the BIOS: Quickboot/Fastboot, Intel Smart Response
Technology (ISRT), and FastStartUp (if you have Windows 8). With that done,
you should be able to boot your distribution without problems.
If that doesn’t work,
note that some BIOSes are equipped to run in what is called EFI or “legacy”
mode. If your BIOS does allow this mode, set it and you should have zero
issues with Linux. Certain motherboard manufacturers label this as Compatibility
Support Module.
If, however, you get
a Secure boot or signature error, it’s time to disable Secure Boot. If your
machine has Windows 7, you can simply enter the BIOS in the standard fashion
(by hitting the proper keyboard key associated with your motherboard BIOS
settings) and disable Secure Boot. If, however, your machine runs Windows 8,
getting to the Secure Boot toggle isn’t quite that simple. To do this you must:
Boot Windows 8
Press the Windows+I keys
Click Change PC Settings
Click General and then Advanced Startup
Click Restart now
Click UEFI Firmware settings.
In Windows 8.1, do
the following:
From the left
sidebar, go to Update and recovery
Click Advanced startup
Click Restart now.
The machine should
then reboot and enter the BIOS where you can disable Secure Boot.
Security
of LOM (Lights-out Managment)
Intel developed IPMI, a
popular open standard for implementing LOM, supported by Dell, HP, and others.
Intel replaced IPMI with Active Management Technology (AMT), and later
with Intel’s Management Engine BIOS Extension (MEBx). You can
usually get to that by powering up while holding down the F12 key.
MEBx actually uses a separate CPU
(a system on a chip computer) that runs digitally-signed code from
Intel, meaning end users have no control over the system and no way to audit
the code for vulnerabilities. Several vulnerabilities were reported in 2018.
LOM can run even when the main
system is turned off or crashed and can invisibly use your NIC if there isn’t a separate LOM-dedicated one. The only
requirement is access to ports 16992 and 16993.
It is strongly suggested you change
the default password for MEBx on your PC if it has that feature.
Lecture
4 — Security Threats
A threat
is a potential violation of security. (U.S. Military defines a threat as a
potential intruder.) This can also be called a vulnerability.
Note that the violation need not occur, but just be possible, to be considered
a threat. You must guard against threats. The common counters to threats are
the three security services (CIA) defined above.
An action that could cause a threat
to occur is called an attack. Those who perform such actions, or
cause them to be performed, are called attackers or sometimes intruders
or crackers.
During the first six
months of 2011, over 150,000 unique pieces of malware was discovered by
security researchers. This is an increase of over 60% over same time in 2010. A
new web threat is detected every 4.5 seconds. 1,000,000 people were taken
advantage of and scammed. (The FBI estimates that a cybergang tricked nearly a
million people into buying fraudulent software.)
Threats come in all shapes and
guises, but can be classified in a number of ways. One such way divides
threats into four categories:
·
Disclosure (unauthorized access to information).
Snooping/sniffing (passive wiretapping), stealing passwords or data, are
examples.
According to the 2010
Wiretap Report, federal and state courts issued 3,194 orders for the
interception of wire, oral, or electronic communications in 2010. This does
not include interceptions regulated by the Foreign Intelligence Surveillance
Act (FISA) or interceptions approved by the President. Reportedly, the
government applied for 1,579 authorizations to conduct electronic surveillance
or physical search under FISA. Of those applications, the government withdrew
five, and the Foreign Intelligence Surveillance Court denied zero.
The average number of
persons whose communications were intercepted was 118 per wiretap order in
2010. Only 26% of intercepted communications in 2010 were incriminating. The
report also indicated that there were six cases in which law enforcement
encountered encryption during a state wiretap; however, officials were able to
obtain the plaintext of the encrypted communications. In 2010, each authorized
wiretap was in operation for an average of 40 days.
The average cost for
intercept devices in 2010 was $50,085. At the federal level, the average cost
for wiretaps for which expenses were reported was up 2% from 2009, to $63,566.
·
Deception (acceptance of false data). Social
engineering is an example. Spreading false information deliberately,
called disinformation, is another (e.g. the Internet Water Army).
Companies may use disinformation to hide their true timetables for product
launches, disrupt competitor’s sales (e.g., leaking rumors about upcoming
products or bad reports on the competitor’s product), or protect information.
(E.g., in WWII, to protect the fact that they had broken the Nazi encryptions,
false but plausible stories would be leaked about how bombers “just happen” to
stumble upon Nazi convoys.)
A federal court in
Maryland has imposed a $163 million opinion and judgment against defendants
from Innovative Marketing in a massive “scareware” operation. They would trick
users into thinking their computer was infected with malware, by claiming that
they had conducted scans of consumers’ computers and detected security or
privacy issues, including viruses, spyware, system errors, and pornography.
Then sell them $30 to $100 program which they claimed fixed the fictitious
problem. More than a million copies of this software were sold, resulting in
approximately 3,000 customers filing complaints with the Federal Trade
Commission (FTC). Innovative Marketing took in around $60 million in revenue
between 2000 and 2008.
·
Disruption (prevention of correct operation of a
system). DOS, web site defacement.
An increasingly
common (2016) disruption threat is known as ransomware. Malware
(introduced as usual by careless users clicking on links in email, or by other
means) encrypts all data files on the infected systems, then displays (or puts
one unencrypted file) on the system a message explaining how to pay for a
decryption key. One recent (2/2016) incident was a hospital who had all
patient records encrypted, and elected to pay the ransom of $17,000. (Source: Ars
Technica)
·
Usurpation (unauthorized control of some part of a
system). Having your mail system used for spam by a virus.
Additional
classifications of threats
Some threats fall into more than
one of these categories. For example, modification or an unauthorized change
of information is a threat where the goal may be deception, disruption, or
usurpation. (This is sometime referred to as active wiretapping.)
An example of this type of threat
is the man-in-the-middle (“MitM”) attack, where Anne thinks she
is communicating with Betty, but Cindy is intercepting Anne’s messages and
forwarding (possibly altered) messages to Betty. (And in the reverse direction
too.)
Researchers at the DoE
have
demonstrated a MitM attack, that allows remote tampering with the
Diebold AccuVote and Sequoia AVC voting machines, and believe the attack could
be used against a wide range of others. The hardware required to make the
attacks can be attached and removed without leaving any evidence that it had
ever been there. The electronics in the attack require only basic electronics
skills, and cost about $10.50. It is simply jacked in between two components
on the Diebold’s printed circuit board using existing connectors. This can be
done without picking locks or breaking seals on the devices, which are often
stored insecurely in a school or church basement for several weeks before
elections.
Masquerading or spoofing
is when one entity (person, website, ...) impersonates another. This type of
attack falls into the deception and usurpation categories.
Delegation is when
one person (or server) authorizes another to act on their behalf. Note the
distinction between delegation and masquerading: in the first, no one pretends
to be someone they are not, and if Al delegates to Bill, Bill will not pretend
to be Al when communicating with Charlie. Bill will inform Charlie he is Bill,
acting for Al, and if Charlie queries Al, he will confirm.
Repudiation of origin
is a false denial that an entity (person or server) created or sent something.
An example is when you order some product, it is shipped to you, and you refuse
to pay, claiming you never ordered the product. This is related to
Denial of receipt is
a false denial that you received information, message, or some product or
service.
Delay and Denial
of Service are threats that inhibits the legitimate use of some service
or resource. The difference is in the time of the outage; a delay is for a
short while, or applies to a single message. This form of attack usually is
used when one has compromised a secondary server. By delaying a response from
the primary server (whose security the attacker may not be able to compromise),
many clients will retry using a secondary server (which the attacker may
already be in control of).
A buffer overflow attack
is an attempt to exploit poorly written software, to make it do things it
wasn’t intended to. An example is a server program, run as root. If you can
pass enough bad data to it, you may be able to trick the program to, say, start
a root telnet session for you. (See p. 308 for details.)
Rootkits: A typical system
has so many services running, written by so many different people, and each
configured separately, that it is perhaps inevitable that vulnerabilities will
exists on your systems. Many systems have well-known sets of these, and
attackers have created toolkits designed to crack a system and grant the
attacker root privileges. These have evolved over time into point and click
programs to crack systems, and are called rootkits. These are
popular with script kiddies, novice attackers who don’t know
about security except how to run some rootkit. (Show HackAttack.txt.)
There are frameworks available for hackers to use when developing rootkits, and
to perform some pen testing, including Metasploit, Zeus, and Blackhole.
Rootkits provide several “features”
including file and directory hiding, process hiding, socket (open port) hiding,
back-doors, and log file filtering. These are done by modifying the kernel
(say by loading some infected module) and replacing many standard system
utilities with hacked versions.
Sometimes the modified code is
hidden to make it hard to remove. It can hide in any NVRAM on the system (most
PCI devices have some, not to mention BIOS) or in unused disk sectors. (There
are lots of hidden sectors on IDE disks, and some on any
disk/partition/filesystem.)
Some popular Linux
rootkits include adore-ng, suckit, portacelo, and Irk. Some for Windows
include haxdoor and Vundo. Each has dozens of known variants. See PacketStormSecurity.com/UNIX/penetration/rootkits/
for a list of over 250 *nix rootkits; only about half-a-dozen are in current
use. (For Windows, there are hundreds in current use.)
The only 100% failsafe method of
recovering from a system level compromise is to completely reinstall the box,
and carefully examine any data that is restored from a backup and all
NVRAM.
There are several rootkit detection
methods but none are 100% reliable. Building a custom kernel increases
security; attackers creating rootkits (and worms) often rely on known
kernel (version-specific) RAM addresses. With a customized kernel, the
addresses will be different. (Most likely result would be a panic.)
Reverse engineering
is a form of attack where the attacker analyses the executable, looking for
ways to either exploit it for system attacks, to steal the intellectual
property of the author, or to bypass restrictions on the use of the software. Naturally,
this is easier if the source code is available.
Network
Attack Types
Here is a brief list of the types
of attacks on communication networks [Stallings Cryptography and Network Security
4th ed., p. 319]:
Disclosure When
an entity (person or process) not possessing the appropriate key can access the
message contents.
Traffic
analysis Learning the pattern of communications between parties not
including yourself. When, how often, the duration, and the size of data passed
during communication can be valuable data to an opponent. Another possibility
is message injection (“AF is Midway” WWII story).
You can learn the
chain of command (UserA sends lengthy message to UserB, who replies with a
short message and then sends lengthy messages to others), when attacks are
planned, when a competitor is planning to announce a new product release, who
accesses certain websites that would indicate a good target for scams. The
night before a 1990s U.S. mission in Iran, pizza deliveries to the pentagon
increased 100 fold over a normally quiet night. Nazis in WWII used French
phone records to arrest anyone who communicated with arrested Frenchmen.
Masquerade Messages
with a fake source, including fake acknowledgements (or negative
acknowledgements, the ACK of non-receipt).
Modification Changes
to the content, including additions, changes, and deletions.
Re-sequencing Most
messages today are sent as a sequence of packets. Sequence modification, or re-sequencing,
means the insertion, removal, or reordering of these packets.
Time
modification The delay or replay of messages
or parts of a message.
Repudiation Source
repudiation is the denial of transmission of a message by the alleged source. Destination
repudiation is the denial of receipt of a message of the alleged recipient.
Search Engine
Poisoning (New
Scientist 8/26/2011, by Jeff Hecht)
More than 113 million
Internet users were redirected to malicious pages due to search engine
poisoning in May 2011, according to Trend Micro. Hackers start the scam by
gaining access to legitimate web sites and installing programs that monitor Google
Trends for hot keywords. The program then searches for content related to
the hot topics and uses the material to generate automatically new web content
of its own.
As Google’s bots roam
the Web, the malicious program identifies them and feeds them the content from
the fake Web pages. Since everything on the malicious site has been
specifically chosen to relate to a search topic, the fake web page and “poisoned”
images will usually appear near the top of the relevant search results. When
the user clicks on the thumbnail of the photo they want in Google search
results, the malicious program redirects the user to a fake antivirus Web site,
encouraging the user to buy unnecessary antivirus software.
Network malware has two parts, the payload
and a propagation mechanism by which it spreads. While the payload can
be anything, there are only a few ways to propagate. So another way to
classify network threats is by how they propagate:
·
A virus is computer code that attaches itself to
applications (any other executables and DLLs). When the executable code is
run, so does the virus code, which then tries to infect other applications in
addition to whatever evil for which it was designed.
Criminals who are
building banking malware such as Zeus and SpyEye actually have a comparable
workflow to whoever created Flame, Duqu and Stuxnet (now known to be the U.S.
and Israel). They are highly organized, motivated and have similar resources
at their disposal. Testing one’s own viruses with available anti-virus
software to make them harder to detect is a widespread modus operandi. Current
numbers from the ZeuS Tracker project,
for example, show that the detection rate for this kind of malware is still
below 40 per cent. There are 294 variants of the virus that cannot be detected
with anti-virus software even today (2012).
·
A worm is stand-alone malware; it doesn’t need any
host application. Often they are self-propogating, not requiring any user
action to spread to other hosts. Worms are usually RAM-based processes, which
run on one host and attempt to invade other hosts via the network. A worm
usually arrives on your host in the payload of a virus. (Se RFC-1135
for a discussion of the famous Morris worm.)
·
A trojan horse (or just trojan) is similar
to a virus, except it doesn’t infect other random software. Instead, it is
attached by the creator to some application that a user would want to download
and install. When it is run by the user, in addition to some useful task, it
runs the payload too. If attractive enough, users will download (or even
purchase) the trojan, and run it often; once is enough to deliver the payload
however. (Sony put out music CDs that, if played in a computer, would install
a rootkit.)
In practice, modern malware uses
multiple propagation methods, sometimes not even needing to infect executables
to do the damage. (Malicious data can trick trusted code into doing bad
things; think SQL injection attacks for example.)
Common
Vulnerability Scoring System (CVSS)
Another way to classify threats is
the Common Vulnerability Scoring System. CVSS is used to classify
threats on a 10-point scale of severity/urgency. It is widely used. Read more
about it at its home, www.first.org/cvss. The CVSS
numbers included in various databases of threats and vulnerabilities don’t
include some temporal or other changing parameters, so the scores shown may not
be completely accurate. The NVD includes a CVSS calculator
you can use to determine an accurate score for threats of interest to you.
Other
Vulnerabilities
There are many different types of
vulnerabilities in any complex system. A few that are often overlooked
include:
Too much data can
overwhelm a human’s or program’s ability to process it. For example, a current
assessment indicates there were warnings available prior to the 9/11/2001
attack but those were lost in a “flood” of data.
Math errors are
vulnerabilities in the hardware and common software used for INFOSEC. Such errors
have been found in older systems, such as the division bug in Intel’s Pentium
microprocessor discovered in 1994 and a multiplication bug found in Microsoft’s
Excel in 2007. A math error would allow an attacker to break a public key
cryptography system by discovering the error in a widely used chip and
sending a “poisoned” encrypted message to the computer, allowing the attacker
to compute the value of the secret key used by the targeted system. (Show the
Mitre top 25 software errors, and the SAMATE reference DB, from class
resources.)
User programs access kernel APIs
in a CPU dependent way. In essence a table of kernel system call addresses
is built, and a program wanting to make a kernel call will put the index number
of that call in a predefined CPU register, then executes an instruction (e.g.
TRAP, that will cause an interrupt on older systems, or SYSENTER on more modern
hardware), which will switch the processor from user to kernel mode. The
kernel then executes the requested system call. The security problem lies in
the passing of arguments to the kernel system call. The name of a file for
example, might get changed after being validated but before the system call
executes. *Nix kernels prevent this by making a private copy of any arguments,
then validating the copy.
On Windows systems,
the system call table is modified by security software, which is
supposed to validate the data passed to the system call. The program makes the
system call as normal, but the hook placed in the table points to McAfee
or whatever, which validates the date and then invokes the real system call.
It turns out that an
attack specially written to target anti-virus and firewall software by using
these hooks can successfully switch around its parameters after just a handful
of attempts. The researchers found exploitable versions of this vulnerability
in every program they tested, including products from McAfee, Trend Micro, and
Kaspersky. In fact, the researchers said that the only reason that they found
exploits in only 34 products was that they only had time to test 34 products.
One thing that might
be a solution is switching to 64-bit Windows. 64-bit Windows largely prohibits
this kind of kernel modification with a system called PatchGuard. With
PatchGuard, any attempt to update the system call table will result in the blue
screen of death shortly thereafter.
Unfortunately for
end-users, a number of security companies (the same security companies that
routinely write insecure, exploitable kernel hooks) complained about
PatchGuard, claiming that it prevented them from writing effective security
software for 64-bit operating systems. Microsoft eventually relented, offering
an API to allow certain patching operations to be performed by third parties.
No fix is currently available (5/2010) and none is likely anytime soon.
Lecture
5 — Cryptography Overview, Digests / Hashes, MACs, Trust, Steganography
An access control mechanism
is used to support the goal of confidentiality. Another possible mechanism is cryptography.
Some of the many forms of cryptography include: one-time pad
(OTP), symmetrical (crypt, DES),
and public key (RSA, ECC). These methods encrypt plaintext using
a standardized algorithm, plus a password, passphrase, or key. The result is
known as ciphertext; even knowing the algorithm details
but without the password/key, it is computationally infeasible to
compute the plaintext. However if you know the key, it is relatively simple to
recover the plaintext. So no access control is needed to protect the
ciphertext from attackers. (Unless you want multi-layered security.)
Computationally
infeasible means that some computation takes far too long (hundreds of
years at least) to compute even using the fastest computers imaginable.
Suppose our key is a 128-bit number. There are this many possible keys:
340,282,366,920,938,463,463,374,607,431,768,211,456
To recover a
particular key by brute force, on average one must search half the number of
possible keys, or about 170 × 1036.
If you could use a
million computers that could each try a million keys every second, it would
take about 5 × 10¹⁸ years, far longer than the universe has existed
(about 14 × 109 years) or is likely to exist, to find the key! Of
course, an attacker could get lucky on their first guess. Usually however,
other methods are used to try to reduce the number of keys to guess, based on
weaknesses in the algorithm or in the RNG.
While an important
concept, you should realize that attackers won’t even try to guess keys if it
would be this hard. If the attacker has access to the sender’s or receiver’s
computer, they can access data before encryption or after decryption. There
are any number of ways to do that, including power consumption monitoring.
Also, if the attacker prepares in advance of your communication, they may be
able to spoof each side to the other. These and other side-channel attacks
make computationally infeasible key cracking irrelevant by bypassing the
encryption. You want to use such encryption, and then harden your system to
prevent (as much as possible) side-channel attacks.
The different methods can be
classified as either stream ciphers or block ciphers, or as shared/symmetric
key or public key systems. These are discussed next.
Converting plaintext to ciphertext
is known as encrypting. Converting ciphertext to plaintext is
known as decrypting. (Technically, there is a difference between
this and enciphering/deciphering: encryption results from using codes (also
called encoding/decoding), while encipherment from using ciphers. In practice,
the terms are often used interchangeably.)
Codes convert
words or phrases into shorter words: “BAR” may mean “attack at dawn”, “FOO” may
mean “Prof. Wayne Pollock”, etc. On the other hand, ciphers convert one
character at a time. Both methods can be used; have codes for (say) 1,000
names and phrases, and encipher the rest.
Opportunistic encryption
(OE) refers to any system that, when connecting to another system, attempts to
encrypt the communications channel otherwise falling back to unencrypted
communications. Many email systems support this but often other network
systems on a host won’t, unless enabled. Examples include VoIP, Kerberos,
HTTP, DNS, and others. (Windows 7 includes OE support for most network
services, but it is off by default.) OE provides many possibilities for abuse;
it has been removed from most Mozilla software.
Passwords
and Keys
A passphrase is just
a password that accepts spaces. (Usually, a passphrase is composed of randomly
selected but otherwise valid words, and sometimes symbols are used to separate
words, not spaces.) A key is generally a huge random number,
with hundreds or thousands of digits. Keys are too hard to type in or remember
and are usually stored in files, which in turn are encrypted with a password or
passphrase. To use the key, you need to enter the password/passphrase.
Random Numbers
The heart of cryptography is the
use of random numbers. (See RFC-4086, Randomness
Requirements for Security.) Basically the numbers should be evenly
distributed in their range (for a uniform generator; bell-curve and other types
are possible), all values in the range should be possible, and the next value
generated shoujld be completely unpredictable from the list of previous values.
But, how can a computer generate high quality (truly random, or at least
totally unpredictable by an attacker)? Since computers are deterministic
(unless they include special hardware), they cannot “compute” random numbers.
The numbers they produces form a pseudo random sequence, and the
algorithms are known as pseudo-random number generator (PRNG).
(For example, if the PRNG uses the forumula previous value + 5 mod 101,
by observing a few of the generated values it is easy to determine what the
next values should be.)
FIPS-140-2
contains tests of random number sequence quality; see testrng(1). However, such tests are for statistical
properties of the stream of numbers produced (looking for patterns, or for
values that occur more often than they should). For use in security systems,
the numbers must also be unpredictable. These are produced using a truely
random seed value with a cryptographic PRNG (CPRNG), to start a
sequence of numbers that are unpredictable as well as statistically random.
Since 2013, the U.S. government has
been operating the NIST random number beacon, to
set a standard for randomness. (But thses cannot be used for crypto, as each
value is preserved and timestamped forever. So it’s not a secret.)
The original Netscape
web browser used a 40-bit random number to generate the keys for HTTPS. However,
this number wasn’t truly random, composed of the current time, the PID and the
PPID. Even in 1995 it would only take about 30 hours to crack such a key; as
an attacker knows the current time (roughly), and can guess the PPID (and
possibly the PID too) fairly easily.
Modern web browsers
have just as much trouble generating good random numbers. A flaw
in the popular V8 JavaScript engine’s Math.random() function was
recently (12/2015) discovered and will be fixed soon (this blog post is a good
read).
In *nix, /dev/random is
usually a special file that serves as a random number generator (RNG)
or as a pseudo-random number generator (PRNG). It allows access
to environmental noise collected from device drivers and other sources (for
example, the number of milliseconds between key presses or mouse clicks, the
time between TCP packet arrivals, the seek time of the disk since the last head
movement, etc.). All these random numbers are stored in a list called the entropy
pool by the kernel. As each value is added, the kernel adds to the
estimate of the available entropy. When /dev/random
is read, the data from the pool is hashed using a cryptographically secure
hashing algorithm (e.g., SHA-256), the results are returned, and the estimate
of available entropy is decremented.
Data is added to the Linux
entropy pool indirectly; kernel noise sources are mixed together into an “input
pool”. An estimate of the entropy of this data is made, and a SHA hash of the
data (and some more mixing) is done to transfer the data to the “entropy
pool”. (I’m simplifying a bit here; See Linux Pseudorandom Number Generator
Revisited for details.)
It is possible to
write to /dev/random on Linux,
to add more noise. The data will be mixed in and used, but the entropy
available counter won’t be changed. (That requires root privilege.) Also,
Linux allows you to see how much entropy it currently has from /proc/sys/kernel/random/entropy_avail.
Virtual machines have a security
issue with this procedure; they only have fake hardware, resulting in low or no
entropy. If the host OS maintains an entropy pool used by the virtual
machines, one VM can use up the pool, “starving” other VMs.
Modern Intel CPUs include special
RNG hardware that can be used in place of the traditional sources. The Linux
VM software (KVM and libvirt) support (7/2013) a paravirtual random number
generator device. This can be used to prevent entropy starvation in virtual
machines. (See VirtIORNG for
some details.) However, due to distrust of Intel, Linux uses such hardware
only to add to the entropy pool.
Random numbers are
used for more than just key generation. For example, TCP sequence numbers need
to be random. Also, a lack of randomness can lead to DoS attacks against web
applications.
Web application
servers or platforms commonly parse POST form data into hash tables
automatically, so that they can be accessed by the application. If the programming
language used does not provide a randomized hash function, or the application
server does not recognize attacks using multi-collisions, an attacker can
degenerate the hash table by sending lots of colliding keys. The algorithmic
complexity of inserting n elements into the table then goes to O(n**2),
making it possible to exhaust hours of CPU time using a single HTTP request.
Although not all systems implement /dev/random this way, this method
provides cryptographically secure random numbers. However,
any attempt to read more random bits than the entropy pool currently contains
will block, waiting for more random noise to be added to the pool. Linux
was the first operating system to implement a true RNG this way (Theodore Ts’o’s
Implementation for /dev/random
in 1994). This feature can be exploited in a side-channel attack; an attacker
can obtain keyboard interrupt timings by exhausting the pool and waiting. Some
patches by Ts’o in 2012 mitigate this and other issues.
In 11/2012, another side-channel
attack was reported. Researchers have devised a virtual machine that can
extract private cryptographic keys stored on a separate virtual machine when it
resides on the same piece of hardware. The technique they used took several
hours to recover the private key for a 4096-bit El Gamal-generated public key
(used with GPG and elsewhere). You can read the details from Ars
Technica.
For years, one could
obtain true random number from lavarand.com,
which set up digital cameras in front of some lava lamps in their server room.
The digital photos were then hashed using SHA-1 and the result was a truly
random number.
For some systems including Linux, there
is also /dev/urandom,
which works the same except that if the entropy pool runs out, it uses PRNG
techniques and so will never block. But the quality (“randomness”) suffers.
(This is a bit of a simplification.) That can be taken into account by the
software using it, by using a secure one-way function to reseed frequently.
But most people forget to do so when implementing their own security system.
(So don’t do that.)
You can generate strings of 10 (or
any length; just change the “10”) random characters this way:
tr
-cd '[:print:]' </dev/urandom \
|od -cAn -N10 |tr -d '[:blank:]'
You can change print to alnum, to restrict the output to letters and digits
only. Use this technique to generate passwords if pwgen and/or apg
aren’t available.
On some (e.g., BSD) systems, /dev/random is reserved for hardware
RNG (e.g., counting cosmic ray particles per second that hit the chip). These
OSes have /dev/srandom that
is similar to Linux /dev/random.
Linux does have /dev/hw_random,
if such hardware is detected.
In 2008, Debian-based
Linux systems were patched to fix a serious bug in the random number library.
It didn’t use any source for random numbers correctly, resulting in perfectly
predictable numbers! Some SSL certificates, and even some CA certificates were
generated using the broken random number library, although all known ones were
quickly revoked. (From the
Register.)
“Using pseudo-random numbers for
security results in pseudo-security.”
“Random numbers should not be
generated with a method chosen at random.”
Modern systems lower the
security of the /dev/random
method of random number generation, as solid-state disks and virtual hardware
eliminate most sources of random data, or make them less random. This has been
a long-known problem with embedded systems such as those found on routers and
switches. Reportedly, 1 in 250 SSL or SSH keys generated by these devices
can be broken by an attacker in a matter of hours. This happens because
OpenSSH and OpenSSL rely on the quality of random numbers from /dev/[u]random. But they didn’t have
to!
A related problem is
that during or just after booting, the entropy pool is empty. Many systems
generate host keys then, with between 5% and 10% of such keys identical. Not
good. Recent patches to Linux have added a bunch of data to the pool at boot
time, such as MAC address, serial numbers of attached devices, etc. While not
random, such data does vary from system to system and may be hard for an
attacker to predict.
In 2011 Intel added
new random number generator hardware (“Bull Mountain”, later renamed to
“RdRand”) to their CPUs (since Ivy Bridge), which can generate truly random
numbers. However, Intel isn’t trusted sufficiently to use that as the sole
source of entropy. Linux uses it in /dev/random
but doesn’t expose it as /dev/hw_random.
FreeBSD decided not to use it or any untrusted HW (that’s all HW since
Snowden’s NSA revelations) as the sole source, starting in version 10.
Crypto
Primitives and Protocols
Cryptographic systems are built
from simpler pieces, known as cryptographic primitives. Each of
these is designed to have a simple function, for example the functions of
encryption, integrity checking, or authentication. Some of these primitives
are discussed next.
A combination of crypto primitives
is used to construct a cryptographic protocol. Examples of such
protocols include SSH and TLS. It should be noted that even if the individual
primitives are error-free, their use in a faulty protocol won’t ensure
security. There are several well-known examples of such failures, such as
Wi-fi’s WEP.
Kerckhoff’s
Law
Early symmetric encryption schemes
had no keys or passwords! The encryption method itself had to be kept secret.
Qu: what’s the problem with such schemes? Ans: Since you have to share your
scheme with someone else for it to be useful, it is difficult to keep secret.
If you communicate with a large group, everyone needs to have the same scheme.
Finally, it turns out to be very difficult to design a good crypto protocol, so
if you have to keep yours a secret, it will not be possible to have lots of
smart people study your method for flaws.
The requirements for a modern crypto
protocol were first stated by Kerckhoff in 1883:
A cryptosystem should be secure
even if everything about the system, except the key, is public knowledge.
This principle was restated years
later by Claude Shannon, the inventor of information theory as well as the
fundamentals of theoretical cryptography. Shannon’s Maxim states the enemy
knows the system.
All modern crypto follows this
principle. The scheme is public knowledge, and (hopefully) well-studied. The
security of the scheme rests with the security of a key.
Stream
ciphers
Stream ciphers are a type of
encryption algorithm that read a continuous stream of bits of plaintext, and
produce a stream of ciphertext as output. One very common stream cipher was RC4
(used in SSL and WEP). Others include Salsa20 (and the related ChaCha20, which
as part of the BLAKE hash, was a finalist in the NIST’s competition for an SHA successor),
and Spritz (designed as a “drop-in” replacement for RC4).
RC4 is now (2016) known to be
vulnerable to some attacks (e.g., the SSL/TLS “Bar Mitzvah” attack), and is no
longer considered secure. TLS 1.2 permits AES-GCM (a block cipher that is fast
enough to be used instead of a stream cipher) instead of RC4, and that should
be used if possible.
The key determines the encryption
of the first bit of data, and the result is used as a key for the next bit.
For many stream ciphers, the sequence of key bits (known as a keystream)
is simply XOR-ed with the plaintext. With a stream cipher, if the initial part
of the stream is corrupted or lost, the rest of the stream cannot be decrypted.
If the sequence of keys repeats, the length is the key period and
must be long (ideally, longer than any message).
RC4 (“Rivest Cipher 4”)
was the most popular stream cipher used (2013). Originally a trade-secret of
RSA, Inc., the name is a registered trademark; the algorithm is also known as
“ARC4” (alleged RC4).
Another approach is called self-synchronizing
stream ciphers. Rather than use all previous ciphertext to determine
the next bits of the keystream, only the last few (“N”) digits are
used. So an error in one bit will only affect the following N bits of
output. Thereafter the data is decryptable again.
If used incorrectly, a stream
cipher is easy to crack (but then, that’s true of all cipher methods). One
common problem is bit-flipping attacks (if an attacker flips a bit in
the ciphertext, the corresponding bit in the plaintext gets flipped. Adding a
MIC (message integrity code; see below) can protect against this.
Another attack is that using short keys can result in multiple messages sharing
the same keystream. By XORing two such messages together, the XOR of the two
plaintexts are produced! Statistical analysis of the result can reveal the
plaintext. Adding an initialization vector (or “IV”) or nonce
effectively increases the key length.
Stream ciphers generally need less
hardware and are faster than block ciphers. This makes stream ciphers useful
for network connections such as with HTTPS.
XOR, or exclusive
OR, is a function that produces true
if exactly one of its inputs (arguments) is true, and false otherwise. XOR is easy to implement in hardware,
and is used to calculate RAID-5 parity data, in encryption to scramble data,
and many other uses. For example, XOR is used when adding data to the system’s
entropy pool, because XOR of random and non-random data is still random (you
don’t lose entropy by mixing data this way). (Demo xor.c.)
Block
ciphers
Block ciphers work by
transforming a fixed-size block of plain text to a block of cipher text. When
used with a variable amount of data, you need to pad any short blocks. Some
commonly used block ciphers include 3DES (replaced DES), AES
(replaced 3DES), IDEA, and Twofish (replaced Blowfish
which is still in wide use).
When you have more data than can
fit into one block, you use some sort of mode of operation to
determine what to do. Other than ECB mode, block ciphers require an initialization
vector (or IV). This is a fixed, predetermined block of data. It is used
like salt to make sure the same key doesn’t produce the same output. There
is no need for the IV to be secret, but reusing the same IV with the same key
leads to weak security (which is exactly what happened with Wi-Fi’s WEP). (See
NIST
SP-800-38a (PDF) for details on block ciphers.)
·
In ECB (electronic codebook) mode, each block of
plaintext is separately encrypted using the identical key and algorithm. ECP
is useful when you have a multicore computer as each core can encrypt a different
block simultaneously. While simple, it is not secure.
·
With CBC (cipher-block chaining) mode, each
block of plaintext is XORed with the previous ciphertext block before being
encrypted. This mode operates much like a stream cipher in that the result of
a block depends on all the previous blocks.
·
Using CFB (cipher feedback) mode is similar to
using CBC mode except that only the last N blocks are used to determine
the encryption of the current block. With CFB mode, the output will still be
decryptable if a block is lost.
·
OFB (output feedback) mode operates just like a
self-synchronizing stream cipher. If even a single bit is lost, only that
block (and possibly the following block) will be unusable; after that the
plaintext will be recoverable.
·
CTR (counter) Similar to OFB, counter mode turns a
block cipher into a stream cipher. It generates the next keystream block by
encrypting successive values of a “counter”. The counter can be any function
which produces a sequence which is guaranteed not to repeat for a long time.
·
GCM (Galois/Counter Mode) This is a fast and secure
variation of CTR mode that provides not only confidentiality, but data
integrity as well. (AES-GCM is recommended for use in TLS security over the
RC4 stream cipher.)
There are other modes possible for
block ciphers. Except for ECB, each mode depends on the output of one or more
previous blocks and thus can’t encrypt different blocks in parallel. The
different modes provide different benefits, so you would pick a mode based on
the goal: confidentiality, authentication, etc.
In addition to the modes, the other
important features used to distinguish block ciphers are the block size
and the key length. For example, Blowfish has a 64-bit block size and a
variable key length from 32 up to 448 bits; AES has a 128-bit block size, with
key sizes of 128, 192 or 256 bits. In general, a longer key is more secure. A
too-small block size leads to weak security. For example, the 8-byte size of
DES turns out to be safe for up to only 32 GB of data max, before you must
change the key. (With such a small block size, it is reasonable to change the
key every few hundred megabytes.) But beyond a 16- or 32-byte blocks, you need
not change keys for so much data that the number has no name. Larger blocks
increase the number of blocks that need padding, and that can cause issues too.
(Note that block sizes are generally multiples of 8, since that makes the code
more efficient on computers.)
One Time
Pad
With OTP, a string of truly
random numbers (the key) is added to message, and no key is ever used twice.
(Ex: CAB-> 312, OTP=465, result=777.) OTP is the only guaranteed totally
secure encryption method possible, even in theory. Special hardware can be
used to generate the random numbers.
OTP was used by the
allies during WWII. Exactly two copies of a book (a pad) of keys were
made; one kept in the White House basement, the other at No. 10 Downing Street
in London (the UK Prime Minister’s home).
The problem with OTP is
distributing the keys in the first place! A practical alternative to a real
OTP is to use a cryptographically secure pseudo-random number generator
for the string of random numbers. If both parties start at the same PRNG seed,
then they both will generate the same sequence of key digits. While you still
need to distribute the seed value, the sequence produced is very long, so
frequent replacements aren’t needed as with real OTPs.
RSA’s SecurID smart-cards (“tokens”)
use this type of OTP technology, using a PIN or other user-supplied password
for the PRNG seed. This type of pseudo-OTP depends on the seed being
kept secret, and it must be distributed and stored securely.
SecurID tokens from
RSA Security are used in two-factor authentication systems. Each user account
is linked to a token, and each token generates a pseudo-random number that
changes periodically, typically every 30 or 60 seconds. (See time-based OTP
below.) To log in, the user enters a name, password, and the number shown
on their token. The authentication server knows what number a particular token
should be showing, and uses this number to prove that the user is in possession
of their token.
The exact sequence of
numbers that a token generates is determined by a secret RSA-developed algorithm,
and a seed value used to initialize the token. Each token has a
different seed, and it’s this seed that is linked to each user account. If the
algorithm and seed are disclosed, the token itself becomes worthless; the
numbers can be calculated in just the same way that the authentication server
calculates them.
RSA Security replaced
every one of the 40 million SecurID tokens currently in use, as a result of the
hacking attack the company disclosed in March 2011. The public disclosure
apparently came only after defense contractor Lockheed Martin suffered a
break-in. Hackers used a zero-day Flash exploit, embedded in a spreadsheet
sent through a “spear-phishing” attack, to gain access to RSA’s network and
compromise information on RSA’s SecurID authentication tokens. Over 700
organizations’ networks were found to be transmitting data back to the
command-and-control networks used to coordinate the attack—including a number
of ISPs, financial and technology firms, and government agencies. Of the over
300 C&C networks used to coordinate the Flash zero-day attacks, the vast
majority—299 of them—were located in China. And the first communication with
these networks dates back to November 2010.
In 5/2012, another
security problem surfaced. RSA Inc. has Windows software, to allow
users to use their SecurID tokens to authenticate on Windows. Some attacker
reverse-engineered the Windows software and determined how to obtain the secret
seed value. This can be used to lie to any other software that relies on
SecurID for authentication.
A type of OTP (see RFC-2289)
is used for authentication, not so much for encryption. It is based on an
algorithm called S/Key. By exchanging a seed value between the
client and server once, the server can authenticate users. It works this way:
the seed is used with a cryptographically secure hash algorithm. The result is
called key-1. That is used with the same hash to produce key-2.
A large sequence of keys is generated this way, say up to key-1000. The
server discards all the previous keys (and the seed).
When a client needs to authenticate
to some host, the host prompts the client for a key, which should be the
previous key (in this case, key-999). If the client supplies the
correct key, its hash will be key-1000 and the host knows the client
knows the same sequence. The host now stores key-999. For the next
authentication, the client must supply key-998. Note the host doesn’t
know the key it is asking for; every so often, a new seed must be exchanged and
a new sequence generated.
Another popular type of OTP for
authentication is time-based OTP (TOTP). This is used often with
multi-factor authentication schemes, such as used with Amazon, Google, and
Microsoft. (See RFC-6238.)
Special hardware, or (more commonly) a smart phone app is given a seed value
when set up. Thereafter, the device or app displays a number based on a PRNG
and the current time. The number gets updated every minute or so. (Demo
AWS MFA App from my cell phone,)
You
can make your own OTP using 10-sided dice, or tiles from a Scrabble
set. Shake vigorously, record the sequence, and repeat. Make only a single
copy of the OTP!
Symmetric (or
shared) Key Encryption
Modern crypto techniques use symmetric
(or shared or private) key
encryption. With such a system, the details of the method used to encrypt the
message do not need to remain secret. Only a password (or key)
does. With such methods, an organization can and should feel free to have its
security methods published so they can be reviewed for weaknesses. Example of
shared key encryption methods include most block ciphers such as the older DES
(Digital Encryption Standard) and AES (Advanced Encryption
Standard). There are many different symmetric key encryption methods
known.
The U.S. Government
mandated the use of DES (digital
encryption standard, aka DEA; FIPS-46) in 1976 (by the NBS, the precursor
of the NIST). DES uses 56-bit keys only. It transposes (reorders) the data
blocks, encrypts the blocks, and finishes with more scrambling/transposition.
Although DES has lots of steps, it is fast in hardware and slow in software
(due mostly to bit operations such as transposition of bits).
DES was used until
1998, when hardware and software made this insecure due to the small key length.
A temporary fix was 3DES (triple DES, aka TDES or TDEA; originally ANSI
X9.52, currently (2012) NIST SP-800-67).
3DES takes the results of DES and used that as the input to another use of
DES (a decryption operation), and then a third. Two or three keys are used.
(One key used three times was allowed for backward compatibility with DES;
that’s why the 2nd round was a decryption. If using two keys only, the first
and third are the same.) Meanwhile, the NIST went on a hunt for a worthy
successor.
AES (advanced
encryption standard) was announced in FIPS-197
in 2001 by the NIST. AES was the result of a public review of many competing ciphers;
in the past ciphers were selected by secret processes by the NSA.
AES supports three
different key lengths: AES-128, AES-192 and AES-256, all of which were adopted
from the “Rijndael” family of ciphers.
Non-U.S.
government-approved ciphers are popular too, such as Blowfish (and its descendent
Twofish), which supports variable key lengths from 32 to 448 bits; and IDEA
(International Data Encryption Algorithm), which uses 128-bit keys.
Symmetric key uses the same key to
encrypt and to decrypt a message, using two related methods (usually one is the
reverse of the other). Even knowing the methods an attacker can’t recover the plaintext
from the ciphertext. While some methods provide stronger or
weaker encryption than others, generally the strength of the method comes
from the long key length. An attacker must guess keys one at a time to
attempt to recover the plaintext. Initially DES used 56-bit (7 byte)
keys. Advances in computer technology made DES obsolete, as messages can
easily be cracked within hours using moderately priced hardware. Today’s keys
are often 2 kibi bits long.
While 3DES is harder
to break than DES (how much harder depends on how many keys are used), that
isn’t true for many methods. For example, a Caesar cipher (shift by 3) applied
twice is equivalent to a single shift by 6, and is no more secure. The math
for this issue is that of algebraic groups; basically, any combinations of
operations in a group is equivalent to a single (different) operation in that
group. Fortunately, DES doesn’t form a group, but many encryption systems do.
A problem with symmetric key
systems is that of key distribution. How do you get the key to all
who need it, securely? Major concerns such as governments can send keys via
couriers, credit-card companies and banks send PINs (personal
identification numbers) via U.S. mail. But key distribution is still a
problem for B2B (Business to Business) and C2B (Consumer to Business)
communications.
DES was designed at
IBM, with some of the algorithm’s (a Feistel network) parameters
selected with a computer to make DES as resistant as possible to differential
cryptanalysis. The NSA modified IBM’s algorithm by reducing its key length
to 56 bits (they initially wanted to reduce the key length to 48 bits from 64
bits, but later compromised at 56 bits). (Long keys would have required an
export license.) Differential cryptanalysis is ineffective against DES; however,
the short key makes it vulnerable to brute force attacks with today’s
computers. DES was replaced by 3DES, then later by AES.
AES is designed to be
much stronger than DES, and uses relatively simple math operations designed to
be efficient on modern hardware. It was designed to be resistant to different
types of cryptanalysis. There is no evidence that NSA “tempered” the design of
AES (it was selected by an open process, and AES’s designers are not even
Americans), the way they did with DES.
Recently (2009) AES
was found to have some weakness, especially the 256- and 128-bit versions.
While AES is still (2010) considered secure, it seems to be a good idea to
start searching for a new cipher.
DES and AES are block ciphers that
operate on 64-bit blocks. How longer messages are encrypted depends on the mode
(discussed earlier).
Public key
(Asymmetric) Encryption
A breakthrough was made in the
1970s. It was realized that an encryption method could have two keys,
mathematically related in such a way that you could use one to encrypt a
message and the other to decrypt it. (This is the opposite of shared key:
rather than one key and two (related) methods, public key uses two (related)
keys and a single method for both encrypting/decrypting.) Even knowing the
method and one of the keys, it is computationally infeasible for an attacker to
determine the other key!
Consider a commercial
bank’s night deposit box: nearly anyone can use any one of many copies of the
(public) key to make a deposit, but it takes a separate (private) key to
withdraw the funds the next morning.
Special methods are used to
generate a pair of keys, using large random numbers to do so. The key length
used is generally much, much longer than with shared keys.
A group of Stanford and
MIT researchers, Whitfield Diffie, Martin Hellman, and Ralph Merkle, are usually
credited with discovering public key encryption in 1975 (and in 2010 were
awarded an IEEE medal for their work). However, it was British researchers
James Ellis, Clifford Cocks, and Malcolm Williamson who actually invented this
in secret in the early 1970s, for a British intelligence agency. Their work
was only declassified in 1997, too late for public (or financial) recognition.
But they were awarded the IEEE’s 100th Milestone (a high honor), also in 2010,
to give them the credit they deserve.
What this means is that one of
the pair of keys can be made public (say posted on a website). To send a
secret message, anyone can use that key. However even if an attacker then
intercepts the encrypted message they can’t read it. It takes the other key
(the private one that I keep secret) to decrypt the message.
Plaintext + key1 = ciphertext, ciphertext
+ key2 = plaintext
The private key is usually kept in
a file that is encrypted using a shared-key system such as AES, and a
passphrase the user must remember (or keep written down in a secure location).
SSH uses public key encryption.
Public key methods
require an enormous amount of computation. In practice, most systems only use
public key encryption to send securely a large random number, known as a session
key, to the other party, at the start of a conversation. Thereafter
the shared key is used to encrypt the data passed in that session. (This is
discussed further, below.)
A protocol such as
SSH must specify the public key method used, the key lengths, and the methods
used to generate the public/private keys, to generate the shared session key,
to exchange the session key, to authenticate each party to the other, etc.
Note even if each
algorithm used in some protocol is secure (such as RC4), the way they are used
together, such as the way keys are generated, may make some confidentiality
mechanism (such as WEP) insecure.
RSA Three
mathematicians named Rivest, Shamir, and Adleman worked out a practical method
for this, formed a company (RSA, Inc.), patented the method (U.S. only), and
sold licenses until the patent expired in 2000. Their method is called RSA.
This has been refined over the years and is now an Internet standard, used for
HTTPS, SSL, SSH, etc. RSA Inc. was purchased by EMC, Inc. in 2006.
In 2013, it came to
light that RSA, Inc. had accepted millions from the NSA. It is unknown what
the money was for, but it is speculated that RSA allowed NSA some input into
the final algorithm, possibly weakening it.
A popular example of RSA is PGP
(Pretty Good Privacy), which has an interesting history; but for now all
you need to know about it is that GPG or GnuPG (GNU
Privacy Guard) is the modern version of this and is compatible.
While RSA remains
strong, increasing computing power means the key lengths must keep getting
longer each year, to provide the same level of protection. A newer way to
factor large integers is more computationally efficient than RSA methods.
Attackers can use this to break RSA keys more quickly. To keep ahead of the
bad guys, many standards that currently use (or require) RSA are considering
changing to elliptical curve cryptography (ECC), which
allows shorter keys while providing equivalent security to RSA.
Public key distribution (mostly)
solves the key distribution problem of symmetric key encryption. For two
parties to communicate securely, each can send the other (using insecure means)
their public key. (Exchanging keys securely is not as easy as it may seem!
Complex protocols for key exchange have been developed.) Public key systems
are commonly used for HTTPS, SSL/TLS, SSH, wireless communications, and other
popular protocols.
In 12/2009, some
researchers completed work on a cluster that can crack RSA using 768-bit keys,
in about 12 hours. (Building the cluster took years and requires around 5TB of
data.) 1024-bit RSA should be safe for several years more. In 10/2012,
Microsoft updated Windows to declare 1024-bit RSA keys invalid. This may lead
to problems when web browsing, using secure email, or trying to use ActiveX
controls, if any of those use 1024-bit keys.
While RSA is still considered
strong, as usual a poor implementation of it can have vulnerabilities. One
such vulnerability in a popular hardware chip that generates RSA keys was found
in 2017. The flaw allows the calculation of the private key from the public
key! [See the story in Ars
Technica.] The researchers have provided a tool you can use to
check your keys at keychest.net/roca.
SSL (secure
socket layer) protocol was originally developed by Netscape to provide CIA
security for web browser sessions. Version 1.0 was never publicly released;
version 2.0 was released in February 1995 but contained a number of security
flaws which ultimately led to SSL version 3.0, which was released in 1996. Although
well documented and popular, SSL was never documented as an RFC. (Mention
EFF’s HTTPS
Everywhere Firefox add-on.)
TLS
(transport layer security) is the IETF-blessed version of SSL. It has
been through four major versions. TLS 1.0 was first defined in RFC-2246 in
January 1999 as an upgrade to SSL Version 3.0. As stated in the RFC, “the
differences between this protocol and SSL 3.0 are not dramatic, but they are
significant enough that TLS 1.0 and SSL 3.0 do not interoperate.” TLS 1.1 was
released in April 2006 and is documented in RFC 4346. It contains several
security enhancements. TLS 1.2 (sometimes mistakenly referred to as TLS 2.0)
was released in August 2008 and is documented in RFC-5246. This
version added several improvements, including AES cipher suite for encryption.
TLS is not one protocol; rather
it is a collection of four types of security algorithms. (So are other
security protocols, such as SSH.) For each type, a choice of specific crypto algorithms
is possible. The client and server negotiate which specific algorithms to use
for each type, and other parameters. If they can’t agree, the connection
fails. Initially, the client sends a hello packet, which includes the
algorithms it will accept (and they are listed in preference order). The
server responds with a hello packet too, indicating which four protocols
it agrees to use.
The four types of algorithms are
·
Key exchange (used to generate a shared session key)
·
Authentication (using public-key methods such as RSA/PKI)
·
Encryption (symmetric, used with session key)
·
Integrity checking (a MAC is used)
(Other parameters are needed as
well, such as the order of encrypting and integrity checking.) Not all
combinations are possible. Not all algorithms or combinations included in the
suite are considered secure anymore. As a public service, the IANA mantains a list
of the cipher suite combinations currently considered secure
(although the list also shows older mechanisms and combinations now known to be
insecure, so be careful).
TLS 1.3
was finalized 8/2018, and already implemented in popular web browsers. It is a
major rewrite with many improvements: All older and vulnerable crypto has been
removed. Unlike TLS 1.2, you cannot enable RC4, MD5, or SHA-1 even if you
wanted to. Only crypto that provides forward secrecy is allowed. With fewer
choices the configuration is easier for sys admins. More of the handshake is
encrypted.
This CloudFlare
blog post is excellent and readable description of TLS 1.3.
Additional changes to the protocol
have sped up TLS protocol significantly. For example, since SSL 1.0, two
round-trip packet exchanges were required for the “handshake”. Now, only one
round-trip is needed. Also, the session key can be cached on the server for a
short while, so if the same client connects again in the near future, the first
packet of the handshake can also contain data encrypted with the old session
key. (That violates forward secrecy for that one packet, and they put
restrictions in, for example, no HTTP PUT
or other such methods that modify data are allowed in that packet.) All
following packets naturally use the new session key.
TLS 1.2 (and
older) Protocol Details (from weakdh.org):
The TLS handshake
begins with a negotiation to determine the crypto algorithms used for the
session. The client sends a list of supported cipher suites (and a random
nonce cr) within the ClientHello message, where each cipher
suite specifies a key exchange algorithm and other primitives. The server
selects a cipher suite from the client’s list and signals its selection in a ServerHello message (containing a
random nonce sr).
A commonly selected cipher
suite for key exchange is DHE. In DHE, the server is responsible for selecting
the Diffie-Hellman parameters. It chooses a group (p,g) and a random exponent b, computes gb,
and sends a ServerKeyExchange
message containing a signature over the tuple (cr,sr,p,g,gb)
using the long-term signing key from its certificate. The client verifies the
signature, choses its own random exponent a,
and responds with a ClientKeyExchange
message containing ga.
To ensure agreement on the negotiation messages, and to prevent downgrade
attacks, each party computes the TLS master secret from gab and calculates a MAC (using that master
secret) of its view of the handshake transcript. These MACs are exchanged in a
pair of Finished messages and
verified by the recipients. Thereafter, client and server start exchanging
application data, protected by an authenticated encryption scheme with session keys
also derived from gab.
One problem with DHE
is that most implementations use the same, hard-coded prime p and other parameters. This allows
pre-computation of export-grade keys (512 bits or less) for the common
parameters — a kind of rainbow table. In 2015, an attack called logjam
was shown that uses this weakness; the obvious fix was to use different
parameters, and to forbid keys shorter than 1,024 bits. But it took a while for
popular crypto libraries, used by servers and web browsers, to upgrade.
Keep in mind, as a system admin
you need to be aware which crypto methods are available, which are in use, and
which are considered secure. Different systems have different ways to
configure the crypto libraries.
Both clients and
servers use third-party libraries for TLS, and thus the server can’t offer the
client any version better than the library installed in the server. One common
library used on servers is OpenSSL. NSS (Network
Security Services) is an OSS library commonly used by clients, which
only in 2013 added TLS 1.2 support. (OpenLDAP server now uses NSS.)
Usually the sys admin can configure
a server to refuse to use certain algorithms. OpenSSL itself can list default
choices and preference ordering; Apache 2.4 and newer uses that by default. (Show
conf.d/wpollock.conf for old SSL
choice directive; there’s newer syntax now.) Use “openssl ciphers -v [ALL]” to see the default combinations,
in the preference order. (“ALL”
shows all supported combinations; on Fedora 27, there are 140 of them.) See
man page for ciphers(1) for
details.
NSS is less configurable; it ships
with few tools and no man pages. Apparently, you need to rebuild the source
code to change the default algorithms used. You can set the environment
variable NSS_HASH_ALG_SUPPORT to a semicolon-separated list of algorithms to
support, for example: NSS_HASH_ALG_SUPPORT= (See the NSS source code for a
current list and defaults. An older list can be found here.
Fundamental flaws were
discovered in SSL/TLS in 2009, “Transport Layer Security (TLS, RFC 5246 and
previous, including SSL v3 and previous) is subject to a number of serious man-in-the-middle
(MitM) attacks related to renegotiation. In general, these problems allow an
MitM to inject an arbitrary amount of chosen plaintext into the beginning of
the application protocol stream, leading to a variety of abuse possibilities.”
Successful attacks against Apache and MS IIS using HTTPS have been shown. A
newer version of TLS to address the flaw is in the works.
A JavaScript hacking
tool dubbed BEAST was demonstrated in 9/2011, which can intercept PayPal or
other secure sessions using a blockwise-adaptive chosen-plaintext attack. This
is a MitM attack, which injects plain text sent by the target’s browser into
the encrypted request stream to determine the shared key. The code can be
injected into the user’s browser through JavaScript associated with a malicious
advertisement distributed through a Web ad service, an IFRAME in a Linkjacking site, or other
scripted elements on a webpage. Using the known text blocks, BEAST uses
information collected to decrypt the target’s AES-encrypted requests, including
encrypted cookies, and then hijack the no-longer secure connection. BEAST
currently needs sessions of at least a half-hour to break cookies using keys
over 1,000 characters long.
In 2012, another attack
against HTTPS was found, when such traffic uses compression such as SPDY or
Deflate. Named CRIME,
it is useful to understand how such chosen plaintext attacks work
(a good explanation can be found on zoompf.com;
another on stackexchange.com):
If a
man-in-the-middle (MitM) attacker can observe network traffic, and manipulate
the victim’s browser to submit requests to the target site, she can, as a
result, steal the site’s cookies, and thus hijack the victim’s HTTPS session. In
the current form, the exploit uses JavaScript and needs six requests to extract
one byte of data. The use of JavaScript is not required; simple <img> tags can do the job just
as well, although with a performance penalty.
The beginning of each
web HTML request contains an authentication cookie with a secret key (which may
look something like XS8b1MWZ0QEKJtM1t+QCofRpCsT2u).
The encrypted message is combined with attacker-controlled JavaScript that,
letter by letter, performs a brute-force attack on the secret key. When it correctly
guesses the letter X as the first character of the cookie secret, the encrypted
message will appear differently than an encrypted message that uses W or Y,
even though the rest of the key is not yet cracked. Once the first character
is correctly guessed, the attack repeats the process again on the next
character in the key, and then the next, until the whole key is deduced. Once
the session cookie is decrypted, hackers can exploit it to gain unauthorized
access to the user account on the website that the session cookie is designed
to authenticate. The process only takes a few minutes.
So how does the
attack guess the encrypted key? Data compression reduces the number of bytes
contained in a file or data stream by removing redundant information. CRIME
forces a web browser to compress and encrypt requests that contain
attacker-controlled data, combined with the cookie secret. If one of the
requests produces fewer encrypted network packets, that’s an indication there is
more redundancy in the request, and so the attacker data and the secret data
have more information in common. So first send a request with a key of
AAAA...A and see if the result is smaller. Then try BAAAA...A, then CAAAA...A,
and so on. When the first letter is correct, the resulting compressed data
will be smaller.
The take-away from
this is, just because an encryption algorithm E is chosen-plaintext secure,
doesn’t mean that composing an arbitrary function C before E is
chosen-plaintext secure. While composing C after E is secure, with C before E,
all bets are off and you need to re-prove security.
IE was never susceptible
to this attack, since it doesn’t support SPDY or Deflate. Other browsers have
been patched to turn off these compression methods, until a better fix is
available.
In mid-January 2010,
AT&T wireless customers were logged into Facebook using other customers’
credentials, allowing them to deface others’ Facebook pages. The obvious
reason this occurred was the lack of HTTPS when connecting to Facebook but the
technical reason this was an issue was the AT&T’s proxy servers got
confused and send session cookies to the wrong sessions! (Google reported that
they wouldn’t have this happen to them, and they started using HTTPS for all
Gmail traffic.
Digital
Signatures A neat application of public key systems is for digital
signatures. A digital signature is an encryption of a message with
the private key.
This means anyone with the matching
public key can decrypt the message, but since nobody but the owner has access
to the private key, a successful decryption proves the messages was sent by the
owner of that pair of keys. For security, a digitally signed message is
usually further encrypted with the recipient’s public key, so only they can
read it. There are other ways to provide digital signatures, for instance DSS
(Digital Signature Standard).
Digital signatures are an excellent
way to prevent all sorts of attacks. By putting a timestamp in the message, an
old signed message can’t be sent later as “new”. This prevents a replay
attack.
An important use for
digital signatures is code signing. This is when each executable
and DLL is digitally signed (known as Authenticode on Windows). These
signatures are verified when loading the code into memory. Any virus-infected
code won’t load! Currently, Linux doesn’t require this (not even on LKMs). See
signtool(1) or bsign(1) on Ubuntu, and the DigSig kernel module, or the NSS
Signing Tool for Java applets and JavaScripts. Code signing doesn’t solve all
security issues; a user can’t easily tell whose code to trust, a signed ActiveX
control may still not be safe, using multiple signed code modules together may
cause security vulnerabilities.
Since only the sender has access to
the private key, the sender can’t later claim they never sent the message.
This is called non-repudiation. In some states, a digitally
signed message or file has the legal status of one with a holographic signature.
On June 30, 2000,
Congress enacted the Electronic Signatures in Global and National Commerce
Act(1) (“ESIGN” Act), to facilitate the use of electronic records and
signatures in interstate and foreign commerce by ensuring the validity and
legal effect of contracts entered into electronically.
Because of the importance of
keeping the private key secure, it is often stored in a file that is itself
encrypted with AES or some other symmetric key encryption method. To use the
private key, the owner must enter in a password or passphrase (on
the local system, not across a network). This way, even a virus-infected host
can’t send private keys to an attacker. (However, a human must enter the key
for each use. Even if a program such as a mail server only read the key once
(and kept a copy in RAM), you couldn’t have an unattended reboot! Often, the
key is kept in a root-owned file with mode 400, unencrypted, for convenience.)
A popular way to use
digital signatures is by using DocuSign. You upload your document
and state who should sign it. The signers get an email message, allowing them
to sign.
Elliptic-Curve
Cryptography (ECC) is the successor to RSA for public key
cryptographic technology (used for Diffie-Hellman key exchange). ECC can offer
equivalent security to RSA with substantially smaller key sizes. (See entropy
and key length below.) This makes ECC software stronger, faster, and more
efficient in use of memory and bandwidth, than RSA.
First described in 1985 by Victor
Miller (IBM) and Neil Koblitz (University of Washington), and immediately
placed in the public domain, ECC is based on finding the discrete logarithm of
a random elliptic curve, from a public base point, is computationally
infeasible. The larger the curve, the harder this becomes.
The IEEE P1363 standard group
standardized elliptic-curve cryptography in the late 1990s, including a
stringent list of security criteria for elliptic curves. NIST used the IEEE
P1363 criteria to select fifteen specific elliptic curves at five different
security levels. In 2005, the NSA issued a “Suite B” standard, recommending
the NIST elliptic curves (at two specific security levels) for all public-key
cryptography, and withdrawing previous recommendations of RSA. Some specific
types of elliptic-curve cryptography are patented, but many others (e.g., Curve25519)
are not. Sun, OpenSSL, Firefox, MS, Red Hat and others have endorsed this
newer method, making it the likely standard for the Internet 2.0.
ECC is used much like RSA: given a
user’s 32-byte secret key, Curve25519 computes the user’s 32-byte public key. Given
the user’s 32-byte secret key and another user’s 32-byte public key, Curve25519
computes a 32-byte secret shared by the two users. This secret can then be
used to authenticate and encrypt messages (usually just a symmetric key,
subsequently used) between the two users.
See Ars
Technica for a really good article on ECC.
In August 2015, the
NSA announced they no longer recommend ECC and suggested people go back to
RSA. They never said why. Note the NIST still recommends ECC. Conspiracy
theories abound about this: They broke ECC and don’t want the US to use it but
don’t want to announce the weakness; they can’t break ECC and have broken RSA
so they want everyone to go back.
Key
Exchange
Public key methods are great, but
very slow! Too slow and CPU intensive to be used in the obvious way, to
encrypt long messages and TCP/IP sessions, or to digitally sign files.
For digital signatures where the
goal isn’t privacy of the message, the usual approach is to compute a message
digest, which is a cryptographically secure form of checksum (MD5
and SHA1 are popular examples). This digest is a comparatively
small number and only that is digitally signed (encrypted with a private key).
This encrypted digest is appended to the message. At the receiving end, the
same digest is computed from the unencrypted message, the encrypted digest is
decrypted, and the two are compared. This use of a digital signature
ensures message integrity.
To exchange files or messages
confidentially, symmetric key encryption is much faster. The common solution
is to use public key methods to securely exchange a random huge number between
two parties. This value is used as the shared key (called the session
key) for a symmetric encryption method. Unfortunately the obvious way
to exchange these keys and agree on a session key (for example, a web browser
generates the session key and encrypts it with the server’s public key) is
subject to several types of attacks. To provide PFS (perfect forward
secrecy), both parties must contribute to the session key.
Diffie, Hellman, and Merkle
solved the problem of key exchange in the 1970s. Diffie-Hellman key
exchange is used today to establish a confidential communication session with
SSH, SSL/TLS and other systems. (Show D-H Key Exchange resource.) This
scheme can be explained this way:
1. Alice generates
a session key for use in traditional symmetric encryption (such as AES). This
session key is put into a strongbox which Alice locks with her (unshared) key.
The locked box is then sent to Bob.
2. Bob receives the
locked box, but can’t open it since he doesn’t have Alice’s key. (Neither can
any eavesdropper.) Bob adds another lock to the box, using his (unshared key),
and sends the doubly locked box back to Alice.
3. Alice receives
the locked box, and using her key, removes her lock. The box is still securely
locked with Bob’s lock. The box is sent back to Bob.
4. Bob uses his key
to remove his lock. Finally, Bob can read the contents of the box (the session
key).
Of course, it really
doesn’t work that simply: D-H
key exchange has two parties jointly exponentiate a generator with
random numbers (raise a number to some randomly chosen power), in such a way
that an eavesdropper cannot feasibly determine what the resultant value used to
produce a shared key is. In this way, both parties have input (their randomly
chosen exponent) to the resulting session key.
There are other key exchange
protocols in use today as well (IPSEC uses IKE, Internet Key
Exchange protocol), but those protocols (currently) don’t support perfect
forward secrecy. (An attack (2015) called logjam causes web and mail
servers to down-grade the DH and DHE key-length to a very insecure 512 bits.
This is because of U.S. crypto export regulations of the 1990s forced that
keylength to be available. Make sure your servers do not offer the cipher
suite “DHE_EXPORT”!)
Perfect forward
secrecy/security (or PFS) is the property that ensures that a session
key, derived from a set of public and private keys, will not be compromised if
one of the private keys is compromised in the future. With PFS, the compromise
of a single key will permit access to only data protected by that single key. For
PFS to exist, the key used to protect transmission of data must not be
used to derive any additional keys (the session keys). In essence, PFS has a
new session key generated periodically.
Only certain key
exchange algorithms provide PFS, such as EDH/DHE and EECDH/ECDHE. (The
original DH method essentially reuse session keys.) These are variants of
Diffie-Hellman; the extra “E”
means ephemeral, meaning different session keys every time. EECDH/ECDHE
uses elliptical curve, ephemeral Diffie-Hellman; this is the best algorithm
currently (2014) known and is immune to logjam and related attacks.
While a number of
algorithms provide PFS, OpenSSL and Apache aren’t generally configured to use
PFS (2015). (NSS, the crypto library powering most web browsers, doesn’t
currently (2015) support those algorithms.) This may be because there is a
performance hit using these algorithms, but more likely, it is because commonly
used web browsers don’t support these methods.
PFS is very
important, as the recent (3/2014) Heartbleed security flaw (CVE-2014-0160)
demonstrated clearly. This was a one-line coding mistake by a volunteer to the
OpenSSL project, that wasn’t caught in code review. OpenSSL is used heavily in
OSes and on the Internet. This attack compromises the private keys used, yet
that would be less serious if it only lead to the disclosure of a single
session’s data.
Good recommendations
for configuring Apache, NginX, and OpenSSL can be found at community.qualys.com/../configuring-apache-nginx-and-openssl-for-forward-secrecy
and wiki.mozilla.org/Security/Server_Side_TLS.
See also this good explanation of TLS
and PFS.
One problem
with this method is that the two parties must exchange several messages prior
to sending the encrypted message. Thus it is not suitable for encrypting (say)
email. Other methods, such as RSA, allow Alice to send an encrypted message to
Bob if she knows Bob’s public key; no exchange is needed. Another problem is
that there is no way to authenticate the person at the other end of the
exchange; Alice can’t be certain Bob is receiving the session key. Key
exchange to generate a session key is used together with certificates and other
algorithms, in a security scheme (such as SSH) to overcome these issues.
Secret
Sharing
Shamir’s Secret
Sharing is a form of secret sharing, where a secret is divided into parts. Each
participant is given one (unique) part. Depending on how you use this, either
all of the parts or just a given number of them are needed in order to
reconstruct the secret. The secret is usually a key that was used to encrypt
data. For example, Symantec has 16 employees authorized to modify PKI (SSL)
certificates. The master key to unlock the database is split into 16 parts.
It takes any three of them to obtain the key and thus unlock the data. (From Ars
Technica.) This is easy to use: yum
install ssss; man ssss.
Cryptanalysis
Traditional crypto was all too easy
to break (show crypto quote puzzle copycreate.com resource;
requires “flash-plugin” from Adobe, not “gnash-plugin”). Cryptanalysis
studies the encrypted text and looks for patterns. For example the most common
letter is “e” in English. A word such as “WXY’Z” almost certainly ends in a
‘t’ or an ‘s’. By looking for such statistical patterns, and doing some
guessing about the plaintext, the method used to encrypt the message can be
guessed with some accuracy, and the keys discovered in a variety of ways.
Early ciphers such as a Caesar cipher suffered from this problem.
During WWII (and at
other times no doubt), cryptanalysis was the most secret wartime technology
available. Rather than let on to the enemy that their keys were compromised,
false reasons were given why a bomber just happened to target some convoy. In
some cases, enemy attacks were allowed to succeed without warning personnel, in
order to convince the enemy they didn’t need to change their keys yet.
(Changing keys was much harder than you might think; code books had to be
hand-delivered to officers in the field.)
Of course, by the end
of the war, everyone was changing keys as often as possible!
A weak but secret method offers
security against only the most casual attackers. Early word processors used to
XOR the document with the password repeatedly:
passwordpasswordpassword... XOR plaintext (show bin/xor
on YborStudent). By XORing the encrypted document with itself, the password
drops out; you have the text XORed with itself (the autokey cipher), and
that is usually easy to
break. Also, often you can guess a standard header such as the “From ” or “Date: ” header in an email. By XORing
the encrypted email with the standard header, the password is revealed.
This lesson is often
phrased as security through obscurity is no security at all. Unfortunately,
many companies fail to heed this advice and release weak security products.
Trivial security can be useful for certain purposes (e.g., rot13), but not when
touted as highly secure.
Later, stronger crypto was used as
the math was better understood. These methods first compress the message to
remove redundancy, then encrypt the result. Keys are very large numbers,
hundreds of digits long. Such keys are usually stored in a password protected file
so the user can get to it more easily.
Other things being
equal, long keys are more secure than short ones since an attacker must
guess (on average) many more keys, too many to be practical. However, key
guessing isn’t the only way to attack encrypted communications, and long keys
may provide a false sense of security.
During WWII Germans had
strong encryption methods, but the operatives in the fields used them so badly,
often using easy to guess keys. The strongest encryption methods are worse
than useless if used incorrectly!
Encryption done
correctly can be annoying. In August 2010, Ars Technica reports that Saudi
Arabia has become the second country inside of a week to block access to RIM’s
(Research in Motion) BlackBerry devices on grounds of national security.
Apparently the local wireless companies were unable to bring BlackBerry devices
(and their encrypted e-mail) into compliance with kingdom rules. The Saudi
government laid blame for the situation on the providers and on RIM, which is
famously protective of customer messages.
The encryption used
by RIM was good enough to thwart the security service in nearby United Arab
Emirates, which earlier also blocked BlackBerry service until it could get
access to people’s messages.
Qu: What do you think
it means that other cell phones weren’t banned?
Unicity
Distance
The unicity
distance measures the amount of ciphertext required so there is only
one reasonable plaintext message. If the text is shorter than this, the
cryptanalyst can’t be certain if they cracked the message or not. (For
example, if you intercept a single letter message “G”, and you crack the
encryption and get “P”, you won’t know if that is right or not.) If the
message is long enough, the odds of a random key producing a realistic message
are nearly zero. The unicity distance says how long is long enough.
The unicity distance
depends on the type of data and the key length (k/r, where k
is the key length in bits, and r is the redundancy factor in the data).
For 128-bit key ciphers used today, for English text (an email message body or
an office document, for example), the unicity distance is only about 128/6.8 =
19 bytes. If the data is compressed first, or is non-text, it has less redundancy
and thus a higher unicity distance (maybe twice as long). The moral is, it
doesn’t take a lot of data to be able to recognize a successful cryptanalysis.
Checksums,
CRCs, Message Digests, and MACs
A checksum
(or just sum) is a simple way to check for errors. The bytes (or
words) of some file are added together, ignoring any overflow. The result is a
checksum. Checksums are also used to add a check digit to numbers, to
allow simple detection of valid numbers from (say) random numbers. This is one
of the protections for U.S. currency; most serial numbers won’t be valid.
There are many simple
checksum algorithms in use (see Wikipedia for check-digit),
including mod-10 (a.k.a. Luhn) which is used for credit cards, GS1 used for
ISBN numbers, and other algorithms used for UPC (bar) codes, U.S. currency
serial numbers, etc. (Mod-10 was designed to detect transposed digits.)
Describe casting
out nines method: sum all the digits in a set of numbers, repeating
until a single digit results. Repeat procedure on the answer. If the check
digit is different, the addition was wrong.
A CRC (cyclic
redundancy check) is an improved version of a checksum: the data is considered
a very large single number, which is divided by a special value. The remainder
becomes the CRC. Unlike a checksum, a CRC will detect transposed values and
many other types of problems that would get past a checksum. (This is used for
the FCS in Ethernet, and for the cksum
POSIX utility.)
Neither of these
methods is useful for security applications. It is not difficult for an
attacker to cause a modified file to have the same checksum or CRC as the
original. (These methods are great for detecting data corrupted by noise, but
not from an attacker.) So, how can you protect the integrity of your data even
from attackers? You need to understand a few concepts to see how.
A hash function
is any well-defined procedure or mathematical function that converts a possibly
large amount of data (a message) into a small datum (the hash, hash
value, or hash code). The hash is usually a single integer with
the property that any change to the message will change the hash. (A hash is
often used to speed database lookups, not just for security.)
A one-way
function is a math function that is easy to compute in one way, but the
inverse is difficult. For example, multiplying two numbers is easy, but
factoring a large number into its factors is hard. (This is the math behind
RSA).
A trapdoor
function is a one-way function that becomes easy to solve in the
inverse direction too, with the addition of some data. That additional data is
used as a decryption key. Such functions are used for encryption and
decryption; a regular one-way function is used for message digests.
A cryptographic
hash is a one-way function that supposedly can’t be easily reversed (i.e.,
you can’t find the original message just given the hash), can’t be easily faked
(i.e., you can’t easily change the message without also changing the hash), and
can’t be easily spoofed (i.e., you can’t easily find a second message with the
same hash as another message). Some better-known cryptographic hash functions
include MD5 and SHA-1.
There are compiled
lists of hash values for known (common) files, both “good” files (so you can
validate your copy of some standard DLL) and “bad” files (so you can check for malware
or child porn without viewing the files. Many vendors keep such lists for
(some) versions of (some) their software, including Microsoft, Sun, etc.
Hashkeeper (www.justice.gov/ndic/domex/hashkeeper.htm)
was created by the U.S. National Drug Intelligence Center (NDIC). It uses the
MD5 file signature algorithm to establish unique numeric identifiers (hash
values) for known files and compares those known hash values against the hash
values of files such as those on a seized computer system. HashKeeper was
available, free-of-charge, to law enforcement, military and other government
agencies throughout the world. It was available to the public by sending a
Freedom of Information Act request to NDIC. However, the project was
discontinued because “... the state of forensic software has surpassed the need
for HashKeeper, therefore NDIC no longer maintains or distributes HashKeeper”.
The National
Software Reference Library (NSRL at www.nsrl.nist.gov) is designed to
collect software from various sources and incorporate file profiles computed
from this software into a Reference Data Set (RDS) of information. The RDS is
a collection of digital signatures (both MD5 and SHA-1 hashes) of known,
traceable software applications. There are application hash values in the hash
set that may be considered malicious, i.e. steganography tools and hacking
scripts. There are no hash values of illicit data, i.e. child abuse images.
A [message]
digest and [secure] hash [code]
(a.k.a. “MDs”) is usually used instead of checksum or CRC for security
applications. Also called a fingerprint, file signature, or message
integrity code (MIC). These have the same overall purpose as a checksum or
CRC but the algorithms used makes it very difficult for an attacker to predict
what changes are needed to cause a particular result.
In 2004, MD5 was shown
to have some theoretical weaknesses. While still considered safe at the time,
in 2008 a more severe weakness was discovered. It is possible for virus
writers to craft a virus infected file to have the same MD5 sum as the real
file! See http://www.phreedom.org/research/rogue-ca/ for more information.
Just how broken is
the MD5 hashing algorithm? A software engineer replicated the type of
attack used in 2012 to hijack Microsoft’s Windows Update mechanism. Nathaniel
McHugh ran open source software known as HashClash to modify two separate
images that generate precisely the same MD5 hash, e06723d4961a0a3f950e7786f3766338.
This hash collision took just 10 hours and cost only 65 cents plus tax
to complete using a GPU instance on Amazon Web Service. (Ars
Technica, 11/6/2014)
How hard is it to
crack a password that was hashed with MD5? Try this to see:
$ printf foobar |md5sum
3858f62230ac3c915f300c664312c63f *-
$ links https://www.google.com.au/search?q=3858f62230ac3c915f300c664312c63f
&ie=UTF-8
(How long did that
take?)
The NIST phased out
acceptance of MD5 and SHA-1 in 2010. Instead it recommends using to SHA2 or
another more secure algorithm (see U.S. Gov. standard FIPS-180-2). Many new
algorithms were considered for “SHA3”. The dozens of algorithms submitted to
NIST for this open competition (started in 2007) was down to 14 finalists in
2010. In 12/2010 NIST selected five finalists, including BLAKE (devised
by a team led by Jean-Philippe Aumasson of the Swiss company Nagravision, and Skein,
which is the work of computer security expert and blogger Bruce Schneier) and
the Keccak algorithm (from a team led by STMicroelectronics’ Guido
Bertoni, and which uses a novel idea called sponge hash construction to produce
a final string of 1s and 0s).
On 10/4/2012, NIST
picked the winner; Keccak (pronounced “catch-ack”) is the new SHA3
algorithm. To turn it into a standard, it must be rephrased in the proper
language, and some tweaks will be considered. (As of 12/2014, this hasn’t been
completed.)
For a list of currently
approved MICs (and other ciphers and related algorithms), see secure hashing
at csrc.nist.gov/groups/ST/toolkit.
MACs (message
authentication code) differ from MDs in that MACs also use a shared key
to compute the digest; both the sender and receiver must share this key to
generate (sender) and validate (receiver) the MAC. A MAC that uses some
hashing algorithm (usually MD5) is called an HMAC. MACs are useful for
authentication and integrity: When A sends B a message, B can compute the MAC
using the secret key and ensure it was sent by A, and wasn’t altered. MACs can
also be used to protect data stored in a DB. A stores the MAC with the data;
when A later retrieves the data, A can be certain the data wasn’t altered since
it was stored.
There are three types
of attacks on hashing primitives: finding a message from a given hash (preimage), finding a message with the same hash as
another message (second preimage), and finding two messages with the same hash
(collision). Depending on the use in a crypto system, protection against one
or two of these attacks may not be important.
HMAC-MD5 is still
used, for example with IPsec, but is slow to compute and not as secure as once
thought (MD5 being weaker). There are ways to create MACs using different
hashing algorithms or even using encryption algorithms to generate a hash.
HMAC-AES and GMAC are becoming used; GMAC can be computed using parallel CPUs
making it very fast.
(Comparing the security of these
methods is discussed below.)
Consider what YouTube
has in a URL: .../watch?v=pgyuYHXqlO4
What is “pgyuYHXqlO4”? This can be determined with a little math. Each of the
11 characters has 62 possible values (a-z, A-Z, 0-9), so there are 62^11
possible strings. How unique are they? The decimal equivalent is about 5.2x10^19.
To find out what that means let’s see how big this number is on a computer. We
do this by finding the log2 of 5.2x10^19, which is 66 bits. This is
bigger than a long. It’s probably a 64 bit (or smaller) hash of something,
with some extra bits in front so the lookup can easily be handled by multiple hosts
in a cluster (each host is identified by that prefix number).
Trust:
Web of Trust and PKI (PKI is discussed in detail, later in
the course)
A further problem is one of trust:
How do you know that the email you got from me, containing my key, is really
from me and not some impostor? This problem is hard!
One insight is that a trusted third
party can digitally sign my public key, before I publish it. A user wanting
Wayne Pollock’s real public key can find it on the Internet, verify the trusted
third party’s signature, and thus be assured that this key is really Wayne
Pollock’s. Of course, you need to “know” the third party’s public key, and you
must “know” that key really belongs to the trusted third party.
Key signing leads to the concept of
a certificate. A person’s (or website’s) certificate is a document
containing their identifying information (name, address) and their public key.
That in turn is combined with the issuer’s (the trusted third party) identity,
the period of validity of the certificate, and (usually) a URL where the
issuer’s public key can be found. Then the certificate is digitally signed.
Of course, unless you know the issuer’s public key is genuine you still have
problems.
The most common type of certificate
in use today is the X.509 compatible one. This standard specified what
data is required (and what is optional, the format of the certificate, and
other information.
X.509 certificates are encoded
when stored in a file, in a variety of formats (.pem,
.crt, ...). Your computer has
one (or more) databases, or stores, of imported certificates.
The GPG/PGP solution is called the web
of trust. The idea is to have your public key signed by as many people
as possible. Then if someone else wants to use my key, they only need to
personally trust any one of the signers. If they don’t know any of them, too
bad! Some popular keys are signed a thousand times, making key exchange
difficult.
The U.S. government solution was
(once) that they would be the trusted third party. Anyone could have them
generate a public key signed by them, who would hold all keys including the
private ones in escrow, an authoritative database of keys (so they could
wiretap). This scheme did not prove popular.
A third solution is used today, a
global public key infrastructure (PKI). This scheme has certificate
authorities (CAs) that everyone knows the public keys for, and
everyone trusts. PKI defines different types of certificates, such as personal
and website certificates. (You can’t use the wrong type). PKI includes mechanisms
to allow you or the issuer to revoke a certificate (before its
expiration date).
A hierarchy of CAs is possible,
with one CA signing the CA certificate on another. Ultimately, you only need
to trust a few root CAs.
To use PKI, you generate you own
pair of keys, and create a key signing request (KSR)
file. That document contains your information plus your public key. You then
submit the KSR to your CA of choice, who typically will charge money. The CA
is then supposed to do a check to confirm your identity, and generates the
certificate for you.
The certificates for some
well-known root CAs are included in most web browsers (show).
Also, anyone can become a CA, only if you do, your CA certificate isn’t signed
by another CA already part of PKI; so it won’t (or shouldn’t) be trusted by the
world at large. Still, organizations such as HCC could become their own CA, to
issue certificates to students, to enable secure emails with faculty and staff,
to allow secure registration, etc.
Many CAs are
vulnerable to attack. In addition, if you have the resources of a large
government, you can afford to create forgeries of certificates that appear to
have valid signatures! The Flame
malware apparently did that, spoofing a valid Microsoft Windows
Update site, and used that to infect computers that used Windows Update.
In response, Microsoft
has also announced that RSA keys of less than 1,024 bits in length will no
longer be accepted by Windows after installing the August 2012 patches. This
affects the SSL certificates of web sites: browsers will respond with an error
message when a connection attempt to an affected site is made. Also, users
will no longer be able to install Active X controls and applications that were
signed using short keys.
To become your own CA, you generate
a pair of keys, create a CA signing request, and then self-sign the
certificate (I trust myself.) Now you have a valid (but untrusted) CA certificate,
which can in turn be used to sign personal and website certificates.
What CA
certificates are included with web browsers (and other software)? A
certification authority (CA) must meet standards set by the American Institute
of Certified Public Accountants (AICPA), the Canadian Institute of Chartered
Accountants (CICA) or the European Telecommunications Standards Institute
(ETSI). The AICPA/CICA standard is called “WebTrust for CAs”. The ETSI
standard is called “ETSI TS 101456 Policy requirements for certification
authorities issuing qualified certificates”.
These are audit
schemes that impose requirements on the CA’s systems, personnel, and
procedures. But, they do not currently (2012) prescribe the specific methods
used by a CA to validate the identifying information that is to be included in
the certificate.
PKI has stalled. The various
companies involved can’t seem to move forward. What we have now is a few
companies such as VeriSign (now owned by Symantec), Thawte, Equifax, and others
whose CA certificate is well-known enough to be considered trusted.
PKI
Alternatives
Convergence Given
all the problems with PKI and certificate authorities (CAs), some work on a
replacement scheme has been done. The current (2013) contender for CA
replacement is called Convergence. Essentially, this replaces
CAs selected by webmasters, with notaries selected by the end user. A
problem is, how can notaries make money? You can read the Convergence
Wikipedia article, and download a Firefox add-on from convergence.io.
Pairing-based
Crypto In 1984, Shamir imagined a public-key encryption scheme
where any publicly-known string (e.g. someone’s email address) could be used as
a public key. In this scheme, the corresponding private key is delivered to
the proper owner of this string (e.g. the recipient of the email address) by a
trusted private key generator. This key generator must verify the user’s
identity before delivering a private key, of course, though this verification
is essentially the same as that required for issuing a certificate in a typical
Public Key Infrastructure (PKI). Thus, an Identity-Based Encryption Scheme
enables the deployment of a public-key cryptosystem without the prior setup of
a PKI: a user proves his identity in a lazy way, only once he needs his private
key to decrypt a message sent to him.
In 2001, Boneh and Franklin devised
the first practical implementation of an Identity-Based Encryption scheme.
Their approach uses bilinear maps [pairings].
Pairings were first
introduced in cryptography as a tool to attack the discrete-log problem on
certain elliptic curves. Pairing is a mapping of numbers from one group
(mathematical system) to another, simpler one. The solving (verifying) of
equivalent keys in the simpler group can be 1,000 or more times faster than
trying to crack the keys in the original group. There are several well-known
pairings available.
Pairings have since found other
applications in the construction of cryptographic systems. Many problems can
only be solved using pairings, such as collusion-resistant broadcast encryption
(and traitor tracing with short keys), 3-way Diffie-Hellman, and short
signatures.
Since PKI
certificates generally rely on MD5 or SHA-1, it has become possible to spoof a
site even when using HTTPS. It is hoped that the X.509 certificates used for
PKI will soon migrate to SHA2 or SHA3. Update: This has happened; as
of 1/2016 CA will no longer be allowed to issue SHA-1 (or MD5) based certificates.
It is expected that browsers will soon stop accepting such certificates as
well.
On 3/15/2011, an
HTTPS/TLS Certificate Authority (CA) was tricked into issuing fraudulent
certificates. This posed a dire risk to Internet security. The certificate in
question used to sign other certificates fraudulently was owned by New
Jersey-based Comodo, one of the largest CAs on the web. Comodo has now
published a statement about the improperly issued certs, which were for
extremely high-value domains including google.com, login.yahoo.com and
addons.mozilla.org. Comodo said that the attack came primarily from Iranian IP
addresses, and that one of the fraudulent login.yahoo.com certs was briefly
deployed on a webserver in Iran. (See the full
story on the EFF Blog.) Japanese-owned GlobalSign CA was similarly
hacked in 2010.
In July 2011, someone
launched a man-in-the-middle (MitM) attack against some 300,000 Iranian Google
users, silently intercepting everything from email to search results and
possibly putting Iranian activists in danger. This attack was active for two
months before being discovered. It was reportedly caught by a user running the
Google Chrome browser in Iran who noticed a warning produced by the “public key
pinning” feature which Google introduced in May 2011. The attacker used a
fraudulent SSL certificate issued by DigiNotar, a Dutch certificate authority
that should not issue certificates for Google. Apparently, they didn’t take
security seriously enough and were hacked in June. The discovery of the Google
attack prompted a round of updates to web browsers and other software, removing
DigiNotar’s “trusted” CA status.
Apparently, no banks or
payment service websites were targeted. The hacker seems much more interested
in harvesting personal data from e-mail services, social networks, credit
bureaus, blogging sites and anonymity services. The most likely purpose was
espionage or political gain.
You can use a Firefox
add-on Certificate Patrol that will warn you whenever your browser
accepts a new or changed certificate. You can also make sure your Internet
software that uses certificates, enables OCSP
(in Firefox since v3, this is on by default; but you can look in about:config).
Steganography
While cryptography can protect the
content of a message, it can’t hide the fact that a message was sent (and on
the Internet, some further information is available in the packet headers).
Sometimes the fact that the U.S. president is sending messages to the premier
of Russia is too much information to let out. In military terms, sending many
messages to someone or someplace can let the enemy know their communications
has been tapped (passive wiretapping, or man-in-the-middle) or something
significant will soon be occurring. (Traffic analysis or signal
intelligence, a.k.a. SIGINT.)
To prevent such consequences, even
the fact that a message was sent must be kept confidential. Steganography
is the art of concealing information, typically messages, so nobody even
suspects a message was sent. (Literally, it means concealed writing.)
Often other techniques are used too, such as cover stories and
fake messages. (Coca-Cola likely does this to prevent anyone from learning the
formula for Coke, by studying shipping orders from their suppliers over time.)
Illicit uses of steganography
include smuggling (e.g., the plans for a new cell phone), terrorist
communications (e.g., the details of a bomb attack on a commuter rail line),
and child pornography.
IDG
News Service - By Jennifer Baker December 12, 2011
The European Union
announced plans to distribute software to help human rights activists and
dissidents in authoritarian regimes circumvent censorship. The “No Disconnect
Strategy” will provide support to Internet users, bloggers, and cyberactivists,
living in countries with poor track records on human rights. The so-called Internet
survival packs would include currently available technology as well as
potential new software aimed specifically at allowing activists to use the
Internet to get their message across, while at the same time remaining safe
from persecution.
Historically, steganography has
been common since at least 500 B.C.E., when a slave had a message tattooed on
his head, and by the time he arrived at his destination, his hair had regrown.
The slave carried an innocuous message but the real message instigated an
Ionian revolt against the Persians that lasted 50 years. Other forms of
steganography include when Demaratus sent a warning about a forthcoming attack
to Greece, by writing it directly on the wooden backing of a wax tablet before
applying its beeswax surface. (Wax tablets were in common use then as reusable
writing surfaces, sometimes used for shorthand.)
Steganography has other uses as
well. By concealing some information in a document, you will be able to show
that someone copied it. This was done with logarithm and other tables of data
(usually, by putting deliberate errors in the least significant digit of
certain entries). More modern examples include fake encyclopedia entries, or a
fake addition to some real entry. This technique was recently used by Google
to determine that Bing was “stealing” some of its search results.
Examples that are more modern
include:
·
messages written in Morse code on knitting yarn and then knitted
into a piece of clothing worn by a courier; messages written on the back of
postage stamps;
·
microdots (pages of text or images photographically reduces to
the size of a period, and then placed on a period in some message, or inserted
inside a postcode (between layers of the paper);
·
all sorts of invisible inks (e.g., writing a message with vinegar
on the shell of an egg causes the message to show on the hard-boiled egg
inside)
·
watermarking (e.g., to trace press leaks the British PM Margaret
Thatcher had word processors modified to encode the users’ IDs in the spacing
between words in justified paragraphs);
·
digital (or network) steganography, when messages are concealed
in unused IP header fields, in the palette of GIF or JPEG images, or in
specially crafted “noise” or “dropped” UDP packets used in VoIP such as Skype.
When a suspected
al-Qaeda member was arrested in Berlin in May of 2011, he was found with a
memory card with a password-protected folder—and the files within it were
hidden. But, as the German newspaper Die Zeit reports, computer
forensics experts from the German Federal Criminal Police (BKA) claim to have
eventually uncovered its contents—what appeared to be a pornographic video
called “KickAss”. Within that video, they discovered 141 separate text files,
containing what officials claim are documents detailing al-Qaeda operations and
plans for future operations—among them, three entitled “Future Works”, “Lessons
Learned”, and “Report on Operations”. (Ars Technica 5-2-12)
With a bit of effort, many digital
covert channels can be rendered unusable. For example, FreeBSD includes
“packet scrubbing” in its network code that zeroes all unused bits in an IP
packet. Similar scrubbing can be used to cleanse GIF or other file types of
any unused fields that could hold secret information.
Georgia Tech
researchers have developed a tool called Collage that will allow Internet
dissidents to insert hidden messages into Twitter posts and Flickr images in
order to circumvent the censorship measures imposed by oppressive governments.
Qu: Should
steganography be banned? Steganography is one method that was used by
the Russian spy ring that was detected operating within the United States in
2010. It is also a favorite tool of terrorists. It has been banned in some
places (not the U.S. though). Many feel that banning its use would only
encourage use by criminals while denying use by legitimate people. A common
argument is that technology is neither good nor bad; only its uses. (I.e., guns
don’t kill, people kill.)
Garage
Door Openers
(From
arstechnica.com/tech-policy/news/2009/12/what-is-drm-doing-in-my-garage.ars,
12/17/2009)
Early designs for Garage Door
Openers (GDOs) were simple: a remote opener would transmit an RF signal and the
receiver would open the door. This scheme is vulnerable to someone nearby
recording the signal and using it later (a replay attack called code
grabbing in this case). However not one case of code grabbing has ever
been reported (2009). But using a fixed code does have problems: pranksters
can drive by broadcasting a signal and hope it operates someone’s GDO. Another
problem is that low-flying aircraft send RF signals that confuse GDOs and open
the doors.
Chamberlain (large U.S. maker of
GDOs) now uses a two part rolling code called “Security+”. The remote
sends an ID signal and a security code. After each open the code changes
(think pseudorandom number generator sequence). This scheme was defeated by
Canadian company Skylink, who sells cheap replacement remotes. By analyzing
Security+ they found a weakness: The Skylink universal remote opens
Chamberlain garage doors by sending out the correct device identification code
and then three signals, none of which have any connection to the expected
security code. The first signal, because it is incorrect, is ignored by the
opener. The second signal is also an incorrect code, but coming so close to
the first, it triggers to opener to look for a third security code to follow
milliseconds later, one which differs from the second code by a value of three.
If this happens, the opener triggers its own “resynchronization” sequence,
resets the code windows it has been using, and (crucially) opens the garage
door.
(An interesting side note is that
Chamberlain tried to sue Skylink for violated the DMCA. They were apparently laughed
out of court.)
Military
Drones Use Less Encryption Than Commercial DVDs
(From arstechnica.com/tech-policy/news/2009/12/predator-drones-use-less-encryption-than-your-tv.ars
12/17/2009)
Militants there have been
intercepting U.S. Predator drone video feeds using laptops and a $30 piece of
Russian software. The Wall Street Journal reports (December 18, 2009):
Insurgents Hack U.S. Drones; $26 Software Is Used to Breach Key Weapons in Iraq.
The military didn’t bother to encrypt the video feed!
Of course this is negligent, but
keep in mind these drones rarely fly over our own positions, only the enemy’s.
And they already know what they’re doing, so the problem is really only in
alerting the enemy of the surveillance. But of course that makes the whole
program much less effective.
(“It’s not a problem,” say leading
experts, “we’ll just put an anti-pirating warning on the video and we’re sure
they’ll be so scared that they will instantly stop the interception. Who’s not
terrified of the DCMA? If they try to illegally download video the RIAA will
sue them!” :-)
Lecture
6 — OpenID and OAuth (single sign-on across entire Internet)
Identity
Systems
There are several identity schemes
being developed, none widely supported yet. Several of these schemes use SAML
(the OASIS Security Assertion Markup Language). Cat Okita defines identity
(“(digital) Identity 2.0”, ;login: (Usenix) V32#5 Oct. 2007, pp. 13–20) as:
1. Verifiable
– My statements/assertions about my identity can be verified.
2. Minimal –
Only tell others the least they need to know to verify my identity. This helps
preserve privacy.
3. Unlinkable
– The different parties I’ve proven my identity to cannot link together the
information each has about me, to get around the minimal requirement.
4. Usable –
The identity system must be useable by average persons, or it is useless.
These are based on Kim Cameron (of
Microsoft) Laws of Identity (www.identityblog.com/?p=352),
which were restated by Ann Cavoukian (www.ipc.on.ca/images/Resources/up-7laws_whitepaper.pdf) as: (1) Personal control and
consent, (2) Minimal disclosure, (3) Need to know access only (justifiable
parties), (4) Protection and accountability (directed identity), (5)
Minimal surveillance, (6) Understandable by (average) humans, and (7)
Consistent experience. The major schemes today include:
·
Microsoft CardSpace (msdn.microsoft.com/en-us/library/aa480189.aspx)
– Not unlinkable.
·
Kantara Initiative (KantaraInitiative.org),
formerly the Liberty Alliance (www.projectliberty.org)
– Verifiable but not currently minimal or unlinkable. Uses SAML.
·
OpenID (openid.net) – Not verifiable or
unlinkable. Used by Web 2.0.
·
OAuth (oauth.net)
- Supported by Facebook and other popular sites. Not unlinkable.
·
Shibboleth (shibboleth.internet2.edu)
and Pubcookie (pubcookie.org)
– Not unlinkable, uses SAML, common in academia.
·
FreeIPA (FreeIPA.org) is supported by Red Hat (and
Linux in general) for single sign-on. It is integrated into SSSD.
·
Persona (Persona.org) is Mozilla’s
re-worked BrowserID system. It is notable for using public-key and X.509
certificate to prove your ownership of some email address, generated quick as
needed. (See this
overview.)
Identity
Management and Single Sign-on
The ability to manage multiple user
identities is a key technology of modern, secure systems. Identity management
(“IdM”) means managing users and roles, their attributes and authority, and
authentication data. A single database is used, just as for single sign-on
(often LDAP). IdM systems are designed to support AAA (especially
accountability and auditing requirements), and to support compliance with
various laws and regulations. This is known as governance, risk, and
compliance (GRC). (See the Open Group’s governance framework,
which is also an ISO standard.)
IdM is a marketing term more than a
technical one, and as such doesn’t have a firm definition (Hatchi-ID.com
has a good definition). In general, any IdM must support:
·
Globally unique (to the organization) IDs that will work on any
system (e.g., Windows, Mac, Chrome, *nix),
·
the ability to create, modify, and delete user accounts,
·
an easy to use user interface (a secure web interface works
well),
·
the ability to manage and report on user accounts, such as the
ability to see all users with certain privileges, or all the privileges of a
given user, and
·
automatic processing, such as password expiration and resetting
(often, via email; see netid.hccfl.edu for example), automatic approvals prior
to granting of access, and automatic processing of onboarding and termination
of employees.
There are many commercial IdM
systems, including from Oracle, BMC, and many others. (See the Sun
Buyers Guide to Identity Management paper.)
All IdMs support single
sign-on, or SSO (or ESSO for Enterprise SSO). In an SSO system,
not only is there a single database for accounts, but logging in to any system in
the organization provides credentials so a user doesn’t need to sign in to each
system. (The credentials last only to the end of the current session.) This
is accomplished by setting up trust relationships. Kerberos is often used for
SSO, but there are many more polished SSO products that can be purchased.
OpenID
OpenID (openid.net) is an attempt to solve the
problem of having (and maintaining) multiple accounts when using the Internet,
by providing a single authentication service (SSO, but not just for any one
organization) for a user. The idea is that you only need a username and
password on your chosen OpenID server. Other websites will trust the OpenID
server to say if you are you or an impostor.
When a user wants to log in to any
web site, instead of submitting a username and password the user submits an
OpenID URL that he owns. This URL points to the user’s OpenID authentication
server. The web site uses this URL to find the user’s authentication server
and asks it, “This user claims he owns this URL. The URL says you are in
charge of authenticating this fact, so tell me, can he access my site?”
The authentication server then
prompts the user to log in using the IP address and port number of your already
open web browser window (to the “store”), and will then ask the user whether he
wishes to be authenticated to the external site. If the user confirms that,
yes she does, then the authentication server will notify the external site that
the user is authenticated. Authentication servers such as RADIUS aren’t
designed for such Internet single sign-on, so OpenID usually requires some
non-standard authentication server to be deployed.
OpenID is becoming popular (2014).
It is used by several major players such as Google, Facebook, and Yahoo
(announced but not yet deployed, 3/2014). The reason is easy to see: companies
that offer such services are all in the web advertising field; knowing what
people are doing on competitor’s sites gives them valuable data.
OAuth
A promising protocol that is
catching on (it’s supported by Facebook, Twitter, Google, and others) is called
OAuth (OAuth.net).
OAuth is intended to be a simple, secure way to authenticate users without
exposing their secret credentials to anyone who shouldn’t have access to them.
It also enables users to grant third-party access to their web resources
without sharing their passwords, allowing third parties to create applications
that can access your Google, Facebook, Twitter, GitHub, and other sites’ data.
OAuth is best thought of as a
delegation protocol, more than an authentication protocol. It is designed to
delegate limited access to some of a given user’s resources, such as their
Google calendars (but not their email). The three actors are: the Resource
Owner (a service such as Google that manages resources, such as calendars, on
behalf of users), Client applications (some server app that wants to access a
user’s resources from a Resource Owner), and a User (the human who wants to use
the client app and to allow them limited access to his or her resources managed
by some Resource Owner).
A user access some client app. The
client app makes an OAuth request to the resource owner, either providing the
user’s credentials (twitter works this way) or has the resource owner
authenticate the user directly (PayPal works this way). If authenticated, the
client app then asks the resource owner for an access token for a specific
resource. If that access is allowed by the user, a token is generated and
returned to the client app. Finally, the client app can make requests to the
resource owner, passing the token as proof that it is allowed.
The protocol is more
complicated than this, since it must deal with more than just web clients.
Also when the access token expires, it can be renewed without asking the user
to authenticate again.
OAuth was started in 2006 by Blaine
Cook, who was working on an OpenID implementation for Twitter. While working
on it, Blaine realized that the Twitter API couldn’t deal with a user who had
authenticated with an OpenID. He got in touch with Chris Messina in order to
find a way to use OpenID with the Twitter API. After several conversations
with a few other people later, OAuth was born. In December of that year, OAuth
1.0 was finalized. A minor revision (OAuth 1.0 Revision A) was published in
June 2008 to fix a security hole. In April 2010, OAuth 1.0 was published as
RFC 5849. Since August 31, 2010, all third-party Twitter applications are
required to use OAuth.
Some security
concerns were identified in OAuth 1.0, and the IETF working Group for OAuth
started working on version 2. OAuth 2.0 is a completely new protocol and is
not backwards compatible with previous versions. However not everyone likes
OAuth 2.
After working for
three years as lead author and editor for OAuth 2.0, Eran Hammer resigned from
the role, left the working group, and has withdrawn his name from the
specification, saying “OAuth 2.0 is a bad protocol. ... It is bad enough that
I no longer want to be associated with it. ...”.
After that, OAuth was
split into two parts, so people who didn’t like the part that Hammer didn’t
like (“Bearer tokens”), didn’t have to have their names on the standard. In
10/2012, OAuth 2.0 was approved by the IETF as RFC-6749 and RFC-6750. (From
Dick
Hardt’s blog post.)
To have your web application (the consumer)
allow users to sign in (authenticate) using OAuth, you first decide which OAuth
providers to allow. It is the provider that actually
authenticates the user. (Naturally, they need to agree to be your provider;
you can’t just use them.) All communications between the consumer and provider
uses HTTPS (that is, it is all encrypted).
Each consumer must register with
each provider it will use. The providers will provide a user name and a
password to identify each consumer.
To authenticate a user using OAuth,
your application sends a message to the provider containing your ID, the user’s
ID, and the “scope” of the request. The consumer redirects the user to the
provider’s website. The user signs on to the provider’s site, and they will be
informed of the scope of the data the application requested from the provider.
(For example, if using Facebook, the scope could request access to any Facebook
data such as your inbox.) Each consumer should only request the smallest scope
needed, of course.
When the user is done
authenticating, the provider will send an HTTP request packet to your
application, indicating the user’s name and a nonce value. Your application
must respond to that request, including the application ID, password, and that
nonce value. The provider then makes one last HTTP request, containing the
result of the user’s authentication attempt.
Qu: Notice how the provider only
makes HTTP requests to your application. Why do you think that is?
Qu: What is the privacy implication
of having (say) Google as a provider? Ans: The provider will know the name of
each user logging into your application, and when (and from where) they access
the client application (and what data was requested).
System
Security Services Daemon (SSSD)
Single sign-on does have a problem
when the network is down, or if a laptop or other mobile device can’t access
the authentication server. (Fedora) Linux now provides SSSD, System Security
Services Daemon. This provides offline caching for networked-users’
credentials, IPv6 support, and many of the features of other frameworks,
including “plug-ins” for different identity providers (i.e., user databases),
called domains. Authentication through the SSSD will potentially
allow LDAP, NIS, Samba, and FreeIPA services to provide an offline mode, to
ease the use of centrally managing laptop users. Some SSSD resources include
the RHEL
6 Essentials, RHEL
6 Deployment Guide, and the Fedora
18 Sys Adm Guide.
SSSD was designed to be a new
backend usable in nsswitch.conf
(the name service switch, NSS) for use by traditional Unix
authentication system calls (as done by the pam_unix
module), but it can be used directly using the pam_sss
module without requiring any changes to existing PAMified daemons. Another
feature of SSSD is support for multiple databases (domains). With just NSS,
you can only use one user DB per type (e.g., one LDAP db, or one Kerberos DB).
Multiple domains also handles the situation of similar usernames in different
domains; you can use a fully-qualified username to distinguish which user.
SSSD provides extra functionality if using IPA version 2 as a back-end, such as
dDNS support (since roaming but authenticated clients can have their IP address
change).
Because SSSD caches
user credentials, you must remember to flush the cache when updating a user’s credentials.
The same is true if using nscd. If
using SSSD, do not also use nscd
(name service caching daemon)!
SSSD supports older services such
as NIS, common ones such as LDAP, as well as Windows Active Directory (Kerberos
5) and FreeIPA. SSSD provides caching of credentials, supporting laptop users,
or data centers with a temporary LDAP or Kerberos server outage. Finally, SSSD
includes access control similar to PAM, allowing you to lock out users (from
login, not from running cron or receiving email). SSSD includes other features
as well, but this list is long enough!
If using SSSD to implement single
sign-on, you won’t want to add users with the useradd
utility that comes with the shadow suite (it won’t add the user to the correct
database). If using LDAP, you could use LDAP tools to update the database; you
would need to use some database specific tool. SSSD provides some utilities
that make this easier, such as sss_useradd.
As long as SSSD is configured correctly, this will add the user to the correct
database. (With proper configuration, it should even add users to local
files.)
SSSD solved a problem with SELinux:
All processes that check authentication originally needed permission to call getpwnam, getpwuid, and getpwent
functions. Traditionally these function calls just read the /etc/passwd file, but with nsswitch,
may need network access to read NIS, LDAP, etc. DBs. That requires too much
permission!
The solution: SSSD causes all
callers of the getpw* functions
to use a socket to communicate with SSSD, /var/lib/sss/nss.
Then the sssd daemon does all of
the network communications for the confined applications, rather than the
confined applications needing to connect directly to remote some server/port.
(Fedora added a new Boolean authlogin_nsswitch_use_ldap,
along with the older allow_ypbind
that allows you to turn off the remote access no longer needed when using SSSD.)
After installing SSSD, you must
configure one domain before starting the daemon.
SSSD is configured from /etc/sssd/sssd.conf, an INI style
file, to say what single sign-on service to use and how to contact it. (There
is a sample in /usr/share/doc/sssd*,
or you can use authconfig{,-gtk}
to create.) The file consists of various sections, each of which
contains a number of name = value pairs (names are also called keys). Some
keys accept multiple values separated with commas. sssd.conf uses data types of text (no quotes required),
integer and Boolean (with values of TRUE
or FALSE). Comment lines
are indicated by either a ‘#’ ‘;’ in the first column. (As is usual
with INI files, the definition doesn’t state if there are spaces around the
equals sign, or how values can start with white-space, or if multiple entries
with the same name are allowed, or the text encoding to use.) (Show sample
sssd.conf.)
To use SSSD directly, configure the
nsswitch.conf with lines like so:
passwd:
files sss
group: files sss
To use it from PAM, you need to
update system-auth. Here’s a sample from the RHEL SSSD guide:
#%PAM-1.0
# This file is auto-generated.
# User changes will be destroyed
the next time authconfig is run.
auth required pam_env.so
auth sufficient pam_unix.so nullok
try_first_pass
auth requisite pam_succeed_if.so uid
>= 500 quiet
auth sufficient pam_sss.so
use_first_pass
auth required pam_deny.so
account required pam_unix.so
broken_shadow
account sufficient
pam_localuser.so
account sufficient pam_succeed_if.so
uid < 500 quiet
account [default=bad success=ok
user_unknown=ignore] pam_sss.so
account required pam_permit.so
password requisite pam_cracklib.so
try_first_pass retry=3
password sufficient pam_unix.so
sha512 shadow nullok try_first_pass \
use_authtok
password sufficient pam_sss.so
use_authtok
password required pam_deny.so
session required pam_mkhomedir.so
umask=0022 skel=/etc/skel/
session optional pam_keyinit.so
revoke
session required pam_limits.so
session [success=1 default=ignore]
pam_succeed_if.so service in crond \
quiet use_uid
session sufficient pam_sss.so
session required pam_unix.so
Lecture 7
— Managing System Security
Setup
security
System security starts with
determining the purpose of the host. Next you determine what data on the
server must be protected, and to what level. This means examining the data on
the server against regulations such as SOX and HIPAA (and HITECH), federal and
local laws, and industry standards (e.g., standard accounting practices). You
must determine what data must be protected, and what data access must be
audited. All that becomes policy, which then becomes procedures and
configurations.
There are a large number of best
practices that should be used to provide security regardless of the use of a
server. These are discussed below.
Physical
Security
Hosts should be physically secure.
Have a secured server room, using rack mounted servers (Qu: what is the standard
rack server size called? Ans: 1U), with no removable drives or connected
console. Keep track of the keys/combination. (And have a procedure in place
if an audit trail is needed of physical accesses.) Don’t rely on having a
server in a busy public place, such as a corridor or reception area. Sooner or
later the server will be left unguarded!
Don’t violate building, fire, or
safety codes in your server room. Worry about fire-suppression systems that
can damage your servers. You need adequate power supplies and/or UPSs, and A/C
systems.
Best
practices for physical security (when feasible)
[adopted from a list by Sarah Scalet, sscalet@cxo.com]
·
Have a separate building for your data center, if possible 20+
miles from organization’s HQ, and 100+ feet from any public road or other
building.
·
Avoid locations near airports, power plants, chemical facilities,
and anywhere near earthquake fault lines flood zones, hurricane prone areas,
etc.
·
Plan for secure air handling: recirculate and/or filter the air
(so smoke and other pollutants can’t get in). For the truly paranoid use air
monitors.
·
Use fire suppression systems that don’t damage your equipment.
Make sure you use plenty of smoke and heat sensors. Use humidity/water sensors
if needed.
·
Don’t put up “Data Center” signs.
·
Landscape for security: Use trees (not too close to the building)
and fences to keep vehicles and pedestrians at a goodly distance.
·
Thick concrete is a cheap and effective barrier against both
attackers and Mother Nature. “Safe rooms” can be made to hold backups. Avoid
windows except as required by law (building codes). And then use warehouse
type safety glass.
·
Don’t use drop-down ceilings in security sensitive areas, which
provide easy access to locked rooms by climbing on a chair.
·
Make sure all contractors, repair personnel, utility and
maintenance people, etc., are accompanied by an employee at all times.
·
Use vehicle crash barriers between parking areas and building.
·
Control access to parking lot and loading docks: manned guard
stations with raisable gate and tire shredders on exit roads. Have few
entry/exit points.
·
Make fire doors exit only (no outside handles), and have them
sound alarms when used.
·
Have a backup source for utilities (phone, data, electrical,
water). Try to have two independent connections to two different ISPs,
substations, and water mains. Have the pipe and wire conduits enter the
building from two different points. Try for underground cables where
possible. Don’t route sensitive cables through low-security areas.
·
If warranted provide anti-explosive measures: have guards check
under vehicles with mirrors, use dogs (bomb-sniffing), metal detectors, etc.
Think airport security.
·
Have plenty of security cameras, with high quality recording
(else it is useless). Have alarms to both the outside of the building and on
the inside (motion sensors).
·
Use two-factor authentication. Hand geometry,
fingerprint, or (when lesser security is enough) phones, smart-cards or just
plain swipe cards.
·
Have multiple (say three) authentication checkpoints between the
outside and the most sensitive rooms. Have a Guest buzzer/door-bell (a
reception desk is good, but may be bypassed in a rush) in a foyer. Separate
visitor areas from employee areas. Have the most secure areas protected with a
single person at a time system (turnstile), that doesn’t block egress in the
event an evacuation is required. Have each room protected as well.
·
Cleaning secure areas can be problematic. Using filtered air and
not allowing food in those areas reduces the need for frequent cleaning.
·
Provide food, meeting, lobby, and restrooms in both the secure
and unsecured areas.
Secure
Installation
Install disconnected from any
untrusted network. (Pull cable from back of NIC.) Next configure firewall and
some basic security systems (PAM, TCP Wrappers, ...).
Install only what is needed!
You will need to make choices of the available software. Often a distro vendor
will make some choices for you. For example: sendmail, Postfix, or other? You
should make your choices based on reputation for performance, reliability,
configurability, security, and cost. Sendmail is an excellent MTA but is very
hard to configure correctly. Unless you have expertise available you could
easily misconfigure sendmail and cause security and/or performance problems. So
if another MTA has the features you need but is easier to install it may be a
better choice.
It may pay to have a local VLAN for
installs: put a KickStart/JumpStart file, the set of packages you have
selected, current patches, and configuration scripts to run, all on a server in
a separate VLAN. When installing, change the switch port for the server to
that VLAN and do a network install!
Once basic install is done,
patch/update the kernel and configure if needed for security.
Use application white-listing.
This technique is the #1 mitigation recommended by many security agencies
(including the U.S. and Australia governments). In this technique, you use
special OS features (e.g., Microsoft’s AppLocker) or third-party applications
to enforce the whitelist on hardened hosts. An excellent overview of the
technique can be found at www.asd.gov.au.
Bring all packages up to date.
Update yum repositories (or whatever) first: rpmfusion, adobe-flash, .... Note
that some Fedora repositories are initially disabled when installed.
General
System Hardening
Okay, you have now installed,
patched, configured your system, and set up policies. Before you are done,
there are a number of sub-systems you can use and configure to generally harden
any server. These are discussed here in no particular order:
Read protect
critical files. Note this include the kernel image and some other files in
/boot, configuration files in */etc (and in a few cases, */lib). Consider
making system binaries execute-only; they are often readable (and writable by
the owner), which facilitates updates, patching, and (virus and other)
scanning, but is less secure.
Setup a
secure environment: umask,
groups (/etc/group), PATH, etc. (See /etc/profile.d/*.sh.) Make sure the
permissions and owner/group are correct for all files.
All config files
under /etc should be read only,
or writable only by root. The
reason is these are often actually shell scripts sourced by service init
scripts, and those are run by root
(before services can drop any privilege).
To find commands
along PATH, use the type utility (similar to where on Windows). There is also the whereis utility (searches using a
hard-coded, standard value for PATH)
that can also find man pages and source files; it has an option for finding
strange files too. Finally, there is command -v (or -V), similar to whereis
but uses the current value of PATH
and will find aliases and shell functions too.
Setup syslog.conf: Fedora <9 doesn’t
support boot logs. System logging should be the first service started and
the last one stopped. Edit init.d/syslog
and change the chkconfig numbers
to 00 and 99, and --del
then --add syslog.
Setup printer
access: What you can do for this depends on the print system used, and if
the printers are local or remote. With CUPS, the default “standalone”
configuration has few security risks. The CUPS server does not accept remote
connections and only accepts shared printer information from the local subnet. When
you share printers and/or enable remote administration, you expose your system
to potential unauthorized access.
You can control what remote (or
local) users are permitted to enqueue print jobs for your printers. CUPS can
use several user authentication schemes, such as Basic, Digest, Kerberos, and
local certificate authentication. This is a threat for local users, since
their usernames and passwords are sent in plain text. It is best to use Basic
authentication over an SSH or SSL/TLS tunnel.
CUPS also allows one to set up
printer quotas, which limits how many pages and/or jobs users can request. For
example:
# lpadmin -p myprinter -o job-quota-period=604800 \
-o job-k-limit=1024 -o job-page-limit=100
Would limit all users to no more
than 100 pages or 1024 KB of data (whichever comes first), within the last
604,800 seconds ( = 1 week).
Change
attacker-useful system banners! (/etc/issue{,.net},
/etc/motd). Note motd usually needs to contain an AUP
or related information!
Setup trust
relationships between systems: BSD-rhosts (modern versions use Kerberos): rsh, rlogin,
rcp, ..., /etc/hosts.equiv, /etc/hosts.lpd and lpd.perms (used to control printer
access). Avoid the rhosts
system and use ssh/VPN instead.
Verify iptables firewall: iptables -vL; /etc/init.d/iptables status
Check default
permissions of standard directories and any added user accounts (show find-world-writable script).
Check for
known vulnerabilities for BIND DNS, postfix, etc., at CERT/CC, Bugtraq, and
elsewhere. Apply required patches.
Securing cron and at Services: Review: crontab
files, crontab -lre, crontab file, /var/spool/{at,cron}, /etc/*cron*, anacron (run tasks
after so many minutes/hours/days/... Unlike cron it doesn’t assume the machine
is always on.). {at,cron}.{allow,deny}
(if the .allow file exists,
ignore any .deny file; if
neither file exists than only root has access (varies by flavor). (Default:
empty .deny file.)
Solaris: *LK* as the 1st four chars in /etc/shadow password field prevents cron or at
jobs of that user from running.
Adjust login
account defaults (/etc/login.defs
on Linux, /etc/skel,
Setup PAM,
/etc/security/time.conf. Per-user
resource limits are discussed below.
Setup SSSD,
/etc/sssd/sssd.conf.
Setup ssh (/etc/ssh/sshd_config, ...) and disable telnet and FTP (discussed later).
Examine /etc/hosts.allow, /etc/hosts.deny (used for TCP
Wrappers) as well (discussed later). Note OpenSSH doesn’t use PAM by default!
Update: OpenSSH since v6.7 (sshd) no longer supports TCP Wrappers.
Setup PKI: Digital
certificates are now centralized (RH) in directories under /etc/pki/. Users performing an
upgrade must relocate their digital certificates. For example /usr/share/ssl/* has moved to /etc/pki/tls and /etc/pki/CA.
Setup
firewall: Use TCP Wrappers to control access too. Never attach a
newly installed machine to an untrusted network until after it has been hardened.
Turn
off all unnecessary services: Remove unneeded software that an intruder could
use, such as a C compiler.
Run auditing / vulnerability scanners: Periodically
(or always) run system and network auditing tools, which scan
your system and report (or even fix) security problems), using such tools as
(see a list at sectools.org).
Not every warning and
suggestion from these tools indicate real problems (false positives). It takes
a human to understand the reports made by these tools. (Analogy: a grammar
check will indicate many possible problems, but only some of them are real
problems, such as the work indicate in the first sentence of this box.
Some of the better-known vulnerability scanners include:
·
Bastille (bastille-unix.org) (bastille -{xc} for interactive mode (X window or Tk console), “-b” (batch mode) to use saved results
(config) from previous run. bastille
-r reverts all changes. # bastille --assessnobrowser
creates an assessment report only and save it in a file. Log of changes and
reports in /var/log/Bastille.
(Always review the log; some errors may be okay.)
Although this remains
useful, it hasn’t been updated since 2008 and doesn’t support distros created
since then, such as Fedora 10+. Even its original DNS name (bastille-linux.org) was “stolen” by a
cyber-squatter.
·
Tiger is another useful system-neutral tool. (www.nongnu.org/tiger,
but not updated since 2007).
·
Lynis is a good system-neutral tool, designed especially
for compliance auditing (www.rootkit.nl/projects/lynis.html).
You can run it with:
# lynis -c -Q
·
Fedora 10 and newer includes the Red-Hat like distro specific sectool (fedorahosted.org/sectool).
This is very good to run on Fedora.
·
Debian has a distro-specific tool called checksecurity, but it is not very
complete (packages.debian.org/lenny/checksecurity).
Mandriva includes a good tool msec
(wiki.mandriva.com/en/Draksec).
·
The Solaris Security Toolkit (SST), formerly known
as the JumpStart Architecture and Security Scripts (JASS) toolkit, is
similar to bastille and provides a way to harden and audit Solaris ≤ 10 (oracle.com/.../819-1402-10).
(Oracle doesn’t support SST for S11, but it may run anyway. Most of the tasks
it did for S10 have been “baked into” S11 Express, according to someone I asked
who should know.) (Update 11/2012: Solaris 11.1 supports OpenSCAP.)
·
Nagios (nagios.org) is “the” Unix/Linux monitoring
system. It includes a plug-in architecture, so it can be used for
vulnerability scanning too. However, it requires some effort to learn, and to
set up as a vulnerability scanner.
·
Nessus (nessus.org) was “the” vulnerability
scanner. It was FLOSS, but then was closed-sourced in 2005. While still a
great scanner, is no longer free; it costs $1200 per year last time I checked.
·
OpenVAS (openvas.org) is a vulnerability
scanner that was forked from the last free version of Nessus after Nessus went
proprietary. It includes over 20,000 checks, and is actively maintained.
(Version 6, released in 4/2013, includes SCAP support.)
·
chkrootkit
(chkrootkit.org)
was last updated in 2009; this tool is no longer considered useful.
·
rkhunter (www.rootkit.nl/projects/rootkit_hunter.html)
This is easy to use and is maintained; I run it via cron on YborStudent. (Show
report email.)
·
OSSEC (www.ossec.net) is an open source IDS. It
performs log analysis, file integrity checking, policy monitoring, rootkit
detection, real-time alerting, and active response. It runs on most OSes.
·
The Automated Security Enhancement Tool (ASET) is a set of
administrative utilities for Unix that improve system security by warning of
potential security problems, allowing administrators to check system files
settings, both attributes (permissions, ownership, etc.) and content. You can
specify low, medium or high security levels. This is similar to Bastille and
other vulnerability scanners.
·
Nikto (www.cirt.net/nikto2) is an Open
Source (GPL) web server scanner that performs comprehensive tests against web
servers for multiple items, including over 3500 potentially dangerous
files/CGIs, versions on over 900 servers, and version specific problems on over
250 servers. Scan items and plugins are frequently updated and can be
automatically updated (if desired).
·
Shadow Security Scanner (safety-lab.com) and
Shadow Web analyzer are good commertial tools with a free trial period.
(This tool found problems on wpollock.com with some PHP scripts that Nikto
missed!)
·
SiteCheck (sitecheck.sucuri.net/scanner)
is a free, on-line website scanner.
·
Saint (SaintCorporation.com, a
commercial vulnerability scanner with a trial version).
·
Security Blanket (trustedcs.com/SecurityBlanket/)
is a well-known commercial vulnerability scanner, now owned by Raytheon. (Sun
partnered with TCS so most of the JASS checks were incorporated into this, for
the Solaris version.) It includes a 7-day trial license.
Related tools monitor
log files, and either send summaries, alerts, or take some action. Some of the
tools not mentioned above include swatch, fail2ban (updates host firewall to
block IPs of brute-force password attacks), splunk (probably the best, but
expensive; the free version doesn’t do as much), SEC (simple event correlator).
Qu: how often should
these tools run? logwatch runs
once a day by default, so it can’t help you with real-time or near real-time
monitoring. On the other hand, these tools are resource intensive tools that
can definitely impact the host’s performance. Sometimes a simpler tool, such
as fail2ban, can be run frequently, and more intensive tools run only hourly
(or less often).
SCAP
OpenSCAP
is a set of open source libraries providing an easier path for integration of
the SCAP (Security
Content Automation Protocol) standards, managed by NIST (who also maintain a list of
commercial, SCAP compliant tools, as well as provide some content
you can download). SCAP was created to provide a standardized approach to
maintaining the security of enterprise systems, such as automatically verifying
the presence of patches, checking system security configuration settings, and
examining systems for signs of compromise. It can then report problems, or
use a configuration management system (OpenSCAP uses Puppet) to effect changes.
The items to be
checked (called “content”) are in a standard XCCDF format, or the “raw” OVAL
format (used internally with XCCDF, that lists all the various checks). Both
are XML files. XCCDF files usually reference one or more OVAL files with the
actual checks to be done, and group the various checks into “profiles”. You
can select which profile to audit with, define new ones, add, enable, disable,
or remove various OVAL checks from profiles. The result of the audit is
generally presented as an HTML file.
Depending on the
tool, any violations can be automatically fixed with one or another
configuration management system (such as Puppet); the oscap tool can generate a Bash shell script you can run
(as root).
To use OpenSCAP’s secstate utility, you need to
import OVAL or XCCDF “content”. Some OVAL content repositories can be found at
www.itsecdb.com/oval/,
www.redhat.com/security/data/oval/
(for RHEL), or at oval.mitre.org/repository/about/other_repositories.html.
You can find XCCDF content for Fedora at fedorahosted.org,
rpm.pbone.net,
rpmfind.net,
from the National Vulnerability Database (Checklists are another term for SCAP
content) at nvd.nist.gov,
and no doubt elsewhere.
Fedora 14 and newer
allow you to import the content and tools from the yum repos (secstate,
openscap, openscap-utils, and openscap-content), but that may not be
current. Using the OpenSCAP utility oscap,
you can also generate content.
secstate, the
Security State Configuration Tool Example:
# yum -y install
secstate
# wget https://fedorahosted.org/openscap/log/dist/fedora/scap-fedora14-xccdf.xml
# secstate import scap-fedora14-xccdf.xml # can take a long time!
# secstate list -a -r # can take a long time, and should show the following:
[X]OVAL File - ID: scap-fedora14-xccdf
# secstate audit
--Results--
True: 0
False: 0
Error: 0
Unknown: 0
Not Evaluated: 0
Not Applicable: 0
(Detailed results get
saved in HTML, in a folder with a name such as./audit-localhost.localdomain-Wed-May-25-15_52_27-2011bEd6I3/
(show).)
Update: On Fedora 20,
secstate tool can’t import any content! Use oscap instead.
oscap (the OpenSCAP
utility) Example:
This works from
Fedora 14 thru Fedora 27 (at least), if you use the correct profile name:
# yum -y install openscap
openscap-utils openscap-content scap-workbench
# oscap xccdf eval
--profile common \
--results /tmp/$USER-ssg-results.xml \
--report /tmp/$USER-ssg-results.html \
--cpe /usr/share/xml/scap/ssg/fedora/ssg-fedora-cpe-dictionary.xml \
/usr/share/xml/scap/ssg/fedora/ssg-fedora-xccdf.xml
# oscap xccdf
generate --profile common fix \ --output xccdf-fix.sh \
/usr/share/openscap/scap-xccdf.xml
The scap-workbench utility is a GUI
tool to run scans and to edit SCAP content.
To review what checks
and tests are performed, you can read the XCCDF content in the
/usr/share/openscap/scap-fedora14-xccdf.xml file. You can generate an easier
to read HTML document instead, like so:
$ oscap xccdf
generate guide /usr/share/openscap/scap-fedora14-xccdf.xml \
> fedor14scap.html
Evaluation of all
OVAL definitions:
# oscap oval eval
--results ~/oval-all.xml /usr/share/openscap/scap-oval.xml
# oscap oval generate report --output ~/oval-all.html ~/oval-allresults.xml
Evaluation of
specific OVAL definition (perhaps you saw an alert from CERT):
# oscap oval eval
--id oval:org.open-scap.f14:def:20055 \
--results ~/oval-20055results.xml /usr/share/openscap/scap-oval.xml
(In all cases,
running an audit can take a very long time!)
firstaidkit (the System Rescue
Tool), automates simple and common system recovery tasks. It can also be used
to diagnose any sub-system for which it has a plugin available (yum install
firstaidkit firstaidkit-plugins-all), making it a useful vulnerability scanner:
# firstaidkit -a --nodeps |
awk -vflag=0 'flag {print; flag = 0}
/ISSUE FROM/ {print; flag = 1}'
[LOCAL] ISSUE FROM Free Space
'Waiting for check on Free Space'
[LOCAL] ISSUE FROM Free Space
'No problem with Free Space'
[LOCAL] ISSUE FROM X server
'Waiting for check on X server'
[LOCAL] ISSUE FROM X server
'No problem with X server'
[LOCAL] ISSUE FROM mdadm configuration
'Waiting for check on mdadm configuration'
[LOCAL] ISSUE FROM mdadm configuration
'No problem with mdadm configuration'
[LOCAL] ISSUE FROM Grub
'No problem with Grub_DIR'
[LOCAL] ISSUE FROM Grub
'Detected Grub_IMAGE -- Bad grub stage1 image.'
STIGs (Security Technical Implementation Guidelines)
[Adapted from Jim
Laurent’s blog, read on 10/4/2011.] DISA (U.S. DoD’s Defense Information
Systems Agency) owns and operates the DoD datacenters, develops a number of
command and control applications, runs the DoD networks and is responsible for
enforcing DoD security mandates. The STIG checklists are a
comprehensive set of requirements that system administrators are expected to
follow in order to attach and maintain a system on DoD networks. There are
STIG documents for databases, firewalls, web servers and other applications, as
well as general STIGs for various operating systems. Unix/Linux SAs should be
most concerned with the STIG
documents for Unix/Linux systems.
The DISA STIG
checklist is a public document that describes specific permissions settings,
password policies, administrative record keeping and more. In the current
version, Section 3 is 546 pages long and is where all the specific requirements
can be found.
There is also a
collection of Security Readiness Review (SRR) scripts that automate
portions of the review process to assist a system administrator in evaluating the
completion of the process. The STIGs also support SCAP standards for auditing;
content is available for some systems and applications (such as for RHEL, from
nvd.nist.gov).
There are, of course,
many other security checklists available from many sources. The NIST maintains
a list
of security checklists. The Federal Desktop Core Configuration
(FDCC) mandates standards for desktop configurations used in the U.S.
government (less stringent than the STIGs). This evolved into the United
States Government Configuration Baseline (USGCB), which includes
SCAP content (security checklists) for Windows and Red Hat Linux systems.
Another excellent
source of checklists is SANS SCORE (show).
Run
system and network intrusion detection systems such as ipcop (ipcop.org). Many
auditing tools can also serve as IDS. (IDS tools are discussed later.)
Run
your malware detection software regularly. For example:
# rkhunter --propupd # Do once
to update the rkhunter properties file.
# rkhunter -c --pkgmgr RPM --rwo -x
(Or
set up as cron jobs.)
Console
Security: A method to force a password on all consoles during any boot is
to simply modify inittab and
add/edit these two lines (Old SysV init only):
d:3:initdefault:
~~:S:wait:/sbin/sulogin
(Note the double
tilde.) This forces the requirement of any legal logon to access the system
even when in single user mode, preventing bypassing login security by booting
in single-user mode. For this to work, you need to protect the BIOS and boot
loader with passwords, disallow booting from removable drives or remotely, and
have a lock on the case. Note BIOS security is very weak except on laptops
(where it is merely weak). Secure remote consoles as well.
There are several
good lists of effective security controls. You should consider these
carefully, and implement all you can:
www.sans.org/critical-security-controls
www.counciloncybersecurity.org/critical-controls
NSA's
IA top-10 Mitigation Strategies (pdf)
PCI
DSS Security Control Prioritization
Lecture
8 — Managing Password Security and Database Security
Password
Security
Unix/Linux systems
have never stored plain text passwords on the disk. When someone tries to
login, they supply a username and a password. The username is used to locate
the encrypted version of the password. This is often stored in the file /etc/shadow (older systems used /etc/passwd, which is publicly
readable), or in some central (organization-wide, networked) database.
Although they should not be available to others, it should still be
computationally infeasible to guess the password even knowing the encrypted
version.
Facebook has released
a statistic (11/2011
blog post) showing that 0.06 percent of logins into the social
network are compromised. However, since more than 1 billion Facebook logins
occur each day, this adds up to 600,000 breaches every 24 hours, or roughly
eight every second.
For managing a single host, the shadow
suite can be used instead of a more complex SSO database. This keeps
the password hash in /etc/shadow,
and only an “x” as a
place-holder in /etc/passwd). The
shadow file has root-only access (show: ls
-l /usr/bin/passwd) so utilities that manage passwords are
often setUID to root. Discuss
the format of /etc/{passwd,shadow}.
Actually, the
password is a secure message digest or secure hash, and not an
encryption. (An encrypted message is supposed to be reversible so you can recover
the message.) The phrase encrypted password is (mis-) used to refer to
a hash of a password, possibly because the hash was originally calculated by
the crypt library using DES.
There are a number of
authentication systems available and each is configured independently of the
others. This can lead to confusion! For example, any settings in the file /etc/login.defs or (for Solaris) /etc/default/passwd (such as for
minimum password length or expiration data) only apply when using the shadow
suite, not for LDAP, NIS, Kerberos, etc. Locking passwords in the shadow file may have no effect on ssh (and its subsystems such as scp and sftp)
when using keys. PAM may or may not be used for FTP, rsh. And so on.
There are ways to
prove a user’s identity, other than supplying a password (something you know).
This include bio-metrics (something you are), and various security
devices such as smart cards and dongles (something you have). However,
all these mechanisms have their vulnerabilities and drawbacks. For all their
faults, passwords are very convenient and in many contexts, offer a reasonable
level of security if used correctly. (Increasingly, two- or multi-
factor authentication is used, where two of the three types of
authentication must be used together.)
Change default
passwords. Default passwords are an
easily and commonly exploited vulnerability. You need to change all default
passwords before any system is exposed to the Internet. (Today the time to
attack for a vulnerable system connected to the Internet is seconds to
minutes.) Don’t forget to change passwords on network devices such as routers,
switches, wireless access points, etc. New user accounts need good passwords
as well.
Use password generators to pick truly
strong passwords (pwgen, apg, pwqgen).
apg uses /dev/random while pwgen
uses /dev/urandom. This means apg may appear to “hang” at times; see
Random Numbers for
why that happens.
To change or set a
password for the root user is a more major event than changing one for an unprivileged
user. The root passwords should be saved in a secure location. Some Linux
systems don’t ship with a root password set; not safe for a server! Use “sudo passwd”
to set the root password on those systems.
Good passwords:
Actually, “good passwords” is an oxymoron. If a password is easy to type and
remember, it is vulnerable to a dictionary attack. But some passwords are
better than others. Use the first letter of words (or better, each syllable)
of a quote or poetry, plus symbols or digits: “Rar,Vab”,
“Iafyds,civ1.0.” (If at first
you don’t succeed, call it version 1.0.), “"Rd"isnaip!”
("RAM disk" is not an installation procedure!)
Treat your
password like your toothbrush. Don’t let anybody else use it, and get a new
one every six months. — Clifford Stoll
A (longer) password composed of
words is called a passphrase. (The term passcode is sometimes
used to mean either a password or passphrase.) Usually, a passphrase is
composed of legal words, preferably chosen at random, and combined with symbols
or spaces. When possible, use a mix of uppercase and lowercase letters, plus
digits, punctuation marks, and other symbols. (See below for ways to generate
passphrases.)
Not all systems accept strong
passwords or passphrases, particularly those with a web interface. (Gmail
permits passwords as long as 200 characters, Yahoo Mail allows 32-character
passwords. Hotmail only allows 16; for years it has accepted longer passwords,
but ignored all but the first 16 characters.)
U.S. federal standard
FIPS-112 (Password Usage) (http://www.itl.nist.gov/fipspubs/fip112.htm)
mandated passwords should only be composed of the 95 printable ASCII
characters. (However, there is no requirement actually to use ASCII to store
the passwords.) Also, the minimal length of an acceptable password is four (4)
characters.
This standard was
withdrawn in 2005. In 2016, more general advice is given in NIST SP
800-63B and NIST SP
800-53 (see page F-96). In brief, here’s the new advice:
·
Make your password policies user friendly and put the burden on
the password quality verifier when possible.
·
Minimum recommended password length is 8 characters, and longer
for more sensitive accounts (such as root and other privileged accounts, say 15
characters).
·
You should allow user passwords to at least 64 characters (which
allows for pass-phrases).
·
Applications must allow all printable ASCII characters,
including spaces, and should accept all Unicode characters, too,
including emoji.
·
The rules implemented by the quality verifier aren’t spelled out
in detail. They do say to check new passwords against a dictionary of
known-bad choices.
·
Don’t have password complexity rules; just have the system reject
bad passwords. If you do have them, the specifics are up to each organization.
·
Do not provide password hints. People
do dumb things such as “rhymes with assword”, “dog + digit”, “try
qwerty123”, or just list the password.
·
Knowledge-based authentication (KBA), such as pick from a list
of questions should not be used, as most people will pick simple questions
that can easily be guessed or found online.
·
No more expiration without reason. (Finally!) No more change
your password every 60 days.
·
SMS should no longer be used in two-factor authentication.
·
Rate-limit password guessing (that is, add a delay when an
incorrect password is provided.
A good discussion of
these changes can be found at nakedsecurity.sophos.com.
(Note that as of
11/2016, this document has not been officially adopted.)
The password changing command “passwd” does a very minimal amount of
checking for poor passwords. On modern systems, PAM can be used to set a
password policy. On such systems you use arguments to the pam_pwquality.so (compatible with the
older pam_cracklib.so) PAM
module to force very strong passwords, or disallow (or allow) null (no)
passwords. You can even prevent users from reusing their last few passwords,
or having the new password too similar to the previous one. (Recall that the passwd command makes you enter your
current password as well as a new one.) Different systems use slightly
different PAM modules for this purpose; pwquality.so
is used on Fedora and Ubuntu at least. (The libpwquality package includes a pwscore(1) utility, allowing one to check for bad passwords
easily.)
Note that setting minimal password
length in other files (such as /etc/default/useradd
or /etc/login.defs) may have no
effect, if the shadow suite isn’t used.
[www.hfes.org/web/Newsroom/HFES09-Hoonaker-CIS.pdf]
In 1979, Morris & Thompson (1979) reported that many UNIX-users choose very
weak passwords, for example very short or obvious passwords. They analyzed
3289 passwords and results showed that passwords mainly consisted of: strings
of three ASCII characters (14%); strings of 4 alphanumerics (a set of
characters, including letters, numbers, and, often, special characters, such as
punctuation marks) (15%); 5 letters, all upper-case or all lower case (21%), or
6 letters, all lower case (18%). Furthermore, 15% of the passwords appeared in
various available dictionaries, etc. They concluded that a total of 86% of all
passwords fitted in one the classes above.
In 2006, a separate
survey of 34,000 MySpace passwords revealed that the most common were “password1”,
“abc123”, “myspace1”, and “password”.
In 2012, 450,000
Yahoo! email addresses and passwords were leaked (they were stored by Yahoo in
plain text, not hashed) and published on the Internet. An analysis
by CNET found “123456” to be the most popular password (nearly 3,000
were sequential numbers), while 780 users used “password”.
The purpose of picking hard to
guess passwords is to prevent attacker from using lists of common passwords.
But instead of forcing users to pick complex passwords, it turns out it is
sufficient just to prevent them from picking common ones. For example, Twitter
allows any password not in a list of about 400 common ones (such as “p@ssword”
or “ABCD”). There is a list of 106
passwords Blackberry forbids. Also, an organization can track how
often a given password is used, and add them to the list if too many users try
to use it. Any password, even if a dictionary word, would be allowed as long
as it is rarely used.
The average Web user
maintains 25 separate accounts, but uses just 6 to 7 passwords to protect them,
according to a 2007 Microsoft
research study.
In general, a passphrase is
stronger (harder to guess) than a password, and good ones are easier to
remember than good passwords. The weak passphrases users typically employ
create a major vulnerability to password cracking attacks.
Password meters are often
used to indicate, when choosing a password, if the password is good, fair, or
weak. Recent work on these meters shows that most are inaccurate. A group of
CMU researchers built a new meter, using an AI (neural network) trained for
this purpose, with some success. You can download it from Github.com/cupslab/password_meter
and try an on-line demo at cups.cs.cmu.edu/meter.
A 2012 commodity PC running
a single AMD Radeon HD7970 GPU can try on average over 8 billion password
combinations each second, depending on the algorithm used to scramble them.
Using botnets or clouds can bring thousands of such computers to bear on
cracking a single key.
In 2012, a $12,000
computer called Project Erebus v2.5, contains eight AMD Radeon HD7970
GPU cards, and requires just 12 hours to brute force the entire keyspace for
any eight-character password containing upper- or lower-case letters, digits or
symbols, using a version of hashcat.
Measuring
Strength of Crypto Primitives
How should we measure the security
of a crypto primitive or a whole crypto system? This is important since we
need a way to compare different crypto mechanisms, are to express our belief in
a given method’s security.
The standard answer is to determine
the number of operations required to break something. Consider the casting-out
nines checksum; at worst it would take ten attempts to break the system (in
this case, break would mean to alter a message but have it produce a
valid checksum), where each attempt means to compute a new checksum (so, not
too many operations per attempt). The number is expressed as the number of
binary digits needed, in this case, between 3 and 4 bits. Crypto primitives
are often designed to require a large number of operations to check or decrypt
something, making each such attempt time consuming. MD5 has strength of about 64
bits (depending on what you are using it for). Originally MD5 was thought to
have a strength of 128 bits, but someone found ways to reduce the number of
operations needed to generate an MD5 hash, so you could then generate them much
more quickly.
For confidentiality, encryption
primitives require a certain (large) number of operations in order to decrypt a
message without knowing the key. With the key, only a few steps are needed.
Thus, the strength of most crypto primitives depends on the length and strength
of the keys used. Or switch to a different security primitive that requires more
steps each attempt; then a smaller key gives the same security.
A good estimate of the strength
needed by various crypto primitives, in order to provide a certain level of
protection against various types of attackers and for various periods of time
was compiled by the ECRYPT 2 project, and is available at www.keylength.com.
(Show.)
Entropy,
Key Length, and Password/Passphrase Length
The strength of passwords and keys
are measured in the number of random-bits they are equivalent to, also called
its entropy. It’s been estimated that normal English text only contains
about 2 to 2.5 bits of entropy per character, and that the 2,000 most common
words have about 10-12 bits per word. So a four word phrase would seem to provide
about 40 bits, except that most phrases aren’t selected at random, and so
contain much less entropy. About 1% of passphrases used by Amazon’s PayPhrase
system users were guessed from a dictionary containing 20,656 phrases of movie
titles, sports team names, and other proper nouns; that’s less than 15 bits of
entropy.
Guessing random keys
until you get the right one is known as a brute-force attack;
randomly guessing the passwords used to generate the keys is known as a dictionary
attack. While most communications are protected by keys, the keys are
generated with, or protected by, passwords. Thus the strength of keys are tied
to the strength of passwords.
While vendors and others like to talk
about key length, it is the entropy that matters. A trivial example makes this
clear. Suppose a key-generator uses this method to generate a key of some
desired length:
key
= 1;
while ( key.length < desiredKeyLength )
append a "1" to the key;
return key;
No matter how long the key, it has zero
bits of entropy. Recording the gender of a random person as a key has one bit
of entropy. The reason longer keys are thought to be more secure than shorter
keys, is the assumption that longer keys contain more entropy. That is generally
true for passwords (where each additional character adds entropy), but not for
keys.
Additionally, a poor algorithm does not
use all the entropy in a key. For example, the original HTTPS implemented in
Netscape Navigator generated 128-bit keys, but the random number generator’s algorithm
meant such keys had a maximum of 20 bits of entropy. Similarly, the A5/1
algorithm used for GSM cell phone encryption uses 64-bit strong keys, but the
algorithm can be cracked as easily as if it had a 30-bit key.
ECC (elliptical curve
cryptography) is said to provide similar security to AES or other currently
used algorithms, while having shorter keys. This is because ECC keys take much
longer to check (more operations per attempt) than to generate. With RSA, breakthroughs
in more quickly factoring large numbers mean you need much longer keys for
similar security. But, ECC also needs a high-entropy random number source.
(And someday, similar math shortcuts for ECC will mean longer keys are
necessary.)
Microsoft (and others) used to use a
user-entered password of eight characters to generate long keys of 128 bits or
longer. But the entropy of such keys is not 128, it is the entropy of the
password, about 16 bits. And in reality, it is much less than that, as humans
don’t pick truly random strings for passwords. An attacker could probably
guess the correct key by trying only a few thousand passwords, so advertising
the security as 128-bit keys is misleading.
If you use GPG and password protect the
file containing the private key with a five-character password, does it matter
that the key length is 1,024 bits? Probably yes, since you expect attackers to
intercept messages, but not to have access to the hard disk containing your
private key. If they do get a copy of your key, you have a few days to change
it before they can break your password, assuming you picked a good, long
passphrase.
How long
should a key/password/passphrase be?
It is a common mistake to believe
that longer keys are always better than shorter ones. The point of long keys
(those having lots of entropy) is to make it unfeasible to try a brute-force
attack. A good analogy I read in Bruce Schneier’s excellent book Secrets
and Lies is to consider the lock on your home’s front door. These are usually
five pin tumbler locks, where each pin could be in one of ten positions, for a
total of 100,000 possible keys. If a burglar could carry around that many
keys, and had to try (on average) 50,000 of them, they would need to stand at
your door day and night for about three days, constantly trying the keys. This
is not feasible, and no burglar would do that. Now, suppose I came along and
offered to sell you a lock with eight pins, each of which as 12 positions.
Would you feel any more secure if you installed such a lock? Probably not! Once
brute-force attacks are not feasible, making them even less feasible does not
enhance security. At that point, an attacker will attempt some other way
to break your security.
An analogy may help:
Suppose your computer is slow because it doesn’t have enough RAM, and is
swapping a lot. Adding more RAM will reduce swapping and speed up your
computer. After a certain point, adding more RAM does nothing. Key length is
like that; too short is bad, but after a certain point, making it longer does
nothing to enhance security. The minimal length depends on the entropy in the
key as well as how the algorithm uses that key.
The DES encryption standard used 56-bit
keys. In 1998, the EFF
funded a machine that could brute-force attack on DES; they called the machine
“DES Deep Crack” and it tried around 90 billion keys a second. It could crack
a DES encrypted message in about 4 and a half days. A year later, a distributed
grid of computers on the Internet could be used to guess 250 billion DES keys
every second. Triple-DES has 56-bit, 112-bit (two key version), or 168 (three
key version) keys.
Qu: Most modern algorithms
including AES use 128-bit keys. Is that long enough? Ans: Consider if you
could build a computer a billion times as fast as Deep Crack, it would still
take a million years to brute-force guess the key.
(Of course, systems may have other
vulnerabilities including side-channel attacks, which make the key entropy moot
as the attackers break in using other means.)
The hashing algorithms
typically used with passwords work a bit differently. They generally require
about twice the key length for the same level of security. Thus, SHA-256 was
good enough in 2011, while SHA-512 would probably have been overkill. Of
course, if the protected information is valuable enough, an attacker can always
use a cluster or grid of computers, so even longer keys are needed. (Analogy:
your home’s front door, versus a bank’s safe door.)
Many companies now use DomainKeys
Identified Mail (DKIM) to include a digital signature and to confirm that an
email originated from their domain. These are created using RSA public keys. However,
in late 2012, it was found that companies such as Google, eBay, Yahoo, Twitter,
and Amazon use 512-bit keys. According to Harris (a security researcher),
these keys can be cracked within three days in the cloud, using Amazon Web
Services (AWS) at a cost of about $75. Financial institutions such as PayPal,
US Bank and HSBC reportedly use 768-bit keys; that are also considered insecure
for the purpose.
To make digital signatures highly
secure, keys with a minimum length of 1,024 bits must be used for RSA. The US
National Institute of Standards and Technology (NIST) in 2013 recommended a
minimum length of 2,048 bits for RSA keys.
For current minimum key length
recommendations, visit www.keylength.com.
Most password related
policies come from the U.S. Government (DoD), technical report
CSC-STD-002-85, Password Management Guideline, also known as
the green book (part of the rainbow series). This was produced in 1985, and
although the advice is outdated, it is still followed.
The situation for passwords and
passphrases is only a little different than for keys. Since passwords contain
so little entropy, they can be attacked by brute-force. So making them longer
makes them harder to crack. (It is doubtful a usable password or passphrase
would contain so much entropy that it would not be feasible to attack this way.)
As mentioned earlier, the FIPS-112
standard requires 4 characters as a minimum password length. The NSA
recommends 12 characters. Microsoft, who in most password-related matters adheres
to NSA recommendations, recommend a minimum length of 8 characters. As stated
previously, your instructor favors strong passwords with lots of randomness
(entropy), and the actual length isn’t so vital. Still, it wouldn’t be difficult
for a modern attacker to be able to easily and quickly brute-force through all
possible passwords shorter than 8 characters, and longer is better. (CERT
recommends stronger passwords for administrator accounts, for example, a
minimum length of 15 for root.)
It is recommended that a passphrase
of at least 5 random words or 14 completely random letters be used. For
high security needs, 8 random words or 22 random characters should be employed
(if you can remember them, of course). Passphrases should be changed whenever
an individual with access is no longer authorized to use the network or when a
device configured to use the network is lost or compromised.
Examples of passphrases: “Sheriff
town, 4 Prison keep?”, “salami-pavement, gracious Volvo”, and “Why use XKCD
when, the Nerf-Herder from Tatooine is the key?”. These are even more
effective if you replace the spaces with (random) symbols.
A good tool for generating quality
passphrases is pwqgen,
part of the passwdqc package.
(See also pwqcheck, part of the
same package.)
You can also generate
decent passphrases with:
shuf /usr/share/dict/words | head -n 5
You can increase the
strength of these by replaces the spaces between words with random symbols. If
you don’t have shuf on your
system, try this Perl shell script:
WORDS=/usr/share/dict/words
MAX=$(wc -l </usr/share/dict/words)
for i in 1 2 3 4
do NUM=$(perl -e "print int(rand( $MAX ))+1;")
sed -n "${NUM}p" $WORDS
done | tr '\n' ' '
If you don’t have
Perl, but do have /dev/*random,
you can generate the random integers with this instead (or write a C program):
NUM=$(( $(od -An -N4 -tu4 /dev/urandom)%MAX+1
))
Password Complexity Rules
Most systems enforce some password
complexity rules, in the hope that this will cause only good, string passwords
to be chosen. This rarely works. Additionally, nearly every host and website
uses different rules. This makes a good password hard to reuse (which is a
good thing), but it is annoying to most casual users, who prefer similar rules
for all sites. Still, many organizations recommend various complexity rules,
including NSA, CERT, SANS, and Microsoft.
As an example of such rules, here
are the default Windows Server 2008 rules. Passwords:
·
cannot contain the user’s account name, or any part of the user’s
real name longer than two characters.
·
must be six or more characters in length.
·
must contain some characters from at least three of the following
four categories: uppercase (A-Z), lowercase (a-z), digit (0-9),
non-alphanumeric chartacters (symbols and punctuation marks). Note, Windows
uses English for the definition of letters and digits.
Here are the rules
from a local bank I used some years ago:
·
Your password must be between eight (8) and sixteen (16)
characters and include at least one letter, one number, and one special
character. Passwords are case-sensitive.
·
If the password is changed, the previous password cannot be
reused for 24 months.
(This bank previously
only allowed a 6-digit PIN number for a password.)
Naturally, government and military
requirements for passwords are stricter.
The DoD/DISA
recommendation (2015):
minlen=14 dcredit=-1 ucredit=-1
ocredit=-1 lcredit=-1
which requires at least one each of a digit, an uppercase letter, a lowercase
letter, and a symbol. (This recommendation changes over time.
You can find some
recommendations in DoD
Changes to UCR 2008, section 5.4.6.2.1.2, part 1b subsection 8,
(PDF), I think from 2015; DoD
STIG for Red Hat Enterprise Linux 7 from 2017 (rules RHEL-07-010280
CCI-000[192..205] and others) or from “Passwords
do not meet complexity or strength.” STIG teleconference (2014).
The teleconference has the easiest to read advice. Here’s an excerpt:
“DoD policy mandates
the use of strong passwords. IA control IAIA-1&2 item 2 states “For systems
utilizing a logon ID as the individual identifier, ensure passwords are, at a
minimum, a case sensitive 8-character mix of upper case letters, lower case
letters, numbers, and special characters, including at least one of each (e.g.,
emPagd2!).” DoDI 8500.2, therefore, sets the minimum complexity requirement for
a character-based password. This minimum complexity is reiterated by CJCSM
6510.01, C-A, Section 4 which adds the recommendation that “If technically
feasible, 12 to 16 characters using a mix of all four-character sets is
recommended (e.g., 14 characters using a mix of all four-character sets in the
first 7 characters and the last 7 characters)” [emphisis mine]. In some
circumstances, ... the minimum password complexity (for systems not using DoD
PKI) to 9 characters with “a mix of at least two lowercase letters, two
uppercase letters, two numbers, and two special characters. This policy may
again be updated to require 15 characters for some systems or devices that do
not support CAC/PKI logon where required. Additionally, in situations such as
when INFOCON levels are raised, additional requirements can be implemented.
...”
In addition to that,
there are many rules (stated in UCR 2008) for password aging, password reuse,
and additional complexity rules (such as the username does not appear in the
password and that the password does not contain three in a row of any
character).
In general, for non-military-grade
protection requirements it is better to take the approach of BlackBerry and
Twitter, and simply ban the most commonly used passwords (which are in available
word lists that hackers use). However, enforcing some minimal password
strength is a good idea by using a simple cracking tool such as pam_pwquality to check that passwords
aren’t trivial to crack, before allowing their use. (pam_pwquality is discussed elsewhere.)
Cartoon I saw:
“Sorry, your password must contain a digit, an uppercase letter, a haiku, a
gang-sign, a hieroglyph, and the blood of a virgin.”
Stanford University has (2014) a
policy designed to make secure passwords easier. The complexity rules for
passwords decrease as the password length increases. Passwords can be as short
as eight characters, but only if they contain a mix of upper- and lower-case
letters, numbers, and symbols. The standards gradually reduce the character
complexity requirements when lengths reach 12, 16, or 20 characters. 20-character
or longer passwords can contain any have no complexity requirements, and could
be all lower case. In addition, passwords must pass additional checks to
prevent common or weak passwords (e.g. “P@ssw0rd1”).
IBM researchers have published a paper
in 2015 that claims complexity rules are not the solution for password
hacking. “The problem is that if there’s a single server that can tell you
whether your password is correct, then when that server gets hacked, your
password is broken. The natural solution is to split the information to verify
passwords over multiple servers so that all machines must work together to
figure out whether a password is correct. Under these circumstances, the
attacker now has to break into all the servers to have a chance at recovering
passwords. This can be made extremely difficult by letting the servers run
different operating systems at different locations, all while being managed by
different system administrators.” — SecurityIntelligence.com
Password
Aging
Passwords and
accounts can be disabled after some time has elapsed. This is known as aging.
Most organizations have differing rules about how long a password can be used.
Additionally, there can be rules preventing a recently used password from being
used again. Many organizations use 90 days (three months) before a user
must change their password. This is called the password’s maximum age.
FIPS-112 mandated a user change their password at least once each year. Some
people recommend (and some organizations enforce) shorter password ages: 60
days is common, while the NSA (and Microsoft) used to recommend 42 days (6
weeks). (That was for Windows XP; they don’t seem to have specific
requirements since then for Windows systems.) For RHEL 5, NSA recommends 60
days.
In 2015, HCC changed
from 90 days. “As part of an ongoing College-wide effort to increase on-line
security, all NetID passwords expire after 60 days from the date they are set.”
In all cases, there
is a minimum password age recommendation, which prevents a user from changing
passwords too often. The usual recommendation is 2 days.
Password history is
the saved previously used passwords. A system can remember the past few
passwords (or actually, the hashes of those passwords). After all, it does no
good to force the user to change their password, only to allow them to reuse
the same one. NSA recommends remembers the most recent 5 passwords; Microsoft
recommends remembering the last 3.
Use chage on Linux, passwd on Solaris. Use “chage -l” to view aging info for some account. Aging defaults
for newly created logins are in /etc/login.defs
on Linux, for Solaris /etc/default/login.
Aging data originally was kept in the second (password) field of the /etc/passwd file using commas as field
separators. Modern systems don’t do that, they use fields in the /etc/shadow file, or columns in DBs
such as LDAP.
For each account the
system holds
1. the date the
password was last changed (#days since 1969)
2. the min # days
that must pass between password changes
3. the max # days
since last change before a password expires and must be changed
4. password
expiration warning #days
5. the # days of
inactivity before an account is locked (confusingly called password
inactivity)
6. the date the
account expires.
You can force a password
change (by setting the date of last change to zero or 1, and setting the
max # days reasonably), force users to change their passwords regularly, and
prevent them from changing passwords too often. (If min > max then users
can’t change their own passwords at all.)
Use
aging and PAM (pam_pwquality)
to enforce password policy. To make passwd
command record old password hashes to /etc/security/opasswd
(the following is all one line):
password
required pam_unix.so use_authtok md5 shadow remember=3
As of Fedora 26, you
could also do this with the pam_pwhistory
module.
The pam_ pwquality
hashes new passwords and checks that against your old saved passwords in opasswd. It also tries a few hundred
variations of what you type, to see if any of those match the old hashes. It
hashes what you entered, the reverse of that, that with all variations of case.
It also checks the length of the password you entered and performs some
triviality checks on it: length (strength) of what you entered, your
user name, or a (small) dictionary of common passwords. The “diffok” argument controls how many characters
must be different from your previous password (remember, you had to type that
in too).
(Review man
pam_pwquality options.)
For Solaris without pam_ pwquality,
you can the line “HISTORY=n”
to /etc/default/passwd. This
causes old password hashes to be saved in /etc/security/passhistory.
Note n should be at least
2. So setting n=4 prevents a user from reusing their
last three passwords.
Password
Mechanisms
Originally, only a
single mechanism “crypt” was used in Unix. Today most platforms provide
several different crypto mechanisms that can be used to create
password hashes. The list of crypto mechanisms available varies by platform. Since
Unix is used in high-security environments the crypto stuff is often part of
the platform’s “trusted base” and adding new mechanisms is involved (since the
OS must then be re-certified).
On Solaris, the list
of available crypto mechanisms is listed in the file /etc/security/crypt.conf. The mechanism used for
passwords is listed in the file /etc/security/policy.conf
(the “CRYPT_DEFAULT=” line). Some
versions of Solaris use “unix”
(which is really the old crypt mechanism under a different name) by default.
An SA should change the
password policy as part of the post-install procedures.
The mechanism used to
hash new passwords (when you run the passwd
command) is defined by an option in the PAM module used to set passwords (e.g.,
“password sufficient pam_unix.so md5 ...”).
A password hash
stored in /etc/shadow (or
elsewhere) could have used any mechanism, so the one used must be stored with
the password. If the first character is not a dollar sign, the old crypt
mechanism is assumed. Otherwise the first part is “$mechanism$”, where mechanism
can vary depending on your system and which mechanisms are installed.
For Linux the
mechanisms are defined in glibc2. You can see the list of supported mechanisms
from your system’s crypt(3) man
page (might be outdated). For Fedora, the mechanisms available in 2015 are: $1$ (the BSD/Linux MD5), $5$ (SHA-256), and $6$ (SHA-512). Other values are used
on other systems: $md5$ (Solaris
MD5 variant, supposedly harder to crack), $2a$
or $2$ (Blowfish, on OpenBSD and
some Linux distros), $2y$
(bcrypt). These newer mechanisms can use up to 16 characters of salt. (See wikipedia.org/wiki/Crypt_(C)
for more details.)
The original Unix crypt password mechanism (adapted from Robert
Morris and Ken Thompson, Password Security: A case study, Published in
Communications of the ACM, vol. 22, issue 11 (Nov. 1979), pages 594–597)
isn’t used much today but is instructive to examine:
1. A 12 bit random
value is chosen and encoded to form a two character string from the
ASCII letters and digits. This is called the salt. Often the current
time is used to generate the salt.
2. Next, read the
first eight characters of the password (the rest is ignored). If a shorter
password is used, append the two characters of salt, then pad with zeros until
8 bytes are available. Using 7-bit ASCII, this results in a 56 bit partial
key.
3. The salt is
added to the partial key to generate the longer key that is used with the
modified DES encryption used (t).
4. A message (a
string of eight bytes initialized to all zeros) is then encrypted using the
key. A modified version of DES is used that incorporates the 12 bits of salt.
This prevents using commercial DES hardware to speed the brute-force checking
of keys. The output is 64 bits (eight bytes) of encrypted data.
5. The encrypted
output is used as the input message (in place of the zeros) and the encryption
is repeated, for a total of 25 DES encryption “rounds”. (Although DES
encryption is used, the original message is known and thus this is more of a
hash of the password than an encryption of the all zero message.)
6. The 64 bit
result is then encoded to be all printable characters (letters, digits,
periods, and slash characters only) that results in an 11 character ASCII
string.
7. The two
character salt plus the 11 character encrypted text is stored in the password
file.
To validate a user’s
password, the entered password plus the retrieved salt value is used to
generate the 11 character result. This result is compared, byte for byte, with
the copy in the password file.
The use of many
rounds of hashing is important. This slows down off-line password guessing
thousands of times; the extra delay won’t matter for users. This technique is
known as hash stretching. Three methods are well-known for this:
Choose one of these three well-known ones: PBKDF2, bcrypt
and scrypt.
The first one is currently the most popular choice, mostly because the hashing
primitives it supports are NIST approved. As attackers gain more powerful
computers, you can regularly increase the number of rounds used.
Password Salt
The salt
serves several purposes:
·
Without salt, if two users had the same password, the stored
result would be the same. So one user could repeatedly change their own password
to guess another’s. With salt, even when users have the same password the salt
will be different, and the stored values will be different.
·
The 12 bits of salt used in crypt increases the effective length
of a short password, effectively making it 4048 times has hard to guess as
passwords generated without the salt. Without salt, a “rainbow table” of all 6-character
or less passwords can be generated and stored on a hard disk. This makes it
trivial to lookup a hash and recover the original password. (Technology
improvements make rainbow tables for 16 character passwords possible today.)
In 6/2012, 6
million hashed LinkedIn passwords were stolen, cracked, and
published. Apparently, the attackers were able to do this easily since LinkedIn
didn’t use any salt, and were cracked using some guessing and some rainbow
tables.
Adding salt to the
password means generating 2-18 character password hashes instead of 0-16
character passwords. Today, MD5 and more modern secure hash schemes use even
more salt. (Unlike the original crypt, the full password and all the salt is
always used.)
·
A rainbow table is a huge lookup table used in
recovering the plaintext password from a password hash. The table takes a long
time to build and a lot of storage, but once constructed it can be used to
quickly lookup a plaintext password from its hash. Salt is often used with
hashed passwords to make this attack more difficult, often infeasible.
Of course, using
very long passphrases / passwords (>100 characters) can be even more effective
than adding salt. But users rarely chose truly random passwords, and prefer
shorter ones, so using salt is an effective solution.
·
The use of salt to modify DES makes hardware implementation difficult.
(In the 1970s, it was considered very impractical if not impossible to do so.)
This forced the use of software DES. Having to do 25 rounds of DES in software
is fast enough when validating a password, but slow enough on (1970s) hardware
to make brute-force cracking of passwords impractical.
Today,
implementations of DES are much faster, as is the hardware used. A moderately
priced cluster or multi-computer (SMP) can perform over 6 million DES
encryptions per second. Today’s hard disk size also means that an opponent can
pre-compute all possible 13 character crypt passwords at their leisure (there
are 62^13 = 200,000,000,000,000,000,000), and quickly lookup any given
password.
Other terms for salt
are nonce and initialization vector (IV). Crypto experts can
make a distinction between salt (a fixed value that is added to password hashes
stored, and stored as plaintext) versus a cryptographic nonce (different for
each use, often used with MACs and block ciphers, and not necessily chosen at
random), but most use the terms interchangeably. (A nonce is an arbitrary
number, used only once: number + once = nonce.) A non-random IV is a
nonce (most algorithms require an IV to be random). Database primary keys are
nonces too.
No version of
Windows, up through Windows 7 and Windows server 2008, include any salt at all
with the passwords.
The
MD5 Mechanism: Until recently (2012), passwords were often encrypted using
MD5 (previously with crypt).
See RFC-1321. This is actually a hash of your entire password (not just the
first 8 characters, and all 8 bits in the bytes are used not just 7).
Next, this is
combined with a variable amount of salt: up to eight characters selected from
all letters, digits, period, and forward slash. (If a two character salt
increases the strength 4,000 times, imagine how much harder it would be to
crack MD5 with a variable length salt up to eight characters!)
The result is padded
with a single 1 bit followed by 0 bits, to a length of 448 bits.
The length of the
password is now appended as a 64 bit number. This results in a message exactly
512 bits (64 bytes) long. It has been discovered that adding the message
length to the message greatly strengthens the security of the hash.
Finally, the MD5 hash
of this message is calculated. The resulting hash is 128 bits (16 bytes). It
is then encoded as a string of 22 characters from letters, digits, slash and
period (double the old crypt length). The salt is separated from the hash with
a “$” (not needed if the salt is 8 characters long, but allowed).
You will notice a
password stored in /etc/shadow
begins with $mechanism$.
This indicates the mechanism (algorithm) used to hash this password. For MD5
(“$1$”), the (up to)
8 characters following the second dollar sign compose the salt,
also known as the seed. As noted above, the salt is separated from the
actual hash by a ‘$’ (unless the
salt is the max length of 8 characters, in which case the dollar-sign is
optional).
Following the salt is
the actual hash of the password. The result stored in the shadow file looks
like this: $1$salt$hash.
Linux allows the use
of batch account creation with passwords. But you need to generate the shadow
file style password yourself:
echo secret |openssl
passwd -1 -stdin
Sadly, openssl still
only supports crypt and MD5 (the “-1”). While good enough for my purposes (a
password that must be changed at first login), there is no standard, portable
tool for this. You need to generate the salt yourself, then generate the SHA
512 hash, and encode that up. Here’s some Python code that works:
$ printf '%s' secret | python -c "\
import crypt,random,string
print crypt.crypt(raw_input(), '\$6\$' + \
''.join([random.choice(string.ascii_letters + string.digits) \
for _ in range(16)]))"
As with crypt in the
1970s, MD5 for a long time was believed difficult to implement in hardware
cheaply. The huge range of hashes possible would be difficult to pre-compute
and store on older disks, and might take hundreds or thousands of years of
constant computing to guess on relatively available computers today. Multi-million
dollar special password cracking computers could be built that could cut the
time down to mere decades. So, how often should you change your password to
be safe? (See below for a discussion of this.)
MD5, while still
widely used with PKI certificates, is no longer secure. In a “Collision”
attack, two different sources of plaintext generate identical cryptographic
hashes. In
2008, a team of researchers made a collision attack practical. By
using a bank of 200 PlayStation 3 consoles to find collisions in the MD5
algorithm, and exploiting weaknesses in the way secure sockets layer
certificates were issued, they constructed a rogue certificate authority that
was trusted by all major browsers and operating systems.
The Flame malware is
the first known example of an MD5 collision attack being used in the
real-world. It wielded the esoteric technique to digitally sign malicious code
with a fraudulent certificate that appeared to originate with Microsoft. By
deploying fake servers on networks that hosted machines already infected by
Flame, and using the certificates to sign Flame modules, the malware was able
to hijack the Windows Update mechanism Microsoft uses to distribute patches to
hundreds of millions of customers.
The
SHA Mechanism: SHA-1 is a similar secure hashing algorithm. It includes a
specific 64 byte value that is added to the password and salt. The resulting
hash is 160 bits (20 bytes) long. Stronger password hashing algorithms include
SHA-2, and variants of that with longer keys: SHA-256, SHA-384, SHA-512, and
others. These are preferred for new applications because they are well studied
and standardized (and required) by NIST SP-800-57.
The various
mechanisms can be made more resistant to brute-force and dictionary attacks, by
taking the salted hash as input to the mechanism again, repeating this process
for a number of rounds. This slows down the matching process up to 150,000
times (depends on the number of rounds; md5-crypt is 40 times slower, Bcrypt is
352 times, and SHA-512 with 1 million rounds would be 156,000 times; see this
ref). That is not a problem for the legitimate user, who only needs
to run through this process once. An attacker must do it for each possible
password.
A number of
mechanisms (and variants of the standard ones) exist that do multiple rounds,
such as MD5-crypt, bcrypt (which uses blowfish encryption to generate the
hashes), PBKDF2 (Password-Based
Key Derivation Function 2, a.k.a. PKCS #5 v2.0 from RSA Laboratories), and scrypt
(specifically designed to make it costly to perform large-scale custom hardware
attacks by requiring large amounts of memory, compared with bcrypt and PBKDF2).
Note, most web site
frameworks don’t use these good methods by default for some reason; Joomla,
Drupal, WordPress, and phpBB all use weak configurations by default, even when
using a powerful security framework (WordPress and phpBB both use the good phpass,
developed by the JtR developer).
Comparing
Password Hashing Mechanisms
In June 2012, 6.5 million LinkedIn
password hashes were made public. They used SHA-1, so it didn’t matter, right?
Wrong. Because SHA-1 uses a single
iteration to generate hashes, it took security researcher Jeremi Gosney just
six days to crack 90 percent of the list. SHA1, MD5, and a variety of other
algorithms widely used to protect passwords are unsuited to the job, because
they were designed to generate hashes quickly using a minimal amount of
computing resources. Compare that with the original crypt algorithm, which was
specifically designed to take lots of time and resources to compute.
Today, there are better hashing
algorithms for passwords known, such as bcrypt, PBKDF2, scrypt, or SHA512crypt,
that take lots of memory and CPU cycles to generate.
The official SHA1 specification
calls for 1,448 distinct steps to calculate a hash. By 2012, crackers had
figured out how to reduce the number to 1,372, and by using special hardware
instructions supported by GPUs, the number of steps needed was cut to 868. Jens
Steube (who is better known as Atom, as the pseudonymous developer of the Hashcat
password-recovery program) then figured out a way to remove identical
computations that are performed multiple times from the process of generating
of SHA1 hashes. That reduced the number of steps needed to 734 (meaning those
LinkedIn passwords could have been recovered in only 5 days).
In 12/2012, a
researcher demonstrated a cluster of five servers equipped with 25
AMD Radeon GPUs, communicating at 10 Gbps and 20 Gbps over Infiniband switched
fabric. The machine is designed to brute-force crack passwords from their
hashes. The system was able to generate 348 billion NTLM password hash checks
per second; a 14-character Windows XP password hashed using LM, for example,
would fall in just six minutes. The system is less effective against stronger
hashing mechanisms; it “only” generates 77 million brute force attempts per
second against MD5crypt, 71,000 guesses against Bcrypt, and 364,000 guesses
against SHA512crypt. (Note, these attacks depend on the attacker obtaining the
password hashes.) While the ability to crack such weak mechanisms is old news
(WinXP’s LM hashes can be cracked using a rainbow table on one PC, in seconds),
consider how easily the five server cluster could become a 5,000 server cluster
and how that would work against SHA-1.
Bcrypt is very
computationally intensive and requires a lot of memory, making it hard to crack
even with GPUs. It is used for passwords in PHP (since 6/2013). For example, a
PC with eight CPU cores can generate around 5,000 hashes per second; current
GPUs generate similar “cracks per second”. Using SHA1 hashing on similar
hardware provides tens of millions of cracks per second. Through the use of (a
lot of) salt, rainbow tables would be difficult to create.
Centralized
User And Password Databases: Single Sign-On
Rather than a password data file
per host, it makes sense to use a single central repository for user authentication
information. This supports single sign-on. Some choices are: LDAP NIS,
NIS+, and Kerberos. Take care to encrypt passwords while in transit across the
network!
All real security policies require
detection of old or rogue user accounts, as well as enforcing password strength
(see below). Only SOHOs use per-host password, group, and shadow files. Larger
organizations use a central repository. In the past NIS/NIS+ were used, but
today LDAP and Kerberos are common. Very large organizations may use PeopleSoft
or SAP HR (human resources) systems to manage employees. You need some way to
“diff” the HR system and the list of user accounts. Note some user accounts
for non-employees are always present, e.g., system accounts.
On most systems,
especially when single sign-on is used, you should make sure your UIDs and GIDs
follow the *nix standard:
UID/GID 0 is reserved
for root user.
UIDs/GIDs ranging
from 1-99 are reserved for other predefined accounts.
UIDs/GIDs ranging
from 100-999 are reserved for system accounts (RHEL <7 reserves only up to
499).
Normal users have
UIDs/GIDs of 1000 or greater (on RHEL <7, they start at 500). Note that
although IDs of <1,000 are reserved, only the ID of zero is special.
Once you have a list of valid accounts,
you must monitor all systems (per host files and LDAP) for any changes.
Nagios, Samhain, or other monitoring systems can do that. Auditors will want
to know how you maintain the legitimate accounts list, and what your incident
response policy is when unexpected changes are made.
How Often
To Change Passwords
It seems intuitive that to defeat a
brute force attack you only need to change your password (“password rotation”)
every so often. A three month lifetime is commonly used in business
organizations. (I believe the three month figure commonly used in
business is because DES could be cracked in about that time frame, when this
“best practice” was promulgated.) FIPS-112 required the maximum lifetime of
a password is one (1) year. However, real-world results, as well as
mathematical analysis, don’t support this theory. (Reference: Howard,
Mike (mike@clove.com), how
often should you change your password? published in ;login:
Usenix vol. 31, no. 6 (12/2006), pages 48–51.)
Making users invent new passwords
for each account several times a year forces users to pick poor passwords, some
variation of “July2010” or worse, or use the same passwords everywhere (so if
any one system is vulnerable, all your systems are). This is clearly bad
security as well as highly annoying to users! If the same password is
used for POP3, IMAP, and other services which transmits usernames and passwords
in plain text, it won’t be long before attackers get a copy of those passwords!
Writing down personal
passwords is a good practice as long as you store them in a secure
location, such as a wallet or purse. If that gets lost along with your
credit cards and other IDs, those passwords are just one more item you need to
cancel. Writing down passwords may be required for various legal compliance
reasons, but in that case the passwords are often stored in a bank safe deposit
box or other secure location with limited access.
Unfortunately,
writing down passwords is forbidden by many organizations’ security policies.
It is safer to enforce good
passwords and use a strong hashing algorithm (MD5 is okay for medium or low
risk situations, SHA–384 or SHA–512 is currently good for high risk
situations). Having very strong passwords and using a strong hashing
algorithm should mean you don’t have to change passwords more than once every 3
to 5 years (or never). This will be safer than using poor passwords that
are quickly guessed.
Also consider using smart cards or
biometrics (e.g., fingerprint scanner) instead of (or better, in addition to) passwords
to authenticate users.
Regulatory compliance
can determine how often you must change passwords. PCI has the strictest
policy requirements (as of 2011), and requires 90-day password rotation for
systems dealing with protected credit card data and any infrastructure
supporting such. PCI also requires two-factor authentication for remote VPN
access; a single password isn’t sufficient. (Certificates plus passwords are
often used.)
Password Auditing
It is possible to bypass the PAM
mechanism and set a weak password (root can do that, or can copy some password
hash and paste it in /etc/shadow.)
A good SA will periodically try to crack passwords, just to make sure only good
passwords are used. One such tool is John the Ripper which is easy
to install and use: yum install john
unshadow /etc/passwd /etc/shadow >~/pwlist; john pwlist
(As of v1.7.6, JtR doesn’t know
about SHA hashes; but there is a patch.
You can DL the source, apply the patch, and build a working version. Or you
can try the new “--format=crypt” option, which should work but is slower. The
current versions do know about modern hash methods.) Additional checkers exist
to audit just Windows passwords, efficiently (useful when using Samba for
example). Other popular tools include the very fast hashcat (uses CPU) and oclhashcat-plus
(uses GPU).
Password
Cracking
An attacker can defeat password
authentication in a number of ways. (A good reason to use two factor authentication!)
If weak physical security is used,
an attacker may be able to see a password as it is typed in. Also, some people
write down passwords. While not an unsafe practice per se, leaving the paper
with the password lying around is. (As is storing passwords in unprotected
files or in emails.)
Passwords can also be stolen with key
loggers, a type of malware.
Using a web browser’s
features to remember usernames and passwords (and form data), to log in to
sites automatically defeats key-loggers: no keys are pressed. This applies to
the form filling too, and can be a factor when you need to enter credit card
numbers etc. There are add-ons for major web browsers that will store that
information with a strong AES or better encryption, using a password you
supply. (The encryption/decryption happens only on your computer; the
information saved on (say) Mozilla’s Firefox Sync server is only usable by
you.)
If weak passwords are allowed, many
people will chose easily guessable passwords. An attacker can do a bit `of
Internet search for a person to find their name, family members’ names, pet names,
cars you’ve owned, the addresses where you or your family has ever lived, etc.
This will yield a few hundred proper nouns and numbers. By trying combinations
and simple variations, a surprisingly high percentage of passwords can be
cracked. In a dictionary attack, a standard English dictionary
of words and proper nouns are tried, including simple variations (e.g.,
reverse, mix in a few digits, strange capitalization, substitute one for ell, zero
or oh, etc.) Using pwquality or other system settings to prevent weak
passwords is very effective here.
In 6/2012, 6 million
LinkedIn passwords were stolen, cracked, and published. These and other stolen
password lists have allowed security firms to compile a
list of the 25 weakest, worst passwords that are still popular:
password, 123456, 12345678,
qwerty, abc123, monkey, 1234567, letmein, trustno1, dragon, baseball, 111111, iloveyou,
master, sunshine, ashley, bailey, passw0rd, shadow, 123123, 654321, superman, qazwsx,
michael, and football. Other cracked popular passwords include ihatemyjob, f***mylife
(and other profane passwords), nobama, iwantanewjob, and strongpassword.
The list is now
compiled each year by SplashData, from stolen password lists that were
published. See their list of worst
passwords of 2012.
The secure hashing scheme used
(e.g., MD5) may have flaws unknown to any but an attacker. This is extremely
unlikely! (As mentioned previously, flaws in MD5 were discovered in 2008. For
this reason, Fedora since version 11 uses SHA-256 or SHA-512 everywhere
(passwords, package digests, etc.)
It can be effective to limit the
number of network attempts per minute to your SSH port. (Changing that from
port 22 will only stop script-kiddies who don’t bother to run a port scan
first. But that may be a lot of attempts!) You can do this at the network
level with iptables; there are several ways it can be done. Here’s what I used
for YborStudent (long lines wrapped for readability):
#
Allow unlimited SSH connections from HCC
# (whitelist, so students don't lock out everyone):
-A INPUT -s 169.139.223.1 -m state --state NEW \
-m tcp -p tcp --dport 22 -j ACCEPT
# Here we limit users to 5 ssh connects per minute,
# or the connection is dropped:
-A INPUT -m state --state NEW -p tcp --dport 22 \
-m limit --limit 5/min -j ACCEPT
-A INPUT -i eth0 -p tcp --dport 22 -j DROP
The problem with this is low
and slow attacks: attacks meant to be slow enough that IDS systems
aren’t tripped, but fast enough where the attacker has a decent chance of
getting access. Typically, there are about one or two attempts per minute
against the root (or other) account, each coming from a different IP address
(maybe a botnet). While this doesn’t sound like much, it’s enough for an
attacker to cycle through 1440 common passwords in a single day. Admins who
use passwords like “root”, “test”, “admin”, “password”, etc., are likely to
fall victim. A good IDS/IPS system such as ossec
should be used and tuned to prevent such attacks (and don’t forget using pwquality
to enforce strong passwords!)
The final method is a brute
force attack. Here the attacker tries all possible passwords until one
works. The strength of various encryption and secure hashing methods is
measured by counting how hard such a brute force attack would be. Statistically
speaking, if there are N possible passwords, an attacker would on
average need to try N/2 of them. Since only so many passwords can be
hashed per second and compared with some hashed result on modern (and
predicted) hardware, you can estimate how many days/months/years it would take
to crack a password. The original Unix crypt algorithm would take less
than a week on a modern COTS computer.
[Adopted from Anatomy
of a crack Ars
Technica Post 5/28/13] Ars asked three experts to crack passwords.
The list contained 16,449 passwords converted into hashes using the MD5. One
expert’s first stage cracked 10,233 hashes, or 62 percent of the leaked list,
in just 16 minutes. It started with a brute-force crack for all passwords
containing one to six characters, meaning his computer tried every possible
combination starting with “a”
and ending with “//////”. Because
guesses have a maximum length of six and are comprised of 95 characters—that’s
26 lower-case letters, 26 upper-case letters, 10 digits, and 33 symbols—there
are a manageable number of total guesses. This is calculated by adding the sum
of 956 + 955 + 954 + 953 + 952 + 95. It took just two minutes and 32 seconds
to complete the round, and it yielded the first 1,316 plains [passwords] of the
exercise.
The first stage of
each attack typically cracked in excess of 50 percent of the hashes, with each
stage that came later cracking smaller and smaller percentages. By the time
they got to the latest rounds, they considered themselves lucky to get more
than a few hundred plains.
Beyond a length of
six, however, Gosney was highly selective about the types of brute-force
attacks he tried. That’s because of the exponentially increasing number of
guesses each additional character creates. While it took only hours to
brute-force all passwords from one to six characters, it would have taken
Gosney days, weeks, or even years to brute-force longer passwords. ... He
took a good word list and tried adding every possible 2-character combo of
digits and symbols to the end, then three, then four. Next he appended each
possible 4-digit number to the end, and finally tried appending four lowercase
letters or digits. This was repeated by prepending and splitting (adding the
extra characters in the middle). In under 5.5 hours, over 78% of all passwords
were cracked.
It turns out that passwords
on any given site are similar, even if the users don’t know each other. For
the final phase of the cracking exercise, Gosney generated a statistical model
of my likely passwords from the ones already cracked, and use that list to
brute-force the rest. The model, Markov attack, guesses all possible passwords
with a given length and a number of the most likely characters for each
position. For length of seven and only 65 characters (of 95), it drops the
keyspace of a classic brute-force from 957 to 657, a benefit that saves an
attacker about four hours.
Like SHA1, SHA3, and
most other algorithms, MD5 was designed to convert plaintext into hashes
quickly and with a minimal amount of computation. That works in the favor of
crackers. Armed with a single graphics processor, they can cycle through more
than eight billion password combinations each second when attacking “fast”
hashes. By contrast, algorithms specifically designed to protect passwords
require significantly more time and computation. For instance, the SHA512crypt
function included by default in Mac OS X and most Unix-based operating systems
passes text through 5,000 hashing iterations. This hurdle would limit the same
one-GPU cracking system to slightly less than 2,000 guesses per second. Examples
of other similarly “slow” hashing algorithms include bcrypt, scrypt, and
PBKDF2.
Today an
attacker has additional tools available to speed up the cracking process:
·
A cluster (or bot-net) may be employed to have hundreds or
thousands of CPUs working on cracking a single password. Governments could
afford to build special purpose clusters with millions of nodes for this.
·
A special “future” type of hardware that uses quantum
computing will be able to search through millions of passwords
simultaneously. So the brute force attack that took years on traditional
hardware may only take hours on a quantum computer.
Quantum computers use
quantum bits, or “qubits” to do their thing. Current quantum computers
(2016) have been built with 5 qubits, but a code breaking quantum computer
would need hundreds or thousands, so there no reason to panic yet. But it is
time to think about solutions.
Unlike current crypto
systems used HTTPS, Ring Learning with Errors, or Ring-LWE for
short, has no known weaknesses to quantum computing. Google is employing it in
test versions of Chrome. [Wired]
The new algorithm is named “new hope” and works with OpenSSL; the hope is even
if the new method proves flawed, you still get today’s level of security
anyway. (Note that Google claims this is only a test, not a new standard, and
will withdraw it after two years.)
·
Today’s massive disk arrays mean an attacker can pre-compute and
store on disk all the MD5 (say) hashes (2^32) for all possible passwords less
than a given length (a rainbow table). Then, a simple lookup of
the hash yields the password. This is the main reason why modern systems use shadow
password systems, where not even the hash is world-readable.
·
The GPU (graphics processing unit, found on high end video
cards) can be used as a math coprocessor for computationally intensive,
data-parallel computing problems. NVIDIA and AMD/ATI have been marketing this
feature of their cards. This can be used to dramatically speed up the
password-cracking process.
Russian-based “password
recovery” company Elcomsoft was in the news in 2003 when Adobe had one of the company’s
programmers, Dmitry Sklyarov, arrested for cracking its eBook Reader software.
Elcomsoft’s new password cracking method attacks the NTLM hashing that Windows
using brute force and a GPU. The company claims this speeds up the time it
takes to crack a Vista password from two months to a little over three days. Elcomsoft
says they have filed for a US patent on this approach.
In 2008, an Elcomsoft
spokesperson said that without dictionary words being involved, cracking WPA
and WPA2 is still quite intensive: perhaps three months to crack a
lowercase-only random eight-character password using a PC with two Nvidia GTX
280 video cards.
Update 9/2009:
Computer scientists in Japan say they’ve developed a way to break the WPA
encryption system used in wireless routers in about one minute. The attack
gives hackers a way to read encrypted traffic sent between computers and
certain types of routers that use the WPA (Wi-Fi Protected Access) encryption
system. The attack works only on WPA systems that use the Temporal Key
Integrity Protocol (TKIP) algorithm. They do not work on newer WPA 2 devices
or on WPA systems that use the stronger Advanced Encryption Standard (AES)
algorithm.
Other Password Issues and Mechanisms
Crypt, MD5, and SHA-1
through SHA-256 are all fast on current hardware. To make your password hashes
more secure you can stretch them by running thousands of hash
operations, each on the result of the previous one. (PHK MD5 does that.) You
start by hashing the password, adding the salt/nonce, and hashing that. Keep hashing
the result a random number of times. To check a password, you must run through
the same number of iterations (unless someone discovers a mathematical trick to
avoid doing that; unlikely.) Or you can use a slower block encryption scheme
to generate the hash, such as Blowfish. (Bcrypt does this.)
Note that besides
correctly hashing a password, there are issues about storing it, using a hashed
value as a web browser cookie, transmitting the password across a network,
time-stamping, generating strong salts, password updating, and other issues.
The bottom line is
you should never roll-your-own password or crypto system. Use a
standard tried-and-true solution or at least use standard crypto
libraries.
SRP is the
Stanford Secure Remote Password protocol. It is a public key
cryptosystem designed to securely store and validate passwords without storing
them in the clear or transmitting them in the clear. This is similar to
MS-CHAPv2. While the University of Stanford holds a patent on this method, it
is available for use for free. The WoW and Warcraft III systems use SRP. The
IETF has standards for it, RFC-2945 (SRP) and RFC-5054 (TLS-SRP).
Never send any
passwords through email. It goes through too many hops unencrypted, gets
indexed by search features on email servers, etc. Login names can be sent this
way, but passwords must go by SMS, or voice, or telegram, or postal mail.
The French government
has passed a law requiring organizations such as Google, Yahoo, etc., to record
and save user’s personal data, including their passwords, and to turn them over
to authorized (French) government agencies when legally requested. This is
being challenged in the French Supreme Court (2011). Update: in 2014, the EU
now requires Google to allow people and organizations to be forgotten.
The interesting part
to me is about saving passwords. Currently no major company saves those, so
there is no way to turn them over to anyone. But if they are saved, there is a
possibility they can be stolen or exposed.
In addition, if
organizations do save such personal data for the French, it will also be available
to other governments, such as the U.S. (using a National Security Letter, or
NSL, under the Patriot Act) with no warrant required, and no notice given.
Once good way to help
protect yourself is to use different passwords for each on-line site.
Keeping passwords
different for every website can be difficult, but there are several
techniques you can use. One is to use a mnemonic technique, combining
the site or project name with a standard password you always use (and can
remember).
For instance, say your
standard password is CatDogRat.
(I would hope it is stronger, something like “:xT9/qwB”;
try apg to make one.) The last
few letters (or last+first) of the site name goes between the Cat and Dog,
and the number of letters of the site name (or the difference between that and
the number of letters in the username used on that site) goes between Dog and Rat.
So my password for wpollock.com
would be CatckDog8Rat. Of course,
the standard password should not be words but a normal, strong password. Using
such a mnemonic means I can use a different and strong password for every site,
while only having to remember one good password.
Of course, there are
many possible mnemonic techniques you can use. Here’s another: Take the first
letters of a sentence you like, say the first line from the poem “Jabberwocky”:
Twas brillig, and the slithy toves” “Tbatst”, add (say) every other character of your user
name (e.g., “wpollock” gives “wolc”) to get “TbatstWolc”, then add (say) every 3rd character from the
site name, e.g. hccfl.edu yields
“TbatstWolcHfd”, and finally
convert all lowercase letters to 7331-speak (or
“leet-speak”), giving a final password of something like “T8@7$7W0LChFd”. The idea is that the
password is strong, hard to guess, and different for every site. But if you
forget it, you can easily recreate it by remembering the poem and the general
method used.
Another technique is
to use a password manager. This is software that stores your user IDs
and passwords for various websites, mail services, etc., in a securely
encrypted file. To use any of the passwords you only need to remember one
(very strong!) master password. Some popular password manager software is
included with web browsers (e.g., Firefox Sync and Xmarks) and MUAs, and there
are stand-alone ones such as gpg-agent,
ssh-agent, and keyring for Linux and Unix systems.
Some others include LastPass,
KeePass, and
1Password.
The encrypted password files can be backed up on a service such as DropBox or Box.net. With
this method, you can use a password generator such as “apg”, “pwgen”,
or “pwqgen” to create very
strong, different passwords for every site (and for the one master password you
must remember).
Microsoft’s
Safety & Security Center provides a guide
on creating strong passwords, that includes using Microsoft’s online
password strength checking service. See also Google’s
guide to creating sensible and more secure passwords.
One last point: Many
websites allow a password reset using just your email address. So if an
attacker gains access to your email, they can reset your passwords! Protect
your email accounts with very strong passwords.
Stolen email accounts
sell for about $3 - $8 on the black market. They have many uses, not just
spamming your friends (who may be fooled, since the email comes from you), but
also resetting passwords for on-line services (those that send a reset request
to the email address), including banks and merchants. (KrebsOnSecurity.com:
the value of a hacked email account)
Facebook has a new
system for resetting passwords: Trusted Contacts. This feature requires the
help of several friends you designate in advance. If a user forgets their
password or is otherwise locked out of an account, they can request that
Facebook send different one-time security codes to up to five friends. You
then contact your friends to get the codes; hopefully, they won’t give them to
anyone but you. Once the user supplies three of the security codes sent,
Facebook will reset the account password.
Locking Down (System) Accounts
Unix and Linux don’t (and never
have!) provide a way to lock accounts. This is because early on, it was
thought that you could prevent logins by manipulating the password hash such that
no password could match it. However, this assumption is no longer true, if it
ever was: fingerprint readers and SSH keys don’t use the hashed password field
in any way. Not only that, but many jobs can be run from an account locked in
this way, such as cron and at jobs, or jobs started vial the
email forwarding system (~/.forward
or the equivalent allows email to be piped through an arbitrary program).
Where possible, replace the shell
with “/sbin/nologin” (which
politely refuses login) or “/bin/false”
(which just fails). This will disable at,
cron, and su on many systems. Note a missing
shell (empty shell field in /etc/passwd)
implies /bin/sh; however, PAM or
other mechanisms may consider a missing shell to lock the account. Run pwck and grpck, and fix any reported
problems. (Missing home directories are common; Consider using /var/empty or /var/empty/username as the home directory.)
If the encrypted password field of
the /etc/passwd file is set to
an asterisk, the user will be unable to login using login, but may still login using rlogin(1), run existing processes and initiate new ones
through rsh, cron, at,
mail filters, etc. If set to “*NP*”
the password is obtained via NIS+. If an “x”,
the /etc/shadow file is used.
If empty, the user can log in without a password (some systems lock the account
if the password field is empty). Otherwise it contains the password hash. (On
older Unix systems, this can be followed by a comma and then password aging fields
separated with commas.)
Enabling/disabling
(unlocking/locking) accounts is done in a system-dependent way. Mostly
commonly, accounts are locked by changing the password hash in /etc/shadow. On some versions of
Unix, this may also prevent creation of new processes via at, cron,
etc. In shadow, an account is
locked if the password field is (or starts with) ‘*LK*’ on Solaris and UnixWare, ‘*’ on HP-UX, containing ‘Nologin’
on Tru64, a leading ‘*LOCKED*’
on FreeBSD and a leading ‘!’ on
Linux. (Empty or null passwords are locked with “!!” instead.) At least on Linux, using “*” or “no login”
in the passwd file’s password
field also locks an account.
Modifying the
password hash makes it impossible for any entered password to match. If the
password field is prepended and not completely replaced, an unlock operation
can restore the previous password. On other systems, the tools locking
passwords replace the hash completely, so a new password must be set to enable
the account.
If there is a
requirement to disable password authentication for the account while still
allowing login via public-key, then the password field should be set to
something other than these values (e.g. “NP”
or “*NP*” should work well).
Generally, you lock and unlock
accounts with passwd -l (and “-u”) or usermod
-L (and “-U”), rather than edit account files by hand (say by
using the vipw command).
Locking an account by changing the
shell field yields the same result, and additionally allows the use of su. The system maintains a list of valid
shells (often in /etc/shells).
Any account with an invalid shell (any program not in the list) is considered
locked (by pam_shells). Using
an invalid shell (often /bin/false)
may prevent other access as well (e.g., FTP; see pam_shells).
Unfortunately, an account with an invalid shell is still a valid account
as far as PAM (pam_unix) is
concerned!
Using an invalid shell may
prevent su and may prevent cron jobs and at jobs as well (depends on your system). Locking an
account may prevent some services for the user. For example, on some systems
sendmail won’t deliver email to a locked account.
If your system allows
cron jobs for accounts with valid shells, or your system accounts don’t use any
cron jobs, you should change the shell to an invalid shell.
Remember that locking a password
doesn’t prevent login or remote command execution via ssh (or scp or sftp)!
(User can still use SSH keys, which bypasses PAM’s auth modules even when sshd
is configured to use PAM.) You should also change the shell to an invalid
one.
Some versions of sshd do check for locked accounts,
when not configured to use PAM. When configured to use PAM and sshd uses keys to authenticate the
user, then it only uses the PAM account
modules, not the auth modules,
and pam_unix doesn’t check for
locked accounts. (The designers apparently assumed the authentication will
fail if the account is locked.) While Linux PAM doesn’t contain any module
that can check for locked accounts in the account
context, you may be able to find one you can use from a list of
non-standard PAM modules on the Internet, or create one, but make
sure the module you find can work in the account
context and not just auth.
pam_unix on Linux will check if an
account is expired (in the account
context), so one way to lock out an account is to use chage and expire the account.
The standard Linux OpenSSH server sshd supports an internal list of allowed
(or denied) users, but you must update that whenever you lock or unlock any
account. There are PAM modules such as pam_listfile
that also use such lists, but they only work in the auth context. (Note that not all *nix systems have this
bug.)
Consider changing the
user’s expiration date to one in the past (set the field to “1”, which means
January 1 1970). This should prevent login from the console or from ssh (when sshd is configured to use pam).
Most sshd
servers can be configured to use PAM, and a PAM module could check for locked
accounts (currently there isn’t one). Also, sshd
can deny access to a configured list of users or groups. (See sshd_config).
On Linux, you can use
pam_tally to lock
accounts after a number of unsuccessful attempts. The /var/log/faillog keeps track, and can
be viewed with the faillog
command. On Solaris, in /etc/default/login
define RETRIES=3, and then
enable locking using the LOCK_AFTER_RETRIES
variable in the /etc/security/policy.conf
file.
However, this can be
dangerous, allowing the possibility of a DoS attack simply by trying to log on
to some account.
Summary: For maximum safety,
lock accounts by both setting an invalid, non-working shell and locking the
password, after updating PAM to check for valid shells in both the auth and the account contexts. Don’t rely on just passwd -l to lock passwords.
Configure SSH to use PAM. Consider creating a PAM module to check for locked
accounts, if your system doesn’t provide one.
Database
Security
A database
(DB) is simply a collection of related data. Simple files are often used as
databases, such as /etc/passwd.
More complex situations use a Database Management System (or DBMS) to
gain extra performance, support multiple users, allow remote access, etc. Common
DBMSs include Oracle, PostgreSQL, MySQL, Jet (MS Access), SQLserver, DB2, and
others. Each can manage multiple independent DBs.
Ultimately a DMBS
stores data in files. So securing a DB means first securing its files by
choosing an appropriate filesystem, using RAID hardware, setting correct mount
options, performing regular backups, using monitoring tools, and of course
setting the proper file permissions.
Beyond this, a DBMS
has its own security system to limit access and to provide audit logs. For
each DB a DBMS allows you to specify a set of users and passwords (or other
authentication tokens), and for each what data the user can access, modify, or
add. Normally this list of users and passwords is independent of the system
users and passwords.
Depending on the DBMS
used, access may be limited to the tables, the columns, or the rows
in a DB. In addition, a view can be defined. A view can be
considered as a virtual table, defined in terms of other tables, and is
handy to limit what a user can access (i.e., instead of defining tedious
rules of which parts of which tables can be accessed, you create a view that
only shows the accessible data, and allow users access to the view rather than
the underlying tables). Access to such database objects is controlled with the
grant and revoke statements.
With PostgreSQL,
access is separated from authentication. User authentication is controlled by
the file pg_hba.conf. The usual
default is to authenticate all local (system) users. See the pg_hba.conf
file documentation for details. Users can be defined with the create user
command.
With MariaDB (MySQL)
and other RDBMSes, user authentication is done with nonstandard grant syntax.
For remote users (the
common case), you should enable TLS security for the connections.
You should consider
database (or whole disk) encryption. This might be required depending on the
type of data stored (financial, health records, etc.).
Finally, be sure
access to and performance of your database is monitored. You need to watch for
unusual activity, such as very large transactions, number of connections, access
denied log messages, very slow response times, many password attempts, etc.
Preserving
Integrity with Normalization
Another problem is
preserving the integrity of a DB. There is little that can be done to prevent external
inconsistencies, often the result of operator input errors. A poorly
designed DB can suffer from internal inconsistency (also very poor
performance). Internal inconsistency occurs when updates to part of the DB
conflict with other parts.
The solution is to
use normalization, a process of transforming a poor DB design (called
the schema) into a good design, one where internal consistency is
preserved. There are many steps to normalization, but it is common to use only
the first three (which is almost always good enough). Each step is called first
normal form, second normal form, and third normal form.
Discuss referential
integrity and foreign keys.
You might not think an SA needs to know this, but you
can’t always assume there is a qualified database expert (or DBA) available.
Many employers expect SAs (and programmers) to be able to set up simple DBs
properly.
Review AUnix1/DatabaseBasics.htm.
Demo: Create DB
and secure PostgreSQL DB. Show user management, views, referential integrity,
not NULL.
Project: design a
properly normalized DB. Allow three users: admin (total access), user1 (write
access to one table, read for rest), user2 (read-only to some views). Make
sure DB uses referential integrity. Implement in PostgreSQL and MySQL.
Consider monitoring and backup.
Other
Datasbase Security Issues
Distributed databases
and “big data” applications have some interesting security issues. Multiple
nodes must agree on changes made, even with the threat of external actors and
malicious or erroneous nodes in the network, and even if some parts of the
network are unreachable. Data integrity and accountability must be possible.
The issue is called the consensus problem, and is addressed by
using special protocols such as paxos and/or blockchain
technology.
Lecture 9 — File Permissions
*nix systems (including Mac OS X
and other POSIX compliant systems) have a simple system for controlling access
to files and directories. And since other resources such as disks, ports, etc.
have file names (under /dev) you
can also control access to these devices. Windows filesystems up through
Windows ME don’t support permissions. (Just a “read only” attribute.)
This system works by assigning a user
(UID) and a group (GID) to every file. Then, users (processes’ owners)
of a file are put into one of three classes: the owner (the process’ UID
matches the user of the file), the group (not the owner, but the
process’ UID is a member of the file’s group), and other (everyone
else).
The owner of a new
file or directory will be the effective UID of the process creating the
file; generally, that is your UID.
The group of a new file
or directory might be either the group ID of the creating process, or the group
of the containing (parent) directory; POSIX permits either behavior (See the
description of the O_CREAT flag
for open(2)):
“The POSIX.1-1990
standard required that the group ID of a newly created file be set to the group
ID of its parent directory or to the effective group ID of the creating
process. FIPS 151-2 required that implementations provide a way to have the
group ID be set to the group ID of the containing directory, but did not
prohibit implementations also supporting a way to set the group ID to the
effective group ID of the creating process.”
On Linux, the
effective GID is used; on FreeBSD, the group of the parent directory is used.
For each class of user, there are
three possible permissions that can be granted: read, write, and execute.
Any attempt to access the file’s data requires read permission. Any
attempt to modify the file’s data requires write permission. Any
attempt to execute the file (a program or a script) requires execute permission.
In *nix systems, directories are
also files and use the same permission system as for regular files. Note
permissions assigned to a directory are not inherited by the files within that
directory.
Because directories are not used in
the same way as regular files, the permissions work slightly (but only
slightly) differently:
·
An attempt to list the files in a directory requires read permission
for the directory (but not on the files within).
·
An attempt to add a file to a directory, delete a file from a
directory, or to rename a file, all require write permission for the
directory (but, surprisingly, not on the files within).
·
Execute permission doesn’t apply to directories (a directory
can’t also be a program). But that permission bit is reused for directories
for other purposes.
Execute permission is needed on a
directory to cd into it (that
is, to make some directory your current working directory). You need execute permission
on a directory to access the inode information of the files within. You
need this to search a directory to read the inodes of the files within.
For this reason the execute permission on a directory is often called search
permission instead.
You can think of read
and execute on directories this way: directories are data files that hold two
pieces of information for each file within: the file’s name and its inode
number. Read permission is needed to access the names of files in a
directory. Execute (a.k.a. “search”) permission is needed to access the inodes
of files in a directory.
Search permission is
required in many common situations. Consider the command “cat /home/user/foo”.
This command clearly requires read permission for the file foo, but unless you have search
permission on /, /home, and /home/user directories, cat
can’t locate the inode of foo,
and thus can’t read it! You need search permission on every ancestor
directory to access the inode of any file (or directory), and you can’t read a
file unless you can get to its inode.
Various other
commands will need to access the inode of files to work. Earlier I said you
need write permission on a directory to add, rename, or delete files within.
But all those actions require changing or at least reading the inodes of the
files within, so search permission is also needed.
Permissions don’t
determine what commands can access files, they determine what system calls can
access files. The required permissions for system calls are documented in
their man pages (section 2). So to know what permissions are needed to run the
command X on a file Y, you need to know (or guess) what system calls X will try
to make.
Most systems also
support some kind of access control lists, either proprietary (old HP-UX
ACLs, for example), or POSIX.1e ACLs (a POSIX draft that was abandoned
but is still used) or NFSv4 ACLs, which are the part of NFSv4 standard. These
are discussed below.
Review inodes
(three time stamps: atime, mtime, ctime, also called “MAC
times”. Ext3 adds a “dtime” which is when the file was deleted).
Review other inode information. See /usr/include/ext2fs/ext2_fs.h
for a list of reserved inodes (1-10, #2=root) for ext* filesystems. The atime
is updated when the file’s data is read. The mtime is updated when the file’s
data is changed. The ctime is updated when the file’s inode data changes.
Note that changing the mtime, permissions, or anything except atime causes
ctime to be updated as well.
Other filesystem
types have different kinds of inodes (and may not call them that). The OS maps
the actual filesystem’s data to standard inode data (e.g., FAT, NTFS).
Defaults are provided for missing permission data (e.g., FAT), while extra
permission data is ignored (e.g. NTFS). So all files appear to have standard
inodes.
Review links (hard
and soft).
Discuss FilePermisions.htm
doc, especially SGID on a
directory (e.g., a web author’s group).
EUIDs
While every user has
a UID assigned, every process has several: The effective UID
(EUID) is the UID used to determine file permissions. When running a SUID
program (any program with the setUID bit turned on), the EUID changes; the real
UID (RUID) does not. For example, running a SUID instance of
the dash shell and the id
command shows:
uid=500(wpollock) gid=500(wpollock) euid=3(adm)
...
UIDs (and
similarly for GIDs) can be specified as real or effective. Assigning
effective IDs is preferred over assigning real IDs. Effective IDs are
equivalent to the setuid feature in the file permission bits. Effective IDs
also identify the UID for auditing.
However, because some
shell scripts and programs require a real UID of root, real UIDs can be set as
well. For example, the reboot
command requires a real rather than an effective UID. If an effective ID is
not sufficient to run a command, setting the SUID bit may not be sufficient. You
need to assign the real UID to the command as well in such cases, using a
wrapper program that in turn runs the program.
There is also a saved
UID (SUID), which is initially set to a copy of the EUID the program had when
it was started. *nix systems allow you to set any of the three UIDs to any of
the others. Note for a non-setUID program, RUID=SUID=EUID. For a setUID to
root program, run by user auser, initially, RUID=auser and
SUID=EUID=root.
A process can change
the EUID to either the SUID or RUID, whenever it wants. This allows the process
to use privilege bracketing, to run only parts of the process as (say)
root. Note however this doesn’t provide much security; if the program has a
virus, that virus code can always set the EUID too. See wrapper.c demo for an example.
The same applies to
the GID as well.
While a powerful
feature, SetUID (especially to root) is dangerous and unnecessary in
many cases. Fedora removed the SUID bit from most utilities, instead granting
them just the specific rootly privileges (known as capabilities,
discussed below) they need. (Discussed below.)
My wrapper.c is very insecure (and
doesn’t work if the real UID is root): the C system
function is trivially hacked, say by creating your own version of bash and changing PATH to use it; or by redefining IFS to include “/” and creating a program named bin that does evil things, or simply
by mucking up the environment (PATH,
umask, ...). A better wrapper.c uses execv (?) not system,
uses absolute pathnames, and “scrubs” the environment (deleting the environment
including aliases and functions, then resetting PATH,
umask, HOME, etc. to correct default values. (Left as an
exercise to the reader.)
Show and discuss SUID Demos (reader, wrapper.c
on YborStudent).
Mention the wheel and sysadmin groups (members have rootly powers on
some systems). (On Fedora, only members of group wheel can use sudo
and perform other admin tasks that use polkit (similar to sudo, but a DLL used mainly with GUI
applications). Such users are “Administrator” as opposed to “standard” users,
when managing uses from the GUI.)
Discuss using
setGID (and possibly the sticky bit) to create a workgroup directory.
(FreeBSD also allows setUID on directories; requires a special mount option.)
All world-writable
directories should include the sticky (text) bit: /tmp, /var/tmp, and /dev/shm.
An idea from 1996 was
added to the Linux 3.6 kernel: symlinks won’t be followed if they point to a
location above the directory with the sticky bit set. (Use sysctl or /proc to enable.) As of Fedora 19, symlinks are only
followed when outside a sticky world-writable directory, or when the UID of the
link and follower match, or when the directory owner matches the link’s owner. (In
previous releases, this was enforced by SELinux policy; since Fedora 19, the
restrictions are enabled by sysctl
settings (in /usr/lib/sysctl.d/00-system.conf).
Additionally, in
Linux 3.6 and newer, a hard link to a file can only be created if the user
owns the file or has write access to it. This prevents the common trick
used by attackers to escalate their privileges by using background services running
as root. See /proc/sys/fs/protected_hardlinks
in proc(5) for details. Modern
Fedora enables this protection by default, in /usr/lib/sysctl.d/50-default.conf.
To override that, copy that file into /etc/sysctl.d/,
and edit that copy.
chmod [ugoa]{+-=}[rwxXstugo]: +X means to add x if dir or has x for someone; g=u means to copy owner perms to group.
UNIX group memberships
have always been problematic. If a user is a member of a group, that user can
always become member of that group again. When dropping any user from a
group, be sure to audit the system for any setGID files owned by that user.
Otherwise, that user can do this:
cp /bin/dash
~/sh; chgrp apache
~/sh; chmod g+s ~/sh
Then, even after
removing the user from group apache,
they can still run:
~/sh
to get a shell with
the effective UID of apache.
(This won’t work with bash, but it does with other shells.)
Files
attributes:
In addition to the standard
permissions, some filesystems support file attributes or flags.
(BSD’s UFS does, Solaris’ UFS doesn’t. Linux ext* filesystems do.) For Linux,
use the commands: lsattr,
chattr: chattr +|-attributes
The ext* attributes include: A=don’t
update atime, S=synchronous
updates, D=synchronous directory
updates, a=append only, c=compressed, d=no dump, i=immutable,
j=data journaling (not useful
for ext[34]), s=secure deletion,
T=top of directory hierarchy, t=no tail-merging, and u=undeletable. See the man pages for
more details. (Attackers often set these, especially “i” on infected files.)
For security (integrity),
consider setting the S and D flags on database files.
Since DB files are very
large and constantly changing, backups of them are wasteful; unless the DB was quiesced,
the backups will be corrupted anyway. Normally, you backup databases with
special tools. If that is the case, you could add the d flag (no dump) as well.
The immutable bit (i) is useful to prevent some attacks
and some errors. Most script-kiddie attacks won’t account for that, and their
failure should show in your logs. (This bit prevents files from being opened
for writting, but if the file is already open, does not prevent modification.)
Critical config files can be made immutable as well, such as /etc/ssh/*. Finally, some malware
creates files to compromise your system. You can prevent that by creating
empty, immutable files. For example, ~root/.rhosts
(if you are foolish enough to enable rsh), dhclient.conf,
and similar files. Note the i
bit is used on aquota.* files by
quotaon, presumably to prevent
you from running quotacheck
without turning them off first. (If your system crashes, you may need to unset
that manually or quotacheck may
fail!)
You should consider which
attributes (when available) are more useful than problem-causing and enable
them. One problem-causing attribute is the a
flag. It seems obvious to use that on log files, but doing so may prevent log
rotation!
File
Commands Review, Files with Spaces in Names
Review mv, cp,
rm, ln, touch
commands, and umask, chmod, chown,
chgrp, commands. su (for “switch user”, not “super-user”),
su – (Runs root’s login scripts), su [-] user. Note su [-] [user]
command, the command
is passed to sh (for example, “su -c
'something'”).
Show security hole
with find and xargs: since file names can contain
any characters except for “/”
and NUL, the following creates a
file that appears as two files to the rm
command: cd /tmp; mkdir -p 'foo\n\etc';
touch foo 'foo\n/etc/passwd' then: find /tmp ... |xargs rm -f
(The fix is to use -print0 with find and -0 with xargs.
These options separate filenames with NUL
and not newline.)
ACLs
(or Access Control Lists)
Using groups to
define permissions can be tedious. You need to define one group for each set
of users with the same permission requirements per set of files. Changing the
groups of such files, and adding and removing users to each of the dozens of
groups, can be time-consuming, tedious, and error-prone. New files may need
their group changed, a step often forgotten (but SGID on a directory helps.) Restoring
files from archives may cause unexpected access to the files as the group
definitions change over time.
Using ACLs may be a
much better approach if available. Both the OS and the filesystem must support
these. Common to Linux and Solaris is POSIX ACLs. The idea is that a given
file (file system object) can have multiple users and groups associated with
it, each with its own set of (three) permissions. It is no longer necessary to
define new groups. In addition, directories can be given default ACLs that
will be added to any new files added to that directory.
[Read on 10/21/08
from www.suse.de/~agruen/acl/linux-acls/online/]
Deficiencies of the
traditional permission model eventually resulted in a number of Access Control
List (ACL) implementations on UNIX, which are only compatible among each other
to a limited degree. POSIX decided to standardize this. A need for
standardizing other security relevant areas besides ACLs was also perceived.
Eventually a working
group was formed to define security extensions within the POSIX 1003.1 family
of standards. The document numbers 1003.1e (System Application Programming
Interface) and 1003.2c (Shell and Utilities) were assigned for the working
group’s specifications. These documents are usually just referred to as
POSIX.1e. This working group focused on the following extensions to POSIX.1:
Access Control Lists (ACLs), Audit, Capability, Mandatory Access Control (MAC),
and Information Labeling.
Unfortunately
standardizing all these diverse areas was too ambitious a goal. In January
1998, sponsorship for 1003.1e and 1003.2c was withdrawn.
Some parts of the
documents produced by the working group until then were already of high
quality. It was decided that the last version of the documents the working
group had produced should be made available to the public. It is this document
that defines how POSIX ACLs work. These have been implemented in Solaris and
Linux but other *nix systems use their own ACL schemes. NFSv4 supports new
ACLs (similar to NTFS ones), and these are used in ZFS.
POSIX
ACLs (a.k.a. draft POSIX ACLs)
Many systems (including
Linux) support POSIX ACLs (as of 2009). Both the FS and kernel must support
ACLs. The FS must be mounted with -o acl. If a file has ACL entries the “ls -l”
output includes a “+” after the
permissions.
The 11th column (the
first after the permissions) of the ls -l output is normally a space. With
Gnu ls, a period is used to show
an SELinux label (security context). But it can be some other character
to indicate the presence of ACLs, attributes, or extended attributes (usually a
plus sign).
The Mac OS X Unix
works a bit differently; the output of ls -l on a Mac is either a space, or:
@ — the presence of extended
metadata, see it with “ls -@”
+ — the presence of security
ACL info, see it with “ls -e”
The Mac OS X mdls(1) command might also be if
interest for another view of the metadata. The metadata is stored in a file
that begins with ._ (dot
underscore) followed by the normal filename. So the metadata for file.txt would be found in ._file.txt.
The POSIX ACL
commands affect all users and groups with permissions on a file, except for the
owner (and “others”). You can view and set/change/remove POSIX ACL entries (on
systems that support them) with:
getfacl file
setfacl [--test] -m acl file...,
acl = {u|g|o|m}:[name]:[rwxX]+, where ‘m’ is mask, ‘X’ (cap X) means execute only if
directory, or if some (other) user already has execute. Use “-m acl”
to modify, “-s acl” to replace (set) with new,
and “-x acl” to remove. Use “-b” to remove all, and “-k” to remove default ACLs. Use “-R” to apply ACLs recursively.
Because ACLs can be complex
it was realized that it is easy to create files with more access than
intended. To control this, an effective rights mask is also
defined. This mask defines the max permissions allowed for any ACL
entry as well as the owning group, but not the user owner or (oddly)
“others”.
As a “convenience” when
changing ACLs, the mask is recalculated to the union of all assigned ACLs
(including the owning group). That will undo any explicit setting of the
mask. Use the “-n” option
to prevent this.
Directories can be assigned
an additional set of ACL entries, the default ACLs. Files created in
a directory that has default ACL entries will have the same ACL entries as the
directory’s default.
Use “-d” to affect the default ACL (useful
on directories), or use an ACL prefix of “d:”
(ex: d:m::rX or d:u::rx). Examples:
setfacl -m u:ud00:r file # add read for ud00,
setfacl -m d:u:ud00:r dir
# set default ACL to read for ud00,
setfacl -x u:ud00 file #
remove ACL entry for ud00,
setfacl -m m::rx #
remove write permission from all,
setfacl -b file #
remove all ACL entries from file,
u::rw-,u:ud00:rw-,g::r--,g:staff:rw-
# more complex example.
See acl(5). Remember: FS, kernel must
support; FS mounted with -o
acl. (This is the
default for ext4 as of 2012; use
the noacl option to disable.)
Most FSs use extended
attributes to hold ACLs (not related to ext* attributes). A pointer in
the inode points to a single block holding these. Thus the total size of all
attributes (SELinux labels, ACLs, and any others) must be less than 1 KiB. (See
{get,set}fattr(1), attr(5): Show: getfattr -dm - path
(There is a mount option for this as well, for some FSes. Like
the acl option, it is enabled by
default on modern Linux.) Note attribute names that don’t start with “user.” are restricted to root
and/or system use only. You can define your own attributes to use with
your own tools and scripts (e.g., last-backup-date, type, icon-data, ...).
(Ex: setfattr -n user.foo -v bar file)
Files created in a
directory that has default ACL entries will have the same ACL entries as the
directory. New sub-directories will get the default ACL entries too.
Many archiving
tools ignore extended attributes (and hence, ACLs). Backup and restore
(per filesystem) by saving ACLs to a file, then applying the file.
Backup: cd /home;
getfacl -R --skip-base . > ./backup.acls
Restore: cd /home; setfacl
--restore=./backup.acl
Or use an archiving
tool that supports extended attributes, ext* attributes, and ACLs: star H=exustar -acl
-c path >archive.tar
and to restore use: star -acl -x
<archive.tar
(The POSIX standard tool
pax can support this, but only
when using the non-default archive type “pax”.
Run “pax -x help”
to see if the pax archive type
is available on your system.)
Example 1: A
project directory (e.g., the website) can have permissions of drwxrwsr-x root www,
which means any new files added will also have group www. (Setting the sticky bit can be good too, to prevent
anyone except the owner from deleting the file.) However, with the default umask that is often used, the new
file’s permissions will be -rwxr--r--
and this won’t allow other group www
member to edit the file. The solution is to set a default ACL on the directory
as well, effectively overriding umask:
setfacl -R --set d:g::rwX /var/www/html
Example 2: Older
rsync versions have no options
to set/change the permissions when copying new files from Windows; umask applies. So when uploading a
website, no files are readable! One way to fix this is to run a cron job
regularly to fix permissions. A better way is to set a default ACL on each
directory in your website. Then all uploaded files will have the umask over-ridden:
cd ~/public_html # or wherever your web
site is.
find . -type d | xargs setfacl -m d:o:rX
This says to set a
default ACL on all directories, to provide “others” read, plus execute
if a directory. (New directories get this default ACL too.) With this ACL,
uploading a file will have 644 or 755 permissions, rather than 640 or 750.
Windows Resource
Protection (WRP) prevents modification of protected system files and certain
registry settings, using ACLs. Only if the process’s SID is “TrustedInstaller”
can such resources be modified. Only Windows Update, Hotfixes, and system
upgrades processes from MS run as this user.
NFSv4
and ZFS ACLs [From: opensolaris.org/os/community/zfs/docs/zfsadmin.pdf]
Defined in the NFSv4
specification, a new ACL model (sometimes called NT-style or NFSv4-style ACLs,
or just NT-ACLs) fully supports the interoperability that NFSv4 offers between
UNIX and non-UNIX (i.e., NTFS and SMB) clients. (NFSv4 ACLs and Windows ACLs
are the same except for the format of the username.)
NT-ACLs provide much
richer semantics than old-school POSIX permissions (and ACLs). ZFS and NFSv4
support this new ACL model and no longer support the POSIX-draft model. (ZFS
“fakes” standard permissions for the “ls -l” output.)
NT-ACLs use chmod to change, and ls -v to view.
For Solaris, POSIX
ACLs are only supported on UFS, but some effort has been made to automatically
translate ACLs when copying files between UFS and ZFS (or NFSv4). As noted
above, it only appears that ZFS has traditional DAC controls; they really only
have the new ACLs.
In the new model files
and directories can have multiple access control entries (or ACEs).
Unlike POSIX ACLs there are two types of ACE: ALLOW and DENY. These are examined,
in order, to determine if access is ultimately allowed or denied. Only ACEs that
have a who that applies to the current user are examined.
If some ACE grants
access, a subsequent deny ACE has no effect. So always put the deny
ACEs first, then the allow ACEs last.
You can append a new
ACE to the end, insert a new one at any position, and replace and remove
existing ACEs.
NT-ACLs provide 17
different permissions, unlike POSIX ACLs that only provide read, write, and
execute/search. You can set the new ACLs for a file’s owner, group, or others
using a special syntax: owner@, group@, and everyone@. Beyond that you can set ACLS for any user or
group with user:name or group:name.
NT-ACLs have several
different inheritance modes (besides none). (See the table below.)
Each ACE is roughly
three parts: who it applies to, which set of permissions, and if the
permissions are allowed or denied. This syntax allows the SA to (for example)
add an ACL that denies all members of some group the permission to add a file
in some directory, and also make exceptions for specific users by adding
additional ACEs to allow the permission.
The Solaris syntax to
prepend (not append) a new ACE to the ACL list is:
chmod A+who:permission[/permission]...[:inheritance-flags]:{allow|deny}
file...
You can replace an
ACE with “Aindex=...”,
remove one with “Aindex-...”,
insert a new ACE after an existing one with “Aindex+...”,
and remove all extra ACEs with “A-”.
The permissions and inheritance-flags can be specified with a verbose or a
compact notation, for example “r” or “read_data”.
Here’s
an example:
# chmod
A+user:gozer:read_data/execute:allow test.dir
# ls -dv test.dir
drwxr-xr-x+ 2 root root 2
Feb 16 11:12 test.dir
0:user:gozer:list_directory/read_data/execute:allow
1:owner@::deny
2:owner@:list_directory/read_data/add_file/write_data/add_subdirectory
/append_data/write_xattr/execute/write_attributes/write_acl
/write_owner:allow
3:group@:add_file/write_data/add_subdirectory/append_data:deny
4:group@:list_directory/read_data/execute:allow
5:everyone@:add_file/write_data/add_subdirectory/append_data/write_xattr
/write_attributes/write_acl/write_owner:deny
6:everyone@:list_directory/read_data/read_xattr/execute/read_attributes
/read_acl/synchronize:allow
The ACEs can be shown
in a more compact form using “ls -V” instead. The compact form ACEs
can be used with chmod (so you
can copy/paste).
ZFS has been ported to many systems, and work on
supporting NFSv4 ACLs on other *nix systems is progressing, so it is probably
only a matter of time before an SA will need to understand the new ACLs. See
the ZFS Admin Guide and the NFSv4 docs (RFC-3530) for more details. Also all
(or at least Linux) systems that support NFSv4 support the new ACLs. (Fedora 8
and newer does; yum install nfs4-acl-tools.)
(Note that Solaris 11 permits chmod to add either POSIX
or NT ACLs!)
|
Access Privilege
Name
|
Flag
|
NFSv4 ACL Description
|
|
add_file
|
w
|
Permission to add a new file to a directory.
|
|
add_subdirectory
|
p
|
On a directory, permission to create a subdirectory.
|
|
append_data
|
p
|
On a file. (Not currently implemented for ZFS.)
|
|
delete
|
d
|
Permission to delete a file.
|
|
delete_child
|
D
|
Permission to delete a file or directory within a
directory.
|
|
execute
|
x
|
Permission to execute a file or search the contents
of a directory.
|
|
list_directory
|
r
|
Permission to list the contents of a directory.
|
|
read_acl
|
c
|
Permission to read the ACL (ls).
|
|
read_attributes
|
a
|
Permission to read basic attributes (non-ACLs) of a
file. (Think of basic attributes as the stat level
attributes.)
|
|
read_data
|
r
|
Permission to read the contents of the file.
|
|
read_xattr
|
R
|
Permission to read the extended attributes of a file
or perform a lookup in the file's extended attributes directory.
|
|
synchronize
|
s
|
Not currently implemented.
|
|
write_xattr
|
W
|
Permission to create or write extended attributes.
|
|
write_data
|
w
|
Permission to modify or replace the contents of a
file.
|
|
write_attributes
|
A
|
Permission to change the times associated with a
file or directory to an arbitrary value.
|
|
write_ac
|
C
|
Permission to write the ACL or the ability to modify
the ACL by using the chmod command.
|
|
write_owner
|
o
|
Permission to change the file's owner or group.
(Extra rootly power is needed to change the owner, or to a group of which the
user isn’t a member.)
|
|
Inheritance Name
|
Flag
|
Description
|
|
file_inherit
|
f
|
Only inherit the ACL from the parent directory to
the directory’s files.
|
|
dir_inherit
|
d
|
Only inherit the ACL from the parent directory to
the directory’s subdirectories.
|
|
inherit_only
|
i
|
Inherit the ACL from the parent directory but
applies only to newly created files or subdirectories and not the directory
itself. This flag requires the file_inherit flag, the dir_inherit flag, or
both, to indicate what to inherit.
|
|
no_propagate
|
n
|
Only inherit the ACL from the parent directory to
the first-level contents of the directory, not the second-level or subsequent
contents. This flag requires the file_inherit flag, the dir_inherit flag, or
both, to indicate what to inherit.
|
|
-
|
N/A
|
No
permission granted.
|
File
Locking [Expanded from Admin 2, Shell Scripting. See also flock-demo.]
Some administrative tasks that
involve updating config files (or any shared data files) can be dangerous. A
conflict can arise if two or more processes attempt to modify the same file at
the same time. For example, consider what might happen if you edit the /etc/passwd file while someone else (or
a dnf update running from cron)
updates the file (or a related one such as opasswd,
gpasswd, shadow, ptmp,
...) at the same time. Or one process modifies shadow
while another modifies passwd;
the files are no longer consistent and may even become corrupted.
Another common problem is with
daemons. Starting one while a previous one is still running can cause the
running process to fail.
File locking is used to
prevent this sort of error. Before opening some file, a process obtains a lock
on it. While locked, no other process can open the file and hence must wait
until the first one is done before having a chance to obtain a lock of their
own.
A system admin must sometimes
manage, troubleshoot, or setup locking. This may involve mount options,
setting special permissions, creating/removing lock files, and even tracing
utilities to see what locking they use, if any. Accordingly, you need to know
something about them.
There are different types of
locks used:
·
Locks can be shared (read-only) locks that prevent
anyone from writing to the file while allowing read-only access, or exclusive
locks for writing (and security) that prevents any other process from accessing
the file while locked.
·
If the kernel enforces the locks they are called mandatory
while if not they are called advisory (only supported by a shared
library perhaps, so apps not using the library aren’t forced to obey the
locks). Not even root can violate a mandatory lock!
·
Locks that work on a range of bytes within a file are called record
locks; otherwise whole files are locked.
·
Locks that force a process to wait to acquire it are called blocking;
the process is frozen until it can obtain the lock. Locks that simply return
failure immediately (when trying to acquire one held by another process) are non-blocking.
Mandatory locking can
be thought of this way: The key to the lavatory is hung upon a hook. If you
need to use the lavatory, you take the key from the hook, use the lavatory, and
return the key to the hook. If the key is not on the hook, you must wait until
the key is returned.
Advisory locking can
be thought of this way: the key to the lavatory is hung upon a hook. If you
need to use the lavatory, you take the key from the hook, use the lavatory, and
return the key to the hook. If the key is not on the hook, you must wait until
the key is returned. But, the lavatory door HAS NO LOCK!
Different *nix systems support
different locking schemes. See flock(2),
fcntl(2), and lockf(3). Flock was introduced in BSD. The original implementation
had problems and later versions work in incompatible ways. POSIX defines both
historical fcntl and newer lockf locking, but not flock even though it is arguably
better. Note that flock(1) can
be used from the shell.
On most
systems, all three locking mechanisms are supported for advisory locking, but
are independent of each other. (Nasty when you don’t know which scheme
was used by other utilities!)
Qu:
how can you determine which lock mechanism was used by some utility? Ans: strace:
strace
-fFo pw.out passwd;
grep -E 'fcntl|lockf' pw.out
(Another way: run the lslocks command.)
Only POSIX fcntl locks are honored by NFS.
On Linux 2.6,
lockf is implemented as fcntl (so you have one less scheme to
worry about.)
Sys V Unixes
(including Solaris, HP-UX, and others) and Linux support mandatory locks, even
though POSIX only requires advisory locks. In the Sys V scheme, a file could
use mandatory locks by setting the SGID bit on and the group execute bit off.
(This is otherwise a meaningless combination of permissions.) (Solaris also
allows chmod +l; ls
-l will show either the l or the s in the group field.)
Linux permited Sys V mandatory
locking on filesystems that support it (including ext*), if that FS is
mounted with the mand mount option and the file has g+s,g-x permissions. (Show, but
don’t demo lcktest.c.) If so, fcntl locks become mandatory. flock is still advisory. (On Linux,
remember lockf is implemented by
fcntl.)
(Summary: Some filesystems,
if mounted with mand, if file
has g+s,g-x, has mandatory locks
with fcntl locks. The kernel
feature for this is disabled as of Fedora 27 however.)
Modern Linux no
longer defines in the mount man page what are the default mount flags for each
type of filesystem (some are still documented). For ext4 (for example), the
default options are set by the mkfs.ext4
utility, which has a config file of defaults that you can override on the command
line, or change later with tune2fs.
So if mount |grep /home
shows “defaults” but not mand (or acl), you need to check with tune2fs:
$ sudo tune2fs -l /dev/vg/lv_home |\
grep "Default mount options"
Default mount options: user_xattr acl
Open File
Description Locks (old name: file-private locks)
In Linux 3.15, a new type of
locking mechanism was added. This felt to be needed, because of two major
issues with POSIX locks, and one issue with BSD locks:
1. POSIX locks are
per-process, not per-thread. When a request for a lock comes in that would
conflict with an existing lock that the process set previously, the kernel
treats it as a request to modify the existing lock. Thus, POSIX locks are
useless for synchronization between threads within the same process.
2. All locks
held by a process are dropped any time the process closes any file
descriptor that corresponds to the locked file, even if those locks were
made using a still-open file descriptor. So if a program opens two different
links of a hard-linked file, takes a lock on one file descriptor and then
closes the other, that lock is implicitly dropped even though the file
descriptor on which the lock was originally acquired remains open.
3. BSD-style locks
(using flock) have better
semantics. Whereas POSIX locks are owned by the process, BSD locks are owned
by the open file. So if a process opens a file twice and tries to set
exclusive locks on both, the second one will be denied. Thus, BSD locks are
usable as a synchronization mechanism between threads as long as each thread
has a separate opened file. Also, BSD locks are only released when the last
reference to the open file on which they were acquired is closed.
However, BSD locks are
whole-file locks. POSIX locks, on the other hand can operate on arbitrary
byte ranges within a file. While whole-file locks are useful and common, they
are not granular enough for some cases (such as a database locking a record).
The new locking scheme is aware of
the older POSIX scheme; it’s basically BSD-style locks with byte-ranges, using
POSIX (fcntl) system calls. See
“Open file description locks” in the fcntl(2) man page and this article.
Lock Files
System utilities, user
applications, and shell scripts often create locks by creating lock files.
When starting, they check if the lock file exists already, and if so either
wait or abort. If there is no lock file already, they create it. This
scheme depends on all utilities accessing the same resource use the same lock
file. So, always document any lock files used by your admin scripts.
It also depends on checking and
creating a lock file atomically, which is often not done
correctly in shell scripts. One common but incorrect method is to attempt to
create a symlink; if it already exists, this will fail. However, the only
(POSIXly) correct way is the same as for temporary files; turn on no-clobber
mode and attempt to create the file using output redirection:
set
-C # or set -o noclobber
: 2>/dev/null >lock-file
if test $? = 0; then got lock...; rm lock-file; fi
Here’s some
code to wait for a lock to be released:
set
-C # or set -o noclobber
while ! { : 2>/dev/null >lock-file; }
do sleep 1; done # loop until lock file created
# got lock...
rm -f lock-file
Often these lock files are empty,
but sometimes they contain data such as a PID. Most system lock files are kept
in /var/lock or /var/run. You can use the old lslk or more modern lslocks to examine these easily.
While common, using /var/run and /var/lock has problems since /var may not be mounted early enough at boot time. Many
daemons instead use hidden files under /dev,
but that has never been a good idea.
A new approach (used since
Fedora 15 and other post-2011 Linux distros) is to use a new top-level
directory for both, /run (and /run/lock). Often that will use tmpfs. The old folders will become
symlinks to the new locations.
The procmail package includes a lockfile utility, used when accessing
mailboxes. However, it can be used to create lock files for any purpose.
Linux also provides flock(1):
$ echo hello > file1
$ flock -n file1 sleep 30 &
$ flock file1 cat file1
When working with /etc/passwd and related shadow suite
files, lckpwdf(3) is used. Rather than lock
multiple files, this creates an advisory lock on the single file /etc/.pwd.lock (created if it
isn’t already there). vipw and vigr additionally use /etc/ptmp as a copy of the file
being updated; when done this is “mv”-ed
to replace the original file.
vim edits a copy named .name.swp but allows you to
re-edit files anyway. (It’s not really a lock file.) If you get a recovery
message you can recover using vim -r, but this won’t remove the .swp file. You must do that manually.
Old vi also has such files but
in /var/preserve.
Normally utilities trap signals to
allow them to clean up lock files (and other resources). But, when some
program crashes it may not have a chance to remove its lock files.
In that case, you will have problems running the program later. Many
applications (e.g., Firefox web browser) may create lock files that
occasionally you must manually remove. The fix is simple; just manually remove
the offending lock file. Finding the correct file is the hard part! Google or
strace can be used for this.
The POSIX standard explicitly
allows symbolic links to contain arbitrary strings; they do not need to be
valid pathnames. Some applications make use of this feature to store
information in symbolic links, using them as lock files. For example, Firefox
creates this symlink lock file when running:
$ readlink .mozilla/firefox/def*/lock
10.9.9.1:+29143
Here’s some sample code you
could use, that checks for lock files containing PIDs (a common case) before
starting a daemon (here, we do a sleep 60):
#!/bin/sh
LockDir="/tmp" # /var/run or /var/lock is common
PidFile="$LockDir/${0##*/}.pid"
AlreadyExists () {
read RunningPID < "$PidFile"
if grep -q "${0##*/}" /proc/$RunningPID/cmdline \
2>/dev/null
then echo "$0 is running as PID $RunningPID"
else echo "Stale $PidFile found from PID" \
"$RunningPID. Overwriting."
DoIt
fi
}
DoIt () {
echo "$$">"$PidFile"
echo "Started ${0##*/} with PID=$$"
sleep 60 # Replace this with real work
rm -rf "$PidFile"
}
(set -C; echo 2>/dev/null
"$$">"$PidFile") \
&& DoIt || AlreadyExists
Filesystem
Security
Use mount options
to limit untrusted file systems. Example: Create a floppy with suid to root
version of bash, or
world-readable/writable version of /dev/mem
or /dev/kmem, then mount it at YborStudent.
Useful security
related mount options: nosuid,
nodev, noexec, and ro (for forensic examination). (noatime for flash drives is also
useful.)
A write barrier
is a kernel mechanism to prevent data loss when writing data to disks. It
forces metadata writes (inode and directory updates) to flush a disk’s
write cache. Using a write barrier offsets any advantage to using a write
cache in the first place, but it is safer; in the event of a power loss, you
don’t lose vital metadata.
For filesystems with
no write cache enabled, or a battery backed-up write cache (common in SAN/NAS),
the write barrier hurts performance without adding much safety. The Linux
kernel enables write barriers this by default; to disable, use the nobarrier mount option.
Hiding
Data
Files can be hidden
using OS features and bugs. On *nix systems files can be hidden by
mounting a filesystem on top of a non-empty directory.
Files don’t get
deleted until the hard link count goes to zero. Even then, the file won’t be
deleted until it is no longer in use by any process. A technique (no longer
used much) is to create hidden files by creating them, opening them, and
immediately deleting them. The directory entry goes away but the file can
still be used by the process.
Use shred to make it harder to recover
deleted files on older hard disks. (-v
= show progress, -u = remove
file when done.) Newer disks and SSDs don’t benefit from repeatedly writting
data over files; over-writing them once with zeros (using dd works well) is
sufficient, and won’t shorten the life of SSDs as much.
ATA disks allow sneaky commands to
permit the disk to hide some space from the OS, using a Host Protected
Area (HPA) (since v3) and Device Configuration Overlay
(DCO) (since v6). Actually, at boot time the OS can access the HPA
then lock it down, so Microsoft can hide stuff there. The HPA and DCO are hard
but not impossible to access with special software.
ATA (and newer disks such as SATA)
support several security features, normally disabled. Some BIOSes or EFI
firmware may enable these features, and may have settings changable from their
user interfaces. If not “frozen” (locked down), you can examine and change
these settings using hdparm.
One useful feature is the enhanced secure erase, which erases every sector on
the disk (and resets the security settings as well).
USB drives (flash
sticks) are actually simple computers that can talk to a host overt a network.
The device drivers don’t have much (if any) security protocols, making it easy
for malware on the drive to lie to the host. A security researcher at a 2012
security conference installed an unauthorized extension on a Samsung
smart TV that allowed him to gain full access to the TV’s system. The TV
initially checks for authorized extensions on the USB memory stick. For the
check, the malware presented the TV with an allegedly authorized plug-in. However,
during the actual installation process, the USB device planted a totally
different file in the system and used it to obtain telnet access. This allowed
him to make arbitrary firmware changes, for instance in order to record content
from a premium TV channel. [Reported on H-online.]
A device that looks
like a normal USB flash stick is known as the USB-Killer.
This device rapidly charges internal capacitors from the USB power line, then
sends destructive surges through the data lines.
Some stand-alone utilities bypass
filesystems and can access the raw disk by sector numbers. This allows data
hiding in un-allocated or un-partitioned sectors, and the slack space between
the end of filesystems and the end of the volume (partition). Additionally
there are “reserved” and unused areas in most filesystems that can hold hidden
data, e.g., an unused sector used to hold boot loader, when the boot loader is
in the MBR instead.
Other utilities allow software to
read/write NVRAM (CMOS or BIOS memory), both on the motherboard and also any
peripheral device with flash-able memory. This is another place data can be
hidden.
Windows is notorious
for making it easy to hide data, especially from the GUI tools. Some tricks
you can use include using command line utilities:
regedit and regedit32 won’t show registry entries when the key is longer
than 255 characters. Use reg.exe
(cmd line) to see these. Keys containing NUL (‘\0’)
won’t show the characters following without a special tool.
Files with the both
the system and hidden attributes won’t show in the GUI, even if
you select the option to show them! Use dir/a
and attrib from the command line
to view all files and change those attributes.
NTFS has a “feature”
to associate multiple data streams (files) with one name, and only the first
shows in any standard tool. Even the size of the “alternate” stream is
hidden. Demo this: notepad fake.txt, then create an alternate
data stream with “notepad fake.txt:real.txt”. This is sometimes
called clubbing. The dir
command has an option to show these.
Encrypting
Storage Volumes
Most OSes today
support storage volume encryption, but a better solution is often to use the
open-source TrueCrypt
software. Encrypting a volume this way can provide plausible deniability; you
can just claim you wiped the drive and an examiner can’t tell. (With a bit of
work, you can use this to secure flash disks too.)
In 5/2014, the
anonymous maintainer of TrueCrypt shut down development in a surprising
announcment, indicating the software may have serious flaws. (It was also
reported the developer used TrueCrypt exclusively on Windows XP, and once
Microsoft dropped that, he had no further interest in the project.) TrueCrypt
is currently being audited, and if found clean, perhaps someone will take over
the project. Update: Several expensive and extensive code reviews
later have revealed some minor flaws but none that puts encrypted disks at
risk. And although the official web site is gone, digitally signed copies of
(the last version of) TrueCrypt are still available for download.
There is no widely
used, cross-platform, open source replacement for TrueCrypt. However, there
are plenty of filesystem-specific ones and some cross-platform but proprietary
ones. This include Bitlocker for Windows, File Vault for Apple systems, Geli
for FreeBSD, and md-crypt/LUKS for Linux. See Wikipedia
for a comparison of some of these. Currently (2018), I think LUKS is your best
option for Linux.
Update: VeraCrypt
is an open source fork of the last available version of TrueCrypt. It is
actively being maintained, and the developers have (or are planning to) address
the flaws found in the audits done on TrueCrypt. Hopefully, they will add UEFI
support; currently, like TrueCrypt you need BIOS, and fewer devices support
that each year.
Windows
Encrypting Filesystem (EFS) and Windows
Bitlocker make an interesting case study. Every file is encrypted
with a randomly generated key (file encryption key, or FEK), using AES. This
key is then encrypted with the user’s public key and stored as an attribute of
the file. (Every user gets a public/private key pair in Windows.)
To allow for
recovery, Windows registers an Administrator account as a recovery agent
(RA), with public/private key pair of its own. The FEK is also encrypted with
the RA’s public key. This allows system recovery, but is also a weakness if a
local admin account is used for the RA, as any exploit that compromises the
local system has the key; a major problem in the case of lost or stolen
laptops.
Bitlocker was
designed to mitigate some of these issues by providing hardware-assisted
whole-drive encryption, while still allowing for EFS to be used to protect
individual files and folders.
LUKS
LUKS stands for Linux Unified Key Setup. LUKS enables the system
to encrypt a whole storage volume (any block device) in Linux for security
purposes. This is an advantage for people who use mobile devices for
their day to day work; if the entire disk is lost, your data cannot be easily
accessed as it is encrypted and requires a passphrase or password to access the
data inside.
Red Hat uses
encryption of each disk (partition), from Red Hat Enterprise Linux 6 onwards. This
encryption of the entire file system’s is a much better way to secure the data
on the disk than per-file encryption. Red Hat implements this through LUKS.
LUKS works by
encrypting block devices, including disk partitions and logical volumes. To
use the filesystem (or swap data) within the encrypted block device, the admin
must enter the password/passphrase to unlock the volume. Once unlocked, the
volume can be accessed normally through the use of a special driver, dm-crypt. To access the protected
filesystem, you use the /dev/mapper/name
for the unlocked device, to use with mount,
fsck, tune2fs, backup, etc.
To encrypt or to
access an encrypted block device with LUKS, the admin uses the cryptsetup utility. This program
can work with other encryption types too.
Suppose you have a
volume group “vg” with a logical
volume in it, “lv1”, and you
wish to encrypt it. You would run the command like this:
# cryptsetup luksFormat /dev/mapper/vg-lv1
WARNING!
========
This will overwrite data on /dev/mapper/vg-lv1
irrevocably.
Are you sure? (Type uppercase yes): YES
Enter LUKS passphrase:
Verify passphrase:
Command successful.
You can view data
about a LUKS protected device with the command “cryptsetup
luksDump /dev/mapper/vg-lv1”. To use the device, you need to
unlock (“open”) it first with:
# cryptsetup open /dev/mapper/vg-lv1 myluks
Enter LUKS passphrase for /dev/mapper/vg-lv1:
key slot 0 unlocked.
Command successful.
That command makes /dev/mapper/myluks refer to the
unlocked volume. After this, the device is open and the dm-crypt driver will keep the key in
memory, allowing you to use the device with the name you provided: you can now mount, fsck,
tune2fs, or backup the
filesystem using /dev/mapper/myluks.
When done, you can run cryptsetup
close to remove the unlocked
device and to wipe the key for memory. (Note: LUKS supports having several
different keys, so you can make one for emergencies (such as forgetting the
regular key) and lock it in a safe.)
To shutdown your
system, you need to unmount the open block device first, then remove that with
“cryptsetup close /dev/mapper/myluks”.
To resize an LVM encrypted
with LUKS, you need to run the cryptsetup
resize command after resizing
the logical volume, so dm-crypt will notice the new size.
You can have an
encrypted volume unlocked and mounted automatically at boot by adding an entry
to /etc/crypttab for the
device, the open (unlocked) name, the key file, and options; dm-crypt will open (unlock) it at boot
time. Then, the entry to mount the unlocked mapper name should work normally
(say, via an entry in fstab). Otherwise,
you are prompted for the password/phrase. See the crypttab(5) man page for details. Here’s an example:
# mkdir /myluks # the mount point
# echo '/dev/mapper/myluks /myluks ext4 defaults 0 0' \
>>/etc/fstab
# umask 077
# echo "myluks /dev/mapper/vg-lv1 /etc/myluks.key \
luks,nofail" >> /etc/crypttab
# printf 'secret' > /etc/myluks.key
(Note the use of printf; using echo will not work, since that adds a newline to your key
file!) Naturally, don’t use “secret”. In fact, you can create a good key with
the command:
# dd if=/dev/urandom of=/etc/keyfile
bs=1024 count=4
LUKS allows you to
have multiple keys, so this 4 KiB random number can be one of the keys, and a
secure password or passphrase for you to type can be another.
Automatic unlocking
defeats the whole point of encryption on a mobile device, but may be useful
for a physically secure server.
Lecture 10 — Intrusion Detection Systems (IDS)
Host-based intrusion detection
systems (HIDS), as the name implies, are installed on each host and look
for attacks directed at the host. (That is, they don’t examine network data
that doesn’t go to the host, and may not examine network data at all.) Most
HIDS employ automated checks of log files, file checksums, file and directory
permissions, local network port activity, and other basic host security items.
HIDS are generally required for compliance with HIPPA, PCI-DSS, and various
“best practice” standards such as the ISO 27000 series.
HIDS offer the benefit of being
able to detect attacks local to the machine or on an encrypted or switched
network where a NIDS might have issues.
It’s not well-known,
but some CAs will provide “stealth” HTTPS certificates for organizations to use
on their proxy web servers. This results in a MitM attack, the purpose of
which is to allow organizations to monitor HTTPS traffic as well as HTTP.
A recent RFC has been
proposed, ATLS
(application-layer TLS), to thwart this problem.
HIDS provide a wealth of forensic
data and can often determine whether or not an attack, originating from the
local host or the network, succeeded or failed.
Some disadvantages to HIDS include
the administrative and computing overhead of running them on each machine, and
the potential compromise of the HIDS in the event of a successful attack. HIDS
can generate a surprisingly large number of alerts, and if you have
dozens/hundreds/thousands of hosts to monitor, you will need to have a
centralized alert DB and analysis tool. Finally, some HIDS are licensed per
host, making the costs of HIDS infeasible for every host when your organization
has hundreds. Still, there’s not law that you must monitor every host; you can
deploy HIDS on just the most important and/or vulnerable hosts.
In contrast, network-based IDS
(NIDS) monitor what traffic they can see. This allows detection of attacks
that target more than a single host, such as nmap
scanning of a network, looking for hosts. NIDS usually have a number of
well-placed sensors plus a central management console/server. Getting the
traffic to the sensor can be difficult. Usually, a tap is used in
high-volume locations. In other cases, you attach the sensor to a span
(or mirror) port of a switch. Such sensors can be simple hosts
(stripped down VMs), which passively listen for packets using an unnumbered NIC
in promiscuous mode.
While NIDS can scale up
economically, they lack the ability to examine host changes. Often, NIDS can’t
tell if an attack was successful or not. If data is encrypted, only a HIDS can
examine the decrypted network traffic.
Example: A NIDS
might detect a successful TCP connection to your database server, and note from
where it came, and how long the connection lasted. But it can’t tell what SQL
statements might be sent if the connection was encrypted (which is likely the
case). A HIDS however can monitor the DBMS logs and see the failed
authentication attempts and any successful DB modifications attempted.
Sensor location critically affects
NIDS abilities and costs. At one end, you could deploy a sensor in front of
each and every host. This would give you all of the problems of HIDS, with
none of the benefits. At the other end, you could have a single sensor between
your ISP and organization. Such a sensor could be easily overwhelmed with too
much traffic to analyze in real-time. Additionally, some traffic can bypass
such sensors in some cases. Whether you deploy one sensor per subnet, or have
fewer sensors, is up to you.
An intrusion prevention system
(IPS) is the same as an IDS, except that instead of merely alerting, they
actively block perceived attacks, usually by sending updating blocking rules to
one or more firewalls. A danger of IPS is blocking legitimate traffic, either
by false positives, or by an attacker triggering the blocking as part of a DoS
attack.
The most popular NIDS
by far is Snort. It is signature based, actively maintained, and modular in
design (now). Back in 2002 the developer of Snort created a support company
Sourcefire, which sells sensors, monitors, and services based on Snort.
The sensor of a NIDS is configured
in an unusual way. If you enable a firewall on that host, most of the traffic
the NIDS must see gets filtered. So you need to turn off the firewall on that
host. But that is dangerous, so always strip such a system to the bare-minimum
and harden that as much as possible.
Because of the large number of
alerts that may be generated by an IDS, some sort of central DB and analyzer is
used. One popular commercial tool is splunk.
HIDS Types
and Operation
HIDS (Host IDS) are
generally File Alteration/Integrity Monitors (FAM/FIM). Such tools run
periodically from cron and look for altered files, such as hackers modifying
important files and infecting programs with viruses. This is done by computing
checksums/CRCs for a set of files (generally you don’t monitor /home or /var, as you expect files there to change all the time).
When run, the system re-calculates the checksums and compares them with the
previously saved checksums. The saved checksums are digitally signed and
ideally stored on a read-only media such as a CD-ROM (or kept on another host).
Tripwire and Samhain are popular HIDS that work this way (FAM/FIMs).
Every server, laptop,
and PC connected to any U.S. DoD network runs a HIDS called HBSS (Host
Based Security System), maintained by DISA. It was this system
that detected the keylogger virus in the Predator and Reaper drones at the Creech
Air Force Base, in 2011.
Other types of HIDSs are possible,
that examine log files and audit records, looking for suspicious activity, or
more traditional virus scanners. Such HIDS are signature based.
Samhain for instance checks for file checksums and detects modifications,
searches for rogue SUID executables, detects rootkits (under Linux and
FreeBSD), and is able to log to an SQL database.
Finally, there are statistical
anomaly based (SAB) detectors. This type of HIDS monitors system
(and/or library) calls, looking for unusual actions (e.g., httpd trying to set the date or open a
listening socket for port 22). This is known on *nix as syscall monitoring.
No popular open source HIDS is statistical anomaly based as far as I know;
Microsoft has made available in 2015 its Advanced
Threat Analytics (ATA) tool for windows, which is SAB.
OSSEC HIDS
The most popular and powerful HIDS by
far is OSSEC.
[From OSSEC
in a Nutshell] OSSEC is a popular host-based intrusion
detection system (HIDS) that is an open source project owned and sponsored by
Trend Micro. The OSSEC users include Netflix, Samsung, Apple, Barnes &
Noble, NASA, and others. Use OSSEC to monitor system logs, do file integrity
checks, look for rootkits, check for registry changes (on Windows systems) and
take actions based on security events that are detected.
OSSEC operates as an agent-server
system. Agents handle monitoring logs, files and (Windows) registries then
sending back relevant logs in encrypted form to the OSSEC server over UDP port
1514 (default port). The agents are small and run in chroot jails (on *nix
systems).
On the manager host, the logs
are parsed with decoders and interpreted with rules that generate security
alerts found in the log stream. OSSEC comes with a rich set of decoders and
rules to track important system events, such as file changes, root logins, and
much more. Users can add custom decoders and rules to monitor any files and
generate alerts specific to their needs.
[From alienvault.com]
OSSEC is very good at what it does and it is extensible. OSSEC will run on all
major operating systems. It uses a client/server based architecture which is
very important in a HIDS system. Since a HIDS could be potentially compromised
at the same time the OS is, it’s very important that security and forensic
information leave the host and be stored elsewhere as soon as possible to avoid
any kind of tampering or obfuscation that would prevent detection.
OSSEC’s architecture design
incorporates this strategy by delivering alerts and logs to a centralized
server where analysis and notification can occur even if the host system is
taken offline or compromised. Another advantage of this architecture is the
ability to centrally manage many agents from a single server.
Most other open source HIDS are no
longer popular as a result, except for samhain which is still
actively maintained (2015).
There are several simple FAM/FIMs
as well. Most these are better than Tripwire in configurability, documentation,
and the ability to reduce the logging output to a manageable level. However,
most alternatives to Tripwire lack strong cryptographic protection. AIDE (Advanced
Intrusion Detection Environment) is free FAM/FIM software that in theory
does everything Tripwire can and more. The integrity database is defined by
writing regular expressions in the configuration file. Besides MD5, several
other algorithms are supported such as SHA1. More recently maintained than
AIDE is afick,
which is reported to be good as well.
OpenDLP
(Data Loss Prevention) (also MyDLP) will scan data while it’s on the disk (most
enterprise DLP software also examines network traffic) looking for pieces of
data like credit cards or SSNs. It can be extended with regular expressions to
find data that is sensitive to your organization. OpenDLP will look for this
data even inside databases, on both Windows and Linux. While not a HIDs, DLP
software should be considered as well.
An unusual HIDS is PortSentry. It
monitors network traffic at a host, listening for signs of port scanning. It
can modify a firewall automatically to block the source IP of the scan.
PortSentry can be used in conjunction with other HIDS. PortSentry is part of
the open source sentry security tools,
along with logcheck and logsentry, which monitor log files and provide alerts.
PortSentry remains popular (2014) even though there’s been no active
development for many years (since 2006-ish).
Under the Solaris system,
administrators can use BART, the Basic Audit Reporting Tool, to
track files at a system level (it’s a FAM/FIM). On earlier versions of
Solaris, checksums for system files can be matched against the Solaris
Fingerprint Database (needed a SunSolve account, which I
had). While neither of these is a full-blown HIDS, they do provide basic
functionality for detecting modified files.
rpm -V packagename is
a pseudo-HIDS on RPM based systems. (Try: vi /etc/DIR_COLORS; rpm -V coreutils)
This shows what has changed for each changed file in the package: 5=MD5,
s=size,T=mtime, ... (See the rpm man page for “VERIFY OPTIONS”.) For Debian
Linux, use the debsums utility.
For *BSD systems, see mtree(8).
As of Linux 3.7, some HIDS
functionality has been included in the kernel itself. The Linux Integrity
Measurement Architecture (IMA) was initially added to 2.6.30. The
full functionality depends on the presence of the Trusted Computing Base
modules, based on the standards from the Trusted Computing Group.
Basically, the kernel will digitally sign a file’s hash code and store it in
the file’s extended attributes. The file’s integrity can then be checked on
every access. Note the kernel can also sign and verify LKMs (supports Secure
Boot).
Windows 2000 and
newer includes a FAM called Windows File Protection (or WFP) that
watches system-critical files. (For Vista and newer it is called Windows
Resource Protection or WRP). If one is altered or deleted, WFP will
automatically replace the altered one with a known good copy that it keeps
cached someplace. Try sfc.exe/SCANNOW
(or /VERIFYONLY).
Using
Tripwire HIDS
Download Tripwire from sourceforge.net/projects/tripwire.
Unpack in $HOME. Read the INSTALL file and the ./configure --help output to choose your options. I used:
./configure
--sysconfdir=/etc/tripwire --enable-static
This didn’t work! A visit to the
website “help” forum, there was a thread for Fedora (FC5). Turned out Tripwire
had a known bug and a patch was available. Download the patch to $HOME and run it with patch -p0 <patch-file.
Next cd
into the tripwire directory and run configure again, then make clean and then
make. Even with the patch an “su
-c 'make install'”
didn’t work. Apparently the contrib
directory should have been named install
(?). After creating a symlink with the correct name, it finally finished the make successfully.
There are a few post-install tasks
needed: cd into the contrib directory and edit the cron
script tripwire-check to change
the “/usr/local/etc” path(s) to
“/etc”. Finally, as root, you
must copy this script to /etc/cron.daily
(or put it elsewhere and leave a symlink to it, if your cron allows symlinks to
crontab files.)
After installing, you must
configure it. Besides setting various options the way you like you need to
define your system policy (what will be monitored by tripwire). In /etc/tripwire you will find twcfg.txt, the configuration file,
and twpol.txt, the policy
file. The default configuration is probably okay but you may wish to turn on syslog reporting instead of email, or
play with the log level. Setting LOOSEDIRECTORINGCHECKING
to TRUE will not report changes
to a watched directory itself, only the contents, which is usually good enough
(else you get two reports when a file changes!) See man twintro(8).
Tripwire
Policy File (See man twpolicy(4)
)
Creating the policy is the hardest
part. It is also the part that needs updating when your system configuration
is updated (once a year or so on a typical production server). The policy file
has two parts. The first sets file locations and values of directives. The
second part is a (huge) list of rules: files (filesystem objects, which
include directories, named pipes, sockets, and devices) to watch and what
attributes to watch (and ignore). A rule for a directory means that directory
and everything in it (recursively).
object_name white-space
-> white-space property_mask [(attr=val[,...])] ;
The property_mask is a list
of the form: +xxx-yyy to check xxx but not yyy.
If some property is not mentioned, it means to not check it, so you can often
omit the “-yyy” part.
Because some combinations are
frequently used in your policy for different objects tripwire allows you to
define a variable for that can be used for the property_mask (or even an object
name):
name white-space =
white-space value ;
You use these similar to shell
variables: $(name). A number
of variables are predefined by Tripwire: ReadOnly,
Growing (for some log
files), Device, IgnoreAll (just make sure the
object is there), IgnoreNone
(useful with: $(IgnoreNone)-yyy),
and some others.
Here are some examples:
mask1
= ...;
mask2 = ...;
#
Scan /etc directory tree using mask1, except the
# file /etc/passwd, which is scanned using mask2:
/etc -> $(mask1);
/etc/passwd -> $(mask2);
/lib -> $(ReadOnly)
(emailto = bob@foo.com,
severity = 80);
Only one rule may be associated
with any given object. If any object has more than one rule in a policy file,
Tripwire will print an error message and exit without scanning any files. For
example:
#
This is an example of an illegal construct:
/usr/bin -> $(mask1);
/usr/bin -> $(mask2);
Other things can go into a policy
file, including directives (e.g., “email this violation to wpollock”, severity
numbers (these can be used in the report, with a Perl script to handle severe
violations differently), section definitions, and other stuff.
If a bunch of attributes apply to
many rules, rather than repeat them per rule you can use this syntax:
(
attribute-list ) [\n] { \n rule; \n rule; \n ... }
You need to decide which parts of
your system to monitor, and to what degree. A simple basic policy can be used
to protect only your critical files. For example binary directories and their
contents should never be modified without detection: /bin, /sbin,
/usr/bin, /usr/sbin, /usr/local/[s]bin, /opt/[s]bin,
and so on. (Basically the directories found by running:
find / -type d -name \*bin
You must also protect any lib directories, as these contain
kernel modules, PAM modules, and DLL files.
Next you should protect
configuration files. On a learning host like ours you should expect most of
these files to change regularly, but rarely in a production setting. These
directories include /etc and
other directories in /usr, /opt, etc. Additionally some programs
put config files in strange locations, such as under /var/lib/someplace.
In /etc
are a few special files that are expected to be present, but whose contents
changes all the time. Examples include mtab
and ld.so.cache. If you use a
general policy rule for all of /etc
and its contents (a good idea), you must make exceptions of such files. (mtab can be a symlink to /proc/mounts on many systems, and ld.so.cache could be put under /var, with a symlink left in /etc.)
Log files should exist and not
change, except to grow or be rotated (which usually changes the inode number
then shrinks the file).
Finally you need to protect other
important but not critical files, such as timezone files or printer
configuration files, often found under /usr
someplace. Also, on a production machine you are rarely adding users, so the
directories under /home may be
usefully monitored, although a looser policy to allow legitimate users to add
or change files should be allowed (perhaps it is enough to monitor system
account home directories). Also it may pay to monitor /root, but to allow some files to change without
reporting them (e.g., .bash_history,
.viminfo).
Tripwire
Administration
Once you set the configuration and
policy files the way you like, you then generate some encryption keys, one (the
site key) used to encrypt the configuration and policy files and the other (local)
to both encrypt and sign the tripwire database. If you plan to run tripwire
unattended via cron you might consider using no password on the local key.
To create
the passwords run (as root):
tripwire-setup-keyfiles
(or you can use “twadmin --generate-keys”.)
When run for the first time, a
database of all the digests/hashes is built from all the specified files. This
is then digitally signed and encrypted, to make sure it isn’t changed by some
attacker. Ideally you would burn this DB on a CD-ROM. The command for this
is:
tripwire --init
To run a check on your system and
have tripwire generate a report, run:
tripwire --check
At this point you may discover some
flaws with your policy file. Now is a good time to fix those. Edit the policy
file and then run
tripwire --update-policy
to update the policy (the encrypted
version) and to update the database to match the new policy. Run a check again
and repeat until you have a good policy.
Now is a good time to back up the
encrypted policy and configuration files. Then delete the plain text
versions. You can get these back using:
twadmin
--print-cfgfile
twadmin --print-polfile
You may also want to back up the
database; burn all three files on a CD-ROM.
Then (via cron) tripwire runs and
checks all the watched files, recomputing their hashes and comparing them to
the ones saved in the DB. This may require you to enter a password to read the
DB. If that is annoying you can remove the encryption from some or all of
these files using the command:
twadmin --remove-encryption ...
Eventually you will see a report
showing something has changed. If you (or another administrator) didn’t update
the software and it is several important files (e.g., /sbin/login, passwd,
...), now would be the time to suspect a rootkit and/or virus has replaced
those binaries. You should take appropriate action (including restoring the
bad files from a backup). If the change is harmless (a result of running yum for instance) you need to update
the database with the new information or you will see that error in all future
reports. You can do this in one of two ways:
tripwire
--update [-a]
With the “-a” option the DB will automatically update the database
with the current system data. Without it, tripwire will launch the editor on a
text file. In that file there will be an “x”
next to each reported violation. Leaving that “x”
causes that item to be updated, removing it causes no update for that item.
When you save and quit the editor, the DB will be updated.
Use the twprint command to produce human-readable copies of
saved tripwire reports. Note if these are saved (e.g., in /var/log/tripwire) you may need to
rotate them over time.
NIDS Types
and Operation
NIDS (Network-based
intrusion detection systems) run on one or several carefully placed hosts
(called network monitoring stations or NMS) and view the network as a
whole. NIDS use NICs running in promiscuous mode to capture and analyze
raw packet data in real time. They need to be configured for your
organization’s normal traffic to reduce false-positives. (Many SAs omit this
vital step!)
Most NIDS (and HIDS too) use one of
two methods to identify an attack: statistical anomaly detection or pattern-matching
(or signature-based) detection.
A signature based NIDS such as snort
examines visible network activity, looking for suspicious activity such as port
scans, packets with fake source addresses, etc. Not all malicious activity is
visible on a given host’s NIC, so the location and number of such scanners must
be carefully thought out.
An anomaly based IDS looks for
activity that is different from a user’s or system’s normal behavior. (Credit
companies use the same technique, to spot unusual credit card purchases.) This
approach self-trains to create a baseline.
Anomaly based IDSs causes many more
false-positives than with a signature based IDS, thus requiring more effort
over time. But they can detect zero-day attacks that signature
based IDSs can’t.
Snort is the most popular NIDs
(2015). It is signature based. Another very good one is Suricata.
While Suricata is designed differently than Snort, it is also signature based
and can in fact use Snort rules. Suricata is multi-threaded and can use
hardware acceleration (i.e., a GPU), can capture malware or other designated
traffic in files, and can have rules that use more than packet data. Suricata
also provides nice dashboards and is easy to use.
Bro (Bro-IDS) is the only popular open
source NIDS that is anomaly based. While probably the most powerful tool, it
is considered difficult to learn and use.
Don’t forget about
your wireless network! It needs an IDS too, one that can handle the specific
threats of wi-fi. Kismet is considered by some to
be the best available open source WIDS, capable of site surveys, rogure WAP
detection, etc.
Anti-Virus
Scanners, malware scanners
In addition to HIDS that look for
modified files, scanners check downloaded data such as downloaded packages and
most commonly, email messages. These help prevent the system from getting
infected (modified) in the first place. Note web and other servers can spread
various types of malware, including viruses, trojans, worms, cookies (a type of
spyware), etc., even if your system itself remains un-infected.
So-called adware is another form of malware that can be blocked.
There are a number of ways these scanners
can work, but most commonly, they are signature-based. Most only work for
Windows (or scan for Windows malware, even when run on a *nix host). Examples
of common anti-virus scanners include Clam AV (clamav.net), Panda (pandasecurity.com),
ESET NOD32 Antivirus 4 (eset.com),
AVG Anti-Virus (free.avg.com),
and Norton AntiVirus us.norton.com/antivirus).
There are scanners for Android and other mobile devices too. These generally
also offer GPS location, backup, remote-wipe (in case of theft). (I like Lookout, but
most are about the same in cost, features, and reliability, so it probably
doesn’t matter much which one you use.)
Signature-based scanners are about
93% accurate, but that number is misleading. They detect most of the more
common malware (closer to 100%), but do less well against new or rarely seen
malware.
Vulnerability
Scanners
There are a class of related tools
known as vulnerability scanners or security audit tools that
look for potential problems in your host (and in some case, network) configuration.
Examples include bastille, nessus, saint, and others, listed previously.
Some scanners such as Nagios
will also work as an IDS.
The Center for Internet Security
(cisecurity.org)
provides excellent vulnerability scanners which they call benchmarks,
some for free trial use (CIS is non-profit but they do charge for some tools
and support). The platform specific scanners provide a report and include
generally excellent security advice in the accompanying documentation. (CIS_Solaris_Benchmark_v4.0
includes an 89 page security document that is one of the best security
resources available.) CIS benchmark scanners are available for all Unix,
Linux, and Windows systems, plus a few network devices (e.g., Cisco routers)
and major applications (e.g., Major DBMSs, Exchange Server, BIND, Apache,
etc.).
Sun also makes a security
vulnerability scanner tool for Solaris called “JASS” at www.sun.com/software/security/jass.
(The name came from JumpStart Architecture and Security Scripts, but is
now called Solaris Security Toolkit. The acronym is still JASS for some
reason.)
Lecture 11 — Security Assessments, Evaluations, and Audits, and ROI
Qu: How do you know you are
secure? The answer is you must conduct assessments and evaluations to know.
Being secure doesn’t mean your system can’t be hacked or compromised. There is
always a risk! (“Prevention eventually fails.”) To be secure means you
have an acceptable level of risk.
Assessment
A Security assessment
is the first step. The assessment involves the whole organization and assesses
the non-technical aspects of security. It is useless (or worse, leading to a
false sense of security) to evaluate the technical aspects before you know
what must be protected. For example, evaluating the network encryption of
data is pointless if the data is easily obtained from a non-protected database.
The assessment should examine the
security policies (and related policies, such as disaster recovery policy or
DRP), procedures, organizational structure and infrastructure architecture.
However a preliminary step is to
determine exactly what resources are considered vital to protect. You must
know what the organization considers valuable and/or private. If possible
dollar amounts should be assigned. (This step is related to the risk analysis
done for a DRP. Note you can often get help assigning dollar amounts from
organization’s finance/insurance dept.)
Next you need to make sure the
policies, procedures, organization, and infrastructure, if all implemented
correctly, would protect that data to the levels required. Often, an
organization will adopt inappropriate policies and procedures (sometimes
self-contradictory ones). It doesn’t matter how well you have implemented security
measures if they wouldn’t protect the data that needs protecting!
You must also make sure the
policies and procedures are in compliance with applicable laws, regulations,
and best practices. Examples include HIPAA (Health Insurance Portability
and Account Act), SOX (Sarbanes-Oxley act of 2002), GLB (Gramm-Leach-Bliley
act), DMCA, FMA (Financial Management and Accountability act), FERPA (Family
Education Rights and Privacy Act), CFAA (Computer Fraud and Abuse Act), and
many other federal and state regulations and laws. International regulations
may apply as well, such as the EU’s General Data Protection Regulation
(new in 2018).
Many of these laws and regulations
require the data they use to be available, thus essentially mandating a good disaster
recovery policy. (SOX 2002 is often cited for this.)
Return
on Investment (ROI) [Adopted from Network Security Evaluation
by Cunningham et. al,
(C)2005 Syngress, p. 57]
A quality assessment of a medium to
large sized organization could take months for a (small) team. For this reason
such assessments (like risk analysis) are usually left to consultants who will
receive tens of thousands of dollars for the work. To justify this expense the
system admin should be able to explain the current and expected return on
investment (ROI) or ROSI (return on security investment) for the
assessment and/or evaluation. (And indeed, for any security related budget.)
Unfortunately there isn’t a single
widely agreed upon method for this calculation. (Do a Google search for
“security ROI”.) Traditional ROI calculates an actual payback and/or reduction
in expenses. But for security money spent you will rarely if ever see such a
return. Instead you must focus on security expenses as a kind of necessary
insurance, and the ROI is the lowered risk exposure.
Understanding
Risk [from: www.csoonline.com/read/120902/calculate.html]
According to one study the American
Society of Safety Engineers (ASSE) cites, the ROI of fire extinguishers is in
fact about a $3 return for every $1 invested if you take fire extinguishers as
part of a larger corporate health and safety initiative—which you should, since
fire extinguishers (like IT security) rarely show up as a discrete security
purchase.
... A binary thinker might suggest
that, since there was no fire last year, there was no ROI. If that is the
attitude at your company, it’s time to initiate some awareness and education because
that’s not how risk mitigation works. Think of it this way: If you wear your
seat belt but don’t get in a car accident, does that mean you ought not to
invest in a seat belt because there was no return?
No. You did get a return, because
return is not measured in a dogmatic world of what did or did not occur, but in
the stochastic world of what might occur and how likely it is to occur. That
is the game of risk; prepare for something to happen by investing in ways to
stop it from happening.
Calculating
ROI
One way the security ROI can be
estimated is by computing the annual estimated loss expectancy of a security
incident, which can be calculated as:
Incident-cost x
probability x mitigation + cost-of-mitigation
Note a mitigation is some
measure taken that either reduces the probability of an incident, or
reduces the cost of recovery should some incident occur. The annual
estimated loss expectancy is the sum of these calculations for each
incident, for some combination of mitigations.
Suppose the cost of a security
break-in $1,000,000 and the probability of this is 35% if you do nothing. Then
the annual loss expectancy if you take no action is $1,000,000 x 0.35 =
$350,000.
Next consider what mitigations you
can take. Each has a cost so you need to determine which mitigations are the
most cost-effective, given the limitations of your overall budget.
Suppose a $20,000 anti-virus program might reduce the
chance of occurrence by 50%, a $10,000 user security awareness training program
might reduce the expected loss by (say) 33%, and a $15,000 security assessment
and evaluation by 35%. The choices are:
|
Mitigation
|
Cost
|
% Improvement
|
Expected annual loss
($350,000 x (1-%improv.) + cost)
|
ROI
|
|
None
|
0
|
0
|
350,0000
|
0
|
|
Anti-virus
|
20,000
|
50%
|
195,000
|
155,000
|
|
Training
|
10,000
|
33%
|
244,500
|
105,500
|
|
Assess
& Eval
|
15,000
|
35%
|
242,500
|
107,500
|
Of course you need some reliable
industry data to back up these claims for improvement. (The numbers used here
are unrealistic.) Also, you can combine various mitigations to reduce the
expected loss (and hence increase the ROI). Also in a real calculation, you
would need to consider initial or one-time (capital) costs (and depreciation)
and recurring (operational) expenses. Qu: if your annual budget was
$25,000, what mitigations would you recommend?
“Building security into software
engineering at the design stage nets a 21% ROSI. Waiting until the
implementation stage reduces that to 15%. At the testing stage, the ROSI falls
to 12 percent.” – From: www.cio.com/archive/021502/security.html
For the loss that is left after all
mitigations, you can get cyber-insurance. Some sources include:
Lloyd’s e-comprehensive, Chubb’s Cybersecurity, and AIG’s Net Advantage
Security.
The NSA (National
Security Agency) has published the Information Assurance Methodology
(IAM), with practical and very valuable advice on how to conduct an
assessment, including for example how to negotiate the contract for the
consultants. (Show book.)
Evaluation
Once you have determined the
correct procedures, policies, and infrastructure required to provide adequate
protection, it is time to conduct a Security Evaluation. In this
phase you examine the equipment and configurations to make sure your routers,
switches, firewalls, servers, and hosts will implements the policies determined
by the assessment.
The NSA has also published the Information
Evaluation Methodology (IEM) as a guide to conducting the evaluation.
(Show book.)
The definitions of assessments and evaluations
as explained here are not universally agreed upon terms. Many would consider
these terms interchangeable with each other, and also with an audit.
Audits
The main goal of IT audits,
assessments, and evaluations is to reduce business risk and liability
exposure. IT has become a critical part of an overall business strategy. The
audit does this by finding abuses, security problems, compliance violations,
and other configuration errors that can lead to poor performance. Today most
people speak of a security audit, which is only concerned with locating
(and later fixing) security related issues.
Many people get
scared when they hear audit. In business matters, audit means a formal
examination of a person’s or organization’s financial (and related) records, to
either confirm they have followed proper procedures, or to assign blame for
negligent or malicious activities.
An Audit may be defined
as a comprehensive examination and evaluation of a system (possibly a network).
An auditor examines the configuration of the system and past and current
activity as recorded in various log files. Some extremely detailed log files
are called audit logs or audit trails, and/or system
activity logs. Usually such logs are not enabled except when an audit is
in progress. These logs can report every action of every process (most audit
logs only report the OS system calls made by each process, which is usually
good enough).
The difference
between assessments, evaluations, and audits are not necessarily in how they
are conducted, but rather in the goals and intended audience.
There are many types of audits,
even just considering IT audits. Once type of audit is a routine part of
on-going security measures (this can be called an assessment/evaluation).
Another type is performed after a problem has been discovered (or suspected),
to assess what is wrong with the policies and procedures and to assign blame.
A security audit is conducted to trace a series of related events, to determine
the trail of an attack. This often involves examining multiple logs,
sometimes from multiple systems, and sometimes working backwards from the final
event toward the initial event of the attack.
An organization may conduct internal
assessments and evaluations to ensure to themselves that the system works
correctly and efficiently. Audits are conducted to provide the same assurances
to shareholders, business partners, customers, and government regulators
(external audit).
Auditors
ensure:
·
An adequate audit trail exists for all activities,
especially financial transactions.
·
Controls to ensure data integrity.
·
Both unit (subsystem) and integration (whole system) testing
procedures, to make sure the system performs as intended.
·
Exceptional conditions are anticipated as much as possible, and
general exception handling procedures are in place. This includes
authorization procedures for system overrides when needed.
·
Controls exist to prevent unauthorized and/or undocumented
changes to the infrastructure (and indeed, to any procedures).
·
Required government, industry, and internal policies and
procedures are followed. (Sometimes referred to as compliance audits.)
·
Adequate training is provided for personnel.
·
Additional security, compatibility (different vendor equipment),
..., and controls.
Audits may be conducted to:
·
Ensure confidentiality, integrity, and availability of
info and resources.
·
Ensure compliance with various regulations and policies (e.g.,
SOX, HIPAA, HITECH).
·
Ensure conformance to the local security policies.
·
Investigate possible security incidents.
·
Monitor user or system activity where appropriate.
HIPAA compliance is
enforced by the federal government (Office of Civil Rights), with random audits
and requirements to inform patients of privacy and security breaches.
Violations can be expensive. In 2/2011, Cigna
was fined 4.3 million for poor HIPAA compliance, concerning
information withheld from 41 patients. In 2009, as part of another act (ARRA),
HIPAA security and privacy requirements were upgraded by the HITECH act.
Auditing is sufficiently hard
that most organizations will hire out the audit. Auditing doesn’t need to
be done continuously but should be done periodically, especially after a system
upgrade. (See The Unix Auditor’s Practical
Handbook.) Compliance and legal issues may force an audit (of
some sort) every year.
A basic audit log can be made by running
an IDS frequently (continuously, but may be hourly, daily or weekly runs are
enough), and regularly running a vulnerability scanner. However a complete
audit could take days to weeks (or even months!) to complete and is expensive.
These may only be run annually, or only after a major change to the network or
some server.
Audits have a negative connotation
for many organizations. They are viewed as a “fault finding” expedition when
something has gone wrong. For this reason proactive audits are often called
“assessments” and/or “evaluations”. From a security standpoint, an assessment
is used to determine what policies are required to protect valuable information
assets. An evaluation is used to determine if the procedures and
configurations (of firewalls, routers, switches, and servers) are correctly
implementing the policies. (As per NSA.) As a result, these terms are often
used interchangeably.
Solaris uses BSM for auditing,
enabled by starting the audit daemon (auditd).
The /etc/security directory
contains subdirectories with audit files related to audit control. auditd collects data and writes it to
records, forming audit files. To check if BSM is running, type “ps -ef |grep auditd”. If not, research bsmconv
on Solaris and ausearch on Linux
(“man -k audit” works too.)
Audit files that are complete have
names like: start-time.finish-time.hostname. The exact format is: YYYYMMDDHHMMSS.YYYYMMDDHHMMSS.hostname
For example: “20020610020543.20020617225351.SERVER01”
indicates the log file on Server01
was started June 10th, 2002 at 5 minutes after 2 am, and closed itself
successfully on June 17th, 2002 at 10:53 pm.
If the audit log file is still
active or was interrupted, it uses the form: start-time.not_terminated.hostname.
Enabling auditing adds a 1% to 3 %
performance penalty, not very much! However the audit logs can grow by many
gigabytes a day; you must allow for that. OS auditing tools collect data that
makes it possible to:
·
Monitor security-relevant events that take place on a host
·
Record the events in a network-wide audit trail
·
Detect misuse or unauthorized activity
·
Review patterns of access and the access histories of individuals
and objects
·
Discover attempts to bypass the protection mechanisms
·
Discover extended use of privilege that occurs when a user
changes identity
Some
important IT related audits include:
C2 Audit:
Many Unix systems allow the admin to enable auditing called “C2 audit”
which is the form specified by Department of Defense regulations to meet C2
level of trust. (DoD 5200.28-STD, “Department of Defense Trusted Computer
System Evaluation Criteria” (TCSEC), commonly known as the orange
book. This was part of the rainbow series.) C2
auditing generally means assigning an audit ID to each group of related
processes at login, and thereafter related system calls performed by every
process are logged with that audit ID. There is no accepted standard for the
logging format; C2-style logging can have different formats, controls, and
locations. C2 audit is useless without interpretation and reduction tools,
such as those provided in the Solaris Basic Security Module (BSM).
(Linux doesn’t call it that.) It doesn’t work well for networked systems.
Common
Criteria (CC): This is an international standard (ISO/IEC 15408)
for computer security (and is available for free download, e.g. from niap-ccevs.org).
This has replaced the TCSEC. The Common Criteria does not provide a list of
product security requirements or features that products must contain. Instead,
it describes a framework in which computer system users can specify their
security requirements (called protection profiles), from a common list
of criteria. Vendors can then implement and/or make claims about the security
attributes of their products (that is, which protection profiles they meet),
testing laboratories can evaluate the products to determine if they actually
meet the claims. The labs are audited by governments (in the U.S by NIAP CCEVS,
part of the NSA) to ensure they use the testing procedures listed in the CC.
SAS70: Statement
on Auditing Standards (SAS) No. 70, Service Organizations, is a widely
recognized auditing standard developed by the American Institute of Certified
Public Accountants (AICPA). Released in 1992, SAS70 is authoritative guidance
that allows service organizations to disclose their control activities and
processes to their customers and their customers’ auditors in a uniform
reporting format. This is especially useful for on-line companies, to provide
customer confidence in their data handling procedures. In 2010, SAS70 was
updated and renamed to SSAE 16, but most still refer to SAS70. (The new
standard is available since 6/2011.) SAS70 is being revised to reflect the
same changes made in SSAE 16, so both are essentially the same standard. A
company such as Box.net that is SAS-70 certified, allows admins for enterprise
accounts to run full audit trails of all users.
Safe Harbor
and Privacy Shield: While all governments want to protect their citizens’
privacy (or so they claim), the European Union (EU) was the first to pass
comprehensive laws, in 1998 (“Directive on Data Protection”). This causes a
problem for multi-national companies, since non-EU members may have different
laws in place. In order to bridge these different privacy approaches, the U.S.
Department of Commerce, in consultation with the European Commission, developed
a “Safe Harbor” framework. Organizations can evaluate and possibly join the U.S.-EU
Safe Harbor program. (There is a similar agreement for the U.S.
and Switzerland.) Members are claiming to comply with both sets of
laws. Note, these programs are self-certified.
In 2015, after complaints and
evidence of PII being used inappropriately, the EU decided to end their safe
harbor agreement with the U.S.
In 2016, the EU approved a
sucessor to Safe Harbor known as Privacy Shield. This is
similar to Safe Harbor but with more transparancy, oversite, and a redress
procedure for EU citizens (missing from Safe Harbor).
PCI (Payment
Card Industry) Compliance and Security, Consumer Privacy
The Payment
Card Industry (PCI) has created requirements known as the PCI data
security standard (or DSS) for protecting payment card
information, including information in computers which process, store, or
transmit (across the Internet) credit card and other payment card
information. Some non-obvious issues include data retention issues and
data disposal issues. Many commercial organizations need to handle such
electronic payment information. Merchants and payment processors need
to regularly file notices of compliance, usually created by an
internal audit.
In the past each type
of card (Visa, Amex, ...) had security regulations for handling customer names,
addresses, and other collected payment information. (E.g. usa.visa.com/merchants/risk_management/cisp_merchants.html.)
Recently all the major banks have agreed to a single set of standards, the
PCI DSS. For example, under the new PCI standard an un-encrypted
log file is not allowed to store a complete credit card number; but you can
store the first 6 and last 4 digits.
Credit Card and Electronic Payment
Information: Fraud Protection
There are two mechanisms currently
in place in credit card technology that assist a merchant in minimizing credit
card fraud. Both of these are of particular benefit when processing
credit card transactions “anonymously” as they are done online. These two
mechanisms are nicknamed “AVS” and “CVV”. For your own protection as a
merchant, you are strongly encouraged to require both (or at least CVV) from
your customers.
AVS stands for Address
Verification Service. This is a means by which you can determine
if the address the customer provides agrees with the address associated with
the credit card account. This provides you with some measure of
confidence that the person using the credit card is the person who owns
it. AVS information is not required for credit card transactions.
However, if it is provided, the transaction processor issues back a response
indicating how much of the address matches. There are levels of matching:
it may be the case that the street address is correct, but the postal code is
wrong, etc. It is important to note that a credit card transaction will
not usually be denied if the address is wrong. It is up to you to decide
what to do if the address does not match or matches only partially. One
course of action would be to void the transaction and deny the sale, but this
is entirely at your discretion.
CVV stands for Card
Verification Value (sometimes called CVV-2). This is a 3 or 4
digit code that is found on Visa, MasterCard, Discover, and American Express
cards. It appears on the card but nowhere else, not even on credit card
statements. Its primary purpose is to validate that the user of the
credit card actually has the card in hand. On Visa, MasterCard, and
Discover CVV data consists of the 3-4 digits found after the card number on the
signature strip on the back of the card. On American Express CVV data
consists of 3-4 digits on the front of the card, to the upper left of the card
number. CVV data provides the merchant a high degree of confidence that
the customer actually possesses the credit card that is being used.
Consumer Privacy Protection
Besides protecting your enterprise
from credit card fraud, it is important to guarantee customers that their
credit card information is protected. Of course you should use encryption
for you web site (HTTPS rather than HTTP for all web pages that require
security). But there are additional protections needed too. There
are at least four different times when customer credit card information is
being transferred and must be protected (there may be more depending upon how
your business operates):
1. When
the customer sends his/her credit card information to you. When
processing credit card transactions online, this step takes place over the
Internet, and guaranteeing security at this time is entirely your
responsibility as an Internet merchant. You must have a secure server,
with a valid security certificate, and you must be sure to use the “HTTPS”
protocol whenever your customers are sending private information.
2. When
the credit card information is sent to the transaction processor. You
do not have direct control over security at this step, but you will need to be
sure that the credit card transaction processing software you use is
secure. All credit card information should be securely encrypted as it is
passed back and forth from your server to the credit card transaction
processor.
3. When
credit card information is being moved into and out of a database.
Again, the security measures in place at this step will depend upon the
software you are using to handle your transactions and maintain the
database. Whatever credit card transaction processing software (CCTPS)
you decide to use, never store unencrypted credit card information in a
database.
4. When
credit card information is being viewed and handled by your staff.
Ensuring security at this step is your responsibility. Some CCTPS includes a
reporting capability that will be of great use to your accounting
personnel. Since these reports include credit card information, you will
need to be sure to restrict access to the site that hosts the CCTPS and the DB,
and to run it on your secure server.
For more information
see pcianswers.com
and www.pcisecuritystandards.org.
IP addresses are
personal information, according to the head of the European Union’s data
privacy regulators. German data-protection commissioner Peter Scharr told the
European Parliament that if an Internet user is identified by an IP address,
then it must be considered personal data. If the EU decides to mandate that IP
addresses be considered personal information, it would change the way search
engines record data.
Google says an IP
address only identifies the location of a host and not the identities of users.
They keep user’s search information for up to 18 months in an effort to improve
its regional search results and to prove to advertisers that they are not being
deceived by “click fraud”.
Privacy Assurances
Two further measures
should be taken by merchants that offer on-line sales. The merchant’s
site must have a privacy policy that should meet the P3P Privacy Policy
standard. (See www.w3.org/P3P/).
While mainstream browsers don’t currently include support for this, there is
no competing standard to use.
Secondly your site
should include some assurances to the user about your on-line business
practices (especially data collection, retention, and handling). This is
commonly done by having a well-known third party certify your site as compliant
with their policies and practices. (This is in addition to the PCI DSS.)
You include a special icon and notice of compliance on your site.
Remember that few
companies are so well-known that assurances are not needed. Some common
assurance providers are BizRate.com, ResellerRatings.com,
TRUSTe.org,
BBBOnLine.org,
TrustWave.com,
and VeriSign (verisign.com/trust-seal/).
(Show the bottom of the welcome page at NewEgg.com.) Many of these are
based on consumer reviews.
[http://blogs.sun.com/martin/entry/solaris_audit_settings_for_pci]
Martin
Englund’s Weblog:
Wednesday September 19, 2007
Solaris
audit settings for PCI DSS version 1.1
Permalink |
| 2007-09-19 12:27
I’ve
reviewed the Payment Card Industry Data Security Standard version 1.1 for which
audit settings are needed to be compliant, and thought I should share this.
The reason for sharing it is twofold: I want to verify that I got it right as
many of the requirements are vague or ambiguous, and think it is useful for
those of you who also have to be compliant with the PCI DSS.
Requirements:
10: Track
and monitor all access to network resources and cardholder data
Logging
mechanisms and the ability to track user activities are critical. The presence
of logs in all environments allows thorough tracking and analysis if something
does go wrong. Determining the cause of a compromise is very difficult without
system activity logs.
10.1
Establish a process for linking all access to system components (especially
access done with administrative privileges such as root) to each individual
user.
This is
handled by default through Solaris auditing, but you need to configure what to
audit.
10.2
Implement automated audit trails for all system components to reconstruct the
following events:
10.2.1 All
individual user accesses to cardholder data
This
requirement is met by the fr and fw audit classes, but unfortunately you cannot
enable it for just the cardholder data, you will have to audit all files, which
will generate a considerable amount of traffic.
10.2.2 All
actions taken by any individual with root or administrative privileges
This
requirement is a bit vague. What is an action? Assuming that they mean
executed commands, you can meet this requirement by using the ex audit class.
10.2.3
Access to all audit trails
Access
to the audit trails is audited using the fr and fw classes. As with 10.2.1
this will generate loads of unwanted audit records.
10.2.4
Invalid logical access attempts
Again
this requirement is vague. Access to what? Assuming that they refer to files,
this requirement is met by the -fr and -fw audit classes.
10.2 5 Use
of identification and authentication mechanisms
This
requirement depends on what authentication mechanisms you are using. Assuming
that you just use plain Solaris, it is covered by the lo class. If you use
Kerberos you need the ap class too.
10.2.6
Initialization of the audit logs
This
requirement is met by the +aa class.
10.2.7
Creation and deletion of system-level objects.
This
requirement is met by the fc and fd classes (file creation and file deletion).
I assume that they only mean successful events, so we can use +fc,+fd to reduce
the size of the audit trail.
10.3 Record
at least the following audit trail entries for all system components for each
event:
10.3.1 User
identification
10.3.2 Type
of event
10.3.3 Date
and time
10.3.4
Success or failure indication
10.3.5
Origination of event
10.3.6
Identity or name of affected data, system component, or resource.
All
these requirements are met by the audit records generated by Solaris.
10.4
Synchronize all critical system clocks and times.
This
requirement is met by synchronizing time using NTP.
10.5 Secure
audit trails so they cannot be altered.
10.5.1
Limit viewing of audit trails to those with a job-related need
This
requirement is met by limiting who can become root, which is best handled by
turning root into a role, as it require explicit authorization (knowing the
password isn’t enough).
10.5.2
Protect audit trail files from unauthorized modifications
The
default owner, group and mode of the audit trails are root, root and 640, and
the only user who is a member of the root group is root, unless you have
changed that this requirement is met by default.
10.5.3
Promptly back-up audit trail files to a centralized log server or media that is
difficult to alter
Upon
audit file rotation (audit
-n) it should immediately
be sent through a drop box to a remote system.
10.5.4 Copy
logs for wireless networks onto a log server on the internal LAN.
This
requirement has nothing to do with Solaris auditing, so I don’t cover it here.
10.5.5 Use
file integrity monitoring and change detection software on logs to ensure that
existing log data cannot be changed without generating alerts (although new
data being added should not cause an alert).
This
requirement can be met by computing a MAC (mac -a sha256_hmac) of the audit
file once it is terminated (audit -n) and recomputing it before you use it
again.
10.6 Review
logs for all system components at least daily. Log reviews must include those
servers that perform security functions like intrusion detection system (IDS)
and authentication, authorization, and accounting protocol (AAA) servers (for
example, RADIUS). Note: Log harvesting, parsing, and alerting tools may be
used to achieve compliance with Requirement 10.6.
This is
the hard part. The above settings will generate several gigabytes of data on
one busy system.
10.7 Retain
audit trail history for at least one year, with a minimum of three months
online availability.
Two tips for storing audit
trails: either compress it using gzip or save them on a file system with
compression enabled. If you are required to audit all file access it will
generate a gargantuan amount of data, probably several gigabytes per day per
system. You need to minimize this, without post-processing the audit trail if
possible.
There are two sets of files for
which we must audit access to: cardholder data and audit files. If you make
the cardholder data owned by a role (e.g. “pci”),
and set the file mode so that only the role may access the file (chown pci and chmod 0600), you don’t have to audit fr
for everyone. It will be enough to audit fr for the pci role. When the users who are
authorized to access the data assume the pci
role, they get audited for fr even though their normal account aren’t.
However, since root can read all
files that account also needs to be audited for fr. This also takes
care of the auditing of access to the audit files, which are only accessible by
root.
To catch someone changing the mode
of cardholder data (e.g. making it world readable) the pci role should be audited for +fm (successful file attribute modification).
Solaris Audit configuration
files:
Below is the audit configuration
for the PCI DSS version 1.1:
/etc/security/audit_control
flags:lo,-fr,+fc,+fd
/etc/security/audit_user
root:ex,fr,fw,+aa:no
pci:fr,fw,+fm:no
Lecture 12 — Process Privileges — Linux Capabilities and Solaris
Privileges
Process
Privileges — Linux Capabilities and Solaris Privileges
Traditional Unix
implementations distinguish two categories of processes: privileged processes
(whose effective user ID is 0, referred to as super-user or root), and
unprivileged processes (whose effective UID is non-zero). Privileged
processes bypass all kernel DAC permission checks, while unprivileged
processes are subject to full permission checking based on the process’s
credentials (usually: effective UID, effective GID, and supplementary group
list).
This traditional Unix
approach is flawed in that it violates the principle of least privilege:
to be able to perform any privileged act (e.g., listen on a well-known port) a
program must be enabled to perform all privileged acts (e.g., shut down the
system or write to read-only files in /bin).
Originally the
SUID feature of *nix was designed for this situation. The idea is to make
the data only accessible by app-owner (an otherwise unused user account
with no login), make a SUID executable accessible (executable by all) owned by app-owner.
Now the only access to the data is indirectly via this “proxy” application,
which in theory can implement an arbitrary security system. The problem is
this is extremely hard to do well and means every application uses a different
authentication/authorization scheme. Most implementations used SUID to root,
to make configuration simpler (no extra permissions or groups to manage).
Today there are few SUID programs and most of these should not be SUID!
One commonly used
approach is to use privilege bracketing. With privilege
bracketing, privileges are enabled only when they are actually required and
turned off when they are no longer required. (You see this used in daemons,
which start as root, then “drop privileges” by changing the effective
user ID (euid). The idea of privilege bracketing is to narrow the
window of a program’s vulnerability so that it is as small as possible,
reducing the damage any exploit can do. (Ex: your FTP server runs as root; a
remote attacker uses an FTP server security hole (vulnerability) to gain
a root shell.)
A newer scheme that
can be used in addition to privilege bracketing, is to provide a large set of
individual privileges (Solaris), or capabilities
(Linux, POSIX), where the god-like abilities available to processes whose effective
UID is 0 are broken down into numerous discrete privileges. A process only is
granted the rights it really needs.
A process can
voluntarily remove some privileges but never add to them. In this way, an
error or security compromise is limited in the damage that can be caused.
Although using
privilege bracketing and a minimal set of privileges/capabilities doesn’t
reduce or remove software flaws that can be exploited, it does limit the damage
that can be done. However it does rely on the programmer to drop privileges;
an SA can’t manage this security. “sudo”
helps with this.
Linux
Capabilities
Linux (since v2.2)
also has split rootly powers into discrete privileges, only in Linux they are
called capabilities. Each capability grants the process that has
it the right to bypass some specific kernel permission check. (e.g., CAP_CHOWN,
CAP_KILL). There are close to 3 dozen of these. (Show /usr/include/sys/capability.h)
POSIX Std.
IEEE-1003.1e is a list of such capabilities, 7 basic ones and 22 altogether.
IEEE 1003.2c is a description of the POSIX std tools to work with those
capabilities. Unfortunately both standards never made it past “draft” status,
and both have been withdrawn. None-the-less, 1003.1e is commonly referenced;
most OSs implement the POSIX defined capabilities and others. DL from: wt.xpilot.org/publications/posix.1e/download.html
A root process gets
all permitted (/proc/sys/kernel/cap-bound)
capabilities, which gives it traditional privileged status.
Any process can
remove capabilities from its current (effective) set, but not add any
that aren’t already in the permitted set. This is one reason why
daemons start as root, remove some capabilities (from effective and permitted),
then switch to a regular user account.
Capabilities in a
process’s current set can be marked to be inherited by child processes
(similar to export). The inherited
capabilities of a parent process become the permitted capabilities of a
child process (after a fork()).
Thus there are three sets of capabilities: permitted, inheritable, and
effective (the ones currently set). See man capabilities(7)
for details. Show cat
/proc/$$/status, at
the bottom is capability sets. Show for init
(PID of 1) too. Then show getpcaps
pid,
part of lib[p]cap package; see cap_from_text(3)
for an explanation of the output. Also demo less /usr/include/linux/capability.h.)
Modern systems (such
as FreeBSD and Linux) allow root to add some (permitted) capabilities to an
executable program. This can be considered the fine-grained version of SetUID
to root. See setcap(8) and getcap(8). Demo both getcap /usr/bin/ping
and getfattr -dm -
/usr/bin/ping.
Solaris Process Rights
Management
The Solaris 10 OS
introduced process privileges, where the rootly powers available to
processes whose effective UID is 0 are broken down into numerous discrete
privileges. This is very similar to Linux capabilities and is related to RBAC
and Solaris containers (zones), discussed later. Like Linux Solaris privileges
are a superset of POSIX’s IEEE-1003.1e capabilities (Solaris 10 has about 60).
A privilege
is a discrete right that a process requires in order to perform an operation. The
right is enforced in the kernel. Programs can be run with the exact set of
privileges that enable the program to succeed. This is specified in a security
policy.
For example a program
that sets the date and writes the date to an administrative file might require
the sys_time and file_dac_write privileges. If that
program is granted these privileges than it doesn’t need to be run as root.
To perform some
privileged action the process must assert the relevant privilege first,
using the setppriv
system call. A given process is allowed only a limited set of privileges it
can assert.
For example, a
process that needs to bind to a reserved port (i.e., the web server binding to
port 80) used to require root privileges. Now a process can do this by
asserting the privilege PRIV_NET_PRIVADDR.
If a program has been written correctly other privileged operations such as the
ability to read or write any file on the system will not be available to it.
The privileges man
page describes each of the available privileges. (There are also predefined
privilege sets, e.g. All or Basic.)
A process owned by
root has all available privileges, restricted by the privilege set assigned to
the process’s zone, known as the “L” (limit) set of privileges. The set
of privileges a process is allow to assert is called its “P” (permitted)
set, and the set of privileges a process has currently asserted successfully is
called the “E” set. Some of these can be marked for export, known as
the “I” set (a subset of the P set, which in turn is a subset of the L
set). When a parent process creates a new child process (via fork), the
child’s P set equals the parents I set. With su
to root, E = P = L.
Use the ppriv pid command to see these sets, and to start processes
with reduced privilege sets:
ppriv -e -s L=basic ksh; ppriv $$;
ppriv -lv
sudo and /etc/sudoers
Allows a sys admin to
give rootly privileges to users without giving the root password out. sudo provides a useful audit log;
running stuff via su doesn’t.
Exactly what a given user is allowed to do (with rootly privilege) can be
defined, although that can be tricky to get correct, and many systems (such as
Ubuntu) don’t bother to try to restrict user actions.
Users run commands
prefixed with sudo. Sudo then
checks the /etc/sudoers
file to see if the current user is allowed to run the given command with the
given args, from the (possibly remote) host they are logged in on. The command
then runs as root (sudo is
suid). Example of a user changing another’s password:
/home/auser$ sudo passwd buser
sudo prompts users for their password
and remembers it for about 5 minutes so you don’t have to re-authenticate for
every command. (It is easy to create a background job that runs some allowed
sudo command every few minutes, to perpetually reset the timer.)
Every sudo action, whether sucessful or not,
is logged (the file depends on your system; For RH, it is usually /var/log/secure). (Demo.)
sudo is very popular on *nix systems.
On some Linux distros the root account is never used directly and all admin is
done by prefixing commands with sudo
(no password is asked). On these systems root is not assigned a password, but
I am not convinced this is a good idea!
Solaris 11 includes sudo, and root is now a role
rather than a standard user account. This is similar to the Ubuntu system.
Users can’t log in as root but instead must use su
to assume the root role, or just use sudo.
The sudoers file must be setup carefully
to allow authorized users permission to run their commands, but it is easy to
accidentally allow too much access! Edit /etc/sudoers
only using visudo, which
performs some sanity checks on the file before saving it to disk. Man sudo, sudoers
for details. (Discuss /etc/sudoers
example web resource.)
At the beginning of
the sudoers file are a lot of definitions for aliases. There are four
kinds of aliases: User_Alias
(list of users), Runas_Alias
(list of usernames), Host_Alias
(list of locations) and Cmnd_Alias
(list of commands). Such aliases can be used to define a list of users for
example, so you don’t have to have many identical rules for each user. A
typical alias looks like this (note alias names must begin with an uppercase
letter):
User_Alias PWADMINS = user1, user2, user3
Aliases are very
flexible. A user alias can include users, groups, or even other User_Aliases. Host_Aliases can contain IP addresses of hosts, network
numbers (with netmask), or hostnames with wildcards (e.g., “*.hccfl.edu”). A Cmnd_Alias can contain an absolute
pathname to a command, a directory containing commands (e.g., “/sbin”), or the special word “sudoedit”.
The alias definitions
are followed by a list of sudo parameter settings used to override the
defaults. For example, you can set certain users so they don’t have to
authenticate to use sudo. (That is the default for Ubuntu Linux, where any
user can use sudo.) You can define such parameters for any user of sudo, for
all users logged in from a given location, or for a given user (no matter where
they are logged in from).
At the bottom of /etc/sudoers is the heart of the file,
the entries that define who can do what. Entries look like this:
user host = [(runas)] command
[ argument(s) ] , ...
Or put another way: who where = (as_whom) what
Each field can be a
comma separated list or an alias (of the correct type). Note a list can also
contain aliases. Using “!”
means not allowed; this is useful in a list with wildcards to narrow the list.
For example the host list can be “*.example.com,!www.example.com”.
The first field is a
username or a defined alias for a bunch of users. You can also use numeric
IDs.
The second field
is the exact hostname as reported by the “hostname”
command; “ALL” means any
host. The idea is that you can maintain the same sudoers file on several hosts.
Saying “localhost” here won’t work unless
that is the defined hostname (a.k.a. nodename) on your host. Fedora
sets the hostname incorrectly to “localhost.localdomain”.
You can fix that or use a wildcard (“localhost*”).
If you’ve changed the hostname (statically or via DHCP) this doesn’t work;
using ALL is recommended when
the file is used on one host only.
After the equals sign
an optional “run as” list of users can be specified, in parenthesis. Normally
sudo only runs
commands as root. But a user can use “sudo -u username” to run commands as username
if that username is in the “run as” list. Use “(ALL)”
to allow a user to run commands as any valid user.
The rest of the line
of the entry is the command(s) and their options the user(s) are authorized to
run. Commands should be listed by their absolute pathnames (or as an alias). You
can use the special word sudoedit
to allow users to safely edit files normally writable only by root. (See
below.) You can use ALL to mean
any command with any arguments is allowed. You can use wildcards to specify
arguments.
If two or more
entries match but conflict in what they allow, the last one wins.
The syntax of sudoers is more complex than this, but
you shouldn’t need to know more to set nearly any policy; the extra features
are rarely used.
Except maybe this
one: At the end of the defaults section, add “Defaults
insults”. Next, try using sudo, but type an incorrect password.
Modern sudo versions are SELinux-aware and
include extra features. Once such feature is the noexec which prevents in many cases a user from
gaining a root shell. For example, if you allow some user to run “vigr” to update the /etc/group file, that user will really
be running vi/vim which supports a “:sh” command for a shell prompt.
Since the editor is run as root, so is the shell!
One way to avoid such
problems is to use a restricted version of some command. For example, “rvim” is a restricted version of vim, and “rsh” is a restricted bash.
(rsh also is the name of the
“remote shell” command.) When a command has some sort of shell escape but no
restricted mode (that you trust), you should use the noexec feature.
A better way to allow some users
the ability to edit normally restricted access files is to add “sudoedit file” to sudoers. With this setup, the sudo -e file command (same as the sudoedit file command) makes a copy of the file
which will be owned by the user. Next vi/vim is started on that copy. But
unlike normal sudo operation,
the command has an EUID of the user, not root. When the editor exits, if the
copy has been modified then sudo
will replace the original with the copy. To allow jdoe to edit /etc/hosts
you can add an entry like this:
jdoe ALL = sudoedit /etc/passwd
(Don’t use /usr/bin/sudoedit; the word sudoedit name is special.)
Shell (and other)
scripts cannot be made secure. Modern systems ignore SUID on shell scripts
for this reason. One solution is to use a wrapper C program, that can
be made SUID, and that then runs a shell script with elevated privileges. But
this is dangerous! It is much better to re-use an existing solution, such as sudo.
RBAC (Role
Based Access Control)
In conventional UNIX
systems, the root user, also
referred to as superuser, is all-powerful. Programs that run as root,
or setuid-to-root programs, are all-powerful. The root user has the ability to
read and write to any file, run all programs, and send kill signals to any
process. Effectively, anyone who can become superuser can modify a site's
firewall, alter the audit trail, read confidential records, and shut down the
entire network. A setuid program that is hijacked can do anything on the
system. The root user is also anonymous, in that you can’t tell which
human executed some command; only “root” is logged.
Role-based access
control (RBAC) provides a more secure alternative to the all-or-nothing
superuser model. Using RBAC, one can enforce security policy at a more
fine-grained level. RBAC uses the security principle of least privilege:
a user has precisely the amount of privilege that is necessary to perform a
job, no more. Regular users have enough privilege to use their applications,
check the status of their jobs, print files, create new files, and so on. For
tasks that traditionally required rootly privilege, a user must assume a role
that has sufficient privileges to do the task. Not every user can assume every
role; which users can assume which roles, is up to the administrator.
It is up to the
system administrator to define roles, define which users can assume which
roles, and what privileges are associated with each role.
RBAC works best when the roles are
clearly defined in an organization, and don’t change or evolve much or often;
and when there are many more users than roles. This is not always the case,
and RBAC is not always the best way to manage access control. In addition,
basic RBAC may grant too much privilege. (Imagine access to HIPPA-protected
medical records: all doctor-roles need access, but only to their patients’
records.)
Because RBAC can be used in
cross-enterprise situations, exact meanings of RBAC concepts needed to be
standardized. This was done by ANSI (and INCITS), standard
359-2011, (link is to an older draft PDF). Work is ongoing to
enhance this standard, at NIST and INCITS.
Solaris
RBAC
Roles
are a special type of user account. Then run a special version of the shell
(there are versions for many different popular shells, see /usr/bin/pf*sh), which allows commands
to run that require the extra privilege granted by the role. Note it isn’t
possible to login using one of these role accounts. Users must first log in as
themselves, and then assume the role needed to run privileged commands.
Solaris 11 comes
configured with these roles:
root – A powerful role that is
equivalent to the root user. However, this root cannot log in. A regular user
must log in, then assume the assigned root role. This role is configured by
default.
System Administrator – A less
powerful role for administration that is not related to security. This role
can manage file systems, mail, and software installation. However, this role
cannot set passwords.
Operator – A junior administrator
role for operations such as backups and printer management.
(Note, backup privileges imply read access to the whole filesystem, so you
should still be careful with trusting people with these roles.)
RBAC distributes the
various superuser capabilities into rights profiles. These
rights profiles are assigned to special user accounts that are called roles.
A user can then assume a role using the su
command, to do a job that requires some of superuser’s capabilities.
Predefined rights profiles (and the root
role) are supplied with Solaris. You create the additional roles you wish and
assign the profiles to them. You can also create new rights profiles.
Rights profiles can
provide broad or narrow capabilities. For example, the System Administrator rights profile enables an account to
perform tasks that are not related to security, such as printer management and
cron jobs. The Cron Management
rights profile only has privileges to manage at and cron jobs. When you create
roles, the roles can be assigned broad capabilities or narrow capabilities.
Solaris tries to
avoid the trap of having too-finely-grained rights, which makes management
difficult (and security flaws more likely). The way Oracle
explains RBAC, system calls that require extra privilege will check
that a process contains the appropriate rights. These rights can be associated
with programs (in which case they are called security attributes, and
are essentially the same as setuid and setgid), users (rarely done), or roles.
Some of these rights
are called privileges, such as proc_exec
that allows a process to use the execve
system call, or the file_flag_set
privilege that allows a process to set immutable, append-only, or other file
attributes. Other security attributes called authorizations are broader
in scope, allowing a whole range of commands and system calls. For example,
the solaris.device.cdrw
authorization enables users to read and write to a CD-ROM device.
The privileges are
enforced at the kernel level. That is, system calls check that the process has
the required privileges. Authorizations on the other hand are enforced at the
command level. RBAC-compliant applications can check a user’s authorizations
prior to granting access to the application or specific operations within the
application. This check replaces the check in conventional UNIX applications
for RUID=0. For example, mount,
fdisk, and shutdown can check if the process has
the appropriate authorization(s) before attempting privileged operations, even
though they are setuid to root (or the RBAC equivalent of EUID=0 security
attribute).
A rights profile can
include authorizations, directly assigned privileges, commands to be run with
security attributes, and other rights profiles. This should help make it easy
to manage the various profiles you may need to define.
RBAC assigns various
privileges to roles. Users are allowed to assume certain roles via su by providing an appropriate
password. Each role has just enough privileges to accomplish a specific task:
password reset, DNS administrator, website updater, etc. In this way, few SAs
need the root password to do any task.
RBAC has several
components:
A profile
is a collection of the Solaris authorizations (i.e., privileges)
listed in the file /etc/security/auth_attr.
Profiles are defined
in prof_attr.
The actual commands
usable in a profile, plus the correct GID and UID to use when running these
commands, are defined in exec_attr.
(These are the security attributes discussed above.) Note only the
special “pf” versions of the shells know about such security attributes. A
regular shell will note SUID/SGID bits, but ignore security attributes.
The file user_attr associates user accounts
with roles, and roles with profiles. Although users can be assigned profiles
or even individual authorizations, this is not as safe nor easy to administer.
In Solaris 11, these four
files have been replaced with directories that contain fragments, which are
(logically) concatenated.
A role
is a pseudo account authorized users can use with su to temporarily assume some profile(s). These role
accounts use special versions of the shell (pfsh, pfcsh, pfksh, pfksh93,
pfbash, pftcsh, pfzsh, or pfexec), that can apply security attributes.
Example roles include
password adm, mail adm, backup adm, login adm, mount, shutdown, ..., and
service (start or stop) adm. (In Solaris 11, root is also a role, not an
account.)
You need to
restart nscd, the name
service cache demon for changes to roles and profiles to take effect. (“svcadm
restart system/name-service-cache”) Use sm*
and role* commands to edit the
files. (Show Solaris 10 RBAC.htm demo.) See also the profiles command, to see what you
can do in a role.
Demo: roles, profiles,
auths|sed 's/,/ /g'|fold -sw 30|sort
RBAC works with a basic
privilege set, defined as a system property, and part of Solaris process
rights management. When you specify a set of privileges, you can use the
word “basic” to denote this
basic set:
# ppriv -l basic
file_link_any
proc_exec
proc_fork
proc_info
proc_session
The way this really
works is that the basic set of privileges is really the set of all conceivable
privileges an unprivileged user can have. Sun hasn’t named all those
privileges yet (only five so far, for Solaris 10).
You can use ppriv to see what privileges some
command needs. For example: “ppriv -De cat /etc/shadow” will show something like missing privilege
"file_dac_read". You
can then add that privilege to the set for some role or user.
To list all available
authorizations, use: getent auth_attr
(To view the authorizations assigned to the current user, use the auths command.)
To list all available
privileges, use: man -s 5 privileges
(To list the privileges of roles, users, and processes, use the ppriv command.)
To list all defined
rights profiles, use: getent prof_attr
(To view the current user’s profiles, use the profiles
command.)
To list all commands
with security attributes, use: getent
exec_attr
To see a list of all
defined roles, examine the /etc/passwd
(or similar) and user_attr
files. (To view the roles assigned to the current user, use the roles command.)
(Tip: If you have
the authorizations to run some command, you don’t need to assume a role first.
You can just run the appropriate shell such as pfksh,
and from there run the command.)
To create a role and
assign a user to it, use commands such as:
# roleadd -K roleauth=user -P "Network
Management" \
netmgt
# usermod -R +netmgt jdoe
From the Solaris 11
Release notes (11/2011): The traditional UNIX root account is now a role by
default in Oracle Solaris 11. Authorized users can assume the root role rather
than directly logging into a root user account. During installation, the first
user account is assigned the root role.
Added with Oracle
Solaris 11 is the ability to specify whether to use the role password or user
password when a user wants to assume a given role. Administrators can specify
either user or role for the roleauth keyword. If roleauth
is not specified, role is
implied. Any newly created roles will be user
by default.
Additionally, sudo(1M) is also available to provide
a familiar method for executing commands with privilege.
A kernel patch Grsecurity
is available for Linux that provides RBAC and other security features. (SELinux
also supports RBAC.)
Lecture 13 — PAM (Pluggable Authentication Modules)
PAM Background:
[First discussed in Admin II. Show PAM web resource]
Many interactive commands are
security sensitive. An obvious example is passwd,
used to change a user’s password. Such commands require users to authenticate
themselves even though they have successfully logged in to the system. Also
many server daemons carry out tasks on behalf of remote users, and most of
these require the daemon to authenticate the remote user.
Early versions of Unix had such
programs (applications and daemons) directly read and parse the /etc/passwd file, so they could
authenticate users. This became a problem when the format of /etc/passwd changed to include aging
information in the second field. Every program that needed to authenticate users
had to be updated and re-compiled. Sometime after that single (remote) user
databases became common in large organizations, using technology such as NIS.
This meant a second set of such commands (all NIS commands start with the
letters “yp” as in yppasswd).
Soon shadow passwords became common, then Kerberos, then different password
encryption algorithms (such as MD5), LDAP, etc. Every such change requires
either custom versions of applications and daemons, or a re-write of the
existing versions. And for every program that needed authentication! (On both
Unix and Linux, there are many tools that limit or restrict access to resources
available.)
At some point, someone came up with
the idea that programs that need authentication should use a standard library
for that, which in turn could be configured to use any scheme required by
adding new DLLs (or shared object files) which can be invoked by the
library. With this system known as PAM (for Pluggable Authentication
Modules) programs would not need to be changed in any way to use
different authentication modules. (Hence the name.)
Modern (and most legacy)
applications and daemons that need authentication use PAM. There are many PAM
modules available for every system and new ones can be easily created by
programmers. A nice benefit of this design is that different programs can use
different PAM modules for authentication, all on the same system. In addition,
PAM modules can be used for session setup and tear-down, logging, and various
similar uses. You can list for each application a set of modules to try, so if
the user can’t authenticate using (say) local files then PAM might try a
different database such as Windows AD. PAM can also be configured to deny
access if the resource is busy or based on other criteria such as the time of
day.
PAM allows you to provide
many restrictions on resources such as programs and devices that a user can
access; PAM even allows restrictions such as “only allow 50 simultaneous users
of some program (a database for instance)”.
There are multiple implementations
of PAM, and a specification (it’s basic). OpenPAM is a rewrite of the specification
only parts of Linux-PAM, by someone who thought Linux-PAM code was of poor
quality. While used with Mac OS and FreeBSD, and others, it has little
documentation available and few code contributors, and far fewer available
modules than Linux-PAM. Oracle (Sun) also has their own PAM version for
Solaris. Fundamentally, they all do the same tasks.
Linux PAM
Details
PAM is a library that applications
needing authentication are compiled with (e.g., login). For each program that
you want to control, add a text file in pam.d
with the application’s service name (usually the application’s
name). That file lists the PAM modules that will be used along with any module
options.
To see if some program is “PAM-ified” or not, try: ldd cmd | grep libpam.so
The man page for a PAM-ified
application should say which service name to use. If not you can guess to use
the application’s name as the service name. (Or read the documentation, or
source code, or Google for the answer.)
To determine the PAM service name of some
application (ex: vlock)
(The man pages say the 1st argument is to pam_start is the service name. Use ltrace to obtain that string’s RAM
address and gdb to
display the value there):
$ ltrace /usr/bin/vlock 2> ltrace.out
$ grep pam_start ltrace.out
pam_start(0x8049884, 0x804aea0, 0x804ac70, 0xbfc3adfc, 90) = 0
^^^^^^^--> this is the value gdb needs
$ gdb /usr/bin/vlock
(gdb) printf "%s\n",0x8049884
vlock
(gdb) quit
$ rm ltrace.out
This method won’t work if the binary has been stripped
(or is not readable by the current user). A better method is to use a tracing
tool, such as strace on Linux,
to see which files the command opens:
# strace -uwpollock -e open -o strace.out
chfn
# grep /etc/pam.d strace.out # Hint: not "other"
# rm strace.out
If an application was compiled with
PAM but there is no file in pam.d
for it, the pam.d/other
entry is used.
(Security: Always have an
appropriate other file
using pam_deny.so!)
To impose PAM restrictions on a
program you create a configuration file for that program in /etc/pam.d/ that calls one or more PAM
modules. Some of these modules can be used to restrict access. By editing
(or creating if missing) these files, an SA implements access policy for the applications
and servers on the host.
Other security
systems also require configuration to implement a host’s access policies, such
as firewalls, TCP Wrappers, file permissions and ACLs, group memberships, SELinux
policy files, service configuration files, SASL, and so on.
The available PAM modules are
found in /lib/security
(however you can add others to that directory, or anywhere). Some of the more
interesting modules are pam_access,
pam_console, pam_limits, and pam_time. Many of these modules have
configuration files in /etc/security.
(Show limits.conf.)
The files limits.conf and limits.conf.d/*
(and pam_limit) are not used all versions systemd. With systemd, POSIX per-process
resource limits per user are set in /etc/systemd/user.conf.
Setting cgroup (control group) limits (for per-user limits) is also done solely
by systemd now, however the means of doing so are not well documented.
PAM modules are typically named pam_XXX.so and are documented
in the man pages under pam_XXX
(maybe! Try man pam and/or man pam.conf),
/usr/share/doc/pam-version/* and
the on-line documentation.
Not all PAM modules
deal with security. Since PAM-ified applications will invoke PAM modules when
they start and end, PAM provides a convenient way to run tasks at those times:
display /etc/motd, logging, etc.
PAM modules can do
different things. Some can do several (usually related) things. A PAM module
may be called within one of four contexts, which determines which one of
the four possible tasks you want the module to perform. Another way to say
this is that a PAM module can contain one to four sets of functions (see pam(3)). Not all modules do anything
in a given context (in fact most modules only work in one context). If some
module is missing a set of functions, the module does nothing in that context.
You can see what a
module does by reading the module docs, or by running (Gnu version of nm):
nm --dynamic --defined-only pam_module
and checking which functions are implemented.
The four contexts (or
types) of PAM modules are:
auth modules authenticate
users, most commonly from passwords. But other possibilities include Kerberos
tickets, ssh keys, and biometrics. The standard auth module pam_pwdb (or pam_unix) is used for password authentication and can be
configured to say which authentication (password) database to use. pam_nologin prevents all but root
logins if the file /etc/nologin
exists (and will show users the contents). The two functions are
pam_authenticate and pam_setcred (used e.g. to get a Kerberos ticket).
On most systems, pam_unix in the
“auth” context (and/or the “password” context) is provided the argument nullok, which means an empty password
is allowed. This is generally a bad idea, and should be changed.
account modules check for
valid accounts and also control access to resources by other means: time of
day, location of user, max number of users, etc. (I.e., a given account may
only be valid at certain times.) Examples: games only after 5 PM, up to 50
database users at once. For example root can’t login except at the console.
This is controlled by the pam_securetty
module (which lists authorized locations in the file /etc/securetty, which may need adjusting!). The one
function here is pam_acct_mgmt.
session modules don’t
control access at all. Instead they are used to do some automatic setup (once
the authentication is successful) and cleanup (when the session ends).
Examples include logging user activity, and mounting (and later un-mounting) a
user’s home directory. The two functions are pam_open_session and
pam_close_session.
A useful session module is pam_console, which uses the file /etc/security/console.perms to
control access to devices (such as sound devices and removable media drives)
and the directory /etc/security/console.apps
in which (empty) files can be created with the names of programs that may be
run by any user at the console (e.g., halt).
password modules control a
user’s ability to update authentication information. These modules can be used
to enforce password changing policies. The function for this in the PAM
module is called pam_chauthtok.
What
happens when a PAM-ified program runs
When a user runs an application
such as passwd a PAM function (“pam_authenticate()”) is invoked by the command (after
running pam_start). This
function locates the PAM configuration file for this application and starts
running the modules within, in order, for the auth and account contexts.
(Example: password setting modules are ignored with authenticating a user.)
Each module can either succeed or
fail. The results of the modules called are combined into a single pass /
fall result and that is passed back to the application, which should
continue on if pass or log an error message and quit if PAM says fail.
When the command terminates it ends
the session with a call to the pam_end
function. In between other PAM library functions can be used to check
passwords (when changing), and setup and tear-down sessions.
Configuring PAM
These files have the following syntax
(described in pam.conf(5) man
page):
context control-flag
module options
The file can have blank and comment
lines. Each of the rules should be a single line, but long lines may be
split by ending the first line with a backslash.
As mentioned above, the PAM modules
listed in the application’s configuration file are run in the order listed, for
the appropriate context. Any module arguments listed for some module are
passed to the PAM functions (in that module) that get invoked.
If both /etc/pam.conf and /etc/pam.d/ exist, the directory is
used and the file is ignored.
Each module may return one of
several different values, some of which indicate success and others failure.
For each listed module, there is a control-flag that controls how
PAM will react to a success or failure of individual modules. When done
running all listed modules, the individual module results are combined into a
single success or failure result, which is passed back to the
application. While the modern version of PAM allows a complex control-flag
field that specifies different actions for different return values, the old
style control flags are simpler and are often used instead.
The (old-style) control-flags are: required (the module must
succeed. If a required module fails, the remaining modules are still tried), requisite (a fail-fast version of required), sufficient (if this module succeeds and no previous required modules have failed, no
further modules are tried. A failure of this module won’t affect overall success
or failure of PAM), and optional
(these don’t affect the overall success or failure of PAM.) Solaris 10 version
of PAM also has binding,
similar to sufficient, except
that a failure is like a required-failure rather than an optional-failure.
When the type (context) field is
preceded with a dash, if that module is missing, the “missing module” message
won’t be logged. The module is still run, however, if present. This is
typically used for modules that may not be present (such as a fingerprint
scanner module), and that use a control flag of sufficient
or optional.
So, all modules are
run, except when a sufficient
module passes, or a requisite
module fails.
Two additional control flags in
modern pam are include
and substack. These are
similar, and cause all the rules of the same type (context) from the named
config file to be included.
The options are additional
arguments passed to the module’s functions. Note the unusual quoting
convention: if an option includes spaces, surround it with square braces.
Examples
pam_ pwquality is used when changing passwords. Its
arguments determine the password policy. In /etc/pam.d/passwd
put this line:
password required pam_ pwquality.so
difok=3 minlen=8 \
retry=3
The DoD/DISA recommendation
is stricter:
password required pam_ pwquality.so
retry=3 \
minlen=14 dcredit=-1 ucredit=-1 ocredit=-1 lcredit=-1
This says: at least 10
characters with at least one digit, upper, lower, and symbol.
There are other PAM
modules in use for this purpose, such as pam_passwdqc
(recommended over cracklib by the NSA; available via dnf. The passwdqc package includes pwqcheck and pwqgen utilities, and uses passphrases by default.) A
shortcoming of these is that PAM isn’t always used when setting passwords, such
as for Samba, httpd, MySQL, etc.
In recent Fedora
versions, pam_cracklib has been
replaced with pam_pwquality, which
includes with a DLL usable with any application that want to use the
system-password settings. One such tools is pwscore(1).
The limits are stored
in /etc/security/pwquality.conf.
The DLL also supports strong password generation (that will meet the limits you
set).
Solaris no longer has
such a PAM module; they replaced it with many settings in /etc/default/login.
(Many people mistakenly
think minimum password length policy is set in other files such as /etc/login.defs or /etc/default/useradd, but not so!
Such files are only used under specific circumstances. For instance, login.defs is only consulted when
using shadow password files, not if using LDAP or NIS or Samba. And even when
such files apply, any candidate password must satisfy PAM criteria also. It
makes sense therefore, always to set password policy using only PAM.)
Another policy decision
controlled by PAM is whether or not root can log in using the Gnome GUI (gdm).
(Previously, and still for KDM I think, you needed to edit the GDM or KDM
config file for this; with KDE that is kdmrc
which might be anywhere depending on your system.) Note on Ubuntu, with no
root password set, you couldn’t log in as root anyway — a missing password
locks the account.
QU: Suppose
you make a copy of /etc/pam.d/chfn
in /etc/pam.d/chfn.bak and
modified the chfn file so that
only root can use the chfn
command. Is this safe?
ANS: Security
is a tricky thing. By putting the backup in the same directory, PAM will apply
that policy for a command called “chfn.bak”.
So a malicious user needs only to create a file called “chfn.bak”:
cp /mnt/flash1/chfn ~/chfn.bak
./chfn.bak
In reality the danger
is much less than you might think. For one thing /usr/bin/chfn is not readable (only executable), and thus
can’t be copied. (Of course a user need only use a bootable Cd or flash disk
to get root privileges and copy that file.)
For another thing
commands have hard-coded in them the name of the PAM configuration file to use;
the system doesn’t just use the application name. Still this is a potential
security hole that you should not create.
The ways around this
are: create a different directory to hold your backup copies of files, use
“RCS” or another VCS to manage backups, or just edit the files carefully,
commenting out any modified lines and added additional comments to explain the
changes (and allow your normal backup procedures to save older versions).
Not all config files
have this problem, but be careful with creating new files in “/etc/*.d/” directories.
Some
interesting PAM modules
The pam_stack.so module allowed an
administrator to put common PAM policy in a single file. This module took
another config file name as an argument. When this module ran, it ran all the
appropriate modules from the named file. Modern Linux PAM doesn’t use this
module (although older and non-Linux PAM might), and instead has built-in
support for this, using include
(e.g. “auth include system-auth”) or substack.
RH puts common
authentication in system-auth,
which is over-written by the command authconfig
with a symlink to system-auth-ac.
Always backup this file! An SA can change this symlink to another file, and
the GUI authconfig tool won’t
override your version. This is a good idea (to put the default policy into a
single file).
Ubuntu (and other
Debian based distros) put common authentication in the files common-account, common-auth, and common-password.
Another interesting
module is pam_timestamp.so,
which records the last time a user has successfully authenticated. This module
can be used to avoid re-authenticating if the user has recently done so. The sudo command uses this module,
recording the timestamps as the modification time of files in /var/run/sudo/username/*.
PAM normally logs the
success or failure of each attempt to the secure log. This can be prevented
using pam_succeed_if.so module
with the quiet option.
Here’s an example
policy for the auth context:
auth required pam_env.so
-auth sufficient pam_fprintd.so
auth sufficient pam_unix.so nullok try_first_pass
auth requisite pam_succeed_if.so uid >= 1000 quiet
auth required pam_deny.so
(This is a standard
part of Fedora’s common policy file, system-auth.)
The first rule sets
up the environment (by removing dangerous entries and adding missing required
ones; sudo has a similar
feature). This module should pass.
Next is the
fingerprint scanner. If not installed, no log message about a missing module
is generated (the leading dash). If that passes, PAM is done. If not, keep
going.
Next is the standard
Unix authentication. This means standard system functions are used, which in
turn are configured by nsswitch.conf.
Usually, that is set to use files (the passwd, group, and shadow files), or
some single sign-on database such as Kerberos or LDAP. If this module passes,
PAM is done.
The next line causes
PAM to fail quietly (no log message) if the UID is < 1,000 (meaning, a
system account). Regular user accounts have higher UIDs, so this module would
pass those.
The last line just
fails. The result is logged.
[Students should
examine other policy files, such as the gdm* ones, su, sudo, crond/atd.]
Lecture 14 — Resource Limiting (ulimit, Disk Quotas,
cgroups)
It is often the case that you need
to limit the use of scarce resources (CPU time, RAM, network connections, open files,
etc.) Such limits can be imposed on a per-process basis, or a per-user basis.
There are a number of different
mechanisms used to limit resource use. Some of these seem to overlap in
functionality!
The main tool on Solaris is a zone,
which is the major part of a Solaris container. You can declare
resource limits on a container/zone, and restrict users and processes to only
using certain containers/zones. (This is discussed further below.)
Ulimit
The shell command ulimit can be used to enforce POSIX
per-process resource limits, on processes started by that shell. There are
both soft and hard limits. Once set, a user
(except root) can lower (down to the current soft limit) but never
increase their hard limit. The soft limit can be decreased, or
increased up to the current hard limit. (root
can arbitrartily set these as long as soft <= hard.) Login scripts can set
this to enforce the limits, and there is a PAM module that sets these at login,
from a simple to edit config file. (Show bash; ulimit -a; -Ha; -Hn 1000; -[S]n 900; -Hn 1000; -Sn 1010; -Sn
950.)
If data confidentiality is an issue,
you should ensure your programs can’t produce core dumps. This is done by
limiting the size of a core dump to 0 bytes by using the ulimit(1) command before running the
program.
Systemd thinks it
controls POSIX limits via it’s user session control, and some versions of
systemd ignore (or perhaps override) settings made by pam_limits.) It is not
clear if all versions of systemd ignore those limits. As this is undocumented,
to find out a system admin must run an experiment: Set some value for every
resource limit via pam_limits
only, log in and run ulimit -a to see which (if any) were
changed. Next set different limits using systemd’s user.conf file, and log in again to see what the limits
are now.
(The Solaris command prctl can be used to change these
limits on processes, projects, or Solaris zones. FreeBSD has a similar command,
rctl.)
Additional limits can be made
system-wide or per-user, using Linux control groups (“cgroups” for short)
and/or systemd. However, how to use these features is poorly documented and
not well understood.
Disk Quotas
Disk space used by a given user can
be limited using disk quotas (discussed in admin I course). Quotas are
set per user or per group, and apply per filesystem. Not all filesystem types
support quotas, and those that do generally require a special mount option(s) to enable quota
enforcement (just “quota” as of
ext4). Demo:
mount -o remount,usrquota
vi fstab # add usrquota,
possibly grpquota too
touch /aquota.user # do
this on each mount-point
quotacheck -cavuR #
initialize quota DB except for /
chmod a+r /*/aquota.user /aquota.user # make readable
restorecon /home/aquota* # Update SELinux labels
telinit 1 # go into
single-user mode to check / FS
quotacheck -cvuM / # initialize quota DB on / FS
(On most systems, you can touch a
file to force quotacheck to run on next boot. For Red Hat systems that file is
“/forcequotacheck”. Then a
simple reboot will rebuild the quota DBs safely.)
Linux
Control Groups (cgroups)
A powerful but
little-understood feature of Linux is cgroups, a way to limit resource
consumption by processes. Often performance problems are caused by some
process hogging all the network bandwidth, all the CPU cycles, all the memory,
or some other resource(s). With monitoring, the SA can identify such resource
“hogs”. But it would be better to prevent hogs and report attempts to hog
resources.
Some daemons include
tunable parameters that can limit what they consume, but many do not. Instead,
you can let the Linux kernel enforce the limits, similar to Solaris
containers. Currently (RHEL6) the kernel can enforce limits on the following
subsystems for each task (note the Linux term task essentially means process
or thread):
·
blkio — this subsystem sets limits on input/output access
to and from block devices such as physical drives (disk, solid state, USB,
etc.).
·
cpu — this subsystem uses the scheduler to provide access
to the CPU.
·
cpuset — this subsystem assigns individual CPUs (on a
multicore system) and memory nodes (on a NUMA system) to tasks in a cgroup.
·
devices — this subsystem allows or denies access to devices.
·
memory — this subsystem sets limits on memory use by tasks
in a cgroup, and generates automatic reports on memory resources used by those
tasks.
·
net_cls — this subsystem tags network packets with a class
identifier (classid) that allows the Linux traffic controller (tc) to identify packets originating
from a particular cgroup task. The tc
command can then implement queuing rules to limit bandwidth use for tagged
packets.
·
freezer — this subsystem suspends or resumes tasks in a
cgroup.
·
cpuacct — this subsystem generates automatic reports on
CPU resources used by tasks in a cgroup.
·
ns — the namespace subsystem provides a private view of
the system to the processes in a cgroup, and is used primarily for OS-level
virtualization. It has no special functions other than to track changes in
namespace.
(Only the first six
actually control access to resources.) These subsystems are also called resource
controllers, or simply controllers.
Additional subsystem
controllers are added from time to time to the kernel. For example, Linux v3.3
adds a CPU time limit for process groups, and a net_prio
to set network traffic priorities by application. To see the list of
available controllers/subsystems for your kernel version, use the lssubsys -a command.
To use these,
attach one or more controllers to a hierarchy of cgroups. Each
cgroup has a parent and possibly children cgroups; settings in parents are
inherited in children but can be overridden too. By default, all tasks belong
in a default cgroup with no resource controllers attached. (However, different
distros use different defaults.)
Each controller
can be attached to a single hierarchy only, but it is common to have two or
more controllers attached to one hierarchy such as both memory and CPU. Once
you create the hierarchy (with the one “root” cgroup in it to start) with
resources attached that you want to use, the SA next adds additional named cgroups
to it for tasks with different limits.
Each cgroup can specify
limits for the controllers in its hierarchy. Lastly, the SA puts one or more
processes in each cgroup. Each process can be a member of multiple cgroups,
but only one in a given hierarchy. By default, any children tasks (remember
that a task means process/thread) are in the same cgroup as the parent.
For example, you can
attach the memory controller to a hierarchy of two cgroups, one limiting memory
to 1GiB and another to 500MiB. You then put the PID of postgresqld into the 1GiB cgroup, the PID of httpd in the
other, and that’s it. Red Hat systems automatically add daemons to cgroups
when they start, by means of a setting in the daemon’s /etc/sysconfig file, or by some default rules in the /etc/cgrules.conf file or by
options set in systemd unit files and config files. (cgrules.conf stopped
working after cgroups v2 was released).
Summary: Each
controller can be attached to at most one hierarchy of cgroups. Each hierarchy
of one or more cgroups can have one or more controllers attached to it. Each
process can be a member of multiple cgroups, but only one cgroup per hierarchy
(no overlapping controllers).
The cgroup feature of
the kernel is exposed via a “fake” filesystem (similar to /proc or /sys). You mount
these, one for each hierarchy you wish to create. Each mount point defines one hierarchy,
with subdirectories defining the cgroups. Child cgroups inherit some settings
from their parent cgroup. Fake files within the directories are used to
configure them and to list the PIDs of tasks. Only the owner and group
members of the files have write permission on these files, and thus control
cgroups: change settings, and add/remove processes.
When you create the hierarchy,
you create a default “no limits” cgroup as the “root” cgroup, and by default
all tasks on the system are members of that cgroup. When you put a new process
into some cgroup, you are really just moving it from the default, root cgroup.
To use cgroups: [Skip this section; cgroups have been completely
rewritten in newer Linux, and have a different user interface.]
# yum install
libcgroup # make sure the tools are installed
# chkconfig cgconfig
on # A Red Hat convenience
# service cgconfig
start # mounts hierarchies in /cgroup
according to defaults
(Take a look now at
the hierarchies created. Inside of each is the default, or root cgroup for the
hierarchy, containing the files that can be edited with the limits you want.
For example, in the memory hierarchy, if you want to create a limit for maximum
memory usage, it’s stored in a file called memory.max_usage_in_bytes.)
The default /etc/cgconfig.conf file installed with
the libcgroup package creates and mounts one hierarchy for each subsystem under
/cgroup, and attaches the
subsystems to these hierarchies. If you stop the cgconfig service, it unmounts all the hierarchies that it
mounted. This is equivalent to using the commands (for each hierarchy):
# mkdir /cgroup/name
# mount -t cgroup -o subsystems /cgroup/name
# mkdir /cgroup/hierarchy-name/cgroup-name
# mkdir /cgroup/hierarchy-name/cgroup-name/child-cgroup-name
To specify resource
limits you can use the RH convenience utility cgset,
or just create the appropriate files with the correct contents. Each controller
has its own set of files. Child cgroups can set smaller limits than their
parent, but not larger.
For example, suppose
you have an 8 core CPU and you wish to limit httpd
(Apache) to just using cores #0 and #1. You would mount a cpuset hierarchy, create a cgroup
within with that to limit the CPUs used by processes in that cgroup, and add
the PIDs of httpd to the cgroup:
# mkdir /cgroup/cpuset
# mount -t cgroup -o cpuset /cgroup/cpuset
# mkdir /cgroup/cpuset/group01
# cd /cgroup/cpuset/group01
# echo '0-1' >cpuset.cpus
# cat /var/run/httpd/httpd.pid >> tasks
There are ways to
make all this automatic. A daemon can be run to automatically put processes
into various cgroups, according to the rules in /etc/cgrules.conf.
You can also use the cgclassify
command.
Here’s an example to
limit Apache to 1GiB of RAM when it runs, using the Red Hat config files method:
First create a group
statement in /etc/cgconfig.conf
like so:
group http {
memory {
memory.limit_in_bytes = 1024M;
}
}
This will create a
cgroup named http in the memory hierarchy, with a 1 GiB
limit. Next, add this line to the /etc/sysconfig/httpd.conf
file:
CGROUP_DAEMON="memory:/http"
That’s it! Now start
the cgconfig service, and then
the httpd service.
The definitive
document for Linux cgroups (for RH anyway) can be found at docs.redhat.com
resource management guide. See also this much shorter how-to
article found in Novell’s (now Attachmate’s) Connection Magazine, Effective
Linux Resource Management.
Lecture
15 — Security Policies
The security of a system depends on
two assumptions: there is a clear and comprehensive security policy that
partitions all the system states into secure states and insecure states.
Secondly, that the security mechanisms prevent the system from entering into
any insecure state. Trust is needed that the security mechanisms will do that.
The heart of security is the security
policy and procedures documents. Some types of policy
documents to have include: personal use (or acceptable use policy
or AUP, also called the user code of conduct or UCC), email, web
server, firewall, laptop, problem reporting policy, and others. To create a
security policy:
·
List the users (a.k.a. groups or communities) for whom you plan
to provide services.
·
List the services you plan to provide to each group of users.
·
Describe the security measures to be taken for each permitted
access and for each service. Be detailed and specific!
·
Deny all other access.
·
Provide a procedure to periodically review and possibly update
this policy. Also provide an audit procedure to verify compliance of the
actual systems to this policy. (This audit procedure should say who does the
audit, how often it should be done, what should be tested, who violations are
reported to, and how violations should be handled.)
A place to start is the current
financial statement for the organization. For each line item with a
significant cost or revenue, break it down into tasks and users. If necessary,
break those down further. Then for each list the users (roles) and services
needed by those users to perform their required tasks.
This type of analysis can help with
SOX and HIPAA compliance as well.
A spread sheet table
called a security (or access) authorization matrix is an
important tool. There are several such tables you can use. For example you
can have one row per server (or class of host) and one column per service, and
in each cell list who is allowed read-only access, read-write access, or
administrative access. Another matrix might have rows for each network (LAN)
and columns for services. Still another might have rows for groups of users
(e.g., developers, finance, HR dept., ...) and columns per host.
Such tables help
identify policies in clear terms. One group uses the tables to implement the
controls, another group to audit the security. Such tables are non-technical
and useful to management as well.
Other
Issues
Note a security policy must address
other issues as well, such as data retention, compliance, and procedures for
working with law enforcement.
The Electronic Communications
Privacy act (ECPA) provides a means for law enforcement to access Internet user
information including IP addresses you have accessed. A law enforcement agency
can request an ISP to retain customer information for 90 days and renew its
request for another 90 days, providing time to obtain a warrant.
FRCP
— The Federal Rules of Civil Procedure include rules for handling of
ESI (Electronically Stored Information) when legal action (e.g.
lawsuits) is immanent or already underway. You must suspend normal data destruction
activities (such as reusing backup media), possibly make “snapshot” backups
of various workstations, log files, and other ESI, classify the ESI as easy
or hard to produce, and the cost to produce the hard ESI (which the
other party must pay), work out a “discovery” (of evidence) plan, and actually
produce the ESI in a legally acceptable manner. An SA should consult the
corporate lawyers well in advance to work out the procedures.
Comcast ISP has a
handbook (2007) available for law enforcement policies. In it they state they
charge $1,000 to set up a court-ordered intercept device, additional months are
$750 each. If the case involves child exploitation, Comcast waives all fees.
Comcast says that it will retain and can access call detail records for two
years and IP log files for DHCP leases are kept for 180 days. Should
requests come in for information that exceeds those limits, the company makes
clear that it has nothing to provide.
With respect to
surveillance policy, the Comcast manual hews closely to the letter of the law,
as one would hope and expect. There are many references to statues that need
to be followed and court orders that need to be obtained. National Security
Letters must be hand-delivered, and the company notes that “attention must be
paid to the various court proceedings in which the legal status of the requests
is at issue.”
Assuming that these
actually represent the limits of Comcast policy, there’s little or nothing to
object to here, especially when compared with AT&T, BellSouth, and
Verizon—all rumored to have aided the NSA by turning over customer records
without legal authority or providing full access to incoming optical
connections in secret rooms. (There is currently—10/2007—congressional
hearings, bills pending, FOIA and other lawsuits pending against AT&T and
Verizon.)
OS
Enforced Policies
Some OSes have central policy
stores that contain automatically enforceable, organization-wide policies
that limit resources and/or process access. Windows has group policies
and Mac OS has an authorization service. Both of these use a
single policy database. These policies allow specific combinations of
(user,program) limited access to specific files and devices, without granting
any extra privileges.
There is currently
no comparable Unix or Linux subsystem. SAs usually must use a hodge-podge of
different OS-specific and proprietary solutions to define who can do what. A
combination of PAM, ulimit, disk
quotas (and restrictive mount options), sudo,
group memberships, SELinux rules “sort of” handles this for a single host.
Adding Kerberos and LDAP and a bunch of synchronization tools (such as rsync) can “sort of” handle security
policy enforcement organization-wide. However note sudo grants a user process rootly powers, allowing
a badly written (or virus-infected) program to gain root privileges.
Restricting access with SELinux is very difficult and per system. PAM allows
device access if logged into the console (used mostly by RH; Debian systems
generally use groups to control access (e.g. cdrom,
plugdev, ...).
Issues
with pam_console, group memberships, and sudo
[f/ hal.freedesktop.org/docs/PolicyKit/intro-define-problem.html]
· Mechanisms
are coarse grained: (e.g. it’s hard to express “OK to mount
removable media but not OK to mount fixed media”.
· The
way pam-console and sudo work is to run (large, buggy)
applications (and all their DLLs) as root. This is in direct violation of the
well-known least privilege principle — you want only a small
amount of code to run as root, not the whole Gnome desktop. There is no way to
use PAM or sudo to limit the
privilege to a small part of an application.
· Debian
based systems usually use group membership to determine if a user is allowed to
do something. (The files are only accessible to those group members.) But group
membership is not a good way to enforce security policy; if a user is a member
of a group once, they can always become member of the group again (copy /bin/bash to $HOME; chown
to group, set the setgid
bit, done).
· It
is difficult for upstream projects (such as GNOME or KDE) to implement features
that requires administrative privileges using existing mechanisms, because most
OSes have different ways of implementing access control. As a result such
features are handled by OS distributors who each have their own code for doing
the same thing e.g. setting the date/timezone etc. Without such vendor support,
there is no clean way (for example) for file sharing applications such as
Banshee or Rhythmbox to punch a hole in the firewall.
· Without
a centralized framework, access control configuration is often scattered
throughout the system which makes it hard for system administrators to grasp
how to configure the system. There are many different sub-systems, each with configuration
files with different formats and semantics.
Red Hat now includes
polkit (formerly Policykit) which has a set of tools to
manage a policy DB, and an API for applications to use. (for example, you can
use the crconf tool
(sourceforge.net) to view and configure the Linux kernel’s crypto API.)
Polkit (previously known as PolicyKit)
Polkit differs from
SELinux in several ways: SELinux is static, in the sense that if SELinux (or
Solaris RBAC) denies access, only the admin can change that. In contrast
PolicyKit (like PAM) is dynamic, in that if permission is denied, the app can then
prompt the user to authenticate at that time). PolicyKit requires no kernel
modifications. It can use lots of information to make a decision (e.g., when a
remote desktop session is active). PolicyKit is very similar to sudo, except sudo offers checking of command arguments; PolicyKit
doesn’t. However, PolicyKit is designed to run very small, focused executables
as root, not the whole application as with sudo.
Applications that use
PolicyKit are split into two parts; each runs as a separate process. Only
the part that needs the extra access runs as SetUID (using the sudo-like
program pkexec). The
other part runs as the current user. Note that either or both parts may use
PAM as well.
To (say) disable
networking, the unprivileged part sends a message to the privileged part (in
this case, DeviceKit). This part uses the Polikit DLL (libpolkit) to see if the user is allowed the requested
action. That library consults XML policy files, kept in /usr/share/polkit-1/actions. For
network control, the file used on Fedora is org.freedesktop.NetworkManager.policy.
(Show.)
The SysAdmin can
override such policy files, by putting modified version in /etc/polkit-1/rules.d/.
Polkit will return
one of: yes (the user is allowed to do the action), no (access
denied), user authentication required (the user must supply their own
password, like running passwd or
chfn requires), or admin
authentication required (the user must supply the root password). If the action is allowed, the SUID
program pkexec runs it.
Also, if user or
admin authentication is used, the result can be cached for the life of the
process, the duration of the user’s login session, or permanently. (Not sure
if this is true; with Fedora, the man page only says “caches for a short while”.)
This means if the process needs to repeat the privileged action, the user
doesn’t need to keep authenticating.
By editing (or
adding policy files), an SA can change the policy. For additional details, see
polkit(8), or
hal.freedesktop.org/docs/PolicyKit/model-theory-of-operation.html.
Each file is named
for the actions it has control over. These policy files define the
default policy and are installed automatically when the application is
installed. The configuration file format, along with examples, is described in
the man pages for Polkit(8) and pkexec(1).
Demo polkit’s
pkexec GUI:
$ cd ~wpollock/bin/src/suidDemo
$ cat secret.txt
cat: secret.txt: Permission denied
$ pkexec --user adm cat secret.txt
Error executing command as another user: Not authorized
This incident has been reported.
Secure Boot
This is a combination
of hardware and firmware, designed to prevent untrusted and unauthorized OS
code (rootkits). In practice, this seems more like a Microsoft - Intel
collusion to prevent users from replacing Windows with other operating
systems. This is because there doesn’t seem to be any provision to authorize
any other kernel code (such as WebOS or Linux). Apple apparently has similar
plans. MS has announced Windows 8 will require Secure Boot hardware.
Lecture 16 — Incident Response
An incident is any reported
or discovered problem. Most incidents get reported by customers/users via the
help desk and/or trouble-ticketing system. However you can purchase entire
“incident management systems”, which I think are just glorified
trouble-ticketing systems bundled with a help desk.
Most incidents are not security
related and are handled in the usual way (assign the issue to some SA or
developer). However security related incidents require immediate action.
A security incident
is any unlawful, unauthorized, or abusive action that involves a computer or
network. Examples of such incidents include theft of IP, spam, harassment,
unauthorized use of systems (theft of service), embezzlement, denial of
service, and extortion. An incident response may be appropriate for non-computer
security incidents, when digital evidence may be expected to be obtained.
Once a security incident has been
identified you (or someone) must react to it. Most large organizations define
a group of individuals with various expertise as part of a computer
security incident response team (CSIRT). This group includes
legal, technical, financial, and possibly other experts (e.g. political). It is
dynamically formed when needed from the organization’s employees and
consultants. This is useful because proper handling of evidence, detailed
knowledge of organization policies, and a working relationship with law
enforcement, ISPs, and others is difficult without special (and regular)
training. CERT, SAN, and others now offer courses and certification for
incident response.
An organization’s incident response
policy is determined by the answers to the question “Is prosecution possible?”
For a home or SOHO user, the answer is likely “never”. In that case, your
response need not worry about collecting and preserving evidence, and instead
focus on stopping the attack and resuming operations as quickly as possible.
If prosecution is posible then you
need to collect and preserve digital forensic evidence, in a legally acceptable
mannar.
Once an incident is suspected the
first step is to confirm something has happened. This includes an initial
investigation and recording what is found, including the details that led to
the investigation. Once confirmed the CSIRT should be formed.
Next, notifications may need to
be sent ASAP for legal reasons to affected stakeholders. (For this reason
there is often a lot of time pressure on the CSIRT to hurry the investigation.)
Based on what is known at this
point, policy should determine what action or actions to take, and in what
order and when to take them. The range of possible responses should be considered,
including civil, criminal, administrative, or other actions. The CSIRT must
also decide to “pull the plug” to prevent any further damage, or to investigate
further before taking action.
Pulling the plug may have consequences
worse than letting the action continue, and also risks losing RAM-based
evidence. If you power-down the machine, you can then make images of the hard
disks for evidence. If you wait to power down, and try to run commands to
preserve evidence, those commands will alter the state of the machine and may
not work at all (if a root-kit was installed).
A more thorough investigation
should now be conducted, preserving any collected data’s evidentiary value
(if legal action is even remotely possible). The result of the
investigations should be reported to upper management, who must make the final
decisions as to a course of action. Note in some cases the SA has legal or
ethical requirements on reporting incidents, regardless of the wishes of
management. Sometimes the report will result in a request for a more thorough
investigation.
In the end you resolve the
incident, usually by cleaning up the damage, plugging the holes used, getting
back in operation, filing final reports, and instigating educational
initiatives to prevent similar problems from occurring in the future.
Some
possible incident responses include:
·
Do nothing
·
Discourage, limit, or block access to offending users (rate
limiting in iptables, PAM)
·
Prevent exploit (update firewall, change password reset
procedures, ...)
·
Stop attack ASAP
·
Let attack continue and trace back to originator
·
Gather evidence (forensic) for possible use later RAM snapshots,
network traces)
·
Report attack to originating site (e.g., abuse@domain.com, or use
whois to determine email/phone number to contact)
·
Report to various public advocacy/service organizations (e.g., Vilpul’s
Razor, DCC, DNSBL, your ISP, their ISP, ...)
·
Report to various interested parties and decision makers within
your organization
·
Report to affected customers/users
·
Take legal action: criminal (FBI, local law enforcement, NSA,
DHS, SEC, etc.) and/or civil (report to lawyer, insurance agent, ISP, police)
A Step by
Step Guide for Incident Response
The first rule to handle a
security incident is: Don’t panic! The security policies should specify
what must be done. In general:
1. Verify there
is a problem.
2. Stop any
attack in progress (unless you want to attempt to trace the intruder).
3. Restore/recover
the corrupted systems. In the process a lot of forensic data will be lost;
some can be saved quickly enough that it is worth the time, however most of the
time you need to get the systems back on-line rapidly, to prevent lost revenues
and damaged reputations. (Note how a backup system is useful: you merely need
to switch to that, and then you can take your time with the compromised system.
Typically, you power it off and use forensic tools to image the disks.).
The open-source tool foremost is useful in recovering files
from corrupted filesystems.
If your system is restarted, the
attack may continue. You need to prevent that before restarting.
4. Determine
what the intruder did and how it was done. This will show a vulnerability
in your system that needs to be addressed quickly, or the intruder will just
break in again. If the vulnerability will take a lot of time to patch, usually
a temporary measure can be taken (added a new firewall rule to disable just the
one vulnerable service). This step can take hours to months of time! At the
beginning, and throughout this effort, you need to make incident update
reports.
Most attacks today are done by script-kiddies,
who leave traces of their activities in the log files and elsewhere. Serious
attackers won’t leave such traces for a novice investigator to find, but it
can’t hurt to look before wiping the disk or throwing it out.
Boot using a CD-ROM live distro
and use its tools to examine your password and group files, log files,
etc. Check the MD5/SHA sums for commands such as ls, ps, who, etc., with known good values from
a similar system. Check the reported sizes of disks and filesystems, and
look for gaps or hidden disk areas. Look for cron
and at jobs that don’t belong,
modified boot, service, and login scripts, etc. Use pwck on the suspect passwd
and shadow files. This
should show any bad entries, however if your system was hacked the user name
showing in lsof or ps may be faked.
Try to figure out how the intruder
got into your system. Check the network logs to determine when the attack
started, and then examine the relevant host log file entries to see what
happened at that time. Look for weak passwords with some tool such as John the
Ripper.
Are you running insecure versions
of software? Do you have insecure configurations of servers such as permitting
unrestricted uploads via FTP, WebDAV, etc.? Have you enabled security
features, removed unneeded software, used firewalls, and removed old user
accounts?
5. Report the
incident. (Start at same time as step 4.) This step depends on your
policies. Usually the incident needs to be reported to someone but depending
on the policy (and pertinent laws) you may need to report internally only, to
law enforcement agencies (police, FBI, NSA, DHS, SEC, FCC, CERT, ...), to your
insurance company, to your ISP, and to affected customers and/or users.
Depending on whom the report is
for it will include more or less detail. Technical details ranging from router
and switch logs to system logs and even whole disk images may be included. The
report should include:
·
when you discovered the problem (or when it was reported) and its
duration (to help focus attention on the relevant portion of the logs)
·
the steps you took already (and are currently taking now)
·
the projected impact (a dollar amount may be needed for insurance
purposes)
·
the steps you plan to take in the future
·
any other relevant information (say about past incidents)
Note that any saved log files,
directory listings, backups, and all other forensic evidence you collect may be
used in a court proceeding someday. There are very specific rules for handling
and storing such evidence. Failure to follow these procedures breaks what is
called the chain of evidence and negates most or all of its value as
evidence.
Read the on-line resources for
incident response for more detailed information.
If legal action is a possibility,
hire an expert to work on your system. Or ignore the problem and wipe the
system, but that too requires some expertise as there may be boot sector
viruses, HPA or DCO hidden disk areas (for AT disks anyway), and even flashed
BIOS malware. It is often better/cheaper to pretend it’s time for a hardware
refresh and scrape the suspect system completely. However, wiping, replacing,
or re-installing a compromised system without fixing the security problem that
led to the attack will just leave your hosts vulnerable to another attack. Your
other hosts will be at risk unless the problem is solved. As a novice, you can
work on the log files yourself if they were enabled. Otherwise, you really
need to hire an expert.
Lecture 17
— Using Crypto tools: Checksums, CRCs, Digests / Hashes, and MACs
(The definitions
are repeated here from “Cryptography Overview” on p. 77.)
A checksum
(or just sum) is a simple way to check for errors. The bytes (or
words) of some file are added together, ignoring any overflow. The result is a
checksum. This was used by the Roman bishop Hippolytos as early as the third
century. Today money, credit card numbers, ISBN numbers, etc. all use
checksums.
A CRC (cyclic
redundancy check) is an improved version of a checksum: the data is
considered a very large single number, which is divided by a special
value. The remainder becomes the CRC. Unlike a checksum, a CRC will detect
transposed values and many other types of problems that would get past a
checksum. CRCs are used in networking. (Demo cksum, which uses the Ethernet CRC defined in ISO/IEC
8802-3:1996.)
Neither of these
methods is useful for security applications. It is not difficult for an
attacker to cause a modified file to have the same checksum or CRC as the
original. Instead checksums and CRCs are designed to preserve message/file
integrity.
A [secure]
[message] digest and (a.k.a. MD) is usually used
instead of checksum or CRC for security applications. Also called a
fingerprint, hash, [secure] hash [code] (SHA), file
signature, or message integrity code (MIC). These have the same overall
purpose as a checksum or CRC but the algorithms used makes it very difficult
for an attacker to predict what changes are needed to cause a particular
result. So unless the attacker can change the MD for a file, you will know if
the file was modified.
A hash function is
any well-defined procedure or mathematical function, which converts a possibly
large amount of data (a message) into a small datum (the hash, hash
value, or hash code). The hash is usually a single integer
with the property that a change to the message will change the hash. A hash is
often used to speed database lookups, but some are not secure enough (that is,
hard to generate a specific one) to use for MDs.
A cryptographic
hash is a one-way function that supposedly can’t be easily reversed
(i.e., you can’t find the original message just given the hash), faked (i.e.,
you can’t easily change the message without also changing the hash), or spoofed
(i.e., you can’t easily find a second message with the same hash as another
message). Some better-known cryptographic hash functions include MD5 and
SHA-1.
In 2004, MD5 was
shown to have some theoretical weaknesses. While still considered safe at the
time, in 2008 a more severe weakness was discovered.
The NIST is phasing
out acceptance of MD5 and SHA-1 by 2010; see U.S. Gov. standard FIPS-180-2.
For a list of approved algorithms, see secure hashing at csrc.nist.gov/groups/ST/toolkit/.
See www.phreedom.org/research/rogue-ca/
for more information.
Many people use the
terms checksum, digest, hash, etc. interchangeably. But you shouldn’t!
As mentioned
previously, MACs (message authentication code) differ from MDs,
in that MACs also use a shared key to compute the digest; both the
sender and receiver must share this key to generate (sender) and validate
(receiver) the MAC.
To check downloaded
files weren’t corrupted, you use md5sum
to generate a new hash and compare it with the downloaded one (usually
available on the web site where the file was downloaded). (Other tools such as
sum also generate hashes but are
not secure nor are as commonly used today as MD5.) Usage:
md5sum file (md5sum
-c|--check file.md5)
Demo on YborStudent:
wget
http://hostopia.samba.org/samba/ftp/old-versions/samba-2.2.5.tar.gz
wget http://hostopia.samba.org/samba/ftp/old-versions/samba-2.2.5.tar.gz.md5
md5sum -c samba-2.2.5.tar.gz.md5
echo 'oops' >>
samba-2.2.5.tar.gz; md5sum ...
sha1sum works the same. See also gpg --print-md
md5 file.
On Windows platforms,
text files are summed differently than binary files. Use the “-b” option to force binary mode. To
have md5sum -c use binary mode automatically,
change the space in front of the filename to a ‘*’
in the .md5 file (and similarly
for sha*sum tools); that has no
effect on *nix.
Use gpg --version to see a list of other
supported “Hash” algorithms. Use gpg --print-md algorithm msg
to print the hash, and --print-mds
to print a hash for all available algorithms. Note: Using GPG for hashing is a
good idea, since it is available for all platforms worldwide, and you can count
on repeatable results. (Some folks prefer to see such errors.) See also the
command openssl dgst algo [file...]
(see man dgst).
gpg can be configured to use a
particular key for signing by default, and to use a particular key repository
to fetch and publish keys to. Edit the file ~/.gnupg/gpg.conf
to set these.
digest on Solaris is another tool
that produces digests with a choice of algorithms.
Comparing
the Strength of Secure Hashing Algorithms
The security
strength of a hashing method can be expressed as the number of possible
passwords an opponent would need to process to guess the original message.
(Of course, the attacker could get lucky on the first try but the odds of
winning the lotto every week for years in a row by buying a single ticket each
time are better.)
Generally, the number
is 2 to the power of the length of the hash. However some attacks take only 2
^ (length/2) for many algorithms in use today. The security number is the
exponent used here, generally (hash length)/2. So the security of MD5 is 64,
of SHA-1 is 80. (I think you can calculate the strength of DES crypt the same
way, so that would be 32.)
Today (2006) MD5
or SHA1 CRCs are often used. However, recent analysis of MD5 has shown
that in a few specific applications it is weaker than originally thought. (It
is still much stronger than the original crypt!) SHA-1 (a patch of the
original SHA to address a weakness) suffers from the same flaw, reducing its
strength to 69. Note this doesn’t affect all uses of MD5, such as with HMAC
(RFC-2104) which in turn is used with IPSec.
Newer versions of SHA
that result in longer hashes are available: SHA-256, SHA-384, and SHA-512. The
NIST is phasing out acceptance of MD5 and SHA-1 by 2010; see U.S. Gov. standard
FIPS-180-2. For approved algorithms, see secure hashing at csrc.nist.gov/groups/ST/toolkit/.
The useradd -p string name command (Linux) requires you
to use the encrypted password for string. You can use $(md5crypt.sh password) (command
substitution) to generate the encrypted password in line, but this may leave
the plain password in your history file and/or show it in ps output. (A
clever script can prevent the history file entry.) Use the following
md5crypt.sh script for this: echo
"$1" | openssl
passwd -1 -stdin
Also note using the “-p”
option of useradd is bad
as it bypasses your PAM password security policies (e.g., with pwquality). It is better to use useradd without the “-p” option, then next use the passwd command interactively to set an
initial password. If using a script to add many accounts automatically than
this stronger method can’t be used (because it is interactive). Instead use a
good password-generating program such as pwgen,
apg, or pwqgen that you know generates acceptable passwords, and
use that with something like: pw=$(pwgen
-1); useradd -p $(md5crypt.sh $pw)...
Solaris useradd
command lacks the -p option, so
to script adding new users with initial passwords (passwd command is interactive), use smuser (part of smc). Use LDAP or NIS DB for
passwords to allow a script to update passwords more safely.
Note there are ways to automate interactive commands. The expect tool does this, as will built-in
features of the Z shell.
Digital
Signatures
A digital signature
is the most secure way to verify a file wasn’t corrupted, especially if you can
get the matching public key from a different source. GPG
(previously PGP) is used for this.
Digital signatures
that use PKI (public keys) are as secure as HMACs but don’t require a shared
key, and are thus much more convenient. As long as the attacker can’t guess
the private key, they can’t make a valid signature.
Any hacker who can upload a
corrupted file to an FTP site can also upload the matching MD5 file. But only
the real poster has the private key needed to produce a digital
signature for some file. To validate some file that has been signed, you need
the public key.
Two commonly used standards for
email digital signatures are OpenPGP (implemented by gpg or the older pgp) and
S/MIME. S/MIME
uses PKI certificates, and is mostly used to sign email, not encrypt it. (It
can be used for either or both functions, however two certificates are needed
to both sign and encrypt.) GnuPG is popular since it doesn’t require any
certificates.
To validate the Linux kernel source,
you must get the kernel.org
public key and import it into your PGP or GPG database of keys (called your public
keyring). Here’s how:
GnuPG (or
GPG)
GnuPG (Gnu
Privacy Guard, more commonly referred to by the command name of gpg) is the modern version of PGP
(Pretty Good Privacy). Both GPG and PGP were written by the same person, Phil
Zimmerman. GPG implements the OpenPGP standard, RFC-2440. The gpg command supports over 70
sub-commands, each with options. More information (including the latest
software for download, and documentation) are available from www.gnupg.org.
Zimmerman reportedly
hasn’t used PGP or GnuPG in years. Its use is too complex for ordinary users.
Mr. Zimmerman founded Slient Circle and uses their
products for secure communications. However, with such good crypto, GnuPG is
still around and is likely to be used for many years to come.
You must initialize gpg by running it once, to create the
directories and files (empty keystores) it uses before attempting to
verify any files. The first time you run gpg
it will create a ~/.gnupg
directory and some files. Next, obtain the public keys you want. The easy way
is from a keyserver (see my website for a list of keyservers).
Using
gpg part 1: verify a signed downloaded file
If some file was
digitally signed, you can verify the file’s integrity using:
gpg --verify file.sig
The file and the
signature for it (in file.sig) need to be present. This
operation requires the matching public key for that signature is in your gpg keystore
(the database of public keys), which is often called a keyring.
If missing, gpg will tell you
the KeyID it needs.
GPG keys IDs are
actually the last few bytes in hex of the SHA-1 message digest of the key (also
known as the key fingerprint). You can see this with “gpg -k
--with-fingerprint”.
By default, the last
four bytes (32 bits) are used as the key ID, also called the short keyid.
This has become a problem, since people have since reversed SHA-1 message
digests to generate different GPG keys that have the same short key ID, for any
key! Thus it is easy to get someone to import a fake key.
One solution is to
make gpg display a “long” key ID
of 8 bytes (the last 64 bits of the fingerprint) instead. You can also make gpg display the entire fingerprint.
To do this, add the following to your ~/.gnupg/gpg.conf
file:
keyid-format long
with-fingerprint
For safety, you
should only use long format key IDs with GPG.
You can import
someone’s public key with either of the following commands (use the first if
you’ve downloaded (or received as email) a key, use the second to search on on-line
directory/keystore):
gpg --import keyfile
gpg --keyserver wwwkeys.pgp.net --recv-keys KeyID
Here’s how to get the key for the
Linux kernel source:
gpg
--keyserver wwwkeys.pgp.net --recv-keys 0x517D0F0E
If you don’t know the KeyID number,
you can search the on-line directories using email addresses or DNS domain
names. (See my home page (scroll down to the “Privacy” section) for a list of
such key servers.)
RPM and yum can use digital
signatures to verify packages before installing, but again you will need to
import the public keys for those repositories (and not onto your personal
keyring either).
To obtain the signature for the
kernel source code, use your web browser and go to: www.kernel.org/signature.html. Scroll down until you see
“The current Linux Kernel Archives OpenPGP key is:”. Copy what follows
starting from the “pub 1024D/...”
line up to and including the
-----END PGP PUBLIC KEY BLOCK-----
line into a file, say ~/kernel.pubkey. Then add this key to
your GPG DB with:
gpg --import kernel.pubkey
Now you can verify the signature
for any file signed with the matching private key. Download both the file and
the signature file, then verify like this:
wget
ftp://ftp.kernel.org/pub/linux/kernel/v2.4/linux-2.4.19.tar.gz
wget
ftp://ftp.kernel.org/pub/linux/kernel/v2.4/linux-2.4.19.tar.gz.sign
gpg --verify
linux-2.4.19.tar.gz.sign linux-2.4.19.tar.gz
(Project: create own keys, send
email with digital signature and encryption.)
The Issue
of Trust
Receiving a key is
dangerous since you don’t really know if that is the key of the person or
organization you think it is. With gpg, each person’s public keys are
digitally signed by others. If you trust any of the others who signed the key,
you can have confidence that the key really belongs to the person who claims it
is theirs.
Gpg will tell you
when you verify a signature that the signature is good (or bad), and who it
belongs to, and then it will tell you how much to trust that information. If
the key was signed by someone you trust fully, or signed by three people you
trust a little, then you can have high confidence the key belongs to the person
who claims it is theirs. Gpg requires you to decide how much you trust a key
you are importing.
Suppose you import
key “A” from user “Al”, and trust that this is really Al’s key. Furthermore,
you know Al personally and know that if Al vouches for someone’s key, it is
very likely to be that person’s key. Then tomorrow you need to verify a file
signed by user “Bob” with key “B”. If key “B” was signed with Al’s key, you
can trust that key “B” really belongs to Bob.
Using
GnuPG part 2
Generate a new pair
of keys using: gpg --gen-key
Use DSA and Elgamal
(default) as the encryption type. Use key size of 1024 or bigger, the
default=2048. (Bigger than this doesn’t improve security much.)
Always use an
expiration date! For your first key use a short period, a couple of
months. For a “production” key use something like 5–10 years.
Next enter your full
name, your email address (associated with this key) and a comment (may be
blank, or may be a title, a nickname, etc.).
Next, enter a
password (since blanks are allowed, it is called a passphrase).
The private key is stored in a file on your computer. If you don’t encrypt
this file with a password, then it is easier for someone (or virus) to steal
your private key! Note if you have multiple private keys, then each will have its
own password.
While it is possible
to not enter a password (thus making use of the key easier later), this is not
recommended. Instead, you should use agent software. gpg-agent is available in gpg since
version 1.9+. Your system also comes with ssh-agent,
which works similarly but for ssh keys only. Later we will show how to use
that.
The idea of agent
software is that at login time, this loads up with all your private keys. It
holds the passwords of each, in a master file, protected with its own
password. At login time, you start the agent, providing it with the master
password. All future uses of encryption will ask the agent, and not
interactively ask you, for the private key. This means you don’t have to enter
passwords every time! The agent stores keys only in RAM and never on the disk.
The commands for
listing and exporting keys are:
gpg --list-keys
gpg --list-secret-keys
gpg --export [KeyID]
You can upload your
key to a keyserver with:
gpg --keyserver wwwkeys.pgp.net --send-keys KeyID
You can edit keys,
including the level of trust you have that this key really belongs to this user
id, and also sign keys (proclaiming to the world that you certify this key as
belonging to this user id) with: gpg
--edit-key KeyID
This brings up an
interactive mode, enter “help” to see a list of commands. For example, use the
command “trust” to change the
level of trust you have in a key.
To encrypt some file
for a user, you need their public key:
gpg -a --encrypt -r KeyID > file
# demo with 1184601A
The “-a” says to use ASCII output format. Without
the “-r KeyID” argument, you will be asked
to select a key to use.
To decrypt something
that was sent to you, you need to use your private key:
gpg --decrypt file # will ask for your
passphrase
To sign a file with
your private key, use:
gpg -a --output file.signed --sign file
This command encrypts
file with your private
key and saves the result as file.asc by default.
This isn’t very
useful, as you must decrypt the file to see the original document. A more
useful way of signing the document is to just sign a message digest, and append
that to the file. This is commonly done for email and similar text files. To
sign the document while keeping the original unencrypted, use:
gpg -a --output file.signed
--clearsign file
For files you plan to
make available on the Internet it is usually most convenient to put the
signature (the message digest encrypted with your private key) in a separate
file, usually with the extension “.sig”.
This is done as follows:
gpg -a --output file.sig
--detach-sig file
To verify a signed
file use: gpg --verify file.signed
To verify a file
signed using a detached signature, you need both the file and the signature
file:
gpg --verify file.sig
echo 'opps' >> file
gpg --verify file.sig
Some
other fun gpg tricks:
To encode/decode
a binary file (for email say), gpg
can be an alternative to uuencode
or MIME:
gpg --enarmor < binary-file > text-file
gpg --dearmor < text-file >
binary-file
To generate
checksums you can use the command sum,
md5sum, sha1sum, or digest (if your system has these
commands). But they may not work identically across all systems (they should
but often don’t). Gpg supports a large range of checksums (a.k.a. hash, a.k.a.
message digest) with the “--print-md
type” option, where type
is the algorithm to use for the message digest. You can run “gpg --version” to see a list of
supported message digest algorithms (look for the “Hash:” line): gpg
--print-md md5 file
Gpg also can use
symmetric (shared or private) key encryption methods, used to protect a
file with a password. The default cipher used is CAST5 but another supported
cipher may be chosen by using the --cipher-algo
option. The list of supported ciphers is shown in the output of “gpg --version”.
gpg -c file # or --symmetric
This prompts for a
password, and creates file.gpg. To decrypt, just run “gpg file.gpg”.
Run
this demo on YborStudent (to show xor):
# Create a text file:
echo this is a secret > msg
# Show various checksums:
md5sum msg > msg.md5sum
sha1sum msg > msg.sha1sum
sum msg
sha1sum -c msg.sha1sum
md5sum -c msg.md5sum
gpg --version
gpg --print-mds msg # or --print-md md5 (or
sha1, ...)
# Encryption/Decryption demo:
xor2 < msg > msg.xor # password
"foo"
rm msg; od -bc msg.xor
xor2 < msg.xor > msg
cat msg; less bin/src/xor.c # easier to read
than xor2.c
gpg -c msg # password "foo";
creates msg.gpg
rm msg; gpg msg.gpg; cat msg
The vi and vim
editors can be used with encrypted files. However neither the memory image nor
the swap file are encrypted, so an SA can capture your file contents. To use
crypt on a file, open with “vi -x file”
or (if opened already) save using “:X”
instead of “:w”. To remove the
encryption, use “:set key=” (nothing after the equals sign) then
save the file with “:w”.
Many secure email
clients today use S/MIME or PGP/GnuPG. However they don’t use that correctly
and a flaw (named EFAIL) has be discovered (5/2018) that could allow others to
decrypt your emails. Until the mail clients have been patched (could take
awhile), you should disable such plug-ins and use a separate program to
encrypt/decrypt emails. (Thunderbird with Enigmail has been patched.)
Lecture 18 — SSH Security Features and Advanced
Use
[Basic use of SSH, including key
generation, is described in the Networking class (Remote Access).]
SSH (Secure SHell) is a now
common protocol used for remote access (replacing rlogin, telnet),
file transfer (replacing ftp),
and remote command execution (replacing rsh).
It accomplishes this using encrypted communications packets which provides
great security. SSH can also use public-key encryption techniques to
authenticate users, avoiding the use of weak passwords (and incidentally
automating the login process, so you don’t have to type a password!) The use
of keys means passwords are never sent across the network; not even your keys
are sent (a challenge-response system is used).
Security is provided through a Diffie-Hellman
key agreement (similar to the HTTPS protocol). (Each host has a host-specific
key, normally 2048 bits, used to identify the host.) This key agreement
results in a shared session key. The rest of the session is encrypted using a
symmetric cipher, currently 128-bit AES, Blowfish, 3DES, CAST128, Arcfour,
192-bit AES, or 256-bit AES. The client selects the encryption algorithm to
use from those offered by the server. Additionally, session integrity is
provided through a cryptographic message authentication code (hmac-sha1 or
hmac-md5).
In addition SSH can be used as a
secure tunnel to create an application layer point-to-point VPN (Virtual
Private Network). This is referred to as port forwarding. SSH’s
original protocol turned out to have some weaknesses, so a second version was
created which is referred to as SSH2. There are a number of SSH packages
available for all platforms. One of the best is OpenSSH (www.openssh.org/). This package includes
the server sshd and a number of
client programs: ssh, sftp, scp,
and several other utilities.
User Setup
of SSH
User configuration is in ~/.ssh/*. This directory should be
chmod 700. To
generate the keys you need use the commands:
ssh-keygen
-t ecdsa -C 'auser@wpserver'
cd ~/.ssh; cat id_dsa.pub >> authorized_keys
Without the “-t type” option, ssh-keygen generates RSA keys only
usable by SSHv2. See the man page for the different key types available;
generally “rsa” or “dsa” (both for SSHv2) are used; if available, ecdsa uses ECC keys.
Which to use, RSA or
DSA?
RSA and DSA are two
different algorithms. RSA can be used both for encrypting and signing, while
DSA (digital signature algorithm, FIPS-186; aka DSS
or digital signature standard) can only be used for signing. Either can be
used for SSH session key exchange and authentication.
DSA is often thought
to be faster than RSA for signature generation but slower for signature validation
(but not by a lot). A DSA key of the same strength as RSA (1024 bits)
generates a smaller signature.
DSA security can be
considered equivalent to RSA when using a key of equal length, although it is
hard to compare since the algorithms are based on different math. Some folk
claim DSA is stronger; RSA keys of 512 bits have reportedly been cracked,
whereas only smaller DSA keys (280 bits, last time I checked) have been reportedly
cracked. (No references for that.)
While not designed
for encryption, DSA could be used in a non-standard way for that, although it
would be slower than RSA. DSA is a FIPS standard, but RSA is the de facto
industry standard; now that the RSA patent has expired, it can be used freely.
You may need a license to export RSA code to certain countries.
Practically, it
probably doesn’t matter.
Update: OpenSSH now
supports ECC keys with DSA, “ecdsa” keys. This is recommend, if available.
The keys are only used for
authentication in SSH; after that, a session key is generated and symmetric key
encryption is used for the session data (blowfish, idea, AES, etc.)
The keys go into files id_rsa, id_dsa, or id_ecdsa,
and <the same>.pub
(SSHv2), or identity and identity.pub. (SSHv1). The .pub file should be appended to authorized_keys on every system you
want to have password-less access to; that includes the current host if you
wanted to play around with “ssh localhost”.
The name of the
default identity file varies with the type of key you generate. “identity” is used with SSH1’s RSA
keys, and “id_keytype”
(and the matching “.pub” files)
are used with SSH2. Other types may be supported as well.
Note that the man page says the “-C comment”
option is only supported for SSHv1 type RSA keys, but it works for me on SSHv2
RSA or DSA keys.
The private keys can be encrypted
(with 128-bit AES currently), which means you’ll need to enter a password
(passphrase) each time you use them. If you don’t encrypt your private
keys, you are taking a large risk. However if you do encrypt it, you will
need to supply the password each time in order to use it. You can use an agent
to cache the decrypted key in RAM (the agent process) and set some environment
variables so agent-aware utilities can get the key from the agent. Then you
only have to supply the password once per session. (The keychain agent caches these in such a
way that they remain in RAM until a reboot, even across login sessions.)
Agents are discussed below.
Using SSH
(For Windows, See PuTTY.) When
executed without further qualification:
ssh hostname
or ssh user@hostname
# or: ssh -l user hostname
establishes a secure shell (login)
session with the named host. It finds the private key (id_dsa, id_rsa,
or identity) on the local system
in the current user’s ~/.ssh
directory, and looks for the matching public key within the authorized_keys file on the remote
system.
You can also use ssh to run a command remotely; any I/O
redirection to/from ssh will
have that data redirected to/from the remote command:
echo
hello |ssh user@host 'cat >~/hello'
or: ssh user@host 'cat >>~/.ssh/authorized_keys'
<id_dsa.pub
Once the connection is made, you
can communicate with the local ssh
process (rather than the remote shell) using various escape sequences
(ex: \n~?). See the ssh man page for details.
To allow password-less access to
host foo.com you must append the
public keys from any system you access directly (such as your home/work
computer) to the authorized_keys
files on foo.com. An easy way
to do this (with OpenSSH) is to use “ssh-copy-id
-i id_dsa [user@]host”.
Some systems have different file
formats for keys than OpenSSH, so you need to convert them to the proper format
before adding them to your authorized_keys
file. Most public SSH keys are in RFC-4716 format, and can be converted to OpenSSH
format this way:
ssh-keygen -if some-key.pub >> authorized_keys
(Several other formats are
supported as well; see the “-m”
option.)
OpenSSH
Remote Login
Once login succeeds, SSH sets up a
basic environment (try “ssh localhost env”). It then will add the environment in the ~/.ssh/environment file to that
(this is controlled by the server configuration, as is everything else.)
Ssh then looks for ~/.ssh/rc and runs it if found.
If not, it looks for /etc/ssh/sshrc
and runs that. After that, the users shell is started (and normal startup
scripts are then run).
It is possible to have multiple
private keys, even on a single system. This would be useful when you have
multiple identities (like a super-hero), or when you have special keys for
specific uses. You must use a command-line option to tell ssh which file to use (for your private
key) rather than the default (so name them well).
Tip: When
running as root (e.g., after an su
command), it is hard to ssh to
other hosts, since they may not allow root access. Rather than type “ssh user@host” and
“scp user@host:path”,
you can create ~root/.ssh/config
file to override some ssh
defaults for root. Add the line “User username”,
and when anyone is root and runs ssh,
the user will be username rather than root. (Dangerous if there is more
than one SA!)
Anyone can have ~/.ssh/config to
override some default ssh
settings.
The authorized_keys file
Another issue is the ability to
restrict SSH port forwarding, or to prohibit shell access. If some user
account exists for a limited purpose (such as backups only), you need to be
able to enforce those limitations. Port forwarding is used to create a tunnel
from a local client to a remote service; the ssh
program will forward packets through the tunnel based on the port number.
(Note the user account must exist on the server end to make a tunnel to that
server.) But on the server end, you may not want that user account used for
any but a tunnel to one specific service. Port forwarding can be restricted by
options added to the authorized_keys
file.
The authorized_keys file can
contain blank lines and comment lines (lines starting with “#”). Other
lines contain a single key each, in this format (fields separated by
spaces):
options key-type key comments
(Older SSH1 format RSA keys don’t
contain a key-type and instead have other fields, but still have options at the
front and comments at the end.)
The sshd
man page lists the options you may include here. The options (if present)
consist of comma-separated name or name="value" pairs.
No spaces are permitted except within double quotes, and the name is
case-insensitive. There are many options available; some of the more useful
include:
from="pattern" The use of this key is only valid
from the FQDN of the listed hosts. The pattern is a comma separated
list and can include shell wildcards “*”, “?”, and not (“!”), or IP addresses.
If someone can obtain
a copy of the trusted user’s private SSH key (id_dsa),
they could use it to impersonate that user and gain access to the remote
account. Using the from= option
will restrict sshd to allow only
connections from a given host (or site, if using NAT), reducing the risk of a
stolen key. Of course you’d be better off encrypting your private keys with a
good password!
command="command" When this key is used successfully
then only run this command. (The command supplied by the user, if any, is
ignored, and no shell session is started.)
Other options include: environment="NAME=value",
no-port-forwarding, and no-X11-forwarding.
The sshd server allows ssh clients to authenticate in several
ways: keys, passwords, .rhosts,
etc. It is far more secure to disable all authentication methods except for
SSH2 keys. Use a passphrase encrypted key instead, if you need remote access
from an unknown location (say you are traveling) then carry a copy of the
encrypted private key on a flash drive. Remote users cannot guess a
private key, they have to get it from you. Keep keys safe!
Here is a sample configuration for
the SSH authorized_keys file on a production server, for the user backup when using the backup program rdiff-backup:
command="/usr/bin/python
/usr/bin/rdiff-backup⤸
--server",no-agent-forwarding,no-port-⤸
forwading,no-user-rc,no-X11-fording,no-pty
rest-⤸
of-key...
The sudo
config in this case requires the backup
user to be able to run rdiff-backup
as root:
rdiff
ALL = (root) NOPASSWD: /usr/bin/rdiff-backup
Using
ssh-agent
From your physically secure
computer in your private (and kept locked) office, it may be safe enough to not
password protect your private key. But more likely not! Using keys is done to
provide extra security, not to make remote access more convenient by allowing
users to login without passwords.
Still it is a pain to type in a
password when it is so easy not to encrypt your key. How tempting! To make using
keys easier without storing them in unencrypted files, you can setup ssh-agent, which holds your
private keys in RAM and supplies them to the ssh
(or other programs) as needed. The programs communicate with ssh-agent via sockets or named pipes;
the path to those (and other required information) are put into environment
variables. This implies that you must start ssh-agent first, and have
it in turn start your shell or X session. You can also source the output ssh-agent from a login script; this is
most common.
Run ssh-agent
bash & for a temporary session you can play with, without
modifying login scripts (and logging in again). In a login script you can use
the “-s” option to generate the
proper setup commands. Use it this way in your login script (demo: ssh-agent -s, to show the environment variables created that allow
agent-aware utilities to communicate with the agent):
eval
`ssh-agent -s`
To stop ssh-agent use the “-k”
option. (This command can be put in your ~/.bash_logout
file. Gnome and KDE can use similar files, called when the GUI session
is ended. CDE uses ~/.dt/sessions/sessionexit.)
Initially ssh-agent doesn’t hold any keys. You use the ssh-add file ... command to add the
private keys from file... to ssh-agent
(“-l” and “-L” lists the keys currently held). ssh-agent can also extract private
keys from a smart-card reader so you don’t have to swipe your smart card every
time!
There are other
agents too; Gnome and KDE include one. There’s also gpg-agent.
A standard API for
such agents has been developed. Called Secret Service,
it has already been adopted by KDE. It is hoped that Gnome will adopt it soon,
as well as the other agents out there. Making all these agents compatible
would mean users could use whichever ones they like, and switch between them.
A better key agent is keychain, which is actually a
Bourne (!) shell script that starts ssh-agent
and/or gpg-agent as needed,
loads in the specified keys, and stores the environment variable settings
needed so they can be read when you next login. The agent(s) aren’t stopped
after you log out. Add this to your login script:
eval `keychain --quiet --eval id_dsa`
(See
Configuration below for a discussion of ForwardAgent
setting.)
Running
Commands Remotely
Commands can be executed remotely
by adding them to the command line. For example:
tar cvf - some_dir| ssh
user@host "dd of=/dev/tape"
To ensure validity,
you should compute (then send and compare) checksums: tar cf - /some/dir |tee xyz.tar |md5sum >xyz.tar.md5
This example uses SSH to backup
files from the local system to a remote tape drive. Try running other simple
commands such as who or uptime.
This example runs a command
remotely, reading from a local file (saved remotely), and saving the results
locally:
ssh user@host \
'cat > file && big_app file && rm file' \
<file >file.out && cat file.out'
X-window commands can also be
run through an SSH tunnel. If you are running an X server locally, any
X-client can be run on a remote host and have its GUI appear on your local
system (which also sends events such as mouse clicks and typing back to the
remote application), without SSH. However this is dangerous as X security is
very rudimentary (man xhost) and
the session itself is not encrypted. Instead you can run the remote GUI
application and have it send its X input/output via an SSH tunnel. For
example:
ssh -nX YborStudent.hccfl.edu "gvim foo" &
or: ssh -X hostname xtop (or xterm)
These commands (options in ~/.ssh/config permitting) will set DISPLAY in the environment of the
command on the remote host, to cause it to open windows on the local host via
the SSH tunnel. (The “-n”
closes stdin, needed when running ssh
in the background; this is mainly useful when running remote GUI apps.) Of
course X window must be running locally for this to work! By default, OpenSSH
may not allow X forwarding; see /etc/ssh/*
to check. To override the default (if not permitted), use:
echo
'ForwardX11 yes' >>~/.ssh/config
Port
Forwarding
Suppose you (at host CLIENT) want
to access some service (some daemon-port at host SERVER listening on a
well-known port). Sadly, you find a firewall between CLIENT and SERVER
prevents access to that service’s port number. If SSH is allowed, you can
create a tunnel between CLIENT and SERVER. This is sometimes called an application-layer
(or L3) point-to-point VPN, although OpenSSH does support true VPNs too
(see below).
Securely forwarding packets received
on some port at CLIENT, and delivering them to some service listening in on
some port at SERVER can be useful. For example, your mail reader on CLIENT
thinks it is talking to some mail server listening at CLIENT:client-port.
The mail server (on SERVER) thinks it is receiving a packet from a MUA at
SERVER:server-port. ssh
on CLIENT acts as a proxy server, listening for packets sent to client-port.
It then forwards those packets via the SSH tunnel to sshd on the SERVER, which acts as a proxy client,
forwarding packets to whatever is listening at server-port.
Sshd
need not be running on SERVER! It can be on some MIDDLE system that (a) CLIENT
can reach with ssh, and (b) can send
packets to SERVER. (I.e., the MIDDLE system must be across the firewall that
is blocking direct access.)
Most commonly, MIDDLE and SERVER
are the same host. Then sshd
can efficiently use a Unix socket to talk to the server daemon. Note that when
sshd on MIDDLE connects to
SERVER, it will resolve DNS names using its resolver, not the one on CLIENT.
(So using “localhost” for the
SERVER refers to MIDDLE and not CLIENT.)
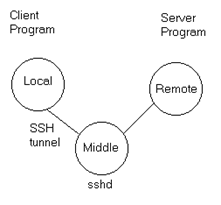 To create a
(application-layer) point-to-point VPN, use the -L
and -R options to forward a
specific port on CLIENT to one on SERVER. This works this way:
To create a
(application-layer) point-to-point VPN, use the -L
and -R options to forward a
specific port on CLIENT to one on SERVER. This works this way:
ssh
-NfL CLIENT:SERVER MIDDLE
CLIENT
is generally “[localhost:]port”, SERVER
is the destination (remote) “host:port”, and MIDDLE is the far end of the tunnel
(generally “user@host”). The “-N”
option says don’t run a remote command; if you don’t specify a command ssh tries to run a login shell. “-N” suppresses this and only creates
the tunnel. (You can forward ports even without this option.) “-f” says to put ssh in the background,
useful for a proxy server. Note that SERVER is resolved from MIDDLE. That’s
why SERVER is often just “localhost:port”, when you don’t need the
gateway host in the middle.
This creates a listening (server)
socket on the CLIENT, listening for arriving IP packets sent to port port.
localhost is the default, so CLIENT
is usually just a port number (but you can use “*” to indicate the socket
should listen to IP packets arriving from any interface, to port port.)
If the remote host is running sshd,
you can use the server’s hostname for middle and “localhost:port”
for SERVER.
You can add the
option “-o ControlPersist=yes” when creating
tunnels. That means to keep the tunnel up, even after your session ends. You
can then create new sessions very quickly since the tunnel is still up. Kill
the tunnel with “ssh -O exit
MIDDLE” when done.
(You can use
persistent connections for regular ssh sessions, the same way.)
Consider this example: You want to
point your web browser to http://wpollock.com/,
but this is blocked on your host (the CLIENT). However it is available from YborStudent, another host where you
have ssh login ability. You
need a tunnel from your localhost to YborStudent, which should then forward the
packets to wpollock.com to port 80:
ssh -NfL 9000:wpollock.com:80 wpollock@YborStudent
This will create a tunnel from localhost to the sshd running on YborStudent. Any TCP connection to locahost:9000 will be forwarded to YborStudent, where the sshd server there (acting as a proxy
client) will forward the packet to wpollock.com:80.
Any response is returned over the same tunnel. (Test by pointing your browser
to http://localhost:9000/.)
For example: ssh -NL 110:mailserver:110 remote tells
the SSH client to take any traffic addressed to localhost
port 110 and shove it through a
secure tunnel to the SSH server running on remote. Upon receipt,
remote’s sshd forwards the
traffic to host mailserver port 110.
Qu: what does this do: ssh -NL 7777:localhost:80 wpollock.com
Ans: Forwards localhost:7777 to wpollock.com:80. (Note the
“localhost” for SERVER is a DNS name from MIDDLE’s point of view!)
When done you tear down the tunnel
by using kill on the PID of the
(background) ssh that was
started on CLIENT.
The -R
option permits reverse port forwarding from remote hosts, through the SSH
server, to the SSH client. This works by creating the listening socket (the
proxy server) at the remote end, and the proxy client at your end. You might
use this to make a web server inside a secure LAN appear to be a service on somehost
in the DMZ; create the reverse tunnel from the web server to somehost.
Another good use of the -R tunnel,
is to allow someone to ssh into your system (think “tech support”). You could,
for example, allow your instructor to ssh into your home computer.
Difference
Between Local And Remote Port Forwarding
-L is
mnemonic for “local”. If I log in to CLIENT host and then run:
ssh -L 7777:localhost:110 SERVER
Then SSH creates a new port number
7777 on the CLIENT. If I connect to localhost:7777 from CLIENT, then I am
actually talking to SERVER:110 via a SSH tunnel. (And the program listening at
SERVER:110 thinks the connection came from localhost (i.e., 127.0.0.1 from
SERVER). But if I had run:
ssh -R 7777:localhost:110 SERVER
Then SSH creates the new port
number 7777 on the SERVER (not the client). Now if I log into the SERVER and
connect to its port 7777, I wind up talking to port 110 on the CLIENT.
So, -L creates a local port that allows me
to access a remote service. -R
makes a local service available to the remote machine on a port that “looks”
local to the remote system.
SSH-Based
Virtual Private Networks (VPNs are discussed in more detail on p. 334)
OpenSSH contains support for
Virtual Private Network (VPN) tunneling using the tun(4) network pseudo-device, allowing two networks to be
joined securely. The sshd_config(5)
configuration option PermitTunnel
controls whether the server supports this, and at what level (layer 2 or 3 traffic).
The following example would connect
client network 10.0.50.0/24 with remote network 10.0.99.0/24 using a
point-to-point connection from 10.1.1.1 to 10.1.1.2, provided that the SSH
server running on the gateway to the remote network, at 192.168.1.15, allows
it.
On the client:
#
ssh -f -w 0:1 192.168.1.15 true
# ifconfig tun0 10.1.1.1 10.1.1.2 netmask \
255.255.255.252
# route add 10.0.99.0/24 10.1.1.2
On the server:
#
ifconfig tun1 10.1.1.2 10.1.1.1 netmask \
255.255.255.252
# route add 10.0.50.0/24 10.1.1.1
Client access may be more finely
tuned via the /root/.ssh/authorized_keys
file and the PermitRootLogin
server option. The following entry would permit connections on tun device 1 from user “jane” and on tun device 2 from user “john”,
if PermitRootLogin is set to “forced-commands-only”:
tunnel="1",command="sh /etc/netstart
tun1" ssh-dsa ... jane
tunnel="2",command="sh /etc/netstart tun2" ssh-dsa ...
john
Since an SSH-based setup entails a
fair amount of overhead, it may be more suited to temporary setups, such as for
wireless VPNs.
Another option is stunnel, such creates SSL tunnels
instead of ssh tunnels. To use
you create a config file, run stunnel
with it. That creates a local proxy that can accept plain text in, and SSL out
(i.e. http://localhost:123 --> https://remote/).
Here’s an example for ssh encrypted
POP email access (Not yet correct):
$ ssh -S -N -L
54321:popserver.example.com:110 ssh-server.example.com
$ pine
??? ssh -gfnL 54321:localhost:110 localhost server-cmd
Then configure your MUA (or fetchmail) to get POP3 email from port
1234 from ssh-server.example.com, and voila! POP3 passwords and all the email
is now sent encrypted. Note some port numbers require root privileges to
access.
A useful technique to
security access remote storage volumes would be to run NFS via SSH or SSL
tunnels. However, there is a much easier way:
sshfs [user@]host:[dir] mountpoint
[options]
The sshfs software is available from fuse.sourceforge.net.
SSH to Encrypt
VNC Session
With port forwarding and an sshd under Cygwin (Unix tool set
ported to DOS), you can safely tunnel VNC sessions without relying on a SSL/TLS
wrapper. VNC works for Unix, Linux, and Windows. First, create an SSH tunnel
to the VNC server running on the remote machine:
$ ssh -L 5900:localhost:5900 user@remotebox
Then, in another window start the
VNC client:
$ vncviewer -encoding tight localhost:0
The trick is remembering that :0
means 5900, :1 means 5901, etc (just add 5900 to the display number). Many
clients assume you’re specifying an implicit port number if you go much over
:20.
You can use stunnel instead with VNC, and use an SSL aware VNC
client.
The TightVNC client doesn’t
support SSL, though newer client/server pairs that are platform specific like UltraVNC
(for Windows) do.
Securing
sshd
To use make sure the sshd daemon program is started at boot
time. It can take a while to generate the random keys used, so sshd should not be started via xinetd. The configuration files are
in /etc/ssh/*, especially sshd_config. (Controls root login
permitted, banner display, keep-alives, ...)
Some of my servers have been under
attack for many months now. Sometimes twice a day, hundreds to thousands of SSH
connections are attempted using a dictionary of common usernames. I have been
saving the logs but no pattern has emerged yet from the IP addresses. Of
course they don’t get in (yet), but I’d like a more automatic way to respond to
such attacks. Some lessons learned:
·
Have account naming policies that forbid usernames that commonly
appear in dictionary attacks.
·
Make sure all system accounts are disabled, and where
possible have invalid shells (such as /bin/false
or /sbin/nologin).
·
Never allow sshd
(or other) root logins. For one thing, many older versions of ssh
(OpenSSH) had a vulnerability where the length of the password could be
determined. That makes it much, much easier to crack a password. Second,
restricting root login gives you an audit trail on who became root. Third,
having to crack two passwords to get into your system is much harder than one,
and gives more time (and log data) to discover the attack (rings of security).
·
Make sure you protect your SSH to allow only “key” (not password)
access, or at least minimize the number of valid users.
·
On production servers, only a few users should be authorized to
access the server. Use AllowUsers
to restrict logins from only those users. If some package/whatever creates an
account and I don’t know about it, it still can’t be exploited.
·
Use iptables rules
only to allow SSH for a handful of addresses. Most servers only need to allow
access for a very limited range of IP addresses. Mobile users can store keys
on a flash drive (along with PuTTY). You can (reasonably) safely allow key
access from anywhere.
·
Configure the PAM “su”
policy only to allow a few select users to succeed with the su command. (The members of group
“wheel”.) Other users who
attempt “su” will fail even if
they know the password.
·
Change sshd
from port 22 to some other (unadvertised) port. This will stop only the
most casual attacks (a port scan will reveal your new ssh port), but a lot of attacks today are casual.
·
Use a PAM module that looks up the user’s cell phone number then
sends an eight-digit random number to the user’s cell phone, which the user has
to type in at the login prompt. This is a variation on the theme to require
human interaction (and thus stop automated login attempts). A similar idea is
to direct the user to a web page, where they must fill out some form and then
re-try the ssh access. The form
could require the entry of some data seen in an OCR-resistant GIF.
What is an SSH key
really? [From Martin Kleppmann’s blog
post ] The SSH private key is an ASN.1 data structure, first encoded
using DER
(resulting in a binary format) and then encoded using Base64 (resulting in a
PEM (text) key format). The key is a series of numbers, nine for RSA keys and
six for DSA keys. The meaning of these values is described in RFC-3447
for RSA and RFC-3279 for DSA (but is
more readable from the Perl DSA
module source, found here).
You can generate an
RSA key pair for experimenting with:
ssh-keygen -t rsa -N '' -f test_rsa_key
And examine it with:
openssl asn1parse -in test_rsa_key
or:
openssl rsa -text -in test_rsa_key
or (if you install dumpasn1; see also lapo.it/asn1js):
sed '1d;$d'
test_rsa_key|base64 -d|dumpasn1 -ap -
The second, third,
and fourth numbers are the components of an RSA private key: exponent e, modulus n, and private key d. (The first number is just a
version number, and the remaining numbers are only there to speed up operations;
they can be calculated from the three key values.) The public RSA keys only
have two values, e and n.
The keys are stored
in files, in various formats: PEM format is common, because it is 7-bit ASCII
clean and can contain several certificates and a key. Other standard formats
are PKCS
ones: #7, #8, and #12. Usually OpenSSL can read any format, and even convert
between them.
sshd
Configuration
The two files are /etc/ssh/ssh_config, which is used
to configure global client options (the user can override these with a ~/.ssh/config file, or from the
cmd line).
The server is configured from sshd_config file. See the man
page for the full list of options you can configure. Some interesting ones
include:
·
*Authentication
(e.g., PasswordAuthentication),
controls which authentication mechanisms can be used. For highest security disable
all except PubkeyAuthentication,
which requires public key access only.
·
AllowUsers,
Specifies which users can login via SSH. There is also a deny directive, as
well as ones for all/deny groups.
·
Protocol,
specifies the protocol versions sshd supports. Valid choices are “2”, “1”,
“2,1”, and “1,2” (allow both, but first one listed
is preferred). Use “2” for
highest security;
·
PermitRootLogin
(defaults to yes! Change to “no”);
·
StrictModes
(specifies whether sshd should check file modes and ownership of the user’s
files and home directory before accepting login);
·
VerifyReverseMapping,
specifies whether sshd should try to verify the remote host name;
·
LoginGraceTime,
the server disconnects after this time if the user has not successfully logged
in. Default is 2 minutes, “0” means disable feature.
Add “sshd: ALL” to /etc/hosts.allow.
In real life, you should limit where incoming SSH connections are allowed from!
OpenSSH since version
6.7 doesn’t support TCP Wrappers. Instead, you can gain similar functionality
using the Match directive in the
sshd_config file.
Don’t forget to also check the
firewalls (host, routers) to allow SSH to this host.
Some home routers drop
TCP connections after a couple of minutes of idle time. This can be mitigated
by having sshd send packets occasionally. (Client programs, such as PuTTY,
also have a setting for that, which may be more effective.) Try these
settings:
ClientAliveInterval 150
ClientAliveCountMax 0
Updated /etc/ssh/sshd_config (grep -Ev
'^#|^$' sshd_config):
Protocol 2
SyslogFacility AUTHPRIV
PermitRootLogin no
PasswordAuthentication yes
ChallengeResponseAuthentication no
GSSAPIAuthentication yes
GSSAPICleanupCredentials yes
UsePAM yes
X11Forwarding yes
KeepAlive yes
ClientAliveInterval 20
ClientAliveCountMax 3
PermitUserEnvironment yes
Banner /etc/issue.net
Subsystem
sftp /usr/libexec/openssh/sftp-server
The “PermitUserEnvironment
yes” lines enables processing of
~/.ssh/environment file, to set PATH, umask,
etc.
(Changes from default config: PermitRootLogin, X11Forwarding, KeepAlive, ClientAlive*,
PermitUserEnvironment, and Banner.)
Advanced
Client Configuration
A use can override the system
defaults from /etc/ssh/ssh_config,
with ~/.ssh/config. This file
permits some very useful configuration settings; see ssh_config(5) for details. With this file, you can
create aliases for hosts and also specify usernames and other settings per host,
so you can type in much less on the command line.
One useful setting is “ForwardAgent”. If you set that, and
are running the ssh_agent
locally, then when you ssh to the remote site, the agent is started there as
well. So you can ssh hostA, then from there, ssh HostB without re-entering
the password/passphrase for the secret key.
Lecture 19
— SELinux (MAC) [Also discuss other Linux MACs ]
SELinux
(Security-Enhanced Linux) is an implementation of Mandatory Access
Control (MAC) in the Linux kernel using the Linux Security Modules
(LSM) framework.
Standard Linux
security is a Discretionary Access Control (DAC) model. In this
standard Unix/Linux DAC model, file and resource decisions are made solely on
user identity and ownership of the objects (files, devices, and
ports). Each user and program/process run by that user has complete discretion
over the user’s objects.
Malicious or flawed
software that is running as a normal user (or root, including setuid and setgid) can do anything it wants with that user’s objects
(or in the case of root, of any user’s objects), and there is no way to
globally enforce an administrative security policy. Recent additions to the
DAC such as ACLs don’t alleviate these problems.
A MAC system addresses
some of the DAC problems. With MAC security, you administratively define a security
policy. The policy describes the access permissions for all subjects
(users, programs, and their processes) to all objects on the system. Decisions
are based on all the security relevant information available, and not just
authenticated user identity.
The MAC policy
cannot be changed without a reboot. Even root
or a kernel module can’t bypass this security! (If loaded in a testing mode, root can turn enforcement on or off
with the setenforce command.)
SELinux is not the
only MAC available for Linux, but it has support of the US Government (the NSA
developed it) and the backing of Red Hat, so it is likely to be more important
than other MAC systems such as Smack, LIDS, AppArmor (supported by Novell), and
TOMOYO. (See Page 262 for more information on these MAC systems).
The Linux kernel
supports a number of security related sub-systems: fine-grained rootly powers (capabilities),
a traditional DAC security system, an LSM (loadable security module)
that supports one (fine-grained) MAC or another, and an audit system to log
(among other things) MAC messages. (The Linux auditing system is discussed in
a later section.) Let’s see how these sub-systems interact to provide a very
secure system.
The SELinux MAC
system is designed to enforce the confidentiality and integrity requirements of
a system security policy. It is designed to prevent processes
from reading data and programs, tampering with data and programs, bypassing
application security mechanisms, executing untrustworthy programs, or
interfering with other processes in violation of the system security policy. It
also helps to confine the potential damage that can be caused by malicious or
flawed programs.
SELinux provides
two additional security systems that are rarely used. One is a role-based
access control, where you can define various roles, which users can assume
which roles (via the newrole
command), and what can be done by a process run with a given role. (sudo is more commonly used for this.)
MLS
SELinux can also be
used to implement a MLS (multi-level security) system. A
MLS allows an administrator to assign security levels to files,
such as unclassified, secret, most-secret, top-secret, read-this-and-die, ...
A given user is also assigned a security level. Then access is denied if your
security level is less than that of the file. (See RHEL
7 SELinux, the MLS section.) Note that Red Hat provides a special
SELinux policy for MLS.
MCS
SELinux also supports
MCS (multi-category security). MCS allows the assignment
of MCS labels to users (processes) and files. With MCS, it isn’t sufficient
for a process to have an MLS level equal or greater than the file’s level; the
process must also have been assigned the same category as the file (or the file
has no MCS category defined for it). It is more commonly used than MLS; it
works well for virtualization (by assigning different categories for each VM or
container, the processes within that VM or container can access their files,
but no others). (See CentOS
MCS, sVirt.)
A recent article by Dan
Walsh (who knows SELinux very well) compares the various enforcements possible,
well-illustrated, can be found at OpenSource.com.
Enabling SELinux may
add about 7% performance penalty. Note most backup tools don’t currently know
about the SELinux labels on files, which are stored on most types of
filesystems as extended attributes. (Use star
or other modern tools to back these up.)
A flow chart of a
typical system call: check root if required capability (rootly power) was
granted to the process, check MAC policy (only if an LSM is installed), check
DAC. Finally, if turned on (is by default), generate audit message. If
allowed by capability check, MAC, and DAC, then do task.
Course-grained
versus Fine-grained Control
Another problem
addressed by SELinux is that traditional kernel security systems are too course-grained.
As an illustration (nothing to do with SELinux), consider traditional rootly
powers. In order to perform a privileged action a process had to have a
EUID of 0 (root). In fact, the flow-chart for kernel security looked similar
to:
If UID=0 allow.
else if DAC says OK, allow.
else deny.
Generate audit message.
If allowed then do task.
For example, only
root can open a server (listening) socket on a privileged port (any port
<1024). So your web server must launch as root. But this also allows your
web server permission to halt the system or remount partitions. This is too
much privilege!
In modern Linux (and
Unix), these rootly powers have been split into a dozen or so individual
capabilities. Now you can grant a web server permission to open a privileged
port but not permission to reboot the system. This is a good example of course
and fine grained control.
Note the traditional
DAC security system is considered course-grained. For a given user there are
only three bits (R/W/X) that can be set! For example, to allow a user to view
their password aging information in the /etc/shadow
file, with DAC you need to allow all users Read permission on the whole file.
Obviously a terrible idea! (Currently, passwd,
chage, and others are either
setUID to root, or use a “helper” program that is setUID.)
With SELinux you can
assign the finest possible level of control. You can specify which set of
system calls are allowed for every file (and other objects, such as sockets),
for every combination of user and program! With this level of control, you can
indeed allow any user read permission to /etc/shadow
only if they are using the chage
program. The modern (2015) flow-chart of a typical system call is:
If the process has
the required rootly capability, allow.
If DAC says okay, allow.
If MAC installed and MAC says okay, allow. (Note SELinux in permissive mode
will allow, but generate a denied audit message anyway.)
If auditing is enabled, generate an audit message.
If allowed by capability check, DAC, and MAC, then do task.
Checking for a
capability in the kernel code is as simple as this:
if (!capable(CAP_SYS_NICE)) // old: if
(!suser())
return EPERM;
(The DAC and MAC
checks are equally simple.)
Historically, fine-grained control was provided by the SetUID
system call. This approach assumes a number of SUID-to-root programs can be
executed by anyone, and that these programs do their own permissions checking,
are robust, and contain no security flaws. Experience has shown this rarely
works well. (There are exceptions such as sudo.)
Additionally, the kernel audit log gets messed up, as it appears
that root (rather than the real
user) is doing the task. With SELinux, the user’s real ID is logged.
Reducing
policy size to a manageable level
The only problem with
such fine-grained control is that you need to specify so much. A default rule
of deny is used but you still must list every user (system and human
login), every program on the system, and for each list all system calls allowed
for each and every file on the system. This will lead to many millions or tens
of millions of rules in the policy for a general-purpose system!
SELinux allows
many simplifications to reduce the size of the policy. For example, many
users and many programs have identical security implications. So rather than
listing every user you can assign the same user identity to multiple users (typically
just one, user_t, is used
for non-system accounts). The same is true for programs. The security
implications of the echo or expr commands is the same, so a single
security label can be used (e.g., bin_t).
Finally many or most (data) files can be treated the same, so a single label
can be used for these (e.g. user_home_t).
Additionally you can
define (or rather tweak the default) rules for assigning security IDs to new
users, and security labels to new files. So there is no reason to continually
update the policy.
There are pre-defined
policies for common scenarios you can use; it is rare to need to write one.
The NSA distributes one called strict, generally used for server-only
systems, and Red Hat distributes one called targeted, useful for home
systems (general use, plus a few services).
In additional to
providing the tools to tweak or write your own policy, SELinux supports conditional
policy rules. These allow a policy to be customized a bit without any
change to the policy itself. For example, suppose you are running a web
server. Some servers need to support user directories, but by default the HTTP_T user has no access to /home/*/public_html. Rather than force
you to modify the policy to allow user directories, you can take advantage of
the conditional rule used on the targeted
policy for this. You set a Boolean flag to true to allow this,
or false to deny.
Depending on which
conditional rules a policy has, the set of Booleans available to the SA can
vary; the Fedora 7 targeted policy has 80 Booleans.
The set of Booleans
supported by your current policy can be viewed with getsebool -a
(see below for more detail). Change them with setsebool (or other tools).
For a list of
Booleans, an explanation of what each one is, whether they are on or off and
their default state, run the semanage
boolean -l command as root.
LIDS and AppArmor
are other MACs you can use instead of SELinux. They are much less
fine-grained than SELinux but sufficient for most systems. LIDS uses an iptables-like syntax to define rules
for the policy.
Remember SELinux
labels each user, program, and file; the access table uses these labels, not
UIDs or pathnames. Labeling files requires a filesystem that supports extended
attributes, and some way to label correctly all the files. Another issue
is that the label is associated with files (inodes) and not pathnames, so if a
word processor replaces one file with another, a default security label is used
which may not be what is wanted. So when creating new files (e.g., via
a yum update) they must be relabeled if the default labeling policy isn’t
correct for some files.
On the other hand,
LIDS and AppArmor use pathnames, not inodes, and no extended attributes are
needed. The risk here is that creating a hard link to some file may bypass
restrictions.
The solution in both
systems is a default “deny everything” policy, however good luck convincing
your users and management to allow such a policy.
User
identity
With traditional *nix
DAC, a user identity (and set of groups) is assigned to a process when it is
created. But by using various system calls this UID can be changed. A
malicious program can change identities to get around DAC security. Also audit
logging is fairly useless if it only shows “root” did this and “root” did that.
With SELinux, a
process is assigned an identity when created that cannot be changed for the
life of that process. This means changing a UID won’t defeat the MAC
security, and the audit log will always show the true user. (Use id -Z to view.)
The one exception to
this rule (of not changing the user identity) is the login program. When run,
it initially is run by the root user. After a successful login, it must exec a shell for the user. At this
time, the user identity of the new shell is not root, but rather the identity
of the user who just logged in.
Implementation
Checking the policy
for every access to a system call would be very slow. Instead SELinux caches
the access decisions. When a system call is invoked, a check of this cache is
done. If the list (called a vector because it is
cooler-sounding) of allowed access for this user/program is not in the cache,
the system will pause, calculate it, add it to the cache, and retry the
lookup. It is then a simple matter to search this vector for allowed access to
a particular file/socket/whatever.
Because of this architecture,
the SELinux “permission denied” messages show up in the log as AVC (access
vector cache) messages, for example (one long line):
type=AVC msg=audit(1184605652.582:39): avc:
denied { search } for pid=2570 comm="procmail"
name="root" dev=sda10 ino=2301537 scontext=system_u:system_r:procmail_t:s0
tcontext=system_u:object_r:default_t:s0 tclass=dir
The results of the mount command show sda10 is the / (root) filesystem, and the results of: # find -H / -xdev -inum 2301537
shows that procmail was denied search access for
the directory /root. Most likely,
it was looking for /root/.procmailrc
or /root/.forward. A properly
secured system won’t have those files, so it is no problem blocking procmail from looking for them. If
you want to allow procmail this
access, first add a+x (search) permission
to /root. This may take care of
the problem. If necessary check if there is a Boolean you can set. If not you
must tweak the policy by adding the new allow rule(s).
Policies
MAC under SELinux
allows you to provide granular (very precise) permissions for all subjects
(users, programs, processes) and objects (files, devices, ports). You
can safely grant an application just the permissions it needs to do its
function, and no more: you specify for each combination of user and process,
which system calls are allowed to each file, device, socket, and port. However
this can be very complex to setup correctly. Normally you use a pre-defined
security policy that will suit your needs.
Initially a strict
policy from the NSA was enforced. However whenever new users, devices, or
software is added to the system, or to conform to local policies, a local
security expert is needed. For most home and school uses of Linux this was
felt to be too restrictive.
Fedora now ships with
both this strict policy and a targeted policy (each
in a separate RPM package). The targeted policy labels most standard daemons
with an appropriate domain (such as named_t
for named) and the rest of the
system processes run in “unconfined_t”
domain, which allows anything.
Note that even if the
MAC allows something, standard DAC security still applies. Thus some operation
must be allowed in both before it can be done.
The security policy
includes such things as
·
The TE Matrix (the table which controls access)
·
A list of roles various users (login accounts) can use
·
A list of types for specific files (those in /bin, /sbin,
/etc, /dev, ...)
·
Other policy rules, such as which roles a user is allowed to use
·
Defaults, such as the default role for new user accounts
you add, and the default type for new files created (e.g., files created in a
user’s home directory get labeled one way, files created in /dev or /etc might get different defaults).
·
A set of on/off flags called Booleans that affect
the policy enforcement.
The targeted
policy defaults are in /etc/selinux/targeted/contexts
in the file files/file_contexts.
You can define which
policy you will run by setting the SELINUXTYPE
environment variable within /etc/selinux/config.
There are many
SELinux policies available for download, which you can use directly or as a
starting point for your own policy. For example, this one from Tresys
Technology.
Concepts
of roles, domains, types, and process contexts
The SELinux
implementation uses role-based access control (RBAC), which
provides abstracted user-level control based on roles and Type
Enforcement (TE).
The domain
of a process determines what access that process is allowed.
Every user is
assigned a role. A role determines what domains
can be used for a process. The domains that a role allows are
predefined in the policy. If the current role does not authorized the
process to enter some domain (in the policy database), then the transition
to the new domain will be denied. The policy lists what roles a given user is
allowed to use.
Every process is
assigned a security context that includes the user identity, the role
of the user, and a domain. To keep the tables as simple as possible SELinux
uses generic user IDs in the rules. So you will not usually see your
UID but rather “user_t” in the
various tools that show security information. You may also see “system_u” (for kernel processes) and “root” (used in the strict policy).
Recall that on
Unix/Linux systems, every process is started by another, the parent process.
When starting a new process the system must determine its security context.
This is based on the parent’s security context and the type assigned to
the program file. The initial security context is the same as the parent. SELinux
then tries to change the domain of the new process according to the current
security context and the type of the file. This is called a domain transition.
For example, if you
try to run the passwd program
from your shell prompt, the shell will start a new process from the /bin/passwd file. The security
context of the new process will have the same identity and role of the parent (bash) process, but the domain will be
“user_passwd_t”.
In order to allow a
user from the unconfined_t
domain (the unprivileged user domain, called “user_t”
in the strict policy) to execute the passwd
command, the following is specified in the relevant config file: “role user_r
types user_passwd_t”. It shows that a process with the user
role (user_r) is allowed to
enter the user_passwd_t domain,
i.e. it can run the passwd
command.
Each file and other
object (devices, sockets, ...) is assigned a type. The security
context of a file can vary depending on the domain that creates it. By default
a new file or directory inherits the same type as its parent directory.
However the policies can be set up to do otherwise.
The terms domain
and type are sometimes used interchangeably, as are the terms context
and label.
A table called the
TE Matrix determines what access is permitted for each combination of domain
and type. This is how SELinux enforces access control.
A cross-reference on the matrix defines
their interaction. (I.e., who is allowed to do what operations
on which files/devices/ports.):
|
TE Matrix
|
Type A
|
Type B
|
...
|
|
Domain 1
|
sys-call 1, 2, ...
|
sys-call 1, 2, ...
|
...
|
|
Domain 2
|
sys-call 1, 2, ...
|
sys-call 1, 2, ...
|
...
|
|
...
|
...
|
...
|
...
|
For example, the
domain “user_passwd_t” permits a
user write access to the /etc/shadow
file, but the “unconfined_t”
domain (the domain of the shell) does not.
In the real world,
the security needs of different organizations will be similar but slightly different.
For example, a web server may need to run CGI scripts but another may not need
that access. Rather than make many policies, only slightly different from each
other, each policy supports a set of conditional rules in the TE
Matrix. These permit or deny access according to the current value of a Boolean.
So a single policy may permit or deny CGI access to httpd, based on some
setting.
A
High-Level Overview
The security context
for processes started at boot time is determined by the file /etc/selinux/targeted/src/policy/initial_sid_contexts.
A user logs on and
the user identity is determined. If there isn’t a specific identity listed in
the policy matching this user ID, then the identity defaults to “user_u”. The user identities are listed
in the files /etc/selinux/targeted/src/policy/users
and .../local.users.
Next, the user is
assigned a role. If one isn’t listed for that user in the policy files,
the default is used (“user_r”).
The login shell then
gets assigned a security context that includes a domain, the user
id, and the role.
When the user runs a
command, the new process is assigned a domain based on the context of
the parent process (user, role, and domain), as well as the type
assigned to the executable file. If the process is assigned a different domain
than the parent process, this is called a transition. (The role
determines what transitions are allowed.) The context of your login shell is a transition
from login process’s role, domain of system_r:remote_login_t
to system_r:unconfined_t.
As the process runs,
it will execute system calls. (For example, suppose the process attempts to
read from a file.) After normal permissions checking, the kernel checks to see
if a LSM such as SELinux is installed.
If SELinux is
installed (enabled), it gets called to check if the access is permitted. The
check is based on the domain of the process, the type of the file
being accessed, and the specific system call being made. If the type of
the file is unknown for some reason, a default type is used.
If SELinux is enabled
a log record is made of the check.
If the access is not
permitted by SELinux and SELinux is in enforcing mode then the access is
denied. If SELinux is in permissive mode then the access is allowed by SELinux
even though the rules don’t allow it. (Note you still get the log record).
Labeling
The process’s domain
lists what that process can do with various objects (or types of objects). An
example is an ordinary user running the date
command. Such a domain permits the process to use gettimeofday(2) but not settimeofday(2)
system calls, and to read(2)
certain files such as /etc/localtime
(the system time zone setting), but not others. The domain is different if
root runs the date command.
Labeling requires a
filesystem that supports extended attributes, and some way to label correctly
all the files. Another issue is that the label is associated with files
(inodes) and not pathnames, so if a word processor replaces one file with another,
a default security label is used which may not be what is wanted.
There are three types
of domains: unconfined allows the process to run as if SELinux
were turned off; permissive is the same but logs violations
anyway; and confined which is the default, enforcing domain.
Note when you run a program, or init
or xinetd does, a transition
to a different domain (process label) may occur.
Demo: ps -Z & date (then repeat
as root)
To make this scheme
work every object and user on the system must be labeled
with its type. The use of roles and defaults (e.g., files in a directory can
inherit the context of the directory) make this simpler. You can’t do this
with setfattr, as unrestricted
use of that would allow any user to bypass the security policy just by
re-labeling things.
(Demo: touch ~/foo /tmp/foo; ls -Z ~/foo /tmp/foo)
Setting the security
context on files is done with the setfiles
command. This command is complex and Red Hat has added a simpler command, fixfiles.
Try as non-root: fixfiles check . |less (this checks the labels
against the policy defaults).
You can use the
option “restore” to fix
any files that aren’t labeled or are labeled incorrectly. Using the “relabel” option instead ignores
any existing labels and relabels the files according to the policy. As root
you can simply run “fixfiles restore”
to fix the labels on all mounted filesystems, which can be handy with removable
media:
fixfiles relabel
reboot
Another approach is
to take advantage of the /.autorelabel
mechanism:
touch /.autorelabel
reboot
(In addition to setfiles and fixfiles you may find restorecon.
All these commands do roughly the same thing.)
If the defaults
aren’t correct for some file, you can change the security context. To change
the security context of any file use chcon
command. Such a change will be lost if the file is relabeled from the policy.
A permanent change should be made in the policy itself.
Users can’t be
relabeled with a different identity. However you can assign different roles to
a user at login time, or using newrole
command. This command starts a new shell with the process context modified by
the command line arguments (if the policy permits).
The policy naturally
prevents regular users from increasing their privileges this way and not even
root can change identity, but you can change the role for the process or
its domain (type). Note that change the role will only affect further
processes started by that one; in the case of a command such as date that doesn’t start additional
processes there should be no effect.
Implementation
Initially, the Linux
kernel needed to be patched for SELinux, and re-built. Instead, a change was
made to how the kernel implements system calls:
userland
program--> kernel API--> check DAC, do auditing, if LSM loaded, invoke
LSM MAC check, if still allowed, do the task and return else generate audit
msg.
SELinux is
implemented as a LSM. LSM (Linux Security Modules)
are an extension of the Linux kernel, which allows security systems to be
easily added to the kernel. SELinux is just one possible security system that
can be added. Another is LIDS. (Only one LSM can be loaded in the kernel at a
time. Initially no LSM is loaded, and thus the MAC check is a no-op (does
nothing).
The context or type
of a file is stored in the filesystems using extended attributes.
Each file contains a set of (zero or more) attribute-value pairs. Attributes
have hierarchical names such as security.selinux,
which is the attribute where the security context of a file is stored. (SELinux
requires not only LSM in the kernel, but patches that support extended
attributes.)
(Note that the
original version of SELinux didn’t use extended attributes, but stored this
information elsewhere. To map users and objects to this table, special
security identifiers (SIDs, PSIDs) were added to the system. These are no
longer used.)
Normal attributes
vary from one filesystem to another, and are examined and changed with lsattr and chattr commands. Extended attributes are supported much
the same way as ACLs are. Most filesystems today support extended attributes
(and ACLs) but not all. Use the commands getfattr
and setfattr to examine
and changes the extended attributes of files:
getfattr -m . -d file
(Normally this
command only shows extended attributes whose name starts with “user.”. To see other attributes use
the “-m RE” option to specify a regular
expression to match what attributes to show. A dot will match all. The “-d” means to dump the attributes.)
Many traditional
commands that show file information have been retro-fitted with new options, to
show the security context of files. Usually the option is “--context” or “--lcontext” or “-Z”. (Show: ls -Z file
and id -Z).
The pseudo-filesystem
/sys/fs/selinux provides
current information from the kernel about SELinux. This filesystem is similar
to /proc. The /etc/fstab file should include the
following:
none /sys/fs/selinux selinuxfs noauto 0 0
(Under older systems,
/sys/fs/selinux has been moved
to /selinux.)
The actual
configuration files are collected under /etc/selinux.
There is a config file there, as
well as a subdirectory for each installed policy. In that directory you
will find further configuration: the Booleans, which are on/off flags for
various aspects of the policy such as which daemons are allowed unrestricted
access (i.e., for which daemons have you turned off SELinux enforcement), the
actual policy rules (the TE Matrix), and the default assignment of labels/contexts
to objects (roles, users, ...).
Summary
All users get
assigned a role based on the policy; if no roles are listed for some
user a default is used. A user can assume a new role by starting a new shell
via the newrole command, or by
changing the policy (and logging in again).
All files get a type
based on the policy; if no type is listed for some file (or directory), a
default is used. The type of new files depends on the type of the
parent directory and the process’s domain. A user can relabel files,
either by changing them directly or by edited the policy and then relabeling.
Every process gets a domain
based on the security context (user, role, domain) of the parent
process, and the type of the program file. If the process’s domain is
different than that of the parent process, a domain transition occurs.
The definition of roles in the policy determine which transitions are allowed.
Access is controlled
by the type enforcement matrix, which is a table with one row for each domain
and one column for each type. The cell in the intersection of a domain
and type lists what system calls are allowed. The matrix is stored in
binary files, which are compiled from plain text files you can edit.
SELinux is
implemented using Linux Security Modules interface of the kernel, and
stores type information using extended attributes in the filesystems.
All the components of the policy (the definitions of the roles, the assignment
of roles to users, and the TE Matrix) are stored in a number of files under /etc/selinux/policyname.
Linux currently ships
with two policies, strict and targeted. The targeted
policy is the default, and is suitable for desktop users (essentially only
certain daemons have access enforcement) and learning. In this policy you can
change the mode, update and reload the policy, and even turn SELinux on and
off, without rebooting.
Policies can be
edited (or created from scratch) using the policy source files, which then get compiled
into the (binary) policy that can be loaded.
Rather than edit the
policy source directly, each policy supports a set of Booleans, which
selectively turn on or off enforcement some rule(s) in the policy.
Using
SELinux — Turning it on and off
Displaying the
current status can be done with the commands sestatus
[-v] or getenforce, or “cat /sys/fs/selinux/enforce”. In
permissive mode SELinux will check and log all accesses, but won’t prevent
any. To switch the modes without rebooting:
echo "1" >/sys/fs/selinux/enforce
which will switch the
kernel into enforcement mode. Conversely,
echo "0" >/sys/fs/selinux/enforce
switches into
permissive mode. (The Red Hat command setenforce
does the same thing.)
Add selinux=0 to your kernel boot line
to disable SELinux at boot time, “1” to enable. Use enforcing=0 in your kernel boot line to boot into
permissive mode, “1” for enforcing mode.
The mode can also be
set by the /etc/selinux/config
file, which overrides the boot parameters. The config file determines if SELinux is disabled
completely, enabled in enforcing mode, or enabled in permissive
mode.
This file can also
set the environment variable SELINUXTYPE
to determine which policy to use.
Any files you create
while SELinux is disabled will not have SELinux context information. You may
need to relabel whole file systems and it’s even possible you will be unable to
later boot with SELinux=1,
requiring a boot to single-user mode for recovery.
Using
SELinux — Modifying the Policy
Use getsebool -a to see what Booleans the
current policy supports, and setsebool
to change them (or “ls /sys/fs/selinux/booleans” to list and echo 0 or 1 to /sys/fs/selinux/booleans/name
to change.) You can examine the current policy using sesearch and seinfo.
(May require additional packages to be installed such as setools-console and selinux-policy-doc.)
The roles a user can
assume is determined by the policy, in the files /etc/selinux/policyname/users/*.
You can add additional roles for a user (or change the default role for a user)
by editing the local.users
file.
To modify the policy
rules that make up the TE Matrix requires that you installed the source package
for the policy. You then edit the text files to make changes, or use certain
tools to generate the text to append automatically (audit2policy). Next you must re-compile the policy
source using the checkpolicy
tool:
cd /etc/selinux/targeted/src/policy
edit the policy files
make
make relabel
reboot
Another tool called load_policy can be used to replace
the old policy with the new one. Naturally this is dangerous! Red Hat added
this tool because typically users are testing and debugging policies, but on
a production system, not even root should be allowed to run this command; the
policy should only be loaded at boot time. You can prevent users (even
root) from turning SELinux on or off, or changing the mode, by editing the file
/etc/selinux/policy/src/policy/macros/admin_macros.te
and remove (or comment-out) the following lines:
can_setenforce($1)
can_setbool($1)
can_setsecparam($1)
If you comment out
these lines, recompile, and reload the policy, then it will not be possible to
change the enforcing mode (not without changing the policy at least, and you
could probably block that as well).
The policy file can be
modified by root by default (shouldn’t allow that on a production server)
but this is beyond human ability. Newer SELinux tools allow you to create local
policy modules that over-ride the regular policy. Use audit2allow and audit2why
to figure out the rules you need, or learn to use the other se* tools. Report
the problem to Red Hat (or your vendor) so they can update the policy or add a
Boolean.
Use semanage to make changes such as
managing the labels assigned to users, ports, devices, or other hosts, managing
booleans, user roles, etc. Use semodule
to create local policy modules that can over-ride the compiled policy.
The semanage command is pretty slow. It can take 10-20
seconds for a semanage command
to complete. semanage
recompiles a huge amount of policy. In Fedora 15, there are nearly 500,000 allow
and dontaudit rules. The compiler checks each type, user, role, etc. to
make sure they are valid. Executing multiple semanage
commands in RPM post-installscripts can be very slow; these can be batched, but
not all RPM authors bother.
Using
SELinux — Backups
Use the (recent
version of) star command
to backup files with their SELinux contexts. For example,
star -xattr -H=exustar -c -f output.tar
[files]
Also the dump and restore utilities for ext[234]
have been updated to work with XATTRs (and therefore SELinux contexts).
Another backup issue
is restoring SELinux changes. (This is used to make identical changes to
multiple hosts, too.) First, copy all the .pp
files you’ve installed into some archive file. Next, run the command “semanage -o mySELinux.conf”
to save all the other changes in a way that can be re-applied using “semanage -i”. Add that file to the archive too. To restore, use semange and semodule.
Using
SELinux — Trouble-Shooting Policies and Fixing Problems
Modifying SELinux Policy
What if the current
policy doesn’t allow something it should? There will be an error message in
the audit log (or some log file such as messages).
Run the audit2why command
to see why access was denied. Another tool is used to automatically convert
audit failure messages into an SELinux rules file. Suppose for example, SELinux
denies some action of Postfix MTA and you think it should be allowed. Here’s
all you need to do:
Step 1: Create
policy:
audit2allow -M mypostfix <
/var/log/audit/audit.log
This will create a
text version of the policy file, name.te, as well as a compiled version,
name.pp, in the current directory.
Step 2: Enable the
new policy:
semodule -i mypostfix.pp
That’s it!
When you install name.pp,
it will replace any previously install policy package file of the same name.
So if a new error occurs either (1) create a new file with a different name and
install both, (2) if both errors are still in the log, just create a new policy
package file and it will contain both rules, or (3) append the output of audit2allow to the existing .te file, and then compile that.
A MYPOLICY.te (type enforcement)
file would look something like this:
module MYPOLICY 1.0;
require {
type staff_mono_t;
type shadow_t;
class file getattr;
}
#============= staff_mono_t ==============
allow staff_mono_t shadow_t:file getattr;
To append the new
rule to some existing name.te file, run:
audit2allow </var/log/audit/audit.log
>>mypostfix.te
and compile the .te files in the current directory
with:
make -f /usr/share/SELinux/devel/Makefile
and install as before
(using semodule).
The output instead could
be added to the local.te
file (in the directory /etc/selinux/targeted/src/policy/domains/misc/),
which is one of the source files for the TE Matrix. (If fixing a broken policy,
you may wish to add to .../domains/programs/xyz.te instead.) After that, “make policy install load” to rebuild the binary TE
Matrix (security policy) file, and reboot. This requires you to have the
source of the policy installed (a separate RPM).
Using SELinux Booleans
The SELinux policy
can include conditional rules that are enabled or disabled based on the current
values of a set of policy Booleans. These policy Booleans allow
runtime modification of the security policy without having to load a new
policy. These are true (1) or false (0) settings.
For example, the
Boolean httpd_enable_cgi allows
the httpd daemon to run CGI
scripts if it is enabled. If the administrator does not want to allow
execution of CGI scripts, she can simply disable this Boolean value.
Use the setsebool command to change them.
(The “-P” option will
update the Boolean file
on disk as well.) Use getsebool
to view the current values. (Demo “getsebool
-a |less”.) See also man page for booleans(8).
Using
SELinux — Debugging Daemons
SELinux intentionally
disables access to the tty
devices, to stop daemons from communicating back with the controlling
terminal. This communication is a potential security hole because such daemons
could insert commands into the controlling terminal. A broken or compromised
program could cause serious problems with this. Normally daemon programs don’t
produce any output, but you may need to run them with debugging mode on.
There are a few ways
you can capture STDOUT from daemons. One method is to pipe the output through
the cat command:
snmpd -v | cat
Many daemons have
special man pages describing SELinux issues and how to overcome them. See for
example ftpd_SELinux(8), named_SELinux(8), httpd_SELinux(8), nfs_SELinux(8), and samba_SELinux(8).
Case
Study: FC4/SELinux and Apache:
SELinux was
preventing access to CGI and user home directories (UserDir). To fix, I first tried the instructions in the httpd_SELinux man page:
setsebool -P httpd_enable_cgi 1
restorecon -R ~wpollock/public_html/
chcon -R -t httpd_sys_content_t
~wpollock/public_html
but I realized I’d
have to do this for every user. And it didn’t work! I must’ve done something
wrong or omitted some step. Re-reading the man page reveals I also should
have:
setsebool -P httpd_enable_homedirs 1
Note CGI script files
need a different label. To set this up correctly you should change the label
on all the files, and also on the directories so new files created in there
will get the correct labels by default.
Although I could have
used audit2allow to try to
repair the policy, instead I ran the following:
setsebool -P httpd_disable_trans 1
which prevents the httpd program from transitioning to
the httpd_t domain when it
starts up. This effectively disables SELinux checks for httpd.
To examine the
current Boolean values for httpd,
you can take advantage of the fact that they are all named after the daemon:
getsebool -a |grep httpd
Modern SELinux
Until 2005, SELinux
tools for administrators (and policy writers) were quite primitive. A new
design has made the system much easier to use. See fedoraproject.org/wiki/SELinux for lots of useful info on
this.
Here’s a list of the
most important SELinux commands you should know:
getenforce
setenforce 0 or 1 (to set permissive or enforcing)
getsebool -a
setsebool some_bool 1 or 0 (on
or off)
To adjust file
labels to the policy:
restorecon -vFR /some/dir
To change labeling
policy:
semanage fcontext -a
-t some_type_t '/some/dir(/.*)?'
For example, to add
httpd file-context for everything under /web:
semanage fcontext -a
-t httpd_sys_content_t "/web(/.*)?"
restorecon -R -v
/web
When all else fails:
audit2why
audit2allow -alrM foo; semodule
-i foo.pp
Smack [from lwn.net/Articles/244531/]
The Simplified
Mandatory Access Control Kernel (Smack) is a security module designed to harden
Linux systems through the addition of mandatory access control policies. Like SELinux
SMACK works by attaching labels to processes, files, and other system objects. It
allows the SA to implement rules describing what kinds of access are allowed by
specific combinations of labels. Unlike SELinux, SMACK was designed
specifically for simplicity of administration. It leaves out the role-based
access controls, the type enforcement, and the MLS. So it can’t make a system
as secure (in theory) as SELinux but it avoids the nightmare of SELinux
administration, which is too complex for mere mortal SAs to deal with.
Smack allows an
administrator to define labels for “objects” (files, processes, sockets,
devices). Labels are 1 to 7 characters in length. (Some labels are reserved
and have special meaning.)
To see if access is
allowed by some task (a process) to some other object, the labels on two are
compared. By default, access is only allowed if the labels match.
There are a set of
Smack-reserved labels that follow a different set of rules which allows most
system objects and processes to be unaffected by Smack restrictions, so Smack
doesn’t get in the way of the OS. The SA only needs to add rules and labels
for the users and processes they want to secure.
Smack uses
filesystem extended attributes to store labels on files. SAs can set
labels using the attr
command. The security.SMACK64
attribute is used to store the Smack label on each file. For example setting /dev/null to have the Smack-reserved “*” label would look like this:
attr -S -s SMACK64 -V '*' /dev/null
Users can be labeled
using a patched version of ssh.
Sockets and their packets are labeled using NetLabel. It provides
packet labeling capabilities for the Linux 2.6 and newer kernel, and supports Common
IP Security Option (CIPSO) labeling.
CIPSO is an old IETF
draft that has been adopted by a number of vendors. The draft expired in the
early 1990s and never became an RFC. It is one of several network labeling
standards in use today.
An administrator can
add rules, but there is no support for wildcards or regular expressions; each
rule must specify a subject label, object label and the access allowed explicitly.
The access types are much like the traditional UNIX rwx bits, with the addition of an a bit for append.
For configuration,
Smack uses the SELinux technique of defining a filesystem that can be mounted, smackfs. Typically, it will be
mounted as /smack, providing
various files that can be read or written, to govern Smack operation.
Smack access rules
are written to /smack/load.
To change rules just write a new set of access permissions for the
subject-object pair.
Here’s an example that
uses the standard security levels for government documents. Smack labels are
defined for each level: UC for
unclassified, C for classified, S for secret, and TS for top secret. Then the
traditional hierarchy of access is defined with a handful of rules (plus the Smack
defaults):
C UC rx
S C rx
S UC rx
TS S rx
TS C rx
TS UC rx
Because of the Smack
defaults, UC will only be able to access data with that same label. Because of
the rules above, TS can access S, C and Unclassified data. Also because no
write permissions have been given, tasks at each level can only write data with
their own label. So secret tasks write secret data and so on.
Note that there is no
transitivity in Smack rules, just because S can access C and TS can access S,
that does not mean that TS can access C. That rule must be explicitly given.
Files inherit the
label of the task that creates them, with Smack ensuring that the filesystem
attribute is set. They will retain that label unless it is explicitly reset by
an administrator using the attr
command.
Linux
Intrusion Detection System (LIDS) [www.securityfocus.com/infocus/1496]
LIDS (www.lids.org) is a
Linux kernel patch that will allow users to give programs exactly the access
they need, and no more. It works much the same as SELinux, only is designed to
be considerably simpler to use.
A LIDS kernel has
several features. One is a port scan detector, which is used to alert users to
a possible intruder. It logs the offending IP addresses via syslog.
The most important
aspect of LIDS is to enforce strong access restrictions (ACLs). LIDS has two
kinds of ACLs: those that restrict actions that can be performed on files (such
as read/write/append), and those that restrict capabilities a process may
possess (e.g., changing NIC addresses, changing user ids). Here’s an example
that hides /etc/shadow form all access, except read access by sshd:
# lidsadm -A -o /etc/shadow -j DENY
# lidsadm -A -s /usr/sbin/sshd
-o /etc/shadow -j READ
LIDS file ACLs are
enforced as soon as the kernel boots, whereas the capability ACLs are not
turned on until the kernel is sealed. The integrity of a LIDS
kernel would be suspect if inappropriate LKMs were allowed to load. Thus LIDS
allows LKMs to be loaded during startup until it is sealed with the “lidsadm -I” command. At the time the kernel is sealed, no more
LKMs can be inserted or removed from the running kernel. (BSD has a similar
capability.)
LIDS keeps its files
in /etc/lids. This is always
protected by LIDS so that it is invisible (DENY) to all users including root.
Once you setup a password, you can start a LIDS Free Session (LFS). In
an LFS session, (shell) LIDS restrictions don’t apply. You establish a LFS by
using the lidsadm command as
follows:
root# lidsadm -S -- -LIDS
enter password:
You now enter your
password and, if correct, you are able to configure the LIDS system and
override any restrictions it imposes. Without a LFS, to make changes (such as
initially setting the password) you need to reboot with LIDS off. Add “security=0” to the boot command line.
AppArmor
AppArmor was developed by Novell
allows the system administrator to associate with each program a security
profile which restricts the capabilities of that program. It thus provides
mandatory access control (MAC).
In addition to manually specifying
profiles, AppArmor includes a learning mode, in which violations of the profile
are logged, but not prevented. This log can then be turned into a profile,
based on the program's typical behavior.
AppArmor is implemented using the
Linux Security Modules kernel interface, the same as SELinux or LIDS.
AppArmor was created in part as an
alternative to SELinux, which critics claim is difficult for administrators to
set up and maintain. Unlike SELinux which is based on applying labels to
files, AppArmor works with file paths. This is less complex to use than SELinux.
SELinux requires a filesystem that supports extended attributes, and thus
cannot provide access control (currently) for files mounted via NFS. AppArmor
is file-system agnostic.
One important difference is that SELinux
identifies file system objects by inode number instead of path. This means
that, for example, a file that is inaccessible may become accessible under
AppArmor when a hard link is created to it, while SELinux would deny access
through the newly created hard link. On the other hand, data that is
inaccessible may become accessible under SELinux when applications update the
file by replacing it with a new version (a frequently used technique), while
AppArmor would continue to deny access to the data. (In both cases, a default
policy of “no access” avoids the problem.)
GRsecurity
From www.GRsecurity.net, this is a set
of Linux kernel patches designed to enhance security in several areas. Some of
these include: RBAC for Linux, chroot hardening,
/tmp (and other publicly
writable directories) hardened to prevent a race condition, auditing,
non-executable stack and heap memory, kernel lockdown, prevent null pointer
dereferencing, randomizing locations of data (prevents many types of attacks), /proc and related restrictions so
users can only see their own processes, and many others.
These were designed for the 2.4
Linux kernel but have been ported to the 2.6 kernel.
Lecture 20 — Service Containment and Vulnerable/Untrusted Code
Containment: chroot, FreeBSD jails, Solaris zones, Virtualization (V12N), &
Clouds
Capsicum
The Capsicum kernel
support (if present) is an extension of fine-grained privileges
(capabilities). The idea is not only to limit the privileges of potentially
unsafe code, but to run such code in a restricted sandbox as well. A
program such as login no longer
needs access to /etc/shadow;
only the small, password checking code does. In this case, the login program is split into two parts
which run as separate processes. Only the password checking code needs the
extra privilege to read /etc/shadow,
and that code needs no other access at all. The two processes communicative
through sockets or another IPC means. Capsicum works by having the privileges
appear as file descriptors to the sandboxed process, passed in from the parent.
Capsicum helps but is
not required to use the general technique; look in /usr/libexec for a bunch of SetUID executables that are
just the privileged parts of other utilities, such as passwd. (Modern systems
may not require SetUID, but use setcap(8)
instead.)
This type of
privilege bracketing and containment requires extra development effort and the
overhead of multiple processes (and their IPC). Generally, the other, simpler
containment mechanisms discussed next are used.
BSD
Security Level
BSD also defines a securitylevel
command, which can be used to freeze the system: no loadable modules will
load/unload, no disk partitions can be mounted. This level is enforced in the
kernel, not even root can override once set!
Linux 2.6 includes
this feature, as a loadable kernel module seclvl.
See seclvl.txt file in the
kernel documentation for details. (LIDS supports it too.)
chroot
Ordinarily, filenames
are looked up starting at the root of the directory structure, i.e., “/”. “chroot” changes the root to some other specified directory
(which must exist), for all filesystem system calls (a.k.a. syscalls
or APIs). The commands run this way cannot access any filename outside of this
directory. Symlinks won’t work but hard links will, so it is best if the
chroot jail is on its own partition.
This works best for a
statically linked server/daemon. You put the server and only its
data and configuration files someplace, and run it as chroot. Even if some hacker breaks into this program,
they cannot access any files outside of this directory. Not even root can
break-out (in theory; several exploits are known and still possible with some
systems). (Danger: what if chroot directory contains /dev/mem or kmem
or hda? Some mount options can
help.)
Not all server
programs support chroot (check the man page and see if there is any command
line option to enable that). Some that do support chroot run the chroot sys
call as soon as they start, others wait until completely setup before running
the chroot call. The first type requires a complete environment setup within
the chroot jail; the second type can refer to DLLs and config files from their
normal locations.
To set up the first
type of server (say “foo”) if it
uses DLLs, run “ldd foo”
to see what shared objects it needs. Then in addition to copying the
application, also copy the listed files to the required positions (.../lib)
under your intended new root directory. If the executable requires any other
files (e.g., data, state, device files), copy them into place too. To find
those, use:
strace -e trace=file foo
So typically a server
will have this directory structure: .../top/{bin,lib,etc,dev}.
Note! Running ldd or strace
on some cmd may cause cmd
to run, in order to see what DLLs it loads or what files it opens. So, don’t
run these as root, or on an untrusted command.
To write to syslog, a socket (.../dev/log) must be created within the
directory structure that the program can access. syslogd must be started with the -a socket
option.) (Demo CWS: /var/named/chroot, /var/ftp.)
Some commands need /proc to run. You can make life
easier by using bind mounts for /proc
and /dev:
mount -o bind /proc $CHROOT/proc # same
for /dev if desired
Note that a trusted
but vulnerable program can be started as root, set itself up, cd to /var/.../top, then execute chroot. Thus the executable itself
and initial configuration files can go in their normal locations, /sbin and /etc. Some daemons work this way but not all; several
FTP servers that (if they support chroot at all) run chroot as soon as they start, and thus need more effort
to setup the chroot jail.
There is a chroot(1) command too, so you can
create a chroot jail even for programs that don’t support it. Project:
setup chroot jail in ~/jail that
allows dash, vim, and ls. Install the glibc-static
package (with yum), then compilea
static version of hello.c:
$ gcc -static -o hello-static hello.c
Put the static binary
(varify with ldd) into ~/jail. Then run:
~ $ chroot ~/jail /hello-static
(You may need to be
root, depending on your OS.)
Now try it with a
dynamic binary. You get a very unhelpful failure message. Use commands like
the fillowing to locate and copy the required DLLs:
~/jail $ mkdir bin lib etc usr
~/jail $ cp /usr/bin/cal bin/
~/jail $ ldd bin/cal
linux-gate.so.1 => (0xb7773000)
libtinfo.so.5 => /lib/libtinfo.so.5 (0x41072000)
libncursesw.so.5 => /lib/libncursesw.so.5 (0x4f031000)
libc.so.6 => /lib/libc.so.6 (0x4ed1d000)
libdl.so.2 => /lib/libdl.so.2 (0x4eed0000)
/lib/ld-linux.so.2 (0x4ecf8000)
~/jail $ ldd bin/cal | tr -s ' ' |cut -d'
' -f 1 \
|xargs locate |xargs -I'{}' cp '{}' lib/
To
find all files, use strace
instead of ldd:
~/jail $ strace -e 'trace=file' env -i /usr/bin/cal
\
2>&1 >/dev/null |grep -v ENOENT |cut -d\" -f2 |sort -u
+++ exited with 0 +++
/etc/ld.so.cache
/etc/localtime
/etc/terminfo
/lib/libc.so.6
/lib/libdl.so.2
/lib/libncursesw.so.5
/lib/libtinfo.so.5
/usr/bin/cal
/usr/lib/locale/locale-archive
/usr/share/locale/locale.alias
/usr/share/terminfo
/usr/share/terminfo/x/xterm
The
env -i command ignores the environment, minimizing what cal will try to open. The grep discards files not found (and
thus, weren’t needed). You can use a xargs
command similar to the one shown with ldd
(but more complex) to automate this, or just copy each file manually. Note,
not all the files found are necessarily required.
FreeBSD
jails
FreeBSD jails take this idea further. The
jail system call reuses chroot, and also separates out all
processes (not just the one that started with chroot)
to be restricted to the jail, adds networking system calls to the jail (so processes can only access
pre-selected addresses and ports), removes super-user privilege to any access
outside the jail (say by using a
hard link, or some copy of a device file). Combined with resource control (rctl, similar to ulimit), jails provide a high degree
of isolation.
Linux kernel 2.6.27+
supports a similar facility netns (network
namespaces), that allows each process group to have its own (virtual)
network stack. Indeed, there is a PAM namespace module to give a private view
of the filesystem.
Solaris
zones
Solaris 10 zones
build on the jail concept and
add even more security and control. Zones are useful to run a number of
applications on a single server. The cost and complexity of managing numerous
machines make it advantageous to consolidate several applications on a single
larger, more scalable server, at the same time providing a lot of security.
A zone provides an application execution
environment in which processes are isolated from the rest of the system.
This isolation prevents processes that are running in one zone from monitoring or affecting
processes that are running in other zones,
even if root.
Each zone that requires network
connectivity has one or more dedicated IP addresses. Each zone has its own set
of users, names service (resolver) setup, hostname, ... Processes that are
assigned to different zones are
only able to communicate through network APIs. Zones provide virtual instances
of Solaris, one per application if desired.
For efficiency, zones
are managed by a single OS (kernel) instance. Zones allow application components
to be isolated from one another even though the zones share a single instance
of the Solaris OS.
Solaris also supports
branded zones (BrandZ) which is a zone with a separate OS. This
other OS need not be Solaris! For example, installing the “lx” Linux branded zone would allow you
to run (RHEL) Linux binaries unchanged on a Solaris server. See virtualization
below for more information.
Every Solaris
system contains a global zone. The global zone is both the default zone
for the system and also the zone used for system-wide administrative control.
All other zones are called local zones. For example, managing zones,
auditing with the Basic Security Module or BSM is done from the global zone.
So is extended process accounting, and Solaris’ filesystem integrity monitor (Basic
Auditing and Reporting Tool, or BART). You deploy services from local
zones, one per service.
The following shows
one way to configure a local zone with access to the CD-ROM. The method is to
loopback mount the /cdrom
directory from the global zone to the non-global zone:
# zonecfg -z myzone
add fs
set dir=/cdrom
set special=/cdrom
set type=lofs
set options=[nodevices]
end
#
Solaris
Containers
A Solaris
Container is a complete runtime environment for applications. Using
Solaris Resource Manager (to impose resource limits) on a zone forms a container.
(However, it is common to use the terms zone and container interchangeably.) Containers
provide lightweight virtualization that let you isolate processes and resources
without the need of full virtualization and all the associated complexities and
performance loss.
Unlike jails (which can be considered a type
of zone/container), processes in containers
cannot hog the CPU or RAM of the system. They only use what has been allocated
to the container. (Resource management
is optional and need not be used on some zones.) Resource management features
permit you to allocate the quantity of resources that a workload receives.
Linux includes a
feature inspired by Solaris containers called cgroups. Control Groups
provide a way to group tasks (processes) and all their future children into
groups with specialized behavior, such as resource limits or assigning some
CPUs to some cgroups. (See also LXC below.)
Each non-global zone has
a security boundary around it. The security boundary is maintained by:
· adopting
Solaris 10 Process Rights Management (privileges(5)),
· name
spaces (for example, /proc, /dev) isolation, and
·
allowing zones to only communicate between themselves using networking
APIs such as sockets
Most software doesn’t
require root privileges and can run unchanged in a zone. Some software that
does require root privileges will run unaltered, but some software needs to be
examined to see if it will run in a zone. Automated searching through the
source code will catch issues, but testing with tools such as privilege
debugging, apptrace(1), truss(1), and dtrace(1M) may be needed.
Process rights
management enables processes to be restricted at the command, user,
role, or system level. The Solaris OS implements process rights management
through privileges.
Privileges decrease the security risk that is associated with one user or one
process having full super-user capabilities on a system. The command ppriv -lv prints a description of every privilege to standard
out. (See page 189 for details on PRM.) Rights can be
granted to containers as well.
When the system creates
a non-global zone, an init
process is created for it and that process is the root process of the zone. In
general, all processes in a non-global zone are descendants of this init process. The inheritable
privilege set of init determines
the effective privilege set of processes in that zone. Note that a process is
constrained by the set of privileges assigned to it when it was created, so by
limiting the rights of init you
limit the rights of any process created in that zone later. Not even root can
enable additional privileges in the zone. In addition, standard system
directories are mounted read-only (/lib,
/platform, /usr, and /sbin), and the kernel is locked such that modules can’t
be loaded or unloaded. Not even root can alter this.
The administrator can
enable system-wide privilege debugging by setting the system variable priv__debug = 1 in the global zone’s /etc/system file.
global# zlogin localzone
localzone# ls -l /tmp
total 8
drwxr-xr-x 2 root root 69 Apr 19 22:11 testdir
localzone# ppriv -D -e unlink /tmp/testdir
unlink[1245]: missing privilege "sys_linkdir"
(euid = 0, syscall = 10)
needed at tmp_remove+0x6e
unlink: Not owner
localzone# ppriv -D -e rmdir /tmp/testdir
localzone# ls -l /tmp
total 0
Some of the newer
Linux package managers actually install containers (“containerized
applications”), such as Snappy
and Flatpak.
(Flatpak can also install non-container software bundles.)
Docker Containers
Besides FreeBSD jails
and Solaris containers, other container systems are available. For Linux, you
can install LXC (Linux containers). See LXC at
IBM DeveloperWorks for Linux for more information. While other
container technologies exist, undoubtedly Docker is the most popular one today
(2017).
Docker
is a tool for building and deploying applications by packaging them into
containers. A container can hold pretty much any software component along with
all its dependencies (executables, libraries, configuration files etc.), and
execute it in a guaranteed and repeatable runtime environment. This makes it
very easy to build your app once and deploy it anywhere: on your laptop for
testing, then on different servers for live deployment etc. These containers
can be run from Linux systems, or from other OSes by using a small (25 MiB)
wrapper for the container (essentially, a Linux VM). Currently (2017), Docker
is popular technology.
A Docker Image
is an archive file (“filesystem bundle”) containing all the filesystem objects
and meta-data needed to run a container. There is a public repository of
ready-to-use Docker images, and you can also create and use private
repositories.
Docker images are
built from simple recipe files called dockerfiles. The command docker has many sub-commands, all
that is needed to create, download, start/stop, and manage image files and
containers. Usually, the connection of the container to the outside world is
handed by a number of daemons.
Docker itself does
not provide any isolation. Rather, it uses native Linux isolation features
including the kernel’s firewall code, seccomp (to limit what system calls can
be made from within the container), cgroups, namespaces, and ulimit. All these
low-level technologies can be managed via command line tools, but the
complexity dissuades many from trying; those who do try often get something
wrong in the configuration. Experts at Docker have done all that work for you,
with sensible and secure defaults that can be over-ridden on the command line.
Docker provides a
similar level of isolation to that of FreeBSD jails and Solaris containers, but
due to being provided by cgroups and namespaces, Linux containers can do more
than isolate application processes. (For example, Linux allows you to share
namespaces between containers, so you can run Wireshark or strace in one
container to see what’s happening in another.)
Managing multiple
containers (a container cluster, or farm) requires orchestration
software to deploy, load-balance, and manage containers in a
cluster. For example, a web server container may depend on a MariaDB
container, and others. If a container dies, another should probably be
started, and the monitoring system updated. If load increases, additional
(identical) containers may be started and load-balanced. Balancing the load on
the physical servers requires the ability to move containers from one physical
server to another.
This means clients
wanting to contact a container-provided service must have some way to find it
on your network; they need to determine the IP address and port number of the
service. This task is known as service discovery. This task is
harder than it may sound. Some popular FOSS software that supports service
discovery includes Apache Zookeeper, Doozer, Consul, Etcd, and Kubernetes (uses
Etcd).
Some examples of orchestration
software include Kubernetes
(developed by Google) and fleet (part of CoreOS, a
minimal distro designed just to run containers). (Docker had developed Swarm
for this, but now supports Kubernetes.)
Docker has proven so
popular that other OSes want “in” (Mac and Windows). A consortium was formed,
the Open
Container Initiative (OCI). Docker has donated much of its technology
to the OCI. The future may include Windows and Mac native OCI images that run
native binaries, thus avoiding Linux-only containers and requiring a Linux VM
be running.
Virtual
Machines and Emulators
It is known that
single purpose systems can be made more secure than multiple purpose ones. In
the past, this has meant running each service on separate, dedicated-purpose
hosts. This was a very reasonable choice since server hardware was not capable
of running many services well, and separate hardware was needed for performance
reasons anyway.
Today, the economics
have shifted again (as it always does eventually), and individual hosts are
very capable of running several services at once. However, this raises
questions of security. A vulnerability in any one service could lead to a
compromise in all the other services running on that same host. The normal
isolation provided to separate processes running under a single kernel, isn’t
enough to prevent many types of attacks (e.g., process A reading a file
modified by process B).
Virtualization
(a.k.a. para-virtualization, a.k.a. V12N) is a technique that can
be used to isolate services (a set of processes) running on the same hardware
from each other. Each service runs in a separate instance of the operating
system, or is otherwise isolated from other services. This provides the same
level of protection as provided by separate hosts, each running just one service.
Each OS “sees” different disks and hardware, and can’t affect one another
anymore than they could when running on different hosts.
All computers support
virtualization to some level, for example virtual memory has been in use for
20+ years. Mounting an “image” file makes it appear as a disk. Virtual NICs
are common too. Until recently, only a few of a host’s resources were
virtualized; today virtualization generally implies everything is
virtualized, providing a virtual host commonly called a virtual machine
(or VM).
Virtualization is a
popular solution for “big iron” (i.e., larger computers and mainframes),
development work, testing, and for clusters, grids, and clouds. Virtualization
is also a general technique with many uses (e.g., virtual memory). Sometimes
it is used to permit running applications designed for a different OS or even
different hardware (e.g., wine). Application level virtualization
is also common, including Microsoft’s CLI and Sun’s JVM.
Besides enhanced security
(via increased isolation) and development support, virtualization can be used
for other interesting purposes:
·
Students can practice networking by connections several
virtual hosts in one or more virtual networks. Such setups can be used to
practice security as well; at worst, you end up corrupting a virtual hard
disk. You may not even need a backup copy of it, as some technologies permit
read-only virtual machines (with any virtual disk changes saved in a separate
file). When you reboot the guest OS, you are back to the vanilla system! The
educational uses are endless.
·
Another use is versioning. You can often clone a
“guest” or virtual OS easily from a parent. Then you upgrade one with
new database, or version two of your website, or whatever. Repeat for each
major update to some service. Then all old versions are available, and customers
can migrate slowly from the old to the new.
·
Related to versioning is upgrading/patching with zero down
time. If the kernel is updated or certain other parts of the system (such as
the glibc DLL, SELinux policy, or modules on a sealed kernel), a reboot
is generally needed. Worse, upgrading DLLs can cause running processes to
become unstable. It is therefore often best to upgrade on an off-line system, and
then reboot it; but this can result in long down times. But using virtualization,
you can easily clone a system, update the clone off-line, and reboot the
clone. You can migrate clients with a flash-cut, or gradually via a load
balancer to the new VM, and take the old one off-line when no sessions remain connected
to it (a rolling update or restart).
Rolling
restarts can be much faster. You can create a new cluster of VMs with
the new services, and then allow new clients to connect to the new VMs while
preventing new connections to any old VMs. Once there are no remaining
connections to the old VMs, just delete them. (Normally, a rolling restart
does one server at a time, leading to temporary inconsistencies.)
·
Customer support is easier when you can use virtualization
to mimic a customer’s environment, reproducing problems and testing solutions.
·
Testing is much cheaper (and easier) with virtualization.
(Now you have no excuse for not testing patches!)
·
Software configuration is made simpler, since the actual
hardware used doesn’t matter. You only need a single configuration for the
virtual machine.
·
Demonstration software is reliable when run on a virtual
machine, and easier to run without embarrassment at remote locations.
·
If your application servers run on virtual hosts you can easily
rent cloud computing resources to temporarily expand your capacity (when
you launch a new marketing campaign, for example).
Virtualization
software is generally designed for a specific CPU architecture. The i386
family of CPUs was not designed for this purpose; many x86 emulators have
difficulty with at least some OSs and/or applications. However, today’s
(post-2006) CPUs do provide features to support virtualization, increasing both
performance and security.
Intel calls their
virtualization technology VT (or Vanderpool) and CPUs with this
enabled show the flag vmx.
AMD calls theirs Pacifica and CPUs with this enabled show the flag svm (secure virtual machine).
To see if your CPU has virtualization support, run this:
grep -E '^flags.*(vmx|svm)' /proc/cpuinfo
A Mac doesn’t include
the procfs system, but you can get the same information with the commands “sysctl machdep.cpu.features”,
“sysctl machdep.cpu.brand_string”, and “sysctl machdep.cpu.brand_string”.
Other CPU extensions
for virtual machine security and performance are now (2011) becoming common.
Intel’s VT needs
activation in the BIOS before applications can make use of it. Most systems
disable this by default but make an option available to activate it.
Virtualization
Techniques
Each VM supports some
virtual devices, some (i.e., client versions) support more devices than others
(i.e., server versions). However, all VMs support one or more virtual disks,
stored as image files on the host OS. These virtual disks can be either fixed
or dynamic. A dynamic virtual disk starts off using no space and
grows as files are added. A fixed disk is created at its full size. Fixed
disks are faster but use larger files.
All virtualization
software allows for the saving of the VM state to a file or files on the host
OS. This is similar to hibernation. The VM can later be restored from
the saved state. VMware has two options for this. With non-persistent
disks, any changes made are valid for the current session only; the next
time the VM is restarted, it reverts to that saved state. The other option is
called snapshots, where you can save the current state during some
session, and if desired you can later revert to that snapshot.
Snapshots can be fast
to make but slow to delete, since it is common to implement this by saving new
blocks to the snapshot file, not the old ones. So to delete a snapshot, you
must merge the changes.
Other products use
different techniques. Xen allows for read-only disks, in which all
changes are saved in a separate file. You can delete that file to revert the
state.
Containers are not
the same as virtual machines. With a container, all the processes run on one
host. A container is more like an SQL “view”: it gives a custom and private
view of the system to the processes in the container. This makes containers
very lightweight (compared to VMs), and make it easy to ship an application as
one, or perhaps a group of, containers.
This idea appeals to
many people, and it is not uncommon today to have data centers running
containers on servers, rather than virtual machines. While you can run
containers on a VM, there is little point in that.
As mentioned above a
VM can be cloned. The original is called the parent. The clones take
less space since they only need record the difference between the parent and
clone VMs. An instructor can setup a parent and have the students clone it for
assignments. (Usually the clone will have different MAC addresses for its
NICs.)
Network support
has three different modes (not counting non-networked mode).
For each mode, there is a virtual hub that the virtual NICs (vNICs) connect
to. In local (or host-only) mode each guest VM and the
host OS have vNICs connected to the “local” hub. They can communicate with
each other but not with the physical NIC and in this mode, there is no Internet
access. The SA will need to assign each vNIC an IP address in the same
network.
In bridged mode,
the virtual NICs as well as the physical NIC are connected to the “bridged”
hub. In addition, the Host OS gets a vNIC connected to this hub too, and this
becomes the default NIC for the host OS. The vNICs need IP addresses in the
same network as the physical NIC. Bridged mode VMs can directly communicate
with each other and the Internet (and any other reachable networks). Bridged
mode causes heavy LAN traffic and problems due to delays when switching between
VMs.
With shared
mode, each vNIC connects to the “shared” hub. This is exactly the same
as local mode, except a virtual router with NAT connects the shared hub to the
physical NIC. External hosts only see the host OS’s IP address, not the guest
VM IP addresses. Most V12N products include a DHCP server with the virtual
router to configure the vNICs automatically.
It is possible for
some VMs to use one mode and others to use a different mode. But since each
mode uses a separate hub, only VMs in the same mode can directly communicate.
Note some products refer to the hubs as switches or bridges.
Other features that
some products offer is NTP (sync guest OSs to host OS time), folders that can
be shared among the VMs (think “NFS” or “Samba”), enhanced UI support:
optimized video drivers, drag-and-drop between VMs, remote management console,
integrated mouse and keyboard switching between VMs, etc.
Virtualization
(“V12N”) Products
The virtualization or
emulator software that does all that is variously known as hypervisor, (virtual
machine) monitor, machine emulator, and other such terms. Hypervisors
can sit atop of an OS, or not require any OS (you boot the hypervisor on the
physical machine). A hypervisor that requires an OS is called hosted.
VirtualBox is hosted. The other type is called a bare-metal hypervisor.
VMware’s ESXi is one of these.
The virtual machines
are often referred to as guests or domains. Some technologies
require applications or OS drivers (or whole operating systems) to be made
compatible. Examples include Denali and Xen. With hardware CPU
virtualization as provided by Intel VT and AMD Pacifica technology, the ability
to run an unmodified guest OS kernel is available in many V12N products. While
no porting of the OS is required, some additional driver support may be
necessary, such as for Xen. Note that stopping the hypervisor (say by
rebooting the host OS) has the same effect as turning off the power to
each virtual machine. You need to shutdown guest OSs first!
Although Oracle VM
server uses the Xen hypervisor, it’s not the same as the one used in RHEL Xen. Oracle’s
development team compared the Xen source code between RHEL 5.2 Xen (3.1.0+
patches) and Oracle VM Server 2.1.2 (Xen 3.1.4). The diff file was 1.6MB, or
48,880 lines of code. It’s not just a set of bug fixes or patches; there are
big differences in what’s actually deployed even though both are “Xen”.
Usually you set up virtual
machine instances with virtual hardware: disks, NICs, etc. No two instances
directly share anything. Each sees its own disks, RAM, and NICs. So no matter
what sad fate befalls one service in one instance, the remaining services are unaffected.
Each virtual machine
instance can be referred to as a virtual machine appliance. Starting
in 2010, standards for such appliances have appeared, allowing one to create a
virtual machine using (say) VMware and then run it on (say) VirtualBox.
Normally your software will have an “export appliance” command someplace.
Other technologies
can run unmodified applications or guest operating systems. To simplify PC and
workstation support (with their many devices) some technologies both virtualize
some things and emulate others. VMware Client does this, requiring a
hosted or underlying OS (“host OS”) on top of which runs VMware. VMware
Server (vSphere) enables one host to appear as a pool of secure (i.e.,
isolated) virtual servers which can run several different operating systems. Unlike
the client version, VMware Server does not need a host operating system (a
bare-metal hypervisor). for hosted hypervisors, the (initially booted) host OS
used to create and manage other virtual machines is often referred to as domain
0 or the host OS.
Often the host OS
needs virtualization support built into its kernel. This is in addition to the
hypervisor software (usually runs as a daemon). Various utilities allow you to
create, start, stop, monitor, and manage the hypervisor and the virtual machine
instances.
The 2.6.29 Linux kernel
supports booting as a guest domU but will not function as a dom0. Work is
ongoing and hopes are high that support will be included in kernel 2.6.30 and
Fedora 12. (The most recent Fedora release with dom0 support is Fedora 8.)
Hypervisor-aware OSs
perform better than unmodified OSs that require hardware emulation. This is due
to the CPU context switching to ring 0 and the extra code needed by the
hypervisor to trap selective kernel mode access.
Some virtualization
technologies emulate the hardware with software (called machine emulators).
Examples include QEMU (if not “accelerated”), Virtual PC, Bochs,
and the Hercules emulator.
Others emulators only
emulate a few critical components and allow the guest OS instance
to access the rest of the hardware directly, saving and restoring the machine
state when switching between instances. Examples of this type include KQEMU
(QEMU with acceleration), KVM (the Kernel-based Virtual Machine), Win4Lin,
and VMware (both client and server versions; see also the free VMware
Player). Sun (was Innotek) VirtualBox supports everything,
including VMware DOMs.
VMware is the
standard by which all other V12N products are measured. Between VMware Player
and VirtualBox, I prefer the latter slightly. (VMware Player sometimes requires
a double reboot on Windows to update.)
Other popular V12N
products include Parallels (for Macintosh), Xen from Citrix, and Microsoft’s
Hyper-V. In 2012, MS is apparently targeting VMware the same way they
previously targeted rival web browsers: make a better product than their
commercial offerings, and make it free. VMware may be in trouble!
Other types of
virtualization are possible. OS virtualization is the name
sometimes used when a single OS manages isolation for sets of processes. Solaris
zones or containers and FreeBSD jails also fall
into this category. (There is a Linux product as well, Virtuozzo.) Sun
also supports branded zones that include ABI support for foreign OSs
(Linux and maybe Windows).
FreeBSD supports
foreign OSs with kernel modules that support other ABIs, plus some
compatibility software in /usr/compat/OS-name.
To have the kernel identify with ABI to use the (ELF) binaries must be branded,
i.e., a comment inserted into the ELF binary containing the OS name. See the brandelf command.
Sun xVM is a Sun
version of Xen for IA systems, Logical Domains or “LDoms” work the same
way, but for Sparc. These are para-virtualization since the OS knows about the
hypervisor. For hardware emulation, Sun provides VirtualBox. A lighter-weight
isolation technology is Sun’s zones/containers (there’s one OS instance only).
A branded zone is a zone with ABI support for applications imported from
other OSs.
Sun was purchased in
4/2009 by Oracle. Oracle is a big supporter of Xen, so it is uncertain what
will happen to other Sun virtualization technologies.
KVM
The Kernel-based
Virtual Machine (KVM) development began by Qumranet and assigns every virtual
machine as a regular Linux process handled by the Linux scheduler, by adding a
guest mode execution. With the virtual machine being a standard Linux process,
all standard process management tools can be used. The utilities are a modified
set of QEMU tools and VMM. Red Hat is a major support of KVM, and it has
become quite popular.
KVM is primarily
designed for the x86 architecture (though others are supported) and takes
advantage of processor virtualization extensions (Intel VT or AMD-V (Pacifica)
technology).
Red Hat was
previously closely aligned with the popular Xen virtualization solution and
made Xen a core part of Red Hat Enterprise Linux 5, which was released in
2007. Over the past few years, Red Hat’s allegiances have shifted towards KVM
for reasons that are likely both technical and political. RHEL since version
5.4 uses KVM. XenSource, the company behind Xen, was acquired by Citrix in
late 2007. The close ties between Citrix and Microsoft could potentially have
created some challenges for Red Hat. Technically Xen have been rejected by the
Linux kernel developers for inclusion in the kernel, due mainly to code quality
and design issues. (Xen would require ugly changes to most of the kernel.)
In 4/2013, Citrix
shifted control of Open Xen to the Linux Foundation, with backing from major
cloud providers (except Red Hat). Hopefully, this will provide a high-quality
open source Xen. KVM is not going away anytime soon.
KVM has been part of
the mainline Linux kernel since 2.6.20 and has become the favored
virtualization solution of the upstream kernel community and by Red Hat, who has
phased out support for Xen (in RHEL 6).
KVM with
QEMU and Libvirt
Basically, KVM
handles all the guest processes as if they were host processes, except for when
they try to access protected resources (hardware). The kernel in that case
hands the request to QEMU.
That works fine for a
single VM. To run and manage multiple VMs, you also need Libvirt, which
provides an API for applications to start and stop multiple VMs. Each VM uses
a separate QEMU process. Libvirt also has VM snapshot support. To use the
Libvirt library you need some utilities. Libvirt comes with virtsh and virt-manager, but the library can
be used (for example) by VirtualBox utilities.
Other
issues of V12N
In spite of the many
advantages to using v12n, there are some drawbacks and security issues to
consider as well. If you run 100 VMs, the independence of each means a lot of
duplicated effort: 100 virus scanners running, 100 copies of common files,
etc. This duplication can’t be avoided without sacrificing the isolation that
makes v12n desirable. One possibility would be to use network services, having
different VMs on the same host specialize and provide services for the other
VMs on the same host. Nobody’s yet figured out how to do this. Data
encryption is another problem. While resource intensive GUIs are not usually
used on a VM, encryption is used and requires a lot of CPU power. Additionally,
the entropy pools are either not shared (which requires 100s of times as much
random noise, usually generated from hardware sources), or are shared, in which
case one VM can exhaust the common entropy pool.
The VMs ultimately
use the same memory and disks from the host server. Because of over-commits of
memory, VMs can crash even when sufficient memory is present. Sizing the host
server’s swap space and adjusting the over-commit ratio (the percent of
physical memory the OS is allowed to over-commit), or turning off over-commits
completely, is critical.
If using NUMA (you
are), allocating VMs to NUMA nodes and adjusting memory allocation is important
or performance can suffer. This is because the overflow memory requests from
VMs on other NUMA nodes can fragment memory on this node. Normally this isn’t
an issue, but the kernel (and thus, processes running VMs) need large chunks of
contiguous physical memory. If memory is fragmented, no sufficiently large
blocks may be available. (Discussed under virtual memory topic, in
Admin I course.)
VMs created by
different vendors were inoperable; that is, you can’t run a VMware VM using
VirtualBox. However, a standard was created to address that, with some
success.
VMs running on the
same (physical) server are not completely isolated. The memory caches in the
CPUs and elsewhere are not flushed between running different VMs. Recently
(2009) it was reported that an attacker can be 40% successful in getting their malignant
VM to run on the same server as some target VM, and can launch an attack based
on these caches and other means. Such attacks are hard to detect; most
detection systems use external hardware and can’t see the network traffic on a
virtual switch between VMs.
Some of these
problems are being addressed by a VM design that allows the host OS (using
special software) to invisibly inspect VMs and their network traffic. Called virtual
machine introspection (VMI), this technique shows a lot of promise.
The introspection doesn’t run on the guest VM and is invisible to it. Using
VMI a virus scanner could run once on the host OS and scan all the guest VMs,
and they won’t be able to detect the scan. Adding a software agent to the
guest VMs allows a variation called “lie detection”. The agent can generate a process
list, a list of open sockets, etc., and compare that list to one generated by
VMI. Any difference would indicate a rootkit or virus. (A sort of HIDS,
running on the host OS, and (mostly) invisible to the guest OS.)
While it is a useful
ability to migrate a container from one host to another, without a reboot,
there can be problems; much of the kernel was not designed for that. For
example, consider process IDs. These must be unique per container, and also
unique per host. But if you move a container from one host to another, there
is no longer a guarantee the PIDs are unique per host. (You don’t have this
issue with VMs running on a hypervisor.)
To solve this problem
for Linux containers such as Linux VServer or OpenVZ, the Linux
kernel added support for process namespaces. Developed by OpenVZ and
IBM, this allows a process to have a unique PID per namespace (container). PID
namespaces are hierarchical; once a new PID namespace is created, all the processes
in the current PID namespace will see the processes (i.e. will be able to
address them with their PIDs) in this new namespace. However, processes from
the new namespace will not see the ones from the current (its parent namespace).
This means each process has multiple PIDs: one for each namespace. The first
process in a new namespace gets the namespace-local PID of 1 (the init process
for that namespace).
When migrating a
container to a new host, the namespace-local PIDs don’t change, so the
processes don’t notice any changes. But the global PIDs may change, to
guarantee uniqueness on the host.
Similar types of
container support is needed for memory, NICs, and other shared kernel
resources.
Cloud
Computing [From: arstechnica.com/business/news/2009/11/the-cloud-a-short-introduction.ars
on 11/10/09]
Like grid computing (clusters and grids
are discussed in the network course), a cloud is a utility that involves
a dynamically growing and shrinking collection of servers (or data storage
systems).
Instead of a few clients running
massive, multi-node jobs, the cloud services thousands or millions of clients,
typically serving multiple clients per node (physical server of the cloud).
Grids tend to be multi-institutional,
where institutions and/or individuals all contribute hardware resources that
are then shared by other contributors. A cloud however is always owned by one
institution, regardless of whether use of the cloud is open to clients outside
that institution or not (i.e., whether the cloud is public, private, or
hybrid).
Virtualization has
made cloud computing possible from such vendors as Citrix, Microsoft, Amazon,
and others. In essence, you rent virtual machines (disks too) from the cloud.
There are three
different types of virtual computing you can rent: IaaS, PaaS, and SaaS
(storage rentals not discussed here):
·
Software-as-a-Service (SaaS) means buying a subscription
to an application. Google Apps and Salesforce.com are the two most common SaaS
examples.
·
Platform-as-a-Service (PaaS) means renting a ready-built
platform (e.g., a LAMP web server) in which you upload your web application.
Examples include Google’s AppEngine and Force.com. Note you have vendor
lock-in with this, but more choices than with SaaS.
·
Infrastructure-as-a-Service (IaaS, a.k.a. Hardware-aaS) is
a bare VM instance running a user-provided VM image. This is sometimes called
a virtual private server (VPS). This is the most flexible type
of cloud but requires the most work from the customer. IaaS allows you to
expand dynamically a cluster as needed, by renting more VMs and uploading your
image to them. Examples include Amazon’s EC2 (a VM) or S3 (a virtual block
storage device).
Once you create a VPS
to your liking, nearly all IaaS providers let you replicate it. Get a spike in
traffic and you can fire up additional identical images easily. Some services
also offer tools for load balancing among such servers or round-robin DNS. (Amazon
is particularly good with this, having designed its systems to make it possible
to fire up 1,000 servers and then kill them off while only incurring charges
for the period of time during which they run.) A VPS also allows snapshots
that allow quick roll-backs of some changes.
A VPS runs on shared
hardware. Powerful multi-core host is configured to provide dedicated pools of
memory; shared, single, or multiple cores; and hard disk storage. Hosts
typically offer a selection of GNU/Linux operating systems pre-installed; some
also offer Windows Server in one or more flavors.
The storage attached
to a VPS is persistent: if your virtual machine or the host hardware on which
it runs crashes or loses power, it resumes where it left off after rebooting (except
in the case of hard-drive failures). You can back-up your virtual machine
quite easily.
IDC ran a model that
analyzed what the costs would be to run 100 percent of a large company's IT
infrastructure entirely within the cloud versus on their own data center. It
turns out that according to IDC's estimates, after the first three years of a
cloud IT operation, costs would exceed those of an optimally run datacenter,
and that includes the added three-year refresh cycles costs of 30 percent for
the datacenter. — ldn.linuxfoundation.org/blog-entry/cloud-computing-too-costly-long-term
Some interesting
cloud services include Dropbox, Box.net, and Microsoft SharePoint.
Dropbox and Box.net are popular cloud storage services that run on Linux,
Windows, Mac, iOS, and Android. The client software will automatically keep
files synchronized between multiple computers and the user’s web storage space.
Dropbox detects when files are modified on the local filesystem, and will
immediately upload the changes. The web service then propagates those changes
to all other computers on which the user is running the Dropbox software.
Box.net is similar, but is more enterprise-oriented, and provides (as of 2011)
better security and administrative controls. (Dropbox had a security breach in
6/2011, in which a faulty update caused all Dropbox accounts to be accessible
without passwords for four hours. Lesson: always test your updates before
deploying to production servers!) SharePoint works a bit differently but can
be very useful for enterprise situations.
The company behind
Ubuntu Linux, Canonical, has other products and services. One of this is Ubuntu
One, which includes file synchronization and cloud storage. When users
place files in a special folder on the desktop, the content will be uploaded
automatically to Ubuntu One and propagated to other computers that the user has
connected to the service. It works a lot like Dropbox.
A shared alternative
starting to emerge, best exemplified by Rackspace Cloud Sites.
It’s more expensive than shared hosting and you don’t get root access. But
your files and scripts are spread across a cluster of machines with automatic
scaling. The base price approximates a single dedicated computer. It’s a
combination of virtualization and shared hosting that would work for
higher-volume websites that require no back-end server tweaking. A site that
averages 50,000 page views most days but periodically spikes up to a million
might be an ideal candidate. (Another alternative is CDNs (content
distribution networks) for delivering static pages, components, images, and
other media for a per-GB fee.)
Cloud computing includes many risks.
Beside the security risks of hosting your sensitive data on someone else’s
computer, the cloud is not as reliable. The Cloud Security
Alliance top threats list is compiled by analyzing reported
incidents. Another study (IEEE
Spectrum 12/2012) analyzed news reports from 2008 to 2012, finding
172 unique incidents. Although not all of these have a known cause (vendors
can be sketchy with that data), some of the major threats include:
·
Insecure interfaces and APIs
·
Data loss
·
Data leakage
·
Hardware failure
·
Natural disaster (e.g., hurricane Sandy)
·
Vendor canceling service
·
Poor infrastructure planning (by cloud service vendor)
·
Cloud-related malware
·
Account or service hijacking
·
Traffic hijacking
·
dDoS (distributed denial of service)
·
Malicious insiders
·
Shared technology vulnerability exploits
Modern Commercial Cloud Platforms [Peter Bright, posted on Ars
Technica 6/15/10 and Matthew Braga, posted on Ars
Technica 3/25/12]
Amazon’s
EC2
At one end of the
spectrum is Amazon’s Elastic Compute Cloud product (EC2). EC2 gives
users a range of operating system images that they can install into their
virtual machine and then configure any which way they choose. Customers can
even create and upload their own images. Software can be written in any
environment that can run on the system image. Those images can be administered
and configured using SSH, remote desktop, or whatever other mechanism is
preferred. Want to install software onto the virtual machine? Just run the
installer.
Each physical server in
EC2 can run multiple instances (VMs) at a time, in either Linux or Windows
configurations, and you can use hundreds or thousands of VMs at a time,
connected in various ways (such as a giant cluster). Each VM can be
provisioned in different sizes; Micro instances only come with 613 MB of
RAM, while Extra Large instances can go up to 15GB. There are also
other configurations for various CPU or GPU processing needs. None of these
comes with much persistent (disk) storage; you rent that storage separately.
EC2 instances can be
deployed across availability zones, i.e., the geographic
locations of Amazon’s data centers. Multiple VMs can be deployed within the
same availability zone or across more than one, if increased redundancy and
reduced latency is desired. Using multiple zones allows simple load
balancing. (NetFlix uses this.) Amazon’s Elastic Load Balance
allows developers to set rules that allow traffic to be distributed between multiple
VMs. That way, no one instance is needlessly burdened while others idle. In
addition, more instances can be added automatically as required (determined by
the rules you set). This makes your cloud cluster automatically scale up and
down as needed.
You can create a
custom Amazon Machine Image (“AMI”), as the company terms it, which lets
you take a standard distribution, modify it, and then write it as a loadable
image for any number of instances. This is useful for companies that want to
launch many instances of specific kinds of configurations.
Amazon also lets you
fire up instances on-demand for an hour, a week, a month, or whatever. Because
the VPS providers allocate specific persistent storage on a given machine, you
have to delete an instance when it’s not in use, although you can typically
restore it from a stored image that you pay storage fees to maintain.
To get around the
lack of persistent storage, you can launch an instance with a command so that
it can carry out tasks at boot. Those who rely on EC2 often use such a script
to copy files over from the persistent, but non-mountable S3 service. Other
options include mounting persistent volumes from the Amazon Elastic Block Store (EBS),
or connecting to a persistent MySQL setup at Amazon Relational Database Service
(RDS).
Other Cloud Providers
At the opposite end
of the spectrum is Google’s App Engine. App Engine software runs in a
sandbox, providing only limited access to the underlying operating system.
Applications are restricted to being written either in Java (or at least,
languages targeting the JVM) or Python 2.5. The sandbox prevents basic
operations like writing to disk or opening network sockets.
In the middle ground
is Microsoft’s Windows Azure. In Azure, there’s no direct access to the
operating system or the software running on top of it—it’s some kind of Windows
variant, optimized for scalability, running some kind of IIS-like Web server
with a .NET runtime—but with far fewer restrictions on application development
than in Google’s environment. Though .NET is, unsurprisingly, the preferred
development platform, applications can be written using PHP, Java, or native
code if preferred. The only restriction is that software must be deployable
without installation—it has to support simply being copied to a directory and
run from there.
There are others, of
course. Some
of the best ones currently include Nirvanix, Rackspace, AT&T
Synaptic, and Peer1 Hosting. Both AT&T and Peer1 use EMC’s Atmos platform
on the back end, although EMC itself discontinued its own public cloud based on
Atmos.
A popular (2015)
platform for building your own cloud is OpenStack. Originally developed by
NASA and RackSpace, it can scale up to hundreds of thousands of VMs.
Cloud-Based Storage
The storage systems
are similarly varied. Amazon has four storage systems. There’s the widely
used Simple Storage Service (S3), which offers simple storage of
name-value pairs, where the value can be a BLOB (Binary Large OBject) up to 5
GB in size. S3 is commonly used to store customer data. Your Twitter profile
picture is stored in S3. It can be used for anything, including static web
content, music, videos, etc. Like EC2 instance, the S3 storage can be scaled
automatically as needed.
There’s Elastic
Block Store (EBS), which offers virtual block devices that can be formatted
as if they were hard disks, and used to store regular files. You can boot from
an EBS and keep your applications there. An EBS volume can only be attached to
one EC2 instance at a time, but multiple volumes can be attached to the same
instance. An EBS volume can range from 1GiB to 1TiB in size, but must be
located in the same availability zone as the VM to which it is attached.
There are two other
storage solutions you can use from Amazon: Amazon’s Relational Database
Service (RDS) provides a MySQL database. Finally, there’s SimpleDB,
a non-relational database. (Actually there are many more; See Amazon’s Web Services
website for details.)
SimpleDB stores data
in a non-relational table form. Like a conventional relational database, these
tables allow the storage of entries (customers, orders, addresses, etc.) with
each entry made up of a number of attributes (so, a customer might have a name,
an address, and a telephone number). Unlike a typical database, new attributes
can be added without having to update the existing entries in a table. There
are no relationships between tables, nor do they support that mainstay of
relational database programming, the join.
If applications want to access data from one table that corresponds to entries
in another table, they will have to do the lookup manually.
The reason for these
reduced features is that by relaxing all the constraints that relational
databases impose, the cloud provider has greater flexibility in query
optimization and data storage. Though the limited features seem awfully Spartan
to someone with a relational database background, they are nonetheless rich
enough for many applications.
Google’s main storage
offering is its datastore, which is broadly equivalent to SimpleDB.
Google also has a service called blobstore, offering similar services to
S3. The company's standard App Engine offering has no SQL database features at
all, though a relational database is available for customers of the App Engine
for Business platform, which is currently being previewed.
Microsoft’s range of
storage offerings is equivalent to Amazon’s. Azure Storage includes
both arbitrary binary storage, like S3, and table-based storage, like
SimpleDB. It provides special support for storing VHD disk images, which can
then be mounted as drives, akin to Elastic Block Store. Finally, Microsoft has
a version of SQL Server called SQL Azure that offers almost all the
features of SQL Server to cloud applications.
Amazon and Microsoft
both offer a queuing service, in addition to the conventional storage options.
Queue services allow messages to be passed between applications
in a reliable, asynchronous way. Producer applications put new messages into
the queue, and consumer applications then read them off the queue at their
leisure.
Amazon supports AWS control
from Windows PowerShell (and of course from *nix shell).
Choosing a Cloud IaaS (VPS) Provider:
[from: arstechnica.com/business/news/2011/02/virtual-private-servers.ars/2
by Glenn Fleishman]
(The article this
information is excerpted from (see link) includes an appendix which compares
services and prices from several providers, including Amazon, Linode, Rackspace,
and others, as of 2/2011.)
Every service has its
differences. The basic idea is that you’re purchasing a slice of a host
computer, packaged as a virtual computer. Prices vary by amount of memory, disk
space, and especially bandwidth. Most are priced as multiples of 256 MB of
memory, even though servers may start with a minimum of 512 MB or 1 GB. Hard
disk storage is typically priced as 10 GB disk storage.
Most providers let
you start with one service level, such as a 1GB server, and then migrate to a
higher level (or lower level) with as little as minutes of downtime, or even a
simple reboot.
A server coping with
hundreds of thousands of requests a day (tens of thousands of page views)
running Apache or MySQL likely needs at least 2 GB; 4 GB is necessary for having
both on the same system.
One or two public IP
addresses are included, while private addresses are usually free. Extra public
IP addresses tend to cost $1 per month for each one. Most hosts only allow two
to four extra public IPs. These used to be required to run separate SSL/TLS
Web servers, but that’s no longer the case.
The biggest variable
in service and cost is bandwidth and throughput. Each hosting firm has its own
unique combination of services offered, pricing charged, and promises made. For
simplicity’s sake, many hosts include a certain amount of bandwidth with each server
and charge only when you exceed the included bandwidth. The bandwidth is
generally proportionate to the server’s memory and other resources. Traffic
among private IPs is free at every host Fleishman checked.
Separate from data
transfer is throughput, or the number of megabits per second that each server
is permitted or guaranteed to the Internet. Hosting firms do not go out of
their way to advertise or explain this. In assembling this article, Fleishman
says he spent far more time nailing down this fact than any other in the table.
Generally, host firms offer some tens of Mbps symmetrically per VPS to the
Internet.
Some successful
companies run entirely “in the cloud”, that is, without any servers they
manage. Eventbrite
(lets you announce, manage, and even sell tickets for your events) has 200
employees and no servers. They use a website hosted on Amazon EC2, Google Apps
for e-mail, calendaring and document creation, Salesforce.com to manage sales
and customer relations, DocuSign for electronic signatures, and Box.net to share
documents.
Using Your Own Private Cloud
If your organization
has more than just a few servers, it probably has one or more data centers. In
the past, these data centers ran one server per hardware computer, such as a
rack-mounted server or a blade server. Today, you can use similar technology
to what the large cloud vendor’s use. Running a private cloud has many
advantages, such as very fast provisioning (“I need a new server...” “done!”),
server migration (allowing one VM to move without reboots to a different
physical computer), and superior monitoring and management solutions.
Moving servers while
booted is useful, not just to balance the load so all hardware servers are
equally busy, but also to even out power consumption or heat production.
There are a number of
open source cloud platforms that can be used for IaaS. Currently (2013), there
is no one best choice; each supports different hypervisors (thus the types of
VMs supported) and APIs (thus, different monitoring and management solutions).
Many vendors support more than one of these. The four are (source: Admin
Magazine, Aug/Sep 2013 issue, “Cloud Quartet” by Thomas Drilling):
·
OpenStack
was championed by RackSpace and NASA, and is supported by Citrix, Canonical
SuSE, Dell, HP, AMD, Intel, IBM, and Red Hat. Written in Python, it can
support Xen and KVM hypervisors. (Support for Microsoft’s Hyper-V was removed
at one point.) It uses a “Restful” API, which is a good thing. However, it
doesn’t interface with AWS out of the box, you need 3rd party tools for that.
·
Eucalyptus is
the oldest (I think) OSS cloud platform. A result of research and UC, it is
supported by Amazon, Dell, HP, Intel, Red Hat, and Canonical. Although
Eucalyptus has a reputation as difficult to install, and development seems to
have stalled since 2011, it will work with AWS and EC2 S3. This means admins
can set up a private test system, then easily migrate to AWS to deploy.
·
OpenNebula
is as old as Eucalyptus and designed to support open standards. It is supported
by IBM, Dell, and SAP. It supports Xen, KVM, VMware, and reportedly, Hyper-V
is coming soon. OpenNebula can support multiple cloud APIs, including those
from Amazon and VMware.
·
CloudStack
may be the most popular platform now. An Apache project, written in Java,
it is similar to OpenStack but does work with Amazon APIs, and provides more
than just one API. It supports Xen, VMware, KVM, and other hypervisors.
Vagrant
isn’t a cloud management system as the other mentioned above, but it’s related
to them. Vagrant launches VMs to run apps/services for the purpose of development.
This can be on VirtualBox (the default), VMware, or other local hypervisors. It
can be remote (cloud) hypervisors like AWS or OpenStack. Essentially, Vagrant
manages virtual machines and is popular among modern software developers.
To use, create a
single config file vagrantfile for
a project to describe the type of machine you want, the software that needs to
be installed, and the way you want to access the virtual machine. Store this
file with your project’s code in a repo, so historical versions are always
available. Run a single command, “vagrant
up”, and Vagrant puts together
your complete environment, downloading components such as OS images or software
packages, and then starting the VM and connecting you to it. Using Vagrant,
all members of a development team can easily have identical environments,
essential when patching old code (you want the identical environment including
compilers and libraries). The command line interface is easy to use (and
script).
Lecture 21
— Trouble-shooting Security Problems on a Host
The two basic security problems you
might encounter are (1) something doesn’t work when you think it should, and
(2) something works when it shouldn’t. Solving either is more of an art than a
science. Here we discuss troubleshooting utilities and applications on a host;
a discussion of network security will be deferred for now.
Something Works When It Shouldn’t
This is often caused by incorrectly
attempting to allow something else. When done incorrectly an SA may end up
granting too much privilege. A check of your system journal should show any
recent changes to your security subsystems; those are the ones to check out
first. This is also sometimes caused by the package system, when updating the
system and blindly applying the changes to configuration files. Another cause
is an incorrect umask value when
installing or updating the system. Finally, some (other) SA might have
disabled some security subsystem. (It is common to turn off SELinux if it is
deemed to be causing problems.)
A service should be restricted
using the appropriate subsystem. However, it doesn’t hurt security to restrict
something in several places (multi-layer security), including PAM,
permissions, service/application specific configuration files, etc. To restrict
access to devices, update the udev rules.
When Something Fails to Work When
It Should
It might be an older or
incompatible version. This might be likely if the item was working but no
longer is. Here you can check the system journal to find what changed.
It might be incorrect configuration.
These are likely when something has never worked or newly updated. Here the SA
should check the config files (often they contain helpful comments) or the
package documentation.
Otherwise you should suspect one of
the system’s many security systems is blocking access:
·
file or directory permissions (including ACLs file
attributes/flags, udev rules)
·
SELinux
·
mount restrictions
·
PAM (which can update permissions for console users)
·
TCP Wrappers (including xinetd
configuration)
·
firewall
·
Service configuration file(s)
·
Kernel configuration
Where to start depends on
the item that isn’t working and the error message you get. If it is an
application or sub-system, start with permissions and SELinux. If it is a
service, start with PAM, TCP Wrappers, and the firewall. In either case,
first examine the log files. This will often pinpoint the problem
right away (especially the SELinux audit logs).
Once you guess which security
system to try first, test it by removing all restrictions in that one
sub-system (i.e., turn it off). How you do this depends on the subsystem: with
the firewall you can turn it off completely, with PAM or TCP Wrappers you can
substitute files that allow access for the real ones.
With permissions, examine the
permissions of all parent directories, binaries, DLLs, and configuration files.
Check attributes as well. See if the service works if you try it as root; that
is a strong hint the problem is with permissions.
Always test one subsystem at a
time. If you “rush” and try several at once, you won’t know which subsystem
was responsible for the problem. Or you might forget all the things you tried
before the service “suddenly” starts working. In rare circumstances, the
problem may be with several subsystems and testing one at a time won’t solve
the problem. But that is very rare.
Using
Auditing Rules
SELinux reports
notices and violations using the kernel’s auditing system. In fact, when
auditing is enabled Linux records every system call made and the results!
Looking through the audit log can be very useful when troubleshooting. You can
even specify custom things to audit and report, such as any attempt to read
and/or write some file or directory.
Aside from such
internal messages, the sysadmin can add their own rules specifying things to
watch and report on. Audit messages are in memory only unless the auditd daemon is running, which grabs
the audit messages and writes them to disk. So the first step is to ensure
auditing is on and configured. Then you can examine the audit messages with
various commands (discussed below).
Add audit=1 to your kernel command
line (in grub.conf) to
ensure system-call auditing is on; it’s off by default in some versions and
distros (for example, v2.6.32 in Fedora). Add audit=0 to your kernel command line to turn
system-call auditing off. Auditing may be off by default in the kernel but
turned on later in the boot process. This means any daemons and kernel
subsystems started before auditing is enabled cannot be fully audited (or maybe
not audited at all). So add that now.
The daemon auditd needs to be running to
write the audit records to the log file /var/log/audit/audit.log.
Otherwise audit messages are saved in memory only (but those can be searched
using ausearch) and older
messages are discarded. Not all distros install auditd
by default. (RH distros do.) The auditd
daemon starts another daemon as a helper, audispd
(audit event dispatch).
auditd is controlled from /etc/audit/auditd.conf. Custom rules
can be added to /etc/audit/audit.rules.
Like firewall rules, audit rules live in memory only and are lost if you
reboot. If you use auditd you
probably want augenrules
too. This is a simple program that reads /etc/audit/rules.d/*.rules
files, intelligently merges them, and copies the result as /etc/audit/audit.rules. This makes it
easier to manage custom auditing rules.
You can view/add/delete/modify
the rules for what gets audited using auditctl,
which uses the config files in /etc/audit/.
Note, if setroubleshootd is used
(and it is by seapplet and sedispatch), SELinux denial messages
are translated to an easier-to-read form and sent to /var/log/messages as well.
To search through the
audit messages, use the ausearch
command. (There is also an aureport
utility to generate reports from the audit records.) To narrow the search,
remember that SELinux audit records have the type “avc”.
For example: ausearch -m AVC |less
(or grep or audit2why)
To
learn about Linux auditing, try this:
#
auditctl -l
-a never,task
# auditctl -w /etc/passwd -p war -k passwd-file
# auditctl -l
-a never,task
-w /etc/passwd -p rwa -k passwd-file
$ chfn
# auditctl -W /etc/passwd -p war -k passwd-file
# ausearch -kl passwd-file
----
time->Fri Mar 23 00:29:50 2018
type=CONFIG_CHANGE msg=audit(1521779390.747:240): auid=1000 ses=1
subj=unconfined_u:unconfined_r:unconfined_t:s0-s0:c0.c1023 op=add_rule
key="passwd-file" list=4 res=1
----
time->Fri Mar 23 00:34:46 2018
type=CONFIG_CHANGE msg=audit(1521779686.031:264): auid=1000 ses=1
op=updated_rules path="/etc/passwd" key="passwd-file"
list=4 res=1
----
time->Fri Mar 23 00:35:06 2018
type=CONFIG_CHANGE msg=audit(1521779706.760:280): auid=1000 ses=1
subj=unconfined_u:unconfined_r:unconfined_t:s0-s0:c0.c1023 op=remove_rule
key="passwd-file" list=4 res=1
# grep passwd /var/log/audit/audit.log
Same output, except no timestamps
The first command
says to list all custom rules (“watches”); “-a
never,task” means there are
none. The next command says to watch (“-w”)
/etc/passwd for writes,
attribute changes, or reads (“-p
war”), and to name the rule with
a key (“-k”) of passwd-file. I listed the rules again
for fun. After running chfn I
removed the watch (“-W”). Then
I listed audit messages with the key passwd-file
from the kernel’s memory with ausearch,
and from the saved audit log file. As you can see, there are three audit
records: adding the watch, changing /etc/passwd,
and removing the watch.
Audit rules can be
quite a powerful monitoring tool for watching access to critical files, weird
kernel system calls, etc.
Read the man pages
for ausearch and auditctl, as these commands have many
useful options.
Walk-Through:
Fedora 8 Sound not working
Sound didn’t work for me out of the
box. First thing to try was to un-mute the sound. Many Linux distros ship
with sound muted, and they may re-un-mute after every boot until properly
configured. F8 has an “alsaunmute”
command but un-muting sound didn’t solve the problem. dmesg and other log files showed nothing helpful, and the
error message at the command line was not very specific, just a “can’t access”
generic error message.
Some Google work showed you can fix
this problem with “yum remove
alsa-plugins-pulseaudio”. PulseAudio is a newer Linux sound server.
Maybe that was the problem? Nope, removing it didn’t solve it either.
Using the sound card configuration
utility ("system-config-soundcard") I fiddled with the settings,
changing the default PCM and another setting from the default for AC’97 to one
that included another parameter, iec### I think it was. That worked but for
root but didn’t work for non-root.
I guessed (after checking with
Google) to change the owner of some files in /dev,
by configuring PAM’s console permissions file (“/etc/security/console.perms.d/50-default.perms”).
This changes the owner and permissions of files when a user logs in at the
console, allowing ordinary users to mount files, etc. Changing the recommended
files, and a couple others with *snd* or *audio* or *dsp* didn’t help.
But sound does work for root, so
I’m sure it’s a permissions problem. Checking the audit log again (for SELinux
messages) turns up nothing, and trying “permissive” mode didn’t help. So, how
does one find out which files need to be readable (or read/write) by others for
sound to work for everyone?
As a last resort I used strace. Checking the man page allowed
me to limit the output to open
system calls, which list the pathnames of the files the play utility attempts to open.
But no errors show up! Unfortunately,
it seems the play command I
traced also “stat”s some files
first, and doesn’t attempt to open
them if it would fail. (More skill with various tracing tools would no doubt
have led to a simpler solution.)
In the end, I created a list of
files opened by “play”, by root
and by a non-root user, and then I compared the two lists. The one file root
opened that a user didn’t was /etc/asound.conf,
which was mode 600. Changing that to 644 fixed the sound for all users! But
where did this file come from? When I ran the soundcard config utility, I must
have had a umask of 077. Once I hit save, this file was created but only
readable by root.
The strace
command used (one in a root xterm, one in a non-root xterm) was:
strace -fFqe trace=open play /usr/share/sounds/phone.wav
2>&1 \
|awk -F\" '{print $2}' |sort |xargs /bin/ls -ld 2>/dev/null
The output of strace is processed by awk, which extracts just the pathname
of the file being opened. Sorting the list makes comparisons between windows
easy (could have used diff or comm too). The /dev/null is used to eliminate the
errors of attempts to open non-existent files, which play does a lot.
This general technique will work
for finding permission problems for most programs, when they work for root
only.
Lecture 22
— Network Security and Firewalls
Define (start list of terms on
board):
Firewall — A
firewall is a hardware or software solution to enforce network security
policies. A system designed to prevent unauthorized access to or from a
private network.
A proper firewall is not an
off-the-shelf product you can buy, despite what some vendors (or bosses) claim!
Security is more of an on-going process, a proper attitude, which affects such
things as installing new servers and determining user policies.
A number of components make up a
common firewall: a packet filter such as TCP Wrappers, ipchains, iptables
(Linux; also firewalld* and nft), PF (BSD; also ipf and ipfw),
Cisco PICS, Check Point, ...; proxy servers such as squid,
privoxy, ftp-proxy, JunkBuster, ...; these can be used to enforce an access
policy and require little human interaction once set up, except to make
changes as policies and services change, and to monitor the component to make
sure an intruder hasn’t changed the access policy. This low level of
maintenance makes such products popular with both management and SAs. Indeed,
it is common to refer to a packet filter simply as a firewall.
Other firewall components include IDS
(Intrusion detection systems) and vulnerability scanners. Unlike
packet filters, these products cannot be deployed and forgotten (despite claims
to the contrary!) These products watch the network packets, network device
logs, and other indicators and generate warnings usually
called alerts. However, it takes a human to interpret these
alerts in context and decide if the incident is actually an intrusion that
warrants further activities (escalation).
DMZ (a.k.a. Perimeter
Network) Demilitarized zone, a part of the network that sits
between an internal (private) network and the Internet. A firewall or a router
usually protects (isolates) this zone isolated as much as possible with network
traffic filtering capabilities. Typically, the DMZ contains devices accessible
to Internet traffic, such as Web (HTTP) servers, FTP servers, SMTP (e-mail)
servers and DNS servers.
Common
Architectures:
Internet (untrusted)
-->ISP-->router-->all bastion hosts, intranet servers,
workstations
Internet-->ISP-->router-->DMZ
^--->intranet servers and workstations
Internet-->ISP-->border
router-->DMZ-->router-->intranet servers, workstations
Bastion Hosts A
system that has been hardened to resist attack, and which is installed on a
network in such a way that it is expected to potentially come under attack. Typically,
part of a DMZ (and sometimes considered part of the firewall), a bastion host
is a gateway between an inside network and an outside network.
NAT (Network
Address Translation, a.k.a. PAT a.k.a. IP Masquerading and
other terms, is an excellent security measure but makes routing more difficult,
so IP purists don’t like it much). Source NAT is when you alter
the source address of the first packet (i.e. you are changing where the
connection is coming from). Source NAT is always done post-routing,
just before the packet goes out onto the wire. IP Masquerading is a
specialized form of SNAT. Destination NAT is when you alter the
destination address of the first packet (i.e. you are changing where the
connection is going to). Destination NAT is always done pre-routing,
when the packet first comes off the wire. Port forwarding, load sharing, and
transparent proxying are all forms of DNAT.
Packet scrubbing (normalization)
removes covert channel opportunities that use packet headers to transmit
information. (The OpenBSD firewall, Pf,
supports this.) Such measures also make OS fingerprinting more
difficult for intruders.
This is a big deal,
as packets have a minimum size and are padded using memory that wasn’t zeroed
first. So left-over bits from other packets or locations in kernel memory are
included, for the world to see.
Encryption and authentication
(examples of these include GPG for email and files, passwords, public key
systems such as SSH, VPNs, and others); and other tools and
techniques including masquerading, logging (and log monitoring such as swatch), and monitoring (including
SNMP).
Simple off-the-shelf products are
usually just some sort of router (that supports NAT) with a
packet filter, but may include other services such as VPN software, anti-virus
(that can check all email messages and attachments), URL filtering (to protect
the kiddies), or various proxy servers.
SOHO Internet
connections are usually provided by a DSL modem, which is really a router of
some sort. These are usually installed pre-configured by your ISP, but are
almost never configured for security! In particular you should remember to turn
off any unused services running on that device, especially hackable
protocols such as universal plug and play (UPnP), change all default
passwords, and re-configure if possible to only allow management
access from inside your LAN. Often the default passwords can be obtained (if
you ask politely) from the service technician that installs your equipment, or
you can search the Internet for them (such as from virus.org).
Security
starts at the individual system
·
Turn off unused services
·
Remove unneeded software (such as compilers, Perl, ...)
·
Remove unneeded user accounts
·
Turn off unneeded privileges (no ftp or telnet for some users),
configure users, groups, and permissions correctly
·
Configuring security policies with PAM, sysctl (kernel settings, e.g.,
refuse source-routed packets over Ethernet; ndd on Solaris), and per-system
packet filtering, etc.
·
Discuss and show inetd
(xinetd) (and .conf files), on
Unix, part of SAF/SAC (Service Access
Facility/Control): sacadm -l, pmadm,
/etc/saf/*. hosts.{lpr,equiv}, lpd.perms. (For LPRng, not CUPS.)
·
Use nmap
and /etc/services to see what
services (ports) are open on your systems. Also netstat -nupan
·
Use Intrusion Detection Systems (IDS, a.k.a. HIDS
for host IDS) such as tripwire or samhain to
detect hackers modifying important files and infecting programs with viruses.
Others include AIDE and Integrit, and all are better than Tripwire in
configurability documentation, and the ability to reduce the babble of these
tools to a manageable level. However most alternatives to tripwire lack strong
cryptographic protection.
·
Use Vulnerability scanners such as Bastille to detect
potential problems and to catch common misconfigurations.
·
Use process accounting (sar,
ksar) and auditing
to monitor what users and servers do to your system. Finally, every server
includes its own security system, so correctly configure FTP, Web, mail, DB,
and other services. (This takes expert knowledge, usually available on the
Internet and in various books.)
Network security is used to
monitor and control access to and from your hosts. Given laptops, wireless
LANs, modems, it is not sufficient to have a router at the border of your
organization (an ASBR) block some incoming packets. The hosts must be
protected from each other as well.
Routers can be
attacked as well. Criminals in Brazil managed to compromise 4.5 million DSL
routers for months without being noticed. For their attack, the criminals
first used two Bash scripts and a Cross-Site Request Forgery (CSRF) attack to
change the admin password and then manipulated the router’s DNS server entry. The
CSRF attack even allowed them to bypass any existing password protection. Once
compromised, the PCs were redirected to specially crafted phishing domains that
mainly targeted users’' online banking credentials; the attackers had set up 40
DNS servers to handle this redirection. The only remedy is to not use a
vulnerable router; manufacturers have patched some, but most older routers (the
kind you probably have) don’t have patches available. (H-online
10/3/2012.)
Egress filtering can
be used to help protect some hosts from others, and to block popup ads. (Your
web browser runs the JavaScript in an HTML page, which causes it to request the
banner/popup ads. To stop the ads you must filter outgoing request packets.)
SNMP, RMON,
argus (a network
monitoring tool that provides network-level auditing), and other tools can be
used to collect information you can use to monitor and control your networks.
Collect information (especially
network log files) are often very large so use a tool such as swatch, ngrep, or MRTG
to continually examine collected information and alert you when something
interesting happens.
Packet Filtering
Packet filters are lists of rules
(sometimes called chains) of the form:
criteria action
The criteria are items such
as source or destination address, port numbers, the interface the packet
arrived from or will go out of, and other items that usually can be found in
the IP, TCP, or UDP packet headers.
The action is usually
simple: drop the packet or allow the packet, but additional actions might be to
reject the packet (with a message back to the sender), log the packet,
masquerade the packet (NAT), or modify the packet in other ways (adding labels
to packets, so they can be more easily traffic-controlled, is one common
modification).
(Details for iptables is discussed below.)
Packet
Filter Placement
Placement is an important design
issue. Badly places packet filters might be easily by-passed. Different
networks within your organization might have different security requirements,
so you may need several (or even many) packet filters placed strategically
within your network. However, more firewalls mean more management, log data,
alerts, and thus higher operating costs.
In most cases, you place packet
filters in the same locations you would place routers. (Which is why most
routers include packet filter software.) For a simple LAN, a single packet
filter placed between your ISP may be sufficient. This is a good setup for
SOHO use. For a larger network, using a DMZ and enforcing packet filter rules
for all traffic between the Internet and DMZ, between the internal network and
the DMZ, and between the internal network and the Internet. This design can be
implemented using one or more physical packet filters. You can break down the
internal network into smaller pieces for more control, at the cost of needing a
lot more rules. The ultimate would be per-host packet filters, which quickly
becomes difficult to manage and trouble-shoot as the number of hosts (and LANs)
scales up.
High
Availability
Packet filters, like routers (and
especially routers with packet filtering), are considered network choke
points to control access. But that creates a single point of failure.
Hosts and routers do fail sometimes. Using high availability
techniques, you have two such components, one active and the other in stand-by
mode. Stand-by mode may be “cold” (a human powers up the component when
the primary one fails), “warm” (like “cold”, but is always powered on and synchronized
the filter rules from the primary, greatly reducing the cut-over time), and
“hot” (monitors the primary and automatically takes over. In addition, a
non-stand-by configuration is possible, where a load balancer uses both, but
monitors them and sends all traffic to one if the other fails. Of course, you
need to worry what happens if the load-balancer fails!
The trick to having this work is to
have two devices (routers and/or firewall components) share a single IP and MAC
address. (That’s in addition to separate addresses, for management purposes.)
Cisco created HSRP (hot standby router protocol), which is proprietary.
The IETF worked to create an open standard, VRRP (virtual router
redundancy protocol), which ended up too similar to HSRP; Cisco sued,
and VRRP now required a license fee to Cisco.
A patent-free solution was
developed for OpenBSD, and has since been ported to other OSes including FreeBSD
and Linux. It is known as CARP (common address redundancy protocol).
For the pf packet filter, you
can use pfsync not only
to keep the rules synchronized, but also the current state of connections. The
combination allows seamless cut-over.
The Linux equivalent
would be using conntrack-tools
to sync connection tracking state, and then iptables.
A more comprehensive high availability solution is also available, Linux-HA.
Packet
Filter Functioning
Packet filters have two components:
the kernel code that intercepts and filters the packets, and a userland
utility to manage the rules and other aspects of the filter. The rules are
kept in RAM. To restore the rules after a reboot, the rules are saved in a
file in one format or another. For many Unix packet filters (e.g., ipfw), shell scripts that invoke the
userland utility to add rules one at a time are common. pf and iptables
store the rules in a more compact, text file. The rules on Linux are read and
applied by iptables-restore (and
created by iptables-dump).
When a packet arrives at the packet
filter code of the kernel (either from the current host going out, from an
outside host coming in, or a forwarded packet that is coming in and going out
again), the packed is matched against every rule in order. The first
matching rule’s action is followed. If no rules match the packet, some default
policy determines what do to (the common default policy on PCs is to accept
the packets, but this should be changed to drop the packets on servers.)
The pf packet filter is a bit unusual, in
that the last matching rule’s action if followed instead of the first. pf can also scrub (normalize)
out-going packets, to help eliminate covert channels.
Packet filters vary in what they
can use for criteria. TCP Wrappers for instance can examine the source
IP address, DNS name, and destination port (i.e., the service), and other
information such as the time of day and the user name. In addition it is not
part of the kernel (this is often referred to as a userland packet
filter) and is slower.
TCP Wrappers only
examines the first packet in a connection request. Once it has made a decision
to accept the connection, the remaining packets are not examined. Because of
this, there is little overhead for using TCP Wrappers even if you use another
packet filter on the same host. Because of the custom actions and logging, TCP
Wrappers is quite useful.
In contrast, iptables and ip6tables are user-land tools that
uses the kernel module “netfilter”.
(Either part can be referred to using either name.) It can examine all parts
of the layer 3 and 4 packet headers, of every packet. (Remember those TCP/IP
packet header diagrams in your intro to networking class? That stuff is used
here.)
ip*tables are not the only
user-space tools that can work with the Linux kernel’s netfilter module. A
newer tool is being pushed by Red Hat, firewalld.
Note that each different tool stores the rules in files between reboots, but
not the same files. These are briefly discussed, below. Here, we will focus
on using iptables. Don’t try to use iptables if your system is running
firewalld, and vice-versa.
Linux in kernel 3.13 added
a replacement for the netfilter code, and replaced iptables with a new tool inspired by BPF, “nft”. The new kernel filter is called
nftables.
The nft tool replaces all the
other firewall *tables tools. The main documentation is at wiki.nftables.org.
There is a short how-to document available at home.regit.org.
As of 2018, both netfilter and nftables are in the Linux kernel; Fedora 27
still ships with netfilter/firewalld.
Stateful
and Stateless Packet Filters
Some evil-doers (a.k.a. black
hats) will send TCP packets to your system without setting SYN!
Ipchains has no way to detect this and will allow such packets right through.
What is needed is a packet filter
that keeps track of all current sessions and other statics. Such a packet
filter is called stateful: It can keep track of all
conversations in a table and detect packets without SYN set but that aren’t
part of some session. By keeping statics for each session, many DoS (discussed
later) attacks can be detected as well. For Unix and Linux systems, the
stateful iptables packet
filter is available.
Nobody should be
using a stateless packet filter any more.
Logs
Most packet filters use syslog or similar to handle logging.
However, pf logs packets using pcap
format. This is the non-text format used by tcpdump,
wireshark, and other common
tools. This design choice makes more data available in the logs, but humans
will need to process such logs using another tool.
Creating
good packet filtering rules
This is difficult. For
example to block incoming Telnet requests you can’t just block all incoming
packets for port 23. This will indeed stop incoming Telnet requests, but will
not block the other 64k ports.
To block any incoming TCP
connections, but to allow outgoing connections, as well as incoming packets
that are replies to (or part of) a session started from the inside, you must
understand TCP in some detail:
SYN, ACK, RST, and
other bits in the TCP headers (Three-way handshake with <SYN
then >SYN, ACK then <ACK). So to block any incoming requests with ipchains, you drop any incoming
packets with SYN set.
The Internet is not the warm,
fuzzy, friendly place it once was. In the old days, you could trust all users
and hosts on the Internet to play by the rules and respect your policies.
Sadly those days are gone. Many people claim that TCP/IP is poorly designed
from a security point of view, and perhaps it is but that was not one of its
design goals (one of which was, to stay up in the event that one or more nodes
was knocked out by bombs). Newer standards such as IPSec, and the
security in IPv6 will help but today use encryption and VPN/tunnels to protect
the packets. Use public keys, strong passwords, smart cards, etc. to
authenticate users and hosts. (SSL is used to this now, https.)
Because TCP creates virtual
circuits that use packet sequence numbers, TCP is inherently more secure
than UDP and should be used whenever possible in preference to
UDP. (And never use RPC!)
Many good books available (show
O’Reilly books). To make this easier, tools such as Firestarter and Shorewall
are available GUIs that create iptables
filter rule sets. (I like the GUI wizard mode of Fedora’s system-config-firewall.) You can also
find such rule sets (or iptables
“scripts”) on the Internet that you can download and tweak.
IPv6 and IPv4 may be implemented as
two separate firewalls (e.g., on Linux), each with its own configuration file
(iptables and ip6tables). Make sure both are setup and consistent.
Remember that DNS will return both
IPv6 and IPv4 address when doing name lookups, and most clients will prefer
IPv6. Keep this in mind if you use hostnames in your configuration, such as
localhost.
A problem with most packet filters
is that they are static, and require a reload to change. This is a problem
because some applications require holes to be punched in firewalls (and NAT
boxes) when run, and to have those holes closed when stopped. DoS attack
detection and response may also require dynamic rule changes. While there are
a number of techniques for this (Fedora supports one), there is no standard
mechanism; it may be impossible to update the rules in your ISP’s firewall.
The IETF is working on a solution for this, called the Port
Control Protocol (PCP).
After you set up a packet filter
with a deny-by-default policy, and punch some holes in it for the required
services, you are still not done. For the traffic you do allow, you should
filter on source and destination address, to detect and block martian and bogon
packets.
Martians are source IP addresses that are
reserved for special purposes, and thus should never be the source or
destination of a packet that comes from the Internet. A typical IPv4 martian
filter will look for these addresses (BCP-153):
|
0.0.0.0/0
|
Default (can be advertised in BGP
if desired)
|
|
0.0.0.0/8
|
Self identification
|
|
0.0.0.0/32
|
Broadcast
|
|
10.0.0.0/8
|
Private Networks (RFC 1918)
|
|
127.0.0.0/8
|
Loopback
|
|
128.0.0.0/16
|
IANA Reserved (RFC 3330)
|
|
172.16.0.0/12
|
Private Networks (RFC 1918)
|
|
169.254.0.0/16
|
Local
|
|
191.255.0.0/16
|
Reserved (RFC 3330)
|
|
192.0.0.0/24
|
IANA Reserved (RFC 3330)
|
|
192.0.2.0/24
|
Test-Net (RFC 3330)
|
|
192.168.0.0/16
|
Networks (RFC 1918)
|
|
198.18.0.0/15
|
Network Interconnect Device
Benchmark Testing
|
|
223.255.255.0/24
|
Special Use Networks (RFC 3330)
|
|
224.0.0.0/4
|
Multicast
|
|
240.0.0.0/4
|
Class E Reserved
|
You can find a similar list of IPv6 at RFC-5156:
|
::/0
|
Default (can be advertised as a
route in BGP to peers)
|
|
::/96
|
IPv4-compatible IPv6 address;
deprecated by RFC4291
|
|
::/128
|
Unspecified address
|
|
::1 /128
|
Local host loopback address
|
|
::ffff:0.0.0.0 /96
|
IPv4-mapped addresses
|
|
::224.0.0.0 /100
|
Compatible address (IPv4 format)
|
|
::127.0.0.0 /104
|
Compatible address (IPv4 format)
|
|
::0.0.0.0 /104
|
Compatible address (IPv4 format)
|
|
::255.0.0.0 /104
|
Compatible address (IPv4 format)
|
|
0000:: /8
|
Pool used for unspecified,
loopback and embedded IPv4 addresses
|
|
0200:: /7
|
OSI NSAP-mapped prefix set
(RFC4548); deprecated by RFC4048
|
|
3ffe::/16
|
Former 6bone, now decommissioned
|
|
2001:db8::/32
|
Reserved by IANA for special
purposes and documentation
|
|
2002:e000:: /20
|
Invalid 6to4 packets (IPv4
multicast)
|
|
2002:7f00:: /24
|
Invalid 6to4 packets (IPv4
loopback)
|
|
2002:0000:: /24
|
Invalid 6to4 packets (IPv4
default)
|
|
2002:ff00:: /24
|
Invalid 6to4 packets
|
|
2002:0a00:: /24
|
Invalid 6to4 packets (IPv4 private
10.0.0.0/8 network)
|
|
2002:ac10:: /28
|
Invalid 6to4 packets (IPv4 private
172.16.0.0/12 network)
|
|
2002:c0a8:: /32
|
Invalid 6to4 packets (IPv4 private
192.168.0.0/16 network)
|
|
fc00:: /7
|
Unicast Unique Local Addresses
(ULA) – RFC 4193
|
|
fe80:: /10
|
Link-local Unicast
|
|
fec0:: /10
|
Site-local Unicast – deprecated by
RFC 3879 (replaced by ULA)
|
|
ff00:: /8
|
Multicast
|
Bogons are addresses
that are valid addresses that have not yet been assigned to anyone. There are
no IPv4 bogons anymore, as all IPv4 address blocks have been assigned (in early
2012). You can find a maintained list for IPv6 at team-cymru.org
and elsewhere. Such lists can be turned into a list of ip6tables rules via a
shell script.
Linux also
includes packet filters for layer 2 (arptables,
and to a lesser extent, ebtables
which is used only to set up bridging rules).
A transparent
packet filter can act as a bridge while filtering, allowing you to use
different filtering (access) rules for some hosts on the same LAN as others.
It is possible to obtain lists of
IP blocks assigned to countries. At one point, YborStudent simply blocked all
of China, to stop DoS from all the frequent SSH hack attempts.
A while ago Kernel.org
administrators discovered that something was hammering ftp.kernel.org from all
over the French IP space, by opening a connection and then immediately closing
it (SYN-SYNACK-ACK-FIN). They counted about 100-200 such connections per
second, all from France, all from what looked like mobile IP ranges. “The best
we figured, there’s some kind of a mobile app popular in France that uses “am I
able to connect to ftp.kernel.org” as a sort of a “do I have an Internet
connection” test. Unfortunately, the only sane mitigation strategy was to
block all of France from being able to use ftp.kernel.org. (Wouldn’t have been
a problem if they used http, but the way vsftpd works, this was causing a
fork/destroy for each connection, such as our PID counter wrapped around every
3-4 minutes.)”
Proxy
Servers
Simple relays for traffic. Often
bastion hosts run proxy servers. A router can send incoming port 80 (and 21
for FTP) request to squid, which can examine the HTTP headers within the
packets (content filtering) and determine if the packet is a web
request or IM or SOAP (both of which use port 80 to fool routers and packet filters!).
Web requests will be replied to from squid’s cache, or the request is forwarded
to the real web server. The simplicity of squid (verses Apache) makes it much
easier to configure and secure; any security holes in Apache become moot since
no black hats have any direct access to your server. The same applies
to other proxy servers for other services.
Proxies can greatly increase
security (They usually come with excellent logging features) and improve
performance (by having a large cache the proxy can return the results faster
than a more fully featured server).
There are two types of proxy
servers, Application-level, and circuit- or wire-level. An application-level
proxy knows about a particular application or protocol (such as SMTP or
Telnet). Squid is an application level proxy that knows about HTTP and
FTP.
A circuit-level proxy
just forwards traffic between the client and server without interpreting the
application protocols used. Examples are SOCKS and TIS FWTK
(Trusted Information Systems’ Firewall Toolkit). Circuit-level proxies can
provide service for a number of protocols but by the same token, they provide
little control since that would require application layer knowledge.
Application-level proxies either
require custom client software (An example is a web browser with a “proxy IP
address” setting available), custom procedures with standard clients (e.g.,
using special URLs), or are transparent. Transparent proxies use
standard clients and no special procedures, but redirect the requests to the
proxy server which in turn validates, logs, and either services the request
from its cache or forwards the request to the real server, stores the reply in
its cache, and then returns a result to the client. For this reason,
transparent application level proxy servers are sometimes called interception
caching servers.
There is an
additional risk with transparent proxies. It is sometimes possible for an
attacker to get some data cached there. That data in turn is sent to
unsuspecting clients. Imagine, for example, caching an HTTP 301 (documented
moved) message for www.google.com, which redirects all subsequent traffic to
www.evil-google-clone.com.
Proxy servers are useless unless
steps are taken to prevent users from bypassing them and talking directly to
other servers. Usually proxy servers are used in conjunction with routers and
packet filters.
Benefits of transparent
(application level) web server proxies are (1) There is no client configuration
required (this is the most popular reason for investigating this option), and
(2) You can implement better and more reliable strategies to maintain client
access in case of your cache infrastructure going out of service.
However there are also significant
disadvantages for this strategy, as outlined by Mark Elsen (wiki.squid-cache.org/SquidFaq/InterceptionProxy):
·
Intercepting HTTP breaks TCP/IP standards because user agents
think they are talking directly to the origin server.
·
It causes path-MTU (PMTUD) to fail, possibly making some remote
sites inaccessible. This is not usually a problem if your client machines are
connected via Ethernet or DSL PPPoATM where the MTU of all links between the
cache and client is 1500 or more. But if your clients are connecting via DSL
PPPoE then this is likely to be a problem as PPPoE links often have a reduced
MTU (1472 is very common).
·
On older IE versions before version 6, the ctrl-reload that says
to bypass cache and reload from server) function did not work as expected — the
page is reloaded from the proxy server and not the original server.
·
IP based authentication conceptually fails because the users are
all seen to come from the proxy server’s own IP address. You cannot use proxy
authentication transparently. You can’t use IDENT lookups (which are
inherently very insecure anyway).
·
Transparent proxies generally are incompatible with IP filtering
designed to prevent address spoofing.
·
Transparent proxies won’t work for HTTPS (if it could the result
would be a man-in-the-middle vulnerability). In this case, it wouldn’t
be useful anyway as proxies don’t cache secure web pages.
·
Clients still need to have full Internet DNS resolving
capabilities; in certain intranet/firewalling setups, this is not always
wanted.
·
Suppose a user’s browser connects to a site which is down.
However, due to the transparent proxying, it gets a connected state to the
proxy. The end user may get wrong error messages or a hung browser for
seemingly unknown reasons to them.
If you feel that the advantages
outweigh the disadvantages in your network, you may choose to implement squid.
(Privoxy is based on the no-longer-maintained Internet Junk Buster, but it
doesn’t support transparent proxying nor FTP proxying.)
Web Cache Coordination Protocol
(WCCPv2) is a popular (Cisco routers support it, as do others) dynamic
service in which a proxy communicates to a router about its status, and based
on that the router decides whether or not to redirect the traffic. This means
that if your cache becomes unavailable, the router will automatically stop
attempting to forward traffic to it and end users will not be affected (and
likely not even notice that your cache is out of service). WCCP is documented
in a draft RFC, and is supported by squid.
Tor
Tor (The Onion Router) is
an anonymizing proxy. It ensures privacy by hiding the origin of IP traffic.
Originally developed to protect U.S. government communications, today tor is
more commonly deployed as an anti-censorship tool. Using tor, your Internet
traffic is encrypted and then sent to one of thousands of other tor routers.
These in turn forward traffic to other tor routers. Eventually, the packets
are delivered to the destination.
Privacy is a dual-edged sword,
however. As reported in the H-Online
in 12/2012, the Security Street blog has found a botnet client, the operator of
which is hiding behind the Tor network. This trick makes the work of security
experts and criminal prosecutors much more difficult. The malicious botnet
software, called “Skynet”, is a trojan that Security Street found on Usenet. At
15MB, the malware is relatively large and, besides junk files intended to cover
up the actual purpose of the download file, includes four different components:
a conventional Zeus bot, the Tor client for Windows, the CGMiner bitcoin tool
and a copy of OpenCL.dll, which CGMiner needs to crack CPU and GPU hashes.
It has been reported
that the U.S. govt can use a special type of browser cookie, and other means,
to track user activity even if using Tor.
Types of
Attacks and (Some) Remedies (Review threats on page 48)
1. Botnets
What happens after a successful
network attack? Once an intruder has gained access to a host, they
download and install malware, called the payload. Typically the
payload causes your host to listen to some command and control server, thus
making the compromised host part of a botnet (a.k.a. zombie network). Some of
these payloads then attempt to hide themselves, and some even harden your host
for you, so competitors’ botnets don’t replace the payload with their own.
Often the payload uses the compromised host to attack other hosts.
In Operation Adeona, the
Department of Justice and the F.B.I. shut down the Coreflood botnet in
2011, which had infected hundreds of thousands of PCs. During an 11-month
period starting in March 2009, Coreflood siphoned some 190GB worth of banking
passwords and other sensitive data from more than 413,000 infected systems, as
users browsed the Internet. In 9/2011, Microsoft announced the takedown of a
botnet known as Kelihos (or Hlux), which, while not as massive as Rustock,
controlled 41,000 computers worldwide (Rustock controlled 1.3 million) and was
capable of sending 3.8 billion spam e-mails per day. (The same day MS released
a new version of MRT.exe, designed
to clean the rootkit from all Windows computers.)
Many other named botnets still
exist, such as the Low Orbit Ion Cannon, used by the groups Anonymous and
LulzSec to attack Sony. Law enforcement agencies (and Microsoft) have had some
success disrupting and bringing down some of these botnets, such as Rustock,
and Waledac, but many are still in operation.
Researchers at Kaspersky Labs,
analyzing the 4.5 million-strong Alureon botnet (also known as TDL and
TDSS), have branded it “practically indestructible.” The rootkit uses the Kad
peer-to-peer network, used by filesharing software eMule, to communicate
between nodes. Using Kad, the botnet creates its own network of infected
computers, allowing the machines to communicate with each other without relying
on a central server.
On July 18, 2012, the botnet known
as Grum was shut down, after six servers in Ukraine and one in Russia were shut
down. The botnet operators had deployed those servers following the
disconnection earlier this week of separate servers in the Netherlands and
Panama. Grum was a 100,000 computer botnet, that generated an estimated 18
billion spam messages a day.
How to Take Down a
Botnet [Adapted from an article
posted on 10/1/11 on Ars Technica.]
Normally, Kaspersky or
some other security research organization would reverse-engineer the bot
malware, crack the botnet’s communication protocol, and then developed tools to
attack its peer-to-peer infrastructure.
In the case of
Kelihos, Microsoft obtained a restraining order, allowing it to sever
connections between the machines controlling the botnet and the zombie
computers being controlled. They used this to perform a man-in-the-middle
attack on the botnet, tricking infected machines into updating the address they
had for the command-and-control server, to the address of some machine
controlled by Kaspersky. This server is called a sinkhole and this
technique for taking down botnets is called sinkholing. At that point,
the original botnet owner could no longer control the botnet. Kaspersky says
3,000 infected hosts are connecting to its sinkhole every minute. That number
should drop as PC owners (eventually!) run Windows update, which includes the
new MRT.exe version that removes
the infection.
The task is complex
because the botnet code has algorithms to resist such takedowns. For example,
with the Rustock botnet, bots that detected they were no longer being commanded
used an algorithm to automatically generate new domain names, that could then
be registered by the botnet controller. By analyzing the algorithm, Microsoft
was able to identify the names of the domains the botnet would have generated,
and negotiated with DNS registrars to take control of them before the botnet
traffic could be redirected.
The Alureon botnet
has no central command-and-control server, making it much harder to take down.
By Sean Gallagher |
Published about 8 hours ago
How the most massive
botnet scam ever made millions for Estonian hackers
Reported in Ars
Technica: In 11/2011, seven (alleged) Estonian and Russian hackers
were indicted by the U.S. They apparently hijacked over 4 million computers
worldwide, many of them at government agencies and large companies, and raked
in over $14 million from legitimate businesses. The scheme, which dates back
to 2007, made use of a common botnet trojan to divert Web traffic from its
intended destination, to that of advertisers who paid for traffic
delivery—thinking that it was being provided through paid links.
The malware at the
center of the scam is the DNSChanger botnet. It is a trojan that, once
installed on a system, redirects its DNS requests to a server, effectively
taking control of all of the outbound Internet traffic from the infected
system. The trojan also seeks other systems on the local network that use DHCP
and attempts to change their DNS settings, thereby taking control of computers
on the LAN that haven't been infected.
The botnet and DNS
servers were controlled by Rove Digital—an Estonian company that has made
millions off botnets—and its hosting subsidiary Esthost. Trend Micro senior
threat researcher Feike Hacquebord wrote in a blog post that his company had
known the identity of the company controlling the DNS Changer botnet since
2006, but had held off on publishing the information to allow law enforcement
to take action.
2. Unauthorized
use. This can be prevented (mostly!) by:
a. permissions,
users and groups (verify no login permitted for appropriate accounts), sudo (or Solaris roles and profiles)
b. Many services,
each has independent security configuration: www, ftp, sendmail, DB, ... This
is inefficient and hard to maintain to get exactly correct. One answer is TCP
Wrappers, a better one is a packet filter. In any case, turn off unused
services and remove unused s/w.
3. Exploit known
weaknesses. Common misconfigurations, known bugs in software that wasn’t
updated or replaced, using insecure services such as rlogin.
Often such attacks are made by script
kiddies using a rootkit, which is a program that
systematically examines a target system for known weaknesses, breaks in,
creating new accounts, replacing standard programs with dangerous look-alikes
(e.g., a ps that won’t reveal
processes, a who that doesn’t
show the new account, ...), reconfiguring permissions, firewalls, and adding back-doors
servers.
Buffer
Overflows are a common weakness caused by sloppy programming (e.g.,
in C using gets() at all, or scanf() in dangerous ways). While the
details can wait until you become a security expert, an SA needs to have a
basic understanding of these and the terminology used, if for no other reason
than to communicate effectively with security experts.
On all modern computers, software
is a collection of functions that call or invoke one another. The
memory needed for a function’s data is stored on a stack. When a
program starts, space is reserved on this stack for the data for main. When main calls another function, additional memory is used,
and so on. When a function “returns” (exits), the stack space it used
is now available for the next function call. Global data is stored in another
section of memory called the heap.
When a function is called the
system writes any function arguments onto the stack, then the address to resume
execution when the function exits (the return address), and other
data. Space for the function’s data is reserved by setting a top of stack
pointer. Note that for various good reasons, stacks grow down, toward lower
memory addresses.
Show buf-overflow.c on
YborStudent. Consider the stack as the program runs. (Show stack
frames including return address.) Demo the program with input “Joe”. Qu:
What will happen if input is longer than five bytes (four characters)? Ans: The
extra data will “overflow” the buffer, over-writing other local function data
and if enough input is given, the return address and even data in other stack
frames. (Demo with “Hymie Piffl”.) Show buf-overflow-exploit.c.
By carefully crafting the input,
an attacker can make the function return to any address in memory. One
possible way this is useful: by examining the .exe and finding the starting
address of a function called after a successful login, an attacker can
enter the right input to a login prompt and have the program jump past the
authentication check!
If an attacker knows assembly
language, they can craft the input to be a small bit of machine language that
does nasty stuff. For example, the machine code to “run the /bin/sh program”. This is known as shellcode.
By exploiting a buffer overflow
with shellcode, and also over-writing the return address to be the beginning of
the shellcode, the attacker can do anything the program was privileged to do.
Many programs (foolishly) are run setuid
root: Sendmail, the FTP server, etc. These programs are available everywhere
and if an attacker examines the program and finds a buffer-overflow
vulnerability, they can exploit it easily.
There are other types of buffer
overflow vulnerabilities as well, and not all of them involve the stack. Once
a vulnerability becomes known, the software’s maintainers will (hopefully!)
release a patch to remove that vulnerability.
In 1/2018, a flaw in
the design of modern CPUs was discovered by several indepenent teams of
researchers. Dubbed Spectre and Meltdown, the flaws have been around
for over 10 years. They involve the way CPUs try to speed up execution by
guessing which way an IF-statement will go and speculatively execute that code
ahead of time; if the guess was wrong, they abort the execution. The flaw is,
by the time the execution is aborted sensitive data from other programs or even
the kernel may have been leaked.
The only fix
currently is to avoid speculative execution. Sadly, there’s no switch or
setting for that. Intel and AMD have been rolling out firmware patches to
disable the problem, onlythe patches may brick the computers. In any case,
disabling the feature causes a slowdown of up to 30% (but more likely, closer
to 5%). Oses are also being patched so they don’t cause the but, but that is
hard too. The only sure fix is re-designed CPUs from Intel and AMD.
Google has invented a
cleaver patch that doesn’t require the dangrous firmware updates, called retpoline.
The reason that 64-bit is desirable
is particularly because it offers the potential to strengthen certain
anti-hacking mechanisms:
Related memory issues
include bit rot and row hammer. With modern DRAM,
bits in RAM can flip for no apparent reason, maybe due to radiation or
electrical noise. Row hammer refers specifically to the electrical
noise produced in nearby memory cells (adjacent rows) from specific memory
access patterns. It turns out attackers can perform those patterns and
deliberately corrupt other memory cells.
·
Data Execution Prevention (DEP), which prevents
user programs from executing code from non-executable memory regions (such as
the stack). Hardware-enforced DEP works in conjunction with the NX (Never
Execute) bit on compatible CPUs.
It is possible to get around DEP,
using a technique known as return-to-libc. Instead of putting malicious
code on the stack, the return address (on the stack) is altered, often to the
memory location of the system()
call, which could run any *nix command.
·
The kernel supports Position Independent Executables (PIE)
technology, which means that executable binaries can be loaded at random memory
addresses. This requires applications to be compiled and linked with specific
arguments.
The gcc compiler includes several security
options you can enable when compiling source code. Setting the FORTIFY_SOURCE option causes the
compiler to issue a warning when it detects a defect such as a potential buffer
overflow. The compiler also includes Stack-Smashing Protection, in
which the compiler puts a stack “canary” (a known value) before the stack
return pointer, to discover whether the stack has been “smashed” due to a stack
buffer overflow. The canary value is checked before the return, and if it is
invalid, then it’s likely that malicious code has overwritten the canary value
as well as the return pointer.
·
Address Space Layout Randomization (ASLR) is a
technique used to thwart these attacks, by doing an extra step when loading
code into memory. This loads functions and heap objects in random locations,
translating the addresses as necessary in the code. (Unlike PIE, no special
compilation is needed.) This makes DEP bypass very difficult, since an
attacker must guess the location of the function they want to use.
In a 32-bit process, there are
only a limited number of random locations that can be chosen. 32-bit processes
are also more vulnerable to anti-ASLR measures such as “heap spraying” (wherein
a large proportion of the process’ memory is filled with malicious code, to
make it easier for an attacker to trick the browser into executing it). Using
64-bit applications doesn’t completely protect your code, but it does
strengthen these protection systems. (A modified version, known as high-entropy
ASLR or HE-ASLR, uses “more random” values.)
Normally, 1/2 of the virtual
address space is used for the kernel and the other half for the process’ code.
The kernel can read, write, and execute any memory location. But it never
needs to execute anything in the process’ half. Attackers exploit kernel bugs
to run code (such as libc’s system()
call) in the process’ address space. DEP doesn’t prevent this. Intel’s Ivy
Bridge CPU has a new feature called Supervisor Mode Execution Prevention
(SMEP). When SMEP is enabled, the kernel can no longer execute any of the
process’ memory. This means that any attack code in the process’s half of the
memory space, can’t ever be run.
A similar technique
is being implemented for the kerne’s code and data, known as KASLR.
Security Measures to Take: The
first and best measure to take is not to run programs with vulnerabilities:
Train programmers to write secure software, and only use well-known and
actively maintained software from others.
But as an SA you often don’t have
that kind of control. So you need to implement measures that reduce your
risk of attack, and can minimize the damage a successful attacker can inflict:
·
Don’t run unneeded services.
·
Remove unneeded software (especially compliers and interpreters).
·
Update and maintain all servers.
·
Replace insecure servers with secure versions when possible
(e.g., replace telnet for remote access with ssh
and weak WU-FTP with safer vs-ftp)
·
Carefully configure services (and don’t be afraid to hire a
consultant) according to your policy documents.
·
Monitor CERT.org (esp.
alerts from www.us-cert.gov)
and other sources for problems and patches.
·
Run servers in a chroot or FreeBSD jail, a Solaris
zone/container or a virtual server using Xen, VMware, qemu, etc.
·
Run a security audit occasionally.
·
Purchase and use additional safeguards designed to help prevent
the vulnerabilities caused by sloppy programming from being exploited Solaris
beginning with 2.6 has a line of defense against shellcode in the stack: put
the following two lines in /etc/system:
the first will prevent this attack and the second provides a warning when an
exploit of this type is attempted:
set
noexec_user_stack = 1
set noexec_user_stack_log = 1
There are patches for Linux 2.4+
for this protection as well. See also libsafe and similar safeguards: www.securityfocus.com/infocus/1412
4. SQL Injection,
which attacks CGI, PHP, and similar scripts that perform SQL database commands
using data supplied by a user from a form. An example PHP-Nuke exploit allows
an attacker to deface the website by obtaining the passwords needed to modify
banners or other parts: (from Security Warrior by Cyrus Peikari & Anton
Chuvakin, (C) 2004 O’Reilly & Assoc., pages 388-ff. The authors report the
attack was first publicized by Frogman at http://archives.neohapsi8s.com/archives/vulnwatch/2003-q1/0146.html
)
http://127.0.0.1/nuke/html/banners.php?op=Change&cid=
'%20OP%201=1%20INTO%20OUTFILE&20'/tmp.secret.txt
The problem is the badly written
(from a security standpoint, and since fixed) PHP code found in banners.php:
$sql
= "SELECT passwd FROM " . $prefix
. "_bannerclient WHERE cid='$cid';
The $cid
variable is filled from the client request string (from the form). With the
string above (the “%20” is a space), the SQL command becomes:
SELECT
passwd from nuke_bannerclient
WHERE cid='' OR 1=1
INTO OUTFILE '/tmp/secret.txt'
An interesting security feature of
Perl is a taint mode, in which using client data this way would cause
the script to fail to run.
5. Cross Site
Scripting (XSS) When Netscape first introduced the JavaScript
language, they realized the security risks of allowing a web server to send
executable code to a browser (even if only in a browser sandbox). One key
issue with this is the case where users have more than one browser window open
at once. In some instances, a script from one page should be allowed to access
data from another page or object, but in others, this should be strictly
forbidden, as a malicious website could attempt to steal sensitive information
this way. For this reason, the same-origin policy was
introduced. Essentially this policy allows any interaction between objects and
pages, so long as these objects come from the same domain and over the same
protocol. That way, a malicious website wouldn’t be able to access sensitive
data in another browser window via JavaScript.
Since then, other similar access
control policies have been adopted in other browsers and client-side scripting
languages to protect users from malicious websites. In general, cross-site
scripting holes can be seen as vulnerabilities which allow attackers to bypass
these mechanisms.
JavaScript is just
not secure. For example, here’s how to hijack a user’s click on a link to http://www.example.com/:
var links = document.links;
for(i in links) {
links[i].onclick = function(){
this.href = 'http://bit.ly/141nisR';
};
}
The link appears
correct in the source code, and looks correct when you hover the mouse over
it. But when clicked, it goes to an unexpected destination. The JavaScript can
be in another file, loaded as part of a banner ad perhaps. Note, Facebook and
Google use this technique legitimately (?), so no browser (except maybe Opera)
prevents this.
By finding clever ways of injecting
malicious script into pages served by other domains, an attacker can gain
elevated privilege to sensitive page content, session cookies, and a variety of
other objects. Often attackers will inject JavaScript, VBScript, ActiveX,
HTML, or Flash into a vulnerable application to fool a user in order to gather
data from them. Everything from account hijacking, changing of user settings,
cookie theft/poisoning, or false advertising is possible. New malicious uses
are being found every day for XSS attacks. “Denial of Service” and potential
“auto-attacking” of hosts is possible if a user simply reads a post on a
message board.
Example 1:
1. UserA trusts
example.com to run JavaScript on his/her machine.
2. UserB has found
a way to inject/insert his/her own JavaScript code into example.com (for
example into a bulletin board message) and inserts a malicious script that asks
for people’s credit card numbers and stores them somewhere where UserB can
access them.
3. UserA visits
example.com and UserB’s script asks for his/her credit card number. Thinking
that this is a legitimate request from example.com, UserA provides his/her
credit card number.
UserB has effectively stolen
UserA’s credit card number using cross-site scripting and some social
engineering.
Example 2:
1. UserA has an
account at example.com and is logged in.
2. UserB injected a
piece of JavaScript to retrieve the session ID of the current user and send it
to him/her.
3. UserA visits the
manipulated page and his/her session ID is transmitted to UserB.
4. UserB can now
use UserA’s account until he/she logs out (possibly longer if he/she changes
UserA’s password).
If UserB had put the code on his
own website, it would not be allowed to access the session-cookie.
Cross-site scripting can also be
used to steal passwords saved by the web browser and to perform powerful cross-site
request forgery attacks.
The solution, as with SQL
injection, is to treat all data as suspect (tainted), and to use HTML quoting
for any data that comes from an HTTP request packet, including any HTTP
headers. As a user, if a link seems suspicious (say it is very long or
contains hex characters), don’t follow it! Instead, go to that site’s main
page, and search for the information you wanted.
There are some
measures you can take to reduce the risk of XSS. These include using secure
settings for your web server, and having secure clientaccesspolicy.xml (for MS
Silverlight) and crossdomain.xml (for
Flash and some others).
Some good advice is to use two
web browsers. Install one of them with no additional add-ons or plug-ins.
Use that browser for on-line banking, purchases at your standard locations
(e.g., amazon), and for other security-sensitive sites that you frequent. Use
the other browser for Facebook and other social network sites, for surfing the
web, for visiting new or rarely used sites. But not for any high security
tasks! The reason for using two browsers is that many attacks are from one
window or part of the browser, stealing data or forging it, for the other
tabs/windows. By using two separate browsers, you defeat such attacks.
6. DNS cache
poisoning: DNS cache poisoning is a technique that tricks a Domain Name
Server (DNS server) into believing it has received authentic information when
it has not.
DNS is a trusting
protocol. Early DNS servers used a fixed port from which to send requests.
Since DNS uses stateless UDP, a 2-byte sequence number (a 16-bit nonce) is
included so replies can be matched with queries. To reduce Internet traffic, a
DNS reply can contain extra records. ALL data in a reply to a query is
believed by the server!
Suppose a villain put
up a website, along with something that will direct traffic there, say a link
posted to E-bay. When a user visits that page, their DNS server will make a
query for that website’s IP address. If the villain controls that destination
DNS server, they can serve up all sorts of fake data that the user’s DNS server
will trust and cache.
Modern DNS servers (since
1997-ish) won’t pay attention to any returned records not part of the domain of
the original request (called a “bailiwick” check). However, in early 2008 a
security researcher from IOActive, Dan Kaminsky, discovered an easy way
around this restriction.
Since DNS queries are
just UDP, they are fairly easy for an attacker to spoof; they just have send a
query to the victim’s DNS server for something not in its cache, such as “aaa.ebay.com”. Then the villain
bombards the victim server with hundreds of fake replies, “guessing” the
sequence number used. If that fails, it tries “aab.ebay.com”
and tries again. Sooner or later (a few hundred attempts on average), one of
these fake replies will have the right sequence number and the victim will
cache the false ebay.com data
(replacing any real data for say “www.ebay.com”).
To mitigate this
threat, the SA should make sure to use source port randomization for DNS
requests, combined with the use of cryptographically-secure random numbers for
selecting both the source port and the 16-bit nonce. This can greatly reduce
the probability of successful DNS race attacks; the attacker must guess both
correctly, which would be very hard (2^32). A patch for this was distributed
in 7/08, but many DNS servers are still vulnerable.
A DNS server can also
be configured to ignore requests from outside the organization for any
unrelated domain. The firewall should also include a “throttle” or “shunning”
of networks that flood your DNS server with false replies or repeated queries.
Finally, all web traffic can use HTTPS instead of HTTP, so the attacker would
also need to spoof the website PKI certificate (not impossible!) for E-bay as
well.
To prevent the attack,
you need secure transit of digitally signed DNS records. While this “DNSSEC”
is mandated by the U.S government by 2010, the change-over is slow and a lack
of good documentation makes maintenance of secured DNS servers difficult.
Once the DNS server has been
poisoned, the information is generally cached for a while, spreading the effect
of the attack to the users of the server. This technique can be used to
replace arbitrary content for a set of victims with content of an attacker’s
choosing. The fake server contains real-looking content, but these files could
contain malicious content, such as a worm or a virus, or just a fake login form
to collect usernames, passwords, and credit card numbers. A user whose
computer has referenced the poisoned DNS server would be tricked into thinking
that the content comes from the target server and unknowingly download
malicious content.
As part of the Golden
Shield Project, China regularly engages in DNS poisoning for particular sites
or networks, which violates the policies that the project operates under.
A secure version of DNS called DNSSEC
uses cryptographic digital signatures signed with a trusted digital certificate
to determine the authenticity of data. DNSSEC can counter cache poisoning
attacks, but (as of 2008) is not widely deployed; there are many objections to
the current version.
Similar poisoning attacks can occur
with other services, such as routing table caches built with an insecure
protocol such as RIP, ARP caches, etc.
7. DNS rebinding:
DNS rebinding is a vulnerability in Web browsers and their plug-ins that can be
exploited to circumvent firewalls or to temporarily hijack a client’s IP
address, effectively converting browsers into open network proxies. This
vulnerability allows the attacker to communicate with a remote server, which
ends up thinking the packets come from your web browser. DNS rebinding thus
bypasses any browser same-origin policy used to prevent XSS attacks.
Here’s how it works with a Java plug-in (patched long ago; Applets are now
restricted to connecting to the IP address from which they were loaded):
1. A client visits
a malicious web site, attacker.com,
containing a Java applet. The attacker’s DNS server binds attacker.com to two IP addresses: the
attacker’s web server and the target’s web server.
2. The client
executes the attacker’s applet, which opens a socket to the target. The JVM
permits this connection, because the target’s IP address is contained in the
DNS record for attacker.com.
In the JavaScript version of this
attack, the attacker sends some JavaScript to the browser that instructs the
browser to connect back to a server at attacker.com.
The attacker’s server refuses this second TCP connection, forcing the browser
to switch over to using the victim IP address in about 1 second.
DNS rebinding can be exploited
to circumvent firewalls. If a user inside a corporate network views
malicious content (delivered, for example, as an advertisement on a reputable
Web site) the attacker can open network connections to any machine behind the corporation’s
firewall, through the browser. Using these connections, the attacker can access
confidential documents, exploit unpatched vulnerabilities in network services,
or otherwise abuse network services relying on the firewall for protection.
Additionally DNS rebinding can
be exploited to hijack a user’s IP address (temporarily) to send spam email
or defraud pay-per-click advertisers. Filtering spam relies heavily on
black-listing IP addresses known to send spam. Using DNS rebinding, an
attacker can send spam from the IP address of every client viewing his or her
malicious content, avoiding these black lists. Similarly, the pay-per-click
advertising schemes used by most advertising networks rely on filtering fake
clicks by examining the patterns of clicks by each IP address. Using DNS rebinding,
the attacker can launder his or her clicks through hundreds of thousands of
unsuspecting Web browsers.
This vulnerability has been fixed in
the past by the browser and plug-ins, which preventing host names from changing
from one IP address to another, a defense that came to be known as DNS
pinning. Current browsers defend against the standard rebinding attack
by “pinning” host names to IP address, preventing host names from referring to
multiple IP addresses. E.g., Internet Explorer 7 pins DNS bindings for 30
minutes. Unfortunately, if the attacker’s domain has multiple A records and
the current server becomes unavailable, the browser will try a different IP
address within one second. Current browsers use several plug-ins to render web
pages, many of which permit direct socket access back to their origins.
Another class of rebinding attacks exploit the fact that these multiple
technologies maintain separate DNS pin databases.
Pinning not a sufficient defense
against DNS rebinding because modern browsers contain many different
technologies that permit network access, such as Flash and Java. These
technologies have separate pin databases but are permitted to communicate
within the browser. This allows the attacker to pin one technology, say
JavaScript, to his server and simultaneously pin another technology, say Java,
to the target server. The attacker can then use LiveConnect (a feature that
bridges Java and JavaScript) to communicate with the target server, effectively
rendering the DNS pining useless. Modern browsers no longer support pinning
over many minutes or hours, as DNS load-balancing returns different IP
addresses for the same FQDN. Firefox releases a pined IP in about 1 second.
To prevent an attacker from
circumventing a firewall, you must prevent your resolver from binding DNS names
to your organization’s internal IP network addresses. dnswall is a daemon that filters out
private IP addresses in DNS responses. It is designed to be used in
conjunction with an existing recursive DNS resolver in order to protect
networks against DNS rebinding attacks. Currently there’s no good defense
against IP address hijacking, but there is work in progress in both DNS and in HTML5.
Domain name
frontrunning (a.k.a. domain tasting) is a technique used by
Network Solutions and other registrars to hold domain names hostage, so you can
only register them via that registrar. ICANN unanimously voted in Jan. 2008 to
enforce a 20-cent surcharge for registering a domain name, even if the domain
is returned during the add-grace period.
The new policy is
designed to prevent “domain tasters” from registering millions of
domains without paying for them. Under the current rules, registrars can
sample domains for five days without committing to purchase them. This was
originally implemented to allow people who made a mistake to get their money
back, but some registrars have built a multimillion-dollar industry off of registering
millions of domains and only paying for those that earn enough money through
pay-per-click advertising.
The new regulation
means that for every 100,000 domains bought, registrars will owe ICANN $20,000.
VeriSign estimates that the top 10 domain-tasting registrars were
responsible for 45.4 million of the 47.8 total domains deletes in January 2007.
8. DoS
(Denial of Services) occurs when an attacker can use up so many resources on a
server, that the service can’t be used by legitimate users. This can be done
in several ways: sending small requests that consume many resources, tricking
legitimate services into attacking a target (an amplification attack),
or having many clients send requests at once (a distributed denial of
service attack, using a botnet). Some examples include packet storm,
SYN flood (Each SYN packet can use up some RAM even if the 3-way
handshake is never completed. By sending lots of SYN packets the server could
crash), DDoS (from many bots or zombies
at once), smurf attacks (send a ICMP echo (ping) or fraggle
attack (a UDP ping), with fake src addr to a broadcast addr for your LAN;
worse: send ping to bastion host with fake LAN broadcast addr, causing your
host to flood your LAN with packets). Describe the ping of death.
To fix smurf and fraggle attacks turn off services from xinetd: echo, discard, daytime, chargen, and any others
you don’t know you need. Disable echo and echo replies to/from broadcast (or
multicast or anycast) addresses. You can’t stop packet storms yourself, you
must contact your ISP and get them to stop the attack. (Some ISPs don’t have
plans or procedures for this; don’t use them!) Use a stateful packet filter in
your firewall and use a proper architecture (such as using a DMZ). A modern
TCP/IP stack should not use RAM per SYN packet.
Historically the
initial sequence number used for a TCP/IP 3-way handshake was zero, but the
standard allows any value. Using zero causes two security issues. One is
allowing attackers to guess the sequence numbers of the next packets easily.
An attacker could then send a RST packet to the client (or server), and pretend
to be the client to the server, “hijacking” the connection.
Another security
problem is SYN flooding. A technique called syn cookies means a
server doesn’t have to store any data for a connection until the handshake is
complete. In essence, when the initial SYN packet arrives the server takes the
client’s IP address, source port number, a timestamp (accurate to the minute),
and a secret number, and computes a hash. This hash is the SYN cookie and is
used as the initial sequence number by the server. When the third packet is
received, the server can recompute the hash to compare with the received
sequence number (minus 1). Previously information (about half-open
connections) had to be kept in memory until the handshake was complete.
This method still has
some problems, (e.g., any options set in the first SYN packet are lost). A
newer but non-compatible method (it requires a new TCP option and sends some
data in the handshake packets) is called TCP cookie transactions
(TCPCT).
Both the client and server must support it. Most systems do today (2010), such
as Linux 2.6.33 and newer. (This will be RFC-6013 when published.)
A dDoS (Distributed
Denial of service) threat is when an attacker coordinates a DoS attack from
hundreds/thousands of hosts. The hosts originally were compromised PCs, but
increasingly (2012), attackers form a botnet from servers instead. Servers typically
have much higher out-going bandwidth. The amount of bandwidth used in DDoS
attacks can be about 50 gigabits per second, with peaks as high as 130 Gbps.
Modern (2016) attacks have been as high as 650 Gbps!
Other forms of DoS are possible.
Slow attacks can clog servers with traffic in many ways, such as the Slowloris
tool used in 2009 to attack Iranian government websites during the protests
that followed the Iranian presidential election. Slowloris clogs up Web
servers’ network ports by making partial HTTP requests, continuing to send
pieces of a page request at intervals to prevent the connection from being
dropped by the Web server. The Slow
Read attack sends a full request to the server, but then holds up
the server’s response by reading it very slowly from the buffer. It does that
by setting the TCP’s window size field to a very small value.
The DNS system itself can be used
to cause a DoS. This is because a small UDP request to a public DNS server can
have the source address easily spoofed, and the reply is often 50 times the
size of the request. So a small number of spoofed requests to some public DNS
server can cause a flood of data to a victim host. This is known as a DNS
Amplification attack.
The so-called Internet of Things
(IoT) allows more opportunities for dDoS attacks. SC
Magazine reported in 10/2015 on a dDoS attack from 900 compomised
closed-circuit television (CCTV) cameras, which would send 20,000 HTTP GET
requests per second to the victim. The cameras were open to being compromised
because they were remotely accessible via Telnet and/or SSH, and used default
or easily guessed credentials. The cameras were then checked to see if they
ran (the common) BusyBox on embedded Linux, on an ARM CPU. If so, malware was
uploaded.
Cybersecurity blog
site KrebsOnSecurity
was hit on 2016/9 by a distributed denial of service (DDoS) attack having a
bandwidth between 620 and 665 Gbps — one of the largest such attacks to date.
Despite the continuous attack, the website remained functional for most of the
day. How is that possible? KrebsOnSecurity used a content delivery
network, or CDN, to host its website: Akami. Akami was
providing the mitigation service for free, but the attack continued.
Eventually, Krebs was forced to take down his very popular site until he could
make alternate arrangements. Eventually, KrebsOnSecurity found a new home: it
is now behind Google’s Project Shield,
a free program run by Google to help protect journalists and dissidents from
online censorship. Once back online, it took 14 minutes for the attacks to
resume, by sending 130 million SYN packets per second. Four hours later, the
attackets sent more than 450,000 queries per second from about 175,000
different IP addresses. The original site could handle a load of about 20 Q/s
only, but Google has sufficient capacity that the attacks make little
difference to it. (See Ars
Technica.)
The attack,
apparently motived by a small group of dDoS hackers who objected to a recent
expose, used IoT devices to send the data. As of 2/2017, the attack is
continuing.
9. Spoofing
(and replay and man-in-the-middle) email, hostnames/domain names, IP addresses,
port numbers, AS numbers, MAC addresses can all be faked. A well-known
spoofing attack is to hijack an rlogin session by guessing TCP sequence
numbers. Another common spoof attack is to trick your MTA into sending out
spam that appears to come from a valid user. The man-in-the-middle
attack is when your outgoing packets go to a black hat, who has cut communications
between you and some host, and they spoof that host to you and spoof you to
that host. In the process they can read, modify, or drop any packets.
Use SSH, VPNs, and
GPG encryption to defeat this attack. Other measures include reverse-DNS
lookups to validate the hostnames. Use a modern TCP/IP stack that uses
hard-to-predict sequence numbers. A common spoof attack is to fake email
headers by using sendmail
directly. In this case (common in a university setting) using the identd server may identify the
wrong-doer (your host sends a request to the identd
server running on the client’s host, providing it with the port numbers used,
and identd should respond with
that user’s username. Not all servers run identd,
and you must not trust what they say blindly.)
Cyber-squatting
is the practice of registering “near-miss” domain names for popular
destinations, such as americalbank.com
(instead of bankofamericia.com)
or newyorktimes.com (instead of nytimes.com), hopping that users will
visit their web sites by mistake. These fake web sites usually contain
pay-per-click content (e.g., selling Viagra or Rolexes) but sometimes mimic the
real destination, in the hopes of obtaining usernames, passwords, or
credit-card data. Sometimes these sites are created in an automated process by
major spammers.
WIPO (world intellectual
property organization) has a Uniform Domain Name Dispute Resolution Policy
(UDRP) to complain about cyber-squatters. They have the power (and often do)
re-assign the domain name to the complainant.
Related to cyber-squatting
is the use of Doppelganger domains, which are domains that are
spelled almost identically to legitimate domains, but differ slightly, such as
a missing period separating a subdomain name from a primary domain name—as in
the case of seibm.com as opposed
to the real se.ibm.com domain
that IBM uses for its division in Sweden. These domains can be used to
intercept email intended for the target.
Recently (2011) a
study found that 30 percent, or 151, of Fortune 500 companies were
potentially vulnerable to having e-mail intercepted by such schemes, including
top companies in consumer products, technology, banking, internet
communication, media, aerospace, defense, and computer security. The
researchers say they managed to vacuum up 20 gigabytes of misaddressed e-mail
over six months. These included such items as employee usernames and
passwords, sensitive security information about the configuration of corporate
network architecture that would be useful to hackers, affidavits and other
documents related to litigation in which the companies were embroiled, and
trade secrets, such as contracts for business transactions.
The researchers also
discovered that a number of doppelganger domains had already been registered
for some of the largest companies in the US by entities that appeared to be
based in China
10. Eavesdropping is done by
users or viruses (or worms) on the same host looking at things they shouldn’t,
by users on other hosts listening to network traffic. This is called packet
sniffing or snooping. To do this requires a NIC that supports promiscuous
mode (sometime called debug mode). In this mode the NIC will
pass to an application all packets it sees, not just the ones addressed
to it. (Demo tcpdump. Discuss sniffit, snort.)
Reading your boss’
e-mail account isn’t just a bad idea—it could also get you hauled in federal
court on wiretapping charges. David Szymuszkiewicz, an Internal Revenue
Service worker in Wisconsin, from 2007–2010 used an Outlook mail rule installed
on his boss’ computer to copy messages over to his own account.
To fix, make sure file permissions
and umask setting are correct.
Remove un-used accounts. To see which hosts have NICs in promiscuous mode use
the ifstatus command. Use switched Ethernet
instead of hubs (discuss).
11. Ethernet Switches have some
security issues. Malicious users can forge MAC addresses, confusing switches
into broadcasting all packets as if the switch was a hub. Cisco switches use dynamic
trunking protocol (DTP), which allows a host to pretend to be a switch, and
then receive all traffic. Spanning tree protocol (STP) can be abused
similarly, to make other switches send all traffic to some host (pretending to
be a switch). There are a number of mitigations possible: timing out and
restricting Mac-to-port mapping, disabling DTP except on selected trunk ports,
and disabling STP root-switch elections. (The blinking lights on switches can
be captured with cheap equipment from up to 100 feet away, another item that
may be configurable.)
12. Phishing is the act of
tricking someone into giving them confidential information or tricking them
into doing something that they normally wouldn’t do or shouldn’t do. It is a
type of social engineering. The term comes from the analogy that
internet scammers are using email bait to fish for passwords and financial data
from the sea of internet users. A common type of phishing is fraudulent e-mail
that appears to be from a legitimate Internet address with a justifiable
request, usually to trick you into surrendering private information that will
be used for identity theft.
Most phishing
attacked are aimed at the general public and attempt to obtain general,
personal data such as credit card numbers. A targeted attack, aimed at a
single person or group and intended to obtain specific data is known as a spear
phishing attack.
Japan’s top weapons
maker, Mitsubishi Heavy Industries (MHI), has confirmed it was the victim of a
cyberattack in 8/2011 that reportedly targeting data on missiles, submarines
and nuclear power plants. MHI said viruses were found on more than 80 of its
servers and computers. This were spear phishing attacks; hackers sent highly
customized and specifically targeted messages aimed at tricking people into
visiting a fake webpage and giving away login details. (Neither the Japanese
government nor MHI have said who may be responsible. A report in one Japanese
newspaper said Chinese language script was detected in the attack against MHI,
but China has denied any responsibility.) The attack was not reported to any
government officials, who learn of the attack by reading about it in a
newspaper story. (Reported in BBC news on 9/20/2011.)
13. Pharming is a version of
online ID theft. A virus or malicious program is planted in your computer and
hijacks your Web browser. When you type in the address of a legitimate Web
site, you’re taken to a fake copy of the site without realizing it.
14. Linkjacking
is a way to drive content to a designated site. Aggregation sites such as Digg.com
or Google News pull content in from other sites. When users visit these
services, the pages and links they wee are created by third parties. If you
can add content to a blog or other site used by an aggregation service, you
could add fake content, often nothing more than a list of hyperlinks to some
website you wish to promote. This content will be read by the aggregator and
displayed, with the URLs often obfuscated (Google search results do this) and
users can’t always tell the link is fake/bad. When a visitor visits the page
that has been linkjacked, they will see links that redirect them to other sites,
most with no content.
15. Social Engineering
is when a user is tricked into doing something a black hat couldn’t do alone.
A common example is to request user ID, password, or credit card information in
a way that the user thinks is legitimate, say by popping up a window that
states “You have been disconnected, enter your userid and password to
continue”, or “login: read password: read login incorrect now
run real login” and the user often thinks they just mistyped their
password.
Another favorite is an attachment
in an email with a name such as “claim-prize.com”.
This looks like a URL, but is in fact a .com
program that will run when you click on it. I recently received a notice with
a link to “wwwfacebook.com” that
otherwise was a duplicate of a real Facebook email. The only solution is not to
be fooled. Continuous education and training of users is often a job of a
system admin.
Another example is so-called Nigerian
or 419 scams, or Advance-fee fraud (AFF) in which the target is
persuaded to advance sums of money in the hope of realizing a very much larger
gain. (Also called “advance-fee scam”.) “419” is the statute number of the
Nigerian legal code this violates. Scammers send huge checks to unsuspecting
victims with some story attached to explain the overpayment, and the victim is
expected to wire back the difference immediately. When the checks are
deposited, they bounce. Variants of the scam have become more creative such as
asking for help in laundering (“moving”) money, asking for down-payments of
fantastic opportunities and offers, or promising to provide a newly-discovered
herbal cure for some disease such as AIDS.
Dutch investigation
firm Ultrascan is a company that has been monitoring the activities of 419
scammers since 1996. They analyzed 8,503 cases across 152 countries in 2009,
and report that victims lost $9.3 billion in 2009 (compared to $6.3 billion on
2008).
The majority of AFF is organized by
people living in Nigeria, but it’s not always carried out by people there
anymore. Ultrascan says that 250,000 scammers perpetrated their crimes from
Nigeria, and at least 51,761 scammers are from 69 other countries. AFF remains
popular in its native country, perhaps due to a poor economy that can’t provide
jobs to English-educated students. (Also, there is “a truly epic level of
corruption”, according to Transparency International.)
‘People who fall for
so-called “Nigerian scams” aren’t victims at all—in fact, they’re greedy and
should be jailed,’ according to Nigerian high commissioner Sunday Olu Agbi. He
said that Nigeria has gained a bad reputation because of the scams perpetrated
by a minuscule number of people, and that those who find themselves involved
with the scams are equally as guilty as those running them. ‘Out of the 140
million people in Nigeria,’ Olu Agbi said, ‘that less than 0.1 percent were
involved in Nigerian scams.’ [That’s 140,000. -WP] — Ars Technica 8/22
16. Spam refers to electronic
junk mail or junk newsgroup postings. Spam can lead to a denial of service
attack, make a newsgroup (online discussion forum) worthless to attempt to
read, or fill a mailbox past some quota. (This last is sometimes also called
an email bomb.)
You can and should help fight
spam. You can report any spam to spamcop.net and sign up for their DNS
blacklist. (HCC uses this; report HCC spam to spamcop@hccfl.edu.)
Spam is discussed in more detail,
below.
17. Spyware/Adware/Malware:
Generic terms for evil software. These work by adding BHO Demon for BHOs (browser
helper objects or plug-ins) in IE, Outlook, and other programs that allow
some form of plug-in. Unlike a virus the program itself isn’t modified, rather
the trusted program (web browser) runs the malicious software. However a virus
or other technique may be used to install (and re-install if removed) the
malware. Tools to combat malware include Spybot Search & Destroy, Lavasoft
Ad-aware. Also Window’s malicious software removal tool MRT.EXE (free and updated monthly
by Microsoft).
The governments of
the United States, Canada, and South Korea, as well as the UN, the
International Olympic Committee, and 12 US defense contractors were among those
hacked in a five-year period, starting in 2006, and dubbed “Operation Shady
RAT” by security firm McAfee, which revealed the attacks. Many of the
penetrations were long-term, with 19 intrusions lasting more than a year, and
five lasting more than two. Targets were found in 14 different countries,
across North America, Europe, India, and East Asia.
The infiltration was
discovered when McAfee came across a command-and-control server, used by the
hackers for directing the remote administration tools—“RATs”, hence the
name—installed in the victim organizations, during the course of an investigation
of break-ins at defense contractors. The server was originally detected in
2009; McAfee began its analysis of the server in March 2011. On the machine,
the company found extensive logs of the attacks that had been performed, a big
error by the attackers. Seventy-two organizations were positively identified
from this information; the company warns that there were likely other victims,
but there was not sufficient information to determine what they were.
The attacks
themselves used spear-phishing techniques that are by now standard. Apparently,
legitimate e-mails with attachments are sent to organization employees, and
those attachments contain exploit code that compromise the employee's system.
These exploits are typically zero-day attacks. With a PC now compromised, the
hackers can install RAT software on the victim PCs, to allow long-term
monitoring, collection of credentials, network probing, and data exfiltration.
McAfee says that the total data stolen through these attacks amounted to
petabytes. Where it has gone and who has used it remains unknown. The targets
were a mix of governments, technology and defense companies, and nonprofit
sports bodies and think tanks, leading some to accuse China.
Related to these threats is the threat
of tracking users without their consent. Evercookie is a
JavaScript-based application created by Samy Kamkar which produces zombie
cookies in a web browser that are intentionally difficult to delete. In
2013, a top-secret NSA document was leaked citing Evercookie as a method of
tracking Tor users.
An Evercookie is not merely
difficult to delete. It actively “resists” deletion by copying itself in
different forms on the user’s machine and resurrecting itself if it notices
that some of the copies are missing or expired. Specifically, when creating a
new cookie, Evercookie uses the following storage mechanisms when available:
Standard HTTP cookies, Local
Shared Objects (Flash cookies), Silverlight Isolated Storage, Storing cookies
in RGB values of auto-generated, force-cached PNGs using HTML5 Canvas tag to
read pixels (cookies) back out, Storing cookies in Web history, Storing cookies
in HTTP ETags, Storing cookies in Web cache, window.name caching, Internet
Explorer userData storage, HTML5 Session Storage, HTML5 Local Storage, HTML5
Global Storage, and HTML5 Database Storage via SQLite. The developer is
looking to add additional features as well.
In addition to zombie cookies,
advertizers have found ways of linking
user identities across domains (nasty, since cookies can usually
only be served to sites from the same source as the cookie).
One type of malware to watch out
for, is the silent installtion of a proxy server on your PC. Then a web
browser (and other network software) silently sends all traffic to a malicious
server, which can forward boring traffic, operate MitM eveesdropping, or direct
your browser to fake websites.
Security report:
1. Firefox Options
-> Advanced -> Network -> Connection Settings = "Use system proxy
settings"
2. Control Panel
-> Internet Options -> Connections -> LAN settings ->"Use a
proxy server for your LAN" checked!
...-> Advanced =
"HTTP:127.0.0.1 port 16110", Secure: 127.0.0.1 port 16110" !!!
After unchecking “Use
a proxy server”, to be safe, set Firefox to “No proxy”.
Proxy server =
127.0.0.1 port 16110 is the work of malware! A quick web search found the
“PUM.bad.proxy” malware does that. (And who knows what else!)
Also, be sure and
check your hosts file in C:\Windows\System32\drivers\etc\.
Malware uses that as plan B when plan A (changing your proxy settings) fails.
Email Threat: Spam
Spam is loosely
defined as unwanted email. Some people define spam even more generally as any
unsolicited e-mail. Similar terms: unsolicited bulk/commercial email
(UBE/UCE). The problem is not all unsolicited bulk email (UBE)
and unsolicited commercial email (UCE) is considered spam by
everyone. Adjustable and adaptive mail filters (sometimes known as milters)
can be very effective, once trained by a user, in separating the spam from the ham
(non-spam email).
In an attempt to
shame organizations with poor security into improving, a new website, SpamRankings.net
lists top spam-sending, spam-friendly organizations.
Spam is becoming a problem on
newsgroups and on-line forums as well. Besides regular spam, there is a
growing trend to post “prank” messages. Such messages have subject lines that
seem relevant to the discussion, but take you to a photo of a duck on wheels
(called “duck-rolling”). Another popular prank takes you to a YouTube
video of Rick Astley’s 1987 Never Gonna Give You Up music video, a
practice now known as “Rick-rolling”.
A mail filter produces a false
positive when it misclassifies ham as spam, and a false negative
when it misclassifies spam as ham. No mail filter can be correct 100% of the
time, and will produce many more false positives than false negatives, or
vice-versa, depending on the filtering technique used. (QU: which is less
objectionable?)
Even the best filters won’t provide
100% protection. Spam is a transient threat so by the time you know a
sender should be blacklisted or have updated your mail filters to reject
such mail as spam, the damage has already been done. By combining many
different techniques, incorrectly classified email can be kept to well under
0.5% for individuals, and under 1-5% for organizations and IPSs.
All mail filtering techniques take
CPU processing time (some need a lot), RAM (hundreds of megabytes), disk space
(up to a gigabyte not counting email stores), and network bandwidth for
additional DNS and other lookups. This places limits on how much email a
single server can handle (usually measured in terms of active users). Today a
single mail server with good filtering can probably handle a few thousand
active users except for peak traffic, in which case some email will be backed
up for hours (which may cause duplicate emails to be send) or lost altogether.
Your mileage may vary.
Other
Email Threats
Usually, spam is sent to legitimate
user email addresses. Sometimes the spammer is trying to either break into a
system (by discovering valid account names) or perform a denial of service
attack on your MTA. In these cases the spammer will use a dictionary of
common account names, usually hundreds to thousands, including variations on
each (such as upper/lower case letters, or appending a number such a 1 or
123). Such an attack of referred to as a dictionary attack.
Phishing is a fraudulent
e-mail that appears to be from a legitimate Internet address with a justifiable
request, usually to trick you into surrendering private information that will
be used for identity theft. Such emails are a type of security threat known as
social engineering and will rarely be detected by spam or virus filters.
A targeted attack, aimed at a single person or group and intended to obtain
specific data, is known as a spear phishing attack.
Joe jobs are obvious spam
sent with inflammatory content such as child porno, hard drugs, etc., with the
victim’s address as the return address. Usually the Joe job will contain the
victim’s website URL(s) too. The idea is to make the recipients so angry that
they in turn attack the intended victim (listed as the sender), by blacklisting
or other means. Joe jobs are usually sent as revenge, not for gain.
While not considered
vulnerability (threat), it is worth noting that some people attempt to avoid
email surveillance by not sending emails. Instead, they write a letter and
save it in a draft folder. Then someone else logs into the same email account
and can read the draft. This is a well-known technique. However, it has a
flaw: The U.S. department of justice has argued that e-mails in a “draft” or “sent
mail” folder are not in “electronic storage” (as defined by the Stored
Communications Act), and thus don’t need a warrant to obtain. The DoJ has
argued it should be able to get such messages with a mere subpoena.
Email
Threat Counter-Measures
Header and protocol
conformance and coherency (or consistency) filters check for
SMTP protocol violations and envelope and header violations and
inconsistencies. A lot of spam can be identified by violations of email RFC
standards (e.g. RFCs 5322 or 2045) such as suspicious dates (e.g., a sending
date in the far past or future), or violations of SMTP protocols. In fact many
spam-sending tools ignore error returns and reply messages and still send the
email data. By adding a small delay to some of the SMTP messages, such as the
greeting sent in response to the HELO message, a lot of spam can be caught.
Whitelists are lists
of trusted senders, and blacklists are lists of known bad
senders. Unfortunately, since the bad guys will use forged sender information
and/or throw-away accounts, such lists are often more trouble than they are
worth. Additionally ISPs use a pool of IP addresses, so a spammer may have a
different IP address each time, and worse the old IP address may be assigned to
an innocent party. Some well-known blacklisting services are spamhaus (www.spamhaus.org),
SORBS (sorbs.net),
and MAPS (mail-abuse.com).
(There’s a good list at spamlinks.net.)
Hash Cash, or electronic
postage (hashcash.org)
makes the sender add a header that is time-consuming to generate but easy to
validate. This makes it very expensive to send thousands or millions of
emails. An example might be to generate an MD5 checksum of the sender,
recipient, date, and subject headers, and compute the square root, and include
that in a postage header. The recipient can easily square the value provided
to validate it. This technique requires a lot of initial buy-in before it will
be useful, as all MTAs will need to support it.
Challenge/Response
(or C/R) techniques are used to authenticate senders. These quarantine
email from unknown senders, who get sent a reply email with some sort of
challenge. The idea is that it takes a human at the other end to reply
correctly to the challenge (within some timeout interval). When the challenge
reply is received and validated, the original email gets sent and the sender is
added to a whitelist so future emails get through immediately. These systems
are annoying, and with forged sender addresses cause even more spam.
Legitimate automated email (say from a mailing list) would had problems too
(you’d had to add them manually to some whitelist).
Greylists (unknown
senders that get rejected once) are useful as spammers rarely will take the
time to resend spam. However most MTAs will attempt to resend email in about
10 minutes or so after the first try fails. The greylist filter notices the
second email, delivers the first, and adds the sender to a whitelist. The
delay is unacceptable to some users, and is under the control of the sender MTA
in any case (which may not resend until the next day, or ever). Like C/R
techniques greylists add extra burdens of memory and bandwidth to both your MTA
and the sender’s MTA, but as humans don’t have to deal with this, and only the
first email sent is delayed, greylisting is much more acceptable the C/R
techniques.
When a domain has both a primary
(high priority, low number) and a secondary (low priority, high number) MX
record configured in DNS, RFC-5321
(SMTP) specifies that a client MUST try and retry each MX address in order, and
SHOULD try at least two addresses. Violators of this specification are usually
sending spam or viruses. Nolisting takes advantage of this fact by
configuring a domain's primary MX record to use an IP address that does not
have an active service listening on SMTP port 25. RFC-compliant clients will
retry delivery to the secondary MX, which is the real MTA. This technique may
lead to issues with some ISPs like Earthlink and AOL, who are known for being
rather stupid in their mail servers. Also, if widely adapted, the attackers
will just change their MTAs.
Content filtering
checks the body of the message (and any attachments) for signs of spam.
Examples include looking for URLs to known spam-sites, buzz-words such as
Viagra, etc. (This sort of filtering uses regular expressions.)
There are many techniques for
filtering available, and used in combination they can catch well over 99% of
spam, with few false positives. (Ham classified as spam.) Such
filters often use a technique known as Bayesian filtering, which
is an adaptive technique that requires the filter to be trained with a large
set of both spam and of ham.
Bayesian filters are the type of
filters built into Mozilla, Thunderbird, and other MUAs. Over time, the nature
of spam changes and occasionally the filter will incorrectly categorize email
(in which case you merely need to click on an icon to re-train the filter).
Bayesian filters don’t work as well for organizations, as more email gets
classified as ham than any one person would like. It’s even worse for an ISP.
However, eliminating even 80% of spam is worthwhile!
There are some near real-time
spam filtering systems, including Vilpul’s Razor (razor.sourceforge.net)
and the Distributed Checksum Clearinghouse (DCC www.rhyolite.com/dcc).
These efforts rely on a large network of (trusted) email users to notify them
at once of new spam. By configuring your system to use one of these systems,
you can identify new spam usually within minutes of its first appearance.
(Consider contributing to the effort by becoming a member.) Spammers need to
customize each spam message to defeat this.
These spam filters
need to read the email body, a security and privacy concern; it may not be
legal for ISPs to do this. Researchers from the U.S. Naval Academy have
developed a technique for analyzing
email traffic in real-time to identify spam messages as they come
across the wire, by using just the information from the TCP/IP headers. The
researchers showed that spam email blasts have certain characteristics at the
networking transport layer. Signal analysis of factors such as timing, packet
reordering, congestion and flow control can reveal the work of a spam-spewing
botnet. “A lot of spam comes from spambots, which are sending as fast as they
can and congesting their local uplink. So you can detect them by looking
really hard at the TCP stream”.
Message limiting is
an accounting technique that is used to limit the number (or rate) of messages
arriving (or better, leaving!) an MTA according to domain, sender, or
recipient. Hotmail uses this to limit outgoing spam from its users.
Call-back is a
technique that causes an MTA to use DNS to lookup the sender’s mail server, and
attempts to send an error message (but without any DATA, so it won’t actually
get delivered) to the sender. The idea is that the MTA will reject this error
email if the sender doesn’t exist, and we’ll know the original email has a
forged sender address. This will catch fake domains, IPs and users, but not
legitimate email addresses. For this technique to work the sender’s MTA must
correctly accept the null address (“<>”)
and many don’t. Another problem is that of dictionary attacks, where the
spammer sends to many names on your host instead of one targeted user. For
each message a call back is required, which is a lot of work. Because it
requires resources on the sender’s MTA too, it is often seen as a type of C/R
system.
Call-ahead is a
related technique that has your MTA check for a legitimate recipient before
accepting the email data. When a dictionary attack is done, a few thousand
error messages or bounces can be generated; this would stop these.
Although I haven’t heard of the
idea implemented anywhere, call-ahead would allow the MTA to recognize
dictionary attacks and block (blacklist) or shun (temporarily block) the
sender.
Accreditation filtering or
authorized mail sources are anti-forgery tools such as SPF
(OpenSPF.org),
Microsoft’s Caller ID (which merged with SPF classic to
produce MS Sender ID, but that’s just SPF) DomainKeys (patented by Yahoo.com, and now called DKIM
for DomainKeys Identified Mail; see RFC-5617), MTAmark,
and GOSSiP.
SPF works by adding a TXT record to the DNS database (there
is also an SPF RR type, but it
shouldn’t be used), which identifies the IP address for a domain from which
legitimate email can come. (See RFC-6686, and others) SPF
breaks if the mail is relayed (forwarded), but MTA’s can be configured to
re-mail the email, rather than relay it. This can have problems too with very
long email addresses that result.
MTAmark is similar to
SPF but uses the reverse IP lookups, and claims it doesn’t break relaying. However,
it never gained widespread support.
DKIM adds an encrypted digital
signature header to the email (similar to electronic postage). A good
explanation of DKIM can be found in the 12/2008 H-online DKIM article Signing
emails with DomainKeys Identified Mail. When checking email, an MTA
fetches the public key from DNS, and validates the digital signature. This
works best when DNS is also secured (with DNSSEC).
DKIM has an adjunct
proposal called Author Domain Signing Practices (ADSP), defined in RFC-5617.
Similar to DMARC, ADSP allows a domain to make a statement to other DKIM
verifiers (via DNS records) that all mail it sends is signed, and that any
unsigned mail from that domain (or mail with signatures that fail to verify)
should simply be discarded.
Of these schemes, SPF and DKIM are
the most widely used. According to a
Google study, incoming non-spam mail to gmail users is over 91%
protected by SPF and/or DKIM.
These systems are not perfect
though. For one thing, they haven’t been adopted by everyone. This means that
some legitimate mail will arrive that won’t have SPF or DKIM DNS entries, and
so mail servers shouldn’t (currently) depend solely on that to reject email.
Common legitimate operations can also break these schemes; mailing list
programs and MTAs can add footers to messages, which will cause rejection by DKIM,
and forwarding e-mails causes rejection by SPF. SPF and DKIM also make it hard
to diagnose misconfigurations. Receiving servers will typically silently drop
email sent by systems with bad SPF or DKIM configurations.
Recently (2012), a
large group of companies (including some of the most common corporate victims
of phishing attempts) is proposing a new scheme, DMARC (Domain-based Message
Authentication, Reporting & Conformance). DMARC fills some of the gaps
in SPF and DKIM, making those tools more trustworthy. DMARC is based on work
done by PayPal along with others. This initial work resulted in a substantial
reduction in the number of PayPal phishing attempts seen by users of Yahoo Mail
and Gmail.
As with SPF and DKIM,
DMARC depends on senders of email storing extra information about the sender,
in DNS. This information tells the receiving MTAs how to handle messages from
that sender that fail the SPF or DKIM tests, and how critical the two tests
are.
Using accreditation tools,
whitelists and blacklists become more useful as you can then be sure of the sender’s
identity (although it still won’t help against throw-away accounts). It is
worth noting that the original purpose of SPF and similar tools is not to
prevent spam. These tools will usually stop most phishing and Joe jobs, which
rely on forged sender information. (Now the spammers and phishers must also
forge IP addresses).
Using SPF is simply a matter of
adding an appropriate DNS record for your domain. DMARC is just as simple.
DKIM is a bit more involved however. Typically, you generate a pair of keys,
and publish the public key (and some other info) in DNS. A milter (mail
filter) is used to sign the outgoing email: The MTA pipes the message through
the milter (using a socket), and then sends the result. OpenDKIM is a
popular milter, but there are others as well.
Reputation
filtering is similar to a blacklisting, but takes into account many
factors about the sender: domain, IP address, sender’s name, age of the sender
(i.e., is this a brand-new account or a sender on-line for months/years?), and
email history. A third party collects this data and provides the reputation
score for the sender that your MTA can request. Many such services exist
including Aspen, Cloud Mark,
Outbound Index, and Return Path.
SpamAssassin
SpamAssassin is one of the
most popular filtering tools available. It is a giant Perl script that
combines many different filtering techniques and computes a composite score for
each email message. The idea is that if only one of many checks think the mail
is spam, maybe it isn’t. Different factors add to the score (such as
variations of “Viagra” or “Rolex”) while some subtract from the score (such as
valid SPF records). SpamAssassin
adds a spam score header and allows the MDA to set a threshold to allow or
reject the mail. It also has its own threshold and adds a simple “yes” or “no”
spam header as well. By default a composite score >= 5 means spam.
This tool is great but does has
some problems: it is slow and a memory hog, and can bring a busy mail server to
its knees. When used site-wide it is a good idea to use a cron job to have it
re-train itself nightly on the email that users have looked at and classed as
spam and ham. (The training tables can be larger than 300MB!) (A C version
called Dspam is available that reportedly outperforms SpamAssassin.)
Users can override SpamAssassin’s
site-wide defaults, with the file ~/.spamassassin/user_prefs.
You can set the threshold with a line of “required_score num”.
You can add lines to white-list or black-list some email addresses (which
either adds or subtracts 100 points to the score) with “whitelist_from user@host” and “blacklist_from user@host”. You can change the
score of any of the SpamAssassin tests (a list is available at spamassassin.apache.org/tests.html)
with “score tstName num”.
One of the tests SpamAssassin uses
is a statistical analysis of the email, using something known as a Bayesian
Filter. This analyzer can be trained on what you consider spam and ham. A
well trained filter can detect correctly close to 99% of the time, while a
poorly trained filter (that is, the default) may not work better than 75% to
90%. However it takes about 1,000 email messages each of spam and ham to see
any improvement, and at least 2,500 of each for close to the maximum
improvement.
To train SpamAssassin, save your
spam in an mbox. When you have enough run:
sa-learn
--mbox --spam spam-mail-file
sa-learn --mbox --ham ham-mail-file
Note you can use shell wildcards to
specify several files (useful with ham in many folders). The sa-learn man page has lots of useful
background information.
Other
security tools and techniques:
Port knocking (fwknop): A series of packet
connection requests to a specific series of (closed) ports define a secret
knock that will unlock some port for the host doing the knocking. The knock
sequence may include different protocols (ICMP, UDP, TCP, various header
attributes, and relative timings between knocks. Note this may be more useful
for rootkits to hide the backdoors they install.
Use a blacklist for rogue
websites. Various security companies and organizations make malware-infected
domain name lists (“block” lists) available, with the names of known
malicious websites. Some examples include mvps.org, malwaredomainlist.com,
and safeweb.norton.com/dirtysites)
To blacklist one, just add the name in /etc/hosts
file, with the IP address of 127.0.0.1.
Any attempt to direct network traffic to the rogue site will fail (assuming you
have nsswitch.conf set as
normal, to try files then DNS).
Read up on security from
organizations such as www.cert.org and www.sans.org.
Detailed security policy and
procedures documents. (These should be living documents, in the sense that
they are frequently examined and updated.)
Monitoring (log files, resource
use). This can include using SNMP and RMON, ISS, SATAN, SAINT, COPS (Network
Intrusion Detection Systems).
Use LDAP to centralize access
control information (e.g., passwords). Consider Kerberos security too. Use
gpg to encrypt files and emails, and to verify downloaded files were not
altered. (See below.)
Use ssh
to provide encrypted communications, VPNs (see FreeS/WAN too).
Use PAM, correct permissions,
limited use of SUID, liberal use of chroot, ..., to enforce security policies.
port scans (nmap host),
nmapFE is GUI Front End to nmap
packet sniffing (tcpdump, snort, sniffit, snoop on
Solaris):
tcpdump
-X -s 0 ... # show contents of packets.
tcpdump -e -t host ipaddr
# show all packet headers to/from ipaddr.
This may not be legal
in all cases, even on your own organization’s network. Legislation such as the
“Regulation of Investigatory Powers Act 2000 (RIPA)” and the “Data Protection
Act 1998” may apply.
Use lsof
to determine what files are open and what processes are using them.
Use ifstatus
to determine what interfaces are in promiscuous (or debug) mode, often a sign
of someone monitoring traffic to steal passwords or other valuable information.
Network
Access Control
You don’t want to
hand out a lease to any host that shows up on your LAN! Today the solution is
to implement Network Access Control. The 802.1x standard is a
good way to do this. Used on modern Wi-Fi networks, an Ethernet switch or WAP
that implements 802.1x will force newly connected (or just brought on-line)
hosts from connecting until they complete some authentication (usually with a RADIUS
server) using EAP packets. Only then are the hosts connected to your LAN
allowed to send/receive other types of packets. (See 802.1x, page 371.)
Network access
control is the main reason for deploying a network access server, or NAS.
In the past banks of modems were attached to a NAS, which would connect the
modem to the network. Today NASs often use RADIUS for access control. See
RFC-2881 for more information about NAS.
Other solutions can
be used too such as RADIUS, TACACS, PPP, or even a captive portal.
[From Wikipedia:] A captive portal turns a Web browser into an
authentication device. This is done by intercepting all packets, regardless of
address or port, until the user opens a browser and tries to access the
Internet. At that time, the browser is redirected to a web page that may
require authentication and/or payment, or simply display an acceptable use
policy and require the user to agree. Captive portals are used at most Wi-Fi
hotspots, and it can be used to control wired access (e.g. apartment houses,
hotel rooms, business centers, “open” Ethernet jacks) as well.
Since the login page
itself must be presented to the client, either that login page is locally
stored in the gateway or the web server hosting that page must be “whitelisted”
via a walled garden to bypass the authentication process. Depending on the
feature set of the gateway, multiple web servers can be whitelisted (say for iframes or links within the login
page). In addition to whitelisting the URLs of web hosts, some gateways can
whitelist TCP ports. The MAC address of attached clients can also be set to
bypass the login process.
With portable
wireless devices, NAS is making a comeback as an alternative to trying to have
a single point of entry to your network. With an NAS, an SA can secure their
networks by enforcing authentication and registration for newly connected
devices. The NAS can detect abnormal network activity, and isolate suspicious
devices. An example is PacketFence.
VPNs
— Virtual Private Networks
A VPN is used to extend a private
network to include (geographically) remote sites or just remote hosts. The
remote network/host and the local network are connected across a public network
that you don’t have control over, such as the Internet. Because of the nature
of the Internet, a VPN must take into account the unreliability and insecurity
of the public network in the middle.
Before the Internet
became nearly universal, a virtual private network consisted of one or more
circuits leased from a communications provider (a “leased line”). Each leased
circuit acted like a single wire in a network that was controlled by customer. The
communications vendor would sometimes help manage the customer’s network, but
the basic idea was that a customer could use these leased circuits in the same
way that they used physical cables in their local network. – vpnc.org/vpn-technologies.html
There are many different VPN
protocols and software packages. These are used for two different purposes:
VPN for remote access (a single remote user/host connects to your
private network) and VPN for site-to-site connections (a remote
network connects to your private network); this is often referred to as a VPN
tunnel.
When two or more
network segments form a single LAN (data link), the term used is virtual LAN
or VLAN, not VPN. With a VPN the remote host/site always connects to the local
site through a router.
Another classification can be used
to distinguish between VPNs:
·
Telcos and ISPs don’t provide encryption or authentication for
their VPNs. Instead they just guarantee the sites will be connected by private
virtual circuits (thus providing similar QoS guarantees as with leased lines).
Because you need to trust the provider these are known as trusted VPNs.
Trusted VPNs run from one geographic site to another so no authentication is
used or needed. Trusted VPNs usually provide lots of bandwidth limiting
controls and are generally always available (PVC).
·
For remote access VPNs that run over the Internet, the virtual
circuit is not private and the remote side could be anywhere (a roaming
user). This type of VPN requires authentication and the data integrity and
confidentiality that is provided by encryption. Because of the security features,
this type of VPN is known as secure VPN. These VPNs are created
and destroyed for each user session.
Many popular VPN
packages don’t fall neatly into any one category and are called hybrid
VPNs.
Although VPNs of any type connect
to the private network via a router, and all modern routers “speak” one or more
VPN protocols, secure VPNs consume a lot of processing power. For this reason
if you have more than a few sessions at once it is common to use special VPN
hardware: a “gateway” server/router connecting all incoming VPN connections to
your network, or special router crypto-accelerator hardware add-ons.
Traditional VPNs operate between
layers 3 and 4, encrypting the bodies of outgoing packets. This is generally
done by creating a virtual NIC that accepts packets, encrypts them, and sends
them out a “real” NIC. (This sort of tunnel is usually called a GRE (Generic
Routing Encapsulation) tunnel.) Developed by Cisco, GRE tunnels, along
with some authentication and encryption are the basis for most VPNs today.
However it is also possible to run the tunnel at layer 2.
SSL/TLS tunnels function
between the Transmission Control Protocol (TCP) layer and Application layer. Because
of this, such VPNs are referred to as application layer. In addition
these tunnels are usually only used for point-to-point tunnels. When
used only to forward certain types of traffic (e.g., TCP port 80) the term port
forwarding is used. OpenVPN uses TLS tunnels.
Different VPN protocols are
supported by different manufacturers, making incompatibility a problem just
like with WPA. Many VPN implementations use PPP protocols and break up the
resulting data into encrypted IP packets that can be sent across an insecure
internet. The VPN consortium provides compatibility charts (and basic VPN
standards) at www.vpnc.org.
Some examples of VPN protocols
include:
·
Microsoft’s PPTP (which is deeply flawed with known
weaknesses). PPTP is popular as all Windows platforms support it, despite the
known flaws.
·
Cisco’s L2TP
·
IPSec (part of IPv6 but available for IPv4). Considered
the most secure today.
·
SSTP (Secure Socket Tunneling Protocol) by
Microsoft introduced in Windows Server 2008 and Windows Vista Service Pack 1. SSTP
tunnels Point-to-Point Protocol (PPP) or L2TP traffic through an SSL 3.0
channel.
·
OpenVPN doesn’t require kernel modules like IPsec and can
be easier to setup and use. It uses OpenSSL for the encryption (which allows a
choice for the cyphers used) and can use either TLS or a preshared key for
authentication. (Strictly speaking OpenVPN is not a protocol, but a software
suite.)
·
DTLS (datagram transport layer security) is used
for UDP protocols. It is similar to TLS.
·
Cisco VPN, a proprietary VPN used by many Cisco hardware
devices and proprietary clients exist for all platforms. HCC uses this.
·
Cisco AnyConnect VPN uses TLS and a slightly non-standard
version of DTLS as the tunneling protocol instead of the more common IPSec
mechanism.
Only SSL 3.0 (or TLS)
and IPsec are considered strong enough for a VPN today (by the VPNC at least).
However in 2009, several security flaws in SSL/TLS were uncovered, one in the
protocol itself. Look for SSL 4.0/TLS 2.0 in the future. If possible,
configure your tools to use only TLS 1.1 or TLS 1.2.
VPN suffers from an image problem:
VIPs in a company like to brag about VPNs, and usually insist they connect the
home/laptop computer directly to the company’s intranet (bypassing any
firewall). Needless to say, this is a bad idea. It is much better to place
the VPN gateway host in its own LAN, connected to the company intranet only
through the firewall router (thus treating VPN traffic nearly the same as
Internet traffic.)
A VPN solution also requires all
traffic to go through the corporate intranet on the way to/from the Internet.
(Consider sitting at Starbucks and trying to connect to Google.) Many
companies insist that corporate laptops only use VPN through the corporate
gateway. This prevents problems related to DNS cache poisoning (you’re forced to
use the company’s DNS server).
[Reported in The-H
8/22/12] At the 7/2012 Black Hat conference, Moxie Marlinspike announced
the CloudCracker web service, which can crack any PPTP connection within
24 hours, for $200. (PPTP uses MS-CHAP-v2.) The same is also true for
corporate Wi-Fi networks even if they encrypted with WPA2, if they use MS-CHAP2.
In response, Microsoft made two recommendations. Users of MS-CHAP technology
should either:
(1) Give the MS-CHAP
authentication traffic its own, separately encrypted tunnel; Microsoft
recommends the Protected Extensible Authentication Protocol (PEAP) for this
purpose.
(2) Migrate to a
secure VPN technology. Microsoft’s suggested alternatives include Cisco’s
proprietary L2TP with IPSec, and IPSec with IKEv2 and SSTP. (The open source
protocol OpenVPN is not listed in Microsoft’s recommendation.)
(See this follow-up
story on the-H on 9/26-2012.)
VPN and WPA solutions can be used
together in improve security for Wi-Fi hot-spots. A captive portal
can also be used. This is a router that blocks all traffic unless the user has
authenticated. Such portals usually redirect all HTTP traffic (using DNAT) to
a web server, allowing the user to login or to agree to terms of service (for
public WAPs). Once authenticated, the DNAT entry is removed.
When using any type of WLAN, always
use a VPN or some other form of encryption (such as SSH) that runs on
top of the network layer. This provides a great deal of protection! However, the
cost of all that encryption and decryption, and extra protocol overhead, can
mean a drop in throughput of up to 80%!
VPNs for users
People using public
networks such as with cell phones or laptops and wi-fi hotspots should use
VPNs. There are many free and paid VPNs to choose from, to ensure your
privacy. You need to consider if the VPN provider has but a single egress
point or several, and in what countries.
Many counties have
spying and data-sharing agreements. For example, the UK now stores all text
messages for two years, and they are available without a court order. The UK
shares all such data with the US. The agreements are known as 5 eyes, 9
eyes, and 14 eyes, depending on the number of countries
participating. (See restoreprivacy.com.)
So you probably want a VPN provider with multiple egresses, all outside of 14
eyes countries. VPN providers also vary by the encryption they use; not all
use large keys or provide perfect forward secrecy.
My current personal
choice is ProtonVPN.
AAA
Besides authenticating users there
is a need (especially with a NAS) to provide authorization (what can be
accessed and how) and accounting (who did what, and when) services as well.
Many protocols that provide network authorization implement AAA as well. (See
page 29.)
Lecture
23 — Securing Network Services: TCP Wrappers, xinetd, kernel parameters
TCP Wrappers is
considered a legacy technology by some, but I like it. It is a sort of
firewall. Only daemons complied to use libwrap.so,
and any on-demand services (because xinetd
uses libwrap) use this. There
is a program tcpd, which
can be used if you use the older inetd
daemon instead, which doesn’t use libwrap.
When a TCP packet
arrives with the SYN bit on, in other words, when a request for some (TCP)
service arrives, TCP Wrappers consults the hosts.allow
file. If a rule in there matches the daemon and request information
(typically, just the IP address, but often TCP Wrappers just allows a given
service for anyone), access is allowed and the daemon then processes the
request normally.
If there is no match
in hosts.allow, the hosts.deny file is examined next.
If a match is found there, the request is denied and a log message is written.
If there is no match
in either file, the request is allowed. Both files have the same syntax:
blank lines, comment lines (starting with “#”) and rules. If a line ends with
a backslash, you can continue it on the next. The basic syntax is:
daemon-list : client-list [
: shell-command ]
where the list items
are separated with spaces and an optional comma. You can use various wildcards
and expressions in the lists, such as ALL.
The daemon names listed should match the name of the daemon as shown in a ps listing (the argv[0] string of the program).
The syntax is more
powerful than this shows. Consult the man page for hosts.allow (or hosts.deny;
both show the same page) for all the details. Note that you can put allow
rules in hosts.deny, or deny
rules in hosts.allow. Some SysAdmins
like doing strange things like that.
To have a secure
system (a default deny policy), you usually add the single rule:
ALL: ALL
to the hosts.deny file. This denies every
service from everywhere. Then only the services listed in hosts.allow are permitted. For
example, to allow SMTP email, you could add this rule:
sendmail, postfix: ALL
To not use TCP
Wrappers, have an empty hosts.deny
file (or comment out all rules); then everything is allowed. (Provided there
are no deny rules in the hosts.allow
file.)
Note, not all daemons
use TCP Wrappers. (OpenSSH no longer is compiled with libwrap.so.) And it can’t be used for UDP services, such
as DNS. Also it is sometimes tricky to know if it is used or not. For
example, NSF doesn’t seem to use TCP Wrappers, however NSF depends on RPC
(portmap), and that does use TCP Wrappers.
But TCP Wrappers is useful
in many cases, because the matching rules allow nearly anything to be used to
allow or deny a service request, unlike packet filters. Also, only the initial
request packet is examined by TCP Wrappers; the other packets in the TCP stream
(assuming access is permitted) are not examined, so TCP Wrappers is efficient.
Finally, TCP Wrappers logs the information about the refused request. Here’s a
sample of the default log message, although you can customize that:
Oct 15 01:17:22 YborStudent xinetd[7331]:
libwrap refused connection to telnet (libwrap=in.telnetd) from ::1
See the man page for hosts.allow or hosts.deny if you care about the advanced syntax details.
Although TCP Wrappers
is very general, the most common functionality has been added to xinetd, which (unfortunately) allows
you to set the policies in two different places.
Since xinetd directives only apply to the on-demand
services and not the others such as sendmail, I prefer to keep my security
policy in one place using the host.{allow,deny}
files, and not xinetd
directives. YMMV.
Here’s a xinetd entry for ntalk (used by the talk program) to allow talk connections only from localhost,
and that doesn’t use tcpd:
service ntalk
{ disable = no
socket_type = dgram
wait = yes
user = nobody
group = tty
server =
/usr/sbin/in.ntalkd
only_from =
localhost
}
/etc/xinetd.d/telnet: If TCP Wrappers
not compiled into xinetd (check messages for xinetd startup message) can manually added it, otherwise server=in.telnetd:
service telnet
{ flags = REUSE
NAMEINARGS
socket_type = stream
wait = no
user = root
server =
/usr/sbin/tcpd
server_args =
/usr/sbin/in.telnetd
log_on_failure +=
USERID
disable = no
}
Then
edit or create the following files:
/etc/hosts.deny: ALL: ALL
/etc/hosts.allow: in.telnetd: LOCAL, 10.
This
/etc/hosts.deny example blocks a
known bad host (identified by log files) from attempting to access a host,
while logging the attempt:
ALL : 192.1.168.73 : spawn /bin/echo \
$(date) %c %d >> /var/log/alert-admin
Here’s
a final example, a hosts.deny
that does fancy logging via email:
ALL : ALL : spawn ( \
/bin/echo -e "\n \
TCP wrappers refused connection\:\n \
Server \: $(/bin/uname -n)\n \
Process \: %d (pid %p)\n \
Date \: $(date)\n\n \
Offender\: %c\n \
User \: %u\n\n \
Dig\'d offender information\:\n \
$(/usr/bin/dig +nocmd +nocomments +noquestion \
+nostats
+multiline -x %c ns)\n" \
|/bin/mail -s \
"$(/bin/uname -n) wrappers\: %d
refused for %c" \
me@my-ISP \
) &
Enabling
Kernel Network Security Parameters
Reminder: Kernel
parameters can be changed via the command
“echo value > /proc/sys/file”.
On many Unix and Linux systems a command is provided that makes this easier: sysctl. The /etc/sysctl.conf file lists kernel settings to be applied
at boot time.
Some of the available kernel
parameters on Linux you can tweak: Turn off IP forwarding, enable the use of syncookies,
ignore broadcast ping, disable source routing (used on token-ring but not
generally on Ethernet), disable ICMP redirects (which allow a remote ICMP
message to update the routing table), disable IPv6 (for now), and enable the
source address verification checking (“rp_filter”).
Lecture
24 — Stateful Packet Filtering Firewall with Iptables,
firewalld
iptables
examines incoming and outgoing packets at various points. It does this by
matching each packet against a chain of rules. Each rule
contains matching criteria and a target that says what to do with
a packet that matched the criteria. A chain of rules is a list. Packets are
matched against each rule in a chain, in order, until a match occurs. Then the
target of that rule is used (generally) to accept or to drop the packet. However,
the target may cause the packet’s header fields to be changed, to log the
packet, or do another action. If no rule matches some packet then a default
policy is used to decide what to do.
There are many packet
filtering firewall tools available for any platform. For Linux systems, most
use the netfilter kernel module. Here, we will only discuss the popular (2014),
iptables (and ip6tables).
The newer kernel
module “nftables” is intended to eventually replace netfilter (it is considered
superior in many ways). The user-space tool nft
interacts with nftables and replaces iptables, ebtables, arptables, ip6tables,
and firewalld*. The nftables module includes a iptables compatibility layer,
and the package includes an iptables-to-nft translator tool. Currently (2018)
there is no GUI tool available for nftables.
Non-Linux systems
today often have similar packet filter firewalls, which use similar concepts to
iptables. (ipf a.k.a. ipfilter on Solaris; its default location for the
firewall rules file is /etc/ipf/ipf.conf.
For BSD, the packet filter is called pf,
and the command to use it is pfctl.
To enable, add “pf=YES” to /etc/rc.conf.local. The rules go in /etc/pf.conf.)
Installing
iptables if firewalld is Present
Before delving into iptables (and
ip6tables), make sure you have it installed. Modern Linux systems may ship
with firewalld instead. The two do not work well together, so you need to
install iptables (includes ip6tables), disable firewalld, and enable iptables.
If you’ve modified your firewall rules from firewalld, make sure to save a copy
of the rules you want.
yum
install iptables-services iptables-utils \
iptables system-config-firewall
systemctl mask firewalld.service
systemctl enable iptables.service
systemctl enable ip6tables.service
systemctl start iptables.service
systemctl start ip6tables.service
If all that works, you have just
turned off your filewall! Since Fedora 19 (?), the iptables packages no
longer install a default set of rules, so everything is allowed by default.
You need to create rules yourself. The easy way is the wizard mode of system-config-firewall (a GUI
tool).
On RH systems, iptables stores its
rules between boots in the files /etc/sysconfig/iptables
and ip6tables. These files are
in a format used by iptables-restore
(run at boot time) and iptables-dump
(run at shutdown), but they are easy to understand and edit by hand once you
understand iptables. Here’s the default files I used for my desktop system:
iptables
# Firewall configuration
written by system-config-firewall
# Manual customization of
this file is not recommended.
*filter
:INPUT ACCEPT [0:0]
:FORWARD ACCEPT [0:0]
:OUTPUT ACCEPT [0:0]
-A INPUT -m state --state
ESTABLISHED,RELATED -j ACCEPT
-A INPUT -p icmp -j ACCEPT
-A INPUT -i lo -j ACCEPT
-A INPUT -p ah -j ACCEPT
-A INPUT -p esp -j ACCEPT
-A INPUT -m state --state NEW
-m udp -p udp --dport 500 -j ACCEPT
-A INPUT -m state --state NEW
-m udp -p udp --dport 631 -j ACCEPT
-A INPUT -m state --state NEW
-m tcp -p tcp --dport 22 -j ACCEPT
-A INPUT -m state --state NEW
-m tcp -p tcp --dport 443 -j ACCEPT
-A INPUT -m state --state NEW
-m tcp -p tcp --dport 80 -j ACCEPT
-A INPUT -j REJECT
--reject-with icmp-host-prohibited
-A FORWARD -j REJECT
--reject-with icmp-host-prohibited
COMMIT
ip6tables
# Firewall configuration
written by system-config-firewall
# Manual customization of
this file is not recommended.
*filter
:INPUT ACCEPT [0:0]
:FORWARD ACCEPT [0:0]
:OUTPUT ACCEPT [0:0]
-A INPUT -m state --state
ESTABLISHED,RELATED -j ACCEPT
-A INPUT -p ipv6-icmp -j
ACCEPT
-A INPUT -i lo -j ACCEPT
-A INPUT -m state --state NEW
-m udp -p udp --dport 546 -d fe80::/64 -j ACCEPT
-A INPUT -m ipv6header
--header ah -j ACCEPT
-A INPUT -m ipv6header
--header esp -j ACCEPT
-A INPUT -m state --state NEW
-m udp -p udp --dport 500 -j ACCEPT
-A INPUT -m state --state NEW
-m udp -p udp --dport 631 -j ACCEPT
-A INPUT -m state --state NEW
-m tcp -p tcp --dport 22 -j ACCEPT
-A INPUT -m state --state NEW
-m tcp -p tcp --dport 443 -j ACCEPT
-A INPUT -m state --state NEW
-m tcp -p tcp --dport 80 -j ACCEPT
-A INPUT -j REJECT
--reject-with icmp6-adm-prohibited
-A FORWARD -j REJECT
--reject-with icmp6-adm-prohibited
COMMIT
Iptables
Background
Iptables is a stateful
packet filter, in that it keeps track of connections, statistics, and packet
flows. Even UDP packets can be tracked (e.g., a DNS query and the response).
All that information may be used in the criteria to match packets, or to
produce reports. Note that connections have a timeout value, so iptables may
“forget” some long idle connection and begin dropping packets.
One problem today is that many
applications use the same port number (e.g., MS with SMB on ports 138 and
139). So you can’t filter traffic just by examining packet headers, you need
to examine the application layer (layer 7) headers too. (This is sometimes
called deep packet inspection.) This is the only way for example to see
if some packet going to port 80 really contains an HTTP request, or is some stealth
IM or file transfer packet. Some commercial packet filtering firewall devices
can examine layer 7 data and use that to decide to accept or drop the packet.
A more common solution is to use transparent
application proxy servers, which receive the supposed HTTP
packet, and forwards it if it really is an HTTP packet.
IP Accounting Besides
packet filtering, iptables collects statistics on byte and packet counts for
each rule. This is called accounting.
Iptables can also be used for NAT
(including masquerading and port forwarding), packet mangling
(modifying bits of the headers), and load balancing.
Chains
There are
five built-in chains, one for each point in the kernel’s processing path:
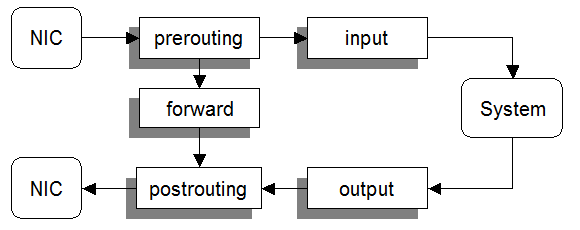
The chain determines when a packet
is examined. An incoming packet (from the outside to this host) arrives at a
NIC, and will be processed only by the rules on the prerouting and input
chains.
Outgoing packets (from this host to
another) will use the output and postrouting chains only.
When the host acts as a router, it
will forward some packets (from one interface to another). These will traverse
only the prerouting, forward, and postrouting chains.
Some (or all) of these chains may
be empty. You can set a default policy for these standard chains.
Defining
new chains
You can also define new chains.
Such chains may be the targets of rules in other chains. Defining your own
chains may be useful in a couple of situations.
If you have a set of rules that
need to be part of several chains, it is handy to be able to define it once.
Then you add a rule to each of the built-in chains with no criteria, with a
target of the new chain. Commonly, both the input and forward
chains (of the filter table) have similar rules for dropping packets. So you
create a new chain “rulz” or some other name, add the rules to that, and use it
from both the input and forward chains.
Matching packets against a lot of
rules can take time, thus increasing the latency of the packets and lowering
throughput. Using a user-defined chain can help with this. Suppose it takes
six (or more!) rules to determine what to do with incoming packets going to
some particular server. Rather than add all the rules to the input
chain, and thus force all incoming packets to be matched against them, you can
put them in a new chain, and add a single rule to the input chain that
only matches the destination IP address of the server in question, and uses the
new chain as the target. (Illustrate!)
Note that ordering the rules in a
chain carefully can also affect performance.
Tables
In addition to organizing all rules
in one or another chain, iptables
also organizes the rules into one of four tables. A rule’s table
determines what targets are valid for that rule, as well as to which built-in
chains the rule can be added. Note some targets (e.g., ACCEPT, DROP) can be
used in all tables. Only tables containing rules are “active” at any given
moment. The active tables can be viewed with the command “cat /proc/net/ip_tables_names”.
There is a table for filtering the
packets (the “filter”
table), which can have only rules in the INPUT,
OUTPUT, and FORWARD chains. Rules in this
table don’t alter the packet in any way.
There is a table for NAT (the “nat” table) which uses the chains PREROUTING (for altering packets as
soon as they come in), OUTPUT
(for altering locally generated packets before routing), and POSTROUTING (for altering packets
as they are about to go out). Rules in this table are used to alter the
source/destination IP address (and possibly port numbers) in a consistent way.
There is also a mangle table and a raw table that allow rules with
targets that do other things to packets, such as re-routing them or changing
header values (such as the QoS field). The raw
table uses the PREROUTING and OUTPUT chains only, and the mangle table uses all five built-in
chains.
The rules in a chain are processed
in an order determined by the table, as well as the order listed in the chain.
(You might think of each table as having its own set of built-in chains.)
The following table shows the order of processing for
each of the four possible packet flows. For example, consider what happens to
an incoming packet. First the mangle
then the nat table rules
in the PREROUTING chain
are used, then the mangle
table rules in the INPUT
chain, and finally the filter
table rules in the INPUT
chain.
|
Flow
Type
|
Chain
|
Table
|
|
incoming
|
PREROUTING
|
mangle
|
|
nat
|
|
INPUT
|
mangle
|
|
filter
|
|
outgoing
|
OUTPUT
|
mangle
|
|
nat
|
|
filter
|
|
POSTROUTING
|
mangle
|
|
nat
|
|
forwarding
|
PREROUTING
|
mangle
|
|
nat
|
|
FORWARD
|
mangle
|
|
filter
|
|
POSTROUTING
|
mangle
|
|
nat
|
|
socket
(process-to-process)
|
OUTPUT
|
mangle
|
|
nat
|
|
filter
|
|
INPUT
|
filter
|
|
mangle
|
To summarize, the
flow type determines which chains are used, and the tables determine the order
in which the rules are examined. Within a given chain and table, the rules are
examined in the order they are listed. (The table, not the chain, also
determines what targets are valid for the rules.)
Use the “-t table” option to specify which table to use
when adding/removing a rule. If this option is omitted then the filter table is used by default.
Rules
and match criteria
A rule is zero or more
matching criteria and one (optional) target. A rule is added to a specific
table and chain. A rule with no criteria matches all packets.
A rule with
no target does nothing; processing will continue with the next rule on the
chain. Such a rule may be useful for accounting purposes. Iptables keeps a
byte and a packet count for each rule, which is updated whenever a packet
matches the rule’s criteria. So, to count all incoming packets on interface eth0:
iptables
-A INPUT -i eth0
By default
iptables can use criteria that match IPv4 layers 3 and 4 headers:
-d [!] destination
address[/mask] -s [!] source address[/mask]
-i [!] input interface -o
[!] output interface
-p [!] protocol [!]
-f
Here’s an example: iptables -t filter -A INPUT -i
lo -j ACCEPT
A “!”
means “not”. For most values either numbers or names can be given: port
numbers or service names, IP addresses or DNS name, protocol number or name,
and even interfaces can be given names. Most criteria have other names: -s = --source = --src.
When omitted the default is to match on all (i.e., no “-p” is the same as “-p all”). Note it is a bad idea to use a
DNS name that would cause a remote DNS query!
The “-f” matches fragments (all but the
first frame of a fragmented IP packet).
For interfaces, you can follow the
name with a “+” to indicate all
interfaces that start with that name (e.g., “ppp+”,
“eth+”).
To use additional criteria a match
extension must be used. Each match extension provides a set of extra
criteria you can add to the rule. You specify which match extensions you want
to use using the “-m extension_name”,
followed by the criteria that extension enables.
A few match extensions are loaded
automatically if you use the corresponding protocol in the rule: tcp, udp, and icmp.
The first two allow “--dport num” and “--sport num”,
to specify source and destination port numbers (and ranges). The icmp match extension allows “--icmp-type type”. (And others too.)
To see which
criteria an extension provides, use:
iptables -m extension_name --help
Some match
extensions will cause the kernel to load additional loadable kernel modules.
The iptables
man page lists all the match extensions available. One special match extension
is “arp”, which enables layer 2
match criteria. A very useful match extension is “state”, which can be used to see if a packet is part of
an existing session (or flow):
iptables -A INPUT -m
state --state ESTABLISHED -j ACCEPT
The current list of
sessions can be found in /proc/net/nf_conntrack,
or by using the iptstate
command.
Another useful match extension
allows you to match source or destination IP address ranges:
iptables -A INPUT -m
iprange \
--src-range 172.16.0.0-172.31.255.255
-j DROP
Targets
The target of a rule determines
what to do with a packet that matched the criteria. You specify the target
with the “-j target”
option. For example:
iptables -A INPUT -i eth0 -p tcp --dport 23 -j DROP
says to DROP (discard and ignore) any packets that match the
criteria: incoming, from network interface eth0,
to TCP port 23 (telnet).
There are only four built-in
targets, however additional target extensions can be used. The standard
distribution includes many target extensions. Some targets are only valid in
chains in a particular table. (For example the NAT targets are only valid in
the nat table.) Target
extensions (especially those that modify the packet) allow additional
commands. For example:
iptables -t mangle -A PREROUTING -p tcp --dport 80 \
-j MARK
--set-mark 3
To see what additional commands a
target extension allows, use:
iptables
-j target --help
As with match extensions, some
target extensions will cause the kernel to load additional modules.
Some of the
more commonly used targets are (the first 3 are built-in targets):
ACCEPT obvious
DROP obvious
RETURN This is the
default target at the end of a user-defined chain. It means to return to the
next rule in the parent chain.
REJECT Discard the
packet, but send an ICMP message back to the source. Useful when the source is
in your AS but don’t use when source is the Internet! Use DROP instead.
LOG Use to log
the packet to the kernel logger (dmesg,
syslog). This target is special
in that it doesn’t terminate the packet processing. You can add a tag to the
log message with “--log-prefix "text"”;
that makes it easy to find later with grep.
MARK Used with the
iproute2 and the tc command for
advanced routing and traffic shaping.
DNAT Used to
configure transparent proxy.
SNAT Used for IP
Masquerade when the source has a static IP address. It specifies that the
source address of the packet should be modified (and all future packets in this
connection will also be mangled).
MASQUERADE Used for IP
Masquerade when the source has a dynamic IP address.
chain Send
the packet to another chain for further processing. If that chain’s rules fail
to match the packet, then processing will continue with the next rule in the
current chain. (See also RETURN
target.)
(Show the
default iptables rules again.)
Using iptables
To add or remove rules from chains
you specify the table (default is filter)
and the chain. For example, to append a new rule to the end of the OUTPUT chain of the nat table:
iptables
-t nat -A OUTPUT criteria -j action
You can insert rules in any position
in the chain by using “-I”
instead of “-A”. (For
example, using “... -I 2 ...”
inserts the new rule between the old rules one and two.)
To delete a rule, use: iptables -D chain {rule|rule-num}
To delete all rules, use: iptables -F [chain]
To create a new chain, use: iptables [-t table] -N name
Delete (all) user-defined chains: iptables -X [chain]
The deletion of rules
and user-defined chains is per-table only. You need a shell script such as the
following to delete all rules (from built-in chains) and all user-defined
chains:
for TBL in $(cat /proc/net/ip_tables_names);
do
iptables -t "$TBL" -X
iptables -t "$TBL" -F
done
To turn off (and
similarly, to turn on) the firewall, you also need to reset the built-in
chains’ policy to ACCEPT (for each table!), set the accounting values to zero,
and unload the various iptables kernel modules. See the Red Hat SysV init
script for iptables for additional information, or just use the convenient “service iptables stop”
command.
Note! By default,
iptables on RH systems unloads modules when “stopping” the firewall. This
means all current connections are forgotten during an iptables restart. For security this is probably safer,
but if you need to update the firewall rules on a production server that isn’t
part of a cluster (and thus can’t use a rolling update), you can edit
the iptables config file in /etc/sysconfig (not the rules file) to
prevent the unloading of modules.
List [all] rules [no DNS]: iptables [-v] [-n] -L [--line-numbers]
(Using “-L chain”
list only the rules in chain,
which is why “-Lv” causes an
error: iptables is looking for a
chain named “v”! Use “-nvL” instead.) The rules can also be
output in XML format with the command iptables-xml,
which may facilitate processing by programs. (For example, add a style sheet
and the rules will look great in a web browser.)
Reset per-rule packet and byte
counters: iptables -Z [chain]
You can set the default policy for
a built-in chain with:
iptable -P chain
{ACCEPT|DROP}
User-defined chains don’t have default policies, but you can just
put a reject/drop everything rule at the end for the same effect.
Suppose the command:
#
iptables -L -n -v
produces this output:
Chain
INPUT (policy ACCEPT 0 packets, 0 bytes)
pkts bytes target prot opt in out source destination
Chain FORWARD (policy ACCEPT 0 packets, 0 bytes)
pkts bytes target prot opt in out source destination
Chain OUTPUT (policy ACCEPT 0 packets, 0 bytes)
pkts bytes target prot opt in out source destination
This indicates that the firewall is
not active. Note the default ACCEPT policy.
The best way to work with complex
sets of rules is to edit the file where the OS stores the rules (in the “iptables-save” format), then simply
restart iptables. On Red Hat systems,
this is /etc/sysconfig/iptables.
If there is no such file (on other systems), then save the rules as a shell
script that you can run at boot time.
When building a firewall, you can
use the iptables command to
modify the currently loaded (in RAM) rules. These take effect immediately.
Once you’ve added and tweaked the rules to the point that they work, you can
save the current rules to a file with iptables-save.
The result can be used as input to iptables-restore.
IPv6
There are separate commands for
managing the rules for IPv6 packet filtering: ip6tables*. These work nearly identically to
the IPv4 commands, except for the changes in packet headers. (There is also ebtables and/or arptables. These are similar to iptables, but for layer 2 (ethernet)
headers.)
Filtering
Basics [Adapted from “Linux firewalls” 3rd Ed., by Suehring and
Ziegler,
(C)2006 by Pearson Ed.]
Start by deleting all user defined
chains, and clearing all rules from the five built in chains. Next, add a
default policy of DROP to the INPUT, OUTPUT, and FORWARD chains. (The other
two chains don’t need to drop packets, so you can leave the default-default
policy of ACCEPT for them.)
If you stop here you are safe! But
it pays to add holes in this firewall. At this point it is a good idea to
check that all kernel level network protections have been enabled.
A very common situation is to allow
the same packets into this host as you will allow your host to forward, when
acting as a router. If not routing you can just add filter table rules to the
INPUT and OUTPUT chains. If routing, you will usually want the same rules for
the INPUT and FORWARD chains. The way to deal with this is to create a new
user-defined chain, say “MYRULZ”, and all the common rules to this chain. Then
you only have this for INPUT and FORWARD:
-A
INPUT -j MYRULZ
-A FORWARD -j MYRULZ
It is usually safe and useful to
accept packets from your loopback interface. These can only have been sent
from programs on your host, to other programs on your host. So add this (if
using routing, add to MYRULZ instead):
-A
INPUT -i lo -j ACCEPT
Next we want to allow some outside
packets to get through. To start with, we want to allow return packets from
our outgoing connections. This generally means to allow incoming packets that
are part of some established conversation. (TCP or UDP). However you
may also want to allow related packets, if using FTP (FTP establishes an
outgoing connection, then the remote server initiates another using a different
port. This is related to but not part of the established conversation.)
-A
INPUT -m state --state ESTABLISHED,RELATED
-j ACCEPT
Some packets are obviously fake
and should never be allowed, no matter what holes you decide to add. You
should drop any incoming packets from a NIC with the following source addresses
(See RFC-5735 list
of special IPv4 addresses):
·
You host’s IP address assigned to that NIC.
·
Any address from one of your internal LANs (i.e., attached to a
different NIC)
·
Class A, B, C private addresses: 10.0.0.0 - 10.255.255.255,
172.16.0.0 - 172.31.255.255, 192.168.0.0 - 192.168.255.255.
·
Class D (multicast) addresses (these are legal destinations only,
never sources): 224.0.0.0 - 239.255.255.255
·
Class E (reserved) addresses: 240.0.0.0 - 247.255.255.255
·
Higher addresses are not used legally: 248.0.0.0 -
255.255.255.255
·
Loopback addresses: 127.0.0.0 - 127.255.255.255
·
Illegal source broadcast addresses. While some broadcast source
addresses are legal on a single LAN (e.g., 0.0.0.0 for a DHCP requests) you
will never see any broadcast address from the Internet, or as a regular
non-broadcast packet. So in many cases you can filter out any source of
0.0.0.0 - 0.255.255.255, and also 255.255.255.255.
·
Link-local addresses are reserved for zeroconf addressing and are
private on a given LAN, if used at all. So these addresses are not valid
sources from other networks: 169.254.0.0 - 169.254.255.255
·
192.0.2.0/24 block is reserved for TEST-NET, to be used in
examples and documentation.
·
192.88.99.0/24 - This block is allocated for use as 6to4 relay
anycast addresses, according to [RFC3068]. So if you don’t use IPv6 then you
shouldn’t see these.
·
198.18.0.0/15 - This block has been allocated for use in
benchmark tests of network interconnect devices. Its use is documented in
[RFC2544].
·
Any unallocated addresses. You can check IANA and the various
RARs (e.g., ARIN) to see which blocks are currently unassigned. No legal
packet should have such a source address. But be careful! New allocations are
made all the time so you would have to carefully monitor those and frequently
update your firewall. (I don’t know of any site that provides you will alerts
on this, but it would be a good idea!)
·
Any known problem networks/hosts. You can simply drop all
packets that come from problem sites, provided those sites aren’t also used for
legitimate purposes. A business must balance the extra security against the
loss of customers. (An alternative is to rate limit packets from those
sites.)
Limiting
Sources and Services
In many cases, you can limit some
types of traffic to only be legal from a small number of source IPs. For example,
SSH (port 22) access to a production server should only be allowed from a few
places: inside the company LAN, and perhaps a few remote sites that have
administrative access.
You can also drop traffic based on
source port. Legitimate packets for services such as mail or web will have a
source port in the unregistered (dynamic or private) range of
49152 through 65535. While there may be exceptions you will need to allow
(e.g., SMB) in general source ports in the range 0 to 49151 (and especially the
well-known ports of 0 to 1023.
At this point, it is just a matter
of adding rules for the holes you with to allow. For example to allow access
to a web service (port 80):
-A
INPUT -m state --state NEW
-p tcp --dport 80 -j ACCEPT
Don’t forget to allow related
ports, such as DNS, IPP, MTA, POP, HTTPS, etc. In the end, you may wish to add
a rule to drop the packets. The purpose is to be able to see the accounting
statistics on packets dropped. To troubleshoot your system you may also add
LOG rules. (Show log from YborStudent.)
Egress
Filtering
Many sites assume no local evil
users or security problems and simply allow any outgoing packet (set the policy
on the OUTPUT chain to ACCEPT and add no rules).
A better approach it to limit
outgoing packets to ones with a correct source IP address (and source port),
and that are part of an established session. A production server will rarely
if ever initiate out-going connections, it should just respond to incoming
ones. (There are exceptions, e.g. a mail server using a real-time black list
or an FTP server.) If you do allow out-going sessions then limit where they go
by destination port (i.e., only allow the MTA to connect to the RTBL-DNS at sbl-xbl.spamhaus.org, or SSH to
specific servers.)
Strangely, the
Microsoft firewall included in Windows 7 only does egress filtering by default.
When a program opens a listening socket, Windows automatically creates a hole
for that port. Incoming packets are not blocked if any software is listening
on a port (including malware). (This is a strange policy, since if no program
is listening on some port there is no benefit to blocking the packets destined
for that port.)
Filtering
Examples and Gotchas (taken from many sources, such as cyberciti.biz)
Don’t assume that a good border
firewall is all you need. Every router should have some filtering rules on
(that can be monitored). Every server should also.
In general, you only need to use
filtering rules and thus only the default filter table. You can leave the PREROUTING and POSTROUTING chains empty and with a default policy of ACCEPT. However, you should set
the default policy to DROP
on the INPUT, OUTPUT, and FORWARD chains (even if not forwarding!).
When a given policy for some
service/destination takes more than a few rules it can pay to make a general
rule that matches all such packets and direct them to a user-defined chain with
the more specific rules. This way, packets for other services/destinations
don’t need to be examined by every rule. Even when latency and performance are
not a consideration, you may wish or organize your rules in many chains for the
sake of clarity.
The ordering of rules in the chains
can be tricky to get right. In general you should have rules the deny
access listed first, and then rules that allow access last. This way if
you make a mistake with the rules, most likely you will deny traffic you
intended to allow rather than allow traffic you intended to deny.
For any given service, you need
to list more specific rules (the exceptions) before more general rules (the
main policy). For example to allow ping (ICMP echo) from inside hosts but
not outside hosts, you list the allow rule before the drop rule. If you want
to allow SSH from certain selected IP addresses and in general not from others,
you list the allow rules first. If you want to allow access to your POP server
except from a few known bad sites, you list the deny rules first. In all these
cases, you list the exceptional (more specific) rules before the more general
ones.
When you have multiple NICs the
system may not detect them in the same order every time. So “eth0” and “eth1”
may be different. Try to give your NICs better (stable) names (like
INTERNET or DMZ or PRIVATE-LAN, and use those names in iptables rules. (Use
udev or other means to name NICs by MAC addr.)
To allow remote X window GUI access
can be dangerous. ssh can be
used to provide a more secure tunnel for X, POP/ IMAP, etc. To
allow remote X for the local LAN only is still dangerous (because a black hat
may spoof the IP address of some server on your LAN and open windows on
your server or do other more nasty things). X sessions start at port 6000
(for session 0), 6001, (for IP:1), etc. Blocking all ports from 6000 –
6009 is often done to stop X but unfortunately this range overlaps other
registered services, so you must be careful. You might allow access to ports
6000 – 6004 to localhost (or the local LAN) only.
There was a posting about preventing
SSH dictionary attacks on SlashDot, and several people posted iptables methods of dealing with this,
using the recent match
extension. This setup is for a router/firewall to allow or deny ssh from
outside host to some inside host (“Rundown on SSH Brute Force Attacks” at it.slashdot.org/article.pl?sid=05/07/16/1615233.
A different setup allows for ssh source IP white-listing too):
-A PREROUTING -p tcp -d $EXTERNAL
--dport 22 -m recent --rcheck \
--hitcount 3 --seconds 600 -j LOG --log-prefix "SSH attack: "
-A PREROUTING -p tcp -d $EXTERNAL
--dport 22 -m recent --rcheck \
--hitcount 3 --seconds 600 -j DROP
-A PREROUTING -p tcp -d $EXTERNAL
--dport 22 -m recent --set \
-j DNAT --to-destination $INTERNAL:22 # ???
-A OUTPUT -p tcp -d $EXTERNAL
--dport 22 -j DNAT \
--to-destination $INTERNAL:22 # ???
A simpler approach (doesn’t track
by IP or allow bursts) is to use the limit
match extension. The following lines block SSH connections to this (local)
host:
iptables -A INPUT -i eth0 -p tcp
--dport 22 -m state \
--state ESTABLISHED -j ACCEPT
iptables -A
INPUT -i eth0 -p tcp --dport 22 -m state --state NEW -m limit \
--limit 5/min -j ACCEPT
iptables -A
INPUT -i eth0 -p tcp --dport 22 -j DROP
With these three rules, incoming
SSH connections are limited to five, established connections are unaffected and
otherwise the packets are dropped.
The hashlimit match
extension (run “iptables -m
hashlimit --help” for more information on it) allows you to rate-limit
traffic with limits based on source IP (mode srcip)
among other criteria, and to allow burst limits. For example:
# iptables -A INPUT -m hashlimit -p
tcp --dport 22 --hashlimit 1/min \
--hashlimit-mode srcip --hashlimit-name ssh -m state --state NEW -j ACCEPT
# iptables -A INPUT -p tcp --dport
22 -m state --state NEW -j DROP
# cat /proc/net/ipt_hashlimit/ssh
9 64.12.26.80:0->0.0.0.0:0 9600000 9600000 1920000
9 127.0.0.1:0->0.0.0.0:0 259392 9600000 1920000
When limiting,
dropping, or “shunning” traffic for SSH and similar ports, keep in mind the
need to make holes for the administrator’s workstation. If your organization
uses NAT between the inside and the DMZ, all inside traffic will appear to a
DMS server’s firewall to have the same IP address, which may cause an
unexpected denial of service. In general, rate limit traffic originating from
the Internet and not from inside; but log all such traffic.
The limit
module can also limit the number of log entries created per time, to prevent
flooding your log files. For example, to log and then drop source IP spoofing
traffic per 5 minutes, in bursts of at most 7 entries, use:
# iptables -A INPUT -i eth1 -s
10.0.0.0/8 -m limit --limit 5/m --limit-burst 7 \
-j LOG --log-prefix "IP_SPOOF A: "
# iptables -A INPUT -i eth1 -s 10.0.0.0/8 -j DROP
(Note, you don’t rate limit the
dropping, just the logging!)
To make a list of rules easier to
read, I usually create a user-defined chain LOGDROP,
and use “-j LOGDROP” in the
main rule list. Blank lines and comments in rule files are always a good idea
as well.
Firewalld
Firewalld is a newer, dynamic
firewall daemon for Fedora 17 and newer. The idea is that you can update the
firewall without a complete restart of it. (Of course, iptables can do that
anyway.) This replaced iptables and ebtables in Fedora by default, although
you can certainly turn it off and install then enable ip*tables instead if you
wish. Unlike iptables, firewalld uses a daemon, firewalld.
That daemon must be reloaded/restarted when you make changes to the
configuration.
Like ip*tables-save and ip*tables-restore, firewalld stores the firewall rules in
a file between reboots. But it doesn’t use the same file as the iptables
tools, so make sure you save modified firewall rules correctly!
Your computer connects to various
networks through the attached NICs. With firewalld, you can group various
networks that your NICs are directly attached to, together in zones.
Then you can specify different firewall rules for different zones. To see a
list of zones and which NICs are included in them, use the command firewall-cmd --get-active-zones. This should show (by default) a
single zone named public,
containing all NICs except for “lo”.
There are other zones defined by default, but they are not active
(not used). Use --get-zones to
see them.
To see the rules for a zone, use
the command “firewall-cmd --list-all”. If you create other
zones, you can see their rules using --list-all-zones.
By default, firewall-cmd options
only apply to a single zone. To save typing, you can set one zone as a default
zone. To apply some command to some other zone, add the “--zone=name-of-zone” option.
The default zone can be set using a command; the value is in /etc/firewalld/firewalld.conf.
Default zones are
defined by XML files in /usr/lib/firewalld/zones.
To modify one or create a non-standard one, either use a tool (“--new-zone=name”),
or you could copy one from there to /etc/firewalld/zones
and modify it.
To have a NIC in a
non-default zone, add “ZONE=home”
to the correct ifcfg-p2p1 file,
or run the command “firewall-cmd
--permanent --zone=home --change-interface=p2p1”.
Changes to your firewall setup are
made using firewall-cmd (command line tool) or firewall-config (GUI). Any
changes made are only temporary, like with iptables. Also, some changes (such
as adding new zones) don’t take effect immediately; you must reload the config
( “--reload” option).
To make the changes permanent, add
the “--permanent” option when
making changes.
Firewalld knows what ports are
needed for many popular services. To allow one of those, use rules like this:
sudo firewall-cmd --add-service=http
sudo firewall-cmd --permanent --add-service=http
To modify firewall rules for
services not listed, you can either define a new service and then add it to a
zone, or simply open up specific ports. For example:
sudo firewall-cmd --add-port=12345/tcp
sudo firewall-cmd --permanent --add-port=54321/udp
sudo firewall-cmd --add-port=5000-5006/tcp #range
The default service definitions are
XML files found in /usr/lib/firewalld/services.
To modify one, or to add a new one, copy one from there and put it into /etc/firewalld/services.
Nftables
and nft
To Be Completed.
Other Packet
Filters
Although the concepts of stateful
packet filtering is the same regardless of the software or system you use, you
need to know some of the other systems used.
Windows includes a packet
filter built-in, but it filters out-going packets by default, not incoming
ones! There are other 3rd party firewalls for Windows.
BSD systems support
different packet filters. FreeBSD supports three of them. But by for the most
commonly used (and the most capable) is called PF. You can enable it by
adding “pf_enable = "YES"”
to /etc/rc.conf. The rules get
saved in /etc/pf.conf and is
manipulated with the pfctl
command. PF can do more than just filter packets. One interesting security
feature is the ability to normalize packets, known as scrubbing.
Solaris includes IPFilter.
This is one of the BSD packet filters available and most documentation is for
BSD systems (See “ipf”). Solaris
TCP/IP stack is based on the STREAMS framework, which causes some interesting
behaviors for Solaris compared to other packet filters. The kern support (LKM)
is enabled by the SMF service “svc:/network/ipfilter:default”.
However you also need the STREAMS module to be loaded, with the SMF service “svc:/network/pfil:default”. IPFilter
is enabled per network device driver (hme, ge, qfe, … ). In order for the
“pfil” driver to be able to hook properly into the network stack it must be
present the first time a device of a certain type is opened, which means
interface plumbing time. To change the filter on an interface it must be
unplumbed and then re-plumbed. This is technically done by using the autopush
command so that the pfil STREAMS module will be automatically pushed on any
stream opened to a certain network device driver.
The bottom line for Solaris: Edit /etc/ipf/pfil.ap and un-comment the
interface types you wish to use with IPFilter. To start the service use “svcadm enable
ipfilter; autopush -f /etc/ipf/pfil.ap”.
Now unplumb and re-plumb (with ifconfig)
the interfaces. The rules themselves are kept in /etc/ipf/ipf.conf. Example: enable ssh on Solaris:
pass in quick on bge0 proto
tcp from 10.156.20.20 to any port = 22 keep state
Transparent HTTP Proxy Example
This last example comes from the Transparent
Proxy with Linux and Squid How-to, from the Linux Documentation Project.
Here we have a Linux box used as a router, with eth0
connected to the “outside-net” (Parameter) network (i.e., the connection to
your ISP and the Internet), eth1
connected to the “inside-net” network. (Aside: networks can be assigned names
in /etc/networks.) The IP
address of eth1 is
“router-inside”.
In the inside-net is the squid
proxy server, with IP address of “squid-server”. It listens for traffic on
port 3128.
On the
router you need these commands:
iptables
-t mangle -A PREROUTING -p tcp --dport 80 -s squid-server -j ACCEPT
iptables -t mangle -A PREROUTING -p tcp --dport 80 -j MARK --set-mark 3
ip rule add fwmark 3 table 2
ip route add default via squid-box dev eth1 table 2
Note that the choice of firewall
mark (3) and routing table (2) was arbitrary. If you are already using policy
routing or firewall marking for some other purpose, make sure you choose
different numbers here.
The first rule tells the router to
accept TCP packets going to port 80 of the squid server. The second rule marks
all incoming TCP packets to port 80 except those going to the squid server.
The order of these two rules is significant and a common source of error and
confusion. The last two commands set up a routing policy for marked packets.
The first thing we do is to select
the packets we want. Thus, all packets to port 80, except those coming from
squid-server itself, are MARKed. Then, when the kernel goes to make a routing
decision the MARKed packets aren’t routing using the normal routing table that
you access with the “route” command, but with a special table. Together these
commands route all marked packets to the squid server. Next the squid-server
needs one rule:
iptables -A PREROUTING -t nat -i
eth0 -p tcp --dport 80 \
-j REDIRECT --to-port 3128
This rule uses DNAT to change the
destination port number of TCP packets arriving in from eth0 (on the squid server, not the router) to port 3128.
An HTTP proxy such as squid works
as follows: A user on a workstation uses a web browser to visit
www.example.com (which uses port 80 by default). The browser determines the IP
address of www.example.com, creates an HTTP request packet, and sends it there.
For non-transparent proxying, the
browser is configured with the IP address and port number of the proxy server
(e.g. squid-server:3128). Squid reads the HTTP headers to determine the real
destination IP. It then sends the HTTP request, caches the reply, and finally
returns the HTTP reply to the original workstation.
For transparent proxy, no
workstations need any special configuration. Instead you have the router do
all the work.
Lecture 25 — Wireless Security
Initially wireless LANs or WLANs
were slow, expensive, proprietary, and not reliable. The IEEE formed a work
group to define wireless standards that would work better and across different
vendor’s products. These standards are known as “802.11”.
There are a number of variations of
this, 802.11a thru 802.11h (and beyond). By far the most common today is 802.11n,
commonly known as “Wi-Fi”. Other fairly common standards include
802.11g, 802.11a, 802.11b, and the newest one (2013), 802.11ac.
These are all sometimes referred to as Wi-Fi.
These systems contain a wireless
transceiver known as an access point (WAP), which connects
(with a cable) to a router or switch. Wi-Fi NICs generally establish sessions
with WAPs. (However, it is possible for two or more Wi-Fi NICs to setup
communication without any WAP; such a WLAN is known as an ad-hoc
network. In such a network, each NIC is assigned a BSSID (Basic
Service Set Identifier), which the other NICs used to identify it. Ad-hoc
networks are inherently low security.)
Wireless networking is not new, but
previously was mostly used for point-to-point WAN links. Today wireless
networking is common for workstations, which today are often laptops and
notebook (and PDA) computers.
Wi-fi is increasingly used for
non-PC communications. Utility companies use them for “smart meters”, so an
electric meter can be read without leaving the car, a time savings well worth
the expense of new meters. Cars include Wi-fi “hot-spots” for passengers (we
hope!) wishing to use laptops.
Wi-Fi has become very popular both
in the home and in public areas such as bookstores, coffee houses, and various
local area businesses. It is convenient to be able to use your same laptop
computer from home or work. There is a dark security side to this picture
however!
Wi-Fi (b) transmission is at 2.4
GHz. This is a commonly used band and thus there is a lot of interference
from other devices, cell phones, garage-door openers, microwave ovens, etc. To
limit this interference, Wi-Fi uses DSSS (direct sequence spread
spectrum), a (previously) military technique used to prevent jamming. The
bandwidth is divided into 14 channels, and each network needs about 3 (?)
of these to communicate at the full speed with devices. Typical transmit power
is 10-20 mW (up to 100mW ?). [Analogy: wireless phone channels, garage door
opener channels.]
802.11a, b, and g operate at
different frequencies, speeds, and power ranges.
Threats
Wireless hackers like to tap into
WAPs without paying for the service. This is especially attractive to spammers
and other evil-doers, as one they leave the vicinity there is no traceable
connection between their laptop and the IP address of the WAP. Such
unprotected WAPs are known as hot-spots. The hackers locate
these by war-walking or war-driving, which means
they move about with a laptop and special software locating hot-spots. (And
like the hobos of a century ago, they leave chalk marks — war-chalking
— as messages to others about the located hot-spots!)
Free software for this is available
for all platforms and includes {Mac,Net}Stumbler, Kismet, and AirSnort.
Different tools work differently: Stumbler broadcasts connection requests and
waits for a response. kismet and AirSnort work by passively listening for
Wi-Fi traffic.
An additional security risk is eavesdropping
by the WAP operator (or others). Wi-Fi uses plain/clear text so all documents,
emails, etc. can be seen by anyone connected to that WAP.
Smart meters don’t use any security
protocols. An intruder can thus drive down a street and know each house’s
current energy use, allowing them to determine which homes are currently
vacant. (10/2012 story from phys.org.)
Still another risk is rogue
hot-spots, where an employee will connect a WAP to the company network,
inside the firewall. Besides the obvious risks many WAPs contain DHCP servers,
which could disrupt the company intranet!
Finally, Wi-Fi is very susceptible
to DOS attacks. Even simple jamming by broadcasting noise at the proper
frequency will take down a WAP. There are no known effective countermeasures
to this threat.
It should have been criminal to not
design better security into Wi-Fi. Although System Admins know (usually!) to
change default names and passwords and to turn off broadcasting of these, Wi-Fi
products are targeted to home users with little training or security awareness.
[Reported in
Technology Review on 09/07/11 by Robert Lemos] Stevens Institute of
Technology professor Sven Dietrich demonstrated SkyNet, a remote-controlled
aerial vehicle that can automatically detect and compromise wireless networks. Dietrich
showed how such drones could be used to create an inexpensive, airborne botnet
controller. SkyNet consists of a toy helicopter and a lightweight computer
equipped with wireless reconnaissance and attack software. “[Our] drone can
land close to the target and sit there—and if it has solar power, it can
recharge—and continue to attack all the networks around it,” Dietrich says. SkyNet
also can be used to create and control a botnet, creating a weak spot in a
wireless network, known as an air gap, to prevent investigators from identifying
where the attack originated.
Recently, security
consultant Richard Perkins presented the Wireless Aerial Surveillance Platform,
a repurposed Army target drone that can scan for and compromise wireless
networks. “We could identify a target by his cell phone and follow them home
and then focus on attacking their less secure home network,” Perkins says.
WAPs,
antenna types and placement
The “hub” of a Wi-Fi WLAN is called
a WAP or wireless access point. This device operates as the WLAN
equivalent of a hub, and contains an Ethernet connection to a server. All the
wireless NICs in the area establish communication sessions with a WAP, forming
the WLAN. The exact area of the WLAN is determined by the power and type of
antennas used by the WAP and NIC. Generally Wi-Fi is good for about 30 to
300 meters. You can fine-tune this area by disabling one antenna, or replacing
the antenna(s) with directional ones.
The placement of the WAP is the
first issue the admin must deal with. Ideally it should be near the center of
the area to be covered, and as far from streets and neighbors as possible. Of
course the main point of WLANs is to not have to run lots of wire in your home,
and you may live in an apartment with streets and neighbors all around, so you
may have to place the WAP in a less desirable location. (Consider using
directional antennas, or turning off one or more antennas to reduce the WLAN
coverage area.)
The exact area of the WLAN is
determined by the power and antennas used by the WAP and NIC. Generally Wi-Fi
is good for about 100 to 300 meters. You can fine-tune this area by
disabling one antenna, or replacing the antenna(s) with directional ones.
The ideal placement would allow use
in all the areas you wish, but no more. You don’t want you WAP accessible from
the street or from a neighbor’s home.
WAP
Broadcasts (Beaconing)
Each WAP has an assigned name known
as the network identifier or ESSID (Extended
Service Set Identifier). (The generic term for both BSSID and ESSID is
just SSID.) This is just a string of digits and characters which is used to
identify all the people wanting to be on the same logical network.
By default WAPs continually
broadcast a here I am! signal, their SSIDs, which is known as beaconing.
Networks using different network identifiers still share the bandwidth, but are
logically separate and ignore each other.
Some hosts (including most Windows
computers) automatically use the strongest WAP signal they can find. This can
be a problem if your neighbor’s laptop uses your WAP instead of her own!
(Unintentionally of course.) Beaconing will also enable the easiest type of
intruder activity, war-driving. This is driving around with a
laptop trying to find WAPs that broadcast their presence.
Step one in securing your WLAN
is to turn off WAP broadcasts. By turning this off the broadcast of
the ESSID, the WAP will only respond to directed communications from a properly
configured wireless NIC (one that already knows the ESSID). Most WAPs also
support SNMP management, using default community strings (passwords).
You should disable SNMP on the WAP, or at least change the default
password.
Step two is to enable MAC
address filtering. For a private WAP this is a useful way to limit the use
to just a few laptops. For a large organization, or a pubic WAP this measure
can’t be used.
WEP
Even with broadcast turned off your
WAP may be found. A passive intruder sitting in a nearby location can see all
packets on your WLAN. (Just like with old hub technology, WLANs truly are
broadcast networks!) So a security scheme was designed and required for 802.11
compatibility. This became known as WEP (Wired Equivalent Privacy).
This was intended to encrypt the WAP-NIC communications so eavesdroppers could
learn nothing. All 802.11a,b, and g products support WEP, however many
products today still ship with all security settings off!
[ Example reported by Kjell
J. Hole, Erland Dyrnes, and Per Thorsheim in IEEE Computer, 7/2005 issue Securing
Wi-Fi Networks, pp. 28–34: The city of Bergen, Norway has a population of
about 235,000 people. By war-walking and driving, they found 706 hot-spots.
Of these only 244 used WEP. 166 still used the default names assigned by the
manufacturer and were broadcasting their names for all hackers to hear. ]
WEP was designed to use RC4,
a strong encryption technique. Unfortunately, the design of WEP is flawed
and uses RC4 in an insecure way. An intruder with a modest laptop and free
software can crack WEP in just a few minutes to a few hours of listening! The
problems are the tiny size of the initialization vector (3 bytes), which
guarantees duplicate keys (each Wi-Fi station uses a fixed WEP key,
concatenated with the IV) in just a few hours use. A bit of statistical work
and the key can be recovered (by first obtaining a plaintext message, the
keystream is recovered, and the key can be guessed). However, a bit-flipping
attack is faster; WEP uses CRC-32 for the MIC, which is not secure at all;
flipping bits in the ciphertext will flip known bits in the plaintext (if you
can guess some of the contents, such as email headers), and the attacker can
then easily adjust the MIC as well, making the fake message appear legitimate.
None-the-less, you should turn on
WEP, as this will discourage (honest) neighbors from using your WAP, and may
prevent folks from thinking (or later claiming in court) they thought your WAP
was a public one.
AirSnort can crack WEP keys with
just a few (1–6) megabytes of traffic. A home user can use WEP safely only
by changing keys after every 750kb or so of transmitted data. However, this is
not practical.
WEP allows for different key
lengths, and each (WAP) device contains 4 WEP keys, any of which can be
designated the default at each station. You should configure each NIC with
the largest key length available, and a different default for each (of
course if you have more than 4 NICs, some must use the same default).
Some early attempts to fix WEP
include WEP2 and dynamic WEP. Neither of these solutions has been
widely deployed.
As of 10/2008, the
PCI Data Security Standard (DSS) has been revised. Retailers that accept
credit cards from PCI council members may not implement new wireless payment
systems that use WEP after March 31, 2009. For those that already have
wireless payment systems in place, they must stop using WEP for security as of
June 30, 2010. This should finally kill off WEP devices in favor of WPA, or better
WPA2, or even 802.1X.
802.11i —
Robust Secure Network (RSN)
In March of 2001, the IEEE 802.11
group formed a task force (group) to address security. After over three years,
802.11i was approved. This standard uses the Advanced Encryption
Standard (AES), which is the approved US DoD successor to
DES. To address issues of authentication and key management this standard
requires the use of another IEEE standard, 802.1x, which was
originally developed for wired networks. 802.11i is also known as robust
security network.
RSN dynamically negotiates
the authentication and encryption algorithms to be used for communications
between WAPs and wireless clients. This means that as new threats are
discovered, new algorithms can be added.
RSN uses the AES along with 802.1x
and EAP (see pp. 371). The security protocol that RSN builds on AES is
called the Counter Mode CBC MAC Protocol (AES-CCMP). This
is intended to provide confidentiality, integrity, and origin authentication.
802.11i also allows the use of TKIP instead of AES-CCMP, which is very similar.
TKIP (Temporal
Key Integrity Protocol) provides several security features of 802.11i.
TKIP (pronounced “tee-kip”) still uses RC4 (but in a much safer way than WEP
did!) but forces a new key to be generated every 10k packets or so. It also hashes
the initialization vector. These measures make cracking the WLAN much
harder!
AES supports key lengths up to 256
bits but is not compatible with older hardware. (Encryption is hard, and
without special hardware would be too slow to be useful. The hardware used for
RC4 encryption can’t be used for AES encryption.)
There is a specification designed
to allow RSN and WEP to coexist on the same wireless LAN called Transitional
Security Network or TSN. It’s important to remember that if any
devices on a WLAN are using WEP than the WLAN is not secure.
The 802.1i standard requires any
devices wishing to communicate with a WAP must first use EAP to negotiate an
authentication mechanism to use. Then it authenticates itself using the EAP
agreed mechanism. This is known as port security. (Port in the
sense of a NIC in a switch.) Also, network access control. The
WAP will simply refuse to talk with an unauthenticated device. The
authentication can be accomplished by a variety of means, most commonly an authentication
server such as RADIUS (but Kerberos or others could be used). Note each
device authenticates the other. They use PKI to secure communication between
the authentication server and the supplicant.
802.11i also has a pre-shared
key mode (PSK, also known as personal mode or home
mode), designed for home and small office networks that cannot afford
the cost and complexity of an 802.1X authentication server. Each user must
enter a passphrase to access the network. The passphrase is typically stored
on the user’s computer, so it need only be entered once.
All future 802.11 wireless devices
will be 802.11i compliant; it is the successor to WEP. (This includes the new
802.11n and 802.11ac high-speed wireless.)
WPA
The problem with fixing Wi-Fi is
that 802.11b and WEP have been deployed in millions of NICs and WAPs, all of
which would need hardware upgrades to replace the security mechanism with
802.11i. In addition, the older hardware needs to be supported for some time
to come, but better security than WEP is needed on these devices, one that can
be accomplished with a software/firmware upgrade.
The Wi-Fi alliance (www.wi-fi.org) created an interim
solution until the more secure standard 802.11i becomes widely
available. This is called WPA (Wi-Fi Protected Access),
and it implements a sub-set of a draft of 802.11i, known as Robust Secure Network
(RSN).
The WEP key length has been
increased from 40 (+24=64) bits to 232 (+24=256) bits. WPA still uses RC4 so
that no hardware upgrade is needed to switch from WEP to WPA. Five additional
security enhancements were also added (double the Initialization Vector length;
IV sequencing, used to prevent replay attacks; key rotation is used; mutual
authentication prevents spoofing; and the CRC checksum was replaced with MIC,
or Message Integrity Code, which is a kind of digital signature).
WPA uses per-session WEP keys to
encrypt traffic, using a plug-in encryption module. WPA by default uses TLS
(however this is selectable.) The plug-in nature of the encryption (TLS by
default) means different manufacturers can use incompatible WPA compliant
products.
Authentication by EAP requires an
authentication server, something a home user is unlikely to have (or be able
to) setup. To allow for this WPA provides a home mode, which
doesn’t use EAP or require RADIUS. Instead, it uses a pre-shared key
forcing user to enter a password before allowing clients to join the network.
WPA defaults to using home mode.
Home mode of WPA can also be
broken with a laptop, only it takes longer (more data) then with WEP alone.
Still, the next security step is to enable WPA, and to refresh the security
keys often enough to foil most intruders. (Perhaps with cron.)
Home mode of
RSN (and thus WPA) uses a Pre-Shared Key (PSK). A Pairwise Master Key
(PMK) is computed from the PSK and the SSID using a hashing function.
Pre-computed hash attacks can easily crack these. (The hashes are sent in the
clear during the 4-way handshake.)
Enterprise mode
uses EAP and PEAP to exchange certificates and keys with RSA encryption (the
same strong encryption used with HTTPS). This is very secure but requires a
RADIUS server; some WAPs may include that in one unit, preconfigured.
Now that 802.11i is finalized and
some weaknesses in WPA were discovered, a newer version is available known as WPA2.
This is the same as 802.11i, but with some changes that allow interoperability
with older WEP and WPA (version 1) devices. WPA2 cracking would take days to
months using the techniques that cracked LinkedIn and Harmony (in 2012) in
minutes.
Some details on
WPA2: WPA2 uses the PBKDF2 key derivation function along with 4,096 iterations
of SHA1 cryptographic hashing algorithm. Passwords must be at least eight
characters. The WAP’s SSID is used as salt, making rainbow tables difficult.
To crack WPA2, an
attacker captures a valid handshake. To make that happen, the attacker
transmits a “death frame”, similar to a TCP RST packet, that forces the client
to re-connect.
Then upload the pcap
file to CloudCracker, a website that currently charges $17 to check a Wi-Fi
password against about 604 million possible words. For $34, you can use their
1.2 billion-word rainbow table. (Both of these will fail against strong
passwords.)
Other
Security Measures To Take
The recommended solution is to
not use 802.11b but instead one of the more secure alternatives such as 802.11n
(when available it will be 802.11i compliant). However this also will
require upgrades to all NICs and WAPs that must communicate.
Points to
remember:
·
Turn off broadcast of SSID (beaconing)
·
Change default SSIDs (names)
·
Change default WEP keys (and use maximum key length available)
·
Disable SNMP on your WAPs (or at least change the default
community strings)
·
Connect WAPs in LANs outside of the secured intranet
·
War-walk through your company irregularly (no fixed
schedule!) to catch rogue hot-spots
·
Use WPA or at least WEB, and plan to migrate to more secure
standards (something using 802.11i, such as 802.11n) when available
·
If using WPA, configuring it to use the maximum WEP key length
available
·
If using WPA, configure a different default WEP key on different
devices
·
If using PSK mode, use a strong password
·
Use the same manufacturer for all components
·
Use captive portals for publicly accessible WLANs
·
Use VPNs if possible, or SSH/SSL tunnels
·
Install/activate personal firewalls on all laptops or other
computers using Wi-Fi
·
Linux wireless admin commands: iw*
(iwconfig) is used for Wi-Fi
parameters. Note that ifconfig
is still used for normal IP parameters.
Configuring
WLANs (Wi-Fi)
All the wireless commands start
with “iw”. The two most used are iwconfig
which handles 802.11b/a/g parameters, and iwpriv,
which handles the rest. Note that standard TCP/IP parameters are still set
using ifconfig.
iwconfig
interface options, where options include:
·
essid name
(name of the WLAN)
·
nwid name
(network ID or BSSID, needed for ad-hoc WLANs)
·
freq num
(the frequency to use, in Hertz (e.g., 2500000000 or 2.5G)
·
mode mode
(where mode is one of: Ad-Hoc, Managed, Master, Repeater, Secondary,
Monitor, or Auto)
·
ap mac-addr
the MAC address of the WAP to use
·
key key
(The encryption key, in hex (“1234-4321-09ac”)
or as a string (“s:secret”)
iwpriv
Lists other commands supported by NIC, such as WPA modes.
(See also “man wireless”,
and the commands iwgetid, iwlist, iwspy,
and iwevent.)
Identify
your card
Let’s assume you already have a
wireless card plugged in your PC and want to know which one it is and which
driver you need. Linux has usually a way to display a card identification, but
this depend on the type of card.
If the card is an ISA card, you are
usually out of luck.
If the card is a true PCMCIA or
Cardbus card, you need to use the command
cardctl
ident
to display the card identification
strings. Note that cardmgr will
also write some identification strings in the message logs (/var/log/daemon.log) that may be
different from the real card identification strings.
If the card is a PCI card, you need
to use the command “lspci -v” to display the card
identification strings.
If the hardware is a USB dongle,
you usually get the identification strings from the kernel log using “dmesg” (or in /var/log/messages).
The card identification usually
helps to identify the chipset inside the hardware, and in some other cases it
does not, because the vendor has changed the identity. Once you have identified
the chipset, it is usually straightforward to check if the hardware is
supported and which driver to use.
Most Linux drivers knows about some
of those card identifications, and will automatically bind to the hardware. It
is usually simple to add new identification to a driver.
Jacek Pliszka recommends getting
the FCC-ID written at the back of the hardware and to run it through the FCC
database. He also recommends checking the Windows driver (both identification
and file name) for some clues.
For drivers compiled as modules
(but which are not for removable devices), the parameter interface is flexible
and each driver may be different, so you must look in the documentation.
Basically the driver define a set of parameters by their name and you may set
for each keyword an array (one value for each instance of the hardware). The
module configuration is usually done in
/etc/modprobe.conf like this:
alias
eth1 hp100
alias eth2 wavelan
options wavelan io=0x3E0,0x390 name=eth2,eth3 irq=10,11
For PCMCIA modules, the
configuration is usually done in the PCMCIA scripts in the directory /etc/pcmcia/, and you should check
the PCMCIA Howto for details. Note that some distributions may use the
HotPlug scripts. Usually, you don’t need extra driver parameters, as PCMCIA is
Plug-and-Play, and all driver part of the PCMCIA package are already
pre-configured for proper auto-loading. However, you need to make sure the PCMCIA
subsystem load the driver you desire, if there are multiple drivers bound to
the same device you may end up with an unexpected driver. In this case, you
need to edit the various PCMCIA config files (in /etc/pcmcia/
— grep is your friend).
For USB modules, you may use the HotPlug
scripts. USB usually don’t require any driver parameters, but again, you
need to make sure the proper driver is loaded.
Before following up with the
wireless configuration, you may want to make sure the driver is properly loaded,
recognizes the hardware and can initialize it. This can be done by checking
the message logs (with dmesg).
Cell Phone
Security
GSM (Groupe Spécial Mobile) was
developed in 1982 for use with cell phones. GSM uses several cryptographic
algorithms for security, although strong security was never a priority of the
design. The A5/1 stream cipher is used for ensuring over-the-air voice
privacy.
A5/1 was developed
first and is used within Europe and the United States. A5/2 is a weaker cipher,
developed later for use in other countries.
Serious weaknesses have been found
in both algorithms: it is possible to break A5/2 in real-time with a
ciphertext-only attack, and in February 2008, Pico Computing, Inc. revealed its
ability and plans to commercialize attack systems.
On 12/2009 German computer engineer
Karsten Nohl announced that he had cracked the A5/1 cipher. According to Nohl,
he developed a number of rainbow tables and have found new sources for known
plaintext attacks. He also said that it is possible to build “a full GSM
interceptor ... from open source components” but that they had not done so
because of legal concerns. Nohl says the code book was accessible on the
Internet via services such as BitTorrent.
In 2010, threatpost.com reported that “A group of cryptographers
has developed a new attack that has broken Kasumi (the name for the A5/3
algorithm, used to secure most 3G GSM traffic). The technique enables them to
recover a full key by using a tactic known as a related-key attack, but
experts say it is not the end of the world for Kasumi.”
Although the GSM Association
devised a 128-bit successor to the 64-bit algorithm originally adopted in 1988,
the majority of network operators have not upgraded to the new code. Using
such a large key makes the generation and storage of rainbow tables
prohibitive.
At the hacker conference, Nohl
warned that the hardware and software required for digital surveillance of cell
phone calls were freely available as an open source product in which the coding
is available for individuals to customize. In response to his disclosures of
GSM’s weaknesses, Nohl’s decryption efforts were deemed illegal by the GSM
Association.
Another problem with GSM has
surfaced in 2012. Even without breaking its encryption, GSM can be used to
locate a phone and thus track a user. This is done by calling the target’s
mobile number, and monitoring the network’s radio signals as it locates the
phone. The attacker can quickly confirm if the person is located in the LAC (Location
Area Code) being monitored. Attackers can use the same technique to
determine if the target is within close proximity to a given base station
within the LAC, pin-pointing their location to within about 1 square kilometer.
A burglar can use this technique to see if a target is at home or not.
California’s state
legislature passed the Location Privacy Act of 2012 (SB-1434) in 8/2012, which
would make it mandatory for law enforcement agencies to obtain a warrant before
gathering any GPS or other location-tracking data that a suspect’s cell phone
might be sending back to its carrier.
Lecture 26 — 802.1x
and EAP
IEEE 802.1X is an IEEE standard for
port-based Network Access Control (port as in NIC). It provides
authentication to devices attached to a LAN port or preventing access from that
port if authentication fails. It is used for “closed” wireless access points
too, that is it is used for both wired and Wi-Fi connections.
802.1x is based on the EAP, the Extensible
Authentication Protocol, RFC 3748. EAP allows both parties to negotiate
which authentication protocols, common functions, and security mechanisms to
use.
EAP provides a sort of plug-in
architecture for security modules. EAP is an authentication framework, not
a specific authentication mechanism. Such mechanisms are called EAP
methods. There are currently about 40 different methods, including EAP-TLS,
EAP-SIM, EAP-AKA, PEAP, LEAP (a popular Cisco proprietary mechanism that uses
MSCHAP2, known to be weak), and EAP-TTLS.
802.1x
Protocol
There are three actors in this protocol.
The supplicant is the client attempting to connect to a
network. This is extra software on a computer, or extra firmware built
into a NIC.
The authenticator is
generally built into a WAP or a switch. It controls the port (NIC),
initially denying all but 802.1x authentication packets from the
client/supplicant. When the supplicant is authenticated, the authenticator
exchanges a session key and (the encrypted) access to the LAN is allowed. When
the session is over (the supplicant tells the authenticator, or a time-out
occurs) the port is locked down again, awaiting the next authentication
exchange.
The authenticator doesn’t actually
know how to authenticate users, so the name is a misnomer. Instead, the user
IDs and credentials (usually passwords) are kept in an authentication server.
This can be a Windows AD, a Kerberos server, but most commonly a RADIUS
server. Unless they are bundled together in one WAP or switch, the
authenticator must authenticate and use encrypted data with this server.
Many different authentication
methods are permitted by 802.1X. The idea is the authentication server
(commonly a RADIUS server) supports some methods, the supplicant (client, e.g.,
Wi-Fi NIC) supports some. So both parties use the EAP framework to decide
which one they both agree to use for the session.
When the supplicant comes online it
finds access to the network denied. It sends 802.1X packets (the only type
allowed through) and establishes an association with the authenticator. The
authenticator requests the supplicant’s identity (“username:”). The supplicant sends the identity to the
authenticator, which forwards it to the authentication (RADIUS) server as an
access request. Note different identities may have different types of access
allowed.

Now the authenticator simply
forwards packets between the supplicant and authentication server, which
negotiate an authentication method (using EAP; note a particular method may be
pre-configured).
Once the authentication method is
agreed upon it is used. A simplistic example would be a “password:” prompt and reply.
If all goes well the authentication
tells the authenticator “OK”. Then the authenticator tells the supplicant.
Finally a random session key is
generated and securely exchanged between the supplicant and authenticator. The
authenticator now allows access to the network by the supplicant using the
session key.
When done the supplicant sends a
termination message to the authenticator, which responds by blocking the port.
(Or a session might time out.)
Adoption of 802.1X has been slow
and different vendors support different EAP methods and proprietary extensions,
hampering inter-operation. The Open SEA (secure edge access) Alliance (openSEAalliance.org) is creating an
open, non-vendor-specific reference implementation of 802.1X to address this
issue. (When 802.11N final becomes common, so will 802.1X.)
EAP-TLS
EAP-TLS is an IETF open
standard (RFC-2716), and is well-supported among network switch, WAP, and NIC
vendors. It offers excellent security since the whole conversation is
encrypted with TLS. (Recall TLS is considered the successor of the SSL
standard.) EAP-TLS is the original standard WLAN EAP authentication protocol.
Even though EAP-TLS provides
excellent security, TLS requires PKI to be setup. The overhead of client-side
certificates (needed for PKI) may make this seem like a daunting task to set
up. In many cases, the ISP distributes a useable certificate with VPN
installer software. Since all clients then use the same certificate,
additional username and password authentication must be used too. (Thus the
confusing options for the Windows installer for Cisco’s VPN client, which say
to use certificate authentication but asks for a username and password too.)
Lecture
27 — PPP Security
PPP (Point-to-Point Protocol)
is used as the basis for many other security protocols, including VPN (e.g.,
PPTP), dial-up access, uploading email to your ISP’s MTA, etc. SAs need to
understand the basic PPP security mechanisms, configure the most secure
mechanism when a choice is possible, and understand the weaknesses of common
approaches. PPP is discussed in CGS2763,
pp. 117–ff).
PPP is a series of protocols that
operate in layers and phases. The initial link is established
using LCP. This protocol allows options, some of which require the otherwise
optional PPP authentication to be used in one or both directions. When the
option is present, the PPP session next enters the PPP authentication phase,
in which the client and server negotiate which authentication mechanism to use,
and then use it to authenticate one party to the other (and sometimes in both
directions).
Originally PPP provides two
authentication protocols, PAP and CHAP. Later support was added for
vendor-specific additional protocols, of which MS-CHAP was widely used. It
contains numerous security flaws, which allow an eavesdropper to obtain user’s
passwords easily. MS responded with a stronger version called MS-CHAPv2 (and renamed
the original to MS-CHAPv1).
Rather than continue to modify the
PPP RFC standard for each new security protocol, today PPP allows the use of EAP
to negotiate a much larger and extendable collection of security mechanisms.
See the EAP and EAP-TLS (the only required EAP method for PPP, see
RFC-2716) discussion on pp. 371-ff). Here we only discuss PAP, CHAP, and
MS-CHAPv2. MS-CHAPv1, is still in use, but any good SA will Just
Say No! to using it.
In PPP terminology,
the party desiring to authenticate the other is called the authenticator,
and the other party the peer. Most SAs refer to these as the server
and client instead, but keep in mind with CHAP and EAP either side
can demand the other to authenticate or drop the link, so client and server can
be confusing.
PPP
Authentication Negotiation
During the link establishment phase
the Configuration Option LCP packets provide a method for either party
to demand authentication from the other, and to negotiate the use of a specific
protocol. By default, authentication is not required, and the parties can
negotiate different (or no) authentication in each direction.
The party sending a Configure-Request
LCP packet is indicating that it expects authentication from its peer (the
other party). If a party is willing to use any of several authentication
methods, it must attempt to configure the most desirable protocol first.
If that protocol is rejected by the other party (by sending an appropriate NACK
packet), then the implementation SHOULD attempt the next most desirable
protocol in the next Configure-Request packet. If all offered protocols
are NACK’d then you drop the link (common) or (rarely) continue with no
authentication. Remember both parties can do this to demand authentication.
If a host sends a Configure-Ack
packet, it is agreeing to authenticate with the specified protocol. A party
receiving a Configure-Ack SHOULD expect the peer to authenticate with
the acknowledged protocol. Depending on the agreed protocol, the server or
client may start sending packets (to which the other party replies). This is
called the authentication phase and must be completed (if used at all)
before the next phase of PPP can commence.
PAP
With the Password Authentication
Protocol, a username and password pair is repeatedly sent by the peer (client)
to the authenticator (server) until authentication is acknowledged or the
connection is terminated.
PAP is not a strong
authentication method! Passwords are sent over the circuit “in the clear”,
and there is no protection from playback or repeated trial and error attacks. The
peer (client) is in control of the frequency and timing of the attempts.
Any implementations which
include a stronger authentication method (such as CHAP, described below) MUST
offer to negotiate that method prior to PAP.
CHAP
CHAP is defined as one-way
authentication (peer/client authenticates to the authenticator/server). However,
CHAP can be used in both directions if desired, in which case both client-to
server and server-to-client authentication must be successful to continue.
CHAP is simple (remember the password is also referred to as the secret):
1. The client
agrees to authenticate to the server using CHAP. After the Ack the server
sends to the client a random Challenge string (of random length, but
should be long enough for MD5 to work well).
2. The client
concatenates the username + password + challenge. (The password is often
referred to as the shared secret.)
3. The concatenated
string is then hashed using MD-5 to produce a 16 byte Challenge Response.
4. The Challenge
Response value is sent to the Server.
5. The Server
calculates the Challenge Response value the same way as the Client, and
compares the two. If identical, the Client is authenticated (ACK is sent).
Note that CHAP can have the Client
also authenticate the Server, using a different username and password. Also, a
new challenge string can be sent anytime during a PPP session to
re-authenticate.
CHAP is much stronger than PAP. However,
the passwords must be stored at both ends in plain text, which is a weakness. Also,
the server may transmit the passwords around its LAN between servers, another
weakness if not encrypted.
MS-CHAPv2
Both PAP and CHAP requires
storing user passwords in clear (plain) text on both the client and
server, and that’s not usually acceptable. User’s passwords in Windows are
stored in a hashed form only. This hash becomes the “password” stored on the
server end, and for security MS-CHAPv2 only sends a hash of this hashed
password (called the password-hash-hash) across the link.
In Windows OS, there
are actually two hashes of each password stored: the older LAN Manager (LM) one
and newer the Windows NT (WinNT) one. For compatibility, both were used in
SMB/CIFS and MS-CHAPv1. Unfortunately, the older LM password scheme is not
secure at all and easily reversed! MS-CHAPv2 only uses the WinNT hash of a
user’s password.
The stored WinNT
password is the 16-byte MD-4 hash (the RSA implementation) of the user’s
plain-text password. Usernames are encoded in ASCII and the password in
UTF-16. (See RFC 4757 for a description of WinNT password calculation.)
Unlike regular CHAP, MS-CHAP
requires both parties to authenticate to the other. Only one side has to
send the MS-CHAP request; if ACK’d then the first party becomes the
Server/authenticator) and the other the Client/peer. (The new PPP EAP works
the same way.)
MS-CHAPv2 also provides a “Change
Password” packet so clients can update their passwords on the server, using the
current session. Here’s the MS-CHAPv2 protocol (RFC–2759):
1. The client
agrees to authenticate to the server using MS-CHAPv2.
2. The Server sends
a random 16-byte Server Challenge string to the Client.
3. The Client
receives the Server Challenge string. It now generates its own 16-byte
challenge string (used to authenticate the Server) called the “Peer
Authenticator Challenge” string.
4. The Client generates
an 8-byte challenge string these as follows:
a. Concatenate
the 16-byte Peer Authenticator Challenge, the 16 byte Challenge received from
Server + Client’s username (ASCII)
b. Calculate the
SHA-1 hash of that.
c. Use the
first 8 bytes of the result as the “8-byte challenge” string.
5. The client uses
the 8-byte challenge and the stored WinNT hash of the user’s password to
calculate a 24 byte “Challenge Response” as follows:
a. Pad the 16-byte
user password hash by adding five all-zero bytes.
b. Split the
resulting 21-byte value into three 7-byte DES keys (that last key contains the
five zero bytes and is weak).
c. Encrypt
the 8-byte challenge string three times with each of the DES keys, and
concatenate the three results into a single 24-byte result called the “Challenge
Response”.
6. The Client sends
the 16-byte Peer Authenticator Challenge string, the 24-byte Challenge Response
string, and the username string to the Server.
7. The Server uses
the (stored) WinNT hash of the user’s password to generate the same three DES
keys, and uses them to decrypt the 24-byte Challenge Response. The result
should be three copies of the 8-byte challenge string as calculated by the
Client. The Server then calculates what the 8-byte challenge should be using
the same method as Client (in step 4). If the values match the client is
authenticated. The server must now authenticate to the client.
8. The Server now
calculates a 20-byte Authenticator Response (to authenticate the Server to the
Client) as follows:
a. Calculate
the MD-4 hash of the stored WinNT (hashed) password. (This is so we don’t send
the actual WinNT password hash.) This 16-byte result is called the password-hash-hash.
b. The
password-hash-hash is concatenated with the 24-byte challenge response + the
literal ASCII string “Magic server to client constant”.
c. The result
is then hashed with SHA-1, to produce a 20-byte result string.
d. d. The result
string from the previous step is then concatenated with the 8-byte challenge
string + the literal ASCII string “Pad to make it do more than one iteration”. This in turn is hashed
with SHA-1 to produce the 20-byte authenticator response.
9. The Server tells
the client its authentication was successful, and sends the 20-byte
Authenticator Response to the Client.
10. The Client also computes the
Authenticator Response and compares it to the one received from the Server. If
it matches the server is authenticated.
The security of the whole scheme
ultimately depends on the security of the RC-4 hash of the user’s password. A
weak password can be cracked fairly easily. While much better than MS-CHAPv1,
this scheme is overly complex (with no extra security provided over a simpler
version).
[From: The-H
Online, 7/2012] Encryption expert Moxie Marlinspike promised that
his CloudCracker
web service was able to crack any VPN or Wi-Fi connection secured using
MS-CHAPv2 within 24 hours. This service costs about $200. With the help of a
company called Picocomputing, Marlinspike has developed a processing server
which is able to test 18 billion keys DES per second – a feat which would
normally require 80,000 CPUs. Users who want to take advantage of the service
will first have to extract the client-server handshake from a record of the
network traffic. Marlinspike has developed an open source tool called
chapcrack for this purpose.
Despite its (long)
known weaknesses, MS-CHAPv2 is still widely used, especially in company
environments, as the authentication protocol is supported out of the box by
many operating systems. A PPTP/MS-CHAP2 combination is also in widespread use
on smartphones.
References:
www.schneier.com/paper-pptpv2.pdf
“Analysis of MS-CHAP”
www.cisco.com/warp/public/471/understanding_ppp_chap.html
www.oreilly.com/catalog/ntlogon/chapter/ch02.html
www.l0pht.com/l0phtcrack/
Lecture
28 — Configuring SASL
[Adopted from: http://www.sendmail.org/~ca/email/cyrus/sysadmin.html,
Cyrus SASL docs, various RFCs, and 2 O’Reilly SASL articles.]
SASL, the Simple
Authentication and Security Layer (RFC–4422) is a method for adding
authentication support to connection-based protocols and for optionally
negotiating a security mechanism for subsequent protocol interactions. The
method is mainly focused on authenticating a user to a server over TCP. Several
SASL mechanisms have been defined such as the SecurID SASL mechanism, the
One-Time-Password (OTP) SASL mechanism, and others.
Unlike PAM, SASL allows clients and
servers to negotiate which authentication and encryption mechanisms to use
(although PAM does support multiple mechanisms using “sufficient”, it’s not the
same). Also PAM requires the client to supply a raw password, whereas with
remote services such as email, the client usually only sends a hashed version.
Checking user passwords requires
root access (pam_unix.so uses a
setuid “helper” program, unix_chkpwd
for that). SASL typically uses a different user DB per service so no root
access is required.
SASL does support PAM, and does
include its own helper daemon that is setUID to root if you wish to use system
accounts.
Currently SASL is mostly used with
MTAs. With SASL, any program that uses the SASL libraries is an called application,
including both clients and servers. For each SASL application you specify
which mechanisms will be supported, in what preference order you’d like to use
them, and other configuration parameters. (Note the PLAIN SASL mech. can
use PAM!)
Applications use the SASL library
API to accomplish the SASL protocol exchange and to learn what the results
were. SASL is only a framework: specific SASL mechanisms govern
the exact protocol exchange. With a SASL library, the mechanisms need only be
written once and they’ll work with any apps that use it.
Since protocols such as SMTP, IMAP,
and LDAP all use SASL it makes sense to have a single shared SASL library many
applications can use. Some notable applications that use SASL include sendmail and imapd. You can use ldd program |grep sasl
to see if some application is compiled to use a SASL library.
Fedora introduces the
ability to use the SASL protocol for authenticating VNC connection to KVM and
QEMU virtual machines.
Cyrus SASL is the common (and
Linux default) implementation of SASL used. It currently is in version 2
(since 2002), and most commands start with “sasl2”.
The documentation is found at /usr/share/doc/cyrus-sasl*/index.html. Gnu also
provides a SASL library which is newer but not (yet) as popular. Solaris uses
a modified version of Cyrus SASL.
Note that SASL is not the only
framework in use for security mechanisms. GSSAPI (Generic
Security Services API) may become common. Currently it only supports the
Kerberos mechanism, but that is very popular (Windows Active Domains are an
implementation of this.) SASL supports GSSAPI to support Kerberos. EAP
(the Extensible Authentication Protocol) is another framework used with
PPP and Wi-Fi 802.11i. With EAP, after a connection link has been established
between two entities an authentication phase may take place. The authenticator
sends one or more requests to the peer, and the peer sends a response in
reply to each request. The authenticator ends the authentication phase with a
success or failure message. (EAP can use SASL via TLS as a mechanism.)
The Cyrus
SASL Library (the “glue” layer)
As an administrator, you need to
configure the SASL libraries by providing plug-ins for all the various
mechanisms used by any SASL applications on that host. Each such mechanism
must be configured (i.e., usernames and passwords must be entered).
Next each application must be
configured to list what authentication (and encryption) mechanism(s) it will
use. This can be done in an application-specific way, usually by editing the
application configuration files. However the Cyrus SASL library will also look
for configuration files in /usr/lib/sasl2/Application-name.conf if
the application fails to provide the configuration information.
The available mechanisms for SASL
are registered with the IANA (www.iana.org/assignments/sasl-mechanisms),
however a given implementation may not support all 22 (as of 12/2008) of
these. Use the commands sasl2-static-mechanisms [application] and sasl2-shared-mechanisms [application] to see which
mechanisms are supported by the Cyrus SASL library on your system.
The SASL library provides the
following services:
·
Ascertaining necessary security properties from the application
to aid in the choice of mechanism (or to limit the available mechanisms)
·
Loading of any needed plug-ins
·
Listing of available plug-ins to the application (mostly used on
the server side)
·
Choosing the “best” mechanism from a list of available mechanisms
for a particular authentication attempt (mostly used on the client-side)
·
Providing information about the SASL negotiation back to the
application (authenticated user, requested authorization identity, security
strength of any negotiated security layer, and so on)
·
Routing the authentication (and in the case of a mechanism with a
security layer, encrypted) data packets between the application and the chosen
mechanism
This framework allows the
mechanisms and applications access to two types of plug-ins. Auxiliary
property or “auxprop” plug-ins provide a simple database interface
and can return properties about the user such as password, home directory, or email
address. The other plug-in type support username canonicalization, which might
provide site-specific ways to canonicalize (put into a standard format)
a username or perform other tasks.
A useful Cyrus SASL
troubleshooting tools is pluginviewer(8),
to see what is configured and what is available.
In the Cyrus SASL implementation
the framework is entirely contained within libsasl2.so
(or libsasl2.a). However
mechanism-specific daemons may need to be running, and the usernames and
passwords (or other authentication tokens) are stored in various database
files.
The
Application’s Configuration File
By default, the SASL library reads
its options from /usr/lib/sasl2/App.conf
(where “App” is the application-defined name of the application). For
instance Sendmail reads it’s configuration from “/usr/lib/sasl2/Sendmail.conf”
and the sample server application included with the library looks in “/usr/lib/sasl2/sample.conf”.
A standard Cyrus SASL configuration
file might look like:
pwcheck_method:
saslauthd
Applications can redefine where the
SASL library looks for configuration information. For instance Cyrus imapd reads its SASL options from its
own configuration file, /etc/imapd.conf,
by prepending all SASL options with “sasl_”.
So the SASL option pwcheck_method
is set by changing sasl_pwcheck_option
in /etc/imapd.conf. Check your
application’s documentation for more information.
Example
SASL Application: MTA
S: 220 example.com ESMTP server ready
C: EHLO rubble.com
S: 250-example.com Howdy!
S: 250-AUTH ANONYMOUS CRAM-MD5 DIGEST-MD5 OTP
S: 250-STARTTLS
S: 250 HELP
When the client (C:) establishes a
TCP connection to the server (S:), the server sends the 220 greeting. The
client then asks the server to list the SMTP extensions that it supports (EHLO). The server supports SASL with
four mechanisms (AUTH ...).
Also listed is the option for TLS (STARTTLS)
and the help command. The AUTH
extension indicates that the server supports SASL, and remaining parameters
on that line indicate which SASL mechanisms are available on the server. These
are listed in server’s preference order.
The next step is that the client
must tell the server to start a particular mechanism, and then both must be
able to exchange information to initialize the mechanism, possibly indicating
success or failure. Here’s how SMTP uses OTP (and no TLS):
C: AUTH OTP AGJsb2NrbWFzdGVy
S: 334
b3RwLXNoYTEgOTk5NyBwaXh5bWlzYXM4NTgwNSBleHQ=
C:
d29yZDpmZXJuIGhhbmcgYnJvdyBib25nIGhlcmQgdG9n
S:
235
Here the client asks the server to
start the OTP mechanism and supplies an initial argument, which identifies the
user to be authenticated. The server decides to start the mechanism (code
334), and generates a challenge. The client sends a response,
and the server decides it’s valid (code 235 means authentication success).
Because the arbitrary binary data may be sent during the SASL negotiation, it
is always base64 encoded when sent via SMTP.
Other possibilities include first
using STARTTLS to begin
TLS (formally SSL) encryption (and use certificates to have the server identify
itself to the client, and possibly vice-versa). If so, your program tells the
server to start TLS, and ultimately your program gets back another 220
greeting (only encrypted), and sends another (encrypted) EHLO. (Check out RFC-3207 for all the
details.) Then you can use AUTH PLAIN or some other mechanism for
authentication, using the encrypted channel.
Authentication
ID versus Authorization ID
SASL supports the idea of proxy
authentication. The authentication ID (authid) is the
userid being verified. Typically a password or public-key is
used. Additionally an authorization ID (userid) can be
supplied, which means userid is to be a proxy for authid. (If wpollock logs in
using wpollock’s password and an authorization ID of hpiffl, then wpollock may
be allow to read Hymie Piffl’s email.) This is handy when going on vacation
and you wish to delegate your email reading to another.
In other words the authentication
identity is the username you login as, and the authorization identity is the
username you want to act on behalf of. In Cyrus SASL, these are referred to as
the authid and authzid, respectively.
Applications can set their own
proxy policies. By default the SASL library will only allow the same user to
act for another (that is, userid must equal authid).
SASL
Realms
The Cyrus SASL library supports the
concept of “realms”. A realm is a set of users and a set of specified
mechanisms used to authenticate those users. In the simplest case (a single
server on a single machine), the realm might be the fully-qualified domain name
of the server. If applications don’t specify a realm to SASL, most mechanisms
will default to this. For example “Hymie@foobar.com” means user Hymie and the
realm foobar.com.
Authentication
Datastore (i.e. database)
Before using Cyrus SASL in your
server, you need to think about how each SASL plug-in is going to validate the
authentication information provided by a remote user. Instead of requiring
that the network administrator write a customized callback procedure, Cyrus
SASL provides a couple of easy options.
To begin with, you probably have
some kind of a password system already running in your enterprise. For example
if you’re already running Kerberos version 4 or 5, then the right thing just
happens — providing, of course, that the client requests the use of the KERBEROS_V4 or GSSAPI mechanism.
Otherwise you probably have
something (e.g., PAM) that takes a username and a password and comes back with
either a “yes” or “no”. Cyrus SASL comes with a program called saslauthd that knows about several
different mechanisms, such as password files, shadow password files, DCE, PAM,
SIA, and so on. (The reason Cyrus SASL provides this as a separate program is
so that your servers don’t have to run as root; instead, they talk to saslauthd using a named pipe.)
Finally, Cyrus SASL has its own
authentication database. There are a couple of reasons why you might want to
use this rather than some other more standard DB:
·
You want to support a shared secret mechanism (e.g.,
CRAM-MD5 or DIGEST-MD5), which requires either the actual passphrase or a
mechanism-specific hashed-format. CRAM-MD5 supports authentication only
(no authorization). DIGEST-MD5 supports authentication, integrity, and
privacy, as well as authorization.
·
You want to use a mechanism that requires arbitrary
authentication information (e.g., seed and sequence information for the OTP
mechanism).
·
You want to have a namespace for SASL users that’s separate from
what’s provided by your operating system — you don’t have to create a UNIX
login for each user of the service.
Cyrus SASL
provides another program, saslpasswd,
that lets the administrator create, modify, or remove SASL-login accounts.
SASL
Mechanisms
There are several types of
mechanisms:
·
Password Verification Mechanisms – For example, PLAIN
(supports authentication and authorization). These receive a raw password from
the remote application and then pass it into the glue code for verification by
a password verifier. These require the existence of an outside security layer
(encryption) to hide the otherwise plaintext password from people who might be
snooping on the wire. These mechanisms do not require that the server have
access to a plaintext (or plaintext-equivalent) version of the password; SASL
can use PAM and other mechanisms to check the password.
·
Shared Secret Mechanisms – For mechanisms such as
CRAM-MD5, DIGEST-MD5 (successor to CRAM-MD5), and others, there is a shared
secret between the server and client (e.g. a password or key). However, in
this case the password itself does not travel across the network. Instead the
client passes a server a token (a challenge) that proves that it knows
the secret (without actually sending the secret across the network). For these
mechanisms, the server generally needs a plaintext equivalent of the secret to
be in local storage (not true for SRP mechanism).
Using the CRAM-MD5 (challenge
response authentication mechanism) authentication, the server first sends a
challenge string to the client. The client responds with a username followed
by a space character and then a 16-byte digest in hexadecimal notation. The
digest is the output of HMAC-MD5 with the user’s password as the secret key,
and the server’s original challenge as the message. The server also calculates
its own digest with its notion of the user's password, and if the client’s
digest and the server’s digest match then authentication was successful. See
RFC-2195. CRAM-MD5 is the only allowed and widely supported SASL-mechanism for
ESMTP AUTH (“ESMTPA”) without Transport Layer Security (TLS).
·
Kerberos Mechanisms – Kerberos mechanisms use a trusted
third party to authenticate the client. These mechanisms don’t require the
server to share any secret information with the client, it is all performed
through the Kerberos protocol. GSSAPI supports authentication, integrity, and
privacy, as well as authorization but requires a functioning Kerberos
infrastructure.
SASL defines which mechanisms to
use (i.e., which the server will accept, and which the client will try to use)
by defining the minimum (and/or maximum) strength of the mechanisms to use.
You tell Cyrus SASL the actual and desired security level of the connection,
expressed as an integer. Typical values are 0 (nothing), 1
(integrity-checking only, e.g., MD5 checksum), 56, 112, and 128. Excluding zero
and one, it’s easiest to think of this as the number of bits in the session key
being used for privacy.
Available
Mechanisms:
EXTERNAL
where authentication is implicit in the context (e.g., for protocols already
using IPSec or TLS).
ANONYMOUS for
unauthenticated guest access.
PLAIN
The PLAIN mechanism is not a
secure method of authentication by itself. It is intended for connections that
are being encrypted by another level. (For example, the IMAP command
“STARTTLS” creates an encrypted connection over which PLAIN might be used.)
The PLAIN mechanism works by transmitting a userid, an authentication
id and a password to the server, and the server then determines
whether that is an allowable triple.
You can configure which password
repository to use for PLAIN mechanisms. man saslauthd lists all the choices; here
is a shorter list of some common ones:
·
PAM – PAM, the pluggable authentication module, is the
default way of authenticating users on Solaris and Linux. It can be configured
to check passwords in many different ways: through Radius, through NIS, through
LDAP, or even using the traditional /etc/passwd
file. If you wish to use PAM for authentication and the Cyrus SASL library
found the PAM library when it was configured at compilation time, it is the
default (or set pwcheck_method
to “PAM”). It uses PAM with the service name (for example, Sendmail
uses “smtp” and Cyrus imapd uses
“imap”).
The PAM authentication for SASL
only affects the plaintext authentication it does. It has no effect on the
other mechanisms, so it is incorrect to try to use PAM to enforce additional
restrictions beyond correct password on an application that uses SASL for
authentication.
·
passwd – /etc/passwd
is supported innately in the library. Simply set the configuration option “pwcheck_method” to “passwd”.
·
shadow – /etc/shadow
is somewhat trickier. If the servers that use SASL run as root (such as
Sendmail), there’s no problem: just set the pwcheck_method
option to “shadow”. However,
many daemons do not run as root for additional security, such as Cyrus imapd. In order for these servers to
check passwords, they either need a helper program that runs as root, or need
special privileges to read /etc/shadow.
The easiest way is to give the server the rights to read /etc/shadow by, for instance, adding
the cyrus user to the “shadow” group and then setting pwcheck_method to “shadow”. It is also possible to write
a special PAM module that has the required privileges; default PAM setups do
not (to my knowledge) come with this.
·
kerberos_v4 – Kerberos v4, if found by the configuration
script at compile time, can be enabled for plaintext password checking by
setting pwcheck_method to “kerberos_v4”. This is different from
the KERBEROS_V4 mechanism discussed below—this configuration option merely
specifies how to check plaintext passwords on the server.
·
sasldb – This stores passwords in the SASL secrets
database (/etc/sasldb2), the
same database that stores the secrets for shared secret methods. Its principal
advantage is that it means that the passwords used by the shared secrets
mechanisms will be in sync with the plaintext password mechanisms. However,
system built-in routines will not use sasldb.
Note that to set plaintext passwords
in sasldb, you need to configure
“saslpasswd” to do so. The saslpasswd uses the same configuration
files like any SASL server. Make /usr/lib/sasl/saslpasswd.conf
contain the line “pwcheck_method: sasldb” to instruct saslpasswd to create plaintext secrets
in addition to the normal secrets.
NTLM – Undocumented but
provided for compatibility with MS applications.
·
write your own – Last, but not least, the most
flexible method of authentication for PLAIN is to write your own. If you do
so, any application that calls the “sasl_checkpass()”
routine or uses PLAIN will invoke your code.
Shared secrets
The Cyrus SASL library also supports
some shared secret authentication methods such as CRAM-MD5 and its successor DIGEST-MD5, and OTP (and OPIE). These methods rely on the
client and the server sharing a secret, usually a password. The server
generates a challenge and the client a response proving that it knows the
shared secret. This is much more secure than simply sending the secret over
the wire proving that the client knows it.
OTP is more secure than the
other shared secret mechanisms in that the secret is used to generate a sequence
of one-time (single use) passwords which prevents reply attacks, and that
secret need not be stored on the system. These one-time passwords are stored
in the /etc/sasldb2
database.
Cyrus SASL can be configured to use
OPIE instead of using its own database and server-side routines. OPIE
uses its own “opiekeys”
database for storing the data necessary for generating the server challenges.
The location of the opiekeys
file is configurable in SASL; by default it is /etc/opiekeys,
but this is modifiable by the “opiekeys”
option.
There’s a downside to using
shared-secret mechanisms. In order to verify responses the server must keep
password equivalents in a database. If this database is compromised, it is the
same as if every user’s password for that realm is compromised. Additionally saslauthd can’t be used to access this
DB of secrets. It could if it were run SUID root but you should never do
that! Instead each application user id should have the required read (or
read-write) access to whatever DB it uses. It is often a better approach to
use saslauthd and PAM.
The Cyrus SASL library stores
shared secrets by default in the /etc/sasldb2
database. Depending on the exact database type used (gdbm, ndbm,
or db) the file may have
different suffixes or may even be split into two different files (e.g., sasldb.dir and sasldb.pag). It is also possible for a server to define
its own way of storing authentication secrets.
The Cyrus SASL library also comes
with two mechanisms that make use of Kerberos: KERBEROS_V4, which should be
able to use any Kerberos v4 implementation, and GSSAPI (tested against MIT
Kerberos 5 and Heimdal Kerberos 5). These mechanisms make use of the Kerberos
infrastructure and thus have no password database.
Kerberos
Applications that wish to use a
Kerberos mechanism will need access to a service key, stored either in a
“srvtab” file (Kerberos 4) or a “keytab” file (Kerberos 5). Currently, the
keytab file location is not configurable and defaults to the system default
(probably /etc/krb5.keytab).
The Kerberos 4 srvtab file location is configurable; by default it is /etc/srvtab, but this is modifiable by
the “srvtab” option. Different SASL applications can thus use different srvtab
files.
Password
Verification Services
The password verifiers take a
username and plaintext password, and say either “yes” or “no”. It is not
possible to use them to verify hashes that might be provided by the shared
secret mechanisms.
Password verifiers are selected
using the “pwcheck_method” SASL
option. There are two main password verifiers provided with Cyrus SASL:
·
saslauthd – saslauthd
is the server process which handles plaintext authentication requests on behalf
of the Cyrus SASL library.
The saslauthd
daemon has a number of modules of its own, which allow it to do verification of
passwords in a variety of ways, including PAM, LDAP, against a Kerberos
database, and so on. This is how you would want to, for example, use the data
contained in /etc/shadow to
authenticate users.
saslauthd
listens in on a socket for requests and responds to them. Use the
command sasl2-shared-mechlist
to see the list of installed shared-secret mechanisms on your system.
·
auxprop – This uses an auxprop plug-in to fetch the
password and then compares it with the client-provided copy to make the
determination. Auxiliary Property (or auxprop) plug-ins provide
a database service for the glue layer (and through it, to the mechanisms and
application).
Cyrus SASL ships with two auxprop
plug-ins: SASLdb and SQL. Auxprop plug-ins are mostly only used
by shared secret mechanisms (or by the auxprop password verify) to access the “userPassword” attribute of some
database containing user name and password info. This provides a plaintext
copy of the password that allows for authentication to take place.
(Non-plain text mechanisms used to
use a different server, auxpropd.
But in sasl2 the library mechanisms’ code directly accesses the various databases.)
Installing a mechanism is a matter
of putting a plug-in in the correct location, /usr/lib/sasl2.
(You also find application configuration files here by default.)
SASL
mechanisms are generally defined by the IETF standards process, and thus have
RFCs available. However not all supported mechanisms are standardized this
way.
Lecture 29 — PKI and x.509 Certificates
Review PKI overview (page 83).
[Adopted from NIST SP800-32.pdf]
In
conventional business transactions, customers and merchants rely on credit
cards (e.g., VISA or MasterCard) to complete the financial aspects of
transactions. The merchant may authenticate the customer through signature
comparison or by checking identification, such as a driver’s license. The
merchant relies on the information on the credit card and status information
obtained from the credit card issuer to ensure that payment will be received.
Similarly, the customer performs the transaction knowing they can reject the
bill if the merchant fails to provide the goods or services. The credit card
issuer is the trusted third party in this type of transaction.
With
electronic commerce, customer and merchant may be separated by hundreds of
miles. Other forms of authentication are needed, and the customer’s credit
card and financial information must be protected for transmission over the
internet. Customers who do business with a merchant over the internet must use
encryption methods that enable them to protect the information they transmit to
the merchant, and the merchant must protect the information it transmits back
to customers. Both customer and merchant must be able to obtain encryption
keys and ensure that the other party is legitimate. The PKI provides the
mechanisms to accomplish these tasks. (See also AJava/CreditCardProcessing.htm)
Two
parties who wish to transact business securely may be separated geographically,
and may not have ever met. To use public key cryptography to achieve their
security services, they must be able to obtain each other’s public keys and
authenticate the other party’s identity. This may be performed out-of-band
if only two parties need to conduct business. If they will conduct business
with a variety of parties, or cannot use out-of-band means, they must rely on a
trusted third party to distribute the public keys and authenticate the identity
of the party associated with the corresponding key pair.
Public
key infrastructure is the combination of software, encryption technologies,
and services that enables enterprises to protect the security of their
communications and business transactions on networks. PKI integrates digital
certificates, public key cryptography, and certification authorities into a
complete enterprise-wide network security architecture.
PKI History: Hellman
and Whitfield worked out digital signatures in 1976. (Although they weren’t
the first, they were the first to publish. In 1999, the British government
declassified documents showing some of their cryptographers solved this
first.) In 1977, three Massachusetts Institute of Technology researchers (Ron
Rivest, Adi Shamir, and Leonard Adleman) created the first public key system,
RSA. In 1989, the ITU adopted the X.509 standard for digital certificates,
based on RSA. In the mid-1990s, Netscape developed the first versions of SSL,
based on X.509 and RSA certificates. In 1999, the IETF released the successor to
SSL, TLS.
A
typical enterprise’s PKI encompasses the issuance of digital certificates to
individual users and servers; end-user enrollment software; integration with
certificate directories; tools for managing, renewing, and revoking
certificates; and related services and support.
The
term public key infrastructure is derived from public key cryptography, the
technology on which PKI is based. Public key cryptography is the technology
behind modern digital signature techniques. It has unique features that make
it invaluable as a basis for security functions in distributed systems.
PKI
and SSL/TLS Issues
HTTPS
is clearly more secure than HTTP. Why isn’t it used everywhere?
There
is a cost for HTTPS; good certificates aren’t free. It takes additional processing
power and more bandwidth to use than HTTP.
It
is considered unnecessary for some sites that don’t require user login or have
private information on them. However this is a misconception about privacy.
Even when you visit a site that has no private data, and you don’t upload
anything, the URLs and pages you view should still be private. Consider Google
URLs and how what you search for can be used to identify you. When this
information is combined with movie reviews, Amazon.com feedback, and anonymous
transaction data from “secure” sites, you and what you do on them can often be
determined. Note that your mobile browsing (using Wi-Fi hotspots) can be
completely captured by anyone nearby using, say the FireSheep network sniffer Firefox
add-on.
HTTPS
also prevents local ISPs and web browsers from caching content, a big deal for
long distance users or mobile device users. It is becoming more of an issue
with JavaScript libraries such as jQuery and CSS libraries needed for every
page, not to mention the ads and multimedia. (While you can use Akami,
CacheFly, or other CDNs (or even Google) to host such stuff, secure web
browsers will start to complain about XSS and mixed code.) There is an
extension to TLS (RFC-3546) which would
allow this, but it’s not widely used.
Finally,
the use of HTTPS requires a unique IP address for each site. Many smaller
sites use virtual hosts from their ISPs and those don’t support HTTPS.
Server
Name Indication (SNI) is a feature that extends the SSL and TLS
protocols to indicate what hostname the client is attempting to connect to at
the start of the handshaking process. This allows a server to present multiple
certificates on the same IP address and port number, and thus allows multiple
secure (HTTPS) websites to be served off the same IP address without requiring
all those sites to use the same certificate. Most browsers support this as of
2012, but if one doesn’t, it will receive a default certificate and the browser
will pop-up incorrect certificate warning dialogs.
HTTP
Strict-Transport-Security (HSTS)
HSTS is
a new protocol that adds a header to the HTTPS reply packet. It is designed to
work much like the EFF’s “HTTPS Everywhere” Firefox add-on, but even better.
It works like this:
1. Over an HTTPS
connection, the server provides the Strict-Transport-Security
header indicating it is an HSTS host. The header looks like this:
Strict-Transport-Security: max-age=60000
The header’s
presence in the reply indicates the server is an HSTS host, and max-age states for how many seconds
the browser should remember this.
2. For an HSTS
host (e.g., paypal.com),
any subsequent requests for an insecure connection to that host (http://paypal.com) will be rewritten
to a secure request (https://paypal.com)
before any network connection is opened. (And yes, PayPal already supports
this!)
3. Optionally, the
header can include an includeSubdomains
directive in that header that tells the browser to “upgrade” all subdomains of
the serving host to HTTPS too. That looks like this (all one line):
Strict-Transport-Security: max-age=60000;
includeSubdomains
If Firefox knows a
host is an HSTS one, it will automatically establish a secure connection to
your server without even trying an insecure one.
See the Draft
RFC for HSTS for more details. (Although approved, it hasn’t yet
(as of 10/4/2012) been assigned an RFC number.)
PKI
COMPONENTS
Functional
elements of a public key infrastructure include certification authorities,
registration authorities, repositories, and archives. The users of the PKI
come in two flavors: certificate holders and relying parties.
A certification
authority (CA) is similar to a notary. The CA confirms the identities of
parties sending and receiving electronic payments or other communications.
Authentication is a necessary element of many formal communications between
parties, including payment transactions.
A registration
authority (RA) is an entity that is trusted by the CA to register and
verify identities. An RA also make public (in some on-line repository) signed
certificates, and maintain certificate revocation lists (CRLs) that can
be queried in real-time to ensure a certificate is valid. (Actually, the CA is
generally the RA as well. Some CAs are split up this way, to avoid legal
liability for issuing false certificates.)
A repository
is a database of active digital certificates for a CA system. The main
business of the repository is to provide data that allows users to confirm the
status of digital certificates for individuals and businesses that receive
digitally signed messages. These message recipients are called relying
parties. CAs post certificates and CRLs to repositories.
The
CA issues a public key certificate for each identity, confirming that
the identity has the appropriate credentials. A digital certificate typically
includes the public key, information about the identity of the party holding
the corresponding private key, the operational period for the certificate, and
the CA’s own digital signature. In addition, the certificate may contain other
information about the signing party or information about the recommended uses
for the public key.
Note
that public keys in certificates can be thousands of digits long. Scanning
such values for differences, by a human, is not a reliable (or fun) procedure.
Instead, a message digest of the key/certificate can be computed, typically of
128 bits in length. This number, expressed as a 32 hex-digit number, is known
as the fingerprint. This fingerprint can be compared by humans more
reliably. Some companies print their server’s fingerprint on their business
cards. (Despite the importance and many well-publicized frauds, few people
bother to validate the fingerprints.)
A subscriber
is an individual or business entity that has contracted with a CA to receive a
digital certificate verifying an identity for digitally signing electronic
messages.
CAs
must also issue and process certificate revocation lists (CRLs), which
are lists of certificates that have been revoked. The list is usually signed
by the same entity that issued the certificates. Certificates may be revoked,
for example, if the owner’s private key has been lost; the owner leaves the
company or agency; or the owner’s name changes. CRLs also document the
historical revocation status of certificates. That is, a dated signature may
be presumed to be valid if the signature date was within the validity period of
the certificate, and the current CRL of the issuing CA at that date did not
show the certificate to be revoked.
PKI
users are organizations or individuals that use the PKI, but do not issue
certificates.
Certification Authority
The
certification authority, or CA, is the basic building block of
the PKI. The CA is a collection of computer hardware, software, and the people
who operate it. The CA is known by two attributes: its name and its public
key. The CA (with an RA) performs four basic PKI functions:
· issues
certificates (i.e., creates and signs them);
· maintains
certificate status information and issues CRLs;
· publishes
its current (e.g., unexpired) certificates and CRLs, so users can obtain the
information they need to implement security services; and
·
maintains archives of status information about the expired
certificates that it issued.
These
requirements may be difficult to satisfy simultaneously. To fulfill these
requirements, the CA may delegate certain functions to the other components of
the infrastructure.
A
CA may issue certificates to users, to other CAs, or both. When a CA issues a
certificate, it is asserting that the subject (the entity named in the
certificate) has the private key that corresponds to the public key contained
in the certificate. If the CA includes additional information in the
certificate, the CA is asserting that information corresponds to the subject as
well. This additional information might be contact information (e.g., an
electronic mail address), or policy information (e.g., the types of
applications that can be performed with this public key.) When the subject of
the certificate is another CA, the issuer is asserting that the certificates
issued by the other CA are trustworthy.
The
CA inserts its name in every certificate (and CRL) it generates, and signs them
with its private key. Once users establish that they trust a CA (directly, or
through a certification path) they can trust certificates issued by that CA.
Users can easily identify certificates issued by that CA by comparing its
name. To ensure the certificate is genuine, they verify the signature using
the CA’s public key.
The CA is the
weak-link in the PKI chain. CAs need to be approved by web browser makers (to
have the CA’s certificate included). Browser makers trust various companies to
approve other CAs, who approve other CAs, etc. Currently (8/2010) there are
more than 650 trusted CAs. With so many, it is impossible to determine that
all are worthy of this trust.
Mr. Eckersley of the
EFF said Exhibit No. 1 of the weak links in the chain is Etisalat, a wireless
carrier in the United Arab Emirates that he said was involved in the dispute
between the BlackBerry maker, Research In Motion, and that country over
encryption. The U.A.E. has discontinued some BlackBerry services because of
R.I.M.’s refusal to offer a surveillance back door to its customers’ encrypted
communications. Mr. Eckersley also said that Etisalat was found to have
installed spyware on the handsets of some 100,000 BlackBerry subscribers last
year. Research In Motion later issued patches to remove the malicious code.
Yet Etisalat is a trusted CA, and could misuse its position to eavesdrop on the
activities of Internet users.
CAs such as Etisalat
could issue fake certificates to itself for scores of Web sites, including Google.com,
Microsoft.com and Verizon.com, and “use those certificates to conduct virtually
undetectable surveillance and attacks against those sites”. They could also
eavesdrop on virtual private networks. Some people worry about CAs in China
misusing their position to eavesdrop, say on the gmail accounts of dissidents
(which they have tried to do in the past), yet Mozilla recently added a Chinese
CA to Firefox. [Adapted from a NT Times article by Miguel Helft on 8/13/2010]
X.509 Public Key Certificates
The
X.509 public key certificate format has evolved into a flexible and powerful
mechanism. It may be used to convey a wide variety of information. Much of
that information is optional, and the contents of mandatory fields may vary as
well. It is important for PKI implementers to understand the choices they
face, and their consequences. Unwise choices may hinder interoperability or
prevent support for critical applications. The X.509 public key certificate is
protected by a digital signature of the issuer. Certificate users know the
contents have not been tampered with since the signature was generated if the
signature can be verified. Certificates contain a set of common fields, and
may also include an optional set of extensions.
There
are different types of certificates. Some identify people, some identify
specific applications (and other software, such as patches), but most
certificates are used to identify websites.
Certificates
come in levels of assurance:
· Domain-validated
(DV) certificates only ensure the holder owns the domain. Often this is done
by a simple whois lookup and email conformation. While not very trust-worthy
(email and whois data can be spoofed), these certificates are relatively cheap.
· Organization-validated
(OV) certificates require a CA to validate both the organization/person as well
as the domain name. Often hard-copy proofs (such as a company’s incorporation
papers) are examined.
· Extended-validation
(EV) certificates require CAs to meet the very high standards for validation,
as set by the Certificate
Authority Browser Forum.
There
are ten common fields: six mandatory and four optional. The mandatory fields
are:
·
Serial number. The serial number is an integer assigned
by the certificate issuer to each certificate. The serial number must be unique
for each certificate generated by a particular issuer. The combination of the
issuer name and serial number uniquely identifies any certificate.
·
Signature (and signature algorithm). The signature field
indicates which digital signature algorithm (e.g., DSA with SHA-1 or RSA with
MD5) was used to protect the certificate.
In 2004, MD5 was
shown to have some theoretical weaknesses. While still considered safe at the
time, in 2008 a more severe weakness was discovered. It is possible for virus
writers to craft a virus infected file to have the same MD5 sum as the real
file.
Since PKI
certificates generally rely on MD5 it has become possible to spoof a site even
when using HTTPS. It is hoped that the X.509 certificates used for PKI will
soon migrate to SHA-2 or SHA-2.
See www.phreedom.org/research/rogue-ca/
for more information.
·
The certificate issuer name. The issuer field
contains the X.500 distinguished name of the TTP (CA) that generated the
certificate.
·
Validity. The validity field indicates the dates on which
the certificate becomes valid and the date on which the certificate expires
(i.e., the certificate validity period).
·
Subject’s public key information. The subject public key
information field contains the subject’s public key, optional parameters, and
algorithm identifier. The public key in this field, along with the optional
algorithm parameters, is used to verify digital signatures or perform key
management. If the certificate subject is a CA, then the public key is used to
verify the digital signature on a certificate.
·
Subject. The subject is the party that controls
the corresponding private key. The subject field contains the distinguished
name of the holder of the private key corresponding to the public key in this
certificate. The subject may be a CA, a RA, or an end entity. End entities
can be human users, hardware devices, or anything else that might make use of
the private key.
There
are four optional fields: the version number, two unique identifiers, and the
extensions. These optional fields appear only in version 2 and 3 certificates.
·
Version. The version field describes the syntax of the
certificate. When the version field is omitted, the certificate is encoded in
the original, version 1, syntax. Version 1 certificates do not include the
unique identifiers or extensions. When the certificate includes unique
identifiers but not extensions, the version field indicates version 2. When
the certificate includes extensions, as almost all modern certificates do, the
version field indicates version 3.
·
Issuer unique ID and subject unique ID. These
fields contain identifiers, and only appear in version 2 or version 3
certificates. The subject and issuer unique identifiers are intended to handle
the reuse of subject names or issuer names over time. However, this mechanism
has proven to be an unsatisfactory solution. The Internet Certificate and CRL
profile does not recommend inclusion of these fields.
·
Extensions. This optional field only appears in version 3
certificates. If present, this field contains one or more certificate
extensions. Certificate extensions allow the CA to include information
not supported by the basic certificate content.
Extensions
have three components: extension identifier, a criticality flag,
and extension value. The extension identifier indicates the format and
semantics of the extension value. The criticality flag indicates the
importance of the extension. When the criticality flag is set, the information
is essential to certificate use. Therefore, if an unrecognized critical
extension is encountered, the certificate must not be used. Alternatively, an
unrecognized non-critical extension may be ignored.
Any
organization may define a private extension to meet its particular business
requirements. However, most requirements can be satisfied using standard
extensions. Common certificate extensions have been defined by ISO and ANSI to
answer questions that are not satisfied by the common fields:
o Subject type.
This field indicates whether a subject is a CA or an end entity.
o Names and
identity information. This field aids in resolving questions about a
user’s identity, e.g., are “alice@gsa.gov”
and
“c=US; o=U.S. Government;
ou=GSA; cn=Alice Adams”
the same person?
o Key
attributes. This field specifies relevant attributes of public keys, e.g.,
whether it can be used for key transport, or be used to verify a digital
signature.
o Policy
information. This field helps users determine if another user’s
certificate can be trusted, whether it is appropriate for large transactions,
and other conditions that vary with organizational policies.
o Basic
constraints. The subject of a certificate could be an end user or another
CA. The basic certificate fields do not differentiate between these types of
users. The basic constraints extension appears in CA certificates,
indicating this certificate may be used to build certification paths.
o The key
usage extension indicates the types of security services that this public
key can be used to implement. These may be generic services (e.g.,
non-repudiation or data encryption) or PKI specific services (e.g., verifying
signatures on certificates or CRLs).
o The subject
field contains a directory name, but that may not be the type of name that is
used by a particular application. The subject alternative name
extension is used to provide other name forms for the owner of the private key,
such as DNS names or email addresses. For example, the email address alice@gsa.gov.gov could appear in this
field.
o CAs may have
multiple key pairs. The authority key identifier extension helps users
select the right public key to verify the signature on this certificate.
o Users may also
have multiple key pairs, or multiple certificates for the same key. The subject
key identifier extension is used to identify the appropriate public key.
o Organizations
may support a broad range of applications using PKI. Some certificates may be
more trustworthy than others, based on the procedures used to issue them or the
type of user cryptographic module. The certificate policies extension
contains a globally unique identifier that specifies the certificate policy
that applies to this certificate.
o Different
organizations (e.g., different companies or government agencies) will use
different certificate policies. Users will not recognize policies from other
organizations. The policy mappings extension converts policy
information from other organizations into locally useful policies. This
extension appears only in CA certificates.
o The CRL
distribution points extension contains a pointer to the X.509 CRL where
status information for this certificate may be found.
When
a CA issues a certificate to another CA, it is asserting that the other CA’s
certificates are trustworthy. Sometimes, the issuer would like to assert that
a subset of the certificates should be trusted. There are three basic ways to
specify that a subset of certificates should be trusted:
o The basic
constraints extension (described above) has a second role, indicating
whether this CA is trusted to issue CA certificates, or just user certificates.
o The name
constraints extension can be used to describe a subset of certificates
based on the names in either the subject or subject alternative name fields.
This extension can be used to define the set of acceptable names, or the set of
unacceptable names. That is, the CA could assert “names in the NIST directory
space are acceptable” or “names in the NIST directory space are not
acceptable.”
o The policy
constraints extension can be used to describe a subset of certificates based
on the contents of the policy extension. If policy constraints are
implemented, users will reject certificates without a policy extension, or
where the specified policies are unrecognized.
Certificate Revocation Lists (CRLs)
Certificates
contain an expiration date. Unfortunately, the data in a certificate may
become unreliable before the expiration date arrives. Certificate issuers need
a mechanism to provide a status update for the certificates they have issued.
One mechanism is the X.509 certification revocation list (CRL).
CRLs
are the PKI analog of the credit card hot list that store clerks review before
accepting large credit card transactions. The CRL is protected by a digital
signature of the CRL issuer. If the signature can be verified, CRL users know
the contents have not been tampered with since the signature was generated.
Steps
to Setup PKI
To obtain a certificate (for
yourself, for email or commerce purposes, or for a website) you must first
select the CA that you hope will issue your certificate. It is possible to
setup a CA for your organization, which in turn can be used to issue certificates
to employees, customers, etc. Then your CA’s certificate is the only one you
need signed by an outside, trusted root CA. Actually, you can
self-sign your own CA certificate, essentially issuing the CA certificate from
yourself to yourself.
To setup your own CA, you generate
a certificate signing request (CSR) containing a pair of
files (sometimes a single file is used). One contains your private key and the
other contains your public key and your (subject) information. Once the CSR is
processed by a CA (by adding information and digitally signing the content),
this file becomes the CA’s certificate. OpenSSL includes tools to allow you to
generate CSRs, and to self-sign them if desired.
Another possibility is just to use
an existing CA to process all your CSRs. cacert.org will do this for free, and
for learning purposes you can either become your own CA or just use theirs.
Other CAs provide free certificates that may work better (but usually expire in
a couple of months) such as from StartSSL. Here’s a list of some I
know about (as of 6/2012):
·
Self-signed certs (never trusted in users’ browsers, unless
manually added)
·
www.startssl.com
(probably the best choice)
·
www.cacert.org
(not trusted in most browsers)
·
www.comodo.com
(90 days free)
·
www.verisign.co.uk
(30 days free)
·
http://www.freessl.com
(30 days free)
·
www.ssl247.co.uk
(30 days free)
Note! The certificate for your own
CA, and for some others including caceret.org,
are not included in most web browsers by default. (Some are.) This means the
first time someone visits your site using HTTPS, they will need to import the
CA certificate for the CA that signed your website’s certificate.
To setup a certificate for a
website or other TLS protected service, you use some toolkit and library.
Currently the most popular of these is OpenSSL, which comes with a
complete library for crypto and digests, and many utilities.
A newer toolkit is NSS (Network
Security Services). NSS is a set of libraries supporting security-enabled
client and server applications. Applications built with NSS can support SSL v2
and v3, TLS, PKCS #5, PKCS #7, PKCS #11, PKCS #12, S/MIME, X.509 v3
certificates, and other security standards. NSS has received FIPS 140
validation from NIST, making it a preferred network cryptographic library
for SSL/TLS and PKI certificate management and provides an alternative to
OpenSSL and GNU TLS. NSS has been used with Netscape products for
years, proving itself reliable (see www.mozilla.org/projects/security/pki/nss/tools).
openssl
has tools (man CA) to
generate a private key and a CSR. You then submit the CSR to your CA and
install the certificate when they email it to you (it typically takes a few
days). Finally, you must configure your applications to use these certificates
(and TLS). They will need to know the names to use as well as the location of
the private key, the certificate, and the CA’s certificate. An easy way to
accomplish all this:
cd ... (Fedora: /etc/pki/tls/misc/)
./CA -newca
./CA -newreq-nodes
./CA -signreq
# To create a certificate in a standard
format, to
# be imported into a web browser or on
Windows:
#
./CA -pkcs12 "name of certificate to show"
[From www.ciscopress.com/articles/article.asp?p=24664&seqNum=4
]
(You can also use the genkey program, installed from crypto-utils package.)
PKCS #7 and #10 are acronyms
for the Public-Key Cryptography Standards #7 and #10. These are standards
originally from RSA Security Inc. used to encrypt and sign certificate
enrollment messages. Today they are widely used formats for certificates. A
PEM file is a base64 encoded series of certificates and/or keys. (See
“X.509” in Wikipedia.)
The SCEP (Simple
Certificate Enrollment Protocol) is an Internet Engineering Task Force
(IETF) draft sponsored by Cisco that provides a standard way of managing the
certificate lifecycle. The SCEP to automate the exchange of certificates with
a CA server, and is often used by routers or firewalls to obtain PKI
certificates.
When creating certificates, a CA
using SCEP provides two authentication methods: manual authentication
and authentication based on a preshared secret. In the manual mode, the
end entity submitting the request is required to wait until the CA operator,
using any reliable out-of-band method, can verify its identity. An MD5
fingerprint generated on the PKCS # must be compared out-of-band between the
server and the end entity. SCEP clients and CAs (or RAs, if appropriate) must
display this fingerprint to a user to enable this verification, if manual mode
is used.
When using a preshared secret
scheme, the server should distribute a shared secret to the end entity that can
uniquely associate the enrollment request with the given end entity. The
distribution of the secret must be private: only the end entity should know
this secret. When creating the enrollment (certificate signing) request, the
end entity is asked to provide a challenge password. When using the preshared
secret scheme, the end entity must type in the redistributed secret as the
password.
In the manual authentication case,
the challenge password is also required because the server might challenge an
end entity with the password before any certificate can be revoked. Later on,
this challenge password will be included as a PKCS #10 attribute and will be
sent to the server as encrypted data. The PKCS #7 envelope protects the
privacy of the challenge password with Data Encryption Standard (DES) encryption.
Public
Key Pinning (PKP)
Weak algorithms commonly used with
(older) PKI certificates, and weak security in general by CAs and RAs, have led
to a raft of forged certificates, or real CA-produced certificates falsely
obtained. This has led to MitM attacks against HTTPS.
One solution to this WWW problem is
similar to a solution used for DNS: pinning. Pinning avoids using the
PKI chain of trust, in which a site’s certificate is signed by some CA, whose
certificate in turn may be signed by another CA, and so on, until you find a
certificate signed by a trusted CA, whose public key is well-known and included
with browser software. Instead, certificate pinning bundles certificate
validation data, typically a secure message digest of the public key, or just a
copy of the key, in the web browser. The name-validation-data pair is called a
pin. For example, Google’s Chrome browser includes this for the
certificate they use to protect *.google.com
sites. (So if they update or renew that certificate, they need to issue a
browser update as well.) Mozilla is planning on using a pin list starting with
Firefox 32, which will initially include pins for Mozilla, Google, Twitter, Facebook,
and Dropbox web sites. Google pinning has already thwarted an attack.
The benefit is, even if some
attacker manages to get some trusted CA to sign a fake cert for www.google.com (for example), the
browser won’t be fooled, since it will know it has been presented with the
wrong certificate.
There are other ways to get the
validation data to the client besides hard-coding them into the browser. A
client can preload a specific set of public key hashes using the HSTS protocol
(HTTP Strict Transport Security, RFC-6797), which limits the valid
certificates to only those which indicate the specified public key. The
validation data is then downloaded, and stored permanently, on the first use
(HTTP Public Key Pinning, or HPKP). This allows dynamic pin lists.
Problems with HPKP include that
first use is not protected (not an issue with hard-coded pins), and that a misconfiguration
can cause some sites to be unreachable. CDNs, proxies, and corporate
observation, all work like MitM attacks, and may fail. How to securely update
pins is another issue. Finally, pins can be leaked if someone makes an
appropriate fake http response, violating privacy and providing yet another way
to track WWW use. (Putting the pins in DNSSEC might work better, if more
domains used it. You’d still have to pin the DNS servers, but that is much
less dynamic and could be hard-coded more easily.)
As of 2017, Google and others
decided to stop using the pinning technique, in favor of newer protection
mechanisms.
Lecture 30 — Securing Apache to use PKI, Basic/Digest Authentication
Due to the unique evolution of
HTML, HTTP, and related standards, the protocols and standards used for web
services are flawed. Thus, there is no such thing as a secure web server or
web browser; no matter how well implemented, there will be exploitable
vulnerabilities in any web browser or server.
Apache supports the HTTP two
authentication mechanisms: Basic and Digest. (Support
for other mechanisms such as Kerberos can be provided by additional Apache
modules.) Digest is more secure, but not all web browsers today support it.
Basic authentication causes a user’s browser to prompt for a username,
password, while displaying the realm (“AuthName”). The information is
sent in plain text back to the server, which reads the stored password from a
file you specify that uses the correct format (not /etc/{passwd,shadow}!) See htpasswd below.
Basic security is
perfectly adequate if the session is encrypted using TLS (SSL). No web
authentication is secure unless using HTTPS.
For a given location (or
directory), you define the type of authentication desired (AuthType Basic or AuthType Digest), the name of the
realm (AuthName "name of realm"),
and the location of the file that contains username-passwords, and optionally a
group file listing group names and usernames that belong to each group. Use AuthUserFile and AuthGroupFile directives for this.
Next you control access to this
location with the Require
directive. If the Require directive
is inside a <Limit>
directive than the restriction only applies to the named HTTP methods. Besides
listing specific users in the httpd.conf
file to allow/deny, you can define groups of users (and then permit/deny users
and/or groups). You can also allow any “valid-user”.
In addition to the Require
directive, you can use the Limit
directives to control what HTTP methods (or commands) to allow (e.g., GET, POST).
Access Control
Based on the HTTP Request Headers
This is tricky; read the Apache
docs on this carefully. In a nutshell, you use “Allow”
and “Deny” directives inside of <Location> or other containers.
All of the allow and deny rules are examined; this is not like
firewalls where the first match is used. Also the order of allow or deny
directives in the config file doesn’t matter at all.
The “order”
and directive controls the order of processing, and also sets the default if
there is no match. “order Allow,Deny”
says to process all the allow rules first, then the deny rules, and the last
match wins. If no match, deny. “order
Deny, Allow” is similar.
Allow
and Deny directives
control access by hostname, (partial) domain names, IP addresses, or IP address
ranges. (And other parts of the request too.)
The access control directives (Require, Allow, and Deny)
control access no matter the HTTP request type (method). If you want to limit
access by request type too, enclose the Allow
and Deny (and order) directives in a <Limit methodList>...</Limit>
block. The HTTP methods you can use in the list: GET, POST,
PUT, DELETE, CONNECT,
OPTIONS, PATCH, PROPFIND,
PROPPATCH, MKCOL, COPY,
MOVE, LOCK, and UNLOCK.
The method names are case-sensitive. If GET
is used it will also restrict HEAD
requests.
You can also use a <LimitExcept methodList>
the same way. This is actually safer, since new methods might be added to HTTP
someday.
For example, to limit access to GET only for documents under /foo for requests from anywhere, but to
allow PUT (uploads) only from gcaw.org:
<Location /foo>
<Limit PUT>
Order Deny,Allow
Allow from gcaw.org
Deny from all
</Limit>
<LimitExcept GET POST PUT>
Order Allow,Deny
Deny from all
</LimitExcept>
</Location>
(To allow access only from gcaw.org to /foo, you omit the Limit
and LimitExcept and only use order, allow,
and deny directives.)
Apache uses htpasswd command to create and
manage the username/password files for realms. Use the “-c” option for the first user you
create, then omit (as this option re-create the file!) Use the “-m” option to
force MD5 passwords. Here’s an example:
htpasswd
-mc /home/wpollock.com/passwords wpollock
htpasswd -m /home/wpollock.com/passwords hpiffl
The resulting passwords file might look like this:
wpollock:$apr1$XzlEW/..$Q/u97qwnUu3saYZYAahzG.
hpiffl:$apr1$onXrY/..$JqkzHigzOCYmjaJKMC3aP/
The group file is a plain text
file, with one group defined per line. The syntax is:
group_name1:
user1 user2 user3 ...
group_name2: user1 user2 user3 ...
...
Here’s a
sample of authentication on Apache:
<Location />
AuthType Basic
AuthName "Restricted Files"
AuthUserFile /var/www/passwords/gcaw.org-htpasswd
Require valid-user
<Limit GET POST>
Order allow,deny
Allow from all
</Limit>
<LimitExcept GET POST>
Order deny,allow
Deny from all
</LimitExcept>
</Location>
In addition to configuring access
controls, you need to configure which algorithms to support for SSL, and in
what priority order. Your server usually offers several, since not all web
browsers support the best known strongest algorithms. Some older browsers only
support algorithms known by now to be flawed, yet most web servers have default
configurations to allow these flawed methods. You need to decide if supporting
such older clients is worth the risks.
Configuring SSL parameters for
Apache and OpenSSL can be difficult. The directive to worry about is
SSLCipherSuite, which lists the OpenSSL ciphers your server will offer to
clients, in preference order. Exactly which ciphers are available depend on
your version of OpenSSL. You list in this direrctive your choices for key
exchange, authentication, encryption, and MAC algorithms. There are several
aliases for groups of alogrithms.
The value is a colon-separated list
of algorithms, in preference order. Because you may use aliases, some
algorithms might be listed more than once, and you may want to decide which
preference to give that algorithm. The names (the Apache and OpenSSL docs
refer to these as ciphers) can refer to specific algorithms (e.g. MD5 or
DES), a suite of algorithms (e.g. RC4-SHA), or an alias for a list of these
(e.g. MEDIUM or EXP).
Each name can be prefaced with: “+”
to move the algorithm to that position in the list (if it appears later as well,
perhaps as part of some alias), “-” to remove the cipher from that point in the
list (note it might be added again later, if you use an alias), and “!” to
remove it completely. For example, this SSLCipherSuite
value (from the httpd
docs):
RC4-SHA:AES128-SHA:HIGH:MEDIUM:!aNULL:!MD5
means: Put RC4-SHA and AES128-SHA
at the beginning (so they have the highest preference). Next, include all high
and medium security ciphers. Finally, remove all ciphers which do not
authenticate, such as ADH (Anonymous Diffie-Hellman), as well as all ciphers
which use MD5 as hash algorithm.
You can use the command “openssl ciphers
-v [list]” to see the details of any ciphers in list
(defaults to DEFAULT). For example, “openssl
ciphers -v 'ALL:eNULL'”
means show every cipher supported, and “openssl
ciphers -v 'ALL:!ADH:@STRENGTH'”
means show all ciphers except NULL (those that don’t actually do anything) and ADH,
then sort by strength (key length). See man ciphers(1)
for details.
I suggest you use Google to locate
examples of secure configurations. For example, this lengthy one:
SSLProtocol
+TLSv1.2 +TLSv1.1 +TLSv1
SSLCompression off
SSLHonorCipherOrder on
SSLCipherSuite
ECDHE-RSA-AES256-GCM-SHA384:ECDHE-RSA-AES256-SHA384:ECDHE-RSA-AES128-GCM-SHA256:ECDHE-RSA-AES128-SHA256:ECDHE-RSA-RC4-SHA:ECDHE-RSA-AES256-SHA:DHE-RSA-AES256-GCM-SHA384:DHE-RSA-AES256-SHA256:DHE-RSA-AES128-GCM-SHA256:DHE-RSA-AES128-SHA256:DHE-RSA-AES256-SHA:DHE-RSA-AES128-SHA:RC4-SHA:AES256-GCM-SHA384:AES256-SHA256:CAMELLIA256-SHA:ECDHE-RSA-AES128-SHA:AES128-GCM-SHA256:AES128-SHA256:AES128-SHA:CAMELLIA128-SHA
was found at ggramaize.wordpress.com.
A shorter list of cipher suites was found at vincent.bernat.im:
ECDHE-RSA-AES128-SHA:AES128-SHA:RC4-SHA,
which should be compatible with most browsers. But this setting only
offers/prefers PFS; it doesn’t require it.
If you want to require PFS, you
can use something such as this: ECDHE-RSA-AES128-SHA:DHE-RSA-AES128-SHA:EDH-DSS-DES-CBC3-SHA.
It’s important you
disable SSLv3 and older, due to unfixible bugs exploited by malware such as
FLAME, CRIME, and POODLE. (Who names these anyway?) See zmap.io/sslv3
for directions on how to do this for various servers (including Apache) and web
browsers (Firefox directions are found at this Mozilla
blog post. For FF 33 and older, you need a plug-in. For very old
FF, there was an option. Mozilla plans on restoring that option (I think) in
FF 34.)
If you disable SSLv3
in your browsers, note that a few web sites still don’t support TLS (2014), and
you won’t be able to access them. This is changing rapidly.
You can test your server’s SSL
setup using ssllabs.com/ssltest/analyze.html.
FreakAttack.com
tests a web browser for vulnerability to the TLS FREAK attack (2015). My Windows
Firefox 36 results (besides showing not vulnerable) showed this info:
If you’re curious,
your client currently offers the following cipher suites:
Cipher Suite
TLS_ECDHE_ECDSA_WITH_AES_128_GCM_SHA256
TLS_ECDHE_RSA_WITH_AES_128_GCM_SHA256
TLS_ECDHE_ECDSA_WITH_AES_256_CBC_SHA
TLS_ECDHE_ECDSA_WITH_AES_128_CBC_SHA
TLS_ECDHE_RSA_WITH_AES_128_CBC_SHA
TLS_ECDHE_RSA_WITH_AES_256_CBC_SHA
TLS_DHE_RSA_WITH_AES_128_CBC_SHA
TLS_DHE_DSS_WITH_AES_128_CBC_SHA
TLS_DHE_RSA_WITH_AES_256_CBC_SHA
TLS_RSA_WITH_AES_128_CBC_SHA
TLS_RSA_WITH_AES_256_CBC_SHA
TLS_RSA_WITH_3DES_EDE_CBC_SHA
Case
Study: Configuring Apache to use HTTPS, Basic/Digest Authentication
The Debian Apache2
web server comes with the SSL module, but it is not automatically enabled. Debian-like
systems have a command to manage the configuration, which you should use. In
order to enable it you must execute:
a2enmod ssl
and restart the web server. The generic way to do this is to have the
line:
Include /etc/apache2/mod_ssl.conf
in your /etc/apache2/apache2.conf
(this file may also be called httpd.conf).
You’ll need to edit it to give the appropriate location for mod_ssl.conf in your setup. Then
restart the web server.
For other distros you
may have to install a separate package; for Fedora, “mod_ssl”.
On Fedora, digital certificates are
now centralized in directories under /etc/pki/tls/.
See the /etc/httpd/conf.d/ssl.conf
file for default locations and names.
Note: With TLS (and SSL), the
hostname is part of the PKI certificate. In the authentication of the
certificate, the IP address is compared with that name. Thus, you can only
have one certificate per IP address.
For a web server, this restriction
used to mean you needed a separate IP address for each virtual domain you plain
to server using HTTPS. That in turn meant that to use SSL, you must use IP
virtual hosts, not name virtual hosts. However, Apache and all modern web
browsers us libraries (OpenSSL, NSS) that support server name indication
(SNI). This is a TLS 1.0 extension defined in RFC-5246), in
which the client adds the host name it wants to connect with, to its hello
packet. So as long as both client and server support TLS (and not older SSL),
it is possible to use name-based virtual hosts in Apache. See Name-Based SSL
VHosts With SNI for examples and more information. (Below, we just
use IP-based virtual hosts.)
To add SSL support for https://wpollock.com/ to apache, do
these steps (Note: OpenSSL includes a convenience shell script /etc/pki/tls/misc/CA that can simplify
these steps):
# Generate a private key for the wpollock.com
website:
openssl genrsa -des3 -out wpollock-com.key 1024
# Remove password from key (so apache can start
unattended):
openssl rsa -in wpollock-com.key.orig -out
wpollock-com.key
# Generate a CSR (certificate signing request), to
be submitted
# to your CA of choice (I used CAcert.org):
openssl req -new -key wpollock-com.key -out
wpollock-com.csr
# Upload the CSR to cacert.org website,
# Wait for CA to return certificate via email, saved
# as ~/wpollock-com.crt. (This took a little over a
day.)
# While waiting, get the CA's root certificate:
wget https://www.cacert.org/cacert.crt
# Add email alias for webmaster to /etc/aliases:
vi /etc/aliases; newaliases
# Install everything:
cd /etc/pki/tls
cp ~/wpollock-com.key private/
cp ~/cacert.crt certs/
cp ~/wpollock-com.crt certs/
# cp ~/wpollock-com.csr ssl.csr
# Update permissions:
chmod 400 certs/{cacert,wpollock-com}.crt \
private/wpollock-com.key
# Edit /etc/sysconfig/httpd to start apache with SSL
option:
cd /etc/sysconfig/
cp httpd httpd.orig
vi httpd
diff httpd.orig httpd
15c15
< #OPTIONS=
---
> OPTIONS="-DSSL"
# Make firewall hole for port 443 (edit
/etc/sysconfig/iptables
# by adding the following line after the line for
port 80):
-A RH-Firewall-1-INPUT -m state --state NEW -m
tcp -p tcp \
--dport 443 -j ACCEPT
# Modify /etc/httpd/conf.d/ssl.conf to include new
virtual host:
# (comments and blank lines stripped out to reduce
listing
# size here):
<VirtualHost wpollock.com:443>
ServerAdmin webmaster@wpollock.com
DocumentRoot /home/wpollock.com/html-secure
ServerName wpollock.com:443
CheckSpelling on
<Location />
Options Includes SymLinksIfOwnerMatch
</Location>
Scriptalias /cgi-bin/
"/home/wpollock.com/cgi-bin/"
ErrorLog /home/wpollock.com/ssl_error_log
SSLEngine on
SSLCipherSuite \
ALL:!ADH:!EXP:RC4+RSA:+HIGH:+MEDIUM:+LOW:!SSLv2
SSLCertificateFile
/etc/pki/tls/certs/wpollock-com.crt
SSLCertificateKeyFile \
/etc/pki/tls/private/wpollock-com.key
SSLCACertificatePath /etc/pki/tls/certs
<Files ~
"\.(cgi|shtml|phtml|php[345]?)$">
SSLOptions +StdEnvVars
</Files>
<Directory
"/home/wpollock.com/cgi-bin">
SSLOptions +StdEnvVars
</Directory>
SetEnvIf User-Agent ".*MSIE.*" \
nokeepalive ssl-unclean-shutdown \
downgrade-1.0 force-response-1.0
CustomLog /home/wpollock.com/ssl_request_log
\
"%t %h %{SSL_PROTOCOL}x
%{SSL_CIPHER}x \"%r\" %b"
</VirtualHost>
httpd -S # verify apache configuration
# create firewall holes:
vi /etc/sysconfig/iptables; service iptables restart
# Now reload apache (httpd):
/etc/init.d/httpd restart
# Check all logs for any errors:
cd /var/log
tail messages
cd httpd
tail error_log
cat ssl*
# Now try from other host to connect to URL
"https://wpollock.com/":
ssh wpollock@yborstudent.hccfl.edu
links https://wpollock.com/
#Success!
To add
Basic authentication to this site, change (in that virtual host):
<Location />
Options Includes SymLinksIfOwnerMatch
</Location>
To:
<Location />
Options SymLinksIfOwnerMatch
AuthType Basic
AuthName "Restricted Files"
AuthUserFile
/home/wpollock.com/passwords/htpasswd
Require valid-user
<Limit GET POST>
Order allow,deny
Allow from all
</Limit>
<LimitExcept GET POST>
Order deny,allow
Deny from all
</LimitExcept>
</Location>
HTTP Basic
auth header capture (via “Live HTTPHeader” Firefox extension)
https://wpollock.com/
GET / HTTP/1.1
Host: wpollock.com
User-Agent: Mozilla/5.0 (X11; U; Linux i686; en-US;
rv:1.8.0.8) Gecko/20061108 Fedora/1.5.0.8-1.fc5 Firefox/1.5.0.8
Accept:
text/xml,application/xml,application/xhtml+xml,text/html;q=0.9,text/plain;q=0.8,image/png,*/*;q=0.5
Accept-Language: en-us,en;q=0.5
Accept-Encoding: gzip,deflate
Accept-Charset: ISO-8859-1,utf-8;q=0.7,*;q=0.7
Keep-Alive: 300
Connection: keep-alive
HTTP/1.x 401 Authorization Required
Date: Fri, 01 Dec 2006 02:25:54 GMT
Server: Apache
WWW-Authenticate: Basic realm="Restricted
Files"
Content-Length: 510
Keep-Alive: timeout=15, max=100
Connection: Keep-Alive
Content-Type: text/html; charset=iso-8859-1
----------------------------------------------------------
https://wpollock.com/
GET / HTTP/1.1
Host: wpollock.com
User-Agent: Mozilla/5.0 (X11; U; Linux i686; en-US;
rv:1.8.0.8) Gecko/20061108 Fedora/1.5.0.8-1.fc5 Firefox/1.5.0.8
Accept:
text/xml,application/xml,application/xhtml+xml,text/html;q=0.9,text/plain;q=0.8,image/png,*/*;q=0.5
Accept-Language: en-us,en;q=0.5
Accept-Encoding: gzip,deflate
Accept-Charset: ISO-8859-1,utf-8;q=0.7,*;q=0.7
Keep-Alive: 300
Connection: keep-alive
Authorization: Basic d3BvbGvxY3s6cmFiYXV0MjE=
HTTP/1.x 200 OK
Date: Fri, 01 Dec 2006 02:26:06 GMT
Server: Apache
Last-Modified: Mon, 13 Nov 2006 22:35:27 GMT
Etag: "270275-3ae-84afe9c0"
Accept-Ranges: bytes
Content-Length: 942
Keep-Alive: timeout=15, max=99
Connection: Keep-Alive
Content-Type: text/html; charset=UTF-8
----------------------------------------------------------
https://wpollock.com/favicon.ico
GET /favicon.ico HTTP/1.1
Host: wpollock.com
User-Agent: Mozilla/5.0 (X11; U; Linux i686; en-US;
rv:1.8.0.8) Gecko/20061108 Fedora/1.5.0.8-1.fc5 Firefox/1.5.0.8
Accept: image/png,*/*;q=0.5
Accept-Language: en-us,en;q=0.5
Accept-Encoding: gzip,deflate
Accept-Charset: ISO-8859-1,utf-8;q=0.7,*;q=0.7
Keep-Alive: 300
Connection: keep-alive
Authorization: Basic d3BvbGvxY3s6cmFiYXV0MjE=
HTTP/1.x 200 OK
Date: Fri, 01 Dec 2006 02:26:06 GMT
Server: Apache
Last-Modified: Wed, 01 Sep 2004 21:25:07 GMT
Etag: "2708e8-436-ee95b2c0"
Accept-Ranges: bytes
Content-Length: 1078
Keep-Alive: timeout=15, max=98
Connection: Keep-Alive
Content-Type: text/plain; charset=UTF-8
----------------------------------------------------------
https://wpollock.com/UnixSecurity/
GET /UnixSecurity/ HTTP/1.1
Host: wpollock.com
User-Agent: Mozilla/5.0 (X11; U; Linux i686; en-US;
rv:1.8.0.8) Gecko/20061108 Fedora/1.5.0.8-1.fc5 Firefox/1.5.0.8
Accept:
text/xml,application/xml,application/xhtml+xml,text/html;q=0.9,text/plain;q=0.8,image/png,*/*;q=0.5
Accept-Language: en-us,en;q=0.5
Accept-Encoding: gzip,deflate
Accept-Charset: ISO-8859-1,utf-8;q=0.7,*;q=0.7
Keep-Alive: 300
Connection: keep-alive
Referer: https://wpollock.com/
Authorization: Basic d3BvbGvxY3s6cmFiYXV0MjE=
HTTP/1.x 200 OK
Date: Fri, 01 Dec 2006 02:26:12 GMT
Server: Apache
Last-Modified: Fri, 20 Oct 2006 06:55:06 GMT
Etag: "2741de-12b-958ac680"
Accept-Ranges: bytes
Content-Length: 299
Keep-Alive: timeout=15, max=97
Connection: Keep-Alive
Content-Type: text/html; charset=UTF-8
----------------------------------------------------------
Other Web
Security Measures
Web content is generally read-only
and is reasonably safe as long as an attacker can’t modify files on the
server. The best an attacker from the outside can do on a read-only site is to
craft URLs to either access confidential content, or to exploit a vulnerability
in the server. (Here we are ignoring phishing attacks by slightly
misspelling popular web sites, DNS rebinding attacks, etc.) However such web
sites are boring and most are interactive, allowing people to upload content.
This brings many other possible attacks into the mix, such as XSS, SQL
Injection, and spam.
Making a web site secure is more
difficult than most web developers realize. The obvious approaches are
often not secure at all. Best advice is to use a well-known web platform that
provides the security features you need; then all an SA has to do is enable
them correctly.
One common threat is from automatic
spam-bots. There are a few measures you can take to “raise the bar” for
attackers. For example it has been found that checking form input against a
small dictionary of 20 or so words can be very successful at detecting
form/forum spam.
Another technique is to have the
server send an encrypted or specially encoded web page that is meaningless to
attackers. An included JavaScript on the page dynamically renders the page.
This process is invisible to users but an attacker would have to actually
render the page before uploading, for each web site to be spammed. A
similar technique uses CSS style-sheets to make some parts of the page invisible
to users with a browser, but visible to spam-bots (unless they render the
page). The extra fields are “decoys” designed to attract the spam-bots.
A team of computer
scientists at two University of California campuses has been looking into the
nature of spam recently (2011). For three months they set out to receive all
the spam they could, then systematically made purchases from the Web sites
advertised in the messages. The researchers looked at nearly a billion
messages and spent several thousand dollars on about 120 purchases. No single
purchase was more than $277.
The hope, the
scientists said, was to find a “choke point” that could greatly reduce the flow
of spam. And they will report that they think they have found it.
It turned out that 95
percent of the credit card transactions for the spam-advertised drugs and
herbal remedies they bought were handled by just three financial companies
— one based in Azerbaijan, one in Denmark and one in Nevis, in the West
Indies. [Reported in the New York Times.]
Lecture 31 — Mail Server Security (SASL, Remoter User Authentication)
There is good,
current guidence for email security released in 2016 from the NCCoE part of
NIST. NIST Cybersecurity Practice Guide, Special Publication 1800-6: “Domain
Name Systems-Based Electronic Mail Security”. This is currently in
draft form, but worth reading.
sendmail (mail hubs,
daemon-options for RH)
MAA Security: [From POP3 on Wikipedia]
Like many other older Internet protocols, POP originally supported only an
unencrypted login mechanism. Although plain text transmission of passwords in
POP still commonly occurs, POP3 currently supports several authentication
methods to provide varying levels of protection against illegitimate access to
a user's e-mail. One such method, APOP, uses the MD5 hash function in an
attempt to avoid replay attacks and disclosure of the shared secret. Clients
implementing APOP include Mozilla Thunderbird, Opera, Eudora, KMail, Novell
Evolution, Windows Live Mail, PowerMail, and Mutt. POP3 clients can also
support SASL authentication methods via the AUTH extension. MIT Project Athena
also produced a Kerberized version.
IMAP generally uses SASL for
authentication.
Sendmail Security: ForwardPath option to restrict use of ~/.forward files, PrivacyOptions option: define `confPRIVACY_FLAGS’,``needmailhelo,noexpn,novrfy,
Änoverb,authwarnings,restrictmailq,restrictqrun’’).
Recommended settings for this can be set just by using the value goaway instead. You can prevent
sendmail from writting to anything except regular files with define(`confSAFE_FILE_ENV’,`/’). Make
sure files and directories have owner root
(and group smsmp, possibly owned
by that user too) with recommended permissions. Modern sendmail can audit file
and directory permissions and ownership with “sendmail
-v -d44.4 -bv postmaster”.
You can restrict what programs
users can pipe mail into, by running smrsh
and restricting the commands that can be used to those in /usr/libexec/sm.bin/ (make symlinks
there to actual programs). Add “FEATURE(`smrsh',`/usr/libexec/smrsh')”.
POP, IMAP (mail-only accounts:
group=popusers, shell=/bin/false, homedir=/tmp)
Using cpio via cron to backup
nightly, after Postfix and Cyrus are shutdown:
#!/bin/sh
cd
/
find
./var/spool/imap ./var/lib/imap ./etc -depth \
| cpio -oaBv >/dev/st0 2>/var/log/cpio.log
The log file that is created
basically just lists the files were backed up, which is not real convenient for
notifying the admin of the status of the backup.
Configuring
SpamAssassin:
SpamAssassin
comes pre-configured out of the box when installed. The configuration files
are located in /etc/mail/spamassassin.
For the reduction of false positives the file ~/.spammassassin/user_prefs.cf
should list known allowed email addresses for that user:
whitelist_from wpollock@hccfl.edu
whitelist_from wpollock@yborstudent.hccfl.edu
amavisd passes the spam to the spamassassin daemon spamd. Make sure this is running now
and configured to be started at boot time. Logging by default uses syslog mail
facility, so no extra configuration (e.g., log rotation) is needed. After
starting, examine the log file for any errors/problems.
You set options up in
the /etc/default/spamassassin
file, under the OPTIONS= line.
You can also have the SpamAssassin daemon run by setting the ENABLED=1 setting in that file. Then,
in your .procmailrc, instead of
having “|spamassassin” in your
recipe, change it to “|spamc”.
This runs vastly faster than just calling SpamAssassin every time procmail has to feed it an email.
Configuring
ClamAV:
ClamAV is actually
two daemons: clamd to do
the virus scanning, and freshclam
to continuously update the virus definition database with the latest data. It
work best to first install Amavis and then ClamAV. You will need to add the “dag” repository to yum.conf to get these packages!
Currently this is:
[dag]
name=Dag APT Repository
baseurl=http://dag.freshrpms.net/fedora/$releasever/en/$basearch/dag
http://dag.atrpms.net/fedora/$releasever/en/$basearch/dag/
http://ftp.heanet.ie/pub/freshrpms/pub/dag/fedora/$releasever/en/$basearch/dag
gpgcheck=0
[Fedora 3 /etc/yum.repos.d/; chmod a+r
fedora-extras.repo ]
Now you can install
ClamAV and Amavis:
yum install amavisd-new
Before installing ClamAV make sure the appropriate user and group is
there (the ClamAV RPM didn’t do this, probably a bug in the version I used):
grep clam /etc/passwd
useradd -M -s /bin/sh -c 'ClamAV
User' -g amavis clamav
Next install the
ClamAV packages: yum install clamav
clamd. Make sure the install didn’t change the clamav user and amavis group. Now edit clamd.conf to change it to listen on a
socket and not a port. This is because it is not running stand-alone but run
via amavis. Comment and uncomment out lines to look like this (the logging
stuff is optional):
LocalSocket /var/run/clamav/clamd.sock
#TCPSocket 3310
#LogFile /var/log/clamav/clamd.log
LogSyslog
LogFacility LOG_MAIL
ClamAV intends to run
stand-alone, but we want to run it via amavisd. For this to work most of the
ClamAV files need to be accessible by Amavis. To do this you can change all
references from the user clamav
to the user amavis, not
forgetting /var/* and logrotate.d/* files. Or you can do
what I did: add user clamav to
group amavis, and change the
owner/group/permissions on the various clamav files and directories:
grep -E 'LogFile|PidFile|DatabaseDir'
clamd.conf
chown -R amavis:amavis /var/clamav
chmod -R g+w /var/run/clamav # ???
chown -R clamav:amavis /var/run/clamav
cd /etc/logrotate.d
vi clamav freshclam # create 640 clamav amavis
vi amavisd # create 600 amavis amavis
Finally, examine the
log file directives and make sure it does what you want. You may wish to use syslog, either an unused facility or
the mail facility.
Next edit freshclam.conf. Configure logging and
which mirrors to use. (I didn’t make changes to this, the example file
works.) Change the DatabaseOwner
to amavis. Freshclam is
configured to run via cron
(check cron.daily/{amavisd,cyrus-imapd,freshclam}).
Next edit the /etc/cron.daily/freshclam
file and change the owner to amavis:
chown amavis:amavis "$LOG_FILE"
Test it out by
starting the clamd service.
Examine the log files and manually run the freshclam
command if needed.
Configuring
amavis:
Once amavisd-new is
installed, edit amavisd.conf,
locate and change the “$mydomain”
section to your domain name (gcaw.org)
and $myhostname too. The
configuration file uses two variables to define the user, make sure these are “amavis”. Then locate and fix up these
lines to have Amavis work with Postfix:
$daemon_user = 'amavis';
$daemon_group = 'amavis';
$myhostname = 'wphome.gcaw.org';
$mydomain = 'gcaw.org';
$forward_method =
'smtp:127.0.0.1:10025';
$notify_method = $forward_method;
$log_level = 1; # verbosity 0..5
To make Amavis use
SpamAssassin, make sure this line is commented out:
# @bypass_spam_checks_maps = ...
All email related
messages should go to and come from postmaster,
so find and change the “notification sender” lines from “virusalert” and
“spam.police” to “postmaster” (This is optional!):
$virus_admin =
"postmaster\@$mydomain"; # ...
It usually doesn’t
pay to quarantine virus-infected email so set up amavis to discard. Spam will
be delivered to the users with a re-written subject (an alternative is to send
to a special Junk mail folder). Locate and change the following settings for
this:
$QUARANTINEDIR = undef;
$virus_quarantine_to = undef;
$final_spam_destiny = D_PASS;
Check the log entries
to see where log messages go. You can define a special file or use syslog mail
facility. If using a separate file be sure to create the /var/log/amavis.log file and chown it to amavis (it can’t create the file if missing).
Lastly un-comment out
the lines for the scanners you have, and comment out the lines for the scanners
you don’t have. All scanners should be commented out except clamav and spamassassin.
Find the section that starts:
@av_scanners = (
...
### http://www.clamav.net/
['ClamAV-clamd',
\&ask_daemon, ["CONTSCAN {}\n", "/var/run/clamav/clamd.sock"],
qr/\bOK$/, qr/\bFOUND$/,
qr/^.*?: (?!Infected Archive)(.*) FOUND$/ ],
...
###
http://www.clamav.net/ and CPAN (memory-hungry! clamd is preferred)
['Mail::ClamAV', \&ask_clamav, "*", [0], [1], qr/^INFECTED:
(.+)/],
Note the socket
name on the “ask_daemon”
line must match the LocalSocket
name in clamd.conf file!
(Don’t comment-out the “@av_scanners_backup
(” entries! The only other line you may wish to change is:
$sa_spam_subject_tag = '***SPAM*** ';
Finally test the amavis
setup:
# amavisd debug # exit with ^C
# tail /var/log/messages
# /etc/init.d/amavisd start
$ telnet 127.0.0.1 10024
Trying 127.0.0.1...
Connected to 127.0.0.1.
Escape character is '^]'.
220 [127.0.0.1] ESMTP amavisd-new service ready
quit
221 Bye
Connection closed by foreign host.
Configuring
postfix to use amavis:
Postfix
uses transports to communicate with external mail filters/scanners.
These are referenced in main.cf
as:
content_filter
= transportname:nexthop:port
For
amavis use:
content_filter = amavis:[127.0.0.1]:10024
Next you must define
the “amavis” transport in master.cf file. This involves
defining some options to use when talking to amavis and defining the protocol
to be used (SMTP or LMTP). The line to add is (“-” means use default):
# svc type private unpriv chroot wakeup
maxproc command
# default: (yes) (yes) (yes) (never) (100)
amavis unix - - n -
2 lmtp
-o lmtp_data_done_timeout=1200s
Next you need to
define the transport used by amavis to send the mail back. This re-injection
transport is defined the same way but starts a new instance of postfix smtpd. Since this transport has no
name you list IP_address:port instead.
It is vital that
you use the option to over-ride the content_filter! Otherwise the smtpd will use the main.cf option and simply loop the
email back to amavisd! By
over-riding the other restrictions and lookups (which were already done once)
you make the system more efficient:
127.0.0.1:10025 inet n
- n - - smtpd
-o content_filter=
-o
local_recipient_maps=
-o relay_recipient_maps=
-o smptd_restriction_classes=
-o smptd_client_restrictions=
-o smptd_helo_restrictions=
-o smptd_sender_restrictions=
-o smptd_recipient_restrictions=permit_mynetworks,reject
-o mynetworks=127.0.0.1/8
-o strict_rfrc821_envelopes=yes
This causes postfix
to have a second instance of smtpd
listening in at port 10025, and this one uses no content_filter.
Test it with telnet localhost 10025.
Finally setup your MUA
(mutt works) to read your IMAPS email and to use TLS for sending email. Then
send some email to user, user@host.gcaw.org, nosuchuser,
etc. Test for spam and anti-virus too (eicar.org).
Configuring
SMTP AUTH and TLS
To setup AUTH means configuring
SASL for your MTA. Once this is tested you can go ahead and add TLS
encryption. (It is easier to trouble-shoot AUTH without encrypting first.)
Here’s the steps on Fedora to use Postfix as the MTA, to configure SASL for it,
to create a PKI CA certificate used in turn to create a PKI email certificate,
and finally to configure Postfix for SASL and for TLS and to test it all.
Since the initial AUTH tests will send usernames and passwords in the clear,
first create a dummy test account to use:
/etc/postfix#
useradd -c 'Anne User' -m auser
/etc/postfix# passwd auser
Changing password for user auser.
New UNIX password: secret
BAD PASSWORD: it is based on a dictionary word
Retype new UNIX password: secret
passwd: all authentication tokens updated successfully.
Next configure Postfix as the only
MTA (initially only listening on localhost):
/etc/postfix#
alternatives --config mta
There are 3 programs which provide 'mta'.
Selection Command
-----------------------------------------------
*+ 1 /usr/sbin/sendmail.sendmail
2 /usr/sbin/sendmail.exim
3 /usr/sbin/sendmail.postfix
Enter to keep the current selection[+], or type selection number: 3
//etc/postfix# /etc/init.d/sendmail stop
Shutting down sm-client: [ OK ]
Shutting down sendmail: [ OK ]
/etc/postfix# chkconfig sendmail off
/etc/postfix# chkconfig postfix on
/etc/postfix# /etc/init.d/postfix start
Starting postfix: [ OK ]
Now configure SASL and Postfix for
SMPT AUTH, using PAM as the authentication method. That means only system
users will be able to authenticate, but we can configure PAM to control how
that happens. Since PAM wants a username and password, the only SASL mechanism
we will accept is PLAIN. While not safe by itself later we will add TLS
encryption:
/etc/postfix#
cp main.cf main.cf.ORIG
/etc/postfix#
vi main.cf
/etc/postfix#
postfix check
/etc/postfix#
diff main.cf.ORIG main.cf
106c106
<
#inet_interfaces = all
---
>
inet_interfaces = all
109c109
<
inet_interfaces = localhost
---
>
#inet_interfaces = localhost
666a667,681
>
>
# Support SMTP AUTH (via SASL):
>
# (also must configure /usr/lib/sasl2/smtpd.conf with the line:
>
# pwcheck_method: saslauthd
>
# and make sure saslauthd is started with the "-a pam" argument; this
>
# is the default on Fedora Core 5 /etc/sysconfig/saslauthd.
>
# Finally make sure saslauthd is started before postfix at boot time.)
>
>
smtpd_sasl_auth_enable = yes
>
smtp_sasl_security_options = noanonymous
>
broken_sasl_auth_clients = yes
>
smtpd_sasl_authenticated_header = yes
>
smtpd_sasl_local_domain = $myhostname
>
smtpd_recipient_restrictions =
>
permit_mynetworks permit_sasl_authenticated reject_unauth_destination
/etc/postfix#
vi /usr/lib/sasl2/smtpd.conf
/etc/postfix#
vi /etc/sysconfig/saslauthd
/etc/postfix#
chkconfig saslauthd on
/etc/postfix#
/etc/init.d/saslauthd start
Starting
saslauthd: [ OK ]
/etc/postfix#
postfix reload
/etc/postfix#
printf 'auser\0auser\0secret' | base64
YXVzZXIAYXVzZXIAc2VjcmV0
/etc/postfix#
telnet wphome1 25
Trying
192.168.0.5...
Connected
to wphome1.gcaw.org (192.168.0.5).
Escape
character is '^]'.
220
wphome1.gcaw.org ESMTP Postfix
EHLO
localhost
250-wphome1.gcaw.org
250-PIPELINING
250-SIZE
10240000
250-VRFY
250-ETRN
250-AUTH
PLAIN LOGIN
250-AUTH=PLAIN
LOGIN
250
8BITMIME
auth
plain YXVzZXIAYXVzZXIAc2VjcmV0
235
Authentication successful
quit
221
Bye
Connection
closed by foreign host.
Use the openssl CA script to
generate a CA and then email certificates:
/etc/postfix# cd /etc/pki/tls/misc
/etc/pki/tls/misc# ./CA -newca
CA certificate filename (or enter to create)
Making CA certificate ...
Generating a 1024 bit RSA private key
.....................++++++
........................++++++
writing new private key to
'../../CA/private/./cakey.pem'
Enter PEM pass phrase:secret
Verifying - Enter PEM pass phrase:secret
-----
You are about to be asked to enter information that
will be incorporated
into your certificate request.
What you are about to enter is what is called a
Distinguished Name or a DN.
There are quite a few fields but you can leave some
blank
For some fields there will be a default value,
If you enter '.', the field will be left blank.
-----
Country Name (2 letter code) [GB]:US
State or Province Name (full name) [Berkshire]:Florida
Locality Name (eg, city) [Newbury]:Tampa
Organization Name (eg, company) [My Company Ltd]:Gcaw.org
Organizational Unit Name (eg, section) []:.
Common Name (eg, your name or your server's
hostname) []:wphome1.gcaw.org
Email Address []:security@wphome1.gcaw.org
Please enter the following 'extra' attributes
to be sent with your certificate request
A challenge password []:secret [used
with SCEP]
An optional company name []:Gcaw.org
Using configuration from /etc/pki/tls/openssl.cnf
Enter pass phrase for ../../CA/private/./cakey.pem:
Check that the request matches the signature
Signature ok
Certificate Details:
Serial Number: 0 (0x0)
Validity
Not Before: Dec 1 04:40:05 2006 GMT
Not After : Nov 30 04:40:05 2009 GMT
Subject:
countryName = US
stateOrProvinceName = Florida
organizationName = Gcaw.org
commonName = wphome1.gcaw.org
emailAddress =
security@wphome1.gcaw.org
X509v3 extensions:
X509v3 Basic Constraints:
CA:FALSE
Netscape Comment:
OpenSSL Generated Certificate
X509v3 Subject Key Identifier:
01:C1:4E:A2:C8:3A:8E:49:B6:0C:36:EF:CC:23:F3:98:58:D8:91:75
X509v3 Authority Key Identifier:
keyid:01:C1:4E:A2:C8:3A:8E:49:B6:0C:36:EF:CC:23:F3:98:58:D8:91:75
Certificate is to be certified until Nov 30 04:40:05
2009 GMT (1095 days)
Write out database with 1 new entries
Data Base Updated
/etc/pki/tls/misc# ./CA -newreq-nodes
Generating a 1024 bit RSA private key
..++++++
...............++++++
writing new private key to 'newkey.pem'
-----
You are about to be asked to enter information that
will be incorporated into your certificate request.
What you are about to enter is what is called a
Distinguished Name or a DN.
There are quite a few fields but you can leave some
blank
For some fields there will be a default value,
If you enter '.', the field will be left blank.
-----
Country Name (2 letter code) [GB]:US
State or Province Name (full name) [Berkshire]:Florida
Locality Name (eg, city) [Newbury]:Tampa
Organization Name (eg, company) [My Company Ltd]:Gcaw.org
Organizational Unit Name (eg, section) []:.
Common Name (eg, your name or your server's
hostname) []:wphome1.gcaw.org
Email Address []:postmaster@wphome1.gcaw.org
Please enter the following 'extra' attributes
to be sent with your certificate request
A challenge password []:secret
An optional company name []:Gcaw.org
Request is in newreq.pem, private key is in
newkey.pem
/etc/pki/tls/misc# ./CA -sign
Using configuration from /etc/pki/tls/openssl.cnf
Enter pass phrase for ../../CA/private/cakey.pem:
Check that the request matches the signature
Signature ok
Certificate Details:
Serial Number: 1 (0x1)
Validity
Not Before: Dec 1 04:42:29 2006 GMT
Not After : Dec 1 04:42:29 2007 GMT
Subject:
countryName = US
stateOrProvinceName = Florida
localityName = Tampa
organizationName = Gcaw.org
commonName = wphome1.gcaw.org
emailAddress =
postmaster@wphome1.gcaw.org
X509v3 extensions:
X509v3 Basic Constraints:
CA:FALSE
Netscape Comment:
OpenSSL Generated Certificate
X509v3 Subject Key Identifier:
34:06:94:1E:E4:72:CD:5D:EA:9F:4D:55:31:C4:58:C8:93:0B:07:F7
X509v3 Authority Key Identifier:
keyid:01:C1:4E:A2:C8:3A:8E:49:B6:0C:36:EF:CC:23:F3:98:58:D8:91:75
Certificate is to be certified until Dec 1 04:42:29
2007 GMT (365 days)
Sign the certificate? [y/n]:y
1 out of 1 certificate requests certified, commit?
[y/n]y
Write out database with 1 new entries
Data Base Updated
Certificate:
Data:
Version: 3 (0x2)
Serial Number: 1 (0x1)
Signature Algorithm: sha1WithRSAEncryption
Issuer: C=US, ST=Florida, O=gcaw.org,
CN=wphome1.gcaw.org/emailAddress=security@wphome1.gcaw.org
Validity
Not Before: Dec 1 04:42:29 2006 GMT
Not After : Dec 1 04:42:29 2007 GMT
Subject: C=US, ST=Florida, L=Tampa, O=Gcaw.org,
CN=wphome1.gcaw.org/emailAddress=postmaster@wphome1.gcaw.org
Subject Public Key Info:
Public Key Algorithm: rsaEncryption
RSA Public Key: (1024 bit)
Modulus (1024 bit):
00:d5:17:eb:0b:c1:82:d9:a8:3f:ba:ed:20:7d:69:
b0:e1:49:9c:e6:b1:bd:e4:af:6b:8a:40:01:69:91:
bd:67:f1:a2:a6:64:20:52:c9:d3:a9:ee:09:3c:46:
ab:cc:3b:83:32:a4:f0:18:4c:89:f0:6f:22:ed:a3:
ff:a6:9d:9b:6c:87:d8:bb:10:33:75:00:52:5e:56:
06:1d:92:ce:d1:b2:98:11:6e:b4:3d:41:73:f2:c9:
a6:c5:9d:b8:9d:2d:1e:fc:7c:15:dc:0f:ca:ce:70:
23:30:4e:a0:70:26:24:b3:e8:33:e6:20:19:2b:12:
43:c4:dd:c2:4b:a4:0a:1d:6b
Exponent: 65537 (0x10001)
X509v3 extensions:
X509v3 Basic Constraints:
CA:FALSE
Netscape Comment:
OpenSSL Generated Certificate
X509v3 Subject Key Identifier:
34:06:94:1E:E4:72:CD:5D:EA:9F:4D:55:31:C4:58:C8:93:0B:07:F7
X509v3 Authority Key Identifier:
keyid:01:C1:4E:A2:C8:3A:8E:49:B6:0C:36:EF:CC:23:F3:98:58:D8:91:75
Signature Algorithm: sha1WithRSAEncryption
78:59:64:f8:a1:02:db:57:51:05:35:b1:28:59:32:0d:b5:89:
5f:e2:13:84:4f:47:aa:7b:d3:10:d9:95:3b:a9:1f:b2:64:7c:
90:e0:a2:75:65:0d:4a:40:b8:2d:5c:94:64:77:7a:c8:de:4e:
3e:5b:f1:6e:7d:58:dd:eb:cd:10:af:48:01:d6:84:a4:fd:c6:
2c:12:dd:44:6a:d0:44:94:01:bf:a8:78:0e:3c:67:60:e8:23:
a7:d7:54:e0:3f:b4:58:59:12:12:c4:e6:d9:ab:ca:d0:ca:ed:
2b:c0:db:70:eb:52:81:50:45:fb:25:c4:86:d1:dc:15:9c:1b:
ae:7e
-----BEGIN CERTIFICATE-----
MIIC+DCCAmGgAwIBAgIBATANBgkqhkiG9w0BAQUFADB6MQswCQYDVQQGEwJVUzEQ
MA4GA1UECBMHRmxvcmlkYTESMBAGA1UEChMJS2Fvcyxjb29wMRowGAYDVQQDExF3
cGhvbWUxLmthb3MuY29vcDEpMCcGCSqGSIb3DQEJARYac2VjdXJpdHlAd3Bob21l
MS5rYW9zLmNvb3AwHhcNMDYxMjAxMDQ0MjI5WhcNMDcxMjAxMDQ0MjI5WjCBjDEL
MAkGA1UEBhMCVVMxEDAOBgNVBAgTB0Zsb3JpZGExDjAMBgNVBAcTBVRhbXBhMRIw
EAYDVQQKEwlLYW9zLmNvb3AxGjAYBgNVBAMTEXdwaG9tZTEua2Fvcy5jb29wMSsw
KQYJKoZIhvcNAQkBFhxwb3N0bWFzdGVyQHdwaG9tZTEua2Fvcy5jb29wMIGfMA0G
CSqGSIb3DQEBAQUAA4GNADCBiQKBgQDVF+sLwYLZqD+67SB9abDhSZzmsb3kr2uK
QAFpkb1n8aKmZCBSydOp7gk8RqvMO4MypPAYTInwbyLto/+mnZtsh9i7EDN1AFJe
VgYdks7RspgRbrQ9QXPyyabFnbidLR78fBXcD8rOcCMwTqBwJiSz6DPmIBkrEkPE
3cJLpAodawIDAQABo3sweTAJBgNVHRMEAjAAMCwGCWCGSAGG+EIBDQQfFh1PcGVu
U1NMIEdlbmVyYXRlZCBDZXJ0aWZpY2F0ZTAdBgNVHQ4EFgQUNAaUHuRyzV3qn01V
McRYyJMLB/cwHwYDVR0jBBgwFoAUAcFOosg6jkm2DDbvzCPzmFjYkXUwDQYJKoZI
hvcNAQEFBQADgYEAeFlk+KEC21dRBTWxKFkyDbWJX+IThE9HqnvTENmVO6kfsmR8
kOCidWUNSkC4LVyUZHd6yN5OPlvxbn1Y3evNEK9IAdaEpP3GLBLdRGrQRJQBv6h4
DjxnYOgjp9dU4D+0WFkSEsTm2avK0MrtK8DbcOtSgVBF+yXEhtHcFZwbrn4=
-----END CERTIFICATE-----
Signed certificate is in newcert.pem
/etc/pki/tls/misc# mv newcert.pem \
../certs/wphome1-email-cert.pem
/etc/pki/tls/misc# mv newkey.pem \
../private/wphome1-email-key.pem
/etc/pki/tls/misc# mv newreq.pem \
/etc/postfix/wphome1-email-req.pem
/etc/pki/tls/misc# cd /etc/postfix
/etc/postfix#
vi main.cf
/etc/postfix#
postfix check
/etc/postfix#
diff main.cf.ORIG main.cf
106c106
< #inet_interfaces = all
---
> inet_interfaces = all
109c109
< inet_interfaces = localhost
---
> #inet_interfaces = localhost
666a667,695
>
> # Support SMTP AUTH (via SASL):
> # (also must configure
/usr/lib/sasl2/smtpd.conf with the line:
> # pwcheck_method: saslauthd
> # and make sure saslauthd is started with the
"-a pam" argument; this
> # is the default on Fedora Core 5
/etc/sysconfig/saslauthd.
> # Finally make sure saslauthd is started before
postfix at boot time.)
>
> smtpd_sasl_auth_enable = yes
> smtp_sasl_security_options = noanonymous
> broken_sasl_auth_clients = yes
> smtpd_sasl_authenticated_header = yes
> smtpd_sasl_local_domain = $myhostname
> smtpd_recipient_restrictions =
> permit_mynetworks permit_sasl_authenticated
reject_unauth_destination
>
> # Support SSL/TLS (STARTTLS):
> smtpd_use_tls = yes
> smtpd_tls_cert_file =
/etc/pki/tls/certs/wphome1-email-cert.pem
> smtpd_tls_key_file =
/etc/pki/tls/private/wphome1-email-key.pem
> smtpd_tls_CAfile = /etc/pki/CA/cacert.pem
> smtpd_tls_received_header = yes
> # The following means only offer AUTH after
STARTTLS. This is a good
> # idea as AUTH is configured to use SASL, which
is configured to use
> # PAM, which in turn allows system users with
their passwords. But,
> # THIS IS DANGEROUS SINCE THE USERNAME/PASSWORD
IS SENT IN PLAIN TEXT!
> # (OK it is base64 encoded but that is trivial
to reverse.) So it
> # makes a lot of sense to only allow AUTH with
SSL/TLS encryption.
> smtpd_tls_auth_only = yes
/etc/postfix#
telnet wphome1 25
Trying
192.168.0.5...
Connected
to wphome1.gcaw.org (192.168.0.5).
Escape
character is '^]'.
220
wphome1.gcaw.org ESMTP Postfix
ehlo
localhost
250-wphome1.gcaw.org
250-PIPELINING
250-SIZE
10240000
250-VRFY
250-ETRN
250-STARTTLS
250
8BITMIME
starttls
220
Ready to start TLS
^C
Connection
closed by foreign host.
Now try it out using openssl
s_client:
user> openssl s_client -connect wphome1:25 -starttls
smtp -prexit
CONNECTED(00000003)
depth=1 /C=US/ST=Florida/O=Gcaw.org/CN=wphome1.gcaw.org/emailAddress=sec
Äurity@wphome1.gcaw.org
verify error:num=19:self signed certificate in
certificate chain
verify return:0
---
Certificate chain
0 s:/C=US/ST=Florida/L=Tampa/O=Gcaw.org/CN=wphome1.gcaw.org/ema
ÄilAddress=postmaster@wphome1.gcaw.org
i:/C=US/ST=Florida/O=Gcaw.org/CN=wphome1.gcaw.org/emailAddr
Äess=security@wphome1.gcaw.org
1 s:/C=US/ST=Florida/O=Gcaw.org/CN=wphome1.gcaw.org/emailAddress=sec
Äurity@wphome1.gcaw.org
i:/C=US/ST=Florida/O=Gcaw.org/CN=wphome1.gcaw.org/emailAddress=sec
Äurity@wphome1.gcaw.org
---
Server certificate
-----BEGIN CERTIFICATE-----
MIIC+DCCAmGgAwIBAgIBATANBgkqhkiG9w0BAQUFADB6MQswCQYDVQQGEwJVUzEQ
MA4GA1UECBMHRmxvcmlkYTESMBAGA1UEChMJS2Fvcyxjb29wMRowGAYDVQQDExF3
cGhvbWUxLmthb3MuY29vcDEpMCcGCSqGSIb3DQEJARYac2VjdXJpdHlAd3Bob21l
MS5rYW9zLmNvb3AwHhcNMDYxMjAxMDQ0MjI5WhcNMDcxMjAxMDQ0MjI5WjCBjDEL
MAkGA1UEBhMCVVMxEDAOBgNVBAgTB0Zsb3JpZGExDjAMBgNVBAcTBVRhbXBhMRIw
EAYDVQQKEwlLYW9zLmNvb3AxGjAYBgNVBAMTEXdwaG9tZTEua2Fvcy5jb29wMSsw
KQYJKoZIhvcNAQkBFhxwb3N0bWFzdGVyQHdwaG9tZTEua2Fvcy5jb29wMIGfMA0G
CSqGSIb3DQEBAQUAA4GNADCBiQKBgQDVF+sLwYLZqD+67SB9abDhSZzmsb3kr2uK
QAFpkb1n8aKmZCBSydOp7gk8RqvMO4MypPAYTInwbyLto/+mnZtsh9i7EDN1AFJe
VgYdks7RspgRbrQ9QXPyyabFnbidLR78fBXcD8rOcCMwTqBwJiSz6DPmIBkrEkPE
3cJLpAodawIDAQABo3sweTAJBgNVHRMEAjAAMCwGCWCGSAGG+EIBDQQfFh1PcGVu
U1NMIEdlbmVyYXRlZCBDZXJ0aWZpY2F0ZTAdBgNVHQ4EFgQUNAaUHuRyzV3qn01V
McRYyJMLB/cwHwYDVR0jBBgwFoAUAcFOosg6jkm2DDbvzCPzmFjYkXUwDQYJKoZI
hvcNAQEFBQADgYEAeFlk+KEC21dRBTWxKFkyDbWJX+IThE9HqnvTENmVO6kfsmR8
kOCidWUNSkC4LVyUZHd6yN5OPlvxbn1Y3evNEK9IAdaEpP3GLBLdRGrQRJQBv6h4
DjxnYOgjp9dU4D+0WFkSEsTm2avK0MrtK8DbcOtSgVBF+yXEhtHcFZwbrn4=
-----END CERTIFICATE-----
subject=/C=US/ST=Florida/L=Tampa/O=Gcaw.org/CN=wphome1.gcaw.org
Ä/emailAddress=postmaster@wphome1.gcaw.org
issuer=/C=US/ST=Florida/O=Gcaw.org/CN=wphome1.gcaw.org/emailAd
Ädress=security@wphome1.gcaw.org
---
No client certificate CA names sent
---
SSL handshake has read 2137 bytes and written 350
bytes
---
New, TLSv1/SSLv3, Cipher is DHE-RSA-AES256-SHA
Server public key is 1024 bit
Compression: NONE
Expansion: NONE
SSL-Session:
Protocol : TLSv1
Cipher : DHE-RSA-AES256-SHA
Session-ID:
7440731E52B11A8578C4B2250787B4413C944A5EA05B062CFB9E1D6CC3
Ä16A6AC
Session-ID-ctx:
Master-Key:
DD9F22850F7CE2F6D356B2458777C3B5DD79AB535B68FC542A5673EA7B6
Ä0F1255FB3DFD25D2D7ED9014A99FE0379B3E1
Key-Arg : None
Krb5 Principal: None
Start Time: 1165004565
Timeout : 300 (sec)
Verify return code: 19 (self signed certificate
in
Ä certificate chain)
---
220 wphome1.gcaw.org ESMTP Postfix
ehlo localhost
250-wphome1.gcaw.org
250-PIPELINING
250-SIZE 10240000
250-VRFY
250-ETRN
250-AUTH PLAIN LOGIN
250-AUTH=PLAIN LOGIN
250 8BITMIME
auth plain d3BvbGxvY2sAd3BvbGxvY2sAcmFiYXV0MjE=
235 Authentication successful
mail from: <wpollock@wphome1.gcaw.org> size=35
250 Ok
rcpt to: <pollock@acm.org>
250 Ok
data
354 End data with
<CR><LF>.<CR><LF>
From: me
To: you
Subject: test of email from wphome1 via postfix with
Ästarttls and auth
hi
.
250 Ok: queued as 421322DEFC7
quit
221 Bye
---
SSL handshake has read 2689 bytes and written 1499
bytes
Lecture 32
— Using nmap network scanner
nmap
is the de facto standard network scanner. To see what ports are open on your
own host you can use lsof or fuser, but “nmap -p- localhost” really tells the story.
Note! Never scan someone
else’s computer without permission!
From the nmap(1) man page:
nmap
is designed to allow system administrators and curious individuals to scan
large networks to determine which hosts are up and what services they are
offering. nmap supports a large
number of scanning techniques such as:
UDP, TCP connect(), TCP SYN (half
open), ftp proxy (bounce attack), ICMP (ping sweep), FIN, ACK sweep, Xmas
Tree, SYN sweep, IP Protocol, and Null scan.
nmap
also offers a number of advanced features such as remote OS detection via
TCP/IP finger-printing, stealth scanning, dynamic delay and retransmission
calculations, parallel scanning, detection of down hosts via parallel pings,
decoy scanning, port filtering detection, direct (non-portmapper) RPC scanning,
fragmentation scanning, and flexible target and port specification.
The nmap
man page describes the options available, and provides examples of common use.
Here are a few:
nmap
localhost
nmap -v localhost
nmap -sS -O target.example.com/24
Launches a stealth SYN scan
against each machine that is up out of the 255 machines on class “C” where target.example.com resides. It also
tries to determine what operating system is running on each host that is up and
running.
host
-l company.com | cut -d -f 4 | ./nmap -v -iL -
Do a DNS zone transfer to find the
hosts in company.com and then
feed the IP addresses to nmap.
nmap
-oS - localhost # funny easter egg: shows output in l33t mode.
Nmap can tell the difference
between filtered and closed ports. This is because when a bort
is filtered, nothing is returned. When a packet is sent to a closed port, the
system sends a RST packet back. You can configure iptables to REJECT rather
than drop packets, with rules such as:
... -J REJECT --reject-with
tcp-reset # for TCP ports
... -J REJECT --reject-with icmp-port-unreachable # for UDP &
others
Lecture
33 — Monitor a network using NIDS (Snort)
Network Based Evidence: Types of
Data to Collect
To monitor a network you need to
have a way to examine and/or capture the data (traffic) that flows
through it. There is a number of different types of data you can use:
·
Full content data — Every bit of every packet that passes
through some network. This could easily take a lot of disk space if you
capture (store) it! Full content data may not be possible to collect if
the data is encrypted. This data is almost always saved in libPcap
form, and nearly every tool supports this format.
·
Session data — This is information about data flows. Each
TCP (and UDP, which is harder to track) session is recorded: start and end
times, who (IP addresses), and how much data. If full content data has been
captured, the trace files can be examined to extract the session data.
·
Alert data — This is data generated by some NIDS. Alerts
can be used to indicate it is time for more complete data collection (i.e.,
start capturing session or full content data. A problem with alert data is too
many “false positives”, usually caused by not configuring the tool to recognize
the expected data on a given network.
·
Statistical data — This data includes information about
most active hosts, “top talkers” (busiest conversations in a given interval),
traffic averages by service/port, etc.
Hardware
For Network Monitoring
On a LAN with a hub, you can attach
a NMS (Network Monitoring Station) to the hub to examine and
capture all traffic. You typically set the NMS NIC to promiscuous mode
to capture all packets, on a NIC with no IP address (and with ARP turned off
too). A second NIC attached to a different LAN can be used to manage the NMS
remotely.
Hubs are rare today. Commercial
grade switches (which should be used in any organization, even a SOHO if
security monitoring is desired) include a SPAN (Switched Port ANalyzer)
port that copies the data from the TX line on other ports on the switch. You
can often configure multiple SPAN ports, or per VLAN SPAN ports. However, a
limitation of SPAN ports is that under heavy load some packets will not get
copied to them.
Taps (or Test Access Ports)
are special (expensive) devices that you can insert between a router and
firewall or a switch. These generally have 4 NICs on them: one to the router,
one to the firewall/switch, and two to the NMS. (Traffic on the TX line on
each of the first two NICs is duplicated, one to each of the last two NICs.
The NMS will usually have 3 NICS (one for remote access). The two NICs
connected to the tap should be bonded (IPMP) into a single virtual NIC,
which will capture all traffic. (A PC with appropriate hardware and 4 NICs can
be turned into a “home-made” tap.) Some good ones are made by Net
Optics.
Software
For Network Monitoring
Nearly always a NMS is Unix or
Linux based, so most of the tools are available for these platforms. For full
content analysis use Wireshark (formerly Ethereal). You can also use
this to capture (record) the data but the tool is interactive. Use tcpdump
for a command line tool to capture the data. (Both tools can “replay”
previously saved data (libpcap) too, to filter and analyze it later. Libpcap
data files can be examined more easily in some cases using a special tool, such
as ngrep, flowgrep, or a hex editor. There is also Etherape
(etherape.sourceforge.net) which can show the packets in a graphical way.
For session analysis without
capture use argus (qosient.com), which can save session data (but in a
binary format). To generate session data from libpcap files use tcptrace
(tcptrace.org).
For alert data everyone uses snort.
For statistical data a number of
tools exists that work on libpcap files. Tcpdstat (staff.washington.edu/dittrich/talks/core02/tools/tools.html)
is useful. Other tools exists but are designed for performance analysis rather
than security analysis: ntop (ntop.org) and trafshow
(soft.risp.ru/trafshow) are useful, trafshow in particular to show “top
talkers”.
Network
Intrusion Detection Systems
NIDS (Network-based
intrusion detection systems) run on one or several critically placed hosts
and view the network as a whole. NIDS use NICs running in promiscuous mode
to capture and analyze raw packet data in real time.
A NIDS may be stateful
or stateless. Like a packet filter, stateful can catch more
attacks.
Most NIDS use one of two methods to
identify an attack: statistical anomaly detection or pattern-matching
(or signature-based) detection.
Anomaly-based
Detection
In the statistical anomaly
detection model, the software discovers intrusions by looking for activity that
is different from a user’s or system’s normal behavior.
The baseline for normal
behavior is established by profiling user, host, or network activity for some learning
period. After the learning period ends, the anomaly detection-based IDS
scans for usage which deviates from the baseline.
The advantage to an anomaly-based
IDS is that it does not have to be specifically trained to look for a given
attack and can often spot new attacks before they are well publicized. The
downside is a large number of false positives even with a long learning
period. This means a human must spend more time examining alerts.
Signature-based
Detection
Because an anomaly-based IDS is
relatively high maintenance, professionals whose sole job function is not site
security are more likely to employ some form of pattern-matching detection.
A signature based NIDS examines
visible network activity, looking for suspicious activity such as port scans,
packets with fake source addresses, etc. Not all malicious activity is visible
on a given host’s NIC, so the location and number of such scanners must be
carefully thought out.
Signature based detection works by
comparing packets to a set of attack signatures, which are stored
in some form of database and must be frequently updated as new attacks emerge.
(This works like many virus scanners.) Such scanners can detect attacks well
and quickly, but not zero-day attacks. These are attacks for
which no signatures have been yet developed. Anomaly detectors
work more like spam filters, they collect and analyze normal traffic to
establish a baseline. Then any unusual traffic triggers an alert.
The advantages to a pattern-matching
IDS include an easier implementation and smaller learning curve for the
administrator, as well as the generating fewer false positives. However, they
are more easily fooled by the obfuscation and evasion techniques of black
hats. This may not be a problem as the most common attacks are from script-kiddies,
who rarely use such techniques.
Setting up
Snort as an NIDS
[ Adapted from the Sun BigAdmin
article on snort, at
http://www.sun.com/bigadmin/features/articles/intrusion_detection.html ]
SNORT is a popular stateful
signature-based NIDS and scanner. To be useful you must regularly update the
signature database. The Snort website (www.snort.org)
includes subscription access to Sourcefire VRT Certified Rule Updates,
as well as the free source code, documentation, and other resources. Note if
you don’t want to subscribe to the rule distribution (which costs about
$2000/year), you can just register with snort.org and periodically check the
site for the latest rule set (available 5 days after paying subscribers can get
them). If you don’t want to do that either, you can download a limited set of
freebie rules.
(If you subscribe you can use tools
to automatically update rules, see oinkmaster.sourceforge.net
.)
Note the people who invented snort
formed sourcefire (sourcefire.com),
to provide commercial IDS services. They use many technologies including
snort. Such companies are useful to out-source intrusion detection when it
doesn’t pay to train and maintain local security experts and buy and maintain
commercial tools.
Snort can perform real-time packet
logging, protocol analysis, and content searching/matching. It can be used to
detect a variety of attacks and probes such as stealth port scans, CGI-based
attacks, Address Resolution Protocol (ARP) spoofing, and attacks on daemons
with known weaknesses. Snort can also be used as a (packet) scanner, like tcpdump or ethereal (only not with as
many filtering features as those programs).
Snort utilizes descriptive rules to
determine what traffic it should monitor and a modularly designed detection
engine to pinpoint attacks in real time. When an attack is identified, Snort
can take a variety of actions to alert the systems administrator to the threat.
Snort comes as a tar-ball, with MD5
and GPG signatures available on the website. To install you perform the usual
steps as shown below. Note the rules are a separate download. In both cases
be sure to download the latest versions, currently 2.4.3.
Some configure options to consider
are to enable database (e.g., MySQL) support with “--with-mysql”, and extra features for dealing with
hostile connection attempts with “--enable-flexresp”.
See “./configure --help=short” and look up any
interesting-sounding options in the docs. Note some features will require
additional libraries.
Additionally snort comes with
plug-ins you can download and use, as well as additional tools (rule
maintenance, GUI front-ends, ...)
$ wget
http://www.snort.org/dl/current/snort-2.4.3.tar.gz
$ wget
http://www.snort.org/dl/current/snort-2.4.3.tar.gz.sig
$ wget
http://www.snort.org/pub-bin/downloads.cgi\
/Download/vrt_pr/snortrules-pr-2.4.tar.gz
$ wget
http://www.snort.org/pub-bin/downloads.cgi\
/Download/vrt_pr/snortrules-pr-2.4.tar.gz.md5
$ md5sum -c
snortrules-pr-2.4.tar.gz.md5
$ gpg --verify
snort-2.4.3.tar.gz.sig
$ gpg --recv-keys
731681A1
$ gpg --verify
snort-2.4.3.tar.gz.sig
$ tar -zxf
snort-2.4.3.tar.gz
$ cd snort-2.4.3
$ ./configure
$ make
$ su -c 'make install'
$ mkdir /etc/snort /var/log/snort /var/snort
$ tar -zxf snortrules-pr-2.4.tar.gz.md5 -C
/etc/snort
$ cp etc/*.{config,map} /etc/snort
$ cd /etc/snort
$ cp -f rules/*.{config,map} . # replace
defaults with latest
$ vi snort.conf # change "var RULE_PATH
../rules" to "rules"
To run snort as a packet sniffer,
showing only the packet headers, run:
snort -v
(to view the data, rather
than capture it). Hit control-C when you want to stop, and snort provides a
summary. To use your configuration file settings, you must tell snort where
the snort.conf file is. (It
looks by default in /etc/snort.conf.):
snort
-v -c /etc/snort/snort.conf
To view packet data add the “-d” option. To view data-link
(layer 2) headers too, add the “-e”
option (for Ethernet?).
In packet logging mode (no “-v” flag), the captured data is
saved in a directory hierarchy with subdirectories for each IP address. You
specify where to put this with the “-l dir” flag. (You must create
the directory first!)
By default snort now uses tcpdump (pcap) file format for
captured data, so all collected data goes into a single file. The older format
used ASCII files and directories. If you use “-K ascii”
option, snort will create
subdirectories and log packets based on the address of the remote or local host
address.
Snort logs the packets both flowing
from your host and to your host. If you just specify a plain -l option, Snort sometimes uses the
address of the remote computer as the directory in which it places packets and
sometimes it uses the local host address. In order to log relative to the home
network, so all captured traffic is logged in directories named for the remote
end, you need to tell Snort which network is the home (local end) network using
the “-h net/mask” option:
snort
-de -K ascii -l /tmp/snort-log \
-h 192.168.1.0/24 -c /etc/snort/snort.conf
This rule tells Snort that you want
to print out the data link and TCP/IP headers as well as application data into
the directory /tmp/snort-log,
and you want to log the packets relative to the 192.168.1.0
class C network. All incoming packets will be recorded into subdirectories of
the snort-log directory, with
the directory names being based on the address of the remote (non-192.168.1)
host.
Note: If both the source and
destination hosts are on the home network, they are logged to a directory with
a name based on the source or destination IP address of the packet, depending
on which has the higher of the two port numbers. Or in the case of a tie, the
source address is used.
If you’re on a high speed network
or you want to log the packets into a more compact form for later analysis, you
should consider logging in binary mode. Binary mode logs the packets in
tcpdump format to a single
binary file in the logging directory:
snort -l /tmp/snort-log -c /etc/snort/snort.conf -b
Note the command line changes here.
We don’t need to specify a home network any longer because binary mode logs
everything into a single file. You don’t need to run in verbose mode or
specify the -d or -e switches because in binary mode the
entire packet is logged, not just sections of it.
To enable Network Intrusion
Detection (NIDS) mode so that you don’t record every single packet sent down
the wire, try this:
snort
-b -l /tmp/snort-log -h 192.168.1.0/24 \
-c /etc/snort/snort.conf
Snort will look for /etc/snort.conf. This will apply the
rules configured in the snort.conf
file to each packet to decide if an action based upon the rule type in the file
should be taken. If you don’t specify an output directory for the program, it
will default to /var/log/snort.
Alerts
The default logging and alerting
mechanisms are to log in pcap format and use full alerts. The full alert
mechanism prints out the alert message in addition to the full packet headers.
There are several other alert output modes available at the command line, as
well as two logging facilities.
To save all data in binary mode use
“-b” as before (this is
recommended). To just provide alerts and not log the data (not recommended,
the data is useful for later analysis or legal evidence), use “-N” along with “-A mode”.
Use the “-A mode” option to configure alerts. You
can use the default of full,
fast (timestamp, brief
message, source and dest IP and port numbers), none (just log packets), and others too.
To send alerts using syslog, add the “-s” switch. Alerts go to AUTHPRIV facility by default.
To run in the background as a
daemon use the “-D”
option. To run snort at boot time but the appropriate command in rc.local. To more easily control
snort it may be better to create a proper script in /etc/init.d for it, and then use chkconfig (and service) to control it.
When run as a network sensor
(NIDS), you carefully decide where to place the host that runs snort. Use a hardened host
(with excess software removed).
Make sure you have plenty of disk
space available for the logs, on a busy network you may have terabytes of
data! Consider using disk quotas and log file rotation for snort to prevent disk full errors.
Use syslog
to forward the alerts to a central host (syslog-ng
is a better choice than vanilla syslog).
Make sure you routinely check for
new rules frequently (or subscribe to alerts on a mailing list).
Have a policy on escalating alerts
to the proper personnel.
Setting up
Snort as an NIDS
The Snort source code comes with a
default rules file called snort.conf which
can be placed into a location of your choice. Use this file as a starting
point for creating your own Snort installation, turning on binary logging and
fast alerts once you have it customized to your liking:
snort -b -A fast -c /usr/local/etc/snort.conf
Looking at this file, you’ll notice
several types of directives: include,
var, and config, preprocessor, and
output. The var
statement defines a simple substitution variable, much like shell code. The
syntax for defining a variable is:
var
name value
Variables can be used with “$name” or “$(name)” once defined. (Other
syntaxes can be used too, for special effects.)
The default snort.conf file includes a number of var directives, such as RULE_PATH and all of the _NET,
_SERVERS, and _PORTS
variables, which you’ll want to customize for your environment.
The include
file directive allows you
to split the file into logically distinct parts, for example “include $RULE_PATH/local.rules”.
The config
statement defines default command-line options and other Snort configuration
options.
Realistic attacks such as port
scans, or from fragmented packets, can’t be detected without some
pre-processing of the packets. Snort has a plug-in library of pre-processor
modules you can enable with preprocessor statements. (Note that each one used
affects performance; enabling too many can cause snort to fall behind and run
out of memory.) Examples of some of the pre-processor plug-ins that come with
the snort distribution include portscan,
telnet_decode, http_inspect, and asn1 (which looks for suspicious
encodings in packets).
The output statements say what to
do when some rule has been triggered. Some examples include alert_syslog,
alert_full, and alert_fast, which all work as the command line counterparts.
Snort uses a simple rule
description language to describe how data should be handled. Snort rules are
usually written in one line but may span multiple lines by appending the
backslash (\) character to the end of an incomplete line. Here’s an example
rule from rules/dns.rules:
alert
tcp $EXTERNAL_NET any -> $HOME_NET 53 \
(msg:"DNS EXPLOIT named 8.2->8.2.1"; \
flow:to_server,established; \
content:"../../../"; \
reference:bugtraq,788; reference:cve,1999-0833; \
classtype:attempted-admin; sid:258; rev:6;)
This rule says to look for packets
from any external source to any internal source on port 53 (DNS), where the
content matches “../../../”.
This is an attempted exploit for an old version of BIND 8 which is documented
by Bugtraq and CVE. If a packet matches this rule, then Snort triggers an
alert. Each rule is divided into two sections, the header (everything
before the open parenthesis) and the options (everything enclosed in the
parenthesis).
The first part of the header is the
action. The action must be one of the following or user defined:
alert
– Generate an alert using the selected alert method, and then log the packet.
log
– Log the packet.
pass
– Ignore the packet.
activate
– Alert and then turn on another dynamic rule.
dynamic
– Remain idle until activated by an activate rule, then act as a log rule.
The specified protocol must be one
of these: icmp, ip, tcp, or udp.
The two address sections may contain a single IP address, CIDR blocks, or a
list comprising any combination of the two. The single IP or CIDR block
notation may also be negated with the !
character to indicate that a match should be made on any IP address but the
one(s) listed. Some examples of valid addresses include:
192.168.1.0/24 !192.168.1.0/24 10.1.1.1
[192.168.1.0/24,10.1.1.1] ![192.168.1.0/24,10.1.1.1]
The address section may also
contain the keyword any
to imply that any address should match.
The port number fields
define the port or range of ports applied to the preceding address. If the
left side of a port range is left blank, Snort assumes that it should match on
all ports less than or equal to that specified on the right side of the port
range. If the right side of a port range is left blank, Snort assumes that it
should match on all ports greater than or equal to that specified on the left
side of the port range. Lists of ports are not yet supported but are planned
for future code releases. Like addresses, ports and port ranges may also be
negated with the !
character, and the keyword any
indicates that all ports should match.
When specifying a protocol which
does not use ports, such as ICMP, the port field has no meaning and should be
left as the keyword any. Some
examples of valid port declarations include:
111 !443 :1023 1024: 6000:6010 any
The direction field
determines the direction of traffic flow. If the direction field is ->, the address/port combination on
the left-hand side is the source and that on the right is the destination. If
it’s <-, then the left-hand
side is the destination and the right-hand side is the source. If it’s <>, then Snort considers the
address/port as either source or destination. This syntax is useful for
analyzing both sides of something such as a telnet conversation.
Rule options are separated from
each other using a semicolon (;), and option keywords are separated using a
colon (:). Four types of options are usable within a rule:
meta-data
(provides information about the rule but do not have any affect during detection),
payload (look for data
inside the packet payload), non-payload
(look for non-payload data), and post-detection
(rule-specific triggers that happen after a rule runs)
The example rule includes eight
options, two of which are the same but with different values (as shown in the
table below).
Option Type Option
Keywords
msg meta-data "DNS
EXPLOIT named 8.2->8.2.1"
flow non-payload
to_server,established
content payload
"../../../"
reference meta-data bugtraq,788
reference meta-data cve,1999-0833
classtype meta-data attempted-admin
sid meta-data 258
rev meta-data 6
The msg
option informs the alerting engine what message to print. Special rule
characters such as : and ; may be escaped within the msg option with the backslash (\) character.
The flow
option is used in conjunction with TCP stream reassembly to indicate that rules
should apply only to certain kinds of traffic flow. In our example, a match
should occur only when the client requests the content from the server and the
connection is already established.
The content
option allows Snort to perform a case-sensitive search for specific content in
the packet payload. The option to the content keyword can contain mixed text
and binary data. Binary data is usually enclosed within two pipe characters
(|) and represented as hexadecimal byte code. The content keyword also has several modifiers which change
how the content match is applied. Take a look at the content section of the
Snort manual for an in-depth explanation.
The reference
option defines a link to external attack identification systems. In this case,
Bugtraq id 788 and Mitre’s Common Vulnerabilities and Exposures id
CVE-1999-0833.
The classtype
option indicates what type of attack the packet attempted. A full list of all
the default classtype values is
available as part of the classtype section of the Snort manual. The classtype uses classifications defined
in the configuration file distributed with the Snort source code as etc/classification.config. The syntax
of this classification config
option is:
class_name,class_description,default_priority
The priority is an integer value,
usually 1 for high priority, 2 for medium, or 3 for low. This classification
for attempted-admin appears as follows in /etc/classification.config:
config
classification: \
attempted-admin,\
Attempted Administrator Privilege Gain,1
The sid
option, in combination with the rev
option, uniquely identify a Snort rule by correlating the individual rule ID
with the revision of the rule.
Managing
and Updating Rules
Once Snort is running and
triggering alerts, you can spot many of the attempted attacks on your
machines. Since Snort is a pattern-matching IDS, though, you need up-to-date
rules in order to catch the latest vulnerabilities.
Sourcefire, the
company behind Snort development, offers four ways to obtain Snort rules. The
first method is to retrieve the latest Snort source distribution and use the
rules contained therein. In addition, you can download newer rules from the Snort
Download Rules page. To receive rules in real time, you need to purchase a
subscription to the VRT rules. These rules are later released without cost to
the registered Snort users. Lastly, there are Snort rules submitted by the
open source community. Any registered Snort user may also submit a rule for
consideration or discuss Snort rules on the Snort-sigs mailing list.
Once you have new rules, you can
either merge them by hand, do a straight replace (assuming you’ve made no
customizations at all), or use a tool to do the work in an automated fashion.
One of the more popular rule management tools is a Perl script called oinkmaster.
Oinkmaster
downloads a specified file, unpacks it, and looks for a rules subdirectory.
All the rules files in this directory specified in the oinkmaster.conf file are processed and then written back
out. If you’ve specified changes to a specific rule in the oinkmaster.conf file, such as
disabling a rule, then oinkmaster
preserves those changes when it copies the new rules files into place. Once
you’ve read over the changes oinkmaster
made, you can restart Snort to pick up the new rules. Using RCS or some other
mechanism is a good idea to preserve old rules, to compare against old data or
in the event of an update corrupting your rule set.
Analyzing Snort alerts
BASE is the Basic Analysis and
Security Engine (see secureideas.sourceforge.net).
It is based on the code from the Analysis Console for Intrusion Databases
(ACID) project. This application provides a web front-end to query and analyze
the alerts coming from a SNORT IDS system. It uses a user authentication and
role-base system, so that you as the security admin can decide what and how
much information each user can see. It also has a simple to use, web-based setup
program for people not comfortable with editing files directly.
BASE searches and processes
databases containing security events logged by assorted network monitoring
tools such as firewalls and IDS programs. BASE is written in the PHP
programming language and displays information from a database in a user
friendly web front end. When used with Snort, BASE reads both tcpdump binary log formats and Snort
alert formats. Once data is logged and processed, BASE has the ability to
graphically display both layer-3 and layer-4 packet information. It also
generates graphs and statistics based on time, sensor, signature, protocol, IP
address, TCP/UDP port, or classification. The BASE search interface can query
based on alert meta-information such as sensor, alert group, signature,
classification, and detection time, as well as packet data such as
source/destination addresses, ports, packet payload, or packet flags.
BASE allows for the easy management
of alert data. The administrator can categorize data into alert groups, delete
false positives or previously handled alerts, and archive and export alert data
to an email address for administrative notification or further processing.
Although BASE supports many
database options, it is common to have Snort log alert data to a MySQL database
which will then be read by BASE and displayed via an Apache web server. When
doing this make sure MySQL support is built into snort. Add the following
configure option when building snort:
./configure --with-mysql=/usr/local \
--with-openssl=/usr/local
Now set up the Snort database in
MySQL. First create the snort DB. Next use the SQL script included with snort
to create the required tables. Next create a new MySQL user and set the
permissions:
mysqladmin
-u root -p create snort
mysql
-u root -p \
< snort-version/schemas/create_mysql snort
mysql
-u root -p snort
mysql>
set PASSWORD FOR
-> snort@localhost=PASSWORD('snort_user_password');
mysql>
grant CREATE,INSERT,SELECT,DELETE,UPDATE on
-> snort.* to snort@localhost;
mysql>
flush privileges;
mysql>
exit
Finally, edit the snort.conf file and modify the output plug-in directive:
output
database: log, mysql, dbname=snort \
user=snort password=snort host=localhost
output
database: alert, mysql, dbname=snort \
user=snort password=snort host=localhost
This will cause both log and alert
data to be written to the database.
To verify that Snort is able to
write to MySQL, make sure MySQL is running, then start Snort with the following
options:
snort
-c /etc/snort.conf -g snort
Once Snort and MySQL are running,
wait a few moments until it collects some alert data. Then run the following
command:
echo
"SELECT count(*) FROM event" | \
mysql -u root -p snort
Your output should look similar to
the following, where the number is the number of alerts you’ve received:
count(*)
1
If the number is zero, then you
haven’t seen any traffic that will trigger an alert, or you need to revisit
your Snort/MySQL configurations.
Make sure your apache setup
includes PHP support. If not you will need to install and configure that. You
will also need to install some PHP extensions needed by BASE: ADOdb (the Database
Abstraction Library for PHP, from adodb.sourceforge.net),
and the following PEAR modules. PEAR, the PHP Extension and Application
Repository, is installed as part of PHP and is to PHP what CPAN is to
Perl. If PEAR::Image_Graph is
not already installed, obtain it by running the following commands:
/usr/local/php/bin/pear install
Image_Color
/usr/local/php/bin/pear install Log
/usr/local/php/bin/pear install Numbers_Roman
/usr/local/php/bin/pear install
http://pear.php.net/get/Numbers_Words-0.13.1.tgz
/usr/local/php/bin/pear install
http://pear.php.net/get/Image_Graph-0.3.0dev4.tgz
Unpack the BASE source tar-ball
into your Apache DocumentRoot:
cd
/var/www/html
tar zxf /path/to/base-1.1.3.tar.gz
mv base-1.1.3 base
Use the supplied SQL script to
create the BASE database tables:
mysql
-u root -p \
< base/sql/create_base_tbls_mysql.sql snort
Configure BASE by copying the base_conf.php.dist file to base_conf.php and customizing it to
fit your environment:
cd
base
cp base_conf.php.dist base_conf.php
Next configure the following variables in base_conf.php at a minimum:
|
Name
|
Description
|
Value
|
|
$DBlib_path
|
Full path to
the ADOdb installation
|
"/usr/local/share/adodb"
|
|
$DBtype
|
Type of
database used
|
"mysql"
|
|
$Use_Auth_System
|
Set to 1 to
force users to authenticate to use BASE
|
0
|
|
$BASE_urlpath
|
The root URI
of your site
|
"/base"
|
|
$alert_dbname
|
The alert
database name
|
"snort"
|
|
$alert_host
|
The alert
database server
|
"localhost"
|
|
$alert_port
|
The port
where the database is stored (Leave blank if you’re not running MySQL on a
network socket.)
|
""
|
|
$alert_user
|
The username
for the alert database
|
"snort"
|
|
$alert_password
|
The password
for the username
|
"snort_user_password"
|
Protect the directory where you
installed BASE. Apache can be configured to deny access based on IP address, as
well as to require a user to enter a password. Modify httpd.conf and add something like the following to allow
users from the host 192.168.1.100 to authenticate:
<Location
/base>
Order Deny, Allow
Deny from All
Allow from 192.168.1.100
AuthType Basic
AuthName Access is restricted.
AuthUserFile /path/to/htpasswd/file
require valid-user
</Directory>
Once everything is installed and
working, you can start using BASE to examine Snort data rather than use the
less command on some text log file. To make your life easier BASE can be
customized in a number of ways.
Alert groups can be created
to group event information into user-defined categories for easy perusal. In
order to create a new alert group or modify existing groups, click on the Alert
Group Maintenance link at the bottom of the main page.
BASE has a search function
that can be used to quickly search through the database for certain criteria
and present it in an ordered fashion. The allowable search criteria include
Alert Group, Signature, and Alert Time. The results can be ordered by
timestamp, signature, source IP, or destination IP. Unfortunately, there is no
option to use an IP address as one of the criteria.
Graphs can
be created from Alert Data or Alert Detection Time. The Alert Data can be
graphed and charted based on a variety of options to create easily readable
reports. Graph based on Alert Detection Time can be used to identify periods
of heavy activity.
Lecture 34 — Overview of Computer Forensics
[ Adapted from “Forensic
Discovery” by Dan Farmer and Wietse Venema, (c) 2005 Addison-Wesley ]
Computer forensics may be
defined as gathering and analyzing data in a manner as free from
distortion or bias as possible to reconstruct data or what has happened in the
past on a system. In general the term forensics has legal
implications, which are often ignored by many so-called computer forensic
practitioners today.
Order of Volatility
of Data
There is something similar to the
Heisenberg principle (“The more precisely the position is determined, the less
precisely the momentum is known in this instant, and vice versa.” --Heisenberg,
uncertainty paper, 1927) at work here: Collecting data destroys data. Just
running a program disturbs the kernel, RAM contents, CPU register contents, and
file access times on disk. Why is this?
All data is volatile, meaning it
changes over time, goes away entirely, or becomes difficult or impossible to
verify. However some data is less volatile than other data. This is called
the order of volatility (or OOV). You use this idea to decide the order
of data capture. Generally you should capture and preserve the data that is
the most volatile. Note some data (CPU registers, cash contents, device RAM)
can’t be collected with current system hardware and software tools.
Volatility of
Data
|
Type
|
Life Span
|
|
Registers,
peripheral memory, caches, ...
|
Nanoseconds
|
|
Main memory
(RAM)
|
Tens of
nanoseconds
|
|
Network
state
|
Milliseconds
|
|
Running
processes
|
Seconds
|
|
Disk
|
Minutes
|
|
Removable
Media (floppies, backups, ...)
|
Years
|
|
Printouts,
CD-ROMs, other (semi-)permanent media
|
Tens of
years
|
Collecting data in this order will
gather the most information. However in the process the data on the disk is
becoming less valid (the attacker is working on your system all the while).
This may impair its value as evidence. The U.S. Dept. of Justice published in
2004 “Forensic Examination of Digital Evidence: A Guide for Law Enforcement”
which is available on-line at www.ojp.usdoj.gov/nij/pubs-sum/199408.htm,
and also “Electronic Crime Scene Investigation: A Guide for First Responders”
at www.ojp.usdoj.gov/nij/pubs-sum/219941.htm.
According to these guidelines, it is better to lose the more volatile data in
order to secure the disk as quickly as possible: shutdown the system, remove
the disk to copy (with dd) and
examine).
Historically, the definition
of what constitutes a “computer forensics expert” has been a loose one. A
number of states have taken action to tighten the rules and regulations that
must be met in order for such an investigator to testify in court. South
Carolina is one state considering such changes; a bill is up for consideration
(2008) there that would only allow computer forensic experts to testify in court
if those experts are employed by (or own, presumably) businesses that primarily
engage in legal work or divorce cases. In essence, the bill would require
digital forensic analysts to obtain a PI (private investigator) license if they
wish to testify in court.
- Excerpt from ArsTechnica.com post by Joel Hruska, 1/7/08 - 09:50PM CT
The general steps to a forensic
investigation are (Richard Saferstein, “Criminalistics: an Introduction to
Forensic Science”, (c)2003 Prentice-Hall):
·
Secure and Isolate
·
Record the Scene
·
Conduct a systemic search for evidence
·
Collection and package evidence
·
Maintain a chain of custody
A proper investigation could take:
·
no time (do nothing)
·
less than a day (minimal effort by a normal user)
·
normal effort (less than a week by a sys adm)
·
serious effort (several days to several weeks by a senior SA)
·
maximal effort (several weeks to several months by an expert)
Live CDs /
DVDs and other forensic toolkits
There are a number of
bootable Linux live CDs, that contain collections of useful forensic tools.
Examples include Remote Exploit’s Auditor, Phlak, and Pentoo.
(Also useful is the System
Rescue CD (or USB) live distro, for system repair.)
COFEE (Computer
Online Forensic Evidence Extractor - microsoft.com/industry/government/solutions/cofee/)
is a suite of 150 bundled off-the-shelf forensic tools that run from a script. COFEE
was created by Microsoft to help law enforcement officials gather volatile
evidence that would otherwise be lost in traditional, offline forensic
analysis. Officers can run the script in the field from a USB stick, letting
them grab data from password-protected or encrypted sources. The forensics
tool works best with Windows XP but Microsoft is working on a new version of
COFEE for next year that fully supports Windows Vista and Windows 7.
In response to COFEE,
two developers have created “Detect and Eliminate Computer Assisted Forensics” or
DECAF (decafme.org).
DECAF is a counter intelligence tool designed to thwart the Microsoft forensic
toolkit. DECAF monitors the computer it’s running on for any signs that COFEE
is operating on the machine and does everything it can to stop it. DECAF
deletes COFEE’s temporary files, kills its processes, erases all COFEE logs,
disables USB drives, and even contaminates or spoofs a variety of MAC addresses
to muddy forensic tracks.
Cell Phone
Forensics
Increasingly computer
forensic professionals need to analyze cell phone data. Such data includes a
call history, emails, text messages, saved phone messages, a user’s contact
list (address book), images, cached web pages (and browser history), audio
(music), and videos. The memory also contains network connection data, the
phone’s number and user information, and even geo-location data. Collecting
this data turns out to be much hard than for computers or laptops.
There are so many
different models that nobody can be an expert in them all. Push the wrong
button and precious data can be lost. If you turn off the phone, you may find
you need a password to turn it back on. If you leave it on, incoming messages,
text, and email may cause older data to be lost. Geo-location data can be lost
if you turn it off, but if you leave it on and transport the cell phone to your
lab, the newer arriving data may push older (and valuable) data out of a
cache. If you transport the phone in a shielded bag, it will not only lose
some data, but drain the battery faster as the phone boosts its signal, trying
to connect to a cell tower.
Cell phones use SRAM
for active memory, but they may also have memory cards. GSM phones (AT&T
and T-Mobile, in the US, and everywhere else in the world) also have a SIM card
where data can be stored.
It takes special
hardware and software, often quite expensive, that differs for different
models, to collect the data in a proper way. The collection could take hours.
Some toolkits are BitPim (which is free from BitPim.org), for CDMA phones, Oxygen
Forensic Suit (OxygenSoftware.com)
and Paraben Device Seizure (Paraben.com), for about $1200,
Secureview2 (MobileForensics.com)
for $3000, CelleBrite UFED (cellebrite.com) and XRY (msab.com) for
under $10,000, and Logicube CellDek (logicube.com) as the top of the line
mobile forensics kit for a mere $25,000.
Lecture
35 — Building a Secure Logging Infrastructure - syslog-ng
[Adapted from “Building a
Logging Infrastructure” by Abe Singe and Tine Bird, number 12 in the SAGE
“Short topics in Systems Administration” series.]
Logging is the heart of all system
and network monitoring, and hence, of system management and auditing.
Examining logs is one of the first steps in forensic system analysis. Using
NIDS and other alerting tools are only the first step in incident response; the
follow-up is to examine the log files. Logging is used for software
development and system testing. Logs are also used for recovery of
mis-configuration.
A proper logging infrastructure
should include policies that determine what to log, how much/often to
collect log data, log rotation schedules, log backups, security controls for
logs, and (as much as possible) standard log entry formats.
Log data is generated by the OS,
standard services/daemons, and custom software. Other sources include network
components (routers, switches, SNMP/RMON sensors). A huge volume of data is
potentially generated from these sources, yet only a small fraction (less than
5% typically) are security (or otherwise administratively) related. Yet you
need to collect all the data you can, since there is no way to know in advance
which 5% you need. A type of HIDS is used to monitor logs and to generate
alerts and/or summary reports, so the admin doesn’t have to read all the log
data all the time.
Every system today uses syslog to centralize logging on a
host, which facilitates management of all logs on that single host. (Windows
uses a different logging system.) Additionally all systems provide some log
rotation facility (Windows?).
Yet syslog
has issues. By default, it runs on the same server as other services. So if
that server has a problem (especially a security problem) the log files can
become compromised, corrupted, or (if the disk runs low on space) truncated.
(And if the log files fill the /var
partition other services could be affected.)
Centralized
Logging Architecture
Running a log server and having
other server’s syslog daemons
forward log entries is a more secure design; if a host is compromised (or
crashes), the logs, stored on a different host, are still safe. Syslog has a mode where log entries
sent to the local syslog are
forwarded to a central syslog,
known as a loghost. This mode is enabled using a syslogd command line option. This
design is called a single central log architecture. The loghost
should be hardened and only run minimum services: syslogd, sshd,
and ntpd.
All hosts that log to a single
server must agree on the current time. Even if you don’t sync to a public
time server, you should choose one well-connected host to act as the local time
server.
Note there exists 3rd party Windows
event log to syslog forwarders.
If you have several sites connected
by a WAN it may pay to have a central log server at each site, and have that
log server in turn forward to a single log server. This variation is known as
a relay architecture.
The syslog protocol for forwarding log
messages between servers is documented in RFC-3164. Although this
logging infrastructure appears to work well, syslog
has problems, especially with centralized logging:
·
syslog can lose
information (only the last hop IP to the log server is logged).
·
By using UDP, syslog
log entries can be lost.
·
Attackers can forge fake log entries, polluting your logs.
·
Syslog doesn’t validate log message headers or content in any
way.
·
Log messages may include sensitive information but syslog forwards them without
encryption.
·
Denial of service attacks against the log server can render all
logs useless.
·
Collected log data is not easily searchable by standard means.
(You need to cobble together a grep/Perl script for each query against log
files.
·
There is no standard log entry format in the world. This is not
so much a syslog problem but a
general logging issue. However syslog
provides only very limited control over the format of log entries.
·
Syslog provides limited actions upon receipt of a log message.
It can only store or forward the message. There is no way to do anything else,
pass the message to alerting software, pick destinations of regular expressions
matching the messages, or trigger a response to messages (e.g., turn off
services, force a user to log out, ...).
·
There are no restrictions on sources of log data when using a
loghost, as there is no way to configure syslog to only talk to selected hosts.
Today there are a number of replacements
for standard syslog. Some of
these replacements use an extended version of the syslog.conf file syntax for configuration, making them
suitable for drop-in replacements. Others that provide more features use their
own configuration syntax (which may be easier to understand the standard syslog facility and selector syntax!).
Stealth
Loghosts
Whatever logging software you use,
your system can deploy a central stealth log server. Such a
server listens to network traffic on the LAN using promiscuous mode. The NIC
is not assigned any IP address! The other hosts must be configured to send
logs to a non-existent (but valid) IP address. Note that since there is no
host at this fake address, ARP won’t work and you’ll need to configure a static
ARP cache entry as well.
On the loghost itself, you use tcpdump, snort, plog
(“Plog [www.ranum.com] is a promiscuous syslog
listener. It sucks UDP syslog
packets up off a network, rips the message screaming and kicking out of the
packet body, and stuffs it into /dev/log”),
or some other packet logger. From this you extract the syslog entries and forward to syslogd (usually via /dev/log,
or another named pipe or socket).
This stealth solution will work for
any UDP syslog replacement, but
not any TCP one (which requires the server at the other end to complete the
handshake).
Security
Measures for the Logging Infrastructure
Each piece must be secured: update
the software, set owner/group and permissions correctly, set disk quotas.
For centralized logging, configure
TCP wrappers (only for TCP syslog
replacements), host firewalls, and routers (internal routers must forward log
packets, external ones should not). Syslog
listens for log data at port UDP/514. This should be locked down using
local firewall so only localhost
can send to this port (except for the central loghost of course).
A commonly forgotten security
measure is to protect /dev/log
and other named pipes used by syslog
so only root and selected users can write to it:
groupadd
loggers
chgrp loggers /dev/log
chmod 660 /dev/log
When first setting up a loghost you
should aim to use all available disk space for log data. A compressing
filesystem can help here.
You should estimate how much data
you can store and configure log rotation accordingly. (Initially, it is okay
to underestimate log file growth. Whenever you add or change services, you
should monitor log file sizes for awhile. Use that data (and your data
retention policies) to adjust log file rotation.
To ensure the log files don’t grow
too large, configure a separate disk partition for log data, or
configure a disk quota for syslog.
Note some filesystems (or old
kernel versions or file services such as NFS) impose a limit on file sizes,
often around 2 gigabytes. Also, if you create 50+ GB files it will take a long
time to grep through them! In fact,
many tools will not work with very large files. The solution is to configure
log rotation by size, rather than by time (e.g. every day). You can use hybrid
rotation policies as well.
After a while you will run out of
space, so you must decide what to do with old log data. If possible, you
should archive old log data rather than throw it away. (If you do toss
it, make sure to treat paper logs and backup tapes/disks as containing
sensitive information.)
Although you’d like to log everything,
sometimes it pays not to send all available data to your loghost. This can be
done by tuning (configuring) syslog
logging levels to save less data or using other filtering techniques.
Log data should be digitally
signed, to prevent tampering (or corruption). Ideally, you would want one key
to sign each entry, and another to sign the log as a whole; neither key should
be kept on the same host as the logs. This is rarely done.
Forward Secure Sealing
(FSS) is a method to cryptographically “seal” (sign) logs in regular time
intervals. If some host is hacked, the attacker cannot alter log history
(although they can still delete log files, if on the same host they’ve broken
into). FSS works by generating a key pair of “sealing key” and “verification
key”. The former stays on the machine whose logs are to be protected and is
automatically changed in regular intervals (seconds to minutes), using the old
one plus some other data (e.g., the current time) to generate the next; the
previous sealing key is securely deleted. The verification key should be
written down on a piece of paper or stored on your phone or some other secure
location (that means: not on the machine whose logs are to be protected). With
the verification key, you can verify the initial part of the journal, and FSS
then modifies it to match the next sealing key, and so on. If the verification
is successful, the log history until the point where the machine was cracked
has not been altered. (Systemd logs will use FSS from Fedora 18 on.)
(Note! /etc/syslog.conf on many systems requires a tab
character as a delimiter, yet vi
and other editors by default insert spaces when you use the tab key. Messing
up syslog.conf is not a good
thing to do!)
Syslog
Replacements
Syslog
has a number of replacements and additional components available to address the
short-comings noted above. To provide authentication and integrity of log
sources when using central logging, a number of syslog
protocols are being developed:
·
syslog-sign provides reliable transport over UDP.
It also provides authentication of the sender, includes timestamps to prevent
replay attacks, and performs delivery checks (checksum/CRC???).
·
syslog-reliable users TCP rather than UDP.
Another transport option is to use
an SSH/SSL/TLS tunnel to transport regular syslog messages.
There are a number of syslog replacements. None seem to
offer all the features you’d like to have but most are better than the standard
syslog:
·
syslog-ng is a popular syslog replacement. It allows TCP as the transport,
remembers forwarding IP addresses so a relay architecture doesn’t lose data,
and provides finer message filtering than standard syslog facility/level selectors.
·
Modular syslog includes integrity checks, regular
expression message filtering, and easy SQL database integration for storing log
data. This is important for management and analysis: you can use a high-speed
DB, stored queries, and standard reports.
·
SDSC-syslog implements both syslog-sign and
syslog-reliable protocols. It is designed for efficiency and robustness even
under high loads.
·
nsyslog uses SSL (over TCP) for message transport.
SSH/SSL provides authentication, authorization, integrity, and confidentiality.
·
rsyslog is used by default in Red Hat systems. Its
config file is compatible with syslog.conf.
Red Hat picked this over syslog-ng due to license issues, incompatible config
file syntax (which is a silly reason), and performance (?).
I’m not sure the TCP/SSL/SSH
solutions can be used with a stealth loghost. But if the transport is secure,
reliable, encrypted, authenticated, and provides message integrity checks, and
the routers and host firewalls are configured tightly, then maybe you don’t
need a stealth loghost!
Integrating
Windows and Other System Logs
Non-Unix/Linux systems can use
syslog: netlogger for old (OS9 and earlier) Macintosh systems, and Kiwi
syslog for Windows. Modern Macintosh is built on BSD Unix and thus
supports syslog directly.
By default, logging on Windows
hosts uses binary event logs that automatically over-write themselves when
full. The binary the format is publicly available and a number of Perl and
other tools exists to convert these to text.
Windows logs are consistent across
all Windows versions and services (Event ID 529 always means a failed login).
And as event logging is built into the OS it is generally more secure than syslog.
Windows provides no mechanism to
forward events to a central loghost. Instead there are a number of third party
tools for this, such as Kiwi syslog
for Windows, EventReporter,
Snare for Windows, and
even roll-your-own with Perl module Win32::EventLog.
The Windows event log has three
parts: system log, Security log, and the application log. (Think of these as 3
facilities.) Each part is stored in a separate file in ...\system32\conf\SysEvent.Evt, SecEvent.Evt, and AppEvent.Evt. Applications must
register themselves to be able to use the event log service (see registry key HKEY_LOCAL_MACHINE\System\CurrentControlSet\Services\Eventlog\Application.
System and service event logging is controlled by the Windows Audit Policy
(Control Panel-->Administrative Tools-->Local Security Policy-->Audit
Policy)
Windows provides logevent, equivalent to Unix logger command line tool to create
event log messages.
Log files are useless if they
are never examined. Get into the habit of reading logwatch output daily to keep an eye on your system(s).
This activity also provides experience and insight for baseline activities.
For some systems you can examine
some binary logs with special commands. The wtmp,
utmp, and btmp files are examined with who, last, lastlog, and lastb.
(Note you must create the btmp
file manually if you want your system to log bad login attempts: touch /var/log/btmp.
Solaris uses: /var/adm/loginlog)
Lecture
36 — Squid Web/FTP Proxy Server
(Review proxy servers from
page 302.) An HTTP proxy such as squid works as follows: A user on a
workstation uses a web browser to visit www.example.com (which uses port 80 by
default). The browser determines the IP address of www.example.com, creates an
HTTP request packet, and sends it there.
For non-transparent proxying, the
browser is configured with the IP address and port number of the proxy server
(in our example squid-server:3128). Squid reads the HTTP headers to determine
the real destination IP. It then sends the HTTP request, caches the reply, and
finally returns the HTTP reply to the original workstation.
For transparent proxy, no
workstations need any special configuration. Instead you have the router do
all the work.
Qu: How to build a transparent
proxy using squid and iptables? First you need a suitable DNAT or REDIRECT
rule to forward http (web) requests from hosts on your LAN that are sent to the
Internet, to your squid server. If squid is running on another server, you
need to change the destination IP address and port of the packets. This is
what DNAT is for. Use REDIRECT only if squid is running on the NAT box
itself. Example:
iptables -t nat -A PREROUTING -p tcp --dport 80 \
-j DNAT --to 192.168.22.33:3128
or
iptables -t nat -A PREROUTING -i eth0 -p tcp \
--dport 80 -j REDIRECT --to-port 3128
(Note these rules won’t work
properly for HTTP 1.0, only 1.1, due to the missing HOST header that squid
needs to determine the original destination IP address. To support HTTP1.0 as
well, see the transparent proxy example on page 189, or the Transparent
Proxy how-to documents.)
Next squid must be configured
appropriately. The squid.conf
for Squid 2.3 needs to be something like the following:
http_port 3128
httpd_accel_host virtual
httpd_accel_port 80
httpd_accel_with_proxy on
httpd_accel_uses_host_header on
Be sure to set up appropriate ACL
filters, to limit use of the proxy to your internal network. Squid 2.4 needs
an additional line added:
httpd_accel_single_host off
See also “varnish”, a
reverse proxy / HTTP accelerator (means “used on the server side, not the
client side”).
Doing SSL
right on the web [From http://arstechnica.com/business/news/2011/03/https-is-great-here-is-why-everyone-needs-to-use-it-so-ars-can-too.ars]
We’ve looked pretty extensively at
serving Ars Technica over HTTPS in the past. Here’s what we’d need to do to
make this a reality:
First, we would need to ensure that
all third-party assets are served over SSL. All third-party ad providers,
their back-end services, analytics tools, and useful widgets we include in the
page would need to come over HTTPS. Assuming they even offer it, we would also
need to be confident that they’re not letting unencrypted content sneak in. Facebook
and Twitter are probably safe (but only as of the past few weeks), and Google
Analytics has been fine for quite a while. Our ad network, DoubleClick, is a
mixed bag. Most everything served up from the DoubleClick domain will work
fine, but DoubleClick occasionally serves up vetted third-party assets (images,
analytics code) which may or may not work properly over HTTPS. And even if it
“works,” many of the domains this content is served from are delivered by CDNs
like Akamai over a branded domain (e.g. the server’s SSL cert is for
*.akamai.com, not for s0.mdn.net, which will cause most browsers to balk).
Next, we would need to make sure
our sensitive cookies have both the Secure
and HttpOnly flags set. Then we
would need to find a CDN with SSL abilities. Our CDN works really well over
HTTP, just like most other CDNs. We even have a lovely
“static.arstechnica.net” branded host. CDNs that do expose HTTPS are rare (Akamai
and Amazon’s CloudFront currently support it), and leave you with URLs like
“static.arstechnica.net.cdndomain.com”. It would work, but we’d be sad to lose
our spiffy host name and our great arrangement with CacheFly.
We would also have to stick another
web server in front of Varnish. We use Varnish as a
cache, which would still work fine since it would speak plain HTTP over our
private network. It can’t encrypt traffic, though, so we’d need another proxy
to decrypt data from readers and take Varnish responses and encrypt them.
Lastly, we would have to find a way
to handle the user-embedded-content scenario. Images in comments or forums can
come from any domain, and these hosts almost universally support SSL poorly or
not at all. One solution is to prohibit user-embedded content (which we don’t
want to do), or proxy it through a separate HTTPS server that we control. GitHub
has implemented
this using a product called camo and Amazon’s CloudFront
CDN. When every page is rendered, its front-end application rewrites all image
links specified with the ‘http://’ protocol to be requested from its camo
server, which requests and caches the image and serves it over SSL.
Lecture 37
—Authentication Servers
An authentication service is used
to provide a single place to keep track of identities (e.g., users) and
authentication tokens (e.g., passwords). Without such a central service, each
service must provide its own DB of users. So the user must log in to the DB to
fetch data, log into the print server, the mail server, file shares, etc.
Having multiple databases of users and passwords, one per service, is annoying
for users (have to manage multiple identities and passwords) and a lot of extra
work for the SA.
Before networking, each host had a
single DB, accessed via the OS (this is the /etc/passwd
file). This allowed all the services provided on that one host to use a single
authentication service (provided by the OS).
Once networks became useful to logically
separate the service from the host it was on, so we went back to per service
authentication. Additionally a network access server (NAS) needs to
authenticate remote users before they can even access your organization’s
network.
Today the concept of single
sign-on is used to implement a single, central authentication service.
However centralizing authentication still leaves a need for services to
configure authorizations; now all users are allowed to access all
services in some organization, and these are still done per service. (More
work for the SA!)
Besides authentication,
organizations need a way to monitor use of services, for management, auditing,
and possibly billing purposes. Again services traditionally provide such log
(or accounting) services, but many don’t, and in any case these logs
must be combined to produce management reports and customer bills.
While most modern servers still
permit one to configure them individually there are many central
authentication, authorization, and accounting (AAA) servers, including some
that just provide one or two of the “A”s. Most services (and NASs) can be
configured to use one or more of these. Some common authentication servers are
described below.
Kerberos
[Details discussed in networking class.]
Kerberos is a network
authentication protocol, originally developed for MIT’s Project Athena in the
1980s. Today it has become the most widely deployed system for authentication
and authorization in modern computer networks (in part because Window Active
Directory is a variant of Kerberos). Currently it is mostly used in large
corporate networks. Kerberos’ ability to require strong mutual authentication
has enormous potential to protect consumers doing business on the public
Internet from phishing and other types of attacks. [From www.kerberos.org.]
[Adapted from
http://www.isi.edu/gost/brian/security/kerberos.html, “The Moron’s Guide to
Kerberos”.]
Kerberos is an authentication
service developed at MIT. Its purpose is to allow users and services to
authenticate themselves to each other. That is, it allows them to demonstrate
their identity to each other.
Kerberos was designed to eliminate
the need to demonstrate possession of private or secret information (the
password) by divulging the information itself. Kerberos is based on the key
distribution model developed by Needham and Schroeder. A key is used to
encrypt and decrypt short messages. Keys provide the basis for the
authentication in Kerberos.
[ From Sun Solaris docs:
docs.sun.com/app/docs/doc/816-4557/?a=view ]
The Kerberos service is a
client-server architecture that provides secure transactions over
networks. The service offers strong user authentication, as well as integrity
and privacy. Authentication guarantees that the identities of both the sender
and the recipient of a network transaction are true. The service can also
verify the validity of data being passed back and forth (integrity) and encrypt
the data during transmission (privacy). Using the Kerberos service, you can
log in to other machines, execute commands, exchange data, and transfer files
securely. Additionally, the service provides authorization services, which
allows administrators to restrict access to services and machines. Moreover,
as a Kerberos user, you can regulate other people’s access to your account.
The Kerberos service is a
single-sign-on system, which means that you only need to authenticate
yourself to the service once per session, and all subsequent transactions
during the session are automatically secured. After the service has
authenticated you, you do not need to authenticate yourself every time you use
a Kerberos-based command such as ftp or rsh, or to access data on an NFS file
system. Thus, you do not have to send your password over the network, where it
can be intercepted, each time you use these services.
Qu: How do you authenticate
yourself in real life? Typically, you show your driver’s license (or ID card,
if you’re not of driving age). This ID shows that there is an agency
(the one that issued the license or card) that has linked a given identity
to a physical likeness. This physical likeness usually consists of a photo and
some physical stats, and is considered to be difficult to copy. (That is, you
can’t change yourself to look like someone else, without detection.)
The identity consists
of a name and an address, and some other information, such as a birth date. In
addition, there may be some restrictions on what the named person can
do: they may be required to wear corrective lenses while driving. (In many
cases, this restriction is implicit: one can’t drink until the age of 21, based
on the birth date on the card.) Finally, the identification has a limited
lifetime, represented by the expiration date on the card.
Kerberos works in basically the
same way. It’s typically used when a user on a network is attempting to make
use of a network service (such as a network printer), and the service wants
assurance that the user is who he says he is. The user presents a ticket
that is issued by the Kerberos authentication server (AS), much
as a driver’s license is issued by the DMV. The service then examines the
ticket to verify the identity of the user. If all checks out, then the user’s
request is accepted.
Overview
of Kerberos Sessions
A client (a user, or a service such
as NFS) begins a Kerberos session by requesting a ticket-granting ticket
(TGT) from the Key Distribution Center (KDC). This
request is often done automatically by login.
The KDC creates a TGT and sends it
back in an encrypted form to the client. The client decrypts the
ticket-granting ticket by using the client’s password.
Now in possession of a valid
ticket-granting ticket, the client can request tickets from the KDC for all
sorts of network operations, such as rlogin, FTP, or CUPS, for as long as the
ticket-granting ticket lasts. This ticket usually lasts for a few hours.
To access some service, the client
software (e.g., SSH, FTP, NFS, Samba, ...) requests a ticket for a particular
service (for example to remote login on another host) from the KDC. The
client software sends the KDC the user’s TGT as proof of identity. After
validating the TGT, the KDC sends a ticket for the requested service back to
the client software. The client software then sends this ticket to the server
software as proof of authentication and authorization.
For this scheme to work both the
client software (including login)
and the server software must be Kerberized. A server must
exchange credentials with the KDC when it starts up, or the KDC can’t send
tickets for that service to clients.
Non-Kerberized
clients can use a PAM module to authenticate via Kerberos.
Note that all the Kerberos
interactions are handled automatically by the Kerberized clients. The user
just runs SSH and no password is requested (see also SSH agent).
RADIUS
RADIUS (Remote
Authentication Dial In User Service) is an access server that uses an AAA
protocol (See page 29). Although originally designed to support a network
access server connected to a bank of modems, RADIUS is used today for a variety
of uses such as single-sign-on, wireless network access, access to
network equipment (routers), VoIP, etc. A common use is Wi-Fi, since many WAPs
can’t access LDAP directly. (The RADIUS server can be configured to use LDAP
as a back-end.) Network devices (switches, routers, etc.) generally can speak
RADIUS, but not LDAP or some other SSO system.
The basic authentication
and authorization is defined by RFC-2865, while the account component is
defined by RFC-2866. It uses UDP to communicate with a network access server.
RADIUS was deployed
before it was assigned official port numbers by the IANA. The official ports
are 1812 for authentication and 1813 for authorization and accounting. The
traditional ports were 1645 and 1646 respectively. Many RADIUS servers default
to the traditional ports, or monitor both sets.
A network
access server (confusingly called a NAS) is a server attached to
a bank of modems, a WAP, a switch, or a router that enforces network
access control. The NAS is a client of the RADIUS server. (I find the
term client here confusing; the remote user is usually referred to as the
client.)
The NAS collects
identity and authorization tokens (i.e., user names and passwords) from the
remote user attempting network access, and passes that to the RADIUS server.
The RADIUS server then replies with “access allowed” or “access denied” to the
NAS, which either informs the remote user (and possibly allowing them to try
again) or dropping the connection.
The RADIUS RFC
defines PAP, CHAP, and Unix login as the authentication methods, but they
allowed for extensions for other methods. Those are defined in other RFCs (such
as RFC-3580 for EAP (802.1X) authentication) and may or may not be supported by
a particular vendor’s RADIUS implementation.
When a NAS blocks a
connection from a remote user, it can disable further access attempts by that
user. The block may require a SA to manually unlock the account, or the block
may be lifted automatically after some period of time, 15 to 45 minutes is
typical but 24 hours is not uncommon. When the block is automatically cleared,
the process is called shunning and we say the blocked user is shunned.
RADIUS encrypts
only the password in the access-request packet, from the NAS to the server.
The remainder of the packet is unencrypted. Other information sent between
the NAS and RADIUS server (such as username, authorized services, and
accounting) are not protected from eavesdroppers.
RADIUS is common and
well supported by connection (client) software.
RADIUS combines
authentication and accounting with authorization. The “access granted” (user
authentication) messages sent by the RADIUS server to the NAS contain the
authorization information too. This makes it difficult to decouple
authentication from authorization (and accounting), or to provide fine-grained
authorization (and accounting).
But if your
organization uses a different authentication service (say Kerberos or LDAP) you
don’t want to have a separate database of users and passwords just for remote
access. Fortunately most RADUIS servers can act as a proxy to other types of
authentication services.
RADIUS Protocol [From: www.cisco.com/en/US/tech/tk59/technologies_tech_note09186a00800945cc.shtml]
Typically a user
login consists of a query (Access-Request) from the NAS to the RADIUS
server and a corresponding response (Access-Accept or Access-Reject)
from the server.
The Access-Request
packet contains the username, encrypted password, NAS IP address, and port.
The format of the request also provides information about the type of session
that the user wants to initiate. For example, if the query is presented in
character mode, the inference is “Service-Type = Exec-User” If instead
the request is presented in PPP packet mode the inference is “Service Type = Framed User”
and “Framed Type = PPP”.
When the RADIUS
server receives the Access-Request from the NAS, it searches a database for the
username listed. If the username does not exist in the database, either a
default profile is loaded or the RADIUS server immediately sends an Access-Reject
message. This Access-Reject message can be accompanied by a text message
indicating the reason for the refusal.
In RADIUS,
authentication and authorization are coupled together. If the username is
found and the password is correct, the RADIUS server returns an Access-Accept
response which includes a list of attribute-value pairs that describe the
parameters to be used for this session.
Typical parameters
include service type (shell or framed), protocol type, IP address
to assign the user (static or dynamic), access list to apply, or a static route
to install in the NAS routing table. The configuration information in the
RADIUS server defines what will be installed on the NAS.
Since RADIUS is now
used for more than just modem access there are RCFs to describe extensions to
the parameters that can be used. These parameters provide the authorization
data to the NAS (or RADIUS client).
Separate messages are
used to add log messages. A RADIUS server can accept “users started session”
and “user ended session” messages from its clients. This is the extent of
accounting support in RADIUS.
TACACS+
TACACS+ is a protocol which
provides access control for routers, switches, network access servers and other
networked computing devices. The original TACACS is defined in RFC-1492 but despite
the name is not compatible with the modern, widely used TACACS+.
The protocol was
widely used but the original documentation never stated what TACACS stands
for. The best guess is Terminal Access Controller, Access Control System.
TACACS+ is based upon a Cisco
extension to TACACS they called XTACACS. There is no RFC for TACACS+!
However there is a draft RFC that was never given a number, at tools.ietf.org/html/draft-grant-tacacs-02.
Despite the lack of an official standard, TACACS+ is widely used with routers
and other network equipment, perhaps due to Cisco’s market dominance.
Oddly, Cisco no longer implements
TACACS+. (I guess they got miffed when it didn’t become an official RFC.)
Today Cisco uses “Cisco Secure ACS”. However other network equipment
manufacturers such as Juniper do support TACACS+, and there are open source implementations
available as well for all common platforms.
TACACS separates AAA
from authentication. For example, with TACACS it is possible to use Kerberos
for authentication and TACACS for authorization and accounting. After a NAS
authenticates on a Kerberos server, it requests authorization information from
a TACACS server without having to re-authenticate. (The NAS informs the TACACS
server it has successfully authenticated the user, and the server then provides
just the authorization information.) During a session, if additional
authorization checking is needed the NAS checks with a TACACS server to
determine if the user is granted permission to use a particular command
This provides greater
control over the commands that can be executed on the access server while
decoupling from the authentication mechanism. (RADIUS supports trivial
authorization and accounting).
TACACS+ uses TCP.
That means you don’t need to configure timeouts as with RADIUS. Also the
entire message is encrypted, not just the password.
Diameter
There are many
extensions to RADIUS around, I think Cisco calls theirs “RADIUS+” but there is
no RFC for that. (There is an RFC for MS-RADIUS!)
The “official”
successor to RADIUS is called diameter, defined in RFC-3588. The
name is a pun; in geometry a diameter a twice the radius, so radius2 = diameter.
In many ways,
diameter seems to have incorporated the best features of RADIUS and TACACS+, into
a single service, backed by an IETF RFC standard to ensure inter-operability.
Diameter uses TCP not
UTP, and encrypts the whole message using either TLS or IPsec.
While RADIUS provides
a very limited set of messages (so accounting and authorization is very course-grained)
diameter provides a larger and extensible set.
Diameter doesn’t seem
to be widely adopted at this time (2008).
Lecture 38
— Securing Network Services: LDAP, DNS, email
Securing
LDAP
xxx
Securing
DNS
A DNS resolver is called open
if it provides recursive name resolution for clients outside of its
administrative domain. Open DNS resolvers are a bad idea for several reasons:
·
They allow outsiders to consume resources that do not belong to
them.
·
Attackers may be able to poison the cache of an open resolver.
·
Open resolvers are being used in widespread DDoS attacks with
spoofed source addresses and large DNS reply messages.
As with open SMTP relays, open DNS
resolvers are now being abused by miscreants to further pollute the Internet.
You can check your site for an open
resolver at dns.measurement-factory.com.
OpenDNS provides encrytion of the
“last mile” (the network between a client host and an ISP. for DNS queries and
replies. This prevents all sorts of attacks,
DNS rebinding attacks, DNS cache
poisoning
To mitigate these attacks, use
DNSSEC and validate the results, and ignore any DNS records passed back which
are not directly relevant to the query. Use source port randomization for DNS
requests, combined with the use of cryptographically-secure random numbers for
selecting both the source port and a 16-bit nonce, can greatly reduce the
probability of successful DNS race attacks.
BIND allows limiting by IP address
who can do a zone transfer. Only a sNS should be allowed to do a zone xfer
from the pNS, and no one should do zone xfers from a sNS. However, since
hackers are good at faking IP addresses you can also use TSIG, a shared secret
password between pNS and its sNSes.
TSIG can also be used
between local (PC) resolvers that don’t or won’t support DNSSEC, and local
caching DNS servers. TSIG RRs are used for authentication between DNS entities
that have established a shared secret key. TSIG RRs are dynamically computed
to cover a particular DNS transaction and are not DNS RRs in the usual sense;
they are an HMAC (such as HMAC-MD5) for the request and another for the reply.
See RFC-2845
for a good overview (and reference) of TSIGs.
DNSSEC
A secure version of DNS, DNSSEC,
uses cryptographic electronic signatures signed with a trusted digital
certificate to determine the authenticity of data. DNSSEC can counter cache
poisoning attacks, but as of 2008 is not widely deployed. (As of 2017, it is
widely deployed but almost completely incorrectly.) There are a number of objections
to the current version, which requires all DNS info to be available to anyone;
this is considered illegal in many countries.
In order for DNSSEC to work, the
complete naming hierarchy must be signed. So if a server wants to make sure
that example.com really maps to 192.0.2.32,
it needs to check the signature for the example.com
and also .com and “the dot” or
the root of the DNS hierarchy. ISPs such as Comcast will take care of domain
signing such as for example.com. Verisign will sign .com and .net
in 2011 and others, such as .org
and .se, have already signed
their zones. The DNS root is expected to be signed in July 2010. Until then,
ISPs use an ad-hoc list of trust anchors maintained by IANA.
To work-around the
issue of not all parent zones up to the root are signed, a DNSSEC domain lookaside
validation (DLV) system is in place, where additional “top” public keys
can be trusted, as the root of a chain of trust. Eventually, look-aside won’t
be needed.
When validating a
RRSIG, if no DS record is in the parent zone, the resolver will look for a DLV
record named “example.com.dlv.isc.org.”
(assuming you use the ISC.org DLV registry). That RR is used in lieu of the
parent zone’s DS RR.
To make that work,
instead of uploading your generated DS record to your parent zone, you upload
your DLV record to your chosen DLV registrar (usually ISC.org) you list in named.conf. dnssec-signzone generates the DS record automatically
(and saves it in a file). To make it generate a DLV record too, add the option
“-l dlv.isc.org.” to the
command.
(Update: ISC
has decommissioned its DLV registry as of 9/30/2017.)
Cryptographic authentication of DNS
information is possible through the DNS Security (DNSSEC-bis) extensions,
defined in RFC 4033, RFC 4034, and RFC 4035. All the additional signature
information bloat the DNS replies, and if large enough the query and response
will use TCP rather than UDP. (DNS has always been defined to be able to use
either, but mostly UDP has been used and many SAs haven’t enabled the TCP port
in their firewalls.)
Fedora’s BIND now
uses DNSSEC by default for TLDs that support it.
BIND’s DNSSEC requires keyset files
(that is, a zone’s public and private keys) to be in the working directory of
named (usually the directory containing the zone files).
A child zone’s security status must
be indicated by the parent zone or a DNSSEC capable resolver won’t trust its
data. This is done through the presence or absence of a DS record at the
delegation point. For other servers to trust data in this zone, they must
either be statically configured with this zone’s zone key, or the zone key of
another zone above this one in the DNS tree. This is similar to the chain
of trust used in PKI.
A secure zone must contain one or
more zone keys. The zone keys will sign all other records in the zone,
as well as the zone keys of any secure delegated (child) zones. Zone keys must
have the same name as the zone and a name type of ZONE. While you can use
different types of keys, it is best to use a cryptographic algorithm designated
as “mandatory to implement” by the IETF, so you know all DNSSEC capable servers
and resolvers can use it.
The
steps to implement DNSSEC:
1. Generate two
keypairs, a key-signing key (KSK) and a zone-signing key (ZSK). The
ZSK is used to sign all records except for the ZSK’s public key (DNSKEY record); that one record is
signed by the KSK, whose public key must also be included in the zone data in
another DNSKEY record.
The following command will
generate a 2048-bit RSASHA512 key for the example.com
zone (cd into /var/named/chroot/var/named/ first):
dnssec-keygen -a RSASHA512 -b 2048 -n ZONE \
-f KSK example.com
dnssec-keygen -a RSASHA512 -b 2048 -n ZONE \
example.com
Two output files will be produced
for each command: Kexample.com+010+12345.key
and Kexample.com+010+12345.private
(where 12345 is an example of a key tag, and is different for each
keypair). The key filenames contain the key name (example.com), the algorithm (+010 is RSASHA512), and the key tag (+12345 and +67890 in this case). The “-f KSK”
identifies the first keypair as a KSK and not the default of a ZSK (the second
keypair).
Note: currently, you
only should sign the forward zone, not the *.in-addr.arpa
one.
2. Include the two
(public) keys in the zone file. The private keys (in the .private files) are used to generate
signatures, and the public keys (in the .key
files) are used for signature verification by clients. The public keys should
be inserted into the zone file, usually by including the .key files using $INCLUDE statements:
$INCLUDE Kexample.com+010)12345.key; KSK
$INCLUDE Kexample.com+010)67890.key; ZSK
3. Sign the zone,
which adds some RRs to the zone and generates a dsset-zonename
file that contains the DS record
you need to send to your parent zone (and which they will have to sign).
Assuming the zone file is db.example.com:
dnssec-signzone -o example.com \
[ -e yyyymmddhhmmss ] [ -n increment ]\
-k Kexample.com+010_12345 db.example.com \
Kexample.com+010+67890.key
One output file is produced, db.example.com.signed in this case. “-o” specifies the origin (zone name),
“-e” is the date when the data
expires, “-n increment” automatically increments
the serial number in the SOA record, “-k”
specifies the KSK. Options are followed by the zone file and the ZSK file.
4. Reconfigure named.conf to use the signed
version(s) of the zone file(s).
5. Insure named both sends DNSSEC commands and
validates received DNSSEC signed RRs, by enabling the following three options:
options {
dnssec-enable yes;
dnssec-validation yes;
dnssec-lookaside auto;
}
(“lookaside” is an interim measure
since not all parent zones are signed, all the way up. This allows (for now) additional
root keys to be trusted.)
To enable named to respond appropriately to DNS requests from
DNSSEC aware clients, the option dnssec-enable
must be set to yes in named.conf. To enable named to validate answers from other
servers, dnssec-validation must
be set as well.
6. Upload the dsset
records (look for “dsset-example.com.”)
to your parent zone registry; they will need to sign them before DNSSEC fully
works.
In older versions of
BIND, some trusted-keys
must be configured into named.conf
for the look-aside validation to work. These are copies of DNSKEY RRs for
zones that are used to form the first link in the cryptographic chain of trust.
The configuration looks similar to this:
trusted-keys {
/* Root Key: */
"." 257 3 3 "BNY...";
/* example.com key: */
example.com. 257 3 5 "Aw5...";
/* Key for our reverse zone: */
2.0.192.IN-ADDRPA.NET. 257 3 5 "AQOn...";
};
7. Test your
stuff: Restart named, then try
this:
dig +dnssec www.example.com
That should return both an A record as well as an RRSIG record, and the “flags” section shows “ad” (meaning authenticated data)
that says DNSSEC worked. (If the DS record is not found in the parent zone,
you still get the RRSIG records in the response but not the ad flag.)
8. The signed
records expire every 30 days by default. (The two big numbers at the start of
RRSIG records are the record’s birthdate and expire date.) You must rerun dnssec-signzone before then, or
the server will refuse to serve the data!
9. Your two keys
should be replaced every so often, to prevent determined hackers from
compromising (stealing) them. With stronger hashing methods (RSASHA512) or
longer key lengths (2048 or 4096), you can afford to change keys less often
than with weaker methods (RSASHA1) and shorter keys (1024 or smaller). A
common recommendation when using RSASHA1 is to change the keys every 3 months
with 1024-bit keys, and every year with a 4096-bit keys. (See RFC-6781
for some guidance on this.) I have also seen recommendations for ZSK lifetimes
of 21 days. (Personally, I think strong crypto + long keys = large lifetime.
I dearly wish I could find recommendations for a year or longer, but I haven’t
found many recommendations at all.)
Be cautious when
choosing key lengths and algorithms; newer algorithms may not be widely
available yet and thus your DNS data won’t validate. Many DNS systems have
limits on key lengths allowed as well (such as these limits
from Google Cloud).
Changing the keys (“rollover”) is
problematic since old DNSKEY records might be cached, and thus the newly signed
RRs won’t validate. RFC-7583 describes
how to do these roll-overs, which can be automated.
Lecture 39
— Securing FTP
FTP (file transfer
protocol) is an old protocol designed without security as a goal. It uses
two TCP connections between a client and server. The command connection
is from client to port 21 on server. Data is transferred via a second channel,
which can be established in one of two ways:
Using active mode
the client picks a random unprivileged port and tells the server, which then
initiates a TCP connection from port 20 to the chosen port.
In passive mode
the server picks a random unprivileged port (not 20), tells the client who then
initiates a TCP connection from a random port >1023 to the server’s chosen
port.
Demo with ftp -vd.
Q: Which mode works
better with (most) default firewall setups? A: passive mode, since it only
needs to permit clients to initiate connections.
FTP cannot be made
secure. Attackers can hijack a session to corrupt files on the server, or
download them without knowing a password. Also note usernames and passwords
are sent in cleartext on the command channel, and data is also sent
unencrypted.
Active mode is a bit
harder for attackers to mess with but requires a packet filter firewall on the
client side to allow the incoming connection, and the service-side firewall to
allow outgoing connections. Since most default (client-side) firewalls don’t
do egress filtering passive mode is often used.
Ideally, you
should use HTTP servers instead for anonymous file download, and scp or sftp
(or HTTPS) for secure file transfer. (HTTPS supports upload and
download securely, possibly using WebDAV or a CMS (content management system),
Wiki system, or something else such as Git over SSH.
FTP should only be used with
anonymous FTP to permit downloading of selected read-only files. The common
wu-ftpd server has a history of security vulnerabilities and should be replaced
with proftpd or vsftpd. Set it up in a FreeBSD jail, Solaris zone, or
at least in a chroot environment.
Most modern firewalls (including
iptables) can snoop the FTP command channel and open an appropriate port for
the data channel. This permits the use of egress filtering with active mode.
Bonus
Lecture — Securing print services, printer quotas
xxx