In the output of ls -l, the 11th column (the first after the permissions) is normally a space. But it can be some other character to indicate the presence of ACLs (a plus), SE Linux labels (a period), attributes, or extended attributes. The characters are not standardized. For the Mac OS X Unix, the output of ls -l includes:
@ — the presence of extended
metadata, see it with “ls -@”
+ — the presence of security
ACL info, see it with “ls -e”
The mdls(1) command might also be if interest for another view of the metadata. The metadata is stored in a file that begins with ._ (dot underscore) and then the normal filename. So the metadata for file.txt would be found in ._file.txt.
To change your password at any time, use the interactive passwd command (see also pwgen and apg; not standard programs). (Short of writing a C program, there is no standard way to non-interactively set passwords, so you can’t batch add user accounts! There are non-standard ways, however.)
script — saves a transcript of your shell session to a file. Filter (some) unprintable stuff with col command.
screen — Start work in class, detach session, go home/work, attach session, continue working! Also supports logging (transcript) of the session to a file.
Getting help — man pages and other resources
A man page (or manual page) is a quick reference sheet for some topic. Man pages are organized into sections of related topics (user commands, administrative commands, file formats, etc.) If some topic has a man page available, it is often written with the section number in parenthesis, like date(1) or reboot(8).
Not all systems have identical sets of man pages (because not all systems have identical commands). Even the number and purpose of sections can differ between systems. For example on Solaris an administrative command is in section “1M”, so you’ll see a reference to reboot(1M) on that platform. On Linux section 8 is used.
A given topic may have multiple meanings and thus appear in several sections. To see a list of available man pages for a given topic, plus a brief description, use man -f word. This is equivalent to whatis word. The word may be a topic or any word in the brief description of a topic. (Try whatis open.)
To view a particular man page when several have the same topic, you need to specify the manual section as well, or use “-a” to show all matching pages. To specify a manual section on Linux use man secNum topic (1=user commands, 5=file formats). On Solaris use man -s secNum topic, sec 4=file formats.
Use whatis intro to see a list of sections. Then read each intro. Discuss man -k topic (demo fifo) which is equivalent to the apropos command.
All man pages are divided into more or less standard sections (and possibly sub-sections). Not all man pages have the same sections, and not all man page authors use the same section names (e.g., “INTRODUCTION” vs. “BACKGROUND”, “DESCRIPTION” vs. “OPTIONS”).
The most important sections are the NAME section, which lists the command or topic and the brief description, the SYNOPSIS, which lists the legal use of a command or library function, and the DESCRIPTION (and/or Options) section. Other sections include OUTPUT, RETURN VALUES, ERRORS, USAGE, EXAMPLES, ENVIRONMENT VARIABLES, EXIT STATUS, SEE ALSO, BUGS, and AUTHOR. (Few pages will have all sections, and may use other names!)
Understanding SYNOPSIS syntax: “[]” (optional), “|” (separates mutually-exclusive choices), “...” (can repeat item on the left), and sometimes “{}” (list mutually-exclusive options, when at least one is required; this is rarely used). The synopsis syntax is described in the SUS standard. Discuss and demo these when showing the man pages listed below.
Demo man pages for who. Discuss meaning of the terms command line options, switches, arguments, and parameters. Show how to combine one-letter options. For who(1) discuss and demo: -H, -i, -Hi, ...
The words following the command name are called arguments or parameters. The word parameter is ambiguous because shell (or environment) variables are also known as parameters (e.g., positional parameters, parameter expansion, special parameters). According to POSIX, a variable is a parameter that uses a word for the name, not a digit or symbol. So “$foo” is a variable, and “$#” is a parameter.
Many commands take special arguments called options (or switches) that alter the command’s behavior. Options are usually a single letter each, preceded with a dash. Some commands support long option names, (usually) preceded with two dashes. Single letter options can be combined into a single word, with a single initial dash.
To keep the discussion as clear as possible I refer to the words on the command line as either options or (non-option) arguments. Usually options are listed first, followed by the arguments, which are often a list of filenames.
Some options require (or permit) an argument. Most single letter options with arguments permit a space between the option and the argument. (The space is required when the argument might be confused with additional one letter options; Is -xyz the option -x with argument yz, or the options -xy and the argument z, or three options?) With long option names, the argument must be separated with a space, or more commonly with an equals sign: --longoption=argument.
POSIX has standardized the common convention of having “--” indicate the end of options and the start of (non-option) arguments. This is useful when an argument may start with a dash. (The shell still supports the older convention uses a single dash.)
Discuss more and less commands: spacebar for next page, b for back, q to quit.) Consider using man man.
Discuss other sources of help: info (from FSF; demo info mkfifo), help (Bash only), /usr/share/doc/*, http://www.tldp.org/.
Files and Directories
Filenames (any length, any chars except “/” and null, avoid weird chars, spaces, and leading dash; note extensions not recognized by OS). .name (dot-file) is hidden.
The 8th issue of the POSIX/SUS standard will likely forbid newlines in filenames. This is because many utilities produce a list of file names, one per line (e.g., find). Also, avoid NTFS forbidden characters, and those that could confuse other commands (a colon in a filename would confuse scp while an equals sign would confuse awk, for instance).
Show hierarchy: top=“root” spelled “/”.
A filename with slashes (forward) is a pathname. The slash separates the components: directory and file names. (A filename can be thought of as a simple pathname.) Directories allow (logical) groupings of files in the hierarchy. (Show relationships: parent, child, and sibling.)
Complete (absolute) and partial (relative) pathnames (Qu: What’s the difference? Ans: starting slash). Extra slashes in pathname allowed, incl. trailing slashes for a directory. pwd, mkdir, rmdir, cd. (cd<enter> takes you home, cd - takes you back to where you just were.)
In a shell script, a common mistake is failing to check the exit status of a cd command. That is dangerous since subsequent commands that create, delete, or just list files in the current directory will be operating in the wrong one.
Qu: Must filenames be unique? Ans: only absolute pathname must be.
Working directory (aka cwd, ... spoken of as “in” some directory), home directory, root directories (per disk partition, per system (“/”), and /root home dir), the . (current dir) and .. (parent dir) directory entries.
Some directory commands: ls (-a, -d, -R), pwd, cd, mkdir, rmdir (rm -r).
Pathnames are subject to certain limits on allowed characters, length of each component, and overall length. Also there is the issue of using “..” in a pathname. Often what is needed is the canonical representation of a pathname (for portability, or to compare with another). You can use the standard pathchk [-p] utility for to make sure a pathname is valid; it returns an error message (and exit status) if there is a problem with that pathname on your system.
To convert a pathname to a canonical form, use the Gnu utility:
readlink -f bad_pathname
Or you can use a pure POSIX/SUS solution, which is much uglier:
fullname=$(cd -P -- "$(dirname --
"$file")" &&
pwd -P) && fullname=$fullname/$(basename -- "$file")
Or use this solution (which doesn’t always work, but usually will):
LINK=$(\ls -dl link)
printf '%s\n' "${LINK#*-> }"
Gnu readlink command has an option “-m” that works even when the symlink points to a non-existent file. Another useful command to know is symlinks, which will scan directories and report on all symlinks found. (Demo “cd /var; symlinks .”)
In addition to this use of dirname and basename, you can use “basename path suffix)”. This strips suffix from the filename and can be used for things such as:
c99 "$file" -o $(basename -- "$file" .c)
You can achieve a similar effect using parameter substitution: “${file%.c}”.
Lecture 3 — The vi Editor (and vim)
Because of the fundamental idea of *nix that most files contain text you will find yourself creating and editing text files often. Shell scripts too are just text files. Working efficiently with large files or many files, or quickly performing complex text processing, requires a powerful text editor.
While simple Notepad-like editors do exist (such as pico and nano), they are not efficient when working with large files or when performing complex text processing tasks. Today the standard power editor used on *nix certification exams is vi or its descendant, vim (Vi IMproved). Vi commands are used in other utilities as well, such as less.
Initially text editors were designed to work on teletypes (limited keys, rolls of paper, and no CRT). One early editor (still available) is ed. A more powerful editor was ex. Later when CRTs became available a visual mode was added to ex. You can start the editor in open (ex) mode with ex file, or in visual mode with vi file. You can then switch back and forth between these modes.
Today vim is widely used in place of vi. It is mostly compatible with vi but with many extra features. To learn vim interactively, start it with the command vimtutor. (It takes about 30 minutes to work through.)
The vim command has many names, and works differently depending on the name used to start it. In addition to vimtutor, you can also use vi, ex, view (read-only), gvim and gview (GUI), evim and eview (“easy” mode; use ^O to type a command), and rvim, rview, rgvim, rgview, revim, and review (restricted mode). There are others too, such as vimdiff. You may have to install additional packages to have all these available, but (except for the GUI mode) there are command line option equivalents.
Start vim (with and without filename(s) listed). Note on Linux, vi is a link to vim. You can list multiple files on the command line: vi foo bar boz. vim opens the first; when done you can edit the next one listed by using the :n or :wn commands. To review the filenames listed, use :args (or :arg). To start editing the listed files over again use :rew. Change the args list with :args files (can use shell wildcards).
When starting vim the named file is copied into RAM (called the buffer). As you make changes, only the buffer is changed. When you use :w[rite] command the buffer contents are written back to disk. (There is an auto-save feature too; see “autocmd”.)
Modern vim supports multiple buffers at once. You can either switch between them, or use window commands to split the window into sub-windows (panes), each a different buffer.
Vim commands come in different types. There are commands to move the cursor around the buffer, including searching commands. These are called cursor movement commands or simply movement commands. There are other commands to change settings, to copy files to/from buffers, to manage window panes, to insert, delete, or change text, and commands to format the text in various ways. There are also some miscellaneous commands that don’t fit neatly into any category (such as undo).
The editor has modes. In command mode (or normal mode), the keystrokes you type mean commands. In other modes such as insert mode your typing is considered data to add to the buffer. There is also a replace mode similar to insert mode but using type-over to replace rather than insert text. Vim actually has about a dozen modes, and the same keystroke may have different meanings depending on the current mode. (Note this use of mode is unrelated to the earlier use of open mode and visual mode.)
You hit the escape key to switch from any mode to command mode (and to cancel a partially entered command).
You enter replace mode with “R” or “[num]s” (num characters will be replaced—substituted—with what you type).
You enter insert mode with any of the following: a, A (append after current cursor/end of line), i, I (insert in front of current cursor/beginning of line), o, or O (after or before current line—opens a line).
Although there are GUI versions of vim with menus for the commands (including for Windows) all commands can be typed in. Many are a single letter but some are longer sequences. As the original vi used nearly every letter and symbol for commands, the many new ones introduced in vim generally (but not always) are two letter sequences.
Some commands require you to enter line ranges or filenames or other stuff. Generally such commands start with a colon (“:”) which causes the cursor to jump to the last line of the window. These commands don’t take effect until you hit the enter key. (This is sometimes called last line mode but it is really just part of command mode. Such commands are just the older ex open mode commands.)
Cursor Movement and jumping commands
The most basic movement commands are the arrow keys. Touch-typists generally prefer the h, j, k, and l (left, down, up, right) commands since you don’t have to move your hands. Also space, enter (and +), - (minus), and backspace keys move the cursor. Other Cursor movement commands: w, W (forward one word), b, B (back one word), e, E (end of word), ge (end of previous word), ) and ( for next/previous sentence (any [.!?][])}]*[[:space:]] ends a sentence), } and { for next/previous paragraph (a blank line separates paragraphs).
All these movement command can be preceded with a number, to repeat. So “3w” means to move three words forward.
Other movement commands move the cursor some place specific, so should not be preceded with a number: 0, $ (beg/end of line; [HOME] and [END] keys usually work for this too), [num]G (go to line num or last line), 1G (same as gg), H, M, L, num| (go to column num), % (matching parenthesis).
You can set bookmarks with mchar and later jump to a mark with `char and 'char (jumps to beginning of marked line). Use :marks to view bookmark list.
A jump is one of the following commands: ', `, G, /, ?, n, N, %, (, ), [[, ]], {, }, :s, :tag, L, M, H, and the commands that start editing a new file. If you make the cursor “jump” with one of these commands, the position of the cursor before the jump is remembered in a list. You can return to a previous position with the '' or `` command, unless the line containing that position was changed or deleted. CTL+O moves the cursor to a previous jump position in the jump list, tab (CTL+I) to the next position in the jump list. Show the list with :jumps (see also :changes).
^] and ^T (jump to /return from tag under cursor). A separate tags file is used to list identifiers and their file/line/column. This file can be generated automatically for a directory of programs in a variety of languages using the *nix command ctags (or Gnu Global, or gtags), or you can create it manually (vi/vim can’t create the tags file, but it has a simple format). Note the vim help feature uses tags. You can jump to any tag using :tag name, and view a list of known tags with :tags.
Searching
Searching with /RE,
?RE (reverse
search), n (repeat last search same direction), N (repeat last search in the opposite direction).
fchar, tchar
(jump (almost) to char on current line), ; (repeat), , (repeat
backwards). A * searches for the word under the cursor.
Data Changing Commands
Many vi/vim commands follow this pattern: [count]operator[count]movement. For example d) means delete to end of sentence, and >} means indent to the end of the paragraph. Repeating the command letter is a shortcut to specify the whole line as the movement, so “yy” copies the current line, and “d5d” deletes five lines.
The following operators are available (M means [count]motion):
["R]cM change (copy, then replace)
["R]dM cut (delete)
["R]yM copy (yank) into register (does not change the text)
["R]p paste (also P to paste in front)
~ toggle case of current char (and advance cursor 1 char)
g~M toggle case
guM make lowercase gUM make uppercase
!Mcmd filter (and replace) through an external program
gqM text formatting (re-format selected text according to formatoptions)
g?M ROT13 encoding
>M shift right <M shift left
If the motion includes a count and the operator also had a count before it, the two counts are multiplied. For example: “2d3w”, “3d2w”, “6dw”, and “d6w” all delete six words.
When changing data, you can specify (in vim, not vi) a text selection, not just a motion. This selections include aw (a word), as (a sentence), ap (a paragraph), and iw, is, and ip. These select the whole word/sentence/paragraph the cursor is in; with aw/as/ap, the trailing white space is included in the selection. With iw, is, or ip, only the inner word/sentence/paragraph is selected. So if the cursor is on the h of line “this is easy” and you type “ciwthat<ESC>”, the line becomes “that is easy”.
When text is cut or copied, it is saved in a register (a clipboard). The last 10 items are saved in registers "0 through "9. You can also put stuff into named registers (one-character names only), by prefacing the command with “"register”. For example, “"adas” will cut the current sentence into regisiter a. Use :reg to view the contents of the registers.
Using ranges
A range is a list of lines to apply a command to. Only commands that start with a colon (“Ex” commands) can use a range, which may be zero addresses (defaults to current line), one address (just that line), or address,address (all lines between the two addresses, inclusive). An address is a line number, “.” (the current line), “$” (the last line), “address+num” or “+num”, “address-num” or “-num”, or “/RE/” (all lines that match the RE). A “%” is a short-hand for “1,$”. When using + or - (an offset), num defaults to 1 if omitted, and address defaults to “.”.
You can also use 'mark for the line specified by the bookmark. More complex examples: “/RE1/,$” and “/RE1/+1,/RE2/-1”.
Many colon commands can use a range:
:range d (deletes (cuts) whole lines specified in the range; ex: :1,10d or :.,$d for current line to the end). (See below for more complex cases.)
:range s/RE/replacement/flags — search and replace. By default only the first match per line is replaced; use “g” flag to replace all matches, and “c” to confirm each change. “e” means to ignore errors (useful in more complex cmds.)
REs (discussed in detail later): \< and \> (start/end of word), [^list] (any char not in list), \s and \S (white-space and non-white-space char), \e (escape), \t (tab), \r (return) \n (newline), \b (backspace).
:range g/RE/cmd — Run the vi/vim cmd only on the lines in range which match the RE. (Also :g!/RE/cmd to run on lines that don’t match RE.) Some examples include:
:.,.+9g/foo/d Delete
lines containing “foo” with 10 line range
:.,.+9g/foo/s/x/y
Change x to y on lines containing foo, in
range
:.,.+9g/^/exe
"normal! 10\<C-A>" Add 10
to the first number on each line, in range. (This is how you can execute
normal (non-colon) commands with :g. In this
case, “10ctrl-A” to add 10 to the first number on the line, if any. CTRL-X
decrements.) Note that numbers with leading zeros are treated as octal by
default; change the nrformats setting to empty (“:set nrformats=”) to stop that.
:range w [file] (save range lines (to file))
:range y [register] (save range lines (to register))
:line p [register] (put/paste lines (from register) after line)
:range t [address] (copy range lines below address)
:range m [address] (move range lines below address)
:range j (join range lines into a single line)
:range norm commands (run the
Normal mode commands on each line),
for example: .,.+4norm
gUU
:range ce (center), :range ri (right align), :range le (left align)
:range co address (copy range lines
below line address, often “.”)
:range mo address (move range
lines below line address)
Using argdo and colon command shortcuts
:argdo %s/\<foo\>/bar/ge | update
argdo runs commands (separated with pipe) on all files in the args list. Here, all (“g” flag) words “foo” will be replaced with “bar” in every file in the args list. If any changes are made the files get saved (”update”). See also :windo and :bufdo.
On the Ex (colon) mode line, you can scroll through the Ex command history using up and down arrows. TAB auto complete works as in DOS (cycle through each possible match); ^D shows a list of possible matches. “:partailCmd<Up>” scrolls through the history, only showing possible matches.
Other vi/vim commands
Use :help and :options. ^Wq closes current window (so does :q and :close), ^Ww (or ^w^w) moves to next window, :Ws (or :split) to split current window into two. :new or :Wn for new window.
^e and ^y (scroll up/down 1 line), ^u and ^d (scroll up/down 1/2 page)
zenter, z-, and z. (or zz) means to scroll current line to top/bottom/middle
^ONormalModeCommand (From input mode, run one command; example: “^Ozz” will center the current line in the window.)
K (lookup word under cursor in man pages, handy when scripting)
* (search for the next occurence of the word under the cursor)
^g (show status)
^r register (in input mode or with a “:” cmd, pastes the contents of register)
ga (show ASCII for char under cursor)
Many other vim commands start with g. To list them, try :help g
^Vchar means to insert char literally (try inserting tab, newline, or control chars)
^L (redraw screen)
. (a period) means to repeat last change. (Common use: n.n.n. ...)
Note, using dot is a good reason to plan your changes, so repeating the last change does what you want. Also, note that using cursor movement while in input mode ends one change and starts another.
@: means to repeat the last Ex (colon) command, on the current line.
:cmd1 | cmd2 means to run the Ex cmd1, then run cmd2.
:e file means to edit file instead.
:!cmd means to run external cmd. (See also !Mcmd, above.) In the command, you can use “%” to mean the current filename.)
:!! means to repeat the last external cmd.
:read arg (paste from arg, arg = a filename or !command)
:ab (abbreviations) save typing by allowing you to define a short word to expand to a longer phrase. While this can be done in any mode, use :iab word phrase so word only expands in input mode (and :cab to cmd mode only). Example:
:iab SA system administrator
:map is similar to :ab but instead of a text phrase you can define any sequence of vim commands. :imap and :cmap for input mode/cmd mode. There are cmds to list abbreviations and maps (:ab and :map), to clear them, etc.
:map word list-of-cmds Defines a macro, for example:
:map <F2> GoDate: <Esc>:read
!date<CR>kJ
:iab ,t <table border=0 cellpadding=4>
:imap \p <Esc>o\<P>\</P><Esc>3hi
(Notice how function keys, enter key, and the escape key are entered as a sequence of 4, 4, and 5 characters). You can map any keys or sequence of characters. If that is already used the old function can’t be used. Note F1 is already used. Often backslash-char is used, or comma-char. Much more complex macros are possible.
ga shows the numeric value of the character under the cursor. This can be useful to convert, for example, curly quotes, non-breaking spaces, or em-dashes to ASCII equivalents. For example, run “LC_ALL=POSIX vim file”, then search for “/[^{:print:]]” to find a non-ASCII character. Type “ga” to get the Unicode value, say 201c (left curly quote). Now do “:%s/\%U201c/"/g” to convert them all to straight quotes. Repeat for other non-ASCII characters. (You might use recode or iconv instead, if you know the encoding used, to convert to ASCII.)
Some settings: on/off is :set name/noname, others are :set name=value. (:if too.) Vim-only settings without “set”. “:se all” to view. Some settings:
set softtabstop=4 " sets soft tab stops every 4 columns
set shiftwidth=4 " hitting tab indents 4 columns
set backspace=indent,eol,start " allow backspacing over everything
set expandtab " convert all tabs to spaces
set autoindent " indent new line to same as previous
set background=dark " use a color scheme good for black background
set laststatus=2 " always show status bar
set ruler " show cursor position in status bar
set showcmd " shows partial commands (e.g., "dd") in status bar
set ignorecase " ignore case when searching
set nohlsearch " don't highlight search matches
set incsearch " use incremental searching
set syntax off " don't use color at all
set fileformat=dos (or unix) " or set ff=dos or unix
set list " show non-printing chars and EOL (as $)
set history=100 " save 100 previous vim commands, default is 20
set textwidth=72 " Wrap at col 72; don’t use wrapmargin in vim
Mention spell, ispell file (aspell check file), fmt. Mention PuTTY keypad mappings, if you have problems using the keypad or other special keys. Mention vi -x (or “:X”) to encrypt, “:set key=” to remove.
Lecture 4 — Shell Features, I18N, Working with Processes
Wildcards a.k.a. globbing, filename expansion and completion: “*” (match anything, including nothing at all), “?” (match any one character), character class or range or list: [list], [!list], []xyz], [!]xyz-]. (Some commands (e.g. rsync) and shells (e.g., zsh, bash4 with shopt -s globstar) use “**” to match slashes too, so that “**/*.txt” would find all files ending in .txt in this and all subdirectories, recursively.)
The term “glob” comes from a Unix v1 command of that name, apparently short for “global”, that expanded wildcards. Later Unix systems had this functionality built into the shell. See man page for glob(7).
If the locale is POSIX, you can use ranges: [0-9], [a-z], [A-Z]. Note “[z-a]” and “[a-Z]” are not legal, but “[a-z0-9]” is fine.
Characters on a command line can be quoted, to force the shell to treat them as plain, non-special characters. These include the glob characters and others such as the newline or semicolon (“;”) that separate commands.
Normal ranges don’t always work! (Bash example: [!A-Z]* with LC_COLLATE=en_US). POSIX doesn’t actually require support for these, due to support of non-ASCII text. These are only guaranteed to work if the locale is set to POSIX (a.k.a.”C”). (For more info, see locales below.)
POSIX Character Classes
For non-POSIX locales, you should use POSIX pre-defined character classes such as “[:digit:]” instead of ranges. (Discussed with regular expressions, below.) So instead of “[!A-Z]” use “[![:upper:]]”. Other examples: [[:digit:][:lower:]$_]. Not all shells support POSIX character classes (but then ranges should work regardless of locale).
Locales: A locale is a definition of language (and encoding, e.g. UTF-8), time, currency, and other number formats, that vary by language and geographical region. Related formats are grouped into categories. *nix systems include a number of environment variables (one per category) you can use to pick these data formats, by specifying a locale for each.
The settings in a locale reflect a language’s and geographic region’s (i.e., country’s or territory’s) cultural rules for formatting data. A locale name looks like lang[_region][.encoding][@variant]. For example “en_US.utf8”. The encoding determines what bytes or byte sequences are valid; on *nix this is also known as a charmap or charset. The charmap also defines names for every valid character.
Only lang is required. “POSIX” (or “C”) locales are always defined but others may or may not be defined on any given system. A locale can also be an absolute pathname to a file produced by the localedef utility.
The POSIX categories and the environment variables for each are:
LC_CTYPE Character classification (letters, digits, ...) and case conversion.
LC_COLLATE Collation (sorting) order.
LC_MONETARY Monetary formatting.
LC_NUMERIC Numeric, non-monetary formatting.
LC_TIME Date and time formats (but not time zones).
LC_MESSAGES Formats of informative and diagnostic messages and interactive responses. (Related to NLSPATH.)
(Additional categories such as LC_ADDRESS or LC_PAPER may be available on some systems.) If some LC_* variable is not set the value of LANG is used to define its locale. If LC_ALL is set, that value over-rides any other LC_* and LANG settings.
Some systems set default locale settings in /etc/*/i18n (older) or /etc/locale.conf (newer), and ~/.i18n.
To portably set your locale, it is best to set the LC_ALL environment variable to C (or POSIX). Setting only (for example) LC_COLLATE has two problems: it is ineffective if LC_ALL is also set, and it has undefined behavior if LC_CTYPE (or LANG if LC_CTYPE is unset) is set to an incompatible value. For example, you get undefined behavior if LC_CTYPE is “ja_JP.PCK” and LC_COLLATE is “en_US.UTF-8”.
Most shell scripts probably should set LC_ALL to POSIX at the top of the script. (You may want to set TZ to UTC0 as well, especially for utilities that record a date in the current time zone, such as diff and tar.) Using the POSIX locale can import performance (otherwise many utils will treat your text as Unicode and not ASCII), and gives consistent and reliable output from utils such as sort.
The standard utility iconv can be used to convert between (compatible) text encodings. Use iconv -l to list all available encodings on your system. (The non-standard convmv command can be used to convert filenames to UTF-8 or another encoding.) Use the -l option for a list of supported codesets/codemaps.
For example, suppose you have an ISO-8859-1 text file, and you want to grep it for some Unicode string. If your string is just ASCII there is no problem. Otherwise, you need something such as this:
iconv -f ISO-8859-1 -t UTF-8 file |grep 'whatéver'
Other than POSIX (“C”), there are no standard locales. Errors result if you set the locale to one that is not available on the current system. (The locale utility can generate a list for any system.) The various locales and charmaps are stored in an implementation-defined directory (or directories); for Linux, this is usually /usr/share/i18n/{locales,charmaps}.
Also, it was discovered in 3/2013 that POSIX locale does not require single-byte encodings (such as ASCII or ISO-8859-1). This was a surprise to the standards group, and work is underway to address that issue.
Gnu recode is non-standard, but may be more powerful and support more types of conversions than iconv.
Encoding of text is a problem since Unicode replaced ASCII: each character still has a number that defines it (a code point), but the range of numbers is 0 to over 100,000. The encoding is the representation of that number as one or more bytes in some sequence. Every text file is encoded, but unfortunately there is no way to determine exactly which encoding was used. If you guess incorrectly, the data will appear corrupted.
There is a non-standard utility encguess that may be able to guess the encoding used for a file, or you can try “file -kr --mime-encoding file”. If you have to guess, I suggest guessing UTF-8. I further suggest you only encode your files as UTF-8.
Linux (at least) has issues with Unicode normalization: it doesn’t handle combining characters. ICU is a popular FLOSS library and set of utilities for working with Unicode. On Linux, you can find and install a package for this (Fedora: “yum install icu”), and use the uconv utility to handle all your Unicode translation/normalization needs. For example:
$ printf 'Ste\u0301phane+Chazelas\x80\n' |
uconv -i -f utf-8 -t utf-8 -x Any-NFKC
Stéphane+Chazelas
(That might not look right unless your locale (LANG) setting is UTF-8 and your terminal emulator correctly works with UTF-8 (PuTTY does).
PHP7 and
newer support ICU:
$ php -r "echo IntlChar::charName('@');" # shows “COMMERCIAL AT”
The following example from the Fedora locale(1) man page compiles a custom locale from the ./wrk directory with the localedef(1) utility under the $HOME/.locale directory, then tests the result with the date(1) command, and then sets the environment variables LOCPATH and LANG in the shell profile file so that the custom locale will be used in the subsequent user sessions:
$ mkdir -p
$HOME/.locale
$ I18NPATH=./wrk/ localedef -f UTF-8 -i fi_SE $HOME/.locale/fi_SE.UTF-8
$ LOCPATH=$HOME/.locale LC_ALL=fi_SE.UTF-8 date
$ echo "export LOCPATH=\$HOME/.locale" >> $HOME/.bashrc
$ echo "export LANG=fi_SE.UTF-8" >> $HOME/.bashrc
I/O Redirection
Most commands (and all filter commands) are not written to read directly from the keyboard. Instead, they are written to read from standard input (“stdin”) and send output to standard output (“stdout”). It is up to the shell to set these when it starts a new command. Where these are connected to is part of the environment (and is exported). By default, these are connected to the keyboard and screen (window). When using redirection characters, the shell will hook these up differently.
Use a pipe (“|”) when connecting the output of one command to the input of another. But what happens if instead of “cmd1|cmd2” you use “cmd1|file”?
It is possible to connect the input or output of a command to (or from) a file instead. In that case never use a pipe, use these instead: < (input), >, >> (append).
Discuss what happens when using > and the named file exists: clobber. Show set -o noclobber (“>|” to over-ride noclobber). Note that the shell processes redirections before running the command, so the clobber happens even if the command never produces any output.
Discuss the problem with error messages and prompts: they should be seen on the screen and not vanish into a file or pipeline. So another output stream was added: standard error (“stderr”). A well-written command will use stderr for error messages and prompts. But you can redirect stderr as well. (Qu: why would you want to? Ans: you start a lengthy job and go out to lunch, or there are so many error messages they scroll off the screen, or the error messages aren’t important and you don’t wish to be bothered with them.)
Internally the various streams are numbered: 0=stdin, 1=stdout, and 2=stderr. (You can define others too.)
The redirection characters can be preceded with a number (unquoted) indicating which stream. The default is stdin (or zero) for “<” and stdout (or one) for “>”. To redirect stderr you must use “2>” or “2>>”.
The word following the redirection symbol is subject to various expansions. (Pathname expansion, a.k.a. wildcards, are only done if the result would be a single word.)
Redirections can be before, after, or in the middle of simple commands. But they must be on the same line as the terminator for complex commands such as command groups (“}”), if statements (“fi”), etc.
When redirection is
mixed with pipelines, the pipeline redirection is processed first. So: command1 >file | command2
will send all output of command1 to file and not through
the pipe.
(Demo: who -e > who.out, who -e 2>who.out, who 2>who.out)
Discuss why “cmd >foo 2>foo” doesn’t work correctly (due to buffering issues) so use 2>&1 instead.
Redirection as described here also works on the Windows command line.
In a shell script, you may want to send output to stderr: echo msg >&2. For security applications, you can use /dev/tty (your console: keyboard and screen or window).
You can redirect to/from /dev/null too (which is a trash can; anything sent is tossed, and is a zero-length file if you try to read from it).
Using “;” as a pipeline terminator (that’s what newline is), you can enter multiple commands on a single line. In this case, the shell will run the first command, and when it finishes run the next.
You can also terminate a command with “&”. In this case, the shell runs the first command in the background and without waiting starts the next: cmd & cmd &.
Pipelines and redirections can cause otherwise built-in commands to run in sub-shells. Not all shells do this, but they can. This can lead to surprising results in cases such as read var when you expect var to be set in the current environment.
Why use redirections when you could pass filenames to commands? For example, consider “awk 'script' infile >outfile” versus “awk 'script' <infile >outfile”:
· Consistent error messages when filename can’t be opened.
· Command is not even started if infile can’t be opened.
· No clobbering of outfile if infile can’t be opened.
· Filenames are less restricted. (For example, filenames containing “=” would confuse awk, as would a filename of “-”.
· Some commands alter their output format when using input redirection as opposed to filenames passed as arguments (e.g., the wc command).
(Even when using redirection, the names of files could be passed as additional command line arguments, or (even safer) as environment variables.)
Of course, there are disadvantages as well (at least with awk):
· FILENAME variable is not populated.
· ARGV[] doesn’t contain the file names.
· Not extensible to running the script on multiple files.
· Not extensible to running the script on a file plus a pipe.
· Not extensible to some scripts using getline.
· Not extensible to re-reading the input file.
here Documents
Here documents (also called here docs) allow a type of input
redirection from some following text. This is often used to embed a short
document (such as help text) within a shell script. Using a here doc is
often easier and simpler than a series of echo or printf
statements. It can also be used to create shell archives (shar
files), embed an FTP (or other) script that needs to be fed to some command
(such as ftp), and a few other uses. Here docs are so useful
many other languages use them, such as Perl and Windows PowerShell.
The syntax is
simple. Use <<word on the command line. Then all following lines
are collected by the shell (and treated as one very big word), up to a line
that contains the word on a line by itself. (No leading or
trailing spaces or tabs allowed!) That word is fed into the command’s
standard input. Here’s an example:
cat <<EOF

This is a here document.  All lines following

the command, up to a line containing the word

(in this case, "EOF") are collected and sent

into the command's standard input.

EOF
The word used as a delimiter can be anything; EOF or END work well and are common, as is “!”. If quoted, the delimiter word can contain white space, as shown here:
cat
<<' END' # starts with 3 spaces
Hello
END
Note the delimiter word can appear inside the here doc, just not on a line by itself. It is possible to have multiple here docs on a single command, but this is rarely useful. The command’s input is redirected from each here doc in order.
Using <<-word (a leading dash) will strip leading tabs (but not
spaces). (You can enter a tab by typing control-v then TAB.) This
feature was intended to allow you to indent here doc bodies to look nicer in a
shell script, but problems with tabs (for example, automatic conversion to
spaces) mean you’re better off not using this feature. Instead, you can use sed instead of cat, and a
script to remove leading spaces:
sed
's/^[[:space:]]*//' <<EOF
... (note leading spaces/tabs)
EOF
A pure shell solution is also possible:
while
read -r line; do
printf "%s\n" "$line"
done <<EOF
...
EOF
The body of a here doc is
expanded using shell’s parameter expansions, command substitutions, and
arithmetic expansions. A backslash inside of a here doc behaves as if it
were inside of double quotes; single and double quotes are just regular
characters (they don’t quote anything) in a here doc. However, inside of
an inner command ($(...)) or parameter expansion (${...}),
a double quote keeps its normal shell meaning. Also, “\"” gives those two characters. For example:
foo=bar
cat <<EOF
\$foo = "$foo",
but * (or another wild-card) is just a '*'.
Today is $(date "+%A").
EOF
Quoting of any part of word
turns off these substitutions on the here document body. The type of
quoting doesn’t matter: 'X', "X", or \X. For example:
foo=bar

cat <<\EOF

\$foo = "$foo",

but * (or another wild-card) is just a '*'.

Today is $(date "+%A").

EOF
See also Here-Document description in the POSIX/SUS standard.
Demo by adding -h (help) arg to nuser command).
Another interesting use of a here document, is to run a bunch of commands remotely:
ssh
remoteHost << EOF
cmd1
cmd2
...
EOF
(If you quote EOF, you can use environment variables (and wildcards) in the here document that won’t be expanded locally.)
Modern Korn shell supports another redirection operator, which permits filter commands to replace a file with the output of the command, so-called “in-place” editing. With “>;”, you can use:
sed -e s/foo/bar/ file >; file
to do in place editing with sed. The >; operator generates the output in a temporary file and moves the file to the original file only if the command terminates with a 0 exit status.
There is also a “<<<word” in Bash and some other shells, a here-string. Not (yet) port of POSIX. The word becomes the input to the command, after expansions. For example, “grep foo <<<"$BAR"” will search the contents of the variable $BAR for foo.
Another trick for here documents is to comment out a block of statements in a script, like so:
:||: << '#Comment End'
... commented-out stuff ...
#Comment End
(The seemingly unnecessary “||:” prevents the shell from even trying to create a here document.) You can simply comment-out the first line to re-enable the block. Of course, this technique is only useful for large scripts.
Processes
Qu: What is a process? Ans: A running program, in RAM only, own environment. Foreground (the process with the focus) vs. background, start in background with &. Under Unix one process (the parent) creates another (the child) using a syscall named fork (hence the phrase forking a process) to create a duplicate process (differs only in the PID and PPID; some other settings and data are not copied into the new process from the original, e.g. non-exported environment settings).
Modern systems use a process as a container of “threads”. It is threads that have PIDs (since threads can share the same PID, but usually don’t, there is also a TID that is unique. Use “ps -fL” to see the TIDs (in the column named LWP for historical reasons) and the count of threads in that process (the NLWP col).
The fork is followed by an if statement to check the PID to see if this is the parent or child process (remember both will do this). The child then uses the exec operation (actually there are many slightly different exec syscalls) to replace the code with new code, from some other executable program on the disk. Most of the environment and data of the process is unchanged by exec.
ps [start with no options, then describe the kernel’s process table (in RAM only)]. Then -f, then l, then -ef. (ATT -ef, BSD axl, -w = fuller cmd line, see my pps alias). Discuss PID, PPID, time (CPU, not real time), important/standard processes (init, no PPID, PID=1), lpd, xinetd, sendmail, ...). Note in ps output, [cmd] means cmd is swapped to disk on some system, kernel process on Linux and others. (ps -fC command shows all processes named command.)
Show pstree (ptree on Solaris), top command, w command. Other p-commands include pgrep and pkill.
Due to a quirk in POSIX, all standard utilities must be usable with exec. This means you’ll find useless versions of shell built-in utilities on some systems, such as /usr/bin/cd or /bin/read (which have no effect unless run from the current shell process). Personally, I would have been happier with an error message in these cases!
Processes are organized into process groups. When you use the term job, you are talking about a process group. There are foreground/background process groups, not processes. When you run a command line from the shell prompt, or a pipeline, the command/pipeline is put into a new process group.
Process groups have a process group leader, typically the first process added to the group. (When a new process is created via fork, it inherits the PGID of its parent.) All processes keep track of their process group ID (PGID), which is generally the PID of the process group leader. (ps has options to show the PGID.)
To facilitate interactive job control, POSIX has a concept of sessions. Sessions are collections of process groups connected to the same controlling terminal. The TTY shown in ps output is the controlling terminal for the session. Each session may have at most one controlling terminal associated with it, and a controlling terminal is associated with exactly one session. However, not all process groups are in any session, and thus don’t have a controlling terminal. (Shows as a “?” in the ps output.) Linux has setsid program args to run some program in a separate session.
Certain input sequences (control-something) from the controlling terminal cause signals to be sent to all processes in the foreground process group associated with that controlling terminal.
It is easy to send a signal to all processes in a given group, or all processes in a given session, at once. (The kill utility syntax for this will be discussed later.)
You can use job control to manage jobs in an interactive session: review fg, bg, jobs, ^Z, and the extensions to kill (%jobnum).
Process Priority
Different systems uses diff schemes but common to all is that a higher number means a worse priority (except for modern Solaris), even low priority jobs get some time-slices, and priority worsens over time. SysV priority scheme: 60 + (CPU time/2) + (nice -20). Note it is threads (in Linux, tasks) that are scheduled, not processes.
On modern systems the priority reported by ps -l is only a rough estimate of the true priority. The reason is that modern systems use sophisticated scheduler algorithms that can’t be reduced to a single priority number. For example, on Linux (and other OSes) there are several schedulers you can use. For the default one, time-slices and traditional priorities are replaced by assigning a scheduler class and some amount of time quanta (measured in nanoseconds, not milliseconds). When the quanta is used up, the scheduler reassesses the process and changes its class and also assigns more (or less) time than initially. Then while running, processes have a dynamic priority that can increase or decrease temporarily under certain conditions.
nice
This ranges from -19 to +20 (or 0 to 39). This works similarly to nohup; a shell is started that runs the command, and the priority is inherited. (Often use nice nohup command &.) Only root can use negative values and thus improve priority. Default nice value is 10. Can change the priority of existing processes using renice val -p PID.
Linux also has an ionice command to reduce disk scheduling priority. See also chrt and taskset (all non-standard).
Zombies
A terminated process is called defunct or a zombie. It is usually quickly reaped by its parent via the wait(2) (or similar) system call, which removes the process table entry. If the parent process terminates then any children (live, or defunct but not reaped) are adopted by init, which on all modern systems will reap them immediately or as soon as the live processes terminate. Occasionally a zombie won’t get reaped for a very long time (usually the result of poorly written software) and will appear in ps output.
time
You can time a command with the shell’s built-in time command. There is a POSIX standard format for the output, which you can usually force with an option. There is also a /usr/bin/time command (a Gnu version), with a “-p” option for POSIX output, and a “-v” option for verbose output (show).
The times reported are real or elapsed (process end time minus start time), sys (time spent running kernel code, i.e. system calls), and user (time spent running user code).
On a system running more than one process and that has several CPUs, the real time reported has little correlation with the number of CPU cycles that are needed to execute the corresponding code. You have to consider the time used by other processes, the time waiting for resources, and the fact that several processors might run concurrently to perform the task. All you are guaranteed is that:
real >= (user + sys) / num_cpus
Most OSes will try to run one process/thread on one CPU, to take advantage of that CPU’s cache. On Linux you can control this with the taskset command.
Lecture 5 — Regular Expressions and some filter commands
Regular Expressions
Regular expressions (or REs) are a way to specify concisely a group of text strings. The Unix editor ed was about the first (Unix) program to provides REs. Many later commands used this form of RE and their man pages would “see also ed(1)”. Over time, folks wanted more expressive REs, and new features were added. The ed REs became known as basic REs or BREs, and the others became known as extended REs or EREs.
Suppose you needed to find a specific IPv4 address in the files under /etc? This is easy to do; you just specify the IP address as a string and do a search. But, what if you didn’t know in advance which IP address you were looking for, only that you wanted to see all IP addresses in those files?
Even if you could, you wouldn’t want to specify every possible IP address to some searching tool! You need a way to specify all IP addresses in a compact form. That is, you want to tell your searching tool to show anything that matches number.number.number.number.
This is the sort of task we use REs for. You can specify a pattern (RE) for phone numbers, dates, credit-card numbers, email addresses, URLs, and so on.
The Good Enough Principle
With REs the concept of “good enough” applies. Consider the pattern used above for IP addresses. It will match any valid IP address, but also strings that look like 7654321.300.0.777 or 5.3.8.12.9.6 (possibly an SNMP OID).
To match only valid IPv4 addresses is possible, but rarely worth the effort. It is unlikely your search of /etc files will find such strings, and if a few turn up you can easily eye-ball them to determine if they are valid IP addresses.
It is possible to craft a more precise RE but in real life, you only need an RE good enough for your purpose at hand. If a few extra matches are caught you can usually deal with them. (Of course, if making global search and replace commands, you will need to be more precise!)
An RE is a pattern, or template, against which strings can be matched. Either strings match the pattern or they don’t. If they do, parts of the matching string can be saved in named variables (sometimes called registers), which can be used later to either match more text, or to transform the matching string.
Pattern matching for text turns out to be one of the most useful and common operations to perform on files. Over the years, a large number of tools have been created that use REs, including all text editors, grep, sed, sort, and others. The shell wildcards can be considered a type of RE.
While the idea of REs is standard, different tools may use slightly different syntax. Some of these tools also contain extensions that may be useful. Perl’s REs are about the most complex and useful dialect, and are sometimes referred to as PREs or PCREs (Perl compatible Regular Expressions). (See man pages for perlre(1), also perlrequick(1), perlretut(1), pcrepattern(3), and pcresyntax(3).) Java also supports a rich syntax for REs (Java REs).
Sadly, not all utilities that provided REs used the same symbols. Eventually POSIX stepped in and standardized REs, mostly compatible with the original ed REs but with many additions. (POSIX uses the acronyms BRE and ERE, but also uses the terms “obsolete” REs and “modern” REs). Some older tools changed to use the new syntax. See regex(7) for details.
Most RE dialects work this way: some text (usually one line) is read. Next, the RE is matched against it. In a programming environment such as Perl or an editor (sed), if the RE matches than some additional steps (such as modification of the line) may be done. With a tool such as grep, a matching line is just printed. Finally, the cycle repeats.
Top-down explanation (from regex(7) man page):
An RE is one or more branches separated with “|” and matches text if any of the branches match the text. A branch is one or pieces concatenated together, and matches if the 1st piece matches, then the next matches from the end of the first match, until all pieces have matched. A piece is an atom optionally followed by a modifier: “*”, “+”, “?”, or a bound. An atom is a single character RE or “(RE)”.
Show Regular Expression Web resource. The following shows POSIX REs, both BREs and EREs. The syntax that is the same for both is:
any char matches that char.
. (a dot) matches (almost) any one character. It may or may not match EOL, depending on options set. Also, it won’t match invalid multibyte sequences. (So, dot works best in POSIX locale.)
\char matches char literally if char is a meta-char (such as “.”). Never end a RE with a single “\”.
[list] called a character class, matches any one character in the list. Can use a range such as a-z, if LC_COLLATE=C.
[^list] any character not in list (shell wildcard (globbing) uses [!list]).
To include a literal ] in the list, make it the first character (following a possible ^). To include a literal -, make it the first or last character. Note other metacharacters except \ lose their meaning in the list. (So you don’t need a backslash for a dot or open brace, “[].[-]”.) List can include one or more predefined lists, or character classes. In some RE dialects, a backslash+character (e.g., “\d”) denotes a predefined list (in this case, all digits).
In POSIX (and Bash), character classes are: [:name:], where name is one of: alnum, digit, punct, alpha, graph (same as print, except space), space (any white-space), blank (space or tab only), lower, upper, cntrl, print (any printable char), or xdigit.
Concatenated REs Match a string of text that matches each RE in turn.
^RE an RE anchored to the beginning of the whole string.
RE$ an RE anchored to the end of the whole string.
RE* zero or more of RE.
The following two forms are for EREs; use “\{“ and “\}” for BREs:
RE{min,max} max (but not the comma) can be omitted for infinity.
RE{count} Exactly count of RE.
Both EREs and BREs support grouping with parenthesis (with backslashes for BREs). However, only BREs support back-references (see below) that can be used in the matching text, saving the matched text in a numbered register:
(RE) A grouped RE, matches RE. Each group is remembered in a numbered register, counting open parenthesis. For example (BRE): “\([0-9]*\)\1” matches “123123”.
Finally, only ERE’s support the following syntax:
RE+ one or more of RE. (Same as BRE “RE RE*”.)
RE? zero or one of RE. (Same as BRE “RE\{0,1\}”.)
RE1|RE2 either match RE1 or match RE2. (This has no BRE equivalent.)
Word Boundaries POSIX doesn’t have word delimiters, which match the null string at the beginning and/or end of a word. But most RE dialects use “\<” and “\>”, or Perl’s “\b”. (Gnu utilities mostly uses “\b”; Gnu sed uses “\y”.)
Escapes Special (or meta-) characters lose their meaning if escaped, that is preceded with a backslash (“\”) character. Some (in POSIX, all) others lose their special meaning when used in a character class, such as “*” and “.”. In some dialects, meta-characters only have special meaning when escaped! (Mostly true for BREs.)
In POSIX EREs, a “\” followed by one of the characters “^.[$()|*+?{\” matches that character taken as an ordinary character. A “\” followed by any other character matches that character taken as an ordinary character, as if the “\” had not been present (but not all dialects work this way, so don’t try it!).
Some characters used to express REs are only special if they appear in a specific context. For instance, the “^” is special only if it is the first character of some BRE, the “$” only if the last. The “*” is not special if the first character in an RE. A “{“ followed by a character other than a digit is not the beginning of a bound. A backslash is always special, so it is illegal to end an RE with one.
POSIX and other RE dialects have different rules for when special characters need to be escaped. For example, a “^” is only special as the first character in a BRE, and doesn’t need escaping otherwise. The same holds for a “$”. But you must always escape these characters in EREs:
$ echo 'a^b' | grep 'a^b' # matches
since BRE
$ echo 'a^b' | grep -E 'a^b' #
doesn’t match; since ERE
Precedence Rules
1. Repetition (“*”and “+”) takes precedence over concatenation, which in turn takes precedence over alternation (“|”). A whole sub-expression may be enclosed in parentheses to override these precedence rules.
2. In the event that a given RE could match more than one substring of a given string, the RE matches the one starting earliest in the string.
3. If an RE could match more than one substring starting at the same point, it matches the longest. (This is often called greedy matching.) Sub-expressions also match the longest possible substrings, subject to the constraint that the whole match be as long as possible. (Perl supports both greedy and reluctant modes!)
There is also a possessive mode, which is like greedy but will never backtrack even if the match fails: “.*X” with the string “WXYX” will match “WXYX” (greedy), “WX” (reluctant), and fail to match (possessive).
Update: The next version of POSIX/SUS (Issue 8) will include some enhancements to EREs:
The +, *, ?, and {min,max}, as noted above (rule 3), match the longest possible match (greedy). New operators to match the shortest possible match (including a null match) are being added (reluctant). The new ones are the same as the old ones with a “?” appended: +?, *?, ??, and {min,max}?.
In addition, a new flag will be available: REG_MINIMAL will mean switch rule 3 with shortest match (that is, switch to generous mode) for the regular operators. With this flag set, using the new question-mark forms turn back on greedy (longest) matching.
The greedy match of the beginning part of an RE may prevent the following part from matching anything. In this event, backtracking occurs, and a shorter match is tried for the first part. For example, the 5 parts of the RE xx*xx*x (matched against a long string of ‘x’es) will end up matching this as x|xxxxx|x||x.
Back reference (BREs or some non-POSIX dialects only) A ‘\’ followed by a non-zero decimal digit d matches the same sequence of characters matched by the dth parenthesized sub-expression (numbering sub-expressions by the positions of their opening parentheses, left to right). For example: “([bc])\1” matches “bb” or “cc” but not “bc”. For example: (((ab)c(de)f)) has \1=abcdef, \2=abcdef, \3=ab, \4=de
$ echo '12345' |sed
's/\([0-9]*\)\([0-9]*\)/|\1|\2|/'
|12345||
Example Regular Expressions
When using Gnu grep to view match results, note that all possible matches will be highlighted (in red), not just the one match that should be selected according to the rules of precedence. Can use -o option (with head -1), or use this instead: sed -e 's/RE/|&|/'.
abcdef Matches “abcdef”.
a*b Matches zero or more “a”s followed by a single “b”. For example, “b” or “aaaaab”.
a?b (ERE) Matches “b” or “ab”.
a+b+ (ERE) Matches one or more “a”s followed by one or more “b”s: “ab” is the shortest possible match; others are “aaaab” or “abbbbb” or “aaaaaabbbbbbb”.
.* and .+ These two both match all the characters in a string; however, the first matches every string (including the empty string), while the second (ERE) matches only strings containing at least one character.
^main.*(.*) (BRE) This matches a string starting with “main” followed by an opening and closing parenthesis with optional stuff between.
^# This matches a string beginning with “#”.
\\$ This matches a string ending with a single backslash. The regex contains two backslashes for escaping.
\$ This matches a single dollar sign, because it is escaped.
[a-zA-Z0-9] In the C locale, this matches any ASCII letters or digits.
[^ tab]+ (ERE) (Here tab stands for a single tab character.) This matches a string of one or more characters, none of which is a space or a tab. Usually this means a word.
^\(.*\)\n\1$ (BRE) This matches a string consisting of two equal substrings separated by a newline.
.{9}A$ (ERE) This matches any nine characters followed by an “A” at the end of the line.
^.{15}A (ERE) This matches the start of a string that contains 16 characters, the last of which is an “A”.
^$ Matches blank (empty) lines.
\(.*\)\1 (BRE) Matches any string that repeats, e.g., “abcabc” or “byebye”.
Example: Check if some ASCII file foo contains any control (non-printable) characters:
grep -q '[[:cntrl:]]' file && echo "yes" || echo "no"
(Note that tabs and carriage returns are control characters.)
Display any non-ASCII characters in a (text) file:
$ LC_ALL=C grep '[^[:print:]]' file
(Curly quotes match. Note you must use POSIX (=C) locale, or curly quote marks will be assumed to be printable text characters. Using sed to replace these is left as an exercise to the reader.)
A related question is to have a text file encoded in UTF-8, but with some invalid byte sequences (those that are not legal UTF-8). There is no easy answer for this, but Geoff Clare posted this answer in comp.unix.shell on 6/30/2016 “grepping for invalid UTF-8 characters”:
iconv -cs -f utf-8 -t utf-8 file \
| LC_ALL=C diff - file > file.diff
Example: Print a Unix configuration file, skipping comment and blank lines:
grep -Ev '^$|^#' file
or:
grep -Ev '^($|#)' file
A simple way to print all non-blank lines is:
grep . file
To print all lines longer than (say) 80 characters:
grep -E -n '.{81}' file
Determine if some argument to a shell script is an integer (number):
This is an interesting problem because it comes up a lot. Assuming you need to allow whole numbers with an optional leading plus or minus sign. Also assume you don’t need to support weird forms of integers such as 1e6 or 12. or 1,000,000 or 0x1A. Also assume you don’t care if -0 or +0 is considered a valid integer (you can modify the code if you do care).
To just test that ARG is all-digits is simpler (an empty string is not valid):
case ${1:+x} in *[!0-9]* false;; esac
There are a number of approaches for this but the most portable (and that doesn’t require a separate command or pipeline) is:
case $ARG in
"" | *[!0-9+-]* | ?*[-+]* | [-+]) echo no;;
*) echo yes;;
esac
(Case is discussed later.) You can use expr’s BRE matching operator:
LC_ALL=C \
expr X"$ARG" : 'X[+-]\{0,1\}[0-9]\{1,\}$' >/dev/null \
&& echo yes || echo no
Or this grep -E version:
LC_ALL=C printf '%s\n' "$ARG" | \
grep -Exqe '(-|\+)?[0-9]+' \
&& echo yes || echo no
or this awk version:
LC_ALL=C awk '
BEGIN { exit !(ARGV[1] ~ /^[-+]?[0-9]+$/) }' "$ARG" \
&& echo yes || echo no
Find only legal IPv4 addresses (“num.num.num.num”, where “num” is at least one digit, at most three digits including optional leading zeros, and in the range of 0..255):
Sounds like a great project idea to me!
Newlines and regular expressions don’t get along well. POSIX doesn’t support them from most standard shell utilities. C programs can use “multiline” matching; also some non-POSIX utilities (such as Perl and Java) support this, one way or another. Using awk:
$ echo 'ABC
DEF' | awk -v RS='' '/C\nD/'
ABC
DEF
Setting “RS” to null puts awk into multiline mode (blank lines separate records). Also awk ERE’s accept some extensions such as “\n” to mean a newline.
Email addresses as defined by RFC-822 and the newer RFC-5322 standards were not designed to be regexp-friendly. In some cases, only modern (non-POSIX) regular expression languages can handle them. Compare these: ex-parrot.com and stackoverflow.com. Keeping in mind the good-enough principle, here’s the much shorter one I use to validate the email addresses I use in my RSS feeds:
([a-zA-Z0-9_\-])([a-zA-Z0-9_\-\.]*)@(\[((25[0-5]|2[0-4][0-9]|1[0-9][0-9]|[1-9][0-9]|[0-9])\.){3}|((([a-zA-Z0-9\-]+)\.)+))([a-zA-Z]{2,}|(25[0-5]|2[0-4][0-9]|1[0-9][0-9]|[1-9][0-9]|[0-9])\])( *\([^\)]*\) *)*
Security Concerns with REs
Be aware that mixing untrusted data into a regular expression string has a security concern. Malicious (or just bad) users can slip special characters into their text, causing your RE to behave in unexpected and/or undesirable ways. A related concern is that Unicode text permits multiple representations of the same text, so a RE may or may not match a string depending on how it was encoded.
The secure solution is to first normalize any data (text or numbers) into a standard representation, then sanitize it by removing any illegal bytes (or any characters that have special meaning in a regular expression). (Even safer is to just check for them, and reject the data if any are present). You can also try to encode the data to make it safe (e.g., URL or percent encoding). Then validate the data (make sure it is legal for the intended use, for example as a URL, a file name, a user ID, a date, etc.)
For Unicode text, you can use the uconv utility from ICU. Normalization is achieved through transliteration option (“-x”):
$ uconv -x any-nfd <<<ä | xxd
00000000 61 cc 88 0a a...
00000004
$ uconv -x any-nfc <<<ä | xxd
00000000 c3 a4 0a ...
00000003
On Debian, Ubuntu and other derivatives, uconv is in the libicu-dev package. On Fedora, Red Hat and other derivatives, and in BSD ports, it’s in the icu package.
Python has unicodedata module in its standard library, which translates Unicode representations through the unicodedata.normalize() function:
$ python3 -c 'import unicodedata
print(unicodedata.normalize("NFC", "ääääää"))'
ääääää
“NFC” is the best form for general text, since it is more compatible with strings converted from legacy encodings. “NFKC” is the preferred form for identifiers, especially where there are security concerns.
(If you’re thinking this is a big hassle, you’re right. But, not doing this is the #1 cause of security breaches such as SQL injection attacks. So, learn to normalize, sanitize, and validate all data when it crosses a trust boundary into your code, and encode the data when it leaves your code.)
Lecture 6 — Common Filter Commands
Review: Filter commands process input (usually) a line at a time. They read from stdin (unless files are listed on the command line) and send the processed output to stdout. A “-” for a filename (usually) indicates to read/write stdin/stdout.
sed 'script' file ...
Sed is the stream editor. It doesn’t change files; it reads input a line at a time (either from stdin, or from listed files, one after the next), into a buffer known as the pattern space, and removes the trailing newline. Then it applies all the sed commands in the script, in order, for each command whose address matches the current line. (Multiple scripts can be specified, using -e.) Finally, the (modified) pattern space is written to stdout, plus a newline if one was removed earlier. (The -n option suppresses this default output.)
When you need to change the text in lines, possibly from a specific range of lines, no tool is as useful as sed. Sed also supports a wide range of operations, but these are less often used. (All will be explained below, as you may need to read a sed script someday.)
Quotes are used to protect the script from shell expansions. Sed also maintains a clipboard, called the hold space.
If the
script contains more than one sed command, separate them
with “;”. You can use multiple scripts too:
sed -e 'script' -e
'script' ... files...
You can put the script in a file, and use sed -f script-file files...
Modern (2013) sed has an -i option to edit a file in place. A copy of the original is made for safety. (See also the non-standard -c option.)
The current (2012) POSIX solution to editing files “in place” is to use a file editor. The ed editor can be scripted and has a similar (but simpler) syntax to sed. It also supports extended addressing modes, for example “.,.+4” to mean the current line and the following four lines.
We won’t cover ed in this course, but after learning sed, the man page should be sufficient. However, here is an example of editing a file in place, saving the current version as file.bak:
printf '%s\n' 'w file.bak' ',s/foo/bar/g' \
'another ed command' ... \
w | ed -s file
Using modern sed and “-i” is probably simpler; It is marked for inclusion in the next issue of POSIX (along with EREs).
Addresses All sed commands take zero addresses, one address, or two addresses (a range). Each address refers to a line, either as a line number, /RE/ that matches the line, or a $ (matches the last line). Gnu extensions: “num~step” (matches num-th line and each step-th line thereafter), “num,+N” (the num-th line and the N lines following.)
Some commands can take either 0 or 1 address. Any sed command with zero addresses applies to all lines.
A command with one address will be applied to all lines that match that address (if the address is a line number that will be at most a single line (none if the file has no such line) but if a RE than all lines that match.
A
command with two addresses separated
with a comma has an address range. In a range, the line which
matched the first address will always be accepted, even if the second selects
an earlier line (such as “3,2”). If the second
address is a RE, it will not be tested against the line that matched the first
address. Note a range may match multiple blocks of lines; starting with the
line after the second address matches, sed goes back
to looking for lines that match the first address. (Naturally this only
applies if the addresses are REs.) Demo:
$
sed -n '/START/,/END/p' file1.dat
The address(es) may be followed with “!” to select all lines not matched.
The REs may be /RE/ (any embedded slashed must be escaped with a backslash). If the RE has many slashes, you can make it more readable with \cREc, where c can be any character. (For REs used as addresses; for REs used with the “s” function, no backslash is needed or allowed.) /RE/I = case-insensitive (Gnu extension).
Sed supports basic REs, or BREs (Gnu allows extended REs, or EREs, with the right option).
The POSIX committee in 1/2012 approved the addition of the option “-E” to cause sed to use EREs. That won’t be in the standard until the next version, but feel free to use the Gnu “-r” option for that in the meantime.
Sed commands may be grouped, so you don’t have to enter the same address over and over:
addresses {
cmd1
cmd2
...
}
The grouped commands may also have addresses, and you can nest the grouping. Grouping allows for Boolean logic with the addresses. For example, to print all lines containing foo AND that don’t contain bar:
sed -n '/foo/ { /bar/! p; }'
Sed commands can be preceded with spaces, and spaces are allowed between the address (range) and the function letter. Multiple commands can be separated with semicolons. Commands can be followed by comments, which start with “#” to the end of the line (or end of the script).
Some useful sed functions (must know only the first three for our course):
s/RE/replacement/flags
This is probably the most useful sed command. The replacement text can use \# (back-references) and/or an un-escaped “&” to refer to the whole match. Any character except newline or backslash can be used instead of the slash. Whichever is used, you can include it literally by escaping it with backslash.
flags can include: g for global (all changes), n for the n-th occurrence only, p to print the modified line, w filename to append to filename, i for case-insensitive matching (in SUS issue 8). Using ng changes all occurrences from the nth one to the end. (This is a Gnu extension. For example, to change all but the first occurrence of foo to bar, use “s/foo/bar/2g”.)
Gnu sed also has useful extensions for the replacement text: \Ltext\E to force lowercase, \U for uppercase. (text will usually use a back-reference or &.) It also allows common C escapes such as \t. (Not part of POSIX; on many systems (Solaris, HP-UX), those escapes are not allowed.)
d delete the pattern space and read in the next line.
p print the pattern space. (Useful with -n option to suppress auto-printing.)
l print showing invisible chars in a visible form.
# A no-op command; used to insert comments
a \ <newline> text to append after current line <newline>. (Embedded newlines must be escaped with a backslash).
i \ <newline> text to insert before current line <newline>.
N Append the next line of input to the current pattern space (seperated with a newline). If there is no next line, terminate the script.
c \ <newline> text to replace current line <newline>.
q quit sed.
n Skip any remaining sed commands in the script and start the next cycle.
w filename Save to filename.
h copy pattern space to hold space.
H append pattern space to hold space.
g paste (replace the pattern space with the hold space).
G append a newline and then the hold space, to the pattern space.
x swap the pattern and hold spaces.
There are other sed functions that allow for some powerful filters. For example:
sed ':a;N;$!ba;some_command '
The part up to the last semicolon is a loop that reads all the lines, appending them to the buffer. Then some_command (e.g., some s/// command) can operate on the whole file of data, which includes embedded newlines. This is a powerful technique, if you have sufficient memory. Check the man page for all the commands available.
Examples:
To
display file with all characters visible (See also od, less -r, and cat -A):
sed -n
'l' file
To remove
leading/trailing space, squeeze runs to a single space (“⌂”=space):
sed -e 's/^⌂*//;s/⌂*$//;s/⌂⌂*/⌂/g'
Print
the body of an email message (from a file):
sed
'1,/^$/d' file
To remove the first and last lines:
sed '1d;$d' file
To insert a zero before the first string of exactly two (and no more) numerals, which might occur anywhere in a line? (Real-world problem; see zero-pad.sed.)
sed 's/.*/.&./;
s/\([^0-9]\)\([0-9]\{2\}[^0-9]\)/\10\2/;
s/^.\(.*\).$/\1/'
To move comments from the end of a line, to a new line above the command, in a shell script:
sed 's/\([^#]*\) *\(#.*\)/\2\
\1/'
To
extract the CVS module name from an email header; a sample header is
Subject:
YborStudent CVS Repository commit by
wpollock: "cvsproj/src ,Foo.java,1.2"
“cvsproj” is the module name in this example:
MODULE=$(sed -n \
'/^Subject:/{N; s,[^"]*"\([^/ ]*\)[/ ].*$,\1,p}')
What, if anything, is the difference between these two sed commands?
sed -n '/foo/p; /bar/p'
sed '/foo/b; /bar/b; d'
(Note, ‘b’ means to goto (branch to) the end of the script.)
Other filter commands
cut: -c cols cuts the columns specified; ex: 1,2,3 or 1-3, or 20- (to EOL). You can also use delimited fields, using -dchar to say char is the delimiter, and then -f fields instead of -c cols. (If the fields are separated by runs of char (usually space), you can use tr -s ' ' to replace each run with a single space.) (Less useful, but worth mentioning, is the colrm utility.)
Task: display the
last X characters from every line:
rev file | cut -c 1-X | rev
paste: concatenates files of columns, by default using TAB as delimiter (change with ‑dchar). You can also merge groups of lines of a single file to a single line with the -s option, useful for reformatting some files. Also, if some command outputs multiline records, you can use paste to make each record a single line, which can then be piped into other filter commands such as grep or awk. For example, suppose cmd produced records of three lines each. You could do the following to process each record with some awk script, and then split the record back into three lines:
cmd | paste - - - | awk '...' | tr '\t' '\n'
One trick is to get multi-column output from commands using paste. This gives three-column output:
find . -print | paste -s - - - # Also xargs works.
This gives one line of output, no matter how many columns that is:
PATH=$(find / -type d -name bin | paste -sd:)
(Or you can use the column utility if available.)
You can put a list of characters with the -d option, each gets used in order. (Use “-d "\0"” to indicate no delimiter.) This combines pairs of lines from a file into single lines:
paste -s -d "\t\n" file
You can trick paste into using multiple characters as the delimiter:
paste -d "::" file1 /dev/null file2
(Not as used, but join is similar to paste; see join(1) for details.)
tail Displays the end of text files. (head displays the start of text files). For system admins, tail has a useful option: tail -f keeps watching the file and showing any new content. This is used to watch log files while you work on some task.
tr Translates characters. Unlike most filter commands, tr doesn’t accept file arguments. tr has several forms and uses. The most basic is: tr list1 list2. Note ASCII chars can be specified with \nnn, where nnn is an octal number: tab=011, newline=012, carriage-return=015, and escape=033. Also, the standard “C” escapes are recognized: \\, \n, \t, etc. Be sure to quote the backslashes to prevent shell interpretation—tr must see the backslashes!
One use of tr is in pipelines that process
filename that may contain newlines (which are forbidden in by SUS/POSIX after
2012):
find ... |tr '\n' '\000' |sort ... |tr
'\000' '\n'
The list can contain a range (e.g., “A-Z”; historical SysV systems required square braces to denote ranges) if the locale (LC_COLLATE) is POSIX. The list could also be a character class (“[:upper:]”, which works regardless of the locale), or an equivalence class (“[=e=]”).
The form tr -s list squeezes runs of chars in list to a single instance each, for example: tr -s '[:space:]'. This can be useful when fields are separated by multiple spaces (such as in “ls -l” or “who” output), and you want to count fields delimited by runs of spaces. (While awk can do that, other simpler filters such as cut can’t.)
The -s can be combined with the basic form as well: tr -s ' ' '\t' replaces all runs of space with a single tab each.
The form tr -d list deletes all chars in list from the input.
The use of the “-C” (also “-c”) option complements the set of characters in list1, useful with “-s” and “-d” options. For example, you can do this to delete all non-printable characters (such as control characters):
tr -cd '[:alnum:][:space:][:punct:]'
Character classes, or a complemented set of characters, can be tricky to use with tr. This is because the order of the resulting list of characters is undefined. Generally, character classes, equivalence classes, and complements of list are useful only with -s or -d options. There is one exception; this is guaranteed to work:
tr '[:upper:]' '[:lower:]' # and vice-versa
(Using dd to convert case may be simpler.) When using “-C”, the resulting character list is put in ascending collation order (as defined by the current locale). When using “-c”, the resulting character list is in ascending order by the character’s binary value.
A final form is only for use in list2: “[x*n]”, where “x” is any character and “n” is a positive integer. This means to repeat x n times. If n is omitted, then x is repeated as many times as needed to make list2 as long as list1. Some interesting examples:
tr -cs "[:alpha:]" "[\n*]" # Replace runs of non-letters with newline
tr -cd '[:print:]'
<file #Delete all non-printable
characters from a file
You can do this with sed as well; the best way I’ve found to clean up files that should be ASCII only is “... |dos2unix -7”, which fixes any DOS line endings but also replaces any non-ASCII bytes with a space.
tr "[=e=]" "[e*]" # remove any accents from letter “e”.
Try this (as root try pid “1”): cat /proc/self/environ |tr '\0' '\n'
for file in *; do
mv $file $(echo $file |tr '[:upper:]' '[:lower:]');
done
wc This command counts text: lines, words, characters, and bytes (depending on locale setting, #chars != #bytes). Various options restrict the output. “lines=$(wc -l <file)”. Without the redirection, the filename is displayed as well. Since some versions of wc pad the output with spaces you may need to strip that out: lines=$((lines)) will do it; you can combine those steps. When multiple files are listed, wc will output the information for each, one per line, and also display a total.
A hard problem is to make this work:
find ... |xargs wc -l |sort -nr
even if find only finds one file
(no total line is produced), or
is called multiple times (several total
lines are produced), and you should allow for found files to be named total (so you can’t just grep -v total).
In a better world, there would be an option to wc to suppress the total line, but in this world, you can solve this several ways, none of them perfect.
One way is to make sure to only call wc with one file at a time, so no total lines are produced:
find ... | xargs -L 1 wc -l |sort -nr
or the equivalent:
find ... -exec wc -L 1 '{}' \; |sort -nr
The other, more efficient way, is to make sure every call to wc contains at least two files, then use sed or some such tool to delete the first and last lines, before sorting. This is trickier:
find ... -exec sh -c 'wc -l "$@"
|sed "1d;\$d"' \
sh {} + | sort -nr
This may be sufficient for at the keyboard use:
wc -l *.txt | sed '$d'
Here’s an example use:
du -a . | wc -l # count num files accurately
grep The name comes from echo 'g/RE/p' |ed file. By default, grep uses BREs. egrep (same as grep -E) uses EREs. The -v option prints all lines that don’t match. The -l option only shows the names of files with matching lines once (and not the lines themselves). The -c option is similar, showing a count. The -n option also shows line numbers. The -q option (quiet) is useful when testing the return status of grep (in an if statement); grep returns 0 if a match is found, 1 if not, 2 for an error.
Multiple patterns can be specified, separated by newline (so use quotes) or by multiple “-e” options. (Note the man page for Gnu grep doesn’t say that, but it is allowed.) This makes up for a lack of alteration (“|”) in BREs. A null pattern (specified by two successive newlines in the pattern list) matches all lines. For example:
grep $'one\ntwo' files
(The “$'...'” expands in this case backslash-n to a newline.)
There is also an fgrep (historical name for grep -F) which is efficient for parallel plain text string searching through large files.
Gnu grep REs: \w=[[:alphanum:]], \W=[^[:alphanum:]] (i.e., word char). The symbols \< and \> respectively match the empty string at the beginning and end of a word. The symbol \b matches the empty string at the edge of a word, and \B matches the empty string provided it’s not at the edge of a word.
Note: Due to grep version differences, portable scripts should avoid using { in grep patterns and should use [{] to match a literal {.
For example, to show only the non-blank and non-comment lines in some Unix config file, you could use any of these:
grep '^ *[^# ]' file
grep -v '^ *#.*$' file
grep -vE '^ *$|^ *#' file
Gnu grep includes many useful non-standard options, such as -r for recursively scanning all files in some directory, -o to only show the matched output (instead of the whole line), and -C num (and -A and -B) to include num lines of context. See the man page for other useful Gnu extensions. There are other non-standard versions of grep available, such as vgrep (visual), pgrep (grep through the process table), and agrep (approximate grep).
Clever Gnu grep hack: If you use a command such as “grep -E 'RE|$'” with the default color highlighting option (or add “--color=auto”), grep will highlight the part of each line matching RE, and also show all lines (since they all match the “|$” part) but without any highlighting.
sort Sorts lines of text files (or stdin). If you list multiple files, they get merged and sorted together. The more important options are: -u (unique lines only; i.e., discard dups), -o file (put output in file; can use same file for input to sort in-place), -r (reverse sort), -n (numeric sorting; see also -g for floating point), -d (dictionary order; ignores all non-{blanks,letters,digits}), -f (ignore case), -b (ignore leading space), -i (ignore all non-printable chars), -m (merge sorted files), -c (check only), and -s (stable sorting; lines that compare equal are left in original order. This is non-POSIX).
The Gnu sort utility is amazingly efficient. It calculates an estimate of the amount of data to sort; if that’s more than available memory, the data is sorted by chunks saved to temporary files. Each chunk is handed by a different core if multiple cores are available. Finally, the sorted chunks are merged into one output.
Rather than sorting whole lines, you can instruct sort to sort based on a field (part of a line). Fields are separated by runs of blanks (includes tabs) by default. If you specify a delimiter, then each one counts as a field separator (that is, two tabs in a row show an empty field). You can also first sort on one (primary) field and if they compare equal sort on a secondary field (and so on). (This is where the -s option is useful.)
To specify sorting fields, use: -k pos1[,pos2]. (Your text uses the non-standard +field syntax instead.) If only one position is specified, sorting is done from that position to the end of the line.
Each position may be followed with modifier letters to over-ride the global settings (from the options). For example, “n” means to use numeric sorting for that field. It makes no difference where you put the modifier except for b:
sort -k3,3n
sort
-k3n,3
To ignore leading blanks in a field, follow pos1 with “b”:
sort -k3b,3n
A position in a sort field specified with the “-k” option has the form “F.C”, where F is the number of the field to use and C is the number of the first character from the beginning of the field. In a start position, an omitted “.C” stands for the field’s first character. In an end position, an omitted “.C” (or “.0”) stands for the field’s last character. Use the option -t sep to set the field separator character from any run of white-space, to the single character sep.
Technically, the default sep is the null string between a non-blank character and a blank. So leading spaces are part of a field unless you use the b modifier or option, or unless you omit -t sep (since in that default case, runs of blanks separate fields).
Example: Sort numerically on the second field and resolve ties by sorting alphabetically on the third and fourth characters of field five. Use “:” as the field delimiter:
sort -t: -k2,2n -k5.3,5.4
Note that if you had written “-k2n” instead of “-k2,2n”, sort would have used all characters beginning in the second field and extending to the end of the line as the primary numeric key. For many applications, treating keys spanning more than one field as numeric will not do what you expect.
Here’s a similar, real-world problem: Given many CSV files, concatenate them into a single .csv file, numeric sorted by the ID field:
sort -f *.csv > output.csv
This would work if the data had standard ids like id001, id002, id010, id100, but the ids are like id1, id2, id10, id100, etc. Sample input data:
id1,aaaaaa,bbbbbbbbbb,cccccccccccc,ddddddd
id101,aaaaaa,bbbbbbbbbb,cccccccccccc,ddddddd
id2,aaaaaa,bbbbbbbbbb,cccccccccccc,ddddddd
id10,aaaaaa,bbbbbbbbbb,cccccccccccc,ddddddd
id40,aaaaaa,bbbbbbbbbb,cccccccccccc,ddddddd,
id201,aaaaaaaaa,bbbbbbbbbb,ccccccccccc,ddddddd
Solution: Sort numerically on the first (ID) field, after skipping the first two characters of that field:
sort -fn -t, -k1.3,1 *.csv > output.csv
Example: Sort /etc/password on the gecos field, case-insensitively:
sort -t: -k5,5f /etc/passwd
Example: This finds the 10 worst /home disk hogs:
du -sx /home/* | sort -nr | head
(The “-x” option says to not cross filesystem boundaries, useful for example when you want to see hogs of /var and ignore those in /var/log, when that is a different filesystem.)
Sorting Files by Column Labels
When you consider all the commands that produce a special first line of output, containing column headings (or labels), it is common to want to sort all but that line, or to want to sort by a column by name (when you don’t know the column number). Several techniques can be used to handle data when the first line is special. Here’s one interesting way:
( read fields; printf "%s\n"
"$fields";
set X ${fields%$2*}; sort -k $#
) < "file"
(Note how the field name is converted to a column number.) Remember this
{ read first; use-or-ignore first; filter; } <file
pattern when the first line needs special treatment. The read gets the first line while the filter reads the remaining lines.
Other ways include using awk (show sort_by_fieldname.awk):
netstat -anpt | awk 'NR<3;/SomePortNum/'
or this clever hack (“$1” is the filename, “$2” is the column label):
head -1 "$1" tail -n +2 "$1"
| \
sort --key=$(sed -ne "1s/$2.*/$2/p" "$1" | wc -w)
uniq By default this command shows only the unique lines from the input. It compares adjacent lines and discards the second and additional duplicates. Note the file need not be sorted; the output of “A\nA\nB\nA\nC” would be “A\nB\nA\nC”. In many cases, it is preferable to use sort -u, rather than “sort|uniq”.
Uniq handles filename arguments in a non-Unix way; you can list zero files (read stdin and write stdout), one file (read the file, write stdout) or two files (read the first, write the second). Note you can specify “-” for a filename, for stdin or stdout.
The main utility of uniq lies in the options you can use. The “-d” option shows (once only) lines that have duplicates. (Use Gnu’s “-D” to show all duplicate lines, usefule when combined with “-f” or “-s”, or Gnu’s “-w” option.) The option “-c” precedes each line with a count of how many times that line appears in the file. Use this to answer a host of “how many blank in blank?” type of question. The “-u” option shows only lines that don’t have duplicates. The option “-f n” says to skip the leading n fields of each line when making the comparison.
Using uniq with these options allows you to create powerful “one-liners”. Some examples:
sort /etc/passwd | cut -d: -f1 | uniq -d
The above finds user IDs that are duplicates.
A great site with many useful one liners is www.commandlinefu.com.
Although uniq has an option to skip leading fields (or a number of characters), there’s no way standard way to compare only a non-trailing portion of lines (or to display such lines). To compare only parts of lines, use sort or awk: awk '!seen[$2]++'. (See below for more.)
od, xxd od is standard, but xxd is distributed with vim and is commonly available. xxd is more useful with many formatting options. These commands are useful for examining files with unknown formats, by dumping the contents in binary/octal/hex, and ASCII. For example, this shows data in hex:
$ printf ABC | od -An -tx1
41 42 43
You can also use od to convert binary numbers to human readable ones. (So if some field of some data file held 4-byte integers, you could cut that column, convert to text, and paste the columns back.)
strings finds text in binaries by searching for sequences of characters, of at least four characters. This is an incredibly useful utility. It can be used to find command help (when proper documentation is lacking but some help messages have been compiled in). You can determine configuration and other used file pathnames (common example is using strings on libnss_files.so, to find the /etc files used; these aren’t documented anywhere). strings is a commonly used tool in forensic analysis of binary files.
strings has useful options including -a (search whole file), -e encoding, -f (when scanning multiple files at once, displays the filename), and others.
diff This command compares two versions of some file. There are binary comparison tools called cmp (useful for GIF, etc.) and the more useful rdiff (package librsync on RH systems). Other similar tools are diffpp (pretty-prints the diff output), diff3, comm, vimdiff, and sdiff (interactively merge the two versions into one new version.)
You can compare three files at once using diff3 (non-POSIX), which uses one file as the reference basis for the other two. For example, suppose you and a co-worker both have made modifications to the same file (“version1”) working at the same time independently. diff3 can show the differences based on the common file you both started with. The syntax for diff3 is as follows:
$ diff3 version-2a version1 version-2b
vimdiff does 3-way (even 4-way) diffs as well; it is commonly used with git as the “mergetool”, to show: version A, the common ancestor version, version B, and (in the bottom pane) what will become the merged version.
vimdiff Cheat-Sheet
$ vimdiff old new
Lines that are the
same in both files are folded (shows with a “+”). Use zo to open such folds to see the
lines, and zc to close
them again.
Use ]c ([c) to jump to the next (previous)
difference.
Use dp to put the current
file’s version in the other file.
Use do to put the other
file’s version into the current file.
Use ^W^W to toggle cursor
between the two files.
Use :diffu[pdate] to
force vim to recalculate the differences, and to update the highlights.
Use :wall or :wqall to save (and quit) both
files.
The diff utility is also used to create patch files (with the right options). Use “-e” to create an ed script. For patch files, prefer the unified output format, in POSIX locale, and TZ=utc0 (discussed later).
fold is a handy utility to break up long lines into two or more shorter lines. I often use fold to reformate student emails when they forget to keep lines short (they use word-wrap, which only wraps long lines at the sending end). Use the -s option to break at spaces only (that is, between words). Use -w width to override the default width of 80 columns per line.
Setting width to 1 (one) will put each character of the input on its own line. This is useful to process data one character at a time (e.g., frequency count of letters): ... |fold -w 1 |sort |uniq -c |sort -nr |head).
You can use fold to create a screen dump of the console on Linux:
WIDTH=$(dd if=/dev/vcsa bs=1 skip=1 count=1
2>/dev/null |od -An -t u1) # usually 80 or 81
fold -w$WIDTH /dev/vcs1
You can use wc -L file to determine the length of the longest line.
Some non-Filter commands useful in scripts
yes prints the command line arguments separated by spaces and followed by a newline, forever until it is killed. If no arguments are given, it prints “y”. Useful for testing, for example: yes testing |awk 'some prog'
While Linux has the seq command to generate a sequence of numbers, and some shells support brace expansions of “{1..$num}”, these aren’t part of POSIX yet (2015). (yes is common but not actually part of POSIX.) One way to generate a sequence of num numbers on Unix (which lacks seq) is:
yes '' | head -n num | nl -ba -s '' -w1
awk '
BEGIN {for (i=1; i <= ARGV[1]; ++i) print i}' num
(The awk script is POSIX.)
Another use is to automate interactive commands; running fsck may require you to type ‘y’ a lot. You can use yes to copy files with “noclobber” of existing ones:
yes n |cp -i * someplace/ 2>/dev/null
stat This non-POSIX but common utility can produce all sorts of information about any file, in a definable format. It is more useful than ls in scripts.
links (and lynx) This is a text-mode web browser. It works very well and very fast. What make this useful for scripters is the --dump URL option, which renders a web page as pure text:
links --dump http://wpollock.com/Cop2344.htm
Linux systems have some additional useful commands, such as “GET URL”.
script This non-standard command starts an interactive shell, saving all I/O to a file named typescript. Use this to record a session. The resulting text file can be edited to remove unnecessary commands; the result can be a useful “how-to”.
Unfortunately, script saves every byte in and out. So your fancy prompts, backspaces, ncurses output (from programs such as alpine or less), and especially interactive programs such as vim, add a ton of junk to the output. There is no simple way to clean that up (with something like vim, the output stream is non-linear). However, there are several steps you can take to make the results more useful:
· Export a simple prompt before starting script. (You can unset Bash’s PROMPT_COMMAND too.) I suggest dollar-sign space when non-root, and pound-sign space when root.
· Change the TERM setting to “dumb”. This should prevent a lot of non-printing bytes from being generated in the first place.
· Use a separate command line window for checking command syntax, doing ls to find the name of a file, or for reading man pages. Then type the final, correct command in the script window.
· Use a separate window to run vi or other ncurses editors. Indeed, I usually do this to edit file when using script:
(In
script’s window)
$ cat >file
<<\EOF
EOF
Edit file in a different window, then copy and paste the file’s content into the script window, followed by the “EOF”.
If the file is longer, put a fake vi command in the script window, edit the file in a different window, then only show a diff output:
(In
script’s window)
$ cp file
file.orig
$ # vi file
$ diff file.orig file
(And later, remove the comment character from vi command in the typescript.) This technique works for any GUI program you run as well.
· When done, you can remove backspaces with the (common but not POSIX) col command: col -bx typescript > updated
A better solution is to use TERM=ansi when running script, and then process the resulting typescript file with Andre Simon’s open-source ansifilter program. This, along with related useful utilities is available for Linux, AIX, Windows, and includes a GUI version (not installed on YborStudent). You can get the Linux source tar-ball from www.andre-simon.de. (This site is archived at archive.org.)
There is a zip file containing Windows executables in addition to the source. The zip is also available from sourceforge.net (but I couldn’t build that source on Linux).
To log all I/O of some shell script, use:
script -c 'bash your-script'
Or, you can add this to the top of the script:
exec > logfile 2>&1
set -x
enscript is a popular print filter for text data. It can convert a text file to PostScript, Rich Text Format (RTF), or HTML. You have many, many options to control what is printed and how. For example, you can convert a text file to a two column PostScript file using landscape mode, with the command:
enscript -2 -r -p psfile.ps file.txt
Or print Bash shell scripts with syntax highlighting as HTML, with:
enscript -Ebash -p - -w html script.sh
(Show man page, after installing with “yum install enscript”.)
Converting file formats is a common scripting task. Here’s two ways to convert HTML to PDF (both methods use non-standard utilities):
libreoffice --headless --convert-to pdf
and
html2ps file.html | ps2pdf - file.pdf
If you use a modern CUPS print system, you should be able to “print to PDF” from any application as well.
zcat To save time and effort when working with compressed files, a number of common filters are available that work directly on such files. These include zcat, zcmp, zdiff, zgrep, zmore, and zless. Additionally, the same commands are available for files compressed with bzip2 or xz (e.g., bzcat or xzcat).
echo It is not possible to use echo portably across all POSIX systems unless both the -n option (as the first argument, used by BSD systems) and escape sequences (used by Sys V systems) are omitted. The X/Open group defines extra functionality for system interfaces such as the echo utility (e.g., the Sys V backslash escapes), but neither POSIX nor the Open Group’s Single Unix Specification require XSI (X/Open group System Interface) conformance.
Since different Unix system have traditionally used incompatible echo command syntax there is no way to standardize it without breaking some Unix system. To address this issue the printf utility can be used portably to emulate any of the traditional behaviors of the echo utility. (The standard printf is based on the utility that first appeared in Unix version 9.)
Most shells including Bash use a built-in echo command that does support XSI (if the “-e” option is used) and/or BSD extensions. (Gnu echo does this too).
The most commonly used feature is to suppress the newline, when printing a prompt message. This is done with “echo -n text”, or by ending the text with the escape sequence “\c”, as in “echo -e 'name: \c'”. (No characters are output following the \c, not even a newline.)
The following are also recognized when XSI escapes are used: \a (alert or bell), \f (form-feed), \n (newline), \r (carriage return), \t (tab), \v (vertical tab), \\, and \0ddd (where ddd is an octal number representing some ASCII code).
printf The printf command works similarly to the same command found in Perl, C, AWK, and even the find command. (Except that floating point number formatting need not be supported.) It works like this:
printf [--] format [argument ... ]
The arguments are displayed to stdout, under the control of the format string. Each argument is formatted according to some conversion specifier in the format string. These always start with a percent symbol, end with a letter indicating the type of conversion desired, and optional flags in between. Other characters in the format are simply copied to the output unchanged, except that XSI backslash escapes (except for \c which is ignored) are recognized.
With either “echo $var” or printf $var, if var contains wildcards, they get expanded due to the order the shell does expansion processing (variables before wildcards). Use quoting (e.g. “echo "$var"”) to suppress the wildcard expansion.
printf doesn’t automatically output a newline at the end, so it is common to end format with “\n”.
If there are fewer conversion specifiers in the format than there are arguments, the format string gets reused. So:
printf '(%s) ' a b c ==> (a) (b) (c)
printf 'arg: %s\n' a b ==> arg: a\narg: b\n
If there are more conversions specifiers than arguments, printf behaves as if you had sufficient arguments (zero-length strings for text conversions, zero for numeric ones.) So:
printf 'X %s Y %s\n' a ==> X a Y \n
printf '%s, %s, %s\n' a ==> a, , \n
printf '%d, %d\n' 17 ==> 17, 0\n
Some of the commonly used standard specifiers are: %d (integers), %o (octal number), %x and %X (hex), %s (string), and %% (a literal percent symbol). The others are %c (any one char) and %u (unsigned integer), and the optional (not required but may be present) floating point specifiers of %f, %e and %E, (Scientific notation of n.n[eE]n) and %g and %G.
A nifty feature when using %d (or any of the others that expect an integer argument), is that if the argument is a character with a single or double quote in front, printf will display the numeric value of the character according to the charset (encoding):
printf '%d\n' "'A" # shows 65
(The printf function in awk, python, etc., may not have this feature.)
In addition to the standard C printf format specifiers, %b can be used to enable XSI backslash escapes. (Remember these escapes are always recognized in format.) With %s such escapes are not recognized:
printf '%s' '\t' ==> \t
printf '%b' '\t' ==> <tab>
Between the “%” and the conversion letter can appear the following:
%[flags][min-width][.precision]conversion-letter
Not all of these make sense with all conversions (or with each other). The flags that can be used after the % include:
- left
justify
+ precede numbers with a + or - sign
space precede numbers with a space or a minus sign
# precede octal numbers with a zero and hex
numbers with 0x or 0X
0 use leading zeros instead of
spaces for padding numbers
' use thousands separator (try it using en_US locale)
The min-width specifies the minimum number of columns to use (any number except 0). If the output is too short it will be padded on the left (a.k.a. right justified). This is just right for a column of numbers, but for strings you generally prefer left justified output.
The precision specifies a maximum width for strings, or a minimum number of digits for integers (so '%.5d' is the same as '%05d'). If floating point conversions are supported (%f, %g, and %e) then the precision specifies the number of digits to show to the right of the decimal point (the output is rounded to that number of places).
Examples:
printf '%05.5s\n' abc abcdefghi
printf '%.5d\n' 12 1234567
printf "%'d\n" 1234567
printf '%-6s %3d\n' Joe 78 Wayne 85 Jinglehiemmer 100
printf '%-6.6s %3d\n' Joe 78 Wayne 85 Jinglehiemmer 100
printf '%s\n' 'Wayne\tPollock' 'John\tDoe'
printf '%b\n' 'Wayne\tPollock' 'John\tDoe'
The version of printf built into other utilities such as awk, perl, and find, may work a little differently than this command. But the concept of a format string with conversion specifiers is a useful one to master. It is used in many other commands (such as date). Consider the following command to determine the largest file in some directory (not the only way):
find /usr/bin -printf '%s %f\n' | sort -n | tail
For testing purposes, know %d, %o, %x, %s, %b. Know common escapes such as \n, \t, %%, and \\. Know the flags of ‘-’, ‘0’, and the meaning of the minimum field width.
Showing error messages from a script
You can use something like this in your scripts to show prompts or error messages:
echo "This is some message" >&2
In a few (rare) cases you may want to send I/O to the user even if standard error was redirected. You can use this:
printf "Enter your password: "
>/dev/tty
read PASSWORD </dev/tty
The Power of Combining Simple Utilities
All sorts of reports and analysis can be made to data, using pipelines. For example, consider finding the ten most popular web pages on some web server, not counting CSS files. Here’s a simple script for processing the NginX web server’s access log. The format of each line is:
remote_IP - remote_user [time] request
status size referer agent
where remote_user is a dash (“-”) if unknown, time is the local time of the request (in the format “date:time offset”, so two words), request is two words, the command and the pathname of the requested file, status is a number such as 200, size is the number of bytes sent in the reply, referer is the URL of the page with the link that was clicked to get this file, and agent is the type of web browser used.
If you count carefully, the pathname you need is the seventh field. The whole script:
cat access.log |
awk '$7 !~ /\.css$/ {print $7}' |
sort | uniq -c | sort -rn | head
Lecture 7 — Python
Python is a programming language created by Guido van Rossum in the late 1980s. As the developer and overseer of the Python language, he has been designated as the “Benevolent Dictator for Life” (BDFL). He is presently working at Google on Python-related topics. The name is a reference to Monty Python’s Flying Circus.
Python is an open source project with an emphasis on group development. Anyone can propose a modification/update to Python by submitting a PEP, or Python Enhancement Proposal. (The process is described in the very first PEP.) The Python community as a whole is friendly and helpful. The Python forums are a great place for discussion of anything related Python, and there are web locations that provide free documentation on the use of Python.
The design goals of Python make it suitable for learning (and teaching), prototyping, and general scripting. It can be used instead of awk or Perl. (However, as with Perl, it is not mandated by POSIX; only awk is.) Python has a much simpler syntax than Perl, is interpreted (and so portable to any system with an interpreter installed). (Qu: what is an interpreter? What is a compiler?) Python comes with a large standard library (compared to awk). Available for Python are several GUI toolkits, the old (and bundled with Python) Tk toolkit, and the more modern Qt5 toolkit (used on Android cell phones). Thus, it is easy to create GUI scripts with Python. Python supports both simple scripts, scripts with functions, and “object-oriented” scripts suitable for large-scale development.
For these reasons, “Python is the new Perl” (that is, it has become quite popular). Today many new scripts are written in Python rather than Perl. Consider the Red Hat installer program, Anaconda: it’s a big Python script, hence the name. So is yum.
One reason for this switch is that Perl has grown too complex to learn easily. I still use Perl, but usually using someone else’s code I found using CPAN, or stolen from some Perl cookbook (I own several).
Python has had three major versions; the latest is not compatible with the earlier versions, and is often installed as “python3” while version 2 is installed as “python”. If you want to use Qt for the GUI stuff, you need to install that too. I installed the following packages: python3, PyQt-examples, python3-Qt5, python3-tools, and python3-tkinter. (For Python2, you will also need python-tools, python, and tkinter.)
There is excellent documentation available at Python.org, and elsewhere on the Internet.
The Bing search engine has a new widget: when you search for a common programming concept or term it knows about, it will show a window with code, where you can edit and run the code! Knows several languages.
Python Basics
Variables are created when you first assign something to one. Unlike the shell, where all variables contain text, Python variables can contain text, numbers, or other things. The naming rules are simple: letters, digits, and underscores, and can’t start with a digit.
Python keeps lists of variables and the “objects” they refer to. These lists are called namespaces. When using some variable for function, Python will look for its name in the local namespace, then the global namespace, and then the built-in namespace. (This is important if you create functions, or have multiple modules of code.)
You can also nest function definitions or blocks of code, allowing multiple local namespaces. This issue is known as scope. But don’t worry about that for this course; the shell doesn’t support namespaces or scopes.
Comments are the same as for many other scripting languages: a “#” starts a comment, through the end of that line.
Strings (text) can be quoted with either single or double quotes.
Python allows standard “C” backslash escapes in strings: \n, \t, \\. A backslash-newline is ignored, allowing strings to be continued on the next line. To disable these escapes, add the letter ‘r’ or ‘R’: r'C:\Windows'.
Python also allows
multiline strings, using 3 quotes (single or double):
>>> '''one
... two
... three'''
'one\ntwo\nthree'
(Such multline strings also serve as multiline comments in a Python program.)
Statements, as in shell and awk, end with a newline or a semicolon.
Here are some simple examples:
$ python3
Python 3.2.1 (default, Jul 11 2011, 18:55:33)
[GCC 4.6.1 20110627 (Red Hat 4.6.1-1)] on linux2
Type "help", "copyright", "credits" or
"license" for more information.
>>> name = input("Enter your name:
")
Enter your name: Hymie
>>> print("Hello, " + name)
Hello, Hymie
>>> x = 'one'; y = 'two'
>>> print( x, y )
one two
>>> ^D
$
The first example uses the built-in function input to read from the console, and returns what is typed (as a string); this gets assigned to the variable name. The remaining examples show the use of the print function. Note that (just as in shell) Python allows you to put several statements on a single line, separated with semicolons.
To exit from Python’s interactive mode, type control+d.
Using Functions
Functions are described later. Briefly, a function is a name given to a group of statements. When you invoke or call a function, the statements within it are executed. The result of executing those statements is usually a value, so you can use functions within statements and expressions.
Python3 includes 68 built-in functions you can use anytime. It also includes hundreds of other functions, included in various modules. Essentially, a module is a collection of functions.
The sample code above used two built-in functions, input and print. Notice how these function names are followed by parenthesis. This is required to invoke (or call) a function: function-name ( optional-argument-list )
Most functions will require one or more arguments. Arguments are expressions in a comma-separated list. (Both input and print are functions that take one argument only.) Typically a function computes something based on its arguments. The result of the computation is returned as the value of the function call. Thus, you can use function calls in expressions, assignment statements, or even as arguments! (Note that not all functions return a useful value; for example, print always returns the special value None.) Some examples of function calls:
x = min(5, 2, 17)
y = max( 3, min(5, 2, 17), 4)
print( str(23) + 'Skidoo' )
Functions from modules are discussed later. Briefly, you must include the module’s name, as in this example from the re (regular expression) module:
re.sub('foo', 'bar', 'it is foolish to hate food')
However, the name will be unrecognized until the functions of some module are read and the names put into a namespace. This is done with “import module”.
As a special case in Python, variables (depending on what’s in them) can have functions predefined on them. For example, if a variable contains a string, you can invoke various string functions (called methods) on that string:
x = 'hello, world!'
print( x. capitalize() )
print( x.upper() )
print( x.replace('o', 'y')
Math and other Operators in Python
Notice you can use “+” to concatenate strings. (Also try “'foo'*3”.) You can also do normal math operations with numbers. Use “**” for exponentiation. “/” does floating-point division, even on integers. To truncate (the way shell arithmetic does), use “//” instead; this give the quotient only. Use “%” for the remainder. Finally, you can convert strings to numbers using the “int()” function, and numbers to strings using the “str()” function.
Python can convert
automatically between some types of data (but not all). For example, you could
do math on Boolean values:
x = True; y = not x; z = x * 3
(True acts like one and False like zero in expressions.) Note
this is rarely useful. Python cannot automatically convert between strings and
numbers.
Some examples:
>>> x = input( 'Enter a number: ')
Enter a number: 123
>>> x
'123'
>>> x / 100
Traceback (most recent call last):
File "<stdin>", line 1, in <module>
TypeError: unsupported operand type(s) for /: 'str' and 'int'
>>> x = int(x) # convert to an integer
>>> x
123
>>> x / 100
1.23
>>> x // 100
1
>>> x % 100
23
>>> -x
-123
>>> ++x
123
>>> 2 ** 10
1024
>>> 4 + 3 * 2
10
>>> (4 + 3) * 2
14
>>>
To input and convert in one step: num = int(input('Enter a num: '))
There are some short-cuts available, to save typing. For example:
x += 1 # same as: x = x + 1
Python also supports “complex” numbers, used in engineering math: ((0+1j) ** 2).real # “-1”. (You can also use “.imag” to extract the imaginary part.)
Also notice the interactive Python prompt of “>>>”. At the prompt, you can type the name of any variable, or type in any expression and Python will tell you the value. An EOF (^D, or on DOS, ^Z) indicates the end; you can also use the exit() or quit() functions.
Besides this basic mode of work, you can install a simple Python shell, or IDE, called idle (or idle3). This has a few features such as syntax coloring, auto-completion, and a command history. (Show.)
The normal flow of work is to create a script using an editor, a small bit at a time, and save and test (run) the script. You can do this easily with two windows, or using features of vim and/or screen. A second (or third) window is also handy to try out some statements in the interactive python shell or in idle.
If statements and Blocks of Code
A code block is a group of statements. All the statements in the block are executed normally; however whole blocks can be skipped (with an if-statement), repeated (with a loop), or used to define a function.
Unlike most other languages, Python doesn’t use curly braces to indicate a “block” of code. Instead, all statements in a block are indented by the same amount.
If you start a block, or continue a long line, the prompt changes to “...”. The block ends when the next line starts with the previous block’s indent. (In the interactive mode, you also need to enter a blank line to end the block.) Here’s an example of an if statement (similar to the shell’s if statement you have already learned):
>>> name = input("Enter your name:
")
Enter your name: wayne
>>> if name == "wayne":
... print("Welcome, Wayne!")
... else:
... print( "Go away!")
...
Welcome, Wayne!
>>>
The end of the block was indicated by typing a line with no (or a different) indent; here, I just hit enter in column one and that was the end of the if statement.
Notice the colons. In Python, blocks always start with a line that ends in a colon. Also note the else keyword has the same indent (none in this example) as the if keyword.
If the entire block can fit on one line, you can put it there:
if whatever: x = x + 1; print(x)
The if statement takes an expression of any type. The expression is evaluated and converted to a Boolean value (True or False) if necessary. Generally, numbers other than zero (“0”) evaluate to True, as do non-empty strings:
>>> if 0:
... print('yes')
...
>>> if 1:
... print('yes')
...
yes
>>> if '':
... print('yes')
...
>>> if '0':
... print('yes')
...
yes
>>>
Loops
The blocking and indenting works the same way with loops as it does for if-statements. A loop is a way to repeat a block of code. This is handy to do the same set of steps for each line in a file, for each cell in a table, for each user, for each command line argument, for each file in a directory, etc. (As we will see, the shell and other languages such as awk have similar if statements and loops.)
Python has a while loop and a for loop, similar to those in other languages. A for loop is generally used to iterate over some list of things: lines in a file, files, command line arguments, records in a database, and so on. In Python, for loops always look like this: “for variable in list:”. Python will execute the (indented) block that follows once for each item in the list, setting variable in turn to each value of the list before executing the block. For example:
>>> for num in range(5):
... print( num )
0
1
2
3
4
>>> num
4>>> stooges = ['Moe', 'Larry', 'Curly' ]
>>> for stooge in stooges:
... print( stooge )
...
Moe
Larry
Curly
>>> for i in range(len(stooges)):
... print( str(i) + ': ' + stooges[i])
...
0: Moe
1: Larry
2: Curly
A while loop is a bit different; you specify some Boolean expression (one that evaluates to True or False). If True, the block is executed and then the expression is evaluated again. This continues until the expression evaluates to False. Such loops are useful when reading data from a file when you don’t know how long the file is, or asking a user if they want to “play again?”. For example:
>>> while num > 0:
... print( num )
... num = num - 1
...
4
3
2
1
>>>
(We could have used “num -= 1” in the while loop above, but not “--num”. Python doesn’t include “--” or “++” operators, so “--num” is the same as “-(-(num))”, and “++num” is the same as “+(+(num))”.)
Demo looking up the range() function in the on-line Python docs. Note, typing the range() function alone at the interactive prompt won’t show the resulting list. The reason is, internally the range doesn’t generate the list. Imagine how much memory would be wasted if it did, and you tried “range(1000000000)”! To view the list generated by range, try “list(range(5))”. (I tried that once with 1000000000, and it sucked up all virtual memory to the point where I had to reboot!)
Be careful when picking variable names! Since Python looks up user-defined names first and built-in names last, you can easily hide some built-in function with a variable name. Try this (I did by accident once):
>>> list( range( 5 ) )
[0, 1, 2, 3, 4]
>>> list = [ 'not', 'a good', 'idea' ]
>>> list
['not', 'a good', 'idea']
>>> list(range(5))
Traceback (most recent call last):
File "<stdin>", line 1, in <module>
TypeError: 'list' object is not callable
>>>
You can fix this by using “del list”, which deletes a variable (in this case, list), and leaving any built-in meaning intact. (“del” can also delete elements from lists. Note del is smart enough to refuse to delete built-ins.)
If you import the builtins module (discussed later), you can refer to built-ins directly:
>>> import builtins
>>> builtins.list( range(5) )
[0, 1, 2, 3, 4]
Frankly, it is just easier to not reuse built-in names for your variables.
Lists and Strings
Python includes a rich set of operations that work on lists (arrays) and strings:
>>> name = "Wayne"
>>> name[0]
'W'
>>> name[-1]
'e'
>>> name[1:]
'ayne'
>>> name[0:-1]
'Wayn'
>>> toppings = ["meatball", "pepperoni",
"sausage", "anchovies"]
>>> len( toppings )
4
>>> toppings[:-1] # I hate anchovies!
['meatball', 'pepperoni', 'sausage']
>>> toppings[:2] + [ "pineapple" ] + toppings[2:]
['meatball', 'pepperoni', 'pineapple', 'sausage', 'anchovies']
>>> toppings
['meatball', 'pepperoni', 'sausage', 'anchovies']
>>> toppings[1:3] = [ "pineapple" ]
>>> toppings
['meatball', 'pineapple', 'anchovies']
>>> 'pineapple' in toppings
True
>>> 'sausage' in toppings
False
>>> toppings.remove( 'pineapple' )
>>> toppings
['meatball', 'anchovies']
>>> toppings.insert( 1, 'pineapple' )
>>> toppings
['meatball', 'pineapple', 'anchovies']
>>> del toppings[-1]
>>> toppings
['meatball', 'pineapple']
>>> topping1, topping2 = topings
>>> topping2
'pineapple'
As you can see, you can easily obtain a slice from any list, add to a list, and insert or replace parts of a list. You can check list membership. The elements of lists can be anything, even other lists. You can assign one list to a slice of another.
You can think of a list as an array. You can make a two-dimensional array using a list of lists, for example:
>>> x = [ [1, 2, 3], [4, 5, 6],
[7, 8, 9] ]
>>> x[0][0]
1
>>> x[1]
[4, 5, 6]
Python considers a string to be a list of characters, so you can use the same list operations. Unlike other lists, strings are read-only (immutable). So you can’t assign to a slice of one:
>>> name = 'Wayne'
>>> name[:3]
'Way'
>>> name[3:]
'ne'
>>> name[3:] = '' # Error: can’t modify strings!
Traceback (most recent call last):
File "<stdin>", line 1, in <module>
TypeError: 'str' object does not support item assignment
>>> name = name[:3]
>>> name
'Way'
>>>
The ability to easily work with text and lists makes scripting languages such as Python very popular.
Python also supports associative arrays or hashes; they are called dictionaries:
>>> stooge_says = { 'Moe':'Oh, a wise-guy!',
... 'Larry':'Hey Moe!', 'Curly':'Woob-woo-woo!' }
>>> stooge_says['Moe']
'Oh, a wise-guy!'
Notice the use of single-quotes; Python doesn’t care which type of quote is used. Also notice how the long line was continued, without extra indenting. Python noticed the list (in this case, the dictionary) wasn’t complete, and allows you to continue on the next line. As long as you respect the indentation rules, you can also continue long lines by ending the first with a backslash (similar to the shell).
>>> for stooge in stooge_says.keys():
... print( stooge + " says " + stooge_says[stooge])
...
Larry says Hey Moe!
Curly says Woob-woo-woo!
Moe says Oh, a wise-guy!
>>> list( stooge_says.values() )
['Hey Moe!', 'Woob-woo-woo!', 'Oh, a wise-guy!']
>>> print( stooge_says['Shemp'])
Traceback (most recent call last):
File "<stdin>", line 1, in <module>
KeyError: 'Shemp'
>>> print( stooge_says.get('Shemp', "Unknown Stooge") )
Unknown Stooge
>>> stooge_says
{'Larry': 'Hey Moe!', 'Curly': 'Woob-woo-woo!', 'Moe': 'Oh, a wise-guy!'}
>>> stooge_says.setdefault( 'Moe', 'WhyIOughtA...' )
'Oh, a wise-guy!'
>>> stooge_says.setdefault('Shemp','bee-bee-bee-bee!')
'bee-bee-bee-bee-bee-bee!'
>>> stooge_says
{'Larry': 'Hey Moe!', 'Curly': 'Woob-woo-woo!',
'Shemp': 'bee-bee-bee-bee-bee-bee!', 'Moe': 'Oh, a wise-guy!'}
>>>
Python also has read-only (“immutable”) lists called a tuples. (Also it has “sets”.) You create tuples the same way you create lists, only using parenthesis instead of square braces. While important topics in Python, they won’t be discussed further here.
Python supports printf-like formatting of strings, in two ways:
>>> print( '%5d%5d' % (3,4) )
3 4
>>> print( '{0:5d}{1:5d}' .format(3,4) )
3 4
>>>
The printf (print with formatting) function exists in many, if not most, computer languages, including POSIX Unix. The basic idea is the same in all: You supply a string with some placeholders included. This is followed by some data to be substituted for the placeholders. The placeholders can include formatting instructions.
In the two examples shown above, the old and newer python methods are shown. Both contain two placeholders; each value is converted to an Integer, padded if necessary to a width of five characters.
Unlike Perl and awk, Python doesn’t include regular expressions in the language directly. Instead, they are provided by the functions defined in the standard re module. By grouping functions into “modules”, Python reduces the memory used. Only a few of the standard functions are loaded by default. To use others, you will need to import the modules, such as re, that contain the functions you wish to use. Functions and modules are discussed next.
Functions
A function is essentially a named block of statements. By calling (or invoking) a function, the statements within will be executed at that time. Once the function call ends (we say it returns), execution picks up from where it left off:
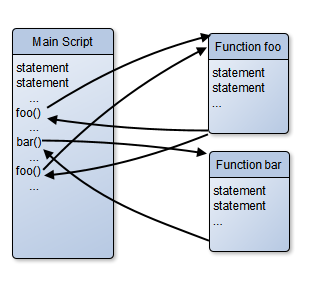
In the diagram above, notice that function foo is invoked from different places. (Not shown, but note that one function can be invoked from inside another.)
In addition to providing many standard functions, Python allows you to define your own functions. Defining functions allows you to avoid copy and paste, when you need to do the same sub-task from different places in your script. You define the code once, and then invoke it (or call it) from different places in your script. In addition, a lengthy script is often easier to understand if you break it down into shorter, simpler functions, each of which does some sub-task (and hopefully has a descriptive name).
Functions can invoke other functions. Functions can be passed arguments (just like any utility).
Functions are invoked by using their name followed by parenthesis containing a list of values called arguments. Even if you don’t pass any arguments to your functions, you still need the parenthesis to invoke them. You define a function by listing its name and a list of variable names to hold the arguments that get passed:
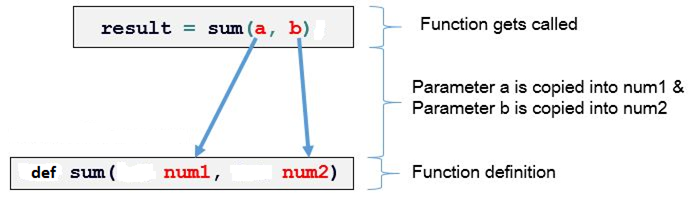
In the diagram above, the call to function sum passes two values, a and b. The values can actually be any expression at all, even one that uses other function calls! The expressions in the call are evaluated, and the two values get assigned to the local variables num1 and num2. Once the function call returns, all local variables are forgotten.
Here’s a simple example of defining a function that displays a greeting:
>>> def greet ( name ) :
... print( "Hello, " + name + "!" )
...
>>> greet
<function greet at 0x983bf6c>
>>> greet()
Traceback (most recent call last):
File "<stdin>", line 1, in <module>
TypeError: greet() takes exactly 1 argument (0 given)
>>> greet('Wayne')
Hello, Wayne!
When you invoke a function, Python stops what it is doing, runs the code from the function, and then resumes where it left off.
Functions
normally return the special Python value of None:
>>>
print( greet('Wayne') )
Hello, Wayne!
None
In a function, you can specify the value to return. Then you can use the function within any expression, or pass the result of one function call to another. This is done by including the statement “return some_value” in the function. When Python gets to that statement, the function call ends and the result is some_value. Note that some_value can be any expression, including one that invokes other functions.
Here’s an example of a function that computes something and returns the result:
>>> def times2(item):
... """ times2( number )
... Returns number * 2
... """
... return item * 2
...
>>> times2( 3 )
6
>>> times2( 'Foo' )
'FooFoo'
>>> times2( times2( 3 ) )
12
>>> num = 3 + times2( 4 )
>>> num
11
(Notice how the multiply works for strings too.)
Python also allows you to define default values for arguments, and to name them. The names are local to the function, and won’t conflict with variables of the same name elsewhere.
Note the multi-line string at the top of the function’s body, called the function’s docstring. Functions can start with such a documentation string, to show others (or yourself in the future) how the function is meant to be used. The docstring is shown if you use the built-in help function. (Demo “help(times2)”.)
Demo changing greet to not print, but to instead return a string.
Mixing Local and Global Variables in a Function — Skip this section
Python includes weird rules for the different namespaces, or scopes. If you assign to some variable from within a function, that variable has local scope. That sounds simple; consider this:
>>> foo
Traceback (most recent call last):
File "<stdin>", line 1, in <module>
NameError: name 'foo' is not defined
>>> def bar():
... print( foo )
...
>>> foo = 17
>>> bar()
17
Python looks up foo when bar is run, not when a function is defined. This makes sense. See if this code makes sense to you:
>>> def bar():
... foo = 22
... print( foo )
...
>>> foo = 17
>>> bar()
22
>>> foo
17
In this case, the name foo inside the function referred to a local variable, not the global one. The global foo still is set to 17.
If all that seems to make sense, I bet this will confuse you:
>>> def bar():
... print( foo )
... foo = 22
...
>>> foo = 17
>>> bar()
Traceback (most recent call last):
File "<stdin>", line 1, in <module>
File "<stdin>", line 2, in bar
UnboundLocalError: local variable 'foo' referenced before assignment
Most would have predicted invoking bar() would print 17. However, when the function is defined, Python sees you created a local variable foo. When the function is run later, it tries to display the value of that local variable. Since it doesn’t have a value assigned yet, you get this error!
In a function, a variable name either refers to a local variable or a global variable; you can’t reference both (not easily) in one function. So how can you change the value of a global variable? Like this:
>>> def bar():
... global foo
... foo = 22
...
>>> foo = 17
>>> bar()
>>> foo
22
If for some perverse reason you have a local variable with the same name as a global one (let’s say “x”), you can refer to the local one by “x” and the global one by “globals()['x']”. Best advice: avoid global variables!
In addition to mixing global and local scope, Python variables are actually references (pointers) to the actual data (objects). When you pass any immutable type to a function, that doesn’t matter:
>>> def foo(num):
... num = 17
...
>>> x = 22
>>> foo(x)
>>> x
22
It does matter if you pass a list or
dictionary, which are mutable:
>>> def foo(aList):
... aList.append(17)
...
>>> x=[22]
>>> x
[22]
>>> foo(x)
>>> x
[22, 17]
Python files that define things are called modules. Module files should have the extension “.py”. You can invoke these to use the defined functions and variables. Your system comes with many modules. Here’s one example:
>>> import random
>>> random.randint(1,10)
3
>>>
In addition to import, you can use functions from modules without qualifying them with the module name. You could repeat the above example this way:
>>> from random import randint
>>> randint(1,10)
6
>>>
(You can import all the functions from a module, using “*” instead of a function name. That imports all names from the module, except those that start with an underscore.)
Python makes it easy to create and use your own modules. Like functions, modules often start with a docstring. Once imported, you can then use the help function to see the docstring of the module or any of its functions. You can use the built-in function dir(module) to see what is defined in module.
When looking for a module, Python will look for a file named module.py in the directories listed on PYTHONPATH. You can view the built-in path with:
>>> import sys
>>> sys.path
['', '/usr/lib/python32.zip', '/usr/lib/python3.2',
'/usr/lib/python3.2/plat-linux2', '/usr/lib/python3.2/lib-dynload',
'/usr/lib/python3.2/site-packages']
(Note the initial zero-length entry, which says to look in the current directory.)
The sys module has many useful functions and variables defined that you can use. For example, the command line arguments to a Python script can be accessed with the list sys.argv. (sys.argv[0] is the name of the script, similar to the shell’s “$0” parameter. You usually want to use sys.argv[1:].)
Even if you don’t import them, Python’s idle tool will import all .py files from the current directory. If any of those have the same name as a standard module, then your code will be used instead. (In my case, I had “warnings.py”, Python3 change the name of a standard package “warn” to “warnings”, used by the idle program (which is a Python script). The fix was to rename my file.)
It is easy to make a file that can be used as a module (and thus imported) or as a script (and run from the shell command line). You just wrap the statements in a function, typically called main, and then have an if statement at the end that says if run as a script, run main. Here’s an example called modscript.py:
#!/usr/bin/python3
""" This file is both a script and a module """
def hello ():
print( "hello" )
def main ():
hello()
if __name__ == "__main__": main()
This module can be either used as a script, or imported as a module:
$ ./modscript.py
hello
$ python3
>>> import modscript
>>> modscript.hello()
hello
>>> from modscript import *
>>> hello()
hello
>>> ^D
Python modules can be compiled (which makes them load faster, although all modules execute at the same speed). Compiled modules are found the same way as regular module files, but have an extension of “.pyc”. Python will create these automatically when it first imports some module. (If both foo.py and foo.pyc exist, Python will use foo.py if it is newer than foo.pyc.)
There is a repository for popular 3rd party Python modules you can just download and install, from pypi.python.org. There is even a command line tool “pip” that downloads, validates, and installs modules for you. This repo currently (2016) has over 70,000 modules you can use such as requests (HTTP), PyPDF2, pyzmail, twilio (SMS), and many more.
Python Examples
To get help on any topic, keyword, module, or function, start the interactive help system:
>>> help()
...info about help...
help> quit
>>>
(If you add documentation in the right way to your own modules, this works for those too.)
Here’s an example that shows how to work with files in Python:
>>> import os
>>> os.getcwd()
'/home/wpollock'
>>> f = open( "myfile.txt", "w" )
>>> f.write("Hello from the world of Python!\n")
32
>>> f.close()
>>> f = open( "myfile.txt", "r" )
>>> text = f.readline()
>>> f.close()
>>> text
'Hello from the world of Python!\n'
>>> ^D
$ cat myfile.txt
Hello from the world of Python!
Here’s a version of the Unix wc utility, in Python:
$ cat wc.py
#!/usr/bin/python3
""" Reads a file and shows the number of lines,
words, and characters.
"""
import sys
infile = open(sys.argv[1])
#lines = infile.read().split("\n")
# results an an extra string for the last newline
lines = infile.read().splitlines()
num_lines = len(lines)
num_words = 0;
# To account for the newlines:
num_chars = num_lines
for line in lines:
words = line.split()
num_words += len(words)
num_chars += len(line)
print( num_lines, num_words, num_chars )
$ ./wc.py wc.py
18 72 504
$ wc <wc.py
18 72 504
$
Here’s a simple “filter” script in Python:
#!/usr/bin/python3
""" A generic filter, that assumes all
command-line arguments are names of files.
This script will work like a standard *nix
filter, reading stdin if no file names
are provided.
"""
import
fileinput
for line in fileinput.input():
process(line)
def process ( line ):
...do something with each line...
This iterates over the lines of all files listed in sys.argv[1:], defaulting to sys.stdin if the list is empty. If a filename is ‘-’, it is also replaced by sys.stdin. Each line of input is passed to (your) function, named process in this example.
(Add more examples.)
Lua
Lua (means “Moon” in Portuguese; it’s not an acronym) is a modern scripting language, similar to Python, and designed to be embedded in applications that allow scripting. Examples include VLC, Wireshark, Nginx, Celestia, and commercial software such as Adobe Photoshop Lightroom. It is popular with software game engines (which use scripting for their actions).
More recently (2013), Wikimedia permits Lua scripts to run in its wiki pages, generating dynamic output “templates” that can be mixed, to make complex pages easy to create. Such Lua templates are included in the page. (See wikipedia.org/wiki/Template:Lua_hello_world.) Lua is becoming very popular; you can download Lua for Windows or Linux, and start scripting.
Lecture 8 — Perl
Perl was invented by Larry Wall to solve some Unix scripting problems. Other methods involve learning a variety of filter commands, some quite complex (such as awk and sed), and learning how to “glue” these pieces together with shell constructs. This is difficult; passing the values from one part of the script to another often involve complex quoting, named pipes, or temporary files.
Perl was designed as a single scripting language that combined all the features (and then some) of other filters plus the shell, into a single scripting language. Now you only need to know a single filter command. While complex, Perl is forgiving of style. The motto is “there is more than one way to do it in Perl.”
In additional to the powerful built-in string, regular expression, and file processing capabilities in Perl, it is extensible with modules. A vast number have been written and tested, and are available through the Comprehensive Perl Archive Network (CPAN), (discussed below).
Perl is so adept at these tasks it became the standard scripting language for CGI programming (for websites). Perl regular expression parsing is second to none and is often used in other languages (referred to as Perl Compatible REs).
Fortunately, you don’t have to learn all of Perl to create very useful “one liners”. Perl is fully documented in a variety of formats including man pages (see perltoc, perlintro, perlretut, and perlfaq) and perldoc -f func
Perl was invented by a linguist who felt that languages should be flexible. In Perl you can say “if (expr) cmd;” but you can also say “cmd if (expr);” Over time Perl has grown and supports different styles such as object-oriented programming. Because of the size of the language, most people only understand a subset of Perl; if the reader doesn’t know the same subset as the author, a Perl script can be unreadable.
Simpler (but nearly as powerful) scripting languages have started to become popular, including Python, Lua, and Ruby (show demos).
The following (very) brief intro to Perl is adapted from How to Set Up and Maintain a Web Site 2nd edition, by Lincoln D. Stein, (C)1997 Addison Wesley, pages 469-472.
Perl supports three basic kinds of variables: simple variables known as scalars, array variables (which are lists of values), and hashes (also called associative arrays). The names of variables start with a character to indicate their type: $scalar, @array, and %hash. Variables are automatically initialized.
When referring to elements of arrays and hashes the leading character indicates the type of the element: $ary[1] and $hash{'foo'}. Notice how Perl uses square braces to index into an array, and curly braces to return a value from a hash.
Perl scripts allow blank lines and comments that start with (a word starting with) a “#” and continues through the end of that line.
Like awk, and unlike Python, strings and numbers are converted back and forth as needed.
Strings in single quotes are taken literally; with double quotes, the string is scanned for variables and escape-sequences (e.g., “\n”) which get replaced with their values. (When printing whole arrays, double quotes work best.)
In Perl, all statements end with a semicolon. So a simple (first) Perl script:
#!/usr/bin/perl -TW
print "Hello, World!\n";
The options above enable extra checks (“Taint mode”) and warnings. (Note, if you run the script from the command line, you need to specify “-T” if it is also in the she-bang line.)
You can also list the script on the command line, using the “-e” option:
perl -TWe 'print "Hello, World!\n";'
(The final semicolon in your script doesn’t seem to be required.)
Functions such as print can have parenthesis around the argument list, but that is optional. So:
print( "Hello, World!\n"
);
and: print "Hello, World!\n";
also: $msg = "Hello,
World!\n"; print $msg;
(Using single quotes would print the backslash-N literally.)
Arrays hold ordered lists of values, using a zero-based index:
@stooges = ( 'moe', 'larry', 'curly' );
print "@stooges"; # print the list
print @stooges; # print w/o spaces
print @stooges . "\n"; # print 3
print $stooges[0], "\n";
print $stooges[@stooges - 1], "\n";
($moe, $larry) = @stooges;
Hashes hold unordered lists of values, each indexed by a string key:
%partner = ( "Laurel", "Hardy",
"Abbot", "Costello" );
%partner = ("Laurel" => "Hardy",
"Abbot"=>"Costello");
$partner{"Adam"} = "Eve";
print "$partner{'Abbot'}\n";
print keys(%partner), "\n";
Perl removes redundant parentheses, so the following are equivalent:
@list = ( 'a', ('b', 'c'),
'd' );
@list = ( 'a', 'b', 'c', 'd' );
To generate arrays of arrays, you need to store a reference to the sub-array. These are generated by using square braces instead of parenthesis:
@list = ( 'a', ['b', 'c'], 'd' );
(print "@list\n"; shows a and d, but a reference to a list, not “b c”! To dereference a reference use curly braces around the reference, like this:
print "$list[0] | @{$list[1]} | $list[2]\n";
Besides the usual math operators (including “**”) Perl uses a period for string concatenation: "a" . "b" and an x for repetition: 'a' x 3 (=”aaa”).
You can define a range in Perl with: @range = (1 .. 10); or for $i (1 .. 10).
For logical comparisons Perl uses standard ops for numeric comparisons (“==”, “!=”, “<”, etc.) but the following for string comparisons: eq ne lt le gt ge cmp. (the $a cmp $b operator and the numerical equivalent of $a <=> $b returns -1, 0, or +1 for $b greater than $a, equal to, or $a greater than $b. You can also test files with: -e file (exists), -r file (readable), -d file (directory), and others. There are also several versions of and, or, and not operators.
To test an expression for true or false, an expression is converted to a string. Then if "0" or "" it is false, otherwise it is true (so 0.0 which converts to "0" is false but "0.0" is true).
Like awk, Perl breaks up input lines into fields you can play with or test (if you ask it too; in awk, it happens automatically). The current line is put into $_.
You must request Perl to break the line into fields by running the split function. With no arguments, this will split the current line (“$_”) into an array of fields that are separated by white-space (and returns it; older versions of Perl implicitly set “@_”, but no longer). So to print the second field of each input line (the “-n” means run for each line):
cat file | perl -ne \
'chomp; @words = split; print "$words[1]\n";'
You can print the last word like this:
cat file | perl -ne \
'chomp; @words = split; print "$words[@words-1]\n";'
Loops (while, until for, foreach)
foreach $i (1..5) {print "$i ";} // Uses $_ if no $i
while (expr) {...} until (expr) {...}
for (init; test; incr) {...} //
can use for instead of foreach
if (expr) { statement...}
else, elsif, last (=break) and next (=continue).
Use statement if (cond); or statement unless (cond);
or statement while (expr);
Input: <> means read a line from stdin (incl. EOL), returns 0 on EOF. To read from file:
open(NAME,
"filename") or die ("msg: $!\n");
$line =
<NAME>; while ( <NAME> ) { ... }
(Note: input goes into $_ if you don’t put it elsewhere. Some common idioms:
while (<>) { # reads a line into $_
print; # prints $_
}
if (/foo/) # means if $_ matches /foo/, a.k.a. if ( $_ =~ m/foo/)
# a.k.a. if ( m/foo/ )
Use chomp $var to remove trailing newline (if any) from $var (or $_).
“=~” means “bind to”. So value =~ m/foo/ means match value against /foo/. Also used with s// (substitution operator), tr/// (translate operator), and others. Returns true (1) or false (0) if matched. So:
$bar =~ s/a/b/ # changes a to b in $bar; returns 1 if any change made.
A key benefit of Perl in shell scripts is the powerful regular expression language.
Perl has some command line arguments that wrap a “one-liner” in one or another type of loop, allowing Perl to operate just like sed (“-p”) or sed -n (“-n”).
Functions and Modules
Perl allows you to define functions, and save perl code in modules. Like Python, Perl has a list of places it will look for modules (“@INC”), so make sure you put any modules in one of those places. (Perl will add to the standard list the value of the PERL5LIB env. var; see below.)
To define a function in Perl, you use this syntax:
sub my_func {
print "The first arg is: $_[0]\n";
return "anything";
}
$result = my_func( 2, 3 );
Any values passed in when invoking the function are stored in @_.
A collection of functions and variables in Perl is a package. When a package is stored in a file of the same name, it is called a module. Perl modules should have the extension “.pm”, and the files should be in the directories listed in @INC. To use one, you need to tell Perl to find it and read it:
use module; # Note, no quote marks used!
or: require module;
(If the module doesn’t have the “.pm” extension, you can still use it by putting the actual name in quotes like this: “use "foo.pl"”.) Module names may be hierarchical; a module called “local::lib” refers to a file “lib.pm” in a directory “local”, which in turn should be found in one of the places listed in @INC. However, the replacement of “::” with : “/” doesn’t happen if you quote the module name. Creating your own modules is harder than this discussion implies. It isn’t as simple as with Python.
To refer to some function or variable in a package, you also use double colons: “package::function”.
Command Line Options
She-bang: #!/usr/bin/env perl or #!/usr/bin/perl -TW
-c check the script for syntax errors
-e 'script' repeat for multiple scripts on one cmd line.
-i[ext] process input (“<>”) in place by renaming the input by adding .ext and redirecting the output. If no .ext than original isn’t saved.
-n Puts a loop around the script: LINE: while(<>){script}
(Can use LINE in next and last.) This is much like sed -n.
-p Similar to -n, this put makes Perl act like sed (process then print each line). This is the same as the above loop, plus: continue{print or die "-p destination:$!\n"}
-T Force taint checks even if not running suid/sgid (which does -T by default). This makes sure no un-processed user input can be used in dangerous ways. (Very useful for CGI!)
-w Turns on several useful warnings.
-W Turns on all possible warnings.
Perl also has a directive you can add to the top of your script:
use strict;
Forces you do declare variables before use, and other “best practices”.
You can trace Perl scripts, similarly to using the shell’s “-x” option. You pass the “-d” option to enable the debugger; by default that pauses between each statement. To simply run and trace, you need to set some Perl debugger options too:
$ PERLDB_OPTS='AutoTrace NonStop' perl -de \
> 'print "foo"'
main::(-e:1): print "foo"
foo
Using CPAN:
Run cpan (or “perl -MCPAN -e shell”) once to configure it interactively. The defaults are usually good enough. To re-configure run the cpan command “o conf init”. cpan is best run as root, so installed stuff can be automatically put into the correct places. Use the “h” command to display the available commands. Some of the most useful include “m /RE/” (Search CPAN for a module name matching RE, case-insensitive), “i module” for info about module, “perldoc module” for details on module, and “install module”. (Note, the perldoc function will require you to install lynx web browser.)
The cpan command can be run interactively (then you say “install foo” or “make foo”), or just run cpan moduleName. To install the latest version of cpan, run “cpan CPAN”. To be able to validate downloads, run (as root) “cpan SHA Module::Signature”. To update all installed modules to the latest versions, run the cpan command “upgrade”.
Qu: I am not root, how can I install a module in a personal directory? Ans: You need to use your own configuration, not the one for the root user. CPAN’s configuration script uses the system config (set by root) for all defaults, saving your choices to your MyConfig.pm file (a user’s cpan home is ~/.local/share/.cpan/; you can delete that to start over).
You can also manually initiate this process with the following command: perl -MCPAN -e 'mkmyconfig' or by running “mkmyconfig” from the CPAN shell, or even using “o conf init”. You will need to configure the makepl_arg setting to install stuff in your home dir, something like this:
o conf makepl_arg "PREFIX=~/perl"
or:
o conf
makepl_arg "LIB=~/perl5/lib/perl \
INSTALLMAN1DIR=~/man/man1 \
INSTALLMAN3DIR=~/man/man3"
(Don’t forget to create these directories.) If you change individual settings with o conf, you make those settings permanent (like all “o conf” settings) with “o conf commit”. You will also have to add ~/man to the MANPATH environment variable, and tell your Perl programs to look into ~/perl5/lib/perl, either by including the following at the top of your Perl scripts:
use lib "$ENV{HOME}/perl5/lib/perl";
or by setting the PERL5LIB environment variable, for example:
export
PERL_LOCAL_LIB_ROOT="~/perl5";
export PERL_MB_OPT="--install_base ~/perl5";
export PERL_MM_OPT="INSTALL_BASE=~/perl5";
export PERL5LIB="~/perl5/lib/perl/i386-linux-thread-multi:~/perl5/lib/perl";
export PATH="~/perl5/bin:$PATH";
(The weird pathnames are Perl’s defaults; it is probably best to stick with that.)
To search CPAN for a module, use:
cpan> m /RE/
To install some module (and all its dependencies), use:
cpan> install module
(From the shell prompt, just type “cpan module”.)
Examples
Search and replaces strings in many files:
perl -pi -e 's/text1/text2/g;' *.ext
or:
perl -pi.bak -e 's/text1/text2/g;' *.ext
find / search_criteria | xargs \
perl -pi -e 's/text1/text2/g'
Show fix-style.pl.
Show Perl/Tk hellotk.pl (demo via Knoppix, or install Windows Perl & Tk)
Show urldecode.
Show url2html.
Sending email with Perl:
cpan Net::Cmd; cpan Net::Config; cpan Net::SMTP
Then show mail.pl.
Lecture 9 — awk
Awk is a filter command (added in the late 1970s to Unix). It is named after its three co-inventors: Aho, Weinberger, and Kernighan. Awk proved so popular that it was extended with many useful feature five years later. Today Gnu provides gawk, and other dialects such as nawk (new awk) exists and are POSIX compliant. Gnu awk (gawk) is the most popular version and includes many very useful features missing from POSIX awk, including regex backreferences, TCP/IP and PostgreSQL DB commands, and many minor improvements.
The oldest version of awk dates from the 1970s. Awk version 2 was invented in the mid-1980s. POSIX awk is based on awk v2. However many systems provide multiple versions (for backward compatibility) and the version called “awk” on your system may be the original version (sometimes called oawk), version2/POSIX (sometimes called nawk), or the Gnu version (often also called gawk). There are other versions too.
Until Perl, awk was the most powerful filter available. (And since Perl isn’t part of POSIX you may not find it on all systems; awk is always available.) Unlike most *nix filters that do a single task, awk (like sed) is a multi-tasker. You can use awk instead of a pipeline of many simpler utilities. Awk is well-suited for many tasks such as generating reports, validating data, managing small text databases (e.g., address book, calendar, rolodex), document preparation (e.g., producing an index), extract data, sort data, etc.
Among awk’s more interesting features is its ability to automatically break the line into fields, to do math, and to perform a full set of programming language tasks: if, loops, variables, functions, etc. These features make awk very useful for both one-liner scripts and for more complete programs. Awk is normally used to process data files and to produce reports from them or to re-arrange the files.
Awk is used this way: awk options 'script' [argument ...]. The script consists of one or more awk statements. Typically, the script is enclosed in single quotes (and may be several lines). For longer scripts, you can also specify a file containing the script with the -f file option (which can be repeated; all the scripts are concatenated). The arguments are filenames just like for other filter commands.
Actually, the arguments may be either filenames or variable assignments. (So avoid using filenames with an equals-sign in them!) Such assignments are processed just before reading the following file(s). (See also the ‑v assignment option, which processes the assignment before anything else.)
Awk has a cycle like that of sed: A line (record) is read, then broken into words (fields). Next, each awk command is applied, in order, to the line, if it matches. Then the cycle repeats.
Most awk statement has two parts:
pattern { action-block } semicolon_or_newline
A missing pattern means to apply the action to all lines. A pattern with no action means to print any matching lines (like grep).
A statement can appear on a single line and no space is needed between the pattern and action (or between statements). For readability, usually you put one statement per line, with spaces or tabs between the pattern and action. The open curly brace of an action-block must be on the same line as the statement’s pattern.
An Action-block can contain any number of awk commands. These are separated with newlines or semicolons. So instead of writing:
/foo/ { action1 }
/foo/ { action2 }
you should write:
/foo/ { action1
action2
}
or:
/foo/ { action1; action2 }
Statements must be separated by a newline or by a semicolon. (Gnu awk doesn’t require a semicolon or newline between statements; e.g.: awk '{print}{print}' instead of '{print};{print}').
An awk statement may also be a function definition. You can use those in actions. (It doesn’t matter where in the script you define these; the whole script is read before it is run.) Function definitions look like this:
function name(parameter_list) { statements }
Discuss style: one liners, multiple short statements, or long actions. Bad style:
awk '{print};function foo(){print "foo"};$0=="abc"{foo();next}' FILE
Awk variables don’t have to be declared, and can hold either numbers or strings. Many variables are pre-defined, e.g., RS is the record separator (normally a newline). Awk also provides one-dimensional arrays but the index is a string. (See below.)
The value of a variable will be converted as needed to/from string, numeric, and Boolean values. To force a variable to be treated as a number, add 0 to it; to force it to be treated as a string, concatenate it with the null (empty) string. When converting a string to a number only a leading number is used. A string without a leading number converts to zero. true/false values: An expression that evaluates to the number zero or null string is considered false. Anything else means true. (Somewhat surprising is that "0" converts to true, not false!)
String literals are enclosed in double-quotes and can use common (C) backslash escapes: \n, \t, \\, etc.
Awk reads input up to the RS value (record separator). This is normally a newline but can be any single character. If RS is set to null (“RS=""”) then a blank line is the record separator. Also a newline becomes an additional field separator.
Next awk splits the line into fields using the value of FS as the field separator. FS may be a single char, a single space (then any run of white-space (tab, space, or newline) is a field separator, with leading and trailing white space ignored), or some ERE. E.g. “FS="[ ]"”:
$ echo ' 1 2 3 ' | awk '
BEGIN {FS=" " }
{ printf NF ": " $1
for (i=2; i<=NF; ++i) printf "|" $i
print ""
}'
3: 1|2|3
(With FS set as “FS="[ ]"” instead, the output is “7: |1||2||3|”.)
Once the line (record) is parsed, awk sets the variables $1, $2, ... to each field’s value. $0 is the whole line. NF is the number of fields. You can use $expression to refer to any field. Using $NF and $(NF-1) are common.
Changing NF will add/remove fields from the line. Assigning to a non-existing field adds fields to the line (and resets NF; skipped fields contain null strings).
Awk sets NR and FNR to the line (record) number; FNR starts over for each file. You can set OFS on ORS (output field/record separator) characters too.
After parsing the input, awk checks (in order) each statement in the script, to see if the pattern matches. The pattern is usually an ERE but can be any Boolean expression. If true then the action is executed. When the end of the script is reached, awk starts a fresh cycle.
AWK patterns may be one of the following:
BEGIN (All statements with this pattern are run before reading any data)
END (All such statements run in order after all data is read.)
Expressions (generally used to test field values):
/ERE/ (matches against whole record/line)
text ~ /ERE/
text !~ /ERE/
lhs == rhs (or !=, <, <=, >, >=, in, etc.)
pattern && pattern
pattern || pattern
pattern ? pattern : pattern
(pattern) for grouping
! pattern
pattern1, pattern2 an inclusive range of lines
The EREs are similar to those in egrep (except meta-chars don’t need a backslash).
Summary of pre-defined variables:
· RS, FS Record separator, field separator
· OFS, ORS “print x,y” is the same as “print x OFS y OFS ORS”
· NR, FNR Current record number; FNR restarts at 1 for each file
· FILENAME Current file being processed; stdin shows as “–”
· ARGC, ARGV, ENVIRON Used to access parameters and the environment; cmd line args (minus the script and options) are in ARGV[1]..ARGV[ARGC-1]; ARGV[0] is “awk”.
· RLENGTH, RSTART Set by match function; see below
· SUBSEP “ary[x,y]” is the same as “ary[x SUBSEP y]”; see arrays below
The most useful actions include print and printf:
print [comma separated list of expressions] - adds ORS at end, OFS between expressions
printf format, list of expressions that match place-holders in format:
{ printf "%-15s %03d\n", name, total }
(This will print the name in 15 columns, padding with blanks on the right, then the total, padding with zeros. The output will be nicely lined up in columns.) Any print or printf can be followed with a redirection:
print stuff | "some shell command"
and print stuff
> "some file" (“>>” works too)
(Don’t forget the quotes!) Each print/printf maintains a separate stream, so you can redirect some output to one place, and other output to a different place.
Operators are similar to those in C (and Java, JavaScript, Perl, ...), with these additions:
· Any space between two expressions, means to concatenate those as strings.
· A “^” means exponentiation; other operators include ++, --, %, etc.
· “$numeric_exp” means a references to a field. Note high precedence!
· A “~” (“!~”) is used to (not) match, e.g., var [!]~ /RE/.
· The expression “val in array” is true if array[val] has been defined.
It is easy to forget that white-space is the concatenation operator, which has low priority. So:
print "result: " 1 + 2 3 + 4 # prints result: 37
In an assignment statement, you omit the slashes from an RE. Ex: “FS="[ ]"”.
Arrays — Awk supports one-dimensional arrays that use strings for the subscripts. (These are often called associative arrays.) You also use “in” with a special form of the for loop, to iterate over each item in the array (var is set to each index):
for ( var in array ) statement
To simulate a 2-d array, you used to have to use string concatenation, something like “array[i "," j]”. Modern/POSIX awk allows us to use “array[i, j]”, which is the same as “array[i SUBSEP j]”. (Show two-d-arrays.awk.)
When using the in operator with these pseudo-2-d arrays, use parenthesis around the subscripts, e.g., “(x,y) in ary”.
To remove an element, use delete array[index]. (The statement “delete array” erases the whole array, but currently, only in gawk. For POSIX prior to 2012, use “split("", ARRAY)” to delete an array.)
You can also use if, while, do statement while, for(init;test;incr), for (var in array), break, continue, exit, block-statements with { and }, next, nextfile, and getline [var].
Using shell variables in awk: You can use the ENVIRON array to access awk’s environment. You can access command line arguments with the ARGV array (indexed from 1 to ARGC-1). A more common solution is to create a shell (not awk) script that runs awk '... '"$1"' ...' to access shell’s $1. Complex quoting can result! (“awk '$1 == "'"$1"'" {...}'”).
You can pass values
in to awk from the command line,
like so:
awk -v name=value
(can repeat -v)
but this is dangerous if value
has backslashes. Use ENVIRON
or ARGV methods instead.
In addition there are a slew of standard functions for math (int, exp, log, sqrt, rand, etc.) and for string manipulation (see the man page for details):
int(num) Returns the integer part of num, for example int(3.14) returns 3.
srand([num]), rand() Generates random numbers; the only function in POSIX that can do so (without using C). The srand function sets the random seed for rand. It defaults to using the epoch time (number of seconds since 1970), a.k.a. a Unix timestamp (this is the only way from shell):
awk 'BEGIN { srand(); print srand() }'
Note that if your AWK script is invoked more than once per second, you get the same number each time!
Each call to rand produces the next pseudo-random number in the sequence, in the range [0..1). (This means including zero but excluding 1.) Starting with the same seed value, you always get the same sequence.
Often you need random integers in a given range. To obtain a random integer from [0..n) use something like this:
srand(); num = int(rand() * n)
To have the numbers start at (say) 1 instead of zero, just add 1.
On Linux, you can use the shuf command for random numbers, e.g., “shuf -i 1-10”. On MacOS or BSD, use jot. There are other ways as well:
echo $(dd if=/dev/urandom bs=1 count=4 \
2>/dev/null | od -An -tu4)
You can use that (or any environment variable) in AWK like this:
RAND=$(dd ...)
awk 'BEGIN { srand('$RAND') }
... num = rand()... }'
If you want random digits and characters:
head -c 16 /dev/urandom |base64 |head -c 22 # Linux
The following is POSIX, except for /dev/urandom; just change “10” to the length desired:
tr -cd '[:print:]' </dev/urandom \
|od -cAn -N10 |tr -d '[:blank:]'
split(string, array [,ERE]) Splits the string into fields, storing each in the array. If you don’t specify an ERE to use, the current value of FS is used instead to split the fields. Note the array indexes start with 1, not 0.
sub(ERE, repl [,string]) Searches through string for the first occurrence of the ERE and replacing it with the text repl. If the string is omitted $0 is used. This works like the sed command s/ERE/repl/, except no back-references. (Can use an “&” in repl to mean the text that matched.)
gsub(ERE, repl [,string]) The same as sub, but every occurrence is replaced.
length([string]) The length in characters (not bytes!) of the string, or $0 if string is omitted.
index(string, substring) Returns the position in string of substring, or zero if it doesn’t occur.
match(string, ERE) Returns the position of ERE in string, or zero if it doesn’t occur. This function also sets the variables RSTART and RLENGTH to the starting position in string that matched the ERE, and the length in characters of the matched text.
substr(string, start [, length]) Returns the substring of string starting at position start, of length characters (if there are that many). If length is omitted, the rest of the string is returned. Note the first characters has position 1, and not 0. (It is common to use RSTART and RLENGTH with substr, right after using match(). This is useful since POSIX awk doesn’t support backreferences.)
getline This function has several forms. It reads the next record of data, or reads from a specified file, or from the output of a pipeline, into either $0 (resetting NF etc.) or into some specified variable.
tolower(string), toupper(string), sprintf(format, args) These have the obvious meanings.
close(stream) Close is used when printing to a file or pipe, or using getline from a file or pipe. (E.g., if your code includes > "foo" or |"cmd", you would use close("foo") or close("cmd")).
Gnu awk has the useful non-standard asort (sort an array by values), asorti (sort an array’s indexes), and gensub (like gsub but with back-references; note the double backslash in this example):
$ echo abc |awk '
{ s = gensub(/.*(b).*/, "x\\1y", "g"); print s }'
xby
Or to swap “<a,b>” to “<b,a>”:
$ echo '<a,b>' |awk '
{s=gensub(/<(.*),(.*)>/,"<\\2,\\1>", 1); $0=s};1'
<b,a>
The match function also supports capture groups in Gnu awk.
Note that unlike sub and gsub, gensub doesn’t modify the string (optional 4th argument, $0 by default) but returns the result. Also note the need to double up the backslashes in the replacement string (do that with sub and gsub too).
Examples are the best way to learn. Awk one-liners are very handy to more easily solve tasks that otherwise require long pipelines of sed, cut, sort, etc. Try to convert your other filter pipelines to awk. Examples:
Explain this output (hint: has less to do with awk than with numbers):
$ awk 'BEGIN{print length( 0123 )}'
2
$ awk 'BEGIN{print length( 123 )}'
3
$ awk 'BEGIN{print length( "0123" )}'
4
$ echo 0123 | wc -c
5
Display the last X characters from every line:
awk '{printf("%s\n", substr($0,length($0)-X))}' file
Display all lines longer than (say) 80 characters:
awk 'length($0) > 80' file
Print and sort the login names of all users (from /etc/passwd):
BEGIN { FS = ":" }; { print $1 | "sort" }
Count lines in a file: END { print NR }
Common
AWK idiom: Work like sed (change lines that match, and output all):
awk
' /.../ { ... };1'
(The “1” is a pattern that matches anything, and the default action of print
is done. A non-zero integer expression for the pattern means “true”.)
Precede each line by its number in the file: { print FNR, $0 }
Display only the options of any command from its man page (bin/showoptions):
man -s 1 "$*" |col -bx |awk '/^[ ]*-/,/^$/' |less
Reformat /etc/hosts to list only one name per line:
awk '{ for ( i=2; i<=NF; ++i ) print $1, $i }'
Print the first and fifth fields from /etc/passwd in the opposite order:
BEGIN { FS = ":" }; { print $5, $1 }
Summarize data. (Show interrupt_cnt.awk.) Note POSIX awk doesn’t have any built-in sort functions. (Gnu awk does.) The common solution is to run the output of awk through a pipe into the sort utility. It is also possible to define a sort function in awk in about 15 lines:
function qsort (A, left, right, i, last) {
if (left >= right) # do nothing if array size < 2
return
swap(A, left, left + int((right-left+1)*rand()))
last = left # A[left] is now partition element
for (i = left+1; i <= right; i++)
if (A[i] < A[left]) swap(A, ++last, i)
swap(A, left, last)
qsort(A, left, last-1)
qsort(A, last+1, right)
}
function swap (A, i, j, t) {
t = A[i]; A[i] = A[j]; A[j] = t
}
Process INI files with awk: validate, display sorted list of name=values. (Show cfg.awk.)
Print the last record of a file where each record is a block of lines that starts with “START”:
tac file |awk '1;/START /{exit}' |tac
awk -v n=1 '
/START/ { capture = 1; delete saved; n=1 }
capture { saved[n++] = $0 }
END { for (i=1; i<n; ++i) print saved[i] }
' file
(The second solution is pure awk, although deleting an array this way is a Gnu extension. Consider how you could use this to extract the last email from an mbox file. Hint: emails in mboxes start with “From ”.)
Address book lookup script, with fields defined for first, last, phone, etc.
Users logged in (but not) from HCC. (Process who output).
Reformat the output of some command. (Modify df output to skip %used column, and any non-disk lines. Show df.awk and df2.awk.)
Merge every line that begins with the ‘[’ character with the previous one. This is very difficult, since nearly all filter commands work on whole lines. One trick is to read all the data into memory, then use a global regex to replace “\n[” with just “[” This can be done with many filters; here’s how with Perl, sed, and awk:
perl -0 -pe 's/\n\[/[/g'
sed ':a;N;$!ba;s/\n\[/\[/g'
awk '{rec = rec $0 RS}
END{ gsub(/\n\[/,"[",rec); printf "%s", rec }'
(The first part of that sed script loops to append all input, then does the substitution.) But such solutions can have poor performance if you don’t have sufficient memory. A simpler way is possible if you can find some character you know can’t appear in the data, say “~”. Then:
tr '\n' '~' |sed 's/~\[/[/g' |tr '~' '\n'
(If this comes up often (and with large files), a C program might work better.)
Convert file formats. For example, you can easily convert CSV or TSV files to another format, such as QIF (Quicken Interchange Format). Note, CSV format isn’t standardized! So you may have to “convert” the CSV output of (say) Excel to the CSV format expected by another program. (Awk is good for converting file names too.)
Print the IP address for a given host. Parse the output of nslookup:
nslookup foo.com |awk '$4~/^foo.com/{print $6}' RS=''
(Parsing the output of “host -t a wpollock.com” might be easier.)
Process Apache error log to find the top 10 “File does not exist” files and the web page referrer (with the bad link): (Convert this sed script to awk)
$ sed -e \
'/File does not exist/s/^.* exist: \(.*\)$/\1/' \
-e '/, referer/s/^\(.*\), referer.*$/\1/' error_log \
|sort |uniq -c |sort -nr |head
Extract some data from the output of a command:
With POSIX awk, you can extract the name of a disk partition from within a string of other output using match and substr (note, on Linux hard disks are named “sd<disk><partition>”). Here’s an example (try on YborStudent):
$ lsblk -l --output NAME,TYPE,FSTYPE |grep LVM2 \
| awk '{ p = match($0, /sd../);
if(p) { print substr($0, p, RLENGTH) }
}'
Define and use a function to clear an array (See function_demo.awk):
{ list[$1] = $2 }
END { for ( name in list )
print name, list[name] | "sort"
clear( list )
}
function clear( array )
{ for ( indx in array ) delete array[indx]
}
There are some incompatibilities between Gnu awk and POSIX awk. If necessary, you can make “awk” an alias for “gawk --posix”, and use gawk when you want to use the Gnu extensions. Gnu awk also has an option “--lint” to check your script and display warnings for questionable code.
Print a range of lines from a syslog log file: To display all log entries related to xinetd between two times: /date1/,/date2/ {if ($5 ~ /^xinetd/) print}
Using a pair of patterns to select a range of lines only works if you know the exact dates that will appear in the file. Otherwise you need a more complex solution. (Show show-range.awk <show-range.dat.)
(From the output of elfdump), print only the lines starting “Section Header” if the sections have the “SHF_WRITE” (section is writable) flag:
elfdump -c|awk 'BEGIN{RS="";ORS="\n\n"};/SHF_WRITE/'
While elfdump may not be available on all systems, similar utilities are readelf and objdump, but with different output formats. For example:
objdump -h cmd |tail -n +2 |paste - - |grep -v
READONLY
readelf -t cmd |paste - - - |grep WRITE
Sort a file, except for the header:
awk 'NR==1; NR>1{print|"sort"}; END{close("sort")}'
(Or use the gawk sorting features.)
Given a text file with some sections (sets of lines) delimited with, say, HEAD and FOOT, output the whole file with the delimited lines having '#' in front of them.
awk '/FOOT/{s="";next};{print s $0};/HEAD/{s="#"}' file
Print the month number, given a month name:
awk -v m=Apr '
BEGIN{print (match("JanFebMarAprJunJulAugSepOctNovDec", m)+2)/3}'
That doesn’t fail well with an invalid month. Another approach is to build an array, using month names as indexes:
awk -v m=Apr 'BEGIN { month["Jan"]=1;
month["Feb"]=2;
month["Mar"]=3; month["Apr"]=4; month["May"]=5;
month["Jun"]=6; month["Jul"]=7; month["Aug"]=8;
month["Sep"]=9; month["Oct"]=10;
month["Nov"]=11;
month["Dec"]=12;
print month[m] } '
Add a footer to a file:
awk '/foo/ { ++cnt }
END { print "num foo =",cnt+0 >> ARGV[1] }
' file
Of course, this won’t work if you pipe into the awk script instead of listing a file. It would probably be safer to test ARGC and/or FILENAME, to be sure.
Print the longest line (the length function defaults to the length of $0. The if-statement makes sure there was at least one line):
awk 'length > maxlen {maxlen = length; maxline
= $0}
END {if (NR) print maxline}
'
When to use awk or sed or plain old shell or something else?
Sometimes you can solve a task using different tools. There are times when one solution is “better” than another. But most of the time, it won’t matter!
Any tool could be used when you only need to process a small amount of data, say hundreds to a few thousand lines. If you have more than that, the performance of the shell may become noticeable. This is because the shell generally processes text using code such as:
while read LINE
do : something with line
done < file
The something with line above often involves external (non-built-in) utilities to be invoked, such as tr or even a sub-shell. Creating a new process for every line can cause noticeable performance loss. This is why script writers prefer using shell built-ins, even if it makes the script uglier to read.
Complex tasks, even for small amounts of data, may be best written in awk or sed. This is because shell scripts can be tricky (many “dark corners”) and the best features are non-portable. Portability matters (when you organization moves from Solaris to HP_UX, AIX, BSD, or Linux). A portable script is also less likely to break when handed unexpected data.
sed is best for simple, line at a time transformations (using “s”), over a small range of lines. One reason is sed’s BREs support back references.
awk supports extended regular expressions but not backreferences. (Note that Gnu awk does has some support for that.) While you can achieve the same effect using several awk statements, a single sed script with an RE using back references is simpler. In addition, awk does a lot of parsing for every line of input (field splitting). This is handy when you need it but does make awk slower than sed, when you don’t need that feature.
Perl is much more powerful than awk and has better regular expressions then any standard utility, but Perl is slower (in most cases) than awk or sed, is non-standard, and is much more difficult to master. Still, there are times when Perl’s extra features are handy, and you don’t need to master the whole Perl language to use it for powerful one-liners. (There are other languages too, such as Python, Lua, or Ruby.)
Here’s an example task, solved with shell, sed, and awk: Write a script that displays the previous and following line to any line containing “$1”:
Shell (show “context.sh en afile” also with “three” or “ne”):
TEXT="$1"
shift
SHOWNEXT=0
PREVIOUS=
cat "$@" | while IFS= read -r LINE; do
[ "$SHOWNEXT" = 1 ] && printf '%s\n---\n' "$LINE"
SHOWNEXT=0
case $LINE in
*${TEXT}*) printf '%s\n%s\n' "$PREVIOUS" "$LINE"
SHOWNEXT=1
;;
esac
PREVIOUS="$LINE"
done
sed (show “context.sed en afile”):
TEXT="$1"
shift
sed -n -e '/'"$TEXT"'/{x;1!p;g;$!N;p;$!a\
---
;D;}' -e 'h' -- "$@"
awk (show “context.awk en afile”):
BEGIN { text = ARGV[1]; delete ARGV[1]; shownext = 0
}
shownext { print; shownext = 0; print "---" }
$0 ~ text { print previous; print; shownext = 1 }
{ previous = $0 }
Python (show “context.py en afile”):
import sys
text = sys.argv[1]
def process ( filename ):
if filename == '-':
file = sys.stdin
else:
file = open( filename )
lines = file.read().splitlines()
for i in range( len(lines) ):
if text in lines[i]:
if i != 0:
print( lines[i-1] )
print( lines[i] )
if i < len(lines) - 1:
print( lines[i+1] )
print( "---" )
file.close()
if len( sys.argv[2:] ) == 0:
sys.argv.insert( 2, '-' )
for filename in sys.argv[2:]:
process( filename )
To me, it is obvious that awk is the way to go even if there wasn’t a lot of data to be processed. If portability isn’t a concern and you have Gnu grep, it has an option for this task. (Note the solutions aren’t 100% as they will sometimes display an extra “---” after the last match. Fixing that is left as an exercise for the reader.)
To compare different solutions, use “time command options”. Note however that timing a single run over a small file will give misleading results; the dominate factor will be the one-time interpreter startup. Try running instead with a dozen or more files (can be the same one).
Task: produce a strong pass-phrase of four words:
You can generate good passphrases by picking 4 random words from a long list. One simple way (on Linux) is with:
shuf /usr/share/dict/words | head -n 4
If you don’t have shuf on your system, try this (shell and Perl) script (genpassphrase on YborStudent):
WORDS=/usr/share/dict/words
MAX=$(wc -l </usr/share/dict/words)
for i in 1 2 3 4
do NUM=$(perl -e "print int(rand( $MAX ))+1;")
sed -n "${NUM}p" $WORDS
done | tr '\n' ' '
If you don’t have Perl but do have /dev/*random, you can generate the random integers with this instead:
NUM=$(( $(od -An -N4 -tu4 /dev/urandom) % MAX + 1 ))
You could also solve this with Python, but not awk. The reason is, awk doesn’t have a way to generate good random numbers, needed for security applications such as this. The only purely POSIX method of generating decent random numbers is to write a C program, since POSIX doesn’t require /dev/*random.
Task: Reformat data
[Posted on comp.unix.shell by Joe Young <j.joeyoung@gmail.com> on 10/28/2010, as “Find Almost Uniq Lines in Sales Report”]
“I have a sales report. And it prints several hundreds of lines like this:
1 Sales restaurant from 2010091009 and period is: 009
open and the store_id 04 20100910
2 Sales restaurant from 2010091009 and period is: 009 checking and the store_id
04 20100910
3 Sales takeaway from 2010091009 and period is: 009 filling and the store_id 04
20100910
4 Sales takeaway from 2010091009 and period is: 009 open and the store_id 04
20100910
5 Sales takeaway from 2010091009 and period is: 009 open and the store_id 04
20100910
6 Sales takeaway from 2010091009 and period is: 009 open and the store_id 04
20100910
7 Sales takeaway from 2010091007 and period is: 007 open and the store_id 10
20100910
“Fields are: record-number, store-type [text:from ...], sales-number [text:and period is:...], period-number, store-status [text before: and the store_id ...], store_id, and the date.
“Problem: many (but by no means all) lines are almost total duplicates, with the exception of their record number, which is always unique. So I need to [discard duplicates]. I can’t just strip the numbers off, sort and uniq the remainder, and then make new record numbers. (The record number needs to be authentic, but it doesn’t matter which record number is used from the duplicate records.)”
Solution 1:
awk '!a[substr($0,index($0, " ")+1)]++' file
This is a variant of a popular awk idiom of removing duplicates (see below).
Solution 2:
sort -uk2 file
This sorts uniquely on the full line from the 2nd field on, ignoring the first field (the record number we want to ignore). Note this won’t preserve the record order if the record numbers aren’t already in numerical order, as they are in the example data above. The awk solution works in both cases.
Remove duplicates from an unsorted file:
awk '!x[$0]++' fileWithDupes > newfile
The array keeps track of lines seen so far; this idiom takes advantage of the fact that uninitialized array elements are zero, and in a pattern, zero means false while one means true. So if x[$0] isn’t zero, the line is not printed. This technique can be used with fields of a line instead of whole lines. (Qu: what happens if the fileWithDups is huge, say > 2GiB?)
The base for that code is:
awk '!x[key]++'
which is equivalent to the (clearer):
awk 'x[key] == 0 { print } { x[key]++}'
The above prints all the lines having a key that has not been seen before. “key” is a generic term; in practice you can use the whole line, a certain field, or in general any expression. Here the “key” is the part of the line following the first space. That’s the substring selected by substr($0,index($0, " ")+1). Removing the “+1” would include a leading space in the key.
Task: Convert the newlines to commas (except for the very last one, which is to be left unchanged).
awk '
BEGIN { ORS = ""; prev = "" }
prev { print "," }
{ print prev = $0 }
END { print "\n" }
'
Alternative solution (sed deletes final comma, then appends a newline):
tr '\n' , |sed 's/,$//;G'
Task: commify (add thousandths separators) in integers.
With Gnu sed (“-r” means use EREs; “t L” is a goto statement):
sed -r ':L;s/\b([0-9]+)([0-9]{3})\b/\1,\2/g;t L'
With Perl:
sub commify {
my $nr = reverse $_[0] ;
$nr =~ s/(\d\d\d)(?=\d)(?!\d*\.)/$1,/g ;
return scalar reverse $nr ;
}
while (<>) {
print commify $_ ;
}
With awk:
awk '
{ for ( pat = "[0-9][0-9][0-9]$";
sub( pat, ",&", $0 );
pat = "[0-9][0-9][0-9]," pat
)
;
sub( /^,/, "", $0 ) # remove first (extra) comma
print }
'
With currently non-standard means (may not work in all locales):
Bash: LC_ALL=en_US printf "%'d\n" 12345678
awk:
echo
"1234567890" |LC_ALL=en_US awk '
{printf "%\047d\n", $0}'
Using
Gnu rev: rev
|sed 's/([0-9]\{3\})/\1,/g' |rev |
sed 's/^,//'
(“%'d” was added to POSIX/SUS issue 7 TC1 in 2013, but not all systems support it yet.)
You can find many other examples of a task done in various scripting languages, at RosettaCode.org.
Lecture 10 — Other Useful Commands
find Review find
tutorial resource. Puzzle:
name of largest man page? Answer:
find /usr/share/man -type f -printf '%b %p\n' \
|sort -nr |head
Gnu cp supports useful but non-POSIX options. Lookup how to use find and cp together.
Gnu find supports -printf,
an extremely useful action:
find -printf
'%i\n' |sort -un |wc -l # count files
find -printf '%T@\t%P\n' |sort -s -k1,1n |cut -f
2-
(which prints found files in modification
time order.) Also try “-ls”.
If you need to use shell features in the command you use with -exec, the POSIX (and ugly) approach is to use:
-exec sh -c '...$1...' sh {} \;
(That passes the two arguments, “sh” and “{}”, to the sh command; the first arg is ignored, but is used in ps output as the name of the command.) An example might be this (problem reported on comp.unix.shell on 2/21/2013, and answered by Stephane Chazelas <stephane.chazelas@gmail.com>): For each sub-directory, run mdsum on all files in the directory, and save the results in a file in that directory:
find -type d -exec sh -c 'for i do \
(cd "$i" && md5sum -- * > md5sum.out) done' sh {} +
(Note that Gnu find supports an -execdir
action, which simplifies that to just:
find -type d
-execdir \
sh -c 'md5sum -- * > md5sum.out' \;
-execdir is just like -exec, except that it does a cd to the directory of the matched file first; then “{}” expands to just the filename, not the pathname.
GNU find also supports the BSD-inspired -newerXY predicates, to see if some file’s timestamp is newer than a timestamp of a reference file. Instead of a reference file, you can specify the time as a string using a getdate(3) date specification when Y is ‘t’, the same type of date strings understood by at and date.
The syntax of this predicate is -newerXY reference. This test succeeds if timestamp ‘X’ of the file being considered is newer than timestamp ‘Y’ of the file reference. The letters ‘X’ and ‘Y’ can be any of the following letters: ‘a’ (last-access time), ‘B’ (Birth time, which is not supported in many common filesystem types), ‘c’ (last-change time), ‘m’ (last-modification time), and ‘t’ (the reference argument is interpreted as a literal time, rather than the name of a file; only valid for Y). For example:
find . -newermt '3 minutes ago' # or ... 'last monday', or similar
Lastly, note that newlines in filenames are problematic. Gnu find supports -print0, which produces a list of matching files separate by NUL, not newline. Many Gnu utilities support a matching “-0” option to read such lists. You can also pipe into the shell:
find whatever -print |while IFS="" \
read -r -d "" file; do ...; done
(The “read -d” option is Gnu, but under consideration by POSIX.)
A common use for find in scripts is with -exec grep. A common problem with -exec is that the output of grep and other utilities depend how many files are found. While Gnu grep has -H option to force the output format, a POSIX solution is this:
case $dir in
([./]* | "") ;;
(*) dir=./$dir;;
esac
find "$dir" -type f \
-exec grep -- "$pattern" /dev/null {} +
The /dev/null argument means grep “sees” multiple files, forcing the output format to be “filename: matching-line”. The case statement ensures find will work properly even if dir is set to something weird: a good technique to use in quality scripts.
Question posted to comp.unix.shell 2/9/2018 by Kenny McCormack, with title 'Need help with a specific "find" command'.
Update 2015: POSIX has approved adding “-print0” to find, and “-0” to read and xargs. Once this change makes it into the world, you can portably use this:
find ... -print0 |while IFS="" read -0r file; do ...; done
To safely process files with standard utilities, consider something such as this (any std commands in place of grep):
find ... -print0 | tr '\0\n' '\n\0' | grep ... | tr '\0\n' '\n\0' | ...
Although that requires your implementation allows NUL bytes in filenames. Also note that with POSIX, you can already do:
find ... -exec printf '%s\0' {} +
as a clumsy work-around for the missing -print0.
Puzzle: Craft a “find” command that will find all regular files whose ctime has changed in the last 10 minutes, but ignoring any files in directories whose name starts with a dot. That is, we should show “dot files”, but not even examine any files in “dot directories”.
find -type d ! -name . ! -name .. -name '.*' -prune \
-o -type f -ctime 0 -ls
locate This command can find files faster than the find command, but doesn’t search the live system. Examples (see man page): locate 'bin/command'; locate -i '*bin/*spell*'. The DB searched must be rebuilt after adding/removing files, usually via cron.
file This command examines a file to determine its type (and if text, the encoding and purpose, e.g., a shell script). Use file --mime to display a MIME string.
dd This ancient tool predates Unix and as a result has an unusual syntax. This command copies input to output, with the possibility of many conversions. No other command works as well for copying disk images. It is efficient and can reblock data (padding or splitting input blocks to output block sizes), swap bytes, read from or write to the middle of files, and do many other essential tasks. Here are a few examples:
dd if=/dev/urandom of=foo bs=1k count=1024
LANG=POSIX; who | dd conv=ucase 2>/dev/null
dd if=/dev/sda of=/dev/sdb conv=noerror,sync
dd if=/dev/sda of=~/sdadisk.img
dd if=~/sdadisk.img of=/dev/sdb
# Copy an ISO to a volume (pv shows a progress bar):
pv -tpreb foo.iso | \
dd obs=1024k oflag=dsync of=/dev/sdX
# Delete first 5 lines of a file, in-place:
count=$(echo $(head -n 5 foo |wc -c))
dd if=foo conv=notrunc bs=$count skip=1 of=foo
(That last example works even when you don’t have sufficient disk space for sed, or sufficient memory for ed. Note the extra echo; that’s because on Solaris at least, the output of wc includes leading spaces and this is the simplest way to remove them. You can also use “...| sed 's/ *//', or this “simple” solution: “... bs=${count#${count%%[! ]*}} ...”.)
If you copy a storage volume while it is mounted, the copy will be incomplete and corrupted. So don’t do that.
The dd command cannot correctly copy one disk to another if they have different sector sizes (since partition tables work in number of sectors and some math would be needed to fix the corrupted table on the destination). Also, if the destination is larger than the source disk, the backup copy of the GPT, which is supposed to be at the very end of the storage, gets copied to the wrong location. So any space after that becomes unusable unless you manually move that GPT.
rsync This command is used to synchronize local and remote directory trees, as efficiently as possible. (You will use rsync in the “backup” admin project.) rsync is efficient because it checks if the file being copied already exists. If it does and there is no change in size or modification time, rsync will avoid an unnecessary copy. If the file was changed, rsync will determine which parts changed and only transfer those.
The only problem with rsync is that it supports a zillion options, making it difficult to learn. But it is worth the trouble! rsync transfers only the changed blocks or bytes to the destination location, and uses compression, to reduce bandwidth use and make the transfer fast. You can use SSH to make the transfer secure. If not using SSH (say within a secure, private LAN, for backup purposes), you can run rsync as an on-demand daemon on the remote end (port 873).
The syntax is “rsync options source destination”. Either the source or destination (but not both) can be to remote hosts. To specify a remote location, use “[user@]host:path”. A relative path is relative to the user’s home directory on host. (Filenames with colons can cause problems, not just with rsync. Colons after slashes work fine, so use “./fi:le” instead of “fi:le”.)
The archive (“-a”) option is a shorthand for several others. It means to preserve permissions, owner and group, timestamps, and symlinks. The “-z” option enables compression. The “-R” option copies pathnames, not just the filenames. The option “-u” says don’t copy files if a newer version exists at the destination. There are many useful options. Some examples (show ybsync):
With the right options, rsync is very good about synchronizing replicas (such as a website mirror.
rsync -r ~/foo ~/bar # -r means recursive
rsync -a ~/foo ~/bar # -a means archive mode
rsync -az ~/foo remote:foo # copies foo into foo
rsync -az ~/foo/ remote:foo # copies foo's contents
rsync -azu ~/foo/ remote:foo #don't overwrite newer files
wget, curl, links The wget and curl commands are similar, and are used to fetch data across a network. Both have dozens of options and uses, but curl seems to offer more options (supports more protocols and authorization). You can use these commands to talk a variety of protocols (HTTP, FTP, and others), fetch single files or whole websites, entire files or just the headers, and much more. For example:
wget http://example.com/somecool.rpm
wget -qO- whatismyip.org
(“-q” suppresses informational messages, and “-O-” sends the results to stdout.)
curl whatismyip.org
curl -u wpollock:secret https://wpollock.com/
Normally, “wget http:/host/file” will download and save the results to file. The default for curl is to send the output to stdout, but you can make it work like wget with “curl -O http:/host/file”.
You can use links (or lynx) to extract text from a web page (a “page scrapper”):
links -dump https://www.whatismyip.com/ |\
awk '/Your IP/ {getline; print $1; exit}'
(This site shows your IP as encoded text, so you need to scrap the page. The IP address data is on the line after “Your IP”.)
Simple website monitoring via a curl script (prints the time for each failure):
while true; do
if ! curl -fSs --connect-timeout 5 http://example.com/ >/dev/null
2>&1
then date # change format to +%s for post-processing e.g. graphing
fi
sleep 10
done > monitor.log
nc The netcat program (“nc”) can do nearly any network-related task, so it is a natural fit for a script. It works at a lower-level than curl or wget, allowing you to send or listen to any port using TCP or UDP (or Unix sockets). You can use this in place of telnet client, set up a simple server, transfer data, network testing, etc. The man page lists several examples near the end.
tee This is a handy program that duplicates its input to its output plus to other destinations you specify. This can be used to capture results of the middle of a pipeline. Here’s a simple example:
find | sort | tee ~/files | grep something
Modern tee can list multiple files. The “-a” option says to append, if the files exists, rather than clobber them.
One handy trick with tee is to use /dev/tty as the file.
Zsh includes built-in support for tee; use setopt mult_ios and then:
cmd >&1 >some-file | other_command
xargs This command constructs and then executes command lines. It reads as many arguments from stdin as can be used in one command, runs the command, and repeats until all arguments have been processed (or until one invocation returns an exit status of 255. If you don’t supply any arguments, the default is to run echo.
A common use for xargs is to process the output of the find command efficiently:
find ... -print | xargs cmd initial_args
However, this can cause problems when the filenames found contain spaces or newlines. While Gnu find and xargs have extensions to address these problems, “find ... -exec cmd initial_args {} +” is often a better solution. Still, historically find didn’t support that option, so many scripts you will encounter will use xargs. (Note: In 2015 POSIX added -print0 to find and -0 to xargs. This form is often more readable.)
Sometimes the list of files doesn’t come from find, and xargs is useful then. For example:
grep -l pam_namespace | xargs vi
(Or use Gnu sed and its -i option.) The xargs utility is more controllable than find. For example, with xargs you can have multiple occurrences of “{}” in the command line (find -exec allows only one), use a different replacement string, allow flexible argument formats (e.g., one argument per line, with line continuation), a tracing mode (show each command line executed), control over the number of arguments per command invocation, and more.
An invocation of the cmd that returns an exit status of 255 will terminate xargs so no further invocations are tried. With find, the -exec action just returns false and the command continues. If any of the -exec invocations returned non-zero, find itself will (at the end) return a non-zero value. (Note that utilities should avoid the exit status of 255 unless preventing further invocations with xargs is intended; some other non-zero status should be returned in most cases.)
Other Uses: Not all commands respect POSIX command line length limits, so find may end up constructing a command line that will fail. With xargs you can limit the size of the command line with the “-s” (or “-L” or “-n” arguments).
Argument lists are not always made up of existing file names (e.g., hostnames, usernames, URLs, ...). So find can’t always be used. Or some command other than find may be used to generate a list of filenames. For example, to do something for each logged in user:
who -s |awk '{print $1}' |xargs something
To concatenate the contents of all the files whose names are listed in file:
xargs cat < file > files.contents
Another use is to interactively pick which arguments to process. The command:
ls *.txt | xargs -pn1 rm
will prompt for each file and only delete it if you answer affirmatively to the prompt. The “-p” means to prompt, and “-n 1” means limit each command to one argument.
Move all files from directory dir1 to directory dir2:
ls dir1 | xargs -I {} -t mv dir1/{} dir2/{}
The xargs -I string argument replaces each occurrence of string (the string “{}”as for the find command is commonly used) in the command line with each filename piped to xargs.
To duplicate a directory tree structure try (pax -rw src dest is best):
find . -type d |sed 's@^@/usr/proj/@' |xargs mkdir -p
The sed command adds “/usr/proj/” to the front of each name, and each resulting directory name is created with mkdir. Note this will fail if any of the found directory names contain spaces or newlines.
To combine the output of multiple commands (or just multiple lines) into a single line:
{ logname; date; } | xargs
Remember, the default command if none is listed is echo. So you can use xargs to combine multiple lines of input, into one line of output.
Gnu parallel works like xargs (same syntax) but executes the built-up jobs concurrently. This can take advantage of multicore hardware to speed up many tasks significantly.
Using expect
Originally a TCL script, expect is a popular but non-standard tool available from expect.nist.gov. Expect is a tool for automating interactive (but non-GUI) applications such as ssh, sftp, passwd, fsck, etc. Expect makes this easy. Expect is also useful for testing these same applications. And by adding Tk, you can also wrap interactive applications in X11 GUIs (e.g., make a GUI version of the passwd program).
Interactive command line tools attempt to read input from (or write output to) /dev/tty. A favorite example is passwd, making it impossible to create a script to batch add accounts. (Linux useradd has an option to support, as well as the chpasswd utility, this but most systems require the use of passwd.) The expect tool uses Unix pseudo terminals to wrap up sub-processes transparently, so any process that reads or writes to a tty can be automated. With expect you say a command line to spawn as a sub-process (a child process), then list statements that list expected output and an action to run when you see that output (such as to send some input).
Here’s a sample expect script (~/bin/expect-demo) to changes passwords, which can in turn be used from a shell script (note this doesn’t show off the extensive abilities of expect, which inherits from TCL if statements, loops, etc.):
#!/usr/local/bin/expect -f
set user [lindex $argv 0]
set password [lindex $argv 1]
if { $user == "" || $password == "" } {
puts "Usage: <user> <password>\n"
exit 1
}
spawn passwd $user
expect "password:"
send "$password\r"
expect "password:"
send "$password\r"
expect eof
A more sophisticated version, mkpasswd, is available on some systems.
Expect can be used for many purposes, such as scripting commercial tools that only have limited command line options, or for testing any software. But while automating interactive tools is useful, but there are frequently better options. For example, a systems administrator needing to log into multiple servers for automated changes might use expect with stored passwords, rather than the more secure solution of ssh agent keys. A script to change passwords will often have those passwords show up in the (readable) script, or in a ps output (when used as command line arguments). (See pinentry.sh demo.)
The sshpass utility is marginally safer and easier to use, to specify an SSH password in a script. (Best would be using keys, not passwords!)
Sending Email From A Script
While it is possible to script mail and/or mailx, this is rarely a good idea. For one thing some versions of mailx and/or mail will interpret “~” commands in the body of the message even if not being used interactively. Other Unix mailers may have similar problems. These security issues aside, mail/mailx may do undesired and/or un-necessary processing. Ultimately mail/mailx will call sendmail anyway.
Instead it pays to craft your email message, including any headers, and pipe it into sendmail. While your system may have a different MTA than sendmail, whatever you have will likely have a symlink called sendmail that works as the original does:
sendmail [-f sender] [-v] [-t] recipients ... < msg
The msg includes both headers and the body. Some headers are required by SMTP standard (RFC2822); some MTAs will insert such required headers if missing. The -f option allows you to fake the envelope sender address (may require extra permissions). The -v option produces a delivery report (for the first recipient only, very useful in sendmail, less so for postfix). The -t option says to scan the headers for additional recipients. (Demo using wpollock.com email to pollock@acm.org.)
Try it! (Show ability to fake most headers, and the difference between the envelope and header addresses.)
Note some scripting languages have built-in means to send email (usually by invoking sendmail!) than may be more convenient to use, e.g., Perl’s Mail::sendmail module, or Python3’s email and smtplib modules.
So many choices: Picking the right tool for the job
“I need to replace “<a,b>” with “<b,a>” throughout some text file. What tool(s) should I use?”
There is no single method! One way would be to use the special features available in a powerful tool such as Perl or AWK. Using gawk for example:
$ echo '<a,b>' |awk
'{result=gensub(/<(.*),(.*)>/,
"<\\2,\\1>",1); $0=result}1'
<b,a>
However, using non-POSIX tools may mean portability problems. Many organizations do not allow third party software to be installed on their hosts. If a tool isn’t part of Solaris or HP-UX or whatever, you can’t use it in such places.
This particular task can be solved using standard tools. Substituting words on lines is a problem that sed was tailor-made for:
$ echo "<a,b>" | sed
's/<\(.*\),\(.*\)>/<\2,\1>/'
<b,a>
The problem is, the given task is too specific. What problem is the user really trying to solve? Too often user’s think they know the “only” solution and ask an implementation question such as this. If possible, ask the user for the real problem (or at least some more “context” to see the “big picture”) so you can pick a reasonable solution.
In this case, if you have anything else you want to do with the input text or if you have records that span multiple lines, then you’d probably want to use AWK instead. The given problem can be solved using POSIX features like this:
$ echo "<a,b>" |awk
-F'[<>,]' '{print "<"$3","$2">"}'
<b,a>
(depending on what the rest of the input data looks like.)
Task: “I have a shell variable containing ten (seemingly) random printable characters. I need to format these, transforming “ABCDEFGHIJ” into “ABCD-EFGHIJ” (that is, with a dash between the 4th and 5th characters).”
Many modern shells support extensions for formatting text this way:
VAR="${VAR:0:4}-${VAR:4:6}"
However, non-POSIX solutions should be avoided if there are reasonable, standard alternatives. Using just printf:
VAR=$( printf '%s\n' "${VAR%??????}-${VAR#????}")
But I like using sed for this:
VAR=$( printf '%s\n' "$VAR" | sed 's/..../&-/')
The echo command is not portable as different systems use it in incompatible ways. The POSIX standard replacement is printf. echo and printf are discussed in detail later (page 56).
Task: “I need to parse the output of df command, to only show the line for /var.”
Several solutions were posted on the Internet for this, including these two:
df -h | awk '$NF == "/var"'
df -h | grep '[[:blank:]]/var$'
The best answer in this case is to use: df -h /var
Lecture 11 — Command line processing (and interactive features) of the shell
Whether reading input from a file (a script) or from the keyboard, the processing steps are the same. A few extra steps are done on most modern shells when the shell is run interactively. These include displaying prompts, history expansions, and line editing; these features don’t apply to scripts. Also, the shell that is run first when a user logs in is call a login shell. A login shell runs a login script (other shells don’t) before printing a shell prompt. Finally some shells have a restricted mode, which disables a number of features. The idea is to only provide a restricted shell for guest users and for system accounts that need to run shell scripts.
Most shells accepts command line arguments that change their behavior to a strictly POSIX compliant mode (or restricted, login, or interactive mode).
POSIX shells process input by following the POSIX Shell Command Language Introduction steps. Modern shells such as Bash, Korn shell, Z shell, etc., add several extra steps to support their extra features. The shell does a number of distinct chores, in this order:
1. (Input) The shell reads its input either from a file, from the -c command option, or from stdin (standard input). Note if the first line of a file of shell commands starts with the characters “#!”, the results are unspecified by POSIX (because some other utility is then responsible for reading the file).
The Shell’s -c Option
Instead of reading commands from the standard input, the shell can read commands from a string. This is a surprisingly useful feature since you can build the string from other commands’ output. The syntax is:
sh -c 'command' [arg0 [args...]]
Where arg0 becomes the name of the command in ps output (not always). Normally we don’t care about that, and use something such as dummy or X or inline or sh for arg0. This command is often used with the shell exec command (one less process). Here’s an example:
echo one
two three | \
xargs sh -c 'exec echo "$@" foo' X
Notice how the sh command uses $@; these get replaced by the arguments added by xargs. The resulting echo command is:
echo one two three foo
Problem: Using find, copy all files from ~ named *.txt to /tmp.
1st try: find ~ -name \*.txt -exec 'cp {} /tmp ;'
which works but is not efficient. Using Gnu extensions:
2nd try: find ~ -name \*.txt |xargs cp -t /tmp
POSIX:
find ~ -name \*.txt -exec 'sh -c exec cp "$@" /tmp' X {} +
2. (Tokenizing) The shell breaks the input into tokens: words and operators separated by spaces (or some meta-characters). The words are classified as reserved words, operators, or just plain words. This is a complex step! One important part is quoting; this is used to remove the special meaning of meta-characters or keywords (such as “if”) to the shell. Quoting can be used to preserve the literal meaning of the following special characters (and prevent reserved words from being recognized as such):
| & ; < > ( ) $ ` \ " ' <space> <tab> <newline>
The following characters need to be quoted under certain circumstances:
* ? [ # ˜ = %
Ignoring quoting for the moment, the tokenizing can be explained this way: The shell starts reading input one character at a time until a token is recognized. The special characters listed above are tokens by themselves. Words are just word tokens; however, at the start of processing a command some words are recognized as keywords such as if, while, fi, and so on. These same words are not keywords if seen elsewhere on the command line, or if quoted. This explains why you need a semicolon or newline in front of “then” and “fi” in this example:
if test -r foo; then ...; fi
Word tokens are separated by white-space. (The white-space separators are not tokens).
The following is a list of the shell’s reserved words: !, {, }, case, do, done, elif, else, esac, fi, for, if, in, then, until, and while. In addition, the words [[, ]], function, and select can be special in some shells and should be treated as reserved (so avoid using these as filenames). Finally, words ending in a colon (such as “foo:”) are reserved.
Finally there is the maximum munch rule, used to resolve the ambiguous case when some characters may be interpreted as either a single token or two tokens. Consider these examples:
& & 2 tokens
&& 1 token
date&&cal 3 tokens
echo hello 2> foo 4 tokens:
echo, hello, 2>, foo
echo hello 2>foo the same 4
tokens
echo hello2>foo 4 tokens:
echo, hello2, >, foo
Quoted characters are always word tokens, never operators or keywords. The various quoting mechanisms are the escape character, single-quotes, and double-quotes: 'x', "x" (‘$’, ‘\’, and ‘`’ still special), and \x (when x is a meta-character), which is sometimes called escaping.
From the SUS: The backslash
shall retain its special meaning as an escape character [inside double-quotes] only
when followed by one of the following [5] characters [...]:
$ ` " \ newline
(Note ‘!’ acts weirdly (history expansion) in Bash inside of double quotes from the command line, but not from in a shell script, as history is turned off.)
Another part of tokenizing is line joining. If a line ends with (an unquoted) backslash, the \newline is skipped and the next line is joined to the current one. The \newline doesn’t separate tokens! (Line joining applies inside double-quotes too.)
The end
of a command is marked by a control operator token, one of:
&
&& ( ) ; ;; newline | || (and
EOF)
These are assigned a precedence, to resolve the ambiguity of (say):
false && echo one ; echo two # What’s the output?
(You can use command grouping to make this do what you want.)
Comment removal is the last part of tokenizing the input. “#” is recognized as the start of a comment token only if it is at the start of a word token: “ #x” (note the space) is a comment, but “ x#” is just a word token.
3. Alias expansion is done after tokenizing and before other shell processing. The token identified as the command word is an unquoted, valid alias name. If so, alias expansion is done at this time, before the list of tokens is parsed. The result of the expansion is just a string of text, which means if any expansion occurred, the input needs to be tokenized again before proceeding. (Alias expansion is described below.)
4. Command parsing is next. The shell examines all the tokens read and breaks them up into one or more commands. The shell recognizes several kinds of commands:
· simple commands (a sequence of optional variable assignments and redirections, in any sequence, optionally followed by words and more redirections, terminated by a control operator such as a “;”, newline, etc.),
· pipelines (one or more commands separated by “|”),
· AND-OR lists (one or more pipelines separated by either “&&” or “||”),
· lists (a sequence of one or more AND-OR lists separated by “;” or “&”),
· compound commands (a grouped command, loop, if statement, case statement, etc.), and
· function definitions.
(Generally speaking, there are simple commands, function definitions, and everything else is a compound command.)
Note that only simple commands can be preceded by variable assignments. These are put into the environment of that command only; the current environment is unmodified. So if currently FOO=one, then:
FOO=two echo $FOO # prints “one”!
FOO=two sh -c 'echo $FOO' # prints “two”!
FOO=two eval echo \$FOO # prints “two”!
FOO=two for i in 1 2; do echo $i; done # error!
FOO=two (echo $foo) # error!
(FOO=two env) |grep FOO # prints “FOO=two”!
(FOO=two : | env) |grep FOO # prints “FOO=one”!
(Make sure you understand the first example: “$FOO” is expanded in the current environment, whereas “FOO=two” is put into the environment of the echo command.)
At this point, the shell will process each simple command separately, in order. If the shell hasn’t read in enough input to find the end of the command, it goes back to the preceding (tokenizing) step and reads in more input. For each simple command the following is done:
a. The words that are recognized as either variable assignments (name=value) or redirections (“[n] op word”) are removed and saved for later processing in steps c and d.
b. The remaining words (that are not variable assignments or redirections) are expanded as described below in steps 4 through 7. If any fields remain following their expansion, the first field shall be considered the command name and remaining fields are the arguments for the command.
c. Redirections (found in step a) are performed next. If the redirection operator (“op”) is “<<” or “<<-” (a here doc), the word that follows op has quote removal done; it is unspecified whether any other expansions occur. For the other redirection operators, the word that follows the op is subject to tilde expansion, parameter expansion, command substitution, arithmetic expansion, and quote removal. (So, use quotes like “cmd > "$file"”.)
d. Each variable assignment (found in step a) is expanded for tilde expansion, parameter expansion, command substitution, arithmetic expansion, and quote removal prior to assigning the value. (Not pathname expansions, a.k.a. globbing.)
Note that field splitting is never done on variable assignments! As long as the name=value is recognized as a single word in step 2, any expansions done on the value will result in a single word. Consider:
foo=* # no quotes needed
foo='x date'
bar=$foo # no quotes needed
The order of steps c and d may be reversed when processing special built-ins.
What is the output of the following?
x=y echo $x
x=y x=z sh -c 'echo $x'
x=y : | x=z echo $x
x=y : | x=z sh -c 'echo $x'
env x=y echo $x
5. (Expansions) The shell performs several types of expansions on different parts of each command, resulting in a list of fields (or words), some to be treated as a command and the rest as arguments and/or pathnames (the command’s parameter list). Most expansions that occur within a single word expand to a single field. (It is only pathname expansion that can create multiple fields from a single word.) The single exception to this rule is the expansion of the special parameter “@” within double-quotes.
The expansions are done in this order, and are discussed in detail afterwards:
A. Alias expansion is done if the command name word of a simple command is determined to be an unquoted, valid alias name. Note that unlike the other expansions, alias expansion is done at the end of phase 2 (tokenizing), and thus can result in multiple commands.
B. Tilde expansion (~ or ~username)
C. Parameter expansion ($word or ${...})
D. Command substitution ($(cmd-line) or `cmd-line`)
The modern “$(...)” is preferred to the back-quotes, except perhaps in makefiles.
E. Arithmetic expansion ( $((expr)) )
6. Field splitting is performed on the results generated by the previous step. This is because what was one word before expansions may result in multiple words after expansions, for example:
FILES="file1
file2"
ls $FILES # results in: ls file1 file2
But since tokenizing was already done, “file1 file2” will be one word and cause an error! So the expanded tokens (which are called fields) need to be split into separate words. (Demo: IFS=; FILES='foo bar'; ls $FILES)
Running: IFS=: echo
$PATH doesn’t work as you might
expect; $PATH is expanded before
the new IFS setting takes effect
(in echo’s environment). You
can use eval for this:
IFS=: eval echo
\$PATH
Field splitting is controlled by the parameter IFS. If set to null (i.e. “IFS=""” or “IFS=”), no field splitting is done. Otherwise the shell treats each character of the parameter IFS as a white space character (or delimiter). The results of unquoted expansions are split into fields (words) separated by runs of such white space. Any leading or trailing white space is skipped as well.
If IFS is unset, the default delimiters are <space>, <tab>, and <newline>. For example, the input:
<newline><space><tab>foo<tab><tab>bar<space>
yields two fields, foo and bar.
Keep in mind that field splitting is not used at tokenizing, just to the results of expansions. So:
IFS=o
violet
results in “bash: violet: command not found...”. However:
IFS=o
cmd=violet
$cmd
will execute the command vi on the file let. (Quoting $cmd prevents this.)
As a final example of field splitting, consider this:
$ cat A
111
222
333
$ VAR=$(cat A)
$ echo $VAR
111 222 333
$ echo "$VAR"
111
222
333
The assignment to VAR has no field splitting. Therefore, the echo command in the first case “sees” three words separated with white-space (newlines), and outputs the three words, each separated by a single space. In the second case, a single word is seen by echo, which includes (quoted) white-space.
In a shell script, you can set IFS to the default value (just in case of a malicious user). It’s a bit tricky to set however; it may be simpler to unset it. To set:
IFS='
' # hard to tell that’s a space, tab, and newline
However this will not work:
IFS=$(printf ' \t\n') # won’t work!
That’s because command substitution strips out trailing newlines. This should work:
IFS=$(printf ' \n\t')
Also this (non-standard currently):
IFS=$' \t\n' # "Dollar quoting"
If you plan on changing IFS in a shell script, that’s fine. But if you do it in a function, or a sourced script, you must restore IFS to its former value when done. The code for that is a bit tricky, as IFS need not be set at all (so you must restore it to unset). Here’s one way:
[ -z ${IFS+X} ] && saved_IFS= ||
saved_IFS="X$IFS"
IFS=$' \t\n' # or whatever
# do stuff here
[ -z "$saved_IFS" ] && unset IFS || IFS="${saved_IFS#X}"
One last point: historically, some shells would (sometimes) inherit the value of IFS from the parent shell. In a shell script, if not set explicitly, some values for IFS can cause security holes. In 2015, POSIX decided to change this to require shells to initialize IFS to <space><tab><newline>, and not inherit.
Brace Expansions: While not part of POSIX (2015), most modern shells also do brace expansion. Brace expansion generates arbitrary strings, not filenames. There are two forms. A word with the form “pre{list}post” will expand into one word for each item in list. For example:
vi file{1,2,3,}.txt
will expand to the line:
vi file1.txt file2.txt file3.txt file.txt
Note pre may not be “$”. The list must include at least one unquoted comma.
The second form uses a range instead of a list between the braces:
vi file{1..10}.txt
A range can be integers or characters (e.g. “ls /dev/sd{a..g}”).
Depending on the shell you can or cannot use shell special characters in list without quoting them; it depends on when the shell does the brace expansions. Bash does brace expansion between steps 4a and 4b; Zsh after step 4e (and field-splitting isn’t done!); and ksh between steps 5 and 6.
Ksh supports more elaborate forms as well. Also, Zsh only permits a range of numbers.
7. Pathname (wildcard) expansion is done next (unless the set option -f is in effect). Note that unlike the other expansions, this can produce multiple words. Also, this is the only expansion done after field-splitting. So if “*.txt” expands out to several filenames, each name is one word even if it contains spaces.
Consider these commands:
foo=*
export foo=*
The first statement is a simple assignment, so no globbing is done and the value stored is “*”. However in the second command, “foo=*” is not a shell variable assignment, but an argument to the export command. Thus, globbing is done.
If unsure, you should just use quoting to prevent globbing.
8. Quote removal is performed next. This simple step just removes the shell quoting characters, as they are no longer needed. (If the complete expansion for a word results in an empty field, that empty field is deleted from the expanded command, unless the original word contained single-quote or double-quote characters.)
9. I/O redirection is performed. Then any redirection operators and their operands are removed from the parameter list.
10. The shell is (almost) ready to execute the command (which may be a function, built-in, executable file, or script). First the shell locates the command (perhaps using PATH) and verifies execute permission. It sets up the environment, assigning the n arguments as positional parameters numbered 1 to n, and the name of the command (or the name of the script) as the positional parameter numbered 0. (Other parameters are set as well.) The environment for the new command is initialized from the shell’s current environment, modified by any I/O redirections and variable assignments made.
11. After starting the command, the shell optionally waits for the command to complete (unless it was started in the background) and collects the exit status, setting the variable “$?” to that value.
Note the history mechanism works at some point (via the readline library on Linux), but is not part of POSIX. Since some characters have special meaning to readline (such as ‘^’ and ‘!’), these may appear to be meta-characters sometimes and not meta-characters at other times. It depends on the shell in use and its history configuration, if readline is used, and your ~/.inputrc file (which is used to configure readline). Apparently, readline knows about single-quote and backslash quoting, but doesn’t recognize double-quotes.
Summary: The shell reads the input, tokenizes it, and breaks it down into simple command(s) to execute. For each simple command, the shell removes redirections and variable assignments, performs various expansions on the command, redirections, and variable assignments (different ones in each case), does field splitting on the command, and finally, pathname expansion.
Tilde Substitution
A bare tilde (“~”) expands the same as $HOME. Although more convenient than using $HOME, sometime parameter substitution is done when tilde substitution is skipped, so in a script $HOME is usually better.
If you use ~username, that expands to the home directory of username.
Command Substitution
Command substitution works intuitively. A subshell is started to read and execute the commands (“$(commands ...)”). The output of the commands is saved, trailing newlines are removed, and the result replaces “$(...)” in the command line. Note this happens before some other expansions and before field splitting; it’s a kind of recursion. To preserve white space in the result, use double quotes:
FOO=$(commands...)
echo "$FOO"
(Note: newlines embedded in the output may be removed later by field splitting (if IFS contains a newline). Use double-quoting to prevent field splitting in this case, for example “echo "$(commands...)"”.)
Quoting
The shell performs a lot of processing on the command line before attempting to run any command. We have seen the ‘$’ and later we will see wildcards and other processing is done. Characters such as ‘$’, ‘*’, space, and newline have a special meaning to the shell and are specially processed. Such characters are called shell metacharacters. Sometimes you want to pass these special characters or shell keywords (such as in) to some command and not have the shell treat them specially. For example a filename with space or dollar sign in the name. Show echo. (echo *** You owe me $10.00. ; echo you cannot do this.)
Metacharacters need to be quoted to be used literally on a command line: 'x', "x" (‘$’, ‘`’, ‘"’, ‘\’, and newline are still special within double-quotes), and \x (when x is a metacharacter), which is sometimes called escaping. Note ‘!’ acts weirdly (history expansion) in bash inside of "" from the cmd line, but not from in a shell script. \newline is skipped even if inside double quotes.
Within shell scripts, quoting is very important. While they shouldn’t be, scripts are often invoked by web servers or other remote users and have security considerations that are well-known. The expansion of shell variables is usually subject to field-splitting and globbing, causing a script to execute unwanted commands. Quoting prevents that. Even when there is no security aspect, preventing these steps by quoting results in more efficient scripts.
“shellcheck” is a tool that can check shell scripts for various bad practices and errors. (The package name to install is “ShellCheck”.)
In general, you must never trust variables set outside of your scripts, nor external data read by your script (from files, pipes, network, or a human). All such data needs to be sanitized before use: First perform Unicode normalization on text, then regular expressions to check data for valid formats (this is whitelisting, and is safer than checking for illegal formats, or blacklisting).
(Most script writers won’t do all that, but at least quote your variables and run shellcheck (and follow its recommendations).
Arithmetic Expansion
This was covered in CTS-1106. Briefly, the shell evaluates expression in $((expression)). The expression only supports integer math, based on the C language operators, with many operators left as “optional” such as “++”.
Be careful when using variables in the expression that may have leading plus or minus signs, or leading zeros. In general, it works best to use var and not $var in expression, and to use spaces around any operators. For example:
x=010; echo $(( x )); x=-3; echo $(( 1-$x ))
(That last example may or may not fail, depending on your shell’s support for the optional “--” operator.)
See leading zeros below for a discussion of leading zeros. As noted there, one way to strip them out would be to use the parameter expansion (see below) of “${x#${x%%[!0]*}}”. Bash supports a non-standard notation to specify the base of numbers, so you can use “$((10#$x))”.
One task you may need is to round a floating point number. POSIX doesn’t require it, but the following works on Bash, Dash, Zsh, and Ksh at least, as well as Gnu printf (/usr/bin/printf):
NUM=$(printf '%.0f\n' "$NUM")
With Bash, you can use this shorter version: printf -v NUM '%.0f' "$NUM"
You can also use a POSIX standard solution:
NUM=$(awk 'BEGIN {printf "%.0f\n", '"$NUM"' }')
Note the default rounding mode for IEEE floating point (which is used by POSIX) is “Round to nearest, ties to even”. So 3.5 and 4.5 both round to 4.
Dollar Quoting
Some shells (including bash) support a useful additional quoting method. (This will become standard in SUSv5.) $'string' (called dollar quote quoting) expands various (‘\’) escape sequences as if you used $(printf 'string'), with some extras such as \e means escape, and \cX means control-X.
Consider these two cases:
(a) printf 'ab\0cd'
(b) printf $'ab\0cd'
(a) sends <a><b><NUL><c><d> to STDOUT (since \0 is evaluated by the printf utility which produces a null byte in the output). (b) sends <a><b> to STDOUT (where the \0 is evaluated by the shell and terminates the format argument given to the printf utility). This is due to the fact that in the programming language C, strings are terminated by a NUL byte.
Complex Quoting
On occasion something you type will be interpreted twice (or more) by the shell. This requires you to quote the quote characters! For example, ssh can call a shell on the remote host and tells it to interpret a command line:
ssh remote find / -user 10002 -exec chown 35645 {} \;
This starts a shell on remote, passing it the interpreted ssh arguments for it to interpret. That is, the remote shell sees a command line of:
find / -user 10002 -exec chown 35645 {} ;
But the semicolon isn’t quoted so it isn’t passed to the find command, and an error message results! What that means is that you need to escape “;” twice: once for the local shell and once for the remote one:
ssh remote 'find /
-user 10002 -exec chown 35645 {} \;'
or ssh remote find / -user 10002
-exec chown 35645 {} \\\;
The ultimate in complex globbing and quoting might be this code, posted on comp.unix.shell by stephane_chazelas@yahoo.fr on 2/28/2011:
set -- [*].txt *.txt
if [ "$1$2" != "[*].txt*.txt" ]
then shift
echo There are txt files:
printf ' %s\n' "$@"
else echo >&2 "No txt file here"
fi
This trick was introduced by Laura Fairhead some time ago. The problem with a simpler solution is that if there is no files with “.txt” extension, then “*.txt” will not expand to nothing, but rather to “*.txt” literally. Worse, it is possible that you could have a filename of those five characters.
If there are no files with a “.txt” extension, "[*].txt *.txt" will expand to "[*].txt *.txt", and the if statement will run the else clause. If there is a weirdly named file called “*.txt” (possibly along with other .txt files), then this glob will expand to "*.txt *.txt other.txt" and the then clause will run. After setting the shell arguments, the shift command removes the extra first argument (of “[*].txt” or “*.txt”, depending if there was a weirdly named file or not).
The eval Command
Consider “cmd="ls | less"; $cmd”. This doesn’t work! Also consider “foo=bar; bar=baz; echo $$foo”. This doesn’t work either. The problem is that the shell doesn’t parse the command line the way we want. Since the pipe is quoted it loses its special meaning and when you run the command, the shell expands $cmd which then sees two arguments: “|” and “less”. Somehow you’d like to have the shell re-parse the line after expanding $cmd.
The second example suffers from the same problem. You’d like to have the shell expand $foo first, and the re-parse the command line.
This is the purpose of the eval built-in command. Running “eval command args” causes the shell to evaluate command args once, as normal. Then, instead of running the command, the shell will re-evaluate the command line a second time. Then the resulting command is run. By quoting some meta-characters and not others, you can control which parts get expanded in the first pass and which in the second pass:
eval $cmd pass 1 produces ls | less. Pass 2 then sees the pipe as special.
eval \$$foo pass 1 produces $bar. Pass 2 then evaluates $bar -> baz
Qu: How to use eval to display the last cmd line arg? A: eval echo \${$#}
There are other ways to display the last command line argument, including using sed, awk, Perl, or Python, but none as simple as using eval. However, eval is often considered dangerous and to be aboided. Here’s a few alternatives:
expr "$*" : '.* \([^ ][^ ]*\)'
echo "$*" |rev |tr -s ' ' |cut -d' ' -f1 |rev
for arg; do :; done; echo "$arg"
If using Bash (or Ksh), you could use these non-standard extensions (From a comp.unix.shell post on 9/22/2018 by Janis Papanagnou):
last=${@:$#:1} # the last argument
last=${@: -1} # also the last arg
last2=${@:$#-1:1} # 2nd to last argument
last2=${@: -2:1} # also 2nd to last arg
a=${@:2:3} # 3 params starting from #2
(Note the required space in examples using a negative number.)
The eval statement is also useful with Gnu getopt, which (by default) quotes arguments. To eliminate the resulting quotes, use eval:
set -- $(getopt -o a: -- -a 'foo bar') ; echo "$2"
produces: 'foo
eval set -- $(getopt -o a: -- -a 'foo bar') ; echo "$2"
produces: foo bar
Another problem that can be solved with eval is when trying to pipe something into the shell built-in read command:
echo "this that" | read foo bar
or: who | while read name; do cnt=$((cnt+1));
done
echo $cnt
This doesn’t work since most shells will run the commands in a pipeline each in a separate process. The same would happen when using I/O redirection and read. But, suppose you got the output of “foo=this bar=that”. You could store that in an environment variable, and use eval to set foo and bar in the current environment (Warning! Confusing code ahead!):
eval
$(echo "this that" | (read foo bar
echo "foo=$foo" "bar=$bar") )
In case the argument to eval starts with a dash, you might be tempted to use “eval -- $cmd”, but the double dash is not supported by eval. Instead, use “eval " $cmd"” (note the spaces). This is always safe.
Qu: How to put the current
hour, minute, and second, into three variables, without calling date (or some
other program) three times? Ans: Use eval:
eval $(date +"
hr=%H; min=%M; sec=%S")
HW: The command “java -version” produces several lines of output. One of those shows the version number as major.minor.patch-level. What shell command(s) can you use to set the environment variables MAJOR and MINOR to the major and minor parts of the Java version? (Hint: use sed, command substitution, and eval.) Create a short script that does this, and then displays the value of $MAJOR and $MINOR.
Try this: foo=bar echo $foo # what is the expected output?
You can delay the evaluation of $foo
with: foo=bar eval echo \$foo
or foo=bar sh -c 'echo $foo'
There is a security implication with eval. If your script includes something like “eval ... $1 ...”, a crafty user could put “;rm -rf /;” as $1, or other nasty code. Use eval rarely, and never with untrusted data.
There’s usually ways to avoid using the dangerous eval. For example, this alternative to the date question above using a shell function:
assign
() { hr="$1" min="$2" sec="$3" ; }
assign $(date '+%H %M %S')
Sub-shells and Command Grouping
In a pipeline or other complex command, the system may start another shell to run parts of the command line. For example, with bash (but not ksh) the rightmost command of a pipeline runs in a different shell then the previous commands. This happens with command substitution as well.
When a command or part of one is interpreted by copy of the current shell process (meaning a new shell process), we call that process a sub-shell. A sub-shell has an exact copy of the current shell’s environment.
There is a subtle difference between a sub-shell and a new shell instance. With a sub-shell, the parent shell does a fork to run the commands, but no exec. It is the exec call that builds a new environment for the child process; the fork call merely duplicates the entire parent’s environment (except for trap). This means that in a sub-shell, even non-exported environment variables are copied and usable, and special variables such as $$ are the same for both the parent and the sub-shell:
$ foo=bar; (set |grep [f]oo) #outputs
foo=bar
$ foo=bar; sh -c 'set |grep [f]oo' #outputs nothing
$ (ps -f); (ps -f|cat) # second ps show extra shell
$ echo $$; (echo $$|cat) # shows same number
Here’s a trick to get
the PID even from a sub-shell:
mypid=$(exec sh -c 'echo $PPID')
Note pipelines and command substitution also run in sub-shells.
For environment variables and settings to be visible (copied into) the environment of a new shell instance, those variables and settings must have the export property set.
Parenthesis “()” use a sub-shell, curly braces “{}” use the current environment. Note that the parens are shell metacharacters and recognized as such anywhere on the command line; however the curly braces are only keywords (like if) and only recognized at the start of commands, and only as separate words. The {} have other uses too, so use care: {Δcmd1; ...; }).
You can sometimes use this to avoid complex filters. Suppose you want to add a job to your crontab file from a script? Try this:
(crontab -l; echo '0 0 1 * * foo') |crontab -
Shell Built-in Commands
Any utility can either be a separate program or built into the shell itself. These simple commands are shell built-in commands, but are in no way different from other, non-built-in utilities. Any utility may be built-in (test, echo, and printf are common examples), or not. But some other simple commands are called special built-in commands, which must be built into the shell (or they couldn’t work). POSIX calls these “special built-ins”.
The special built-ins are: break, colon (“:”), continue, dot (“.”), eval, exec, exit, export, readonly, return, set, shift, times, trap, and unset. (See the full list and description in the online POSIX/SUS reference.)
Special built-ins differ from other utilities (whether built-in or not) in a few ways:
1. Normally a syntax (command line) error with a utility causes that utility to exit. A syntax error with a special built-in may cause the shell itself to exit.
2. Variable assignments preceding a special built-in command will persist in the environment even after the command completes. (For example, “LANG=C :”, but make sure the shell is in POSIX mode).
(Use “command special-built-in” to suppresses those effects.) Note that special built-ins are not subject to a PATH search, and thus can’t be over-ridden. (You can set an alias to override one, but it is not allowed to name a shell function with the same name as a special built-in. If you do, you won’t necessarily see an error message but the results are not specified.)
Not all shells behave this way by default. Bash developers don’t like this behavior and it isn’t the default on Bash (or Z shell). The following should produce “bar”:
foo=bar :
echo $foo
So should this:
f() { :; }
foo=bar f
echo $foo
You can make Bash work correctly by using set -o posix, invoking Bash with the --posix option, or by exporting POSIXLY_CORRECT=1 in the environment before starting Bash.
Intrinsic Utilities
In 2014, a problem with the standard was discovered. If some shell implements a utility as a built-in, a PATH search may not be not performed. Thus, there was no simple way to override such utilities with your own versions (although you can use env for this), nor was there any way to determine which utilities were in fact built-in!
To address this issue, a major change to SUS/POSIX was approved (see Bug 854) in 12/2014, that defines some additional terms and provides that PATH is always used, even for utilities a shell author decides to implement as built-ins.
The new standard states that only intrinsic utilities (and of course, special built-ins) are not subject to a PATH search during command search and execution. The standard specifies these utilities as intrinsic:
alias, bg, cd, command, fc, fg, getopts, hash, jobs, kill, read, type, ulimit, umask, unalias, and wait.
For all other standard utilities, a PATH search must be performed, even if a utility is built-in. If the utility is found in the same location associated (somehow) with a built-in version, the built-in may be used. Otherwise, it can’t. So if you set PATH=~/bin:$PATH, and have a custom executable ~/bin/printf, your version must be run.
Finally, how to setup PATH to override utilities is up to the shell author. Some shells use a percent symbol to indicate a PATH component should be searched for intrinsic utilities. Actually, shells have always dealt with the problem in different ways, so there is no standard way to set PATH for this purpose, or to associate a pathname with a utility.
Note, this change may not take effect for some time yet, and may require that Bash and other shells be run is a strict POSIX mode. Most current shells include the following as if they were intrinsic (so no PATH search):
[, echo, false, newgrp, printf, pwd, test, and true.
(In fact, the change explicitly states “Whether any additional utility is considered an intrinsic utility is implementation-defined.”)
While not standard, with modern Bourne and Korn shells you can view the list of builtins with the command “builtin -s”. For Bash, you can use either “compgen -b” or “enable -a” (also useful is “enable -s” to just show the special builtins). (POSIX didn’t see a need for this as they just have a list of special and intrinsic builtins, and the new wording should mean that a PATH search must be done for the others, so you just need to list ~/bin at the front of PATH to override them.)
Also useful is the standard env and command commands, in addition to the non-standard builtin command.
Lecture 12 — Positional Parameters and Parameter Expansion
Shell scripts are useful when you have a complex task that you may need to do again in the future. Often however some of the details change — a different filename must be processed, a different user name, or different hostname. Rather than edit the script for each minor change it is possible to craft a more general script to which you can pass arguments such as filenames and usernames.
Here’s a
simple illustration: Suppose you create a script “greet” that can
be used to greet your friend named “Jim”. Such a script would be
essentially this line: echo "hello Jim!"
And from now on when Jim walks by when
you’re logged in you can run “greet” and Jim will be
amazed. The problem is, what if a different friend named Kim walks by
instead? You’d like to greet all your friends but it would be
inconvenient to create a different script for each one. All these greet scripts would be identical except for the name.
You have the same issue with most utilities. Consider ls. It would be a pain if there were a different command to list the files in a directory, one command for each directory! And that assumes you know in advance all directory names.
The solution is to allow the user to supply the data that is different each time, as command line arguments. In the case of ls you can supply the name of a directory to list on the command line. For our greet script it would make sense to have the user supply the name of the person to greet on the command line. Then when Kim walks by you can type “greet Kim” and if Jim walks by instead you can type “greet Jim”.
When running any command or script the shell puts any command line arguments in specially named environment variables in the command’s (or script’s) environment (and not your login shell's environment). These variables can be used instead of hard-coding names into your script.
The first command line argument is put into $1, the second into $2, and so on. (If more than nine arguments use the form ${10} to refer to the tenth, etc. on POSIX shells.) These are called the positional parameters because they are named by the position of the arguments on the command line (a parameter is just an argument with a fancier name). The name is really “1” but I refer to these as $1, $2, etc.
The positional parameters get reset from the command line arguments every time a shell is started.
Normally you put
scripts in a directory listed on PATH and run them as “script arg1 ag2 ...” or as “sh script arg1 arg2 ...”. To supply
command line arguments when running a script with I/O redirection, you can use
the “-s” option like this:
sh -s arg1 ag2 ... < script
Each word after the command name becomes one argument, subject to quoting. So the command line “myscript -a -bc yada "foo bar"” has four arguments: $1 = -a, $2 = -bc, $3 = yada, and $4 = foo bar.
Change your greet script to this: echo "hello $1!"
Now don’t get confused by this! If you try this command at the keyboard, you’ll only see “hello !” with no name showing. This happens because your login shell doesn’t have any value set for the environment variable $1. This should make sense; no command line arguments were given when you logged in and that shell was started. But when you run a script a new shell is started, and any command line arguments will be placed in that shell’s environment.
Try running your new script with an argument like “greet Jim”. Note this won’t change the environment of your login script, just of the shell reading your script file. So at the end of the script when that shell exits, it takes its environment with it.
When the shell starts up a number of other related environment variables will be set based on the command line arguments. Some of the more useful include:
$0 Expands to the command’s (path)name. (When sourcing a script, $0 will be unchanged (e.g., “-bash”). Bash can use “$BASH_SOURCE” instead.
When sourcing a script, $0 will be unchanged (“‑bash”). Use “$BASH_SOURCE” instead, which is set correctly in either case.
Note that “echo $0” is the most portable way to determine which shell is currently running. You can use that with an if-statement to ensure parts of a script only run under certain shells.
$# This variable is set to the number of command line arguments provided. For your login shell it is probably zero. As will be seen later, you can use this value to test in a script if the user supplied any arguments.
$* This gets set to a string of all the command line arguments. It is roughly equivalent to $1 $2 $3 $4 $5 $6 $7 $8 $9. $* can be useful when you don’t know how many words the user has supplied on the command line. For example what happens when you run “greet Hymie Piffl”? If you replace the $1 in the greet script with “$1 $2”, running “greet J. R. R. Tolkien” will greet “J. R.” (a character from an old soap-opera and not a famous author). Or if two friends walk by together and you try to greet them with “greet Dick and Jane”?
Using “$1 $2 $3 $4” won’t always work either. What happens when Cher walks by and you wish to greet her? Using $* will work in all cases.
$@ This variable is exactly the same as $*, with one exception. The two behave differently when used inside double-quotes:
"$*"
becomes "$1
$2 $3 $4 ...", while
"$@" becomes "$1" "$2" "$3"
"$4" ...
The difference is rarely important, but sometimes it is. For example, suppose you need to use grep inside a shell script to search for the current user’s name inside of one or more files listed on the command line? Inside the script you might have the line “grep "$USER" "$*"”. This won’t work correctly if two or more files are listed. And not using quotes at all won’t work if the filenames contain any spaces. Using "$@" instead will solve this problem.
(Older buggy shells incorrectly expanded this with no args to "" rather than to nothing. If your script may need to run with such a shell, use the work-around of ${1+"$@"}. This means “if $1 is set, expand to "$@", otherwise expand to nothing”.
It is possible to reset the positional parameters in the current shell’s environment by using the set command:
set -- this is a test
echo $#; # shows: 4
echo $1 # shows: this
echo "$*" # shows: this is a test
echo "$@" # shows: this is a test
echo $3 $4 $1 $2 # Yoda-speak!
The “--” in the set statement is not strictly needed but it’s a good idea. This prevents errors when the first command line argument starts with a dash. And if you use a shell variable that isn’t set (e.g., “set $FOO”), the set command will respond with a list of existing variables rather than set $# to zero.
Using “set -- args” from the command line will set the positional parameters for your login shell. This means you can use the exact same commands at the command line prompt as you will eventually use in a script.
If you reset these, you may want to make a copy of original values first. Note that if you change these in a shell function, it may (or may not) restore the old values upon function exit. Here’s one way to back them up safely:
backup_args(){
local args= # local is a bash extension
local quoted # ditto
for arg in "$@" ; do
quoted="$(printf "%s@" "$arg" \
|sed -e s/"'"/"'\\\\''"/g)"
args="$args'${quoted%@}' "
done
printf "%s" "$args"
}
This puts all the args into quoted, separated by “@” symbols. The sed statement is there to make this work for a weird case when the parameters include newlines. (Note: this is untested code I found on the Internet!)
The shift command
The shift command removes $1 and then resets the positional parameters, effectively shifting the args to the left. So:
$1=$2
$2=$3
$3=$4
...
This command takes an optional count to shift by more than one. This is often used to process a standard Unix command line: Repeatedly process $1 in a loop, then shift until the end of the options. (Demo.)
Using shift was the only way in older shells to access more than 9 arguments. (Modern shells permit the use of ${number}). To remove all arguments you can use “shift $#”.
A common use for shift is for processing command line options and arguments. Suppose the command was “foo -a -b file1 file2 file3 file4”. A common template for such scripts is a loop to process options (while there are unprocessed words, and $1 starts with a dash, do... shift; done). When done with the options, a second loop is used to process each remaining command line word (in this case, file names): while there are unprocessed words, do ...; shift; done.
Special Parameters
The positional parameters of $1 $2 .. $9 ${10} ${11} ..., and the other command line parameters: $*, $@, $#, and $0 (except $0) can be reset using the set command. Some other special parameters are:
$? The exit status of most recent command (rightmost cmd in a pipeline).
$- The shell’s options which are currently set.
$$ The shell’s PID.
$! The PID of the last background command started.
The options currently set are not exported. To start a new shell instance with the same options as the current shell, you can run “sh -$-”. (A sub-shell gets the options automatically.)
Parameter Expansion (Substitution):
Recall the shell performs a number of expansions on words (see p. 117). One of these is parameter expansion (replace “$name” with the value of name from the environment). Note that the dollar-sign does not indicate parameter expansion if it is single (or backslash) quoted or if it is followed by a space, a tab, or a newline.
An environment variable (also called a parameter) name (or symbol) can be enclosed in curly braces, which are optional (except for positional parameters with more than one digit, or when a parameter name is followed by a character that could be interpreted as part of the name). Doing this enables some extra processing, described below.
Normally word (field) splitting is performed on the result of variable expansions. (See IFS above.) However, if a parameter expansion occurs inside double-quotes or if the parameter expansion is part of a variable assignment, then field splitting is not performed on the results of the expansion (with the exception of "$@"). Neither is pathname expansion (wildcards). (So "$foo" expands to one word even if it contains spaces, because of the quotes.)
When substituting values for shell variables, you have the option to perform various substitutions for the value. One use of this powerful feature is to allow an easy way to have the substitution result in something even if the variable is unset. You can use this feature to provide a default value for some variables. Here’s what you can do:
${var-word} returns word if var is not set, otherwise return the value. If word is omitted, returns an empty string. You can also use ${var=word} which is similar but also sets var to word if unset.
Using ${var:-word} and ${var:=word} (an extra colon) work the same but will substitute word if var is unset or set to nothing (null). (Demo with echo.)
word in these substitutions is subject to tilde expansion, parameter expansion, command substitution, and arithmetic expansion. This is rarely used though, and can be ugly (hard to read).
(In all the remaining substitutions, the colon works the same way and is optional.)
${parameter:?[word]} Indicates Error if null or unset. If the parameter is unset (or null), word (or a default message, indicating parameter is unset if word is omitted) is written to standard error and the shell exits with a non-zero exit status. An interactive shell need not exit.) Otherwise, the value of parameter is substituted.
${parameter:+word} Use alternative value. If parameter is set (or set and non-null if colon is used) then word is substituted. The actual value of the parameter is not used. If unset (or set but null if colon used) then substitute the value (i.e., null).
This is rarely useful, but there are a few tricks you can use it for. To build a comma separated list of values in a loop, try this script:
for arg; do list=${list+$list,}$arg; done
"${1+"$@"}" will evaluate to $1 if there are no parameters, resulting in nothing. If $1 is defined then this evaluates to "$@" instead. The idea is that a few older shells are broken and if there are no parameters set, "$@" still becomes a zero-length parameter rather than nothing. If you use a decent shell, just use "$@" and don’t worry about it. If your script may be used by others with older shells, it pays to play safe and use the hack.
${#parameter} = length in characters of parameter value. Note this is not required to do anything for the parameters “*”, “@”, or “#”.
One of the more powerful features of variable substitution is that you can specify a pattern which gets applied to the value. This pattern (“pat” in the examples below) uses shell wildcards (globs) unless quoted (in which case you get the pattern literally):
${var#pat} removes the shortest leading match for pat. Using ## instead is similar but removes the longest leading match. Demo (also with $0): i=/usr/share/man/man1/grep.1.gz; echo ${i##*/}
${var%pat} and ${var%%pat} removes the shortest and longest trailing match. This can be used to remove an extension: ${file%.*}.new_ext.
One way to remember which is which, is that “#” (shift-3) comes before “%” (shift-5), so “#” removes the head and “%” removes the tail of a string.
The double-quoting of pattern in the above is different depending on where the double-quotes are placed:
"${x#*}" The asterisk is a pattern
character.
${x#"*"} The
literal asterisk is quoted and not special.
${x##foo} The leading “foo” is removed.
${x#"#foo"} The
leading “#foo” is removed.
Red Hat’s Sys V init scripts have a clever strstr shell function, similar to this:
substring() { [ "${1#*$2*}" != "$1" ]; }
which tests if $2 is a substring of $1.
Qu: Rename all files in the CWD with extension .foo to .bar:
for file in *.foo; do mv $file ${file%foo}bar; done
Beware of nested quotes! With parameter expansions, you are allowed to use nested quotes, when the string in the substitution may contain special characters:
var=...
cmd "${foo%"$var"}"
The general rule (and “best practice”) is to use the double quotes whenever you don’t want word-splitting to occur, or word may have globbing (meta-) characters. Some versions of some shells have bugs where they get confused with such nested double-quotes. To avoid the problem, use this “idiom” instead:
var=...
trimmed_foo=${foo%"$var"}
cmd "$trimmed_foo"
(Remember, word-splitting is never done for variable assignments, so extra double-quotes aren’t needed on the second line.)
Sometimes, it can be easier to specify a pattern for the part you want to keep, rather than the part you want to lop off. A powerful “idiom” is useful in this case, illustrated in this example: Removing leading spaces from a shell variable’s value, when you don’t know how many (if any) spaces there are. The trick is to make an expansion to the part you don’t want first, and use that as the pattern in a second expansion:
var=" 123"
${var#${var%%[! ]*}}
The inner expansion (“${var%%[! ]*}”) will expand to just the leading spaces, if any. The outer expansion then uses that to lop off those spaces.
(Removing trailing space is left as an exercise for the reader.)
Non-standard (but useful) Parameter Expansions and Related Features:
Bash and some other shells support useful extensions (which may someday become standard):
· $"msg" looks up msg in a locale-specified catalog (allowing I18N scripts).
· ${var:offset:length} expands to a substring of $var. The first character in $var has an offset of zero. A negative offset counts from the end, but you must include a space after the colon (e.g., ${var: -1}) or bash confuses that with “:-”. Since offset can be an expression, you can also use “0-1”. If var is @ or *, this is a specific positional parameter (starting with 1, not zero).
If “:length” is omitted, all characters (or positional parameters) to the end are used.
Task: display the last X characters from every line:
while read line; do echo ${line:0-X}; done < file
· ${var//pat/repl} replaces all occurrences of pat with repl within $var. (If a single slash is used, only the first occurrence is replaced.) The pat can be any glob pattern, not a reg. exp.
Task: display stars for a password:
echo ${password//?/*}
· ${var^pat} converts the first character to uppercase if it matches the glob pat. If two carats are used all matching characters are converted. If pat is omitted it defaults to “?” (any character).
Using a comma works the same way, except that lowercase is used. (Both of these expansions are new in Bash 4.)
In POSIX, you can achieve the same result using several filters, such as sed. Here is a way using tr:
REST=${var#?}
\
FIRST=$(echo ${var%$REST}|tr a-z A-Z) \
sh -c 'echo $FIRST$REST'
Here’s a shell script that uses this technique to capitalize each line of text:
LC_ALL=POSIX
cat "$@" |while IFS= read -r LINE
do REST=${LINE#?} # Lop off leading character
FIRST=${LINE%$REST} # Lop off trailing $REST
printf '%s%s\n' $(echo $FIRST|tr a-z A-Z) "$REST"
done
(Capitalize each word: left as an exercise to the reader!)
Lecture 13 — Basic Control Flow
The if Statement:
The hard part of creating a script is to think about what might happen when a script is run. You need to plan ahead for all the possibilities. This can be especially hard when user input is involved since you can never tell what input (if any) the user will supply. For example, consider the simple greet script created earlier. What happens if the user fails to supply any command line arguments at all? (Fortunately the various startup scripts users and administrators are likely to encounter are usually straight-forward.)
When you enter a command at the keyboard you can see the result before deciding what to do next. In a script you must think ahead and decide in advance what to do next when a command returns an unexpected result.
A powerful tool for this is called an if statement. Using an if statement you can run some command and test the result, doing one thing or another next depending on that result. A simple if statement works this way:
if command_list
then success_command_1
success_command_2; ...
else failure_command_1
failure_command_1; ...
fi
First the command_list is run normally. Next, the last command in the list’s exit status is examined. If 0 (zero for success), then the success commands (the commands following the then keyword) are run in order. However if the exit status is non-zero, the failure commands (those following the else keyword) are run instead.
Only one set or the other will be run. The keyword “fi” (which is “if” spelled backwards) marks the end of the if statement.
The else clause is optional. If omitted and the exit status of any_command is non-zero the “success” commands are simply skipped.
There is no restriction on the number or type of commands used in the then clause or the else clause. You can have one or more commands (Bash allows zero too) and can even use one if statement inside of another. Here’s a trivial example:
if who -e
then echo who worked, yea!
else echo who failed, shucks!
fi
Commands such as grep and expr may be used for any_command (most commonly, the test command, discussed next, is used). Also note that the indenting is optional as far as the shell is concerned. Extra space makes a complex script easier to read by humans (including your instructor), but it is legal to omit the extra space. In fact, you can put the whole if statement on one line, as long as you remember to follow each command with a terminating semicolon:
if who|grep hpiffl; then echo "user hpiffl is logged in"; fi
(Here I omitted the else clause.)
One if statement inside another is called nested statements. To have a series of if statements, where you have multiple tests and only want to run one set of comments (for the first successful command), you can use “elif” clauses:
if command1
then success_set_1
elif command2
then success_set_2
elif command3
then success_set_3
...
else failure_set
fi
This is called an if chain or if ladder.
What if you only want to do something if any_command fails? One way is to have an then clause containing only the colon (do-nothing) command:
if who | grep hpiffl
then :
else echo "user hpiffl is NOT logged in!"
fi
However a more elegant approach is to use the logical NOT operator. The shell allows you to run any command (or pipeline) as “! command”. This reverses the sense of the exit status of the command. So the above if statement can be written more clearly as:
if ! who | grep hpiffl
then echo "user hpiffl is NOT logged in!"
fi
A common mistake with if statements is to try to compare two things like this:
some_command
if "$? = 0"; then ...; fi # won't work
if "$?" = "0"; then ...; fi # won't work
if "$USER" = "root"; then ...; fi # won't work
if "$1" = "--help"; then ...; fi # won't work
if "$#" > "0"; then ...; fi # really won't work
The problem is an if statement only runs a command and tests the resulting exit status. The expr command does include some comparison operators and the regular expression matching operator, for string comparisons. However in most cases the test command (discussed next) is easier to use.
The shell supports an alternative syntax for simple if statements that you might come across when reading scripts:
any_command && success_command
has a similar meaning to:
if any_command; then success_command; fi
And: any_command || failure_command
has a similar meaning to:
if ! any_command; then failure_command; fi
The shorter versions are often more readable, once you get used to the syntax.
These can be combined, but the result isn’t exactly the same as an if-then-else-fi:
any_command && success_command || failure_command
Here, failure_command will run if either any_command or success_command fails. That’s not exactly the same as an if statement, but usually it won’t matter. (Demo with true && false || echo fails, or with false || true && echo huh\?)
Another difference is the exit status. With an if-statement, the exit status is that of the last command to be executed in the then or else clause; if no statements are executed the exit status is zero (the exit status of the test doesn’t matter). With && and ||, the exit status is always that of the last command that ran. (Example: false && true; echo $? shows 1.)
You can pipe into an if statement. This allows you to conditionally run a command that reads from stdin. For example, suppose you want to send some encoded files as email. You might try something like this:
for f in "$FILES"
do uuencode "$f" "${f##*/}"
done | mail -s "The files" user@example.com
The problem with that is, an empty email message is sent if there are no files (that is, if $FILES is empty). A simple fix to that is to pipe into an if statement:
for f in "$FILES"
do uuencode "$f" "${f##*/}"
done | if test -n "$FILES"
then mail -s "The files" user@example.com
fi
Using test with if:
Unlike most commands the test command doesn’t produce any output. Instead test evaluates an expression given as command line arguments and returns an appropriate exit status: zero if the expression evaluates to true, and one if the expression evaluates to false. This command is perfect to use with if statements, for example:
if test "$USER" = "root"
then ...
fi
All sorts of tests can be done with this command:
· You can test various attributes of files, such as if they exist at all, if they are readable, if they’re files or directories, etc.
· You can compare strings to see if one equals another (e.g., “$1 = "help"”), if some string has a (non-)zero length, etc.
· You can compare numbers in all the ways you’d expect.
Like the shell itself, test supports a “logical NOT” operator of “!”. In fact test has other logical operators (Boolean operators) too: logical AND and OR operators, and allows (quoted) parenthesis to be used for grouping.
test can use parenthesis for grouping (but must quote!), “!” for not, “-a” for and, and “-o” for or.
The -a and -o operators of test have historically been difficult to implement correctly. Their use is currently discouraged, and they may be removed from POSIX in SUS Issue 8. Issue 8 will add “[[ expression ]]” to the shell to address shortcomings in test; this is already available in many shells including Bash and Ksh. Until then, use expressions such as “test exp1 && test exp2” instead of “test exp1 -a exp2”.
Without going over all the supported operators and other nuances, here are some examples to illustrate the more common cases. (Consult the man page for a complete list.)
test "x$1" = "x-h" # true of "$1" equals "-h";
safe (test
doesn’t support “--” or “==”)
test "$USER" = "root" # true
if $USER is root; unsafe
test "$USER" != "root" # false if $USER is root
test ! "$USER" = "root" # the
same
! test "$USER" = "root" # the
same
test -z "$1" # true if $1 is has zero length
test -n "$1" # true if $1 is
has non-zero length
test "$1" # the
same but unsafe
test -r ~/foo.txt # true if file exists and is readable
test -x ~/foo.txt # true if file exists and
is executable
test -d ~/foo # true if ~/foo is a
directory
test ! -r ~/foo.txt # false if file exists
and is readable
test "-r" = "$foo" # a
string test, not a file test!
test "$#" -eq "0" #
true if $# equals zero
test "$#" -gt "1" # true
if $# is greater than one
# Also -ne
(not equal), -lt (less than), -le
(less than
# or equal to), and -ge (greater
than or equal to)
num="007"; test "$num" -eq 007
# true
num="007"; test "$num" -eq 7 # true
num="007"; test "$num" = "7" # false
A common mistake is to use “>” for “greater than” rather than “-gt”. “>” and “<” are the shell’s redirection characters.
A potential problem is using historical “==” instead of POSIX “=”. Historical shells are inconsistent with one “=”; sometimes it means assignment. Today, some shells use “==” for equals as an extension. I recommend using POSIX “=”, but if you need portability with non-POSIX shells too, use “test ! onething != another”.
Best practices: Some versions of test may fail when parameters might expand to null, “!”, “=”, “-a”, or other weird characters. POSIX has fixed the standard for these cases, but test is often a shell builtin and may not conform. To avoid such problems in all cases, follow these guidelines:
· Use test -n "$foo" and -z "$foo" instead of “test "$foo"” or “test ! "$foo"”.
·
Use test "x$foo" = "xexpected_string"
# safest
(test doesn’t support
the “--” option.)
· Avoid using the test operators “-a”, “-o”, or parenthesis. It is more reliable (and portable too; “-[ao]” are obsolete in POSIX test) to use the shell for this. (The precedence is different though.) Replace:
test expr1 -a expr2 with test expr1 && test expr2
test expr1 -o expr2 with test expr1 || test expr2
test \( expr1 -a expr2 \) -o expr3
with: ( test expr1 && test expr2 ) || test expr3
It is important to quote environment variables, since if one isn’t set at all test will not see anything and will report an error. (For example “unset num; test $num -eq 5” results in an error message. Quoting prevents this error since empty quotes denotes a zero length string, which isn’t the same thing as no string at all.) Of course in some cases it is safe, if you know the value could never confuse test. However rather than worry about when it is safe and when it isn’t, a good practice is to always use quotes for variables and even numbers and words. (I know of several script writers who also advocate using “${name}” instead of “$name”, because it is safer.)
Many programmers are used to using parenthesis with an if statement to indicate the expression to test. While you can’t use regular parentheses for this in shell (since they have another use, to indicate a sub-shell) you can use square braces. So the following are equivalent:
test EXPRESSION
[ EXPRESSION ]
Spaces around the braces and operators such as “=” and “-r” are required! It is a common error to forget the spaces and try to use something such as “if ["$#"="0"]”.
Combining all these commands and shell features can lead to some elegant (some would say cryptic and confusing!) statements. Many login and startup scripts contain statements such as the following; see if you can understand what it does:
[ -r ~/.bashrc ] && . ~/.bashrc
Think of all the uses for an if statement with test:
· Checking to see if the user supplied the correct command line arguments (you can print an error message and then exit the script if not correct)
· Checking if the argument is “--help” (so your script displays a help message, then exits)
· Checking if a user is logged in (can send an instant message if so, an email message otherwise)
· Checking if a command or script is present before trying to run it
· Checking if some removable disk is mounted or not, before trying to access files there
· ...and many more!
Now try to use some of these features: Modify the greet script so that if no command line arguments are given (that is, no name to greet), print an error message to standard error and exit with an error status.
A solution might look similar to this (note how the error message was redirected to the standard error):
#!/bin/sh -
# Script to display a friendly greeting to the person named
# on the command line.
# Written 3/2008 by Wayne Pollock, Tampa Florida USA
if [ "$#" -eq "0" ]
then echo 'Error: you need to provide a name' >&2
exit 1
fi
echo "Hello $*!"
Best Practice: Always prefer the following syntax for testing if some script is available to run (say from crontab):
[ ! -x /path/to/script ] || /path/to/script
Even though this is less clear than:
[ -x /path/to/script ] && /path/to/script
The first way always leaves $? in the correct state. This results in more robust scripts, allowing you to run scripts in “set -e” mode (exit immediately if a command exits with a non-zero status), or to trap on error.
Conditional Expressions with [[ ... ]] (Expected in POSIX/SUS Issue 8, ~2016):
[[ expression ]] Like test, but works as if each word in the expression were quoted with “"” quotes. Conditional operators such as -f must be unquoted to be recognized (unlike test). “&&” and “||” are used instead of -a and -o. (Also, the Boolean evaluation is “short-cut”: the RHS is not evaluated unless it must be.)
string == glob (like =) and != operators are new; the string to the right of the operator is considered a pattern (glob) and is matched according to the rules for wildcards, only the pattern doesn’t need to match any actual files. So: [[ foo == f?o ]] is true (regardless of what files are in the CWD).
string =~ regex has the same precedence as == and !=. The string to the right of =~ is considered an ERE.
string1 < string2
string1 > string2
These do locale-sensitive string comparison.
pathname1 -nt pathname2
pathname2
-ot pathname1
true if pathname1 resolves to an existing file and pathname2 cannot be resolved, or if both resolve to an existing file and pathname1 is newer than (older than) pathname2 according to their last data modification timestamps; otherwise, false.
pathname1 -ef pathname2
true if pathname1 and pathname2 resolve to existing directory entries for the same file; otherwise, false.
-v word
true if word expands to the name of a variable that is set; otherwise, false.
This feature is currently (2013) being considered for the next release of the POSIX/SUS standard.
Using expr for Testing
As discussed previously, using expr with regular expressions allows you to test strings, for example, to see if they are numeric values:
if expr "${NUM}" :
\
'[-+]\{0,1\}[[:digit:]]\{1,\}$' >/dev/null
(The redirect is needed since expr returns a count of characters matched.) This regular expression matching is very useful when testing command line arguments (or any user input).
As mentioned previously, expr, like all utilities, treats numbers as decimal even with leading zeroes. This may make it a safer bet than shell arithmetic expansion.
String comparison must be done as with test, for safety. Suppose you want to see if $a contains an equal sign. Use: expr " $a" = "
="
(Using a letter such as "X$a" can cause problems in some locales when comparing
strings, as in “expr
" $a" \< " foo"”.
The new shell conditional expression is designed to provide the functionality of expr. In fact, the POSIX standard states “Newly written scripts should avoid expr in favor of the new features within the shell”.
The case Statement
This is a multi-way pattern match (using shell wildcards: “*”, “?”, and “[list]”):
case word in
[(]pat1) cmd-list-1 ;;
[(]pat2|pat3|...) cmd-list-2 ;;
...
esac
The leading open parenthesis is a good idea (some shells and text editors get confused with unbalanced parenthesis) but not required. (Also, it makes it obvious that you will need to quote any pat that starts with an open-paren.) Likewise, the final “;;” before esac is not required (although either a newline or one semicolon is).
case is most useful when there are multiple possible matches, and you want to do something different for each. For example, checking options passed to a script.
Only one of the case statement clauses gets executed. This is unlike the C switch statement that requires a break, or the cases will “fall through” to the next. The 2012 version of SUS/POSIX will add an old shell feature, officially. Ending a case clause with “;&” instead of “;;”, will cause the following cmd-list to be executed too. This is unlikely to be frequently useful.
Note that Python does not have such a control structure.
The patterns (and the word) can use shell wildcards and other expansions. The first pattern to match is used. (So the order matters). Several patterns can be separated with “|”.
The exit status is zero if no pattern matches (!), otherwise the exit status of the last command executed in the cmd-list. It is common to have “*” as the final pattern, to mean “anything else”.
Note the (standard) test command can’t do pattern matching (and neither can the shell itself), so case is useful. You can use it like test in if or while statements, like this (hard to read, but it works and is efficient):
if ! case "$1" in (pattern)
false;; esac
then echo "$1 matches pattern" fi
If the extglob shell option is enabled using the shopt built-in, several non-standard, extended pattern matching operators are recognized in Bash:
?(pattern-list) Matches zero or one occurrence of the given patterns
*(pattern-list) Matches zero or more occurrences of the given patterns
+(pattern-list) Matches one or more occurrences of the given patterns
@(pattern-list) Matches exactly one of the given patterns
!(pattern-list) Matches anything except one of the given patterns
It is not difficult to test for numbers using standard case patterns (but using expr may be more readable):
case "${1:-NaN}" in
(*[!0-9]*) echo not a number ;;
(*) echo a number ;;
esac
Note the use of “${1:-NaN}” to ensure the argument to case isn’t empty. An alternative is to add the pattern "" to the first case, or add a * case at the end:
case "$1" in
(*[!0-9]*|"") echo not a number ;;
(*) echo a number ;;
esac
The case statement is currently (2016) the only standard way to do pattern matching in the shell. Usually, one would use sed or awk for this. But if you need to avoid creating processes, say for performance reasons, case is your best choice (until POSIX approves “[[ ... ]]”).
Of course, readability can be a problem! Here is a recently posted (comp.unix.shell, 5/24/2015, by Stephane Chazelas) shell function that tests if a given directory is empty; it uses no sub-shells:
isempty() {
[ -d "$1" ] && [ -r "$1" ] || return 2
set -- "$1"/[*] "$1"/* "$1"/.[!.]*
"$1"/.??*
case $#${1##*/}${2##*/}${3##*/}${4##*/} in
('4[*]*.[!.]*.??*') return 0;;
(*) return 1
esac
}
Loops
As we learned with Python, A loop is a way to instruct a computer to repeatedly execute a set of commands known as the loop body. Each time the loop body is executed, is one iteration of (or one pass through) the loop. Normally you want to do this a fixed number of times (say once for each command line argument, or once for each file in a directory, or once for each record of data, or line in a file, etc.) This is known as a counting loop. In shell, you use a for loop for this.
The other type of loop is called a sentinel loop, and iterates over the loop body until some condition becomes false (e.g., the user didn’t answer “yes” to “Play again?”). We use a while (or until) loop for this.
The for loop
for var in word1 word2 word3 ...
do command-list
done
First the list of words is expanded. For each iteration, the var is set to each word in turn. Here’s an example:
nfiles=0
total=0
for file in *
do nfiles=$((nfiles+1))
size=$(/bin/ls -ds $file | awk '{print $1}')
total=$((total+size))
done
let 'ave = total / nfiles'
echo "Average size of $nfiles files is $ave."
If “in word-list” is omitted, the for loop iterates over the positional parameters (i.e., the command line arguments). This is the same as using “in "$@"”.
To do some commands N times, you could type:
for num in 1 2 3 4 5 6 ... N-2 N-1 N
Instead, you could use some nonstandard method to generate a sequence of numbers. (See using seq, discussed later.)
Here’s an example use of a for loop. On a production server, I want to change the disk I/O scheduler from CFQ to deadline, but only for rotating (“spinning rust”) disks. (See Linux IO Schedulers and StackOverflow.) How to find those?
for f in /sys/block/sd?
do if test $(cat $f/queue/rotational) -eq 1
then
printf "Changing scheduler for $f from "
cat $f/queue/scheduler
echo deadline > $f/queue/scheduler
printf "\t to "
cat $f/queue/scheduler
fi
done
This loops over each disk, tests if it’s a rotating disk, and if so, changes its scheduler algorithm (The line in bold). The non-bold lines just display the before and after values.
The while loop
This loop iterates over the body as long as the test command returns a zero exit status:
while test_command
do command-list
done
For example, run date +%S and display a message every second until the 30 second mark:
while test $(date '+%S') -lt 30
do echo waiting...; sleep 1
done
A while loop is convenient to process the options passed as command line arguments to a script, even though that seems like a counting loop should be used. It is common in *nix systems to have a command with a variable number of optional arguments, followed by a list of filenames (or user names). With few exceptions (tar is one), all command have the options first.
Thus a common type of shell script works the same as common *nix utilities. In your script, you want to iterate over command line arguments as long as they start with a dash. When done processing the options, the script continues with another loop, iterating over each of the remaining command line arguments (filenames or whatever).
The while loop is often preferred over a for loop in a script in some cases. Suppose a file names contains these three lines:
current resident
occupant
valued customer
This for loop seems an obvious way to send spam, but look at the output:
for NAME in $(cat names); do echo "Dear $NAME";done
Dear current
Dear resident
Dear occupant
Dear valued
Dear customer
This happens because one of the expansions performed is word splitting on the list of words in the for loop. The solution is to use a while loop instead, reading lines from the file until done. No splitting is done on the read lines:
while IFS= read -r NAME; do echo "Dear $NAME"
done < names
(Redirection with loops and the read command are discussed later.)
A possible problem with for loops is with too many files (arguments). The resulting command line may be too large. Instead of using “for i in *; do_something $i |...; done”, you can use just a find command:
find . -path '*/*' -prune -type f -exec \
sh -c 'do_something "$1" | ...' sh {} \;
Or more efficiently:
find . -path '*/*' -prune -type f -print | \
while IFS= read -r file; do
do_something "$file" | ...
done
The until loop
“until command; do ...” is the exact same as “while ! command; do ...”.
(Review script mon.sh: Try it with no args, with -m only, and with -h only.)
Using break and continue
You may need to abort some loop. Use break for this. This is often combined with an if statement inside a loop, to quit the loop if an error condition is found.
Loops are often used to process a list of items (files, data, etc.) Sometimes you discover a problem with the current item being processed. While you can use a break statement to abort the whole loop, often it is better to simply skip the rest of the current iteration and begin processing the next item (that is, start the next iteration of the loop immediately, without finishing the current iteration).
You can accomplish this with the continue statement. This aborts the current iteration, and the loop then continues normally.
Examples:
for i in 1 2 3 4 5
do if test "$i" = "3"
then break
fi
printf '%s ' $i
done
(Output is “1 2 ”.)
for i in 1 2 3 4 5
do if test "$i" = "3"
then continue
fi
printf '%s '$i
done
(Output is “1 2 4 5 ”.)
If you have nested loops, on occasion you may need to abort all the loops, not just the innermost one. Both break and continue allow you to specify an optional number to indicate how many levels of nesting to break; the default is 1. For example:
for m in jan feb mar apr jun jul aug sep oct nov dec
do for day in 1 2 3 4 5 6 7 8 9 10 11 12 13 14 15 \
16 17 18 19 20 21 22 23 24 25 26 27 28 29 30 31
do if beyond last day in the current month
then continue 2; fi # note this is the same as break 1
...
if horrible error; then break 2; fi
done
done
Infinite loops
You can use the special command “:” (or true) that does nothing except return a zero exit status, to create an infinite while loop. Use it like this: while :; do ... done (can also use “until false ...”, or “until ! :”). Such loops are rarely useful unless you have an if statement in the loop body that uses break.
If necessary, you can kill an infinite loop using shell job control features: jobs or ps, then kill pid_or_%jobno
Loops and I/O redirection
I/O redirection works on loops. If stdin is redirected, any commands in the loop body that read stdin will be affected. Likewise with stdout and stderr. You can use pipes as well. Like all compound commands, any redirections must be on the same line as the terminator of the compound statement (e.g., on the same line as the fi, done, or esac).
Any of these control structures can be written on a single line, using semicolons to separate the parts like this:
if test foo; then cmd1; cmd2; else cmd3; fi
while test; do cmd1; cmd2; done
for var in word1 word2 word3; do cmd1; cmd2; done
A shell function might be considered a shell script in RAM. Functions are thus faster to run. Shell functions can be used in place of aliases and are far more powerful. They are also easier to work with than a collection of shell scripts, each of which is not complete by itself. With functions, you can keep all the related bits in a single file. Also, shell functions (can) operate in the current environment so they don’t need to be sourced.
POSIX shell offers no way to list the functions currently defined in the shell. Modern shells often include “declare -{f|F}” for this. Bash also includes function definitions in the output of set (unless posix mode is on).
The System V init system on Red Hat like systems uses shell functions to start and stop daemons. These are documented for system administrators who need to create “init” (or “rc”) scripts for new services, or to edit existing scripts. (See /usr/share/doc/{init*,llvm}). Show /etc/init.d/functions.
name() { statements; }. Bash allows (and some old shells require) a preceding word function. Space between name and the parenthesis is allowed.
calc() { echo "$*" | bc -l; }
To invoke a shell function, just use its name. When the last statement in the function is over, the shell continues:
...
some_function The function body
is executed here
next_command
A function is a name given to a bunch of statements. A script can invoke the statements from different places in the script, just by using the name. (If you only need to invoke a bunch of statements from one place, but several times, use a loop.) Using function can help make scripts easier to understand (and create).
You can use parenthesis instead of curly braces to define the function body. (The standard just says “compound statement”, which includes loops, case, and if statements too.) As usual, if you use parenthesis the body gets run in a sub-shell (as defined earlier). With curly braces, the body gets run in the current shell.
When the function body runs in the current shell, any changes to the environment will persist after the function ends. Such functions must take care not to mess up the environment in unexpected ways, but they are the only way to have a function set a value that can be used after the function returns; if the function runs in a sub-shell, it will only see exported environment, and can’t set any values.
Using a naming convention helps here. Some commonly used conventions are: any variables the function uses (and messes up) should have lowercase names. (So use uppercase names only in your login scripts.) Another convention says to name local variables with leading underscores. A return value set in a function foo should be in a variable named FOO_RESULT.
An alternative is to use a function designed print a value. Then it needs to be used like this: RESULT=$(my_function)
You can also design a function (or script) that produces output to be used with eval (ssh-agent does this), used this way: eval $(foo)
In general, functions often should avoid starting unnecessary extra processes. However, performance may not be important for many cases, such as when a function need not modify the environment. In that case, the safety of a sub-shell is preferred.
You can add I/O redirection to a function definition. Such redirections occur when the function is run, not when it is defined (which produces no output to redirect in any case). For example:
log() { date; echo ": $*"; } >>~/log_file
Any command line arguments passed to your shell function will be assigned to the positional parameters until the function exits. So during a function execution, you can’t easily access the shell’s real command line arguments! Note that $0 is not changed. Show:
set -- A B C; foo() { echo $1; }; foo; foo hello
Like a shell script (or any program), a shell function can be invoked again and again, each time with possibly different arguments.
The common technique is to parse the shell’s command line arguments (possibly with getopt[s]), saving anything important into named variables (e.g., FILE, NAME, ...). Then any functions can access those, even though within the function body, the positional parameters only refer to the function’s arguments.
Shell functions cannot be exported. A common technique is to define these in a shell script file that can be sourced such as ~/.bashrc (the file referred to by ENV).
Modern Linux systems put dozens of long functions in the environment. The output of the set command (which shows both shell variables and functions) can be hundreds or thousands of lines long!
Note parameter expansions (and redirections) are not performed when the shell function is defined, but when it is run! For example:
x=foo
ff() { echo $x; }
x=bar
ff # shows bar, not foo.
Variables in Shell Functions
Since a function operates in the same environment as the shell or in a sub-shell (but not a new shell process), $$ and other environment settings are the same. (Try: foo()(echo $$); echo $$; foo; .)
If using “{” and “}” to define the function body, and if some variable (or other environment setting) is then changed inside that function (or if a new variable is defined), the change will persist. This is the same as with a sourced script. This can be unexpected:
x=foo
ff() { x=bar; }
echo $x; ff; echo $x # shows foo bar
x=foo
ff() ( x=bar; )
echo $x; ff; echo $x # shows foo foo
If you need local variables in POSIX (and you usually do), use the “(...)” form to define the function (which starts a sub-shell). This is safer since you don’t want to affect the login shell’s environment most of the time.
Bash extension: local name[=value] to declare a local variable; name is unaffected if it existed before the function was called (that is, it will have the same value before and after the function runs).
It is often the case you want to change some variables in the parent’s environment, but not others. For example, to put some calculated value in some variable that can be used after the function returns. POSIX doesn’t provide a clean way to do that. (There are tricks you can play with eval, but they are ugly.)
Using “{” and “}” to define the function body, and using local keyword for all variables used that you don’t want to change works better. The local keyword is supported in several shells; ksh supports a similar ability via typeset. Currently (10/2013), there is a lively debate about standardizing local.
In bash, (and likely in future POSIX), local variables have dynamic scope. In most languages including Perl and Python, variables have static (or lexical) scope. With static scope, you can look at a function and decide what variable is referenced; it doesn’t matter from where that function is called. With dynamic scope, it depends on how the function was invoked. For example:
export z=1 # global variable
gg() { echo $z; }
ff() { local z="$1"; echo $z; gg; }
ff 2; gg # shows 2 2 1
In the first call to function gg (from inside of ff), the value of the function ff’s local variable z is echoed by gg. In the second call to gg (directly from the command line), the global variable z (the exported one) is used.
If a language uses static scoping, it doesn’t matter when a function is called; such a function can only see its local variables and the global ones. (So the example above would show “2 1 1” instead.)
Exit and Return from a Shell Function
If you invoke exit then the shell exits; that is annoying if you used “{...}” (or sourced some script that used exit). To cause a shell function to terminate early, and let the shell continue with the next statement, use the return [exit-status] statement, not exit.
A neat trick to deal with script that may be either sourced or run un-sourced, is to use a function. Then, in the function, you use return to exit the function early. That works whether or not the script was sourced. (Show combo.sh.)
There is no simple way to have a function return a value. You can use the exit-status on the return statement, but that limits you to a small number; a non-zero status might even terminate the shell. To have a function return a value, three idioms are common:
1. Define a “global” variable to hold the value (and don’t use a sub-shell for the function; that is, use curly braces). For a function named foo, you could define foo_result or func_foo_result, to prevent name clashes.
2. Have the function send the result to stdout. Then you can run the function this way: RESULT=$(myfunc args).
3. Have the function send NAME=value to stdout and use eval to run the function like this: eval $(myfunc args).
It may seem safer to always use a sub-shell when defining functions, and it is. But there are times when you want a function’s body to alter the environment. Also on Windows systems (using Cygwin), process (and thus, sub-shell) creation can be very slow.
If you have a shell function with the same name as a utility and want to run the utility, use command name. This causes the shell to skip looking for a shell function (or an alias) when expanding and finding name:
command some-conflicting-name args...
To delete a function from the environment, use unset -f name.
It is common to create a library of shell functions (or several of them). Then you can use the functions in any of your scripts by sourcing this library file at the top of your scripts.
If a sourced script my_script produces an error, the whole shell may exit.
Looking For Text Files
It is quite common to want to check if some file is a text file, or some sort of binary file. The POSIX definition of a text file is any file that:
· does not contains a NUL byte
· ends in a NL character
· does not have more than LINE_MAX bytes in between 2 NL characters. (I.e. has a maximum line length defined in limits.h, usually 2047 bytes + 1 for NL.)
“ASCII text files” would further limit each byte to a value in 1 to 127 only. However, text files need not be ASCII. Today, ISO-8859-1 (Latin I) or UTF-8 is common.
The file command can be used to check if some file is text or
not. Here’s a function for this:
istext() { file ${*:-*} |grep text |sed 's/:.*//'; }
The output of the file command when it finds a text file is something like this:
file1: ASCII text
The sed statement strips off the colon and following stuff, leaving just the file name. So “istext file1 file2.gz file3” should produce “file1 file3” as output (assuming those are text files of course). Also note the use of “${*:-*}”, which expands to the list of arguments to the shell function, or to “*” if there were none.
Like aliases, shell functions are normally not executable. However, Bash has a “feature” to allow that, sort of. If an environment variable looks like it contains a shell function, Bash will execute the value! This has led to some serious security issues. You can test your Bash with this code:
env x='() { :;}; echo vulnerable' bash -c "echo this is a test"
The value of x looks like a function definition to Bash, so it runs the whole value, including the commands after the function definition. Currently (9/2014), various patches are in the works for this bug.
Parsing the command line with getopts
Normal *nix command line utilities take one or more one-letter options (either separate or combined after a single dash), some with a (single) required argument, followed by a list of arguments (often filenames). For example:
cmd -ab -c c_arg file1 file2 file3
To allow the list of arguments to start with a dash, a special end of options option of “--” is often used.
When writing a script, you often allow options and arguments. Thus it is common to need to parse the command line to figure out what options and arguments were supplied. In the past, you needed to write your own parsing code. Using a standard utility makes this task easier, for the most common cases.
For unusual cases, such as options mixed with arguments, or options that take more than one argument, you still need to write your own code. The common technique is to use one loop to find and process all the options, by setting variables (often called flags) for each. This is then followed by another loop to process the remaining arguments, one at a time. (Sometimes you have a series of if statements between the two loops, to ensure the set of options provided make sense together and don’t represent an error.
This sort of script is almost always similar to the following:
opt_A=false; opt_B=false; opt_C=false; opt_C_arg=
while test $# -gt 0; do
case "$1"
-a|--longa) opt_A=true ;;
-b|--longb) opt_B=true ;;
-c|--longc) opt_C=true;
opt_C_arg="$2"; shift ;;
--longc=*) opt_C=true;
opt_C_arg="${1#--longc=}" ;;
--) shift; break ;;
-*) error ;;
*) break; # end of options
esac
shift
done
for arg # for remaining non-option arguments
do
...body of script to process $arg goes here...
done
The problem with this is that the user may combine options. So “$1” may be set to “-ab”. Also, the space after an option and its argument may be missing (e.g., “-c10” instead of “-c 10”). You wouldn’t care for a “one-off” script that you don’t plan on using or sharing in the future, but otherwise you need to use more complex code to handle these situations.
It would be easier if you could force a user to use one word per option, like so:
cmd -a -b -c c_arg -- file1 file2 file3
If this was the case, your script could be simpler: one while loop to process all options, ending when you reached the “--” (end of options) option, and then a separate loop for each remaining filename.
This isn’t just a problem for shell scripts. It is a general problem for all programs that need to support complex command line arguments. Well, you can’t force all users to use such nice command lines. But you can do the next best thing. Using a tool called getopt or getopts (the name varies with the programming language you use), you can take the messy command line entered by a user and clean it up to make subsequent processing much easier.
Writing your own parsing code may be necessary for unusual syntax, such as options that take more than one argument, or options that can appear mixed with non-option arguments on the command line. The standard tools don’t handle these cases.
POSIX requires a built-in shell utility called getopts. This utility modifies the environment variables OPTARG and OPTIND and so must be built-in. The POSIX standard requires the ability to parse short (one letter) options only.
Invoke getopts this way:
getopts optstring name
The set of option letters allowed by your script is specified by optstring. Each time the getopts utility is invoked, it puts the value of the next option from the command line into the shell variable specified by the name operand, and the index of the next argument to be processed in the shell variable OPTIND. (The shell initializes OPTIND to 1.) Use this utility in a shell script, in a loop like this:
while getopts optstring name [arg...]; do ...; done
This loops over the option arguments to your script (“$@” by default), even if they are grouped into a single word. If your script is invoked as:
myscript one two three
then there are no options, and getopts returns failure exit status to end the loop. However, with:
myscript -xyz -q one two three
then each time you called getopts, it would set name to the option letters in the order they appear on the command line: x, y, z, and q. (Note, getopts strips off the leading dash.) The getopts utility keeps track of which option is next by setting OPTIND each time it advances to the next argument (word), and by using an internal variable to track which letter of the current word is next to process.
See if you can understand this example (the parenthesis just put this in a subshell, so you don’t need to unset OPTIND each time you run it):
$ set -- -xyz -q one two three
$ ( while getopts qxyz ARG
do echo OPTIND=$OPTIND, ARG=$ARG
done
echo final OPTIND=$OPTIND )
OPTIND=1, ARG=x
OPTIND=1, ARG=y
OPTIND=2, ARG=z
OPTIND=3, ARG=q
final OPTIND=3
$ echo $*
-xyz -q one two three
$ shift $(( OPTIND-1 ))
$ echo $*
one two three
Try running this example with different command line options, until you can see what getopts is doing. (The shift command at the end strips all option arguments from the command line, allowing your script to easily loop over the reaming arguments.)
When some option requires an option-argument, follow that option letter with a colon (“:”) in optstring. getopts will put it in OPTARG. If no such option was found, or if the option that was found does not have an option-argument, OPTARG is unset. (See below for examples of this.)
The end of options is indicated by parsing “--”, finding an argument that does not begin with a ‘-’, or encountering an error. At the end, getopts returns false (1) and OPTIND is set to one beyond the last option (A “--” is considered an option here).
If the first character in optstring is a colon, it disables diagnostics concerning missing option-arguments and unexpected option characters.
The following example (adopted from the Single Unix Spec man page) parses the command line, setting environment variables for each option (and arg) found, then prints the remaining arguments. (Normally those are processed in another loop.)
mflag=
mval=
hflag=
iflag=
while getopts m:hi name # with no other args parses $@
do case $name in
h) hflag=1;;
i) iflag=1;;
m) mflag=1
mval="$OPTARG";;
*) printf "Usage: %s: [-hi] [-m value] args\n" $0
exit 2;;
esac
done
if [ "$hflag" ]; then echo "Option -h specified"; fi
if [ "$iflag" ]; then echo "Option -i specified"; fi
if [ "$mflag" ];
then
printf 'Option -m "%s" specified\n' "$mval"; fi
shift $(($OPTIND - 1))
printf "Remaining arguments are: %s\n" "$*"
: rest of script goes here
While getopts can simplify a script that needs several options, it isn’t perfect. POSIX getopts doesn’t support long form options, doesn’t allow you to control the error message(s) produces, and can get confused with option arguments. (For example, with “getopts x:y ARG”, a command line of “myscript -x -y” or “myscript -xy” doesn’t produce an error, but rather thinks “-y” is the argument to the “-x” option.)
Gnu getopt The Gnu utility getopt supports both long and short option forms, optional option arguments, and other extensions, but isn’t POSIX compatible. But being Gnu, it is commonly available and is worth learning. getopt basically re-writes the command line arguments and options into a standard form, to allow parsing in a simple loop. You use getopt with set and eval, to get the re-written args. The common use is as follows:
eval set -- $(getopt -n foo -o xyz -- "$@")
That command would rewrite the positional parameters in a simpler form. For example, if the command line arguments were “-xy -z one two”, then the above command would replace them with “-x -y -z -- one two”. Once this is done, a script can easily process the options and then filenames in a similar way as with getopts. Here’s the same example from above:
eval set -- $(getopt -n foo -o +m:ih -- "$@")
while test "$1" != "--"
do case "$1" in
-h) H_OPT=1 ;;
-i) I_OPT=1 ;;
-m) M_OPT=1; M_ARG="$2"; shift ;;
*) echo "***Illegal option: $1" >&2; exit 1 ;;
esac
shift # delete "$1"
done
shift # delete the "--"
echo "remaining args are: $*"
-n name means to use name when reporting illegal arguments. Use “-o +shortOpts” to specify one-letter options. (The “+” means to use POSIX compliant mode.) Options that have a required argument should be followed with a colon; ones with an optional argument are followed by two colons. (Note that no space is allowed between an option and its optional argument, or getopt gets confused.)
To make getopt recognize long options, use “-l longOptList” (e.g., “-l foo,bar” would make “--foo” and “--bar” legal). Use one or two colons as with shortOpts. This is followed by “--”, and the actual arguments to be parsed; usually you will use “-- "$@"”.
Solaris <11 also has a non-Gnu getopt command. If you have a Solaris shell script using this older getopt, you can use /usr/lib/getoptcvt to read a shell script and convert it to use the POSIX standard shell built-in getopts instead.
Passing only some arguments to another program
Sometimes your shell script must parse the arguments, and select only some of them to be passed to a shell function, script, or another utility. The problem is if you examine the arguments, and build a list of those you want to pass on, you have evaluated them once already. Special characters such as quotes, dollar signs, pound signs, and so on may mess up your resulting command line.
You can use a trick in this case:
for arg # for each command line argument
do if test "$arg" ...; # should it be passed?
set -- "$@" "$i"; # append to the end
fi
shift; # done with arg
done
do-something-interesting "$@"
Most commands would have trouble with weird file names, such as “ARGC=0” or “-” (or sometimes “foo:bar”. In a production-quality (robust) script, you could pre-process the command line arguments to your script, to convert all filenames to pathnames. This will usually prevent any problems:
for i
do case $i in
(/*) ;;
(*) i=./$i;;
esac
set -- "$@" "$i"
shift
done
awk '...' "$@"
Using seq (Linux only)
The seq command is used to produce a sequence of numbers. This can be used to name a series of files (image001..image999), to produce labels for charts, to implement count up/down sequences, or to control for loops. You can count up or down, using integers or fractions. (Bash: {start..end} does the same.)
This Gnu command is documented only briefly in the man page; see the info page for details. For example, to run some command 10 times:
for i in $(seq 10)
do command-list
done
Some common usage (default start=1, step=1):
seq end produces numbers in the range 1..number.
seq start end produces numbers in the range start..end
seq start step end
produces a sequence from start up to end in steps of step.
Qu: Make a count down from 10 to 0. Ans: seq -s' ' 10 -1 0
By default, you get one number per line but you can use -s separator_string to change the newline. (Try “-s' '”.)
You can use -w to automatically pad numbers with leading zeros.
For total control you can use -f to specify a format for the numbers, using a limited version of printf. You can gain total control by using seq to producing unformatted numbers, which you then format with printf:
seq -f %1.f 1000000 | xargs printf %x'\n'
Note that printf is limited on many systems to 2^32 (2Gi), so you can use bc or perl instead to format very large values:
(echo obase=16; seq -f %1.f 4294967295 4294967296) |bc
Note that using floating point values might not work as expected:
seq -s' ' 0 .1 .3 yields: 0 0.1 0.2, since 0.2 + 0.1 > 0.3 due to floating point rounding errors.
Some shells support a type of brace expansion with ranges: file{1..10}
Of course there is a standard POSIX way to produce such sequences, but it is a lot more work. Here’s an illustration of the technique to display integers one to ten, with leading zeroes for padding:
$ yes | head -10 | awk '{printf("%02d ", ++n)}'
01 02 03 04 05 06 07 08 09 10
BSD systems include a utility called jot that is similar to seq but with more functionality.
Lecture 14 — Review: Shell Scripting Basic Concepts and Shell Features
Aliases
Aliases are a simple way to define a short name for complex commands with initial arguments too. They are not exportable, so set them in .bashrc. You can remove them with unalias. (Show ~wp*/.bash*.)
Use: alias (shows a list). alias name=definition (set). The definition can use name (so, recursion is allowed) but the shell is smart enough to not get caught in an infinite lookup (show ls aliases.)
Only the first word (i.e., the command name) is alias expanded, and only if unquoted and does not contain any slashes. Shell reserved words can’t be aliases.
Examples of illegal alias names: if, while, set, /bin/test, \foo, "foo", etc.
If an alias definition ends with a space, the next word is also examined for aliases: alias nohup='nohup '.
Shell functions are more powerful than aliases (see page 151). If the command name is quoted or a pathname, it won’t be expanded as an alias (so use “\unalias name”.)
To see how a name would be treated by the shell, use the type name... or command -v name. To ignore shell functions use command [-p] name.
Login Scripts
Used to customize the environment in a permanent way. Also used to run certain programs (such as fortune) at login time. A login script is only looked at by the shell when it first starts up. So changes made do not affect the current environment, they only take affect after the next login. (There is also an unset command.)
The exact file name varies by shell (since the syntax of the shells are different, a script that works for one won’t work for another shell). bash: .bash_profile, Bourne: .profile (bash, ksh will use .profile if no more specific login script is found), csh .login. Also .bash_logout (and for csh, .logout).
System-wide login scripts (/etc/profile) run before the user’s login script, so the user gets to over-ride system defaults.
RC scripts are similar to login scripts. These are scripts that are run every time a shell is started except for the login shell. RC scripts are useful because not all environment settings can be exported. So you’d lose your set-o settings, aliases, etc., for each window you open (using a GUI). For Bash the RC script is called .bashrc (and similar names for other shells). A common practice is to source .bashrc from .bash_profile. All exportable items should be set in login script; non-exportable items belong in RC script. (System-wide one too.)
The environment variable ENV contains the pathname of the RC script.
The scripts run when the system boots are often called RC scripts too.
Restricted Shell
If bash is started with the name rbash, or the -r option is supplied at invocation, the shell becomes restricted. Many standard commands and features are disabled including “cd”, using pathnames for commands, I/O redirection, and others.
A restricted shell can be useful for system accounts that must have a valid shell to work. (Most system accounts don’t need a valid shell, but a few do.) A restricted shell might be useful with a “guest” account; however, such accounts are never safe and should be avoided. However a “turnkey” or menu based account can be setup (the menu is drawn in the login script). Some MTAs such as sendmail need a shell to deliver mail (however sendmail includes an even more restrictive shell).
Environment
Qu: what is the environment? Ans: where people/programs live/work. The environment is a collection of settings (in RAM) that a program can examine. Qu: What settings form the environment? Ans: umask, cwd, list of open files (including any redirections), signal handling (e.g., trap), and any variables with the export property set. (Also process resource limits (ulimit -a), the user’s UID and GID, security information, and other OS-specific values; these are not specified by POSIX.)
Each running program has its own environment and virtual memory ensures no program can access the environment of another. When a program is started the shell initializes its environment from its own, by copying parts into the new environment.
A Unix/Linux system has other settings (system variables) that apply system wide. Some of these can be found in the man pages for sysconf (e.g., PATH), confstr, limits.h, and fpathconf (e.g., NAME_MAX). The values for those can be seen using getconf(1). The variables defined in fpathconf depend on the filesystem used, and thus require a pathname argument to indicate which filesystem applies:
getconf PATH; getconf NAME_MAX /
Some interesting values to look up: ARG_MAX (max # args to a command), CHILD_MAX (max # processes per user), OPEN_MAX (max # open files), and LINE_MAX (max length of a line of input).
History Mechanism
Interactive shells keep a list (in the environment) of previously entered commands. This is called the history. Although the official way to view and re-execute (possibly after editing) previous commands is with fc (fix command, see below), most shells support other ways to work with history.
Discuss vi editing mode (hit escape then normal vi commands, with extensions, apply). Bash, ksh default to non-standard emacs editing mode: ^r (incremental search), using arrow keys. The history command is often just an alias for fc -l, but see help history in Bash and the man pages for other shells.
fc options: -r (reverse), -nl (suppress cmd numbers), -l (list), -s (execute without editing), -e editor (uses FCEDIT, defaults to ed), and first [last] (the command (or range) to list/edit). First and last can be cmd numbers or a string (matches the beginning of some command); defaults to last command. “-n” means the nth previous command. With -s you can also use old=new to substitute. (ex: Save last numLines of history without line numbers or leading space: fc -nl -numLines |sed -e 's/^[[:space:]]*//' >script
Discuss HISTFILE (defaults to .sh_history) and HISTSIZE (128). Some shells also support HISTFILESIZE and other non-standard environment variables. In Bash for instance you can set HISTCONTROL=ignorespace to not include commands that start with a space in the history.)
Exactly when commands are read from or written to HISTFILE is unspecified in POSIX. For Bash the file is read once upon startup to initialize a RAM history list, and once upon exit to append the newly executed commands to the file. (The file is then truncated if necessary to hold only the last HISTFILESIZE commands.)
History Expansion
While not defined in POSIX most shells also provide history expansion. This mechanism works at some point, usually early on (via the readline library with Bash). The characters “!” (and sometimes “^”) trigger the history to be searched and some command to be executed, replacing the current command line. Since these characters (can often be changed by setting the histchars string of 3 characters) have special meanings they need to be quoted.
History expansion characters are only quoted by a backslash or within single quotes! Double-quotes does not quote these characters, leading to strange behavior; "hi!" results in an error, but "hi\!" results in “hi\!” (and not, as you might expect, “hi!”). It depends on the shell in use and its history configuration, if readline is used and your ~/.inputrc (readline configuration file).
Turn off history expansion with set +H in Bash or “set -K” in Z shell.
Auto-completion
Modern shells support command, tilde, and pathname auto-completion, usually triggered by typing in a few character and hitting TAB. If you didn’t enter enough to uniquely identify a single command/user/file, then you can hit tab again to display a menu of completions possible.
With this feature it becomes difficult to enter a literal TAB. You use the same control-v technique as for vi: ^vchar means to enter char literally.
Job Control
Modern shell job control features: fg (put stopped/background job into the foreground), bg (put stopped job into background), jobs [-l] (list jobs by name and job number [and PID]), ^Z (stop foreground job; a SIGTSTP (20) signal is sent to the foreground job, which has a different default action than terminate).
These cmds use num (a PID), %num (a job number), or %name (name of a job). These features, while convenient, only apply to background processes attached to the current session. For all other job control, you still need to use ps and kill.
nohup
When a shell exits, any background jobs (process groups) started by that shell are (usually) sent the SIGHUP signal to kill them. To run a job in the background after you log out (or close an xterm window), the job must ignore this signal. Also, the job is no longer attached to any session (i.e., I/O not attached to any terminal) so you must redirect its I/O, ignore SIGHUP, and run it in background. A good use of this would be to begin a lengthy task such as a download or system update and log out:
nohup wget ftp://example.com/big.pdf &
The nohup command runs a shell (not necessarily Bash) that ignores SIGHUP and which runs the command line (signal handling is exported and thus inherited). Output is redirected to ./nohup.out (or ~/nohup.out) unless you redirect it elsewhere.
Input must be redirected (</dev/null) or ssh may not close! (Some versions of nohup don’t have this problem (e.g., Gnu), but for portability always redirect stdin.)
Bash can automatically ignore SIGHUP for background jobs by setting “shopt -u huponexit” (the default with some versions). Bash also has a disown command. This can be used to make an already running job ignore SIGHUP, in case you forgot to run it with nohup: disown -h job. (See also the (non-POSIX) screen command.) Note, disown won’t redirect I/O the way nohup does.
Environment Variables
Environment (a.k.a. shell) variables (a.k.a. parameter): Qu: what’s a variable? Ans: something that can vary or change. Each env. var. is a name for a piece of RAM that can hold a single string value. The set command (with no arguments) will display all environment variables (and shell functions) in the current environment.
Using set to display the environment variables is not a good idea. With Bash, set by default will also include shell functions. (It doesn’t if in posix mode, but POSIX has no way currently (2016) to list shell functions!) In POSIX shells, you can save and restore the environment with:
vars=$(set)
...
eval "$vars"
Some standard environment variables to know include: HOME and TERM (Demo TERM=tvi950; set|less). Others are discussed next.
A parameter can be denoted by a name, a number, or one of several special characters such as “?”. A variable is a parameter denoted by a name. It is common to use the terms “shell variable”, “environment variable”, “variable”, and “parameter” interchangeably.
PATH is a list of directories separated by a colon (semi-colon on Windows). An extra colon in front, at the back, or in the middle means to include the current directory in the list at that point, so :/foo:/bar is the same as .:/foo:/bar, etc. It is very bad practice to list “.” or any world-writable directory on the PATH! This creates a security hole. PATH is ignored if a command contains a slash, so typing ./cmd is common to run a command cmd in the current directory.
The PATH setting is used by the shell (and a few other utilities) to locate utilities. (On Windows, it also is used to find DLLs and help files. On *nix, different but similar variables are used for this, e.g., LDPATH, MANPATH, ...).
The default PATH setting rarely includes every directory with applications in them. On Solaris, if the behavior required by POSIX.2, POSIX.2a, XPG4, SUSv1+ conflicts with historical Solaris utility behavior, the original Solaris version of the utility is unchanged; a new version that is standard-conforming has been provided in /usr/xpg[46]/bin. For applications wishing to take advantage of POSIX.2, POSIX.2a, XPG4 (or 6), or SUS (v1-4) features, the PATH (sh or ksh) or path (csh) environment variables should be set with /usr/xpg6/bin:/usr/xpg4/bin preceding any other directories in which utilities specified by those specifications are found, such as /bin, /usr/bin, /usr/ucb, and /usr/ccs/bin.
(In Solaris 11, the default PATH does contain many/most POSIX versions of utilities, and the legacy versions have been moved to /usr/sunos/bin.
You should consider adding to the default PATH but the order matters.
One way to deal with different versions of utilities is to set PATH to list the most commonly used versions of utilities first. Now put ~/bin and/or /usr/local/bin (or for Solaris and others, /opt/bin) first on PATH. In there, you can put symlinks to the versions that you want and that otherwise wouldn’t be used. For Solaris this is about the best you can do:
PATH=$(getconf PATH):$PATH
In general system standard *bin directories should be listed first on your PATH. You can see the standard directories for your system with the command “getconf PATH”.
Note that built-ins may be searched for, before resorting to PATH lookup. POSIX is currently (2014) unclear on how this works for any non-special built-ins, when PATH includes directories that may not contain POSIX utilities. (For example: PATH=~/bin:$(getconf PATH) and you have, say, an executable named ~/bin/printf? If your shell includes printf as a built-in, which printf gets run?). An intense debate is taking place on what to do about the issue (12/2014).
The Almquist shell and most of its derivatives (including dash) allow a special syntax to specify when built-in lookups should occur:
PATH=~/bin:/%builtin:$(getconf PATH)
And Korn shell has “builtin -d” to disable predefined built-ins (except for the special built-ins, of course).
But all shells behave differently: in some, you get the built-in, in others, you get the POSIX utility (non-built-in), and in still others, you get your version!
Best advice is to avoid naming any shell scripts the same as your shell’s built-ins. For modern Bourne shell and Korn shell, you can view the list with the command “builtin -s”. For Bash, you can use either “compgen -b” or “enable -a” (also useful is “enable -s” to just show the special builtins).
PS[124] (prompt for csh) set the prompts used by the shell. PS1 is the main prompt, PS2 is for commands that continue over multiple lines, and PS4 is used to show debugging output (turn on set -x to see this). PS3 is not standard but is used for most shells for the select statement (menu) prompt string.
The default value for PS1 is supposed to be dollar-sign space (“$ ”), and a different but unspecified value for privileged users (often pound-sign space).
FYI: PS1 undergoes parameter expansion and something called exclamation-mark expansion. Whether the value is also subjected to command substitution or arithmetic expansion or both is unspecified. After expansion, the value is written to standard error.
The expansions shall be performed in two passes, where the result of the first pass is input to the second pass. One of the passes shall perform only the exclamation-mark expansion. The other pass shall perform the other expansion(s). Which of the two passes is performed first is unspecified.
A single exclamation-mark (“!”) is replaced with the history number for the next command to be typed. A double exclamation-mark results in a literal “!” in PS1.
MAILCHECK (review biff) says how often (in seconds) should the shell wait between checks for new mail. Set to zero to turn off the checking. MAILPATH says what file(s) to check for mail and optionally the message to display. The syntax is: MAILPATH='pathname1?message1:...'. (You can use “$_” in message to expand to the pathname.)
LOGNAME and USER (If env not trusted, use logname(1) instead), PWD, MANPATH, and CDPATH.
It’s better to use an empty string in CDPATH, not a “.”, because when cd uses a non-empty entry from CDPATH, it prints out the pathname of the new current directory. If you use dot, it always prints a pathname; with an empty string, cd only prints a pathname when changing to a remote directory, which is useful notice. Also, a leading dot in CDPATH can mess up command substitution in some cases.
TZ is used to set the time zone. On Unix systems, you must set TZ or else a value compiled into the kernel gets used. On Linux it is optional, the SA can create /etc/localtime to set a system-wide default. The syntax for TZ is complex (and will be discussed in a future course) but in general use the relative pathname of a file under /usr/share/zoneinfo, such as “America/New_York”. (Demo: date; ls -l foo; export TZ=PST8PDT; date; ls -l foo)
IFS (Input Field Separators) is a list of characters that is used for field splitting (see p. 13), which occurs when parsing input from read, output from command substitution, and when doing variable substitution ($name). This is often used with read and just prior to resetting the positional parameters with set. If IFS is not set, the default value used is <space>, <tab>, and <newline>.
LINENO is set by the shell to the current line number (starting at 1) within a script or function, before it executes each command. (Useful for debugging). PPID is the parent process ID of the shell. PWD is the absolute pathname of the current working directory, containing no components that are dot, or dot-dot when the shell is initialized. (If an application sets or unsets the value of PWD, the behaviors of the cd and pwd utilities are unspecified.)
TMPDIR provides a pathname to a directory used to hold for temporary files. (If not set, most systems default to /tmp or /var/tmp.) Some programs look for TMP instead. For security, it is best to use a private directory. I usually add the following to my login scripts:
if [ -d ~/tmp/ ]
then TMPDIR=~/tmp
else TMPDIR=/tmp
echo '~/tmp missing' >&2
fi
export TMPDIR
Also remember the various locale environment variables (discussed in CTS-1106): LC_* and LANG, and the related TZ. Portable scripts should probably set LANG to POSIX.ascii locale and set TZ to utc0.
Not standard, but often available is RANDOM. Don’t use it for security-related task however.
Setting variables: To create a new variable (or change the value of an existing one) you use a command of “name=value”. (In C shell you would use “set name=value” but that does something different in other shells.) To remove a variable from the environment, use “unset name”.
Not all variables can be changed or set this way, such as the positional parameters; others will cause undefined behavior if changed, such as PWD or HOME.
Demo on YborStudent (where locale is POSIX by default): ls -a; LANG=en_US.UTF-8 ls -a; LANG=es_US.UTF-8 man man. Show the locale command and “set |egrep 'LC_|LANG'”). LC_MESSAGES controls the language that system messages use. Message catalogs for various installed languages are found in the directories listed in NLSPATH. (The default location is usually /usr/share/locale/nameOfLocale.)
NLSPATH lists where to look for message catalogs. It is a format string (similar to printf). More than one directory can be specified (separating them by colons). The default value is:
prefix/share/locale/%L/%N:\
prefix/share/locale/%L/LC_MESSAGES/%N
where prefix is configured when installing system (usually either /usr or the empty string). Any “%x” in the string is substituted with:
%N The name of the catalog file.
%L The name of the currently selected locale for translating messages.
%l (Lowercase ell.) The language part of the currently selected locale.
%t The territory part of the currently selected locale.
%c The codeset part of the currently selected locale.
%% A literal percent sign.
The following command shows an application of locale to determine whether a user-supplied response is affirmative (“locale -ck LC_MESSAGES” shows all available values you can use for the current locale; read is discussed later):
printf 'Question? ' # This
should be localized too!
IFS= read -r ans
if printf "%s\n" "$ans" |grep -Eq -- "$(locale
yesexpr)"
then echo answer was yes
else echo answer was no
fi
Show and discuss which, echo, ${x}. Demo foo=bar; echo $foobar; echo bar$foo. Demo bar=baz; echo $$foo; echo ${$foo}. Mention advanced uses for ${var} syntax. Bash trick: echo ${!foo} yields baz.
set -o, shopt (-s to set, -u to unset, -o too). Remind re bash help: help shopt.
export. 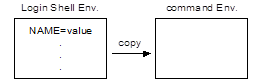 Show TZ
(date; ls -l; TZ=PST8PDT; date; ls -l). Output doesn’t change. Try again after export TZ. Point
out export is an attribute (like read-only) of environment
settings. All environment settings with export
attribute (show with env) get copied when a new process is started. We say
the new cmd inherits its environment from its parent’s (exported)
environment. export -n remotes the export
property from some variable.
Show TZ
(date; ls -l; TZ=PST8PDT; date; ls -l). Output doesn’t change. Try again after export TZ. Point
out export is an attribute (like read-only) of environment
settings. All environment settings with export
attribute (show with env) get copied when a new process is started. We say
the new cmd inherits its environment from its parent’s (exported)
environment. export -n remotes the export
property from some variable.
In some cases variables are called “shell variables” if not exported and “environment variables” if exported.
env with no arguments env displays its environment, which will be whatever your shell has exported. While you can pass variables to a simple command with:
name=value ... simple-command
you can also use the env command to run any command with a modified environment:
env [-i] name=value ... command
The “-i” option says to start with an empty environment (“ignore”). You can also use “-u name ...” to unset certain environment variables only, instead of “-i”.
You can use env to run a command found on PATH; normally, the shell looks for shell functions, aliases, and built-ins before searching along PATH. While the command(1) utility suppresses shell function and alias lookups, it still finds built-ins before searching PATH. So if ~/bin is listed first on PATH, and you (foolishly) created a shell script named ~/bin/test, you could run it with “env test”.
Since env is not the shell and thus doesn’t know about shell functions, aliases, or built-ins, what should a command like “env set” do? Shells do not currently (2017) agree on what to do and POSIX doesn’t say.
Finally, env on all mainstream *nixes has a pathname of /usr/bin/env, so it can also be used in a she-bang line to locate an interpreter using PATH:
#!/usr/bin/env python
readonly is an attribute of environment variables that makes them unchangeable and undeletable. However you can still make them exportable/un-exportable. If exported, the readonly attributed is not copied in all shells!
It turns out that the current (2011) POSIX docs are ambiguous on the interaction of readonly, export, and various built-in utilities (such as read) and predefined variables (such as PWD). The proposed change is “The values of variables with the readonly attribute cannot be changed by subsequent assignment or use of the export, getopts, or read utilities, nor can those variables be unset by the unset utility. ... If an attempt is made to mark any of the following variables as readonly, then either the readonly command shall reject the attempt, or readonly shall succeed but the shell can still modify the variables outside of assignment context, or readonly shall succeed but use of a shell built-in that would otherwise modify such a variable shall fail: LINENO, PWD, OLDPWD, OPTARG, OPTIND, and possibly others (implementation defined).”
Shell Scripts
Anything you can do at the keyboard is legal in a script. When you run a shell script you really start up a regular shell, with its input redirected from the file rather than the keyboard. Indeed, the shell doesn’t know or care if the commands it reads come from the keyboard or a file. If you can enter commands at the command line, you can create a script.
There are exactly two differences between commands in a script and interactively entering commands: There is no history mechanism (the “!” history character isn’t special), and there are no prompts. (Note you can turn these on in a script.)
With the default configuration, .bashrc is run for all shells, interactive or non-interactive. You can add an if statement, so that only appropriate commands are run for each:
case $- in
(*i*) interactive commands go here
;;
(*) non-interactive commands go here
;;
esac
Some students can be intimidated by shell scripts; creating them is programming in some sense. However you do not need to be a programmer to create your own scripts. Remember the commands you put into a script file are exactly the same as the ones you would enter at the keyboard. It is true that the shell contains many powerful features that are useful in complex scripts. But you don’t need to use them at this stage of your career.
Qu: Why write scripts? Ans: The login scripts are just shell scripts that are run automatically whenever you log in. You can add any commands you wish to these files. Unix systems use scripts to initialize the system when it boots up, and other scripts to start and stop services such as a web server or print server. The ability to read and modify shell scripts is therefore a skill needed by system administrators (SAs). Developers and others can use scripts to initialize databases, deploy applications, automate testing, and produce reports. SAs can also use scripts to automate deployment, patching, log file rotation, account creation, system monitoring, etc.
Qu: Write a script/function to do task X? Start by solving the task at the keyboard. Only then, put commands into a script file with vi. Finally, change the permissions and move the file to a directory listed on PATH, to make the script more convenient to run. Always do these four steps!
Utility Guidelines
There are a number of guidelines to follow when creating new utilities. This includes shell scripts created for general use. These aren’t so important for “throw-away” (also called “one-off”) scripts that you create for your own use. But, it can’t hurt to follow the POSIX/SUS guidelines and avoid any unexpected behavior.
Some of these guidelines are: utility names should be 2 to 9 characters long, from lowercase letters and digits; avoid multi-digit options (such as “-12” for “twelve”) and options with colons (“-:”); and the option “-W” (capital W) is reserved for non-standard options (so if you create a new, non-standard option for the ls command, it should be “-Wopt” and not just “-opt”).
PATH and Permissions for scripts
Start simply with a script that does stuff like (cal; date). Show how to run as “bash < caldate”, pointing out that the script needs read permission so the shell can read it.
Try to run as “caldate”, point out why this fails (since “.” isn't on PATH), then run as “./caldate”, (fails since not executable), then move to ~/bin and set permissions: “chmod +x caldate”, pointing out this is just a short-cut to “bash caldate”.
Discuss security of scripts: anyone can view or copy any script if they can run it. Also “bash caldate” works the same way (the shell reads the script file).
The shell requires a script to be readable, not executable. (Adding execute permission makes a script more convenient to use, that’s all.) It is possible to have an unreadable script, if a wrapper program that is setUID is used to run it. Root can run the script directly; others need to run the wrapper program. Since systems ignore SetUID and SetGID when running a script, you must set the real userid to the effective userid in the wrapper, as in this example for Linux (“wrapper.c”):
#define _XOPEN_SOURCE 500
#include <stdlib.h>
#include <unistd.h>
int main ( void ) {
setreuid( geteuid(), geteuid() );
return system( "sh some-unreadable-script" );
}
Show and discuss SUID Demo (wrapper.c). Note that wrapper.c is very insecure (and doesn’t work if the real UID is root): the C system function is trivially hacked, say by creating your own bash and changing PATH to use it; by redefining IFS to include “/” and creating a program named bin that does evil things, or simply by mucking up the environment (PATH, umask, ...). A better wrapper.c uses execv (?) not system, uses absolute pathnames, and “scrubs” the environment (deleting the environment including aliases and functions, then resetting PATH, umask, HOME, etc. to correct default values).
Making a script executable does not convert it to machine code (which is all the CPU can understand). The kernel has a default shell used when running scripts; on Linux it is /bin/bash.
Never name a script the same as a shell built-in command, or you will only be able to run it by providing a pathname (e.g., “test”).
(Have class do nusers script: echo -n "num of users: "; who | wc -l)
Security and PATH — Never include “.” or the equivalent (an extra colon) in PATH. This can lead to various security issues. In general your scripts should use standard commands only. This can be done by using absolute pathnames for all commands, or by setting PATH. In general system standard bin directories should be listed first on your PATH. You can see those with “getconf PATH”.
If you are compelled to include “.” on PATH, put it last. Never use it on root’s PATH.
Shell (and other) scripts don’t (or shouldn’t) honor Set UID and set GID bits on a script. The common solution is to code a short, simple C wrapper program as noted above, but it is not a good idea.
In 2015, it was realized that other names were commonly provided as built-ins in one or another shell. POSIX decided to warn script writers to not use such names, and compiled the following list of names to avoid:
alloc, autoload, bind, bindkey, builtin, bye, caller, cap, chdir, clone, comparguments, compcall, compctl, compdescribe, compfiles, compgen, compgroups, complete, compquote, comptags, comptry, compvalues, declare, dirs, disable, disown, dosh, echotc, echoti, help, history, hist, let, local, login, logout, map, mapfile, popd, print, pushd, readarray, repeat, savehistory, source, shopt, stop, suspend, typeset, and whence.
Sourcing Scripts
When running shell scripts a new shell process is started. So what happens when the script contains statements that modify the environment? The changes only effect the environment of the shell process reading the script. When that shell exits at the end of the script, the environment changes seem to disappear; they were never made in the login shell, so its environment is unchanged.
Normally this is a good thing. You can write a script that sets environment variables, changes settings such as PATH, umask, etc., and all those changes won’t affect the environment of the user running the script. However there are times when you want the commands in the script file to effect the login shell’s environment. An example is the login scripts. These would be useless if the changes they made had no effect on your login shell!
A feature of the shell that supports this is the dot command, .. (Many shells also allow “source” as a synonym, since a dot can be hard to see.) When the shell command “. script” is run, the current shell will read the commands from the file script. No new shell is started. When the end of the script is reached, the shell continues as normal. This is called sourcing a script. (The script can be run with arguments as normal: . script arg ...) [Demo . foo; . foo args; foo is just “echo $*”.]
You can see an example in the default ~/.bash_profile file. Bash runs this login script for the login shell only, not for any sub-shells. The file ~/.bashrc is run for all shells started except the login shell. To have the ~/.bashrc commands run for the login script as well, that file is sourced from the login script.
Create a script to change the prompt that contains the single command “PS1='new prompt'”. When you run this script normally, your prompt won’t change. But if you source this script, you should see your prompt change. (Don’t worry, the next time you login you will get your standard prompt back.)
Sourcing scripts is also how the system administration scripts read files of settings (configuration files). On a Red Hat like system, you can see some of these in the /etc/sysconfig directory. These are sourced by the scripts in the /etc/init.d/ directory. (This explains the syntax of most configuration files; they’re really just shell scripts!)
From within a script, there is no standard way to tell if it is being sourced or not. Since sourced scripts ignore any she-bang line, using some you can try something like “#!/bin/echo source me”, but this isn’t reliable. You can also set an environment variable (say “EXEC_TEST=1”) in your RC script, and don’t export it. Then, if that variable is defined when you run the script, you know it was sourced. But this only works from the command line; if one script sources another, there is no way to tell.
Sometimes, you might want to write a script that can be either run normally, or sourced. (Don’t ask me why though.) You can’t use exit if the script was sourced, and you can’t use return if the script wasn’t. Here is a technique that should work: have your script define a shell function, then at the bottom of the script, call that function. Within a shell function, you can always use return (see combo.sh):
script_wrapper() {
if test $# = 0
then
echo "no arguments provided...exiting" >&2
return 1
else
echo "exiting normally."
fi
}
script_wrapper "$@"
Comments
A comment is simply a line of text that the shell ignores, but has meaning to humans reading the script. Every well-written script will have at least some comments. Sometimes comments are required by your organization and contain copyright and other legalese.
Your scripts should include some comments near the top of the file that include a brief statement of the purpose of the script (often the name alone isn’t much of a clue), the author’s name, and the date the script was written. Additional comments can be placed throughout the script, clarifying the intent of complex and arcane commands and options.
Keep in mind the audience for comments: yourself in the future and others responsible for script maintenance, long after you’ve forgotten the details of your script. They are not generally intended for the users of the script.
Sometimes (not in our class) scripts can be so complicated that they are developed in stages. In such cases, it can pay to write some comments before the script is developed fully, to express the overall design of the script.
Comments are easy to create. Any word starting with an unquoted “#” character starts a comment, and the rest of that line is ignored. A comment can be an entire line, or added at the end of a command.
As will all shell features comments can be entered at the command line as well. This is normally pointless but is useful for learning purposes. Try to guess the output of the following, and then try it to see if you are right:
echo "ABC #DEF" G#H #IJK; echo 123 # 456
Don’t be afraid to experiment until you understand when a “#” begins a comment and when it is treated as an ordinary character by the shell. Then go back to the scripts you’ve written and add the required comments. (That is, required for this class, but a good idea in general.) Also feel free to read the comments on the system scripts such as /etc/bashrc. (You probably won’t fully understand these scripts yet, but take a look anyway.)
As an alternative to providing a separate man page file for a script, you can embed the documentation for the script in the script file itself. One technique for this is to preface documentation with “##” (and normal comments with just one “#”). The documentation can be extracted easily with (say by a “-h” or “--doc” option):
grep "^##" $0 | cut -c3-; exit 0
She-bang (shell-bang)
Not every script is a Bash script. Yet by default all scripts are read by bash on Linux (or some other shell on other Unix systems). So what happens when you use a C shell or Z shell feature in your script that isn’t supported in Bash? You can minimize such problems by sticking to POSIX only features. But sometimes these extra features are very useful and hard to avoid.
In addition not all scripts are shell scripts. There are many popular scripting languages in use, including Perl, Ruby, Python, and Lua. Try this experiment: Create a script named (for example) “say-hi” with the single command “print "hello\n";” and try to run it. You should get an error message because this is not a shell script at all, but a Perl script. Instead of running the convenient way, try the first way you learned to run a script:
perl < say-hi
And it should run fine. The same would be true for a Z shell script or a C shell script, or for any other type of script. You can just start the interpreter (the program that reads a script) with its input redirected from a script file. But we’re back at an inconvenient method to run scripts. What is needed is a way to tell the operating system which interpreter (bash, zsh, perl, etc.) to start when the user attempts to run the script. In other words, we don’t want to rely on the system default shell.
Windows systems use predefined file extensions to identify the type of files, including script files. However Unix systems don’t pay any attention to the file name or extensions, so naming your scripts “caldate.sh” or “say-hi.pl” won’t change which interpreter is used.
But adding “#!pathname” as the first line in a script file (and no leading spaces either) does tell a Unix or Linux system which interpreter to use. When the kernel attempts to run a script, it realizes it is a script and not machine code, starts up the appropriate interpreter (identified by the pathname), and passes it the script’s pathname as an argument. The system checks the first line only for this special comment. (You did notice the “#”, right?) This line is known as a she-bang.
The “!” character is technically called an exclamation point, but that’s quite a mouthful and many old-school hackers call this character a “bang”. Since this comment tells the system what shell to use, it was named the “shell-bang” line, which was shortened to “she-bang”. (Or it may be from the slang expression the whole shebang.) Other names for this line include shebang, hashbang, pound-bang, sha-bang/shabang, hashexclam, or hashpling.
Different systems have slightly different rules for using the she-bang line. This line may need a space after the bang or such spaces may be forbidden. It depends on which Unix system you use. For Linux, spaces here are optional. The other rules apply to all systems:
· You must use a pathname to the interpreter.
· The pathname can be followed by a single word as an optional argument to the interpreter.
Anything else will result in odd error messages! Especially avoid trailing spaces on this line; they can be hard to see but will still cause trouble. DOS line endings may also cause an error. This is because everything after the interpreter pathname (and any following blanks) up to a newline is treated as a single word (as if you had used single quotes), i.e. as a single argument even if it contains white-space characters.
For POSIX shell
scripts, you should probably not use any she-bang line. The reason is there
is no standard location for such a shell. (Solaris < 11 in particular
doesn’t have a POSIX shell at /bin/sh;
OpenSolaris does.) The current (2015) version of the FHS does
require that /bin/sh refer to a
POSIX-compliant shell.
POSIX doesn’t define the she-bang mechanism at all. The best you can do if POSIX compliant is to see if POSIX is available, if so, determine the path of sh, and use that:
# Check if the current version of POSIX is
present:
IS_POSIX=`command -p getconf _POSIX_VERSION 2>/dev/null` ||
IS_POSIX=0
if test "$IS_POSIX" = 200809
then SH=`command -p -v sh`
fi
$SH can be compared to $0 to see if they match. If they don’t, the restart the script using that returned value. (Even this isn’t foolproof; nothing is.)
Unusual she-bang lines can be useful on occasion. A shell script that should not be run directly, but only sourced could use a she-bang line like:
#!/bin/echo You must source this script:
This she-bang leads to a self-printing script:
#!/usr/bin/tail -n+2
When running a script with a she-bang line, the system runs the interpreter with the following arguments (in order): the (optional) argument listed on the she-bang line, the name of the script, and the arguments supplied on the command line. Knowing this, you can use create runnable (say) awk scripts with:
#!/bin/awk -f
Or if you have Gnu, more safely with: #!/bin/awk -exec
This works because the system puts the script name after the “-f”.
You can see what your shell does by running this script, shebang-test:
#!showargs -a -b
Where showargs is this small C program called showargs.c:
/* This C program simply
displays its arguments. It is
* designed to test the she-bang mechanism.
*/
#include <stdio.h>
int main ( int argc, char* argv[] )
{ int i;
for ( i=0; i<argc; i++ )
fprintf(stdout,"argv[%d]: \"%s\"\n", i, argv[i]);
return 0;
}
You can compile this with “c99 -o showargs showargs.c”. Make sure you put showargs in a directory listed in PATH, or use an absolute pathname in the script. Here’s the results on a Linux system:
$ ./shebang-test arg1 arg2
argv[0]: "showargs"
argv[1]: "-a -b"
argv[2]: "./shebang-test"
argv[3]: "arg1"
argv[4]: "arg2"
Many Unix (and Linux) systems install a POSIX compliant shell with the pathname /bin/sh, so that is the most common interpreter listed in a she-bang comment. Also the argument “-” (not “--” for historical reasons) is often used as a security measure to ensure the shell won’t try to read any additional arguments as options.
Unfortunately there is no common location for any other shell or interpreter. Interpreters such as perl or zsh may be found in /bin, /usr/bin, /usr/local/bin, /opt/bin, or other directories. Since you must list an absolute (complete) pathname and PATH isn’t used, the wrong location is a common problem. (I generally add symlinks to perl and other interpreters in several common directories on my servers, so no matter what pathname is listed in the she-bang line it will just work.)
A trick is to use “#!/bin/env perl” (or whatever interpreter you want) to run a Perl script regardless of where perl is found. The env command is used to run another command, and it will use PATH to find it. However no additional arguments can be used in this case.
|
She-bang Line |
Notes |
|
#!/bin/sh - |
Legal: most commonly used |
|
#!/bin/bash - |
Legal |
|
#!/usr/bin/perl -T -w |
Illegal: has two arguments |
|
#!/usr/bin/perl -TW |
Legal: only has one argument (of two options) |
|
#!zsh |
Illegal: no pathname used |
|
#!/bin/sh |
Illegal: line doesn't start with #! |
|
#! /bin/sh - |
Legal on Linux and some other systems |
|
#!/bin/sh # a she-bang |
Illegal: Only one word argument allowed |
Example She-bang Lines
The following is a convoluted way to run a Perl script regardless of its absolute pathname, with arguments (“-Tw” in this case). The actual Perl script follows the “#!perl” line. (Using ugly code just to run perl on every system isn’t worth it! I suggest just using “#!/usr/bin/perl -Tw” and hope for the best.)
#!/bin/sh -
PERL=`command -v perl` # locate pathname of perl
if [ -z "$PERL" ]; then
echo 'Unable to find a "perl" interpreter!' >&2
exit 1
fi
eval 'exec "$PERL" -Tw -x $0 ${1+"$@"}'
echo "exec of \"$PERL\" failed!" >&2
exit 1
#! perl
$name = "Stranger";
$name = $ARGV[0] unless ( scalar(@ARGV) == 0 );
print "Hello, $name!\n";
The following (two lines) is a tricky way to run a MySQL script:
#!/bin/sh -
--/. &> /dev/null; exec mysql "$@" < $0
SELECT 'Hello world!' AS "";
Ensuring a SUS/POSIX Shell Environment
If a user is not running a POSIX shell or in a POSIX environment, there is no way to create a portable shell script that will run a POSIX shell and use POSIX utilities. Using a she-bang line doesn’t help since there is no defined pathname for a POSIX shell.
Instead of a she-bang line you can use something like the following at the top of your shell scripts:
PATH=$(command -p getconf PATH || getconf PATH)
tail -n +4 "$0" | sh -
exit
The system default path is available using getconf. But since getconf may need to have the PATH set up before it can be called itself, built-in command “command” is used. Of course if the default shell isn’t POSIX, it may not have a command built-in; there is no “perfect” way to ensure a POSIX shell is used.
In addition to running a POSIX shell and setting a POSIX PATH, you may want to define IFS correctly and remove any aliases and shell functions. (This should be done before setting PATH. One recommended solution is this:
# Set IFS to its default
value of <space><tab><newline>:
IFS='
'
\unalias -a # Unset all possible
aliases
# Note unalias is escaped to prevent an alias being used for unalias
unset -f command # Ensure command is not a user function
PATH="$(command -p getconf PATH || getconf PATH):$PATH"
Trying to set IFS to
its default value is ugly, since you can’t see the three white-space
characters. Using something such as:
IFS=$(printf ' \t\n')
won’t work, as trailing white-space is stripped away by the shell’s
command substitution. If using the solution above (and a comment) is too ugly
for you, use something like this instead:
# Set IFS to the default value:
IFS=$(printf '\nX\n'); IFS=${IFS%X}
Command Substitution
Command
Substitution is commonly used in
shell scripts with expr and other utilities. It allows one command’s
output to be included as a command line argument to another:
outer-command
arg ... inner-command arg ... arg ...
The inner command runs first. Then
the outer command is run, with its command line modified to include the output
of the inner command (minus all trailing white-space), substituted for that
command:
outer-command
arg ... arg arg ...
The inner command is surrounded by a pair of back-quotes, also known as the back-tic or grave accent character. Since this can be hard to see (with many fonts it looks like a single quote a.k.a. apostrophe), POSIX prefers the inner command to be inside of “$(command)”. Here are some simple illustrations:
echo today is $(date)!
echo today is `date`!
echo There are $(who | wc -l) users on the system.
sum=$(expr 2 + 2)
When used with the set command, the output of a command can be parsed into words. This can be an effective way to access only a part of some command’s output (if you don’t care that the positional parameters get reset in the process):
set -- $(date)
echo today is $1, $2 $3 $6. # date cmd does this too
Another advantage of using -- is that if $(...) resolves to nothing, it sets $# to 0 instead of displaying the list of existing variables.
Using this technique, you can write a shell script that prints only the name and size of a file whose name is supplied as a command line argument. The main part of this script will look something like this:
set -- $(ls -l $1)
echo file \"$9\" contains $5 bytes.
The number of fields used for the date and time in the “ls -l” output will be two or three fields depending on the locale. With “LC_TIME=POSIX” the date and time will take three fields. For “LC_TIME=en_US” on Linux only two fields are used, so change “$9” above to “$8”.
As stated earlier, command substitutions remove trailing white-space from the output of the inner command:
printf 'one\ntwo\nthree\n' > foo
DATA=$(cat <foo) # or just: DATA=$(<foo)
Normally, this is a good thing, but sometimes you need to keep the data intact. Using double-quotes will preserve internal newlines, but not more than one trailing newline. Also, if the file contains non-text data, the NUL bytes will cause problems. There is just no good way to save the contents of a file in a shell variable; consider using awk or Python instead of shell. The only work-around I know of is to store the data in an encoded way, then decode on use:
DATA=$(base64 foo)
printf '%s' "$DATA" |base64 -d
(base46 isn’t standard. uuencode/uudecode are standard, but harder to use portably. With Bash, you could use “uuencode foo /dev/stdout” to encode.)
Because the inner command is processed separately, you can freely use double quotes, even if the whole thing is already inside double quotes (that is, no need to escape the inner double quotes). For example:
$ echo "$( echo "hi" )"
hi
The Colon Command
The colon command (“:”) is a shell built-in command that does nothing. It is sometimes referred to as the no-op command (for no operation). In some ancient shells there was no comment character, so you used the colon instead:
: this is ignored
Today the only use of this command is to do nothing while making the shell evaluate the arguments (or as a place-holder when some command is required by the syntax of the shell). This is useful with arithmetic expansion, which is discussed next. [May be useful with command substitution too.]
Simple Arithmetic
There is sometimes a need to perform some simple math in a shell script. You might want to count things, such as the total number of files/lines/users/whatever processed. In this case you would like to add one to a variable (that is initialized to zero) for each item processed. You might have a need to calculate a date 90 days in the future. You might have a script that produces reports, which have columns that need totaling or averaging. An interactive script might need to display a line number as a prompt. Or you might be creating a script that plays a game and you need to translate a number from 1 to 52 to a suit (divide by 4) and rank (divide by 13).
The original Bourne shell contained no ability to do math. However there are standard utilities such as expr for simple integer math, and other more powerful utilities such as bc for more complex calculations. (I rarely will create a shell script when the task involves complex math, and prefer Perl or even a compiled language such as “C”.)
Most utilities that handle floating-point math default to either 0 or 14 decimal digits, so it pays to know how to control the format. In these examples the output of 2÷3 (or any expression) is either rounded or truncated to 2 decimal places. I generally prefer using Perl; however Perl isn’t part of POSIX. (Neither is the -q argument to bc, but it is needed with the Gnu version.)
perl
-e 'printf "%4.2f\n", 2/3' # output: 0.67
perl -e 'printf "%.2f\n", 2/3' # output: .67
awk
'BEGIN{printf "%4.2f\n", 2/3}' # output: 0.67
echo 'scale=2; 2/3' |bc -q # output: .66
dc -e '2k 2 3 / p' # (dc uses RPN) output: .66
POSIX has standardized some simple integer-only math in the shell, and modern shells have added extra math functions as well. Also note that Perl, AWK, and bc include some standard math functions such as square-root, sine, cosine, etc.
Modern Korn shell (ksh93) does floating point arithmetic.
Some system administration scripts rarely use the POSIX shell arithmetic and use expr instead. (Perhaps because the script writers can’t depend on the users to have a POSIX shell; older systems may only have Bourne or C Shell.) To be able to understand and modify such scripts, you should become familiar with both ways of performing basic math calculations.
Using arithmetic expansion allows you to include the results of a calculation as an argument to some command:
echo "3 + 4 = $((3+4))" # shows: 3 + 4 = 7
You can use environment variables inside the expression (that contain numbers). If the name doesn’t contain digits or operators you don’t even need a dollar sign:
num=8
echo $((num + 7)) # shows: 15
echo $(($num + 7)) # the same
echo $((num+7)) # spaces are optional
sum=$(( 3 + 4 ))
echo 3 + 4 = $sum # shows: 3 + 4 = 7
It is also possible to assign a value to an environment variable within the expression. This is called an assignment expression (Note the single “=”!):
echo $((num = 2 + 3)) # shows: 5
echo $num # shows: 5
To assign a variable without doing anything else you can use the colon command. This works because the colon and the arithmetic expansion is evaluated in the current environment. Let’s look as some examples, showing the basic math operators. The results may appear strange if you’re not used to “computer math”:
: $((w = 2 + 3)); echo $w # shows: 5
: $((x = w - 1)); echo $x # shows: 4
: $((w = 5 + 2)); echo $w; # shows: 7
echo $x # shows: 4 (x doesn't
change because w did!)
: $((y = 5 * 2)); echo $y # shows: 10 (multiplication)
: $((z = 5 / 2)); echo $z # shows: 2 (quotient
only), not 2.5!
echo $(( 2 /
3)) # shows: 0 (no
rounding!)
echo $((15 % 4)) # shows: 3 \
# (“%” is the
remainder or modulus operator)
echo $(( 2 + 3 * 4)) # shows: 14, not 20
echo $(((2+3)*4)) # shows: 20
# (but you should add some spaces to
make this more readable)
x=4; : $((x = x + 1)); echo $x # shows: 5!
# (This is the common way
to add one to a variable.)
: $((++x)) (“++” is increment
operator; not required to be supported).
num=2
echo $((2 = num)) # shows an error message
echo $((2 == num)) # shows: 1 (means
“true”, unlike exit status)
echo $((num == 3)) # shows: 0 (for "false")
Note that the assignment operator “=” means to calculate the value of the expression on the right and then assign it to the variable on the left. Unlike normal math, you can’t reverse this! The “==” operator means to compare the expression on the right with the one on the left.
Bash and some other shells have a built-in let command that works the same way but produces no output, so it’s useful only for assignment expressions. Here’s an example: let 'x = 2 + 3'
Using expr
Not all shells support POSIX features, so using the expr utility may be more portable. It works very much like arithmetic expansion, only it supports some additional operators. To save the result in an environment variable you use expr with command substitution. One difference is that with arithmetic expansion, the expression is treated as if it were double-quoted, so you can use “*” or parenthesis without worry. expr requires you to quote such operators. Another difference is that expr expects each operator and operand to be a separate command line argument; that means you must use spaces between each item. Here are a few examples:
expr -- 5 + 2 # shows 7, returns exit status of 0 (for true)
expr -- '5 + 2'
# error: expression is 1 argument, not 3
expr -- \( 4 + 3 \) \* 2 # shows: 14, exit status of 0
# (Don't forget to quote special
characters!)
num=$(expr -- $num + 1) # adds 1 to num
num="-1"
expr $num \* 3 # may (or
not) cause an error
expr -- $num \* 3 # shows: -3, exit
status of 0
That last case explains why you should use the special end of options option of “--”. Without it, expr might get confused when the first argument starts with a hyphen. (Some versions of expr will not get confused by this; it depends on which type of Unix system you have.)
Besides printing out a result, expr returns an exit status you can use with an if statement. You may see code such as this:
if expr -- $num == 0 >/dev/null
then ...
fi
While you may come across expr in scripts you need to read, I prefer to use arithmetic expansions in scripts I write. However there is one very useful operator that expr provides and isn’t available in arithmetic expansions: expr -- string : BRE. This matches a string of text against a Basic Regular Expression, and returns the number of characters matched (as well as setting an exit status appropriately), or the string matching the first group. Note, the BRE is implicitly anchored at the beginning (there is “^” at the front automatically). Using a BRE such as “^x” won’t do what most will expect!
Some
examples:
num_chars=$(expr -- "$foo" : ".*")
will count the characters in some variable named $foo (or use POSIX’s “echo ${#foo}”), and:
first_char=$(expr -- "$foo" : "\(.\).*")
which will return the first character in some variable named “$foo”.
You can compare strings for less-than or greater than using expr (locale sensitive):
expr "x${string1}" "<" "x${string2}"
will be true if string1 comes before string2 in the current locale.
Leading Zeros: Using Non-Decimal Numbers
POSIX arithmetic is derived from C. One consequence of this is that for arithmetic expansions and certain other contexts, numbers with leading zeros are assumed to be octal, not decimal! (Don’t ask what “09” means.) Also, “0xdigits” indicates a hexadecimal number. Note, this doesn’t (or rather, shouldn’t) apply to utilities such as test. But you must still be careful, since any utility may be built-in, and that may change the meaning:
test $(( NUM + 2 )) -eq 10
will be true if NUM is set to “010”.
(Bash also uses the nonstandard “base#digits” notation, e.g. “16#10” for hex, as does Korn shell and Z shell. However, this varies by version.)
Because leading zeros in numbers affect the meaning of the number, it is sometimes necessary to remove them. It is possible to strip leading zeros from shell variables containing numbers with:
${NUM##0}
The problem with that is, all-zero numbers (“0”, “00”, ...) are converted to an empty string. (If you know for certain the value will have at most one leading zero and at least one additional digit (e.g., date +%S), you can strip it using “${NUM#0}”.) In general, it is probably best to use a function to do the zero stripping:
strip_zeros () {
test -z ${1#${1%%[!0]*}} \
&& echo 0 || echo ${1#${1%%[!0]*}}
}
The expression “${1#${1%%[!0]*}}” returns the augment with all leading zeros removed. If the result is an empty string, echo a single zero, otherwise echo that expression. This is ugly, but reasonably efficient and safe on most shells.
A simpler alternative is to force the number to be interpreted as decimal, like this:
$((10#$NUM))
While this should always work with POSIX shells, it may not.
expr doesn’t care about leading zeros (all numbers are assumed to be decimal) so it may be easier to use if decimal numbers might have leading zeros:
echo $(( 010 + 1 )) # displays 9
expr 010 + 2 # displays 12
The standard is far from clear on when leading zeros mean octal (or hex). Consider this weirdness from Korn shell:
x10=4
if [ 0x10 -eq 4 ]; then echo ksh is weird; fi
The Austin group is currently (12/2013) attempting to clarify and resolve such issues. The following is part of this discussion (from this aardvark):
The SUS/POSIX standard uses the term “decimal number”. The current interpretation of that (2014) is to require all utilities in conforming mode to treat leading zeroes as permitted when converting arguments required to represent integer values, thereby precluding all syntax formats that use a leading zero to indicate an alternate base is desired.
However, consensus was not reached. For the utilities where [this] applies, including sh and the C compiler, it is up to the application developer to detect and strip leading zeroes before use or storage of an argument, and detect and convert to a decimal base any value stored using an alternate base format before using it as an argument to another utility.
(In the end, the committee agreed to disagree, and no action will be done at this time.)
(In other words, the standard seems to imply only decimal numbers are allowed, even if they have a leading zero. “0x” for hex is not allowed either. But, many utilities and shells don't follow this, so a portable script should strip leading zeros and convert bases to decimal (using, say, bc), for any arguments or environment variables that contain numbers.
Update: In 4/2014 it was agreed to add this footnote to the next version of the standard: Some current utility implementations may also permit leading zeros but portable applications shall not rely on this behavior.
Using bc and dc
The shell only supports simple integer arithmetic. For more complex math, Unix provides “bc” (and often “dc”, although it isn’t required by POSIX). bc is a math calculation language, whereas dc is designed as an interactive (but powerful) “Reverse Polish Notation” calculator:
echo '2 + 3' | bc
echo '2 3 + p' | dc
Personally I prefer to use bc, but both allow you to define functions and perform arbitrary precision math. This means the number size is only limited by how much RAM is available; you can multiply and divide 100,000 digit numbers!
Gnu bc, when run interactively, displays a copyright notice. To suppress that, use the (Gnu only) “-q” option.
Normally, bc shows the same number of decimal digits as the longer of the numbers used. To control how many digits to display (to the right of the decimal point) when the result would repeat (try 1/3), set the special variable scale (defaults to zero).
Use bc to convert numbers or perform complex calculations (“-l” makes bc include some standard math library functions, such as “a” for arctan):
echo 'ibase=16;FFFF' | bc #
hex to decimal
echo 'obase=2;123' | bc # decimal to binary
echo 'scale=20;4*a(1)' | bc -l # Pi to 20 places
Puzzle:
Explain the result of: bc ibase=8 obase=16 17 produces 11 not F!
Answer: always set obase first, since 168 =1410, and 178 = 1510 = 1114!
As an example show rsa.bc (a complete RSA encryption/decryption example written in bc). Without these commands you must do floating point (or just complex) math in Perl, awk, or some other computer language.
One problem with bc is there is no way to display leading zeroes, or to print formatted output (numbers and simple strings only). The output must often be processed to produce a pleasing appearance.
Related Techniques
You can use standard techniques to build an expression, and then evaluate it. Here’s an example in Bash to sum a bunch of integers piped in:
echo 1 2 3 |echo $(( $(printf "+%d" $(cat) ) ))
Here’s another version that also can sum real numbers in a file:
echo 1.1 2.2 3.3 > $TMPDIR/file
nums=(0 $(<$TMPDIR/file) )
echo $(IFS=+; bc -l <<< "${nums[*]}") # shows 6.6
Project idea: ip2binary shell function that uses bc to convert to binary, then sed or other tools to format with leading zeros and in groups of 8 bits.
By default, bc uses scale=0 (that is, zero decimal places). So:
echo 2/3 | bc -q
results in 0 (zero). This can be solved using an alias for bc, which sets the scale to (say) 4:
bc() { { echo
"scale=4"; cat; } |command bc -lq; }
echo 2/3 | bc
results in “.6666”. Notice the command grouping, used to add “scale=4” to the front of whatever is piped in. This is an occasionally useful technique.
Debugging Shell Scripts
When a script longer than a few lines has an error, it may be difficult to pin-point the problematic statement. The shell supports a debug mode, where it first echoes a command just before running it. The command is marked in the output with the special PS4 prompt (which defaults to “+”). Also, all command line arguments are processed first, so you can see the expanded results after substituting variables, commands, etc.
Add the command “set -x” near the top, or at least before the part of the script you suspect has the problem. (You can turn this mode off with the command “set +x”.)
Best Practices for Shell Scripts
Simple one-use shell scripts are rare. What starts off that way tends to evolve and be reused in the future. There are best practices you can use for your larger scripts, but you should apply these ideas to nearly all scripts you create.
· To start with, you can use a utility to examine your script for errors and bad practices. Use the shellcheck command to ensure your scripts adhere to best practices, especially the security ones.
· Keep your scripts under version control (VCS aka SCM). This has many advantages. You can see all changes to your scripts over time, including what was changed, when it was changed, by whom it was changed, and why it was changed. That’s information you will not remember months or years later. Modern VCSs include (or work with) code review systems, so you can easily have your scripts reviewed by your peers. The VCS database, often known as a repo (for repository of code) can be used as a library for shared scripts.
· Use shell options to restrict unsafe practices. This is sometimes known as strict mode. The article strict mode for Bash also applies (mostly) to POSIX shell.
· Test your scripts. While not generally worth the effort for very short scripts, more complex ones (or ones that may grow) can be tested in a semi-automatic way: You define some tests and the expected results. A tool runs the tests and checks what your script does, reporting the status. Such testing is commonly (and should be always) done for software development; your scripts deserve the same treatment. It is in fact common to define the tests first, then work on the script until all tests pass. That’s when you know you are done. If any bugs are discovered in the script, first add a test case that fails because of that bug, then make all your tests work.
There are several test frameworks for shell, such as the older (but still works fine) shunit2, or BATS (which is maintained as of 2016).
· When something doesn’t work as expected, it becomes useful to know what happened. This is known as logging, or sometimes, verbose mode. A good practice is to have multiple log levels that you can enable from the command line. Often the log messages can be saved in a temporary file in /tmp (which on most systems these days gets cleaned of old files regularly, so you don’t have to worry about deleting the log files yourself). If the output goes to stderr or stdout, just add a “-v” (verbose) option, which can be repeated for increasing levels of output. A simple method was taken from the web page Shell Scripts Matter. Add the following lines to your scripts (or put in another file logging.sh, and source that in your scripts):
readonly LOG_FILE="/tmp/$(basename "$0")-$$.log"
info() { echo "[INFO] $@" | tee -a "$LOG_FILE" >&2 ; }
warning() { echo "[WARNING] $@" | tee -a "$LOG_FILE" >&2 ; }
error() { echo "[ERROR] $@" | tee -a "$LOG_FILE" >&2 ; }
fatal() { echo "[FATAL] $@" | tee -a "$LOG_FILE" >&2 ; exit 1 ; }
Using this tiny logging framework is as simple as writing log statements such as:
info "Executing this and that..."
It is easy to grep the log file to find something specific. You can improve these functions as needed, by having the statements include the date and time, the calling function name (with Bash’s $FUNCMANE), etc.
Writing to a log file in /tmp is usually good enough. For cron scripts though you should probably investigate using logger.
Use the -v or --verbose of the commands you invoke as needed to improve the quality of your logging, if the user requests logging. Something like this:
some-command ${LOGGING_IS_ON:+--verbose} ...
Where you set LOGGIN_IS_ON to something if logging is on, and the “--verbose” is whatever option(s) are needed to cause some-command to output more information.
Lecture 15 — Some Shell Features Useful For Scripting
The set, unset, and bash shopt commands
set -o, set +o, shopt (Bash only; -s to set, -u to unset, -o too). Remind students that Bash has a help command for built-ins: help shopt.
Other options to set (many of which have a “-o name” form too). Note using “+option” causes the option to be unset. These options can also be passed on the command line when starting a shell. The most useful options include:
-a (allexport), -b (notify — report the birth and death of background processes), -m (monitor — almost the same as -b), -C (noclobber — useful to atomically create new files as for mktemp.sh), -u (nounset — makes it an error to expand a variable that isn’t set), -n (noexec — read but don’t execute) and -v (verbose — write the commands as they are read), -x (xtrace — used for debugging).
Also set -o ignoreeof and nolog (don’t put function
defs into the history file). Also -e (errexit
— exit on any error (some exceptions)),
-f (noglob — disable pathname
expansions), and -h (add the locations from PATH of utilities to the hash list when a function is
defined, rather than when the function is first run).
In Bash v4.2.37, using allexport should also export shell functions, but it doesn’t always do that; it also exports some settings (set –o ignoreeof for example) that is shouldn’t.
A useful Bash option is set -o posix, to make Bash operate much closer to the SUS spec.
Use unset to delete some variable (or function). Note this doesn’t work if the variable has the readonly property. There is also an unalias, and export -n.
shopt -s extglob in bash for extended pattern syntax, -s dotglob to have * match files with a leading dot.
Bash (and some others) support the non-standard declare statement. Show help declare. Indeed, several commands are considered declaration commands, such as export and readonly. This is only significant because variable assignments as arguments to declaration commands persist in the environment (for example, “export a=b”).
The rules can be subtle. Consider this:
unset a b
set '1 b=2'
export a=$1
echo $a:$b: # outputs: 1 b=2::
unset a b
export \a=$1
echo $a:$b: # outputs: 1:2:
In the second case, the quoting of “a” means it could not be a variable assignment, so it is just a word passed to the export command, and field splitting is done on the expansion of $1.
Exit and Exit Status: More Detail
When you enter commands interactively at the keyboard any errors are usually obvious. Depending on the results you see you can do one thing or a different thing next. But when you create a shell script of several commands you can’t know what will happen in the future when the script is run.
To help out script writers all commands return an indication if they worked or failed. Using some features of the shell you can test the results of running commands, and have your script do one thing or another. This indication is known as an exit status.
All commands (including the shell) return an integer exit status to indicate if the command ran successfully or not. Zero means success while any other number means failure. Some commands will return different non-zero values for different types of errors. These should be documented in the command’s man page. (See diagnostics or return code or return status or exit status; show man page for grep).
The exit status is a signed-integer (two’s complement) value, but only the final byte is used (currently; POSIX is looking at changing this as of 2015). So the useful range for an exit status is -128 <= num <=127. Larger values will overflow, i.e. “128” is the same as “0” and “255” is the same as “-1”. However, that doesn’t happen on all architectures, so you should limit your setting of an exit status to the range 0..127, and also ignore the values with special meaning.
The value 255 (= –1) has special meaning with xargs and find, and in general some other value should be used to indicate errors. Other negative values are used when a command is killed via a signal. So the useful range is 0..127 (or -1 to abort if used with xargs, or another value if using trap signal handlers; Linux uses “signo <<8” .)
Certain values are set according to POSIX under certain circumstances. For example, if a command is not found the exit status is set to 127. If the command name is found, but it is not an executable utility, the exit status is 126. (Some versions of Bash seem to have a bug and returns zero in these cases!) The reserved values are 0, 1, 2, 126, 127, 128-254, and 255. The value “1” means “false” or “warning” for those utilities that return “2” for an error, otherwise “1” means error.
The shell puts the exit status of the last command that ran (or was attempted) in a special environment variable named “$?”. Try the following commands:
who -e # an
error since who doesn't have an option "-e".
echo $? # shows: 1
echo $? # shows: 0
Can you see why the second echo command displays zero? It’s because at the point in time when the shell is expanding the $?, the last command was the first echo command and no longer the who command. Since that first echo command worked successfully, $? gets set to 0 (zero) for success.
The exit command is a shell built-in utility. It doesn’t really log you out, it exits the currently running shell. If that’s your login shell then you get logged out automatically. So what happens when using exit in a script? Ans: Exits the script only. You can use “exit status” to exit the script early with status exit status, for example “exit 0” or “exit 1”. (When you are ready to end your session today try to log out using “exit 0”.)
Warning: When you source a script that runs exit (or otherwise causes the shell to terminate, e.g., from a syntax error), your shell exits.
Without an explicit exit command a shell terminates when it hits the end of the script (known as end of file or EOF). In that case the exit status of the shell is set to the value of $?.
Finally, note the exit status of a pipeline is the exit status of the rightmost command. So running “who -e |sort” will show an exit status of 0 (zero) since although the who command failed, the sort command worked (it is not an error to have no data to sort).
(As of 2015, POSIX is considering added an option to the shell, “set -o pipefail”. If pipefail is enabled, the pipeline’s return status is the value of the last (right-most) command to exit with a non-zero status, or zero if all commands exit successfully. Bash already has this option.)
If the right-hand command exits early, a SIGPIPE signal is sent to the first command, as with “who |head -n 1”. So the left-side command may have a non-zero exit status even when there’s nothing wrong.
You can break up pipe, saving results in a variable (or temporary file), then check the exit status of that first part. If OK then feed the result of the first part into the next. Here’s the idea:
if x=$(cmd); then echo $x |cmd2; else ...; fi)
Bash and some other shells have an extension to get the exit status of any command in the pipeline. Also Bash may run a command as part of displaying a prompt, so $? may not get set to the command you think ran last. (Not all versions of Bash have this bug. To fix, just unset PROMPT_COMMAND.)
Lecture 16 —Interactive Shell Scripts using read
The shell includes several features to support interactive shell scripts. For the most part you need to be able to print a prompt message and read user input. In addition you may have a need to control the appearance of text output.
For better control, you can use stty command to enable raw input or to turn off echo when typing. Using curses with the tput command allows many fancy output effects including positioning the cursor on the screen, reverse video, etc. A limited GUI environment is possible using standard terminal windows with the Linux dialog command. These advanced features will be discussed later.
Using read for interactive shell scripts
The read built-in command allows you to read in a line of input from the user and store it in an environment variable:
echo what is your name:
read NAME
You can list multiple variable names. The read utility will perform shell word (or field) splitting on the input (see page 117), assigning the first word to the first variable, the second word to the second variable, etc. This uses the contents of IFS as delimiter characters (IFS normally set to \n to mean any white-space):
IFS=: read f1 f2 f3 f4
If IFS is set to nothing, then all characters are read up to a newline, and assigned to the first variable listed.
If the input contains more words than variables listed, all the remaining ones are assigned to the last variable (using a single space for a word separator if IFS has the default value, else the (string of the) delimiter encountered).
If you list more variables than words in the input, the unused variables are set to empty strings. (This is different from not setting them at all!)
The read utility normally recognizes backslash escapes to allow you to quote the IFS characters (normally any white-space, but always including newline even if IFS is reset, to allow line continuations). However you can use the “-r” option to suppress backslash interpretation and word splitting (raw mode). No other quote chars are special.
A read command can also be used with I/O redirection (including a here document) but not with pipes. The last stage of a pipeline may start a new shell, i.e., as if you used “cmd |(read x)”. (Bash does that; ksh doesn’t so it’ll work).
IFS=: read -r f1 f2 f3 f4 <<EOF
> a:b:c:d
EOF
If you escape a newline with backslash (and “-r” isn’t used) the shell is supposed to display the $PS2 prompt (but some shells don’t).
The read command has exit status of 1 on EOF. That makes it easy to use in a while loop to read and process all lines of some file:
while IFS= read -r line; do stuff; done < file
cmd | while IFS= read -r line; do stuff; done
The read utility is designed to work on text files, that is, files with a newline (the EOL character) at the end of every line. But, if the last line doesn’t end in a newline, read will put that data into $line but will return 1, so the loop terminates without processing that last line.
To fix you can add a newline, use a here doc, or modify the loop like this:
while IFS= read -r line || [ -n
"$line" ];
do stuff; done < file
It is common to try: cmd | read foo. While this works the variable foo set by read may or may not be in a sub-shell rather than the shell you expected, for POSIX shells. One solution is to use a here document:
read foo <<End
$( cmd )
End
Using a loop as shown above works, since the whole loop body is processed by the same shell as for the read command.
Bash, Korn, and the Z shells provide several useful extensions to the read command, although they are not standard nor well documented, and work inconsistently between shells (that is, the same option does something different in a different shell). Only the “-r” option is standardized. For bash only:
“-ddelim” reads up to the un-escaped delim character (instead of a newline)
“-p prompt” displays prompt for the user input, eliminating the need for a separate printf or echo
“-s” suppresses the echoing of user input, eliminating the need for using stty first (e.g. when reading in passwords)
“-n num” causes a maximum of num characters to be read
“-e” causes the readline library to be used if available
“-t seconds” causes the read command to time out after the specified number of seconds. (See p. 227 for a portable way.)
The C shell
(and variants) doesn’t support read, but a limited form
of this is provided with “$<”:
echo prompt; setenv var $<
Not defined in POSIX, but if no variables are listed REPLY is used by default. Bash also provides a timeout feature, allowing you to use read and if the user doesn’t enter something quickly, the read terminates itself. You can also specify a prompt, save output to an array, read a specific number of characters, etc.
A common mistake is using a loop in a pipeline or with redirection, and read:
cnt=0
who |while read user; do cnt=$((cnt+1)); done
echo there are $cnt users on the system
The result will be zero users! This happens because each command in a pipeline may run as a separate process. So the while loop above runs in a sub-shell, and changes to environment variables are lost when the loop exits.
The same thing happens with any compound statement (such as a loop) when any I/O redirection is used:
while read user
do cnt=$((cnt+1)); done </etc/passwd
echo $cnt # shows zero!
What’s worse is this behavior is not specified in POSIX, so different shells produce different results in these two cases. The POSIX (and portable) solution is to use eval (See page 211):
cnt=0
eval $(who | ( while read x
do cnt=$((cnt+1)); done
echo cnt=$cnt
)
)
echo there are $cnt users on the system
If you don’t need to have cnt available in the invoking environment, try this:
who | {
cnt=0
while read x; do cnt=$((cnt+1)); done
echo there are $cnt users on the system
}
Named Pipes
Using a *nix pipe is simple. To have process A send data to process B, you merely start the two processes at the same time like this:
program-A | program-B
This starts process-A and process-B at the same time. Process-B waits for process-A to send it data, which it then reads. When process-A ends, process-B has reached the end of the data to read and finishes.
While this work very well, there are two cases where you can’t use a pipe:
1. If two or more processes want to send data to a single process.
2. If the processes must be started at different times (or by different users).
To solve these problems Unix (and of course Linux) provide a named pipe. This is a pipe that sits on the disk and has a regular file name. Using a named pipe is easy, you can redirect output to it and input from it, as if it were an ordinary file. You can start the process that reads from the named pipe before you start the process that writes to it. You can also have multiple processes write to the same named pipe.
The data is read from the named pipe in the order it is written. This behavior is known as first in, first out order. Because of this named pipes have another name, a FIFO. In fact the command to create one is called mkfifo. (On some systems mknod is used instead.) Here’s a trivial example:
[user@localhost ~] who |
sort
auser pts/1 Jun 17 12:20 (fwacad.hccfl.edu)
user pts/0 Jun 17 11:24 (fwacad.hccfl.edu)
[user@localhost ~] mkfifo fifo
[user@localhost ~] ls -l fifo
prw-r----- 1 user user 0 Jun 17 12:20 fifo
[user@localhost ~] who > fifo &
[1] 12153
[user@localhost ~] sort < fifo
auser pts/1 Jun 17 12:20 (fwacad.hccfl.edu)
user pts/0 Jun 17 11:24 (fwacad.hccfl.edu)
[1]+ Done who >fifo
[user@localhost ~] sort < fifo &
[1] 12154
[user@localhost ~] who > fifo &
auser pts/1 Jun 17 12:20 (fwacad.hccfl.edu)
user pts/0 Jun 17 11:24 (fwacad.hccfl.edu)
A FIFO doesn’t buffer or store the data sent to it, so it takes very little RAM. Instead, when a reader process attempts to read from a FIFO before another process is connected to the sending side, the reader process will block. Similarly if a sending process attempts to send output to the FIFO before a reader process is connected to the receiving side, it will block. Only when both sides of the named pipe are connected to processes can any data flow. You can see this behavior in this example:
[user@localhost ~] date
Sat Jun 17 12:51:47 EDT 2006
[user@localhost ~] date > fifo &
[1] 12329
[user@localhost ~] sleep 5
[user@localhost ~] date
Sat Jun 17 12:52:03 EDT 2006
[user@localhost ~] cat < fifo
Sat Jun 17 12:52:06 EDT 2006
[1]+ Done date >fifo
Here you can clearly see that the date command didn’t run (that is, it was blocked) until the cat command was run.
Suppose you want to use nc (netcat) to make an echo (ping) service. One possible way (not the best) is to redirect the stdout of nc to its stdin. Normally this results in a blocked process (or worse) but nc sends input not to its output but to a socket, and reads from the socket and sends that to stdout, so this use won’t block. You can use a named pipe for this:
mkfifo p
(: > p) &
nc -l -p 1234 < p > p
The (: > p) part is necessary, otherwise “nc < p > p” would block on the “< p” (waiting for another process to open the pipe for writing). With this code nc opens both ends of the pipe and waits for input, just what you want.
Consider one last example showing several processes sending data to a single reader process using a FIFO:
[user@localhost ~] cal
> fifo &
[1] 12209
[user@localhost ~] date > fifo &
[2] 12210
[user@localhost ~] cat < fifo
Sat Jun 17 12:32:16 EDT 2006
June 2006
Su Mo Tu We Th Fr Sa
1 2 3
4 5 6 7 8 9 10
11 12 13 14 15 16 17
18 19 20 21 22 23 24
25 26 27 28 29 30
[1]- Done cal >fifo
[2]+ Done date >fifo
The last example above shows an unexpected behavior for something called a FIFO: the output isn’t in the order it was sent! The problem is the two sending processes are both blocked initially. Once the reader process is connected to the named pipe, all sender processes wake up. However the kernel does not run processes in any particular order, so there is no guarantee of FIFO behavior with multiple senders. Indeed, the output of two (or more) sender processes can become mixed together in some cases.
Named pipes have a number of system administration uses. The most common example is to allow server processes (daemons) to send log messages to the system logger process. During boot up it isn’t feasible to use a regular pipe to connect each daemon to syslogd so a named pipe (or a Unix domain socket, which is similar but can’t be created at the command line) is used, often called /dev/log. First syslogd is started to read from this FIFO. Then the daemons redirect their log messages to that same FIFO. This technique is useful in chroot environments too.
The Korn shell (and maybe some others) supports a special notation for co-processes, which for many uses is simpler and more natural than using named pipes.
Also (if the OS supports it) Bash can use process substitution. The notation “<(...)” runs the ... in a subshell and redirects its output into an automatically created named pipe (/dev/fd/#). The pathname of this named pipe replaces the “<(...)” on the command line. A good use for this might be:
diff <(ls dir1) <(ls dir2)
Named pipes can be combined with the tee command, to create an alternative to the script command. First, create the named pipe and have it use tee for input:
$ mkfifo mypipe
$ tee typescript.txt < mypipe &
To start and stop logging your session to typescript.txt, you issue these commands:
$ exec > mypipe 2>&1
$ some commands to be logged go here
$ exec >/dev/tty 2>/dev/tty
(I suggest using an alias or shell function for these.) Using script is easier!
There is one other alternative to named pipes or sockets, worth mentioning. All *nix system support some “IPC” (interprocess communication) mechanisms. See the man pages for ipcs, ipcmk, and ipcrm for details.
Creating and Using Temporary Files
(Review Using Temporary Files web resource.) Main points:
· Using files with fixed names may cause over-writing if two instances of your script run at the same time.
· You may accumulate files over time in your home directory if you use that for your files.
· If files are put into some temp directory instead, there may be security issues: Denial of service, symlinks to other files so you over-write them.
· It is often a good idea to create a temporary directory (if there is a utility that does this securely). Then you can add as many temporary files of any name to that directory without worry.
$TMPDIR is a standard environment variable that should be set to a writable directory where such files should be kept. Ideally this can be some sub-directory of your home directory (say ~/tmp) where no one else has access, but usually defaults to /tmp (which is OK if proper care is taken when choosing a name). You should probably create ~/tmp with: mkdir -m 700 ~/tmp. Then add export TMPDIR to your login script.
The name of temporary files should include some text to help a human know which script/program created the file.
The name should include a process ID, so you can tell one instance of the file from another. For shell scripts this is easily done by including the value of $$ in the name. This shell variable holds the PID of the current shell, which is the PID of a shell script.
A good name should not be predictable (for security concerns). The easy way to deal with this is to include a random number as part of the name. The problem is that the only POSIX standard way to generate a random number is with awk something like this:
RND=$(awk 'BEGIN{srand();printf "%d\n",rand()*10^8;}')
or: RND=$(date | cksum | cut -d' ' -f1)
The problem with these solutions is that if you run it twice in a single second, you get the same random value. Furthermore, an attacker can guess when you ran the command and have only a few hundred or thousand values to guess yours.
However, most shells today support $RANDOM, which (on Bash at least) provides a 15-bit unsigned random integer. That gives a range of 0..215, or 32,768. This isn’t large enough for many purposes, such as selecting a random port number (up to 64ki). In such a case, you could just sum two (or more) for a range of 0..65,534:
num=$((RANDOM+RANDOM))
While not part of POSIX, most systems also support /dev/*random as a source of random bits. (Different systems support different random number generators, including hardware generators, high quality pseudorandom generators that block such as /dev/random on Linux, and regular pseudorandom generators such as /dev/urandom on Linux.) You can use these to produce a better (“more random” than with awk, C, or shell) random number this way:
RND=$(od -An -N4 -tu4 /dev/random) # non-standard but OK
You can generate random strings of printable characters of any length in a similar way (change “10” to the desired length):
tr -cd '[:print:]' </dev/urandom \
|od -cAn -N10 |tr -d '[:blank:]'
You can substitute “alnum” for “print”, to limit output to letters and digits only. The following also works (if base64 is available), but limits the output characters, so isn’t as strong for use as a password:
base64 < /dev/urandom | cut -c -10 | head -1
Putting all this together a good name for some temp file for a shell script foo would be: ${TMPDIR:-/tmp}/foo-$$-$RANDOM
Even with a good name, the file is initially created with permissions determined by umask, which is often too much. A possible script could be:
#!/bin/sh
# mktemp.sh - Portable, compliant mktemp replacement.
# version 0.1 by Wayne Pollock, Tampa Florida USA, 2007
# Usage: mktemp.sh [ base_file_name ]
set -C # Turn on noclobber option
rand()
{
awk 'BEGIN {srand();printf "%d\n", (rand() * 10^8);}'
}
umask 177
NAME="$1"; NAME="${NAME:=tmp}"
while :
do TMP=${TMPDIR:-/tmp}/$NAME-$$.$(rand)
: > $TMP && break
done
printf "%s\n" "$TMP"
To make the whole task simple, the non-standard utility mktemp should be used if available. This will create a unique file with limited permissions, and return the name. You have lots of control over the filename, but if you don’t care it will create one in $TMPDIR using digits and letters derived from the process ID and some random numbers:
TMP=$(mktemp); do stuff with $TMP; rm $TMP
To control the name, you can supply a name template with some number of capital ‘X’es. The ‘X’es get replaces with the process ID and random numbers/letters. For most purposes 10 (ten) ‘X’es are sufficient:
TMP=$(mktemp -t foo.XXXXXXXXXX)
If you supply a template name (with ‘X’es in it), the file will normally be created in the current directory. Using the -t option makes mktemp always use a temporary directory of $TMPDIR if set, else “/tmp” is used. (Note -t is assumed if you don’t supply any template filename.)
On Unix (with no mktemp utility), there is a C function you can use, or this standard m4 macro:
tmpfile=$(echo 'mkstemp(/tmp/fooXXXXXX)' | m4)
(This works on Linux too, but isn’t as useful as mktemp utility.)
Cleaning up (removing) temporary files
Cleaning up temporary files involves deleting them when the script is over. One way is to add an appropriate rm command at the end of the script. This approach suffers from the fact that if you script exits early for some reason (an exit command in the script, or the user hit control-C) the file doesn’t get deleted. Over time these old files will accumulate in /tmp (or wherever).
One technique is to use .logout (for shells that support it) to add a command to remove temporary files. You could to the same thing using a crontab job. One way you could do that is something like this:
find ${TMPDIR:-/tmp} -mtime
+29 -exec \
/bin/rm -f {} \;
(Next we will discuss how to use the trap statement to perform cleanup when a script terminates for any reason.)
Lecture 17 —Additional Shell Features
Signals and the trap command
One way for one process to communicate with another is by using signals. A signal is an asynchronous message, usually used to cause a process to die. There are many different signals you can send to a process. Each is used for a specific purpose or situation.
(Review from page 28) Unix processes are arranged in process groups to make it easy to send a signal to a bunch of processes at once. One process in the group (the first one) has a PID equal to the PGID (process group ID)
A job is just a process group (so is a pipeline), and you have foreground and background process groups, not processes.
Show kill -l, describe some standard signals and their uses (show man 7 signal): 1 (hup), 2 (int), 3 (quit), 4-8 (internally generated), 9 (kill), 15 (default terminate), 19 & 20 (stop/suspend), 18 (continue).
Only the owner of a process (or root) can send it a signal.
To send a specific signal use kill -signalName pid. Demo: kill -quit 1234 or -QUIT or -SIGQUIT or -sigquit or -3 (using numeric signal number is an XSI extension). Note the QUIT signal “drops” a core file (explain use for debugging). Use ulimit to block this.
To send a signal to some process use the command kill [-sig] pid.
The PID argument of kill can be: num to mean process num, 0 to mean all processes in the current process group, –num to mean all processes in process group num, or –1 to mean every process. Many shells also support kill %jobno and kill %name. (See jobs command.)
When using a PID that starts with a dash, use: kill [-sig] -- PID
Any program can be written so that its processes will ignore some signals, or catch or intercept some signals. Each signal also has a default handler or action.
The Default action of any process when it receives most any signal is to terminate at once. Some exceptions: sigkill (can’t be caught or ignored), sigstop (default is to stop (suspend), can’t be caught or ignored either), and continue (resumes a stopped process but is special in that the process doesn’t handle the signal, since it isn’t running.)
Signals can be sent to foreground process group using the tty driver, that intercepts some input such as control+c and sends a signal instead. Show stty -a.
Not in standard but supported by Linux, Solaris, and others, is pkill to kill processes by name or other attributes. Other non-standard utils: pgrep, skill, and snice.
Discuss Linux killall (kill one process by name) versus Unix killall (kill all processes).
(Solaris: Demo /usr/proc/bin/psig pid to show current action associated with all signals.)
Dr. Evil has typed “# sleep 666; rm -rf /” on your keyboard and went off to buy milkshakes. How can you stop the impending doom? For most shells, just hit ^C, or ^Z and kill the background job, but for bash you must kill -9 the shell itself.
Using trap:
You can change the action of the shell when it receives a signal using the trap command.
trap
'command' sig_list
trap 'rm $TMP; trap - 0; exit 0' 0 1 2 3 15
(Demo trap to say ouch after ^C: trap "echo 'ouch!'" INT)
If command is a single “-”, then reset the listed signals to their default actions (some shells also do that if command is missing completely).
If command is null, then the shell will ignore the listed signals.
Using trap without any arguments (or just --) produces a list of the modified traps set, in a way that can be reused. For example:
orig_traps=$(trap)
# save current traps
trap ...
...
eval "$orig_traps" # restore traps
When a process is started asynchronously (that is, with “&”), POSIX requires it to ignore SIGINT. Furthermore, if SIGINT is ignored when a process is started, you are not allowed to changed that with trap (you can try but it won’t have any effect). (This behavior made sense before the shell had job control features added.)
An interesting behavior is related to signals. Consider the following:
( echo one; echo two >&2 ) | :
That seems as it should produce “two”, yet sometimes produces no output! What’s going on? What happens is that the colon command terminates quickly, and the shell may send SIGPIPE to the subshell on the left before it gets to run the second echo command. Replace the colon command with “sleep 1” and you should always see the “two”.
A common question is how to kill all the children of the current process, for example, a script that does two or more background tasks, then waits for them, and if the user hits ^C, you want to kill the children too.
There’s no perfect solution. Background jobs are required to ignore SIGINT, so you must use a different signal to kill the children. You can keep track of the children’s PIDs and try to kill them this way:
A & pidA=$!
B & pidB=$!
trap 'kill "$pidA" "$pidB"; exit 1' INT
wait
This has the danger that if A or B has terminated early, its PID could end up being reused by a different process, so you’d kill the wrong one. Also, this code won’t kill any grandchildren processes.
If you have pkill available, you can write your script to put the background processes in a separate process group, and kill all of them that way:
#!/bin/bash
( processA & processB &
trap 'pkill -g 0' INT
wait
)
But that may not kill any grandchildren (they may run in their own process groups).
While not important for sys admins (I suppose only those implementing shells would care), signal handling is much more complex than discussed above.
When you close a terminal (e.g., a PuTTY or xterm window), the system may or may not send a SIGHUP to the controlling process (the login shell). It depends on terminal settings and whether it is a pseudo-terminal or real one.
Once the controlling process exits, the system sends a SIGHUP to the foreground process group, and to any background jobs with stopped (say via ^Z) processes. Such background jobs also get SIGCONT (to wake them up, as a stopped process can’t even terminate without first waking up).
It is up to the shell to send a SIGHUP signal to background jobs without stopped members.
Most shells (maybe all of them) use stty system calls to turn off signal processing by the tty driver and handle all signals themselves. By default, Bash doesn’t send SIGHUP to any background jobs at all.
When launching a job, signal handling is restored for that job. There are complex and (IMO) ambiguous rules about background jobs and SIGINT and other signals; it isn’t clear is the shell and/or tty driver isn’t to send such signals, or if the job is supposed to ignore them.
The wait Command
Wait for a background process to finish, then continue. For interactive scripts it may pay to start a lengthy task in the background. Although such a task can be aborted with a signal, sometimes you just want to wait for it to finish before doing anything else.
The special parameter $! holds the process ID of the last background command started:
job1&
pid1=$!
job2&
wait $pid1
echo Job 1 exited with status $?
wait $! # wait for job2
echo Job 2 exited with status $?
If it is known that a signal terminated a process then a script can determine which signal it was, by using kill as shown by the following script:
sleep
1000&
pid=$!
kill -kill $pid
wait $pid
echo $pid was terminated by SIG$(kill -l $?).
Signals and Pipelines
Currently in POSIX, the exit status of a pipeline is the exit status of the rightmost command in that pipeline. However, this is not convenient for pipelines such as:
grep ... | sort
Or:
... | grep ... | less
Some modern shells support an extension to POSIX. If you use “set -o pipefail”, then the exit status of a pipeline becomes the exit status of the last command in the pipeline that returned a non-zero exit status (or zero if all commands in the pipeline return success). Additionally, some shells also create an array of the exit statuses (stati?), so you can tell which command failed.
As of 6/2015, SUS/POSIX are considering adding this feature, as it is extremely difficult to work-around this in a portable manner currently.
Lecture 18 — Optional Topics
Creating and using shell self-extracting archives (shell archives, or shar files).
Using here docs allows you to create a shell script that when run, produces several files. This is known as a (shell) self-extracting archive, or shar. A sophisticated shar will also include checksums (or possibly digital signatures) for files to validate them, and also encode files with uuencode/uudecode so the resulting shar can be easily sent as email (not as an attachment: (-B=uuencode, see man page):
shar -n foo -s 'hymie@localhost' -B files... >foo.shar
mail -s 'here is shar' someone < foo.shar
Gnu has non-standard utilities: shar to create and unshar to safely unpack.
The exec command and advanced I/O techniques
The exec command has two uses. It can be used to replace one program with another, keeping the same environment, i.e. (execdemo-part[12].sh):
exec pathname_to_new_program
The other use is for redirections. Normally, I/O redirections only exist in the environment of the command they are placed on. A common use of exec is to change redirections for the current shell. This can be done by modifying the file descriptors in the environment of the current process. (See book pages 230-231, 261-262.)
The order of redirections matter! Here’s an advanced example:
sh -c 'sleep 3; exec >/dev/null' |(date;cat;date)
sh -c 'exec >/dev/null; sleep 3' |(date;cat;date)
File descriptors (or FDs) are small numbers starting with zero that associate streams of input or output with destinations (open files). We use FDs in redirections. By default, FD 0 means stdin, 1 means stdout, and 2 means stderr.
You can use exec to close any of these streams, to change the destination of a stream, to duplicate one, or even to open up new streams using 3 through 9. (This feature is very useful and not available in csh.)
To open new descriptors, duplicate or close descriptors, you simply use the exec command with some redirections (and no file to exec). For example:
exec > foo.out # stdout now goes to foo.out
exec >&2 # stdout now a dup of stderr
exec < /dev/tty # stdin now comes from /dev/tty
exec n>&- # close (and flush) output FD n
exec n<&- # close input FD n
exec n<> file # open FD n for both input & output
The digit to the left of the redirection symbol indicates which FD is being changed. If omitted there is a default of 0 (zero) for “<” and 1 (one) for “>”.
You can emulate BASIC’s read and data statements (exec-io-demo.sh):
#
setup data:
exec 3<<EndOfData
some data
EndOfData
read data <&3
Or similarly, use a here doc directly with a loop:
while
read data <&3
do_something_with_data
done 3<<EndOfData
some data
EndOfData
(The advantage of using FD 3 (or any FD other than 0), is that the commands in the loop can still read stdin if desired. This technique is useful for any redirection, not just here-docs.)
A given FD can be used for both reading and writing on some file. Demo:
echo
'1234567' > file
exec 3<> file
read -n 3 WORD <&3 # read three chars from file
printf "." >&3 # over-write next char with a dot
read -n 2 WORD2 <&3
exec 3>&- # close (modified) open file
echo $WORD, $WORD2; cat file
Each FD remembers the
position in the data stream where it last read from (or wrote to), so
subsequent reads/writes from the same FD begin at that position. Compare:
{ read < foo; read < foo; }
with:
{ exec 3<foo; read <&3;
read <&3; exec 3<&-; }
Child processes inherit open file descriptors. To prevent an FD from being inherited you should close it first.
You can use this technique to edit a file in place, but it isn’t safe unless the output is at least as long as the initial file, and that repeated uses won’t corrupt the file. Here’s an unsafe example:
echo abcde > foo
printf "123" 1<> foo # results in "123de"
Here’s a safe example:
echo abcbdbe > foo
awk '{gsub(/b/, "B"); print}' foo 1<> foo
Here, awk is reading foo directly and the stdout is also written to foo. Since the redirection opened foo for both reading and writing, no truncation was done initially (such as when you just have “>foo”). The result is “aBcBdBe”.
Here’s another safe example:
$ cat foo
one
two
three
four
five
six
$ sed s/e/E/ foo 1<> foo
$ cat foo
onE
two
thrEe
four
fivE
six
To only pipe stderr and leave stdout alone is tricky, but it can be done by swapping stdout and stderr (./foo is a small C program that prints one line to stderr and the other to stdout. Demo pipe-stderr.sh):
./foo
this was sent to stderr
this was sent to stdout
./foo 3>&2 2>&1 1>&3 3>&-| tr a-z A-Z
this was sent to stdout
THIS WAS SENT TO STDERR
(This technique may be useful with the dialog command too, allowing you to popup error messages for example.) A related technique is to save the stdout and stderr of some command in two different variables. There is no direct way, but this will work:
both_err_and_out=$(
{ out=$(cmd); } 2>&1
ret=$?
printf '--MYSEPARATOR--%s' "$out" exit "$ret" )
ret=$?
out=${both_err_and_out##*--MYSEPARATOR--}
err=${both_err_and_out%--MYSEPARATOR--}
(This code saves stdout in out, then outputs stderr, a seperator string, and the saved stdout, all of which is then saved in both_err_and_out. That is then split by the separator into stdout and stderr.)
Another example: saving stderr to a variable while displaying stdout as normal:
{ STDERR=$(ls -ld /dev/null/nonexistent /etc \
2>&1 1>&3); } 3>&1
echo $STDERR
What’s happening here is the outer redirect (“3>&1”) happens first, so output sent to FD 3 goes to the screen. In the grouped command, stderr is sent to the stdout and stdout is sent to FD 3; thus, the output of the ls goes to the screen via FD 3. What happens to stderr? Because of the command substitution, the stdout of the ls command is saved in the variable STDERR. But only the command’s stderr is send to stdout, so the final result is the command’s original stdout is still sent to the screen, and its stderr is saved in STDERR.
The outer command grouping is required due to a quirk of POSIX, which says shells need not follow a particular order of redirections and variable assignments on empty commands (either can happen first). Using grouping forces the correct order.
Output of commands can be redirected to files on other hosts. Use SSH for this as follows:
command | ssh user@otherhost "cat - > pathname"
Some shells allow non-standard redirection to/from sockets. For bash and ksh, the pathnames /dev/tcp/ip-addr/port (and for udp too) are special within redirection. On these shells, you can fetch a web page with:
exec 3<>/dev/tcp/0.0.0.0/80
printf 'GET / 1.0\n\n' >&3
cat <&3
exec 3<- 3>- # exec 3<>- is not standard!
See if you can figure out what this is doing:
(cmd 2>&1 >&3 |tee errors-only.out >&3) 3>both.out
Answer: This saves all output (stdout and stderr) to the file both.out, and saves stderr output to the file errors-only.out. The redirections on the left side of the pipe send stderr to &1, and stdout to &3. That allows stderr to be sent into the pipe, and the tee command. The output of tee is then also sent to &3. At the right, &3 is saved to the file both.out.
Creating TUI interactive scripts (including non-standard select loops/menus)
Using read you can create simple menu driven scripts. You display information, then a prompt, and read in the user input. Such interactive scripts are useful, but can’t themselves be used in (other) scripts. So most such commands also allow the same functionality via command line arguments. (Show chfn.) Interactive scripts often have a menu interface. An alternative is a wizard interface that guides the user to perform a series of steps in order. (Show add-users, /etc/pki/tls/misc/CA -newreq script use.) Also form interface.
Interactive scripts rarely have their I/O redirected, so it is less important than otherwise to properly use stderr and have a sensible exit status. Still there is no good reason not to do this correctly!
You can also use the select loop to create a menu automatically (not in POSIX, but supported in bash, ksh, and zsh).
select NAME [in WORDS ... ;] do COMMANDS; done
The WORDS are expanded, generating a list of words. The set of expanded words is printed on the standard error, each preceded by a number. If “in WORDS” is not present, “in "$@"” is assumed.
The PS3 prompt is then displayed and a line read from the standard input. If the line consists of the number corresponding to one of the displayed words, then NAME is set to that word. If the line is empty, WORDS and the prompt are redisplayed. If EOF is read, the command completes. Any other value read causes NAME to be set to null. The line read is saved in the variable REPLY. COMMANDS are executed after each selection until a break command is executed.
Example:
PS3='Enter choice: '
select cmd in 'Add a Name' 'Look up a name' \
'Remove a name' 'Exit'
do case "$cmd" in
Add*) echo name added ;;
Remove*) echo name removed ;;
Look*) echo name looked up ;;
Exit) break ;;
"") echo Error: \"$REPLY\" is not valid. ;;
esac
done
(Show fancyio script.) If $cmd == "" then another case on $REPLY can be used to see if the user chose Exit or Help or some such.
File Locking [See also flock-demo. Discussed fully in security course.]
Some administrative tasks that involve updating config files (or any shared data files) can be dangerous. A conflict can arise if two or more processes attempt to modify the same file at the same time. For example consider what might happen if you vi (or even vipw) the /etc/passwd file, and someone else (or a yum update running from cron) updates the file (or a related one such as opasswd, gpasswd, shadow, ptmp, ...) at the same time. Or one process modifies shadow while another modifies passwd; the files are no longer consistent.
Another common problem is with daemons. Starting one while a previous one is still running can cause the running process to fail.
File locking is used to prevent this sort of error. Before opening some file, you obtain a lock on it. While locked, no other process can open the file and hence must wait until you are done before having a chance to obtain a lock of their own.
Lock Files
System utilities, daemons, user applications, and shell scripts often create locks by creating lock files. When starting they check if the lock file exists already, and if so either wait or abort. If the lock file isn’t there, they create the lock file. This scheme depends on all utilities accessing the same resource use the same lock file. So, always document any lock files used by your scripts.
It also depends on checking and creating a lock file atomically, which is often not done correctly in shell scripts. One common but incorrect method is to attempt to create a symlink; if it already exists, this will fail. However the only (POSIXly) correct way is the same as for temporary files (see p. 206): turn on no-clobber mode and attempt to create the file using output redirection:
set -C # or set -o noclobber
: 2>/dev/null> lock-file
if test $? = 0; then got lock...; rm -f lock-file; fi
Often these lock files are empty, but sometimes they contain data such as a PID. Most system lock files are kept in /var/lock or /var/run.
The procmail package includes a lockfile utility, used when accessing mailboxes. However it can be used to create lock files for any purpose. Linux also provides flock(1):
$ echo hello > file1
$ flock -n file1 sleep 30 &
$ flock file1 cat file1
When working with /etc/passwd and related shadow suite files, a lock file /etc/.pwd.lock is used. vipw and vigr additionally use /etc/ptmp as a copy of the file being updated; when done this is “mv”-ed to replace the original file.
vim edits a copy named .name.swp but allows you to re-edit files anyway. (It’s not really a lock file.) If you get a recovery message you can recover using vim -r, but this won’t remove the .swp file. You must do that manually. Old vi also has such files but in /var/preserve.
Normally utilities trap signals, to allow them to clean up lock files (and other resources). But, when some program crashes it may not have a chance to remove its lock files. In that case you will have problems running the program later. The fix is simple; just manually remove the offending lock file. (Finding the correct file is the hard part!)
The POSIX standard explicitly allows symbolic links to contain arbitrary strings; they do not need to be valid pathnames. Some applications make use of this feature to store information in symbolic links, using them as lock files. For example Firefox creates this symlink lock file when running:
$ readlink .mozilla/firefox/def*/lock
10.9.9.1:+29143
Here’s some sample code that checks for lock files containing PIDs (a common case for daemons):
#!/bin/sh
LockDir="/tmp"
PidFile="$LockDir/${0##*/}.pid"
AlreadyExists () {
read RunningPID < "$PidFile"
if grep -q "${0##*/}" /proc/$RunningPID/cmdline \
2>/dev/null
then echo "$0 is running as PID $RunningPID"
else echo "Stale $PidFile found from PID" \
"$RunningPID. Overwriting."
DoIt
fi
}
DoIt () {
echo "$$">"$PidFile"
echo "Started ${0##*/} with PID=$$"
sleep 60 # Replace this with real work
rm -rf "$PidFile"
}
(set -C; echo 2>/dev/null
"$$">"$PidFile") \
&& DoIt || AlreadyExists
Shell Arrays
Although not part of POSIX Bash, Ksh and other shells do support one-dimensional arrays. A one-dimensional array is an ordered collection of variables. You don’t name each variable in the collection. Instead, you refer to a variable by its position (index or subscript) in the collection (and the collection name) using a special syntax. Here we will only discuss Bash arrays.
Any variable may be used as an array; declare -a name will explicitly declare an array. There is no maximum limit on the size of an array, nor any requirement that members be indexed or assigned contiguously. Arrays are indexed using integers and are zero-based.
There are two ways to create an array. The first is to assign a list to a variable:
var=(word1 word2 ...) # var=("$@") or similar works too
var=([3]=word1 [1]=word2 ...) # assign specific subscripts
The other way is to assign using subscripts. Bash will realize the variable should be an array:
var[0]=foo; var[1]=bar; var[3]=mojo
To use the nth variable in the array, you use the following syntax:
${var[n]}
n (the array index) starts at zero for the first item (unless you assigned using specific subscripts). Note that $var and ${var} expand to ${var[0]}.
The subscript doesn’t have to be a literal number (positive integer), but any expression(that is, arithmetic expansion is done on the subscript):
echo "${var[1+2]}"
${var[*]} expands to a list of all the array variables (similar to “$*”), and ${var[@]} expands similar to $@ (only in double quotes is there any difference).
${#var[*]} = length of array.
You can remove elements from an array with unset:
unset var[1] # Removes only the one element from the array
Array tricks:
var=("${var[@]}") will re-order the variables in the collection.
echo "The last one is: ${var[${#var[*]}]}"
Portable Arrays
As noted, arrays are not portable. However you can use eval to simulate arrays easily. Just store each element of an array in a separate variable, using the naming convention of arrayName_index. Then you can use these arrays like this:
index=1
eval foo_$index=\$value
eval echo \$foo_$index
You can define some shell functions to make working with such arrays easier. For example, define functions to create an array of some length, to determine the length of an array, to unset (all the variables that are part of) an array, and so on.
Customizing output with tput (ncurses GUI)
In the beginning of Unix, there were hundreds of terminal types. Most supported special features such as bold, blink, reverse-video, screen clearing, and cursor movement. These features are called capabilities and were controlled by sending special character (byte) sequences from the host to the terminal.
However, no two models of terminals supported the same set of features, and even if they both supported some feature, they would work differently. BSD created a database called termcap that had one row for each model terminal in the world, one column for each possible capability supported by any of the terminals. Each cell said what to send to enable that capability for that model terminal (if anything). Later, AT&T developed a similar (but different) database called terminfo. Today most *nix systems use the terminfo database. The value of the TERM environment variable determines what row in the database to use. A DLL (library) known as “ncurses” can be used to enable an application to send the correct values based on the TERM setting.
Neither termcap nor terminfo are standardized by POSIX. Only clearing the screen is supported.
Many utilities and applications use ncurses to provide “nearly-GUI” interfaces; that is, user interfaces that only need a decent (and supported) terminal emulator, such as PuTTY. Examples include alpine, pilot, mc, talk, and mutt. Even programs such as more or less use ncurses to draw reverse-video prompts, or to scroll the screen. Shell scripts can use the tput command (and a few others, such as dialog) to take advantage of ncurses features. Note, some terminal emulators even support clicking the mouse; they can report the coordinates of the click to the program (e.g., mc)!
The tput command uses the value of $TERM and the terminfo database. (See also setterm non-POSIX Linux command.) For example, “tput clear” will echo the correct string to clear the screen, and “tput rev” will echo the correct string to turn on reverse video mode. “clear” and “rev” are two of the many capabilities defined in terminfo. However, not all terminals (or terminal emulators) support all capabilities! Indeed, the only POSIX standard capabilities are clear and init/reset. (reset is more drastic than init.)
To see a list of the capability names (and values) for your current TERM setting, use the non-standard command “infocmp -1 |sort”, or see the terminfo man page.
This draws a line with dashes, the full width of the screen:
printf "%$(tput cols)c\n" ' ' | tr ' ' -
Some capabilities take arguments, which may be a number or a string. For example:
$ echo "ABCDE$(tput cub 2)123"
ABC123
(“cub” means “cursor back”, so this command over-writes the D and E). Some capabilities come in pairs: one tput cap1 turns cap on, and another tput cap2 turns cap off. (Ex: tput smso; echo blah-blah; tput rmso)
Finally, some capabilities display information. For example, tput cols will display the number of columns in your window; tput lines will display the number of rows in your window, and tput kbs shows the keyboard backspace key (and will do that function).
See the man page for terminfo for a complete list of capabilities. (Note that most of these won’t be useful in a shell script!) Some of the more useful include:
clear (clears the screen), cols (display # of columns), lines (display # of rows), bel (sound the bell), flash (visible bell), hpa/vpa X (move cursor to horizontal/vertical position X), el (clear to end of line), el1 (clear to beginning of line), ed (clear to end of window), home (more cursor to R1C1), cud# (move down # lines), cub X Y (move cursor to position X Y), cub# (more cursor back #), cuf# (move # to the right), cuu# (move up # lines), civis (hide cursor), cnorm (show cursor), dhc# (backspace/delete), dl# (delete current line), blink, bold, rev, smir/rmir (turn on/off insert mode), smso/rmso (start/end mode: standout mode), smul/rmul (start/end underline mode), sc/rc (save/restore cursor position), and use sgr0 to turn off all modes/attributes. sgr p1..p9, each is 0 or 1.
Note the ncurses library provides terminfo functionality to programmers. Also note the older (BSD) database termcap used different names for capabilities. Termcap is rarely used on Linux or Unix (except maybe BSD).
Ex: PS1='\[$(tput bold)\]\h\[$(tput sgr0)\] $PWD\n\$ '
Customizing output with Standard Terminal Codes
Colors and video effects are rarely used outside of boot up scripts (e.g., the green “OK” or the red “FAIL”). Once reason is that text attributes can’t be checked with grep or other utilities. Another is that interactive scripts are rare. Good user interface design demands you don’t only use color or similar attributes to pass information; color should only be used to help clarify an interface.
Still, during boot up the messages scroll by quickly, and it pays to have any failures standout from the rest. Color is used here. Also, some SAs use colors or other attributes in the /etc/issue, /etc/motd files. Personally, I use these when setting complex PS1 (prompt) strings. The issue file also supports various backslash escapes; see *getty man pages (for Linux, mingetty).
At boot time, the terminal type of the console is rarely known, and in any case the terminfo(5) library is usually not yet available. So how are these affects done? (Show: grep 'echo -en' /etc/rc.d/rc.sysinit)
Near the end of the terminal era (before PCs were common), a single terminal became dominant in the industry, the Digital Equipment Corp. (DEC) vt102. ANSI, ISO, and the ECMA have adopted a standard set of console (terminal) codes based on this terminal. Today most console windows and xterm windows (terminal emulators) support these. A copy of the standard is available as a PDF file as ECMA-048, or (if you pay money) as ISO-6429 or ANSI X3.64. However the most important bits (plus some Linux extensions that are supported by the Linux terminal driver) can be seen from console_codes(4). Most of these will also work from an xterm session (such as with PuTTY) and can provide capabilities not available with tput. Some of the most useful of these include (e.g., printf '\e[31m' to turn text red):
ESC 7 Save current state (cursor coordinates, attributes, character sets pointed at by G0, G1)
ESC 8 Restore state most recently saved by ESC 7
ESC [ (CSI) Control sequence introducer; used with many commands.
CSI row;col f Move cursor to indicated position.
CSI attr m Set attributes: 0 (reset), 1, 2, 4, 5, 7, 22, 24, 25, 27, 30-37 (foreground colors), 38, 39, 40-47 (background colors), 49.
(Show ansi_colors.sh.)
ESC ] 0;text BEL Change xterm window/icon title (printf '\e]2;title\a')
Very useful with Bash, use (warning: disables PIPESTATUS):
export PROMPT_COMMAND=\
'printf "\e]0;${USER}@${HOSTNAME}: $PWD\a"'
Using color, cursor movement, or other effects can cause boot logs to be hard to read or parse. It often is best to remove all such effects. You can also create a shell script to filter these out. The less option -R will correctly interpret these, making it easier to read boot.log or similar files.
Using color for prompts can be useful. It is not uncommon to use a red prompt for super-user shells. Add to ~root/.bashrc “RED='^[[31m'” (where “^[” is the escape key; enter with “^vescape”, or use “RED=$(printf '\e]31m')”). Also add “NORM=$(tput sgr0)”. Then set root’s prompt something like this:
PS1='\[${RED}\][\u@\h $PWD]\$ \[${NORM}\]'
Bash and some other shells can get confused with escape sequences in prompts. Setting the window titlebar, turning on color, or other effects should be surrounded in PS1 with “\[” and “\]”. (And you don’t need to set PROMPT_COMMAND in that case. Your shell may be different.)
The console driver also supports reading the mouse! You can create a mostly-portable shell script that draws drop-down menus and can read mouse clicks (which button, if shift etc. was used, the x and y coordinates of the click, and you can specify to get either clicks or independent press and release.) You can find information about this in the console_codes man page on Linux.
Creating progress bars with tput
Show dots demo, rpm -Uvh something demo, and busy.sh demo.
Using stty (and readline) to control input
Besides the regular drivers in the kernel to support the hardware, terminal sessions use an additional kernel sub-system called termios (terminal input-output stream). it is this sub-system that is responsible for handling erase/kill processing (backspace and ^U), signal handling (^C, ^\, ^Z, and break), as well as buffering, echo, NL/CR handling, and other characteristics that only have meaning on hard-copy terminals (e.g., the delay between characters) and dial-up connections (e.g., parity, # of start/stop bits, etc.)
The settings are associated with a terminal name. Each is identified by a serial port (in the old days terminals and modems were connected to these) called “/dev/ttyn” or a pseudo-teletype serial connection (used with Internet connections to “fake” a serial port) called “/dev/pts/n”. The tty command (also the who command) reports on your terminal name. (See also ps -f.)
Use the stty command to view and change the settings for your terminal session.
By default stty only reports a (non-specified) subset of the available settings. With the -a option all available settings are reported. The -g option reports the settings in a way that can be used as arguments later to restore the settings. However the format for -a and -g is up to each implementation.
A portable script may do this to safely change and restore settings:
saveterm="$(stty -g)"
stty new settings
...
stty $saveterm
To change a terminal setting use stty name. To turn off that setting use stty -name. Some settings take a number as an argument. Also some of the setting names are a convenience that turn on/off groups of the settings. A few of the most useful for shell script use include:
stty echo # start/stop echoing characters
stty icanon # start/stop processing erase/kill, and buffering
stty isig # start/stop processing INT, QUIT, & SUSP signals
stty raw # Raw mode sends each keystroke as type directly to the application, with no processing or buffering. Note that cooked is the same as -raw, and vice-versa.
stty function trigger sets the character to be recognized as the trigger for some function. The list of functions include: eof, eol, erase, kill, intr, quit, and susp. The trigger is the ASCII character to use (enter the char, possibly via ^V^char).
If locale = POSIX then for hard-to-type control characters you can enter a two-character string, starting with a circumflex. For example “^h” means an ASCII backspace. (Note that “^h” is the same as “^H”; that is control characters are case-insensitive.)
This table shows the standard control character sequences that generate ASCII control characters (and is used by stty):
Table: Circumflex Control Characters in stty [From SUSv3]
|
^c |
Value |
^c |
Value |
^c |
Value |
^c |
Value |
^c |
Value |
|
a, A |
<SOH> |
h, H |
<BS> |
o, O |
<SI> |
v, V |
<SYN> |
] |
<GS> |
|
b, B |
<STX> |
i, I |
<HT> |
p, P |
<DLE> |
w, W |
<ETB> |
^ |
<RS> |
|
c, C |
<ETX> |
j, J |
<LF> |
q, Q |
<DC1> |
x, X |
<CAN> |
_ |
<US> |
|
d, D |
<EOT> |
k, K |
<VT> |
r, R |
<DC2> |
y, Y |
<EM> |
? |
<DEL> |
|
e, E |
<ENQ> |
l, L |
<FF> |
s, S |
<DC3> |
z, Z |
<SUB> |
|
|
|
f, F |
<ACK> |
m, M |
<CR> |
t, T |
<DC4> |
[ |
<ESC> |
|
|
|
g, G |
<BEL> |
n, N |
<SO> |
u, U |
<NAK> |
\ |
<FS> |
|
|
The trigger can also be the two character string “^-” (or the word “undef”) to disable that function.
Here is a sample shell function that reads in one character (byte). Note the Bash version of read has an “-n num” option to read in num characters, but that isn’t standard. Also note that this may not work for UTF-8 or other multi-byte encodings:
# Function to read next keypress into $REPLY:
getKey()
{ stty -icanon
REPLY=$(dd bs=1 count=1 2>/dev/null)
stty icanon
}
(Note the dd command also has an option to convert to upper or lower case; see the man page for more details.)
Reading User Input with Time-outs (via stty)
Using stty in -icanon mode, you can also set two parameters to read with timeouts: min and time. min num says to read a minimum of num bytes. (There’s no “max”, so to read in at most one byte, you still need to use the dd command as shown above.) If num is zero then there is no minimum (and read may return immediately). time amount sets a timer to amount (in 1/10 sec). Unless min is set to zero, the timer doesn’t start until the first byte is read, and is reset after each byte. Setting amount to zero disables the timer (and only min applies). The following example waits 3 seconds for user input:
stty -icanon min 0 time 30; read LINE; stty icanon
Here is another more complex example of password processing. Normally *nix only turns off echo, but here we echo stars and process backspaces:
# Function to read in a line of
input, echoing stars, and
# processing erase (backspace):
getPassword()
{ stty -icanon -echo
BS=$(tput kbs) # BS = the char generated from the backspace key
REPLY=
while :
do CHAR=$(dd bs=1 count=1 if=/dev/tty 2>/dev/null)
case "$CHAR" in
"$BS") if [ -n "$REPLY" ]; then # lop off
last char
tput kbs; REPLY=${REPLY%?}
fi ;;
"") printf "\n"; break ;; # newline was read.
*) printf '*'
REPLY="$REPLY$CHAR" ;; # append CHAR to REPLY
esac
done
stty icanon echo
}
A simpler approach is to use the pinentry (“PIN Entry”) utility. (Demo pinentry.sh.)
readline
Readline is a library (DLL) that is used by several popular applications, notably Bash. While the “termios” driver does buffer lines of input and allows character/word/line erase functions, the ability to edit a line of input (inserting and deleting text) is not supported. The readline library provides this. Additionally, readline supports a history mechanism so previously entered lines may be recalled, edited, and entered.
Using readline (if available in your application) is easy. It recognizes editing commands of C-x and M-x (control-X and meta-X). The meta key is often labeled “ALT”, and sometimes only the left ALT key will work as the meta key. If you can’t get that to work, the two key sequence “escape x” is the same as meta-x.
You can bind keys on your keyboard to send various readline control and meta key sequences; the arrow, home, end, and delete keys are usually set up for this. Bash uses readline key bindings for different functions depending on the mode (the default mode is set -o emacs). For example, M-. (remember, that’s ALT+.) copies the last word on the previous command line from your history, and pastes it in the current command line; repeating walks back through your history. M-b and M-f move the cursor back or forward a word on the command line. There are dozens of these defined by default, and you can change them anytime you wish.
*nix systems also support the idea of the user controlling what is actually sent when some key on the keyboard is hit. This is called key mapping (there is a separate key map driver and command line tools for consoles and for X sessions).
(Kernel key mapping commands: showkey(1), keymap(5), setkeycodes(8), loadkeys(1), and dumpkeys(1). For X, use xmodmap(1). Some related man pages: unicode_start(1), unicode(7), ascii(7), utf-8(7), and setfont(8).)
Readline is extensible, in that you can define other control/meta key sequences to do almost anything. This makes custom key bindings for your shell script possible, so (for example) the function keys do interesting things.
The global default key sequences for the various readline commands are set in /etc/inputrc. Also you can create ~/.inputrc to over-ride those settings, or define new key sequences. Individual applications can override those, and may or may not have some configuration to change those; Bash supports the bind built-in to allow you to modify these settings for the current session. Here’s a silly example of using bind so that control+t at a shell prompt runs the date command:
bind C-t:"date^M"
or put the following in your ~/.inputrc (or /etc/inputrc) file:
C-t:"date^M"
Here’s a more serious and complex example: re-run the last command from your history, with “sudo ” prepended, via Fn1 key:
"\e[11~": "\C-p\C-asudo \C-e\C-m"
The sequence of “ESCAPE [ 1 1 ~” is what is sent when you type the “F1” key, found by typing “^v” then the F1 key (Note how ESCAPE shows as “^[”). To send an escape, use “\e”. You can use that method to learn the keystrokes sent from any key on the keyboard. (Note the sequence may be different depending on your terminal emulator.)
“^p” is a predefined key binding that recalls the last history line; “^a” moves the cursor to the beginning of the line, “^e” moves to the end, and “^m” is a newline. Note that to perform multiple readline commands, you must bind each one to a keystroke, then define a macro that enters those keystrokes. Bash bind has options to show what keystrokes are bound to a given function.
If you haven’t disabled history substitution, you could have just entered “sudo !!”. Hitting F1 is easier anyway.
You can use a similar macro to run “man <last command name>”.
For a complete list of the available functions and the configuration file syntax, see man readline(3), also help bind.
Suppose you want to bind the control+LeftArrow key to mean skip back by words. The function is “backward-word”, but you need to know what is generated when you type control+LeftArrow. This depends on your terminal emulator and its settings, and the type of session (e.g., a console or an xterm). To find out is simple: hit control+v, then type the key sequence. (Or run the read command, then type anything.) With PuTTY, YborStudent, ctl+LeftArrow generates “^]OD”, where “^]” is how the escape key echoes. So the correct entry in ~/.inputrc is:
"\eOD": backword-word
or enter the command
at a shell prompt:
bind '"\eOD":
backward-word'
(Next, set ctl+RightArrow to forward-word.)
Using the Linux dialog command
Adapted from “Linux Shell Script Programming” by Todd Meadors, (C)2003 Thomson/course Technology, pp. 449-ff
The Linux (non-POSIX standard) dialog command can be used to provide a GUI for shell scripts in a non-GUI environment. If you are running a good terminal emulator (e.g., PuTTY), the GUI will look good and even be able to read mouse clicks!
Use dialog to create a form interface. Such interfaces reduce user error. See mc for a sample of what can be done. (Under the hood these commands use the ncurses library.)
Each label, text input, menu, or other GUI item is called a widget. To display any widget you use
dialog common-options widget-type widget-options
For example to display a menu use:
dialog --menu "menu-name" height
width num-items \
item1-tag item1-label item2-tag ...
To create a complex form either use the form widget or several dialog commands in your script. It can be tricky to get the output from a form! See demos dialog-demo-popup and dialog-demo-form.
Adding a GUI to scripts
For GUI pop-ups, use xmessage, gxmessage, osd_cat (“osd” means on screen display), or zenity (Solaris: dterror.ds). For a console GUI, use dialog (Linux only I think). (Windows: use winpopup.exe for <winXP, or msg.exe for >= WinXP.) Try this:
gxmessage -nearmouse -buttons 'okay:2,quit:0' \
-default okay "$(fortune)" 2>/dev/null
In a script, it can be useful to detect if stdout is connected to a terminal or not. If not, you can alter the output format (for example, what ls and similar commands do). Use the test command for this: “test -t 1” is true if stdout is connected to a terminal.
Internationalized (I18N) Scripts
*nix and Gnu support internationalized programs and scripts. This is useful for help messages, interactive scripts, or for CGI scripts. Gnu gettext is a set of utilities that will translate a set of strings for some program between various languages according to your current locale settings (LANG). Each string is used as an index into a script-and-locale specific catalog of strings (*.po files, which are compiled into *.mo files). Bash also provides $"string" which will translate string the same way.
You first create catalogs of strings in various languages, for a set of programs (called a domain) by crafting *.po (portable object) files. Then compile these into *.mo (machine object) files with msgfmt used by gettext. This NLS scheme was first proposed by Uniforum in early 1990s, and widely adopted. See info/man for gettext, gettext.sh, ngettext, and xgettext. (There are C and other language libraries too for gettext.)
[Adopted from the Adv. Bash Scripting Guide: www.tldp.org/LDP/abs/html/localization.html]
1. First create your script as normal:
#!/bin/sh
printf "Enter your name: "
read NAME
printf "Howdy, $NAME!\n"
2. Next, modify the script by marking all strings as look-up functions. The Gnu gettext utility and xgettext utilities can be used for this as follows to internationalize a script (normally use dir /usr/local/share/locale):
#!/bin/sh
export TEXTDOMAINDIR=~/locale
export TEXTDOMAIN=i18n_greet
. gettext.sh
printf "$(gettext 'Enter your name: ')"
read NAME
printf "$(eval_gettext 'Hello, $NAME!')\n"
3. Generate a template PO file from the internationalized script:
xgettext -d i18n_greet -L Shell i18n_greet.sh
This produces i18n_greet.po:
# SOME DESCRIPTIVE TITLE.
# Copyright (C) YEAR THE PACKAGE'S COPYRIGHT HOLDER
# This file is distributed under the same license as the PACKAGE
package.
# FIRST AUTHOR
<EMAIL@ADDRESS>, YEAR.
#
#, fuzzy
msgid ""
msgstr ""
"Project-Id-Version: PACKAGE VERSION\n"
"Report-Msgid-Bugs-To: \n"
"POT-Creation-Date: 2007-11-01 11:02-0400\n"
"PO-Revision-Date: YEAR-MO-DA HO:MI+ZONE\n"
"Last-Translator: FULL NAME <EMAIL@ADDRESS>\n"
"Language-Team: LANGUAGE <LL@li.org>\n"
"MIME-Version: 1.0\n"
"Content-Type: text/plain; charset=CHARSET\n"
"Content-Transfer-Encoding: 8bit\n"
#: i18n_greet.sh:10
msgid "Enter your name: "
msgstr ""
#: i18n_greet.sh:11
#, sh-format
msgid "Hello, $NAME!"
msgstr ""
4. Now customize this template PO file (See below for an example).
5. Next, make a copy of the file for each language you wish to support, say i18n_greet.sh.fr_FR.po, and customize them with translated strings:
# .po template for i18n_greet.sh script.
# Copyright (C) 2007
# This file is distributed under the same license
# as the i18n_greet.sh package.
# Author: Wayne Pollock <pollock@acm.org>, 2007
#
#, fuzzy
msgid ""
msgstr ""
"Project-Id-Version: i18n_greet.sh-1.0\n"
"Report-Msgid-Bugs-To: Wayne Pollock <pollock@acm.org>\n"
"POT-Creation-Date: 2007-11-01 11:02-0400\n"
"PO-Revision-Date: 2007-11-01 11:02-0400\n"
"Last-Translator: Wayne Pollock <pollock@acm.org>\n"
"Language-Team: Français\n"
"Content-Type: text/plain; charset=utf-8\n"
"MIME-Version: 1.0\n"
"Content-Transfer-Encoding: 8bit\n"
#: i18n_greet.sh:10
msgid "Enter your name: "
msgstr "Entrez votre nom: "
#: i18n_greet.sh:11
#, sh-format
msgid "Hello, $NAME!"
msgstr "Salut, $NAME!"
6.
Finally, compile the .po files to .mo (fast
lookups) files. If necessary create the appropriate directories first:
umask 022
mkdir -p ~/locale/fr_FR/LC_MESSAGES/
msgfmt -o ~/locale/fr_FR/LC_MESSAGES/i18n_greet.mo \
i18n_greet.fr_FR.po
7.
Normally TEXTDOMAINDIR is /usr/share/local/. Be
sure the files are readable:
chmod -R a+rX ~/locale # set dir, file perms
Now try
it out:
$ ./i18n_greet.sh
Enter your name: Wayne
Hello, Wayne!
$ LANG=fr_FR ./i18n_greet.sh
Entrez votre nom: Wayne
Salut, Wayne!
POSIX gencat is a similar utility to gettext but not compatible with it. The catalogs are binary, and need to be recompiled for different machine types. While there are C language library functions (catopen, catclose, and catgets) to lookup the strings, the Unix utility for that is dspcat, which is not in POSIX and not supported in Linux. However, Ksh supports dollar double-quotes that will lookup strings in a catalog, and substitute them. (Bash is similar, but uses Gnu gettext, not gencat.) Here’s an example:
#!/bin/ksh
# Sample internationalized shell script.
# Adopted from:
# blog.fpmurphy.com/2010/07/localizing-korn-shell-scripts.html
# Written 6/2015 by Wayne Pollock, Tampa Florida USA
name="Hymie Piffl"
printf "Simple demonstration of shell message translation\n"
printf "Message locale is: $LC_MESSAGES\n"
printf $"Hello\n"
printf $"Goodbye\n"
printf $"Welcome %s\n" $name
printf $"This string is not in the message catalog\n"
Next, you can view all the strings that will be internationalized:
$ bash -D demo
"Hello\n"
"Goodbye\n"
"Welcome %s\n"
"This string is not in the message catalog\n"
When localizing a shell script, a decision has to be made as to where to place the localized message catalogs. Typically they are placed in subdirectories under the directory where the script is located named for the locale. By default the catalog file should have the same name as the shell script. But they can be placed elsewhere and named anything if the NLSPATH (discussed previously) environmental variable is set correctly. You could name the catalog files demo.cat, and keep them in ~/.locales/en/US, if you set:
$ export NLSPATH="$HOME/.locales/%l/%t/%N.cat"
It is required to have a catalog in the C locale. You can just copy the one for English there. (I think it’s because the strings are looked up in the C locale, to get the message numbers.)
To create a catalog file, prepare a source file for gencat. The format is simple and explained in the man page. Here’s the en_US message source file for demo:
$ cat demo.msgs.en
$quote "
1 "Hello\\n"
2 "Goodbye\\n"
3 "Welcome %s\\n"
And here is the French version:
$ cat demo.msgs.fr
$quote "
1 "Bonjour\\n"
2 "Au Revoir\\n"
3 "Bienvenu %s\\n"
Next, generate the correct message catalogs:
$ gencat locales/en/US/demo.cat demo.msgs
$ gencat locales/fr/FR/demo.cat demo.msgs.fr
$ gencat locales/C/demo.cat demo.msgs
You can only use locales that are defined on your system. Use “locale -a” and grep to see which ones are supported; for example, on my Fedora system, the locales of just “en” and “fr” are not supported.
Finally, set and export NLSPATH as shown above. Apparently, Ksh does localization upon startup, so setting NLSPATH within the script is ineffective.
Now run the script:
$ LC_MESSAGES=fr_FR ./demo
Simple demonstration of shell message translation
Message locale is: fr_FR
Bonjour
Au Revoir
Bienvenu Hymie Piffl
This string is not in the message catalog
$ LC_MESSAGES=en_US ./demo # Works for default
locale of POSIX too
Simple demonstration of shell message translation
Message locale is: en_US
Hello
Goodbye
Welcome Hymie Piffl
This string is not in the message catalog
Using MySQL, PostgreSQL databases with shell scripts
Often data is stored, not in files, but in an SQL database. While you don’t need to be a DBA a good administrator should know have to pull data from a database and format it.
Most popular databases include command line tools to access the databases. In most cases the output is different when these commands are used interactively than as a filter command. Often the output format can be controlled with various command line arguments and database commands.
Note there is a security concern here. Since the DB may require a username and password, your script needs to supply those. But this can be dangerous since scripts must be readable!
For non-interactive use you should store your password in the [client] section of the .my.cnf option file in your home directory:
[client]
password=secret
If you store your password in ~/.my.cnf then that file should not be accessible to anyone but yourself (i.e., chmod to 400 or 600).
With
MySQL you can use: mysql
-D dbname -e script
Without the “-e” option mysql reads
stdin, so can use a (see Double-Quotes) with commands.
Some useful options include --skip-column-names (or -N), --raw (don’t escape output), --show-warnings (useful when debugging), -v (verbose), --safe-updates (prevents accidently deleting all rows in a table by omitting a WHERE clause), -ppassword (no space between the p and your password), -u username, -E (vertical output always; instead you can append \G to any command), -H (HTML output), and -X (XML output).
Sometimes you may want your SQL script to display information to the output (like an echo statement). For this you can insert statements like this:
SELECT 'info_to_display' AS ' ';
Setup test.shop DB on YB (see script in private). Show mysql.sh script.
You can create executable SQL scripts with this trick (show demo.sql):
#!/bin/sh -
--/. &> /dev/null; exec mysql "$@" < $0
SELECT 'Hello world!' AS "";
Using scripts for Website support, management, and web page generation
(to be completed)
Using tar, gzip, rsync to create backup scripts
To duplicate some files or a whole directory tree requires more than just copying the files. Today you need to worry about ACLs, extended attributes (including SE Linux labels), non-files (e.g., named pipes, or FIFOs), files with holes, etc. Gnu cp has options for that, but can’t be used to copy files between hosts.
The cp command doesn’t copy hierarchies correctly: symlinks get their timestamps changed, hard links are lost completely, and sockets, doors, and FIFOs (named pipes) may not copy correctly either. Gnu (and possibly other) versions of cp support extra options for this.
The correct solution involves using archive commands such as Gnu tar, cpio, or pax, in a pipeline:
tar -cf - . | { cd /dest && tar -xpf -; }
You can use find -depth with cpio or pax, and you can pipe into ssh to copy across hosts. Here’s a tar example:
tar -cJf - -C sourcedir files \
| ssh remote_host 'tar -xf - -C destdir'
You can do this with pax as well:
cd dir; pax -w -x pax * | \
ssh user@host 'cd /path/to/directory && pax -r -pe'
With the right options, these archive commands do the right thing for links and non-files. Here’s an example using cpio:
cd /source/dir/
find . | cpio -dump /destination/dir/
To copy a whole storage volume, you can use dump and then transfer that, and restore it on the remote system. Otherwise, you can use cpio, tar, or star, which will duplicate some but not necessarily all of the special files and attributes. Files or backups and archives can be best copied between hosts with scp or rsync.
On POSIX systems, you have pax (and possibly not Gnu tar). It also supports a copy mode:
cd /dir1; mkdir /dir2; pax -rw . /dir2
Here’s a more complex case: copy selected files into a folder, ignoring the initial path (the -s option transforms filenames as if using the s/old/new command of ed):
find -depth -type f -name \*.txt -exec sh -c \
'pax -rw -s ",\(.*/\)*\([^/]*\)$,\2," "$@" dir' \
find-pax {} +
Using rsync over ssh often performs better than tar if it is an update (i.e., some random subset of files need to be transferred). (Show ybsync alias on wpollock.com.)
Exercise: A junior SA comes to you with this problem: “My backup script doesn’t work!” Running tar -cvf etc:full.tar /etc gives this error:
tar: etc\:full.tar: Cannot open: Input/output error
tar: Error is not recoverable: exiting now
What is wrong and what would you suggest to fix it?
Finally, if you use gzip to compress archives, keep in mind this advanced use: gzip allows you to concatenate compressed files to make a single archive:
gzip -c foo > backup.gz
gzip -c bar >> backup.gz
Then the command “gunzip -c backup.gz” acts just like “cat foo bar”.
Gzip is often used by web servers and browsers, since most better compression methods such as xz are too slow to work “on the fly”. A replacement designed just for web pages is brotli.
Creating man pages for your scripts
You learn how to create proper man pages in CTS-2322. For your scripts a full man page may or may not be needed, but without some standard help available, any command or script is worthless. For a script:
· Consider implemented a -h and/or --help option, and also displaying help if illegal options are provided (or required options are missing). This keeps the script self-contained.
· Consider using the RCS description when creating your script, to provide a place to document the reason why you created the script and expected use.
· Consider adding a real man page. For personal system admin scripts, you can put the script in /usr/local/sbin or /opt/sbin or ~/bin, with the corresponding man page in /usr/local/man, /opt/man, or ~/man.
· If your script will be provided to others as Gnu open source, you will need to provide an info page instead. An identical man page is desirable too.
Once your script is more than one file, consider maintaining a package for it. This allows you to easily install the script and related files on another system, the same system after an upgrade, and supports versioning. A package is also a good place to store information about your script (similar to an RCS description).
A simple man page can be just a text file in any format. However it helps the reader if your man page looks like other man pages on the system, so look at a few and use them as a guide.
Name a man page with an extension corresponding to the man section of the command. Usually this will be 1 (general user command), 8 or 1M (and administrator command; the section name varies by OS).
Using RCS (Revision Control System)
A revision control system (called many other names including SCCS, SCM, and VCS) keeps a history of all changes to a set of files. This history allows anyone with appropriate access to see all changes made to any file, in the order the changes were made, and by whom and when the changes were made (often comments can be included too). This also allows you to very quickly revert a file to a previous version if the current version proves to be faulty, or to refresh a file from the repository if it (the used copy) becomes corrupt.
Such a system also provides locking, to prevent simultaneous changes by different users to the same (part of a) file.
Originally used by developers to track all changes to a software project, RCS has proven useful for many others, including system administrators and document maintainers (including web pages).
There are many different revision control systems in common use, each with different strengths and weaknesses. For developers working long distance on a common (e.g., sourceforge.net) project, CVS, Subversion, and Mercurial are popular. There are proprietary systems including BitKeeper and SourceSafe for Windows, although the open source tools have been ported to Windows and are more popular. (Show comparison at: linuxmafia.com/faq/Apps/vcs.html)
The RCS system is simple to use and works well for single users or small groups working on a single server. Subversion is not suitable for SA and document maintainers, because you can’t make changes to individual files in that system. Git is used by the Linux kernel developers. Two others to consider are bazaar and Gnu arch. For SAs, document maintainers, and students, RCS is probably best. (See on-line comparison at linuxmafia.com/faq/Apps/vcs.html)
One drawback to RCS is that the change histories are kept in subdirectories (i.e., for /x/foo the history is in /x/RCS/foo,v). So the revision histories are scattered all over, and can get lost during a major system upgrade. (This is not required, but using a single repository is difficult and not common.)
RCS does allow you to use a single repository, by listed pairs of pathnames (checked-out pathname, and in-repo pathname) on the command line, or by this way:
cd /etc/foo.d; co -l /etc/RCS/foo.conf,v
(Another way is to create
local symlinks to RCS.) Demo RCS (show web resource):
cd ~; mkdir RCS; vi nusers; Add
$Id$ as a comment;
ci -i1.0 nusers; co -l nusers;
You check out a version with co, by default the latest one. To check out a copy for editing, use -l option (lock). ci checks in a new file, or a revised file previously checked out. You can specify the initial version number if you want with -inum (default is 1.1, I prefer 1.0). the command “ci -u” both checks in a revised file and checks out the new copy (-u for unlocked).
It is a good idea to run rcsdiff filename before using the co command, in case the working copy was modified by someone who didn’t use co/ci. (That is they became root and edited the read-only copy directly). If this has happened you can use rcs -l file; ci -u file to record the changes to the history, then co/ci as normal.
rcsdiff -r1.1 -r1.2 file will show the changes made between the two versions listed. rlog file will show the complete history of changes.
Another RCS feature is the expansion of keywords in the file during check-out. You can include these keywords in comments and have them automatically show the version number, date of last change, author, and other data. Keywords all look like “$word$” and these expand to “$word: text$”.
(See man pages for ident (keyword list), rcsintro, rcs, ci, co, rcsdiff, and rcslog).
Good idea: mkdir /etc/RCS, then ci and co all changes, to allow easy back-out and change history.
A good idea is to create a shell script (usually called xed or vir) that checks out the file, fires up $EDITOR, then checks the file in.
A robust script can perform many additional checks such as making sure the RCS subdirectory exists and creating it if not, checking in the current version if the file was modified from the last check-in (or never checked in before), and where possible perform sanity checks on the new file: correct syntax, vital entries intact, etc.
There are sanity-checking commands already for some config files, such as passwd, group, and shadow, httpd.conf, named.conf, sudoers, etc. For others, you can create a sanity checker script (e.g., crontab, resolv.conf, nsswitch.conf, etc.).
Using crontab and at
Show crontab, at resources on website.
Discuss crontab -lre, (review), also crontab file, the files in
/var/spool/{at,cron} and /etc/*cron*.
To run a job every other week, or every second Monday, or the last Friday in the month, requires a trickier solution. You must run the job every week and check in the job (with an if statement) if this is the correct day to run or not. There are several different ways to do this; one clever way to run task every other Monday:
7 3 * * 1 [ $(echo "$(timestamp)%(14*24*60*60)"|bc ) -lt 604800 ] && task
(Can use Gnu “date -u +%s” instead of “timestamp”.) A more obvious solution would be to test for some file; if it exists then run task and delete the file, else touch the file.) Similarly you can run a job for the last 7 days in a month, and check if today is Friday.
Scheduled jobs do not run attached to the current session. However, if running X window, you can pop up windows or affect running GUI programs. For example, this will cause a running Firefox browser to open a new tab:
$ at now + 1 minute
at> xterm -display :0 -e firefox -display :0 wpollock.com
at> ^D
anacron (run tasks after so many minutes/hours/days/...) Unlike cron it doesn’t assume the machine is always on. With Fedora/Red Hat anacron only runs at boot time to run the /etc/cron.{daily,weekly,monthly} scripts that may not have been run by cron. The daily anacron cron job just updates anacron timestamps. (Unix systems may use a different but similar too periodic.)
Using at:
at -l (atq), at
-c atJobNum shows contents of job,
at -r (atrm) (-d and not -r on Gnu for some reason). Discuss access control:
at.{allow,deny}. Mention
batch too.
In interesting problem can occur when you want to run cron jobs on different systems located in in different timezones. With Linux “cronie”, you could specify the timezone of each job like so:
CRON_TZ='UTC'
15 12 * * * utc-time_job-1
30 23 * * * utc-time_job-2
CRON_TZ='Europe/Athens'
45 20 * * * local-time_job
An alternative is to use Gnu date (or any equivalent) that can convert dates from one formate into another. Then you can run at jobs instead, specifying the time as needed. The at job can be started via cron shortly after midnight, such as:
1 0 * * * echo cmds | at $(date -d "06:55Z" "+%H:%M")
Run a task with a time-out
There are several ways to run tasks (such as waiting for user input) with a time-out. A time-out specifies the maximum amount of time the task is allowed to take. If the timer expires, the task is terminated. In the case of waiting for user input, you can either return nothing or return the input read so far.
Modern shells have a read built-in with a timeout option, say by setting TMOUT environment variable. (See p. 227 for a POSIX standard way using stty.)
You may wish to put a task in a login script but to permit the login to succeed (imagine running a non-interactive command via ssh) you need the command to time out after a while.
Another example might be to run rsync in a nightly cron job and make sure it does not run for more than 3 hours (if killed rsync would properly resume its work on the next time it is run).
There are several different ways to accomplish running a task with a time-out.
One way to do this is, start a sub-shell to run the command, sleep for a while in the parent shell, and kill the child if the timer runs out before the child dies naturally.
Let the parent process be P and let the child process be C. The outline is:
1. Have P catch SIGCHILD signals: trap exit SIGCHLD
2. P starts C in background, passing it its (P’s) PID one way or another;
3. P gets C’s PID (set in “$!”);
4. P sleeps for the time-out interval;
5. Meanwhile if C finishes before the timeout it will send SIGCHILD to P automatically (but by default that is ignored, so P needs to catch it).
In a login (or other) script, you can run a command with a time out by starting a sub-shell P. Here’s a sample Korn script timeout that does this (timeout2 on YB):
!/bin/ksh -
PATH=$(getconf PATH)
export MYPID=$$
export SHELL=ksh
USAGE="Usage: ${0##*/} timeout-seconds command [options]"
if [ $# -lt 2 ]; then
echo "$USAGE" >&2
exit 1
fi
TIMEOUT=$1;shift
is_int () \
{ expr "$*" : '[[:digit:]][[:digit:]]*$' > /dev/null; }
if ! is_int "$TIMEOUT"; then echo "$USAGE" >&2; exit 1; fi
trap "exit" SIGALRM
( "$@" ; kill -SIGALRM $MYPID ) &
sleep "$TIMEOUT"
kill %1 || { sleep 10; kill -KILL %1; }
(Note: This won’t work with most shells, since sleep doesn’t exit on a signal!)
The expect tool can be used to add a timeout to use while waiting for some command to send the expected output.
Waiting for File Events
Sometimes you need to do something once a file or direcory changes: the file’s timestamp (a, c, or mtime) changes, a file is added/removed from a directory, etc. Doing this sort of monitoring requires a daemon to watch stuff, or support from the kernel. Linux kernel supports inotify for this. If you install the Fedora package inotify-tools a couple of useful commands are available for use. For example, here’s a short shell script to efficiently wait for httpd-related log messages and do something appropriate (taken from inotifywait(1) man page):
#!/bin/sh
while inotifywait -e modify /var/log/messages; do
if tail -n1 /var/log/messages | grep httpd; then
kdialog --msgbox "Apache needs love!"
fi
done
Run a lengthy task in parallel
Gnu parallel is a program that can take advantage of multiple cores or any task that can be run efficiently in simultaneous jobs (e.g., each sub-task involves an Internet or DB connection). The typical input is a list of files, hosts, users, URLs, etc., and a command. It uses the same options as xargs and can replace xargs and most loops in scripts. For each line of input, GNU parallel will execute command with the line as arguments. If no command is given, the line of input is executed. Several lines will be run in parallel.