-
Save this file to your computer with the name “
practice.htm” by selecting “File→Save As” on the browser menu bar and then selecting a destination on your computer. (If you have a Mac, the equivalent menu choice is “save page source”.) Be sure to save as type “Web page, HTML only”, and not “Web page, Complete” or any other type. (If you are asked to set the “encoding”, it is safe to select “UTF-8”.)With some web browsers, you may have to hit the “ALT” key, to make the menus appear. With others, you may have to right-click a web page to see a menu.
By default, Windows is configured to hide the last part of a file's name, the extension. This can be confusing and annoying when you need to create files with specific extensions! Fortunately, it is easy to change this setting. See these directions to show file extensions.
Do not save to the hard drive of a college computer. Instead you should save on a removable USB (flash) disk.
(Most versions of Internet Explorer will add additional text (tags) to the saved page. This can be considered a bug. Instead of using “Save As”, you can (if available) use the menu choice “File→Edit with Notepad”; then from there use “File→Save As”, and pick the correct name (with the extension of “
.htm”, not “.txt”.) -
After saving the file, open an HTML (web page) editor
such as MS Word, WordPerfect, FrontPage, etc.
I strongly recommend (and personally use) “Notepad” to create
or edit web pages.
You are encouraged to avoid using Word and to use
Notepad instead.
(Otherwise you may have a hard time with some later projects,
when you will need to work with HTML tags!)
Open the saved file in Notepad (or other editor) by selecting the
“File→Open...” menu and browsing until you find the saved
the file.
If opening in Microsoft Word, you may be asked to “convert from HTML”. Don't do it! Convert as “plain text”. Otherwise you will not be able to see the HTML tags. (You don't have this issue when using Notepad.) Note you don't need to add or change any HTML tags for this project, but you should get used to seeing them.
By default, the Notepad editor's File→Open... menu dialog will only show files with the extension of “
.txt”. To see your saved web page so you can open it, you need to click the button “Text Documents (*.txt)”, and select “All Files (*.*)”. Now you should be able to see your saved file (practice.htm).(If you have a Mac computer, use “
Text Edit”, but set it to “Plain Text” mode first.)If you did this correctly, the beginning of the file will look like this:
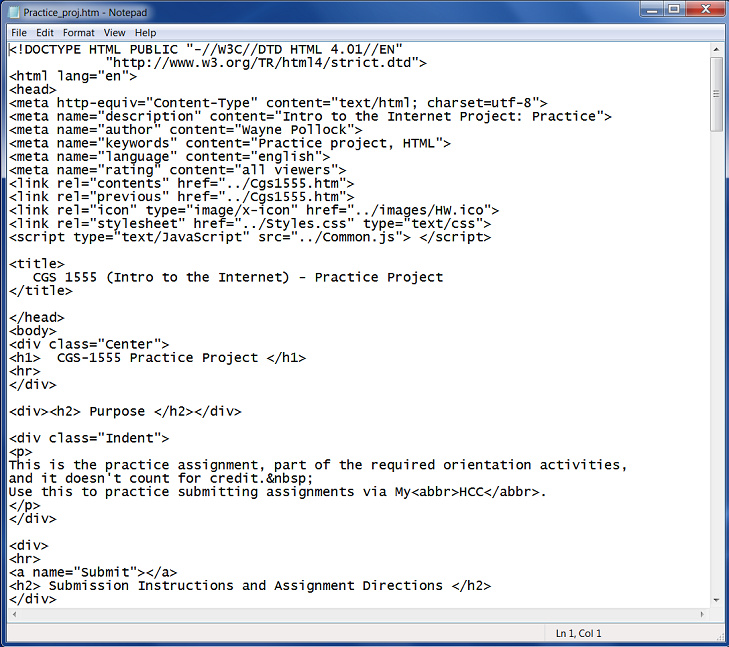
Take a few minutes to examine this. A web page is pure text; that is, no style information or images are part of the document. That's why you can view the source of any web page, in any text editor.
All the style information is represented by tags. The tags are the text between the angle-brackets (“
<tag text>”). Notice how most tags come in pairs:<tag> some text </tag>
For the first few projects, you don't need to know anything about tags. You will simply find the questions in the source, and put your answer after that. It is important to not put your answers inside of the tags! If you do so, the web browser may become confused by the strange new tag.
-
In your editor, scroll down slowly until you find this text.
Then type your name where indicated below to verify
that you can edit HTML files.
Student Name: replace these seven words with your name
Do not change or replace the “tags”, just the seven words. (The “tags” in this case look like this: <i> text text text </i>.)
-
Saving Your Work
Now you should save your work. If using Word, be sure to “Save As...” with type “plain text”. Also, with some versions of Word and Windows you may need to change the “encoding” as well. Without going into details, using an encoding of “UTF-8” should work well. (You can do the same when using Notepad.)
To change the encoding in Notepad, just select “UTF-8” from the list that appears in the “Save As...” dialog. To change the encoding using the “Save As...” dialog in Microsoft Word, you must click on the “Tools” button at the bottom of the dialog, and select “Web Options...”. Then click on the “Encoding” tab to change the encoding. From the list you should choose “Unicode (UTF-8)”, then click the OK button.
In Word 2007, make your changes then click the Office button and choose “Save As...” and then “Other Formats”. In the “Save as type:” list, be sure to select “Web Page, Filtered (*.htm; *.html)”. Don't click on the “Save” button yet! From here, be sure to change the encoding. You must do this every time you save since Word doesn't remember what encoding you previously used.
After changing the encoding in Word, you should be back at the “Save As...” dialog. You can click the “Save” button now.
-
Check your work by opening the modified file in a web browser.
You can do this from the “File→Open File...” menu,
or a similar choice depending on your web browser.
(With some web browsers without menus such as Chrome, you need to type
“control+o” to open a local file.)
The blue background of my web pages is a result of something called a CSS style-sheet. The style-sheet is in a separate file, which you didn't save with
practice.htm. Since the style sheet file wasn't downloaded, the browser ignores the missing file and the blue background won't be there. This is expected and normal; don't worry about the blue background.(If you hate the blue background, you can turn off styles in your web browser! Exactly how depends on the web browser you use. For Firefox, select the menu View→Page Style→No Style.)
If your web page doesn't look right, repeat steps 3 and 4 until it does. You may have to hit the “reload” (or “refresh”) button, or hit the “F5” key, to make your changes show after you have made any changes to your
practice.htmfile. - Return to “Canvas” and select “Assignments” from the course menu (on the left), then the “Practice Project” drop-box.
-
Follow the directions shown there to select, upload and submit the
completed file.
(In brief, click the “Submit Assignment” button to upload
your file.)
Check the uploaded file before clicking on the “submit” button. Make sure the file has the required name. Many Windows users have the system set to hide file extensions. (A symptom of this is to see an uploaded file with a double extension, such as “
Practice.htm.htm”, or even worse “Practice.htm.txt”.) Another problem is trying to upload files from Windows's “Recent Files” list. These are only “short-cuts” to the actual files (often saved in “My Documents”), and they won't work when uploaded. (The symptom of this is if the uploaded file has the extension “.lnk”, as in “practice.htm.lnk”.)If the file name is wrong, you can click the “Do not attach” link that appears next to the uploaded file's name. Then go back and fix whatever was wrong, and then upload it again.
When fully satisfied that you uploaded the correct file, you hit the “Submit Assignment” button. (You can optionally enter comments too. Use a comment to explain a late submission, your feelings about the project, or just to butter-up the instructor. )
After you've done that, you can view the submitted file but not make any changes. You should examine the uploaded file, as it may appear differently than when you view it from your desktop. If the file doesn't show correctly when you view it, or if you decide to make changes later (but before the submission deadline), you can send me an email requesting I un-submit your project for you. Then you can resubmit the corrected assignment.
- Note that projects sent as email WILL NOT be graded. You must use this assignment's “drop-box”.
- You can avoid seeing HTML “tags” if you open in Word and “convert from HTML” when opening the file. In this case you use normal Word formatting to edit the document, rather than type in HTML tags. When done, you must “Save As...” using the type “Web page, filtered (.htm, .html)”, and not the “plain text” format as discussed above. Note this option isn't available for all projects, and you are encouraged to avoid using any word processor, and use a simple text editor instead.
- While most CGS 1555 Assignments are submitted as discussed above, some projects may instruct you to submit as another file type. Also, the final Webpage FTP assignment must be uploaded directly to the Dale Mabry Campus student Web server via FTP, using separate FTP software, in addition to a submission to the drop-box. (Detailed instructions are included in that assignment.)
- Be certain to read any specific instructions that are included in the assignment drop-box.