Stateful Packet Filtering Firewall with Iptables
Lecture
Notes (c) 2006 Prof. Wayne Pollock,
iptables a.k.a. netfilter examines incoming and outgoing packets at various points. It does this by matching each packet against a chain of rules. Each rule contains matching criteria and a target which says what to do with a packet that matched the criteria. A chain of rules is a list. Packets are matched against each rule in a chain, in order, until a match occurs. Then the target of that rule is used (generally) to accept or to drop the packet. However the target may cause the packet’s header fields to be changed, to log the packet, or do another action. If no rule matches some packet then a default policy is used to decide what to do.
Iptables is a stateful packet filter, in that it keeps track of connections, statistics, and packet flows. Even UDP packets can be tracked (e.g., a DNS query and the response). All that information may be used in the criteria to match packets, or to produce reports. Note that connections have a timeout value, so iptables may “forget” some long idle connection and begin dropping packets.
Originally packet filters were stateless, and had to decide what to do with a packet only by examining that packet’s layer 3 (IP, ICMP) and 4 (TCP, UDP) headers. Soon the black-hats were tweaking and faking the various flags and fields in the headers to by-pass the packet filter. The most common attacks were to turn off the SYN bit in a TCP packet so the firewall would think the packet was part of an established session and allow it through.
Non-Linux systems today often have similar packet filter firewalls, which use similar concepts to iptables. (ipf a.k.a. ipfilter on Solaris, the Solaris default location for the firewall rules file is /etc/ipf/ipf.conf. For BSD the packet filter is called pf, and the command to use it is pfctl. To enable add “pf=YES” to /etc/rc.conf.local. The rules go in /etc/pf.conf.)
One problem today is that many applications use the same port number (e.g., MS with SMB on ports 137 and 139). So you can’t filter traffic just by examining packet headers, you need to examine the application layer (layer 7) headers too. This is the only way for example to see if some packet going to port 80 really contains an HTTP request, or is some stealth IM or file transfer packet. Some commercial packet filter firewall devices can examine layer 7 data and use that to decide to accept or drop the packet.
A more common solution is to use transparent application proxy servers, which receive the supposed HTTP packet, and forwards it if it really is an HTTP packet.
IP Accounting Besides packet filtering iptables collects statistics on byte and packet counts for each rule. This is called accounting.
Iptables can also be used for NAT (including masquerading and port forwarding), packet mangling (modifying bits of the headers), and load balancing.
Chains
There are five built-in chains, one for each point in the kernel’s processing path:
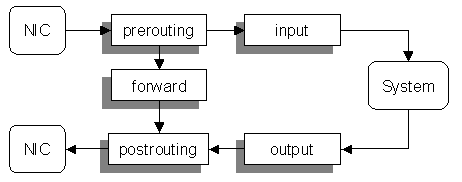
The chain determines when a packet is examined. An incoming packet (from the outside to this host) arrive at a NIC and will be processed only by the rules on the prerouting and input chains.
Outgoing packets (from this host to another) will use the output and postrouting chains only.
When the host acts as a router it will forward some packets (from one interface to another). These will traverse only the prerouting, forward, and postrouting chains.
Some (or all) of these chains may be empty. You can set a default policy for this standard chains.
You can also define new chains. Such chains may be the targets of rules in other chains. Defining your own chains may be useful in a couple of situations.
If you have a set of rules that need to be part of several chains, it is handy to be able to define it once. Then you add a rule to each of the built-in chains with no criteria, with a target of the new chain. Commonly, both the input and forward chains (of the filter table) have similar rules for dropping packets. So you create a new chain “rulz” or some other name, add the rules to that, and use it from both the input and forward chains.
Matching packets against a lot of rules can take time, thus increasing the latency of the packets and lowering throughput. Using a user-defined chain can help with this. Suppose it takes six (or more!) rules to determine what to do with incoming packets going to some particular server. Rather than add all the rules to the input chain, and thus force all incoming packets to be matched against them, you can put them in a new chain, and add a single rule to the input chain that only matches the destination IP address of the server in question, and uses the new chain as the target. (Illustrate!)
Note that ordering the rules in a chain carefully can also affect performance.
Tables
iptables also organizes rules into four tables. A rule’s table determines what targets are valid for that rule, as well as to which built-in chains the rule can be added. Note some targets (e.g., ACCEPT, DROP) can be used in all tables.
There is a table for filtering the packets (the “filter” table) which can have only rules in the INPUT, OUTPUT, and FORWARD chains. Rules in this table don’t alter the packet in any way.
There is a table for NAT (the “nat” table) which uses the chains PREROUTING (for altering packets as soon as they come in), OUTPUT (for altering locally-generated packets before routing), and POSTROUTING (for altering packets as they are about to go out). Rules in this table are used to alter the source/destination IP address (and possibly port numbers) in a consistent way.
There is also a mangle table and a raw table that allow rules with targets that do other things to packets, such as re-routing them or changing header values (such as the QoS field).
The rules in a chain are processed in an order determined by the table. You can think of each table as having its own set of built-in chains.
The following table shows the order of processing for each of the four possible packet flows. For example consider what happens to an incoming packet. First the mangle then the nat table rules in the PREROUTING chain are used, then the mangle table rules in the INPUT chain, and finally the filter table rules in the INPUT chain.
|
Flow Type |
Table |
Chain |
|
incoming |
mangle |
PREROUTING |
|
nat |
PREROUTING |
|
|
mangle |
INPUT |
|
|
filter |
INPUT |
|
|
outgoing |
mangle |
OUTPUT |
|
nat |
OUTPUT |
|
|
filter |
OUTPUT |
|
|
mangle |
POSTROUTING |
|
|
nat |
POSTROUTING |
|
|
forwarding |
mangle |
PREROUTING |
|
nat |
PREROUTING |
|
|
mangle |
FORWARD |
|
|
filter |
FORWARD |
|
|
mangle |
POSTROUTING |
|
|
nat |
POSTROUTING |
|
|
socket |
mangle |
OUTPUT |
|
nat |
OUTPUT |
|
|
filter |
OUTPUT |
|
|
filter |
INPUT |
|
|
mangle |
INPUT |
Use the “-t table” option to specify which table to use when adding/removing a rule. If this option is omitted then the filter table is used by default.
Rules and match criteria
A rule is zero or more matching criteria and one (optional) target. A rule is added to a specific table and chain. A rule with no criteria matches all packets.
A rule with no target does nothing; processing will continue with the next rule on the chain. Such a rule may be useful for accounting purposes. Iptables keeps a byte and a packet count for each rule, that is updated whenever a packet matches the rule’s criteria. So, to count all incoming packets on interface eth0:
iptables -A INPUT -i eth0
By default iptables can use criteria that match IPv4 layers 3 and 4 headers:
-d [!] destination address[/mask] -s [!] source address[/mask]
-i [!] input interface -o [!] output interface
-p [!] protocol [!] -f
Here’s an example: iptables -t filter -A INPUT -i lo -j ACCEPT
A “!” means “not”. For most values either numbers or names can be given: port numbers or service names, IP addresses or DNS name, protocol number or name, and even interfaces can be given names. Most criteria have other names: ‑s = ‑‑source = ‑‑src. When omitted the default is to match on all (i.e., no “-p” is the same as “-p all”). Note it is a bad idea to use a DNS name that would cause a remote DNS query!
The “-f” matches fragments (all but the first frame of a fragmented IP packet).
For interfaces you can follow the name with a “+” to indicate all interfaces that start with that name (e.g., “ppp+”, “eth+”).
To use additional criteria a match extension must be used. Each match extension provides a set of extra criteria you can add to the rule. You specify which match extensions you want to use using the “-m extension_name”, followed by the criteria that extension enables.
A few match extensions are loaded automatically if you use the corresponding protocol in the rule: tcp, udp, and icmp. The first two allow “--dport num” and “--sport num” to specify source and destination port numbers (and ranges). The icmp match extension allows “--icmp-type type”. (And others too.)
To see which criteria an extension provides, use:
iptables -m extension_name --help
Some match extensions will cause the kernel to load additional loadable kernel modules.
The iptables man page lists all the match extensions available. One special match extension is “arp”, which enables layer 2 match criteria. A very useful match extension is “state”, which can be used to see if a packet is part of an existing session (or flow):
iptables -A INPUT -m state --state ESTABLISHED -j ACCEPT
Targets
The target of a rule determines what to do with a packet that matched the criteria. You specify the target with the “-j target” option. For example:
iptables -A INPUT -i eth0 -p tcp --dport 23 -j DROP
says to DROP (discard and ignore) any packets that match the criteria: incoming, from network interface eth0, to TCP port 23 (telnet).
There are only four built-in targets, however additional target extensions can be used. The standard distribution includes many target extensions. Some targets are only valid in chains in a particular table. (For example the NAT targets are only valid in the nat table.) Target extensions (especially those that modify the packet) allow additional commands. For example:
iptables -t mangle
-A PREROUTING -p tcp --dport 80 \
-j
MARK --set-mark 3
To see what additional commands a target extension allows, use:
iptables -j target --help
As with match extensions, some target extensions will cause the kernel to load additional modules.
Some of the more commonly used targets are (the first 3 are built-in targets):
ACCEPT obvious
DROP obvious
RETURN This is the default target at the end of a user-defined chain. It means to return to the next rule in the parent chain.
REJECT Discard the packet, but send an ICMP message back to the source. Useful when the source in in your AS but don’t use when source is the Internet! Use DROP instead.
LOG Use to log the packet to the kernel logger (dmesg, syslog). This target is special in that it doesn’t terminate the packet processing.
MARK Used with the iproute2 and the tc command for advanced routing and traffic shaping.
DNAT Used to configure transparent proxy.
SNAT Used for IP Masquerade when the source has a static IP address. It specifies that the source address of the packet should be modified (and all future packets in this connection will also be mangled).
MASQUERADE Used for IP Masquerade when the source has a dynamic IP address.
chain Send the packet to another chain for further processing. If that chain’s rules fail to match the packet, then processing will continue with the next rule in the current chain. (See also RETURN target.)
Using iptables
To add or remove rules from chains you specify the table (default is filter) and the chain. For example, to append a new rule to the end of the OUTPUT chain of the nat table:
iptables -t nat -A OUTPUT criteria -j action
You can insert rules in any position in the chain by using “-I” instead of “-A”.
To delete a rule use: iptables -D chain {rule|rule-num}
To delete all rules use: iptables ‑F [chain]
Create a new chain with: iptables [-t table] -N name.
Delete all user-defined chains: iptables -X [chain]
List [all] rules [no DNS]: iptables [-v] [-n] -L.
Reset per-rule packet and byte counters: iptables -Z [chain]
You can set the default policy for a
built-in chain with:
iptable -P chain {ACCEPT|DROP}
User-defined chains don’t have default policies but you can just put a
reject/drop everything rule at the end for the same effect.
The best way to work with complex sets of rules is to edit the file where your OS stores the rules (in the “iptables-save” format), then simply restart iptables. On Red Hat systems this is /etc/sysconfig/iptables. If there is no such file (on other systems) then save the rules as a shell script that you can run at boot time.
When building a firewall you can use the iptables command to modify the currently loaded (in RAM) rules. These take effect immediately. Once you’ve added and tweaked the rules to the point that they work, you can save the current rules to a file with iptables-save. The result can be used as input to iptables-restore. You can see this in the file /etc/sysconfig/iptables, which is where RH stores the firewall rules.
Filtering
Basics [Adapted from “Linux firewalls” 3rd Ed., by Suehring and Ziegler,
(C)2006 by Peason Ed.]
Start by deleting all user defined chains, and clearing all rules from the five built in chains. Next add a default policy of DROP to the INPUT, OUTPUT, and FORWARD chains. (The other two chains don’t need to drop packets, so you can leave the default-default policy of ACCEPT for them.)
If you stop here you are safe! But it will pay to add some holes in this firewall. At this point is is a good idea to check that all kernel level network protections have been enabled.
A very common situation to to allow the same packets into this host as you will allow your host to forward, when acting as a router. If not routing you can just add filter table rules to the INPUT and OUTPUT chains. If routing, you will usually want the same rules for the INPUT and FORWARD chains. The way to deal with this is to create a new user-defined chain, say “MYRULZ”, and all the common rules to this chain. Then you only have this for INPUT and FORWARD:
-A INPUT -j MYRULZ
-A FORWARD -j MYRULZ
It is usually safe and useful to accept packets from your loopback interface. These can only have been sent from programs on your host, to other programs on your host. So add this (if using routing, add to MYRULZ instead):
-A INPUT -i lo -j ACCEPT
Next we want to allow some outside packets to get through. To start with we want to allow return packets from our outgoing connections. This generally means to allow incoming packes that are part of some established conversation. (TCP or UDP). However you may also want to allow related packets, if using FTP (FTP establishes an outgoing connection, then the remote server initiates another using a different port. This is related to but not part of the established conversation.)
-A INPUT -m state --state ESTABLISHED,RELATED -j ACCEPT
Some packets are obviously fake and should never be allowed, no matter what holes you decide to add. You should drop any incoming packets from a NIC with the following source addresses (See RFC-3330 list of special IPv4 addresses):
You host’s IP address assigned to that NIC.
Any address from one of your internal LANs (that is attached to a different NIC)
Class A, B, C private addresses: 10.0.0.0 - 10.255.255.255, 172.16.0.0 - 172.31.255.255, 192.168.0.0 - 192.168.255.255.
Class D (multicast) addresses (these are legal destinations only, never sources): 224.0.0.0 - 239.255.255.255
Class E (reserved) addresses: 240.0.0.0 - 247.255.255.255
Higher addresses are not used legally: 248.0.0.0 - 255.255.255.255
Looback addresses: 127.0.0.0 - 127.255.255.255
Illegal source broadcast addresses. While some broadcase source addresses are legal on a single LAN (e.g., 0.0.0.0 for a DHCP requests) you will never see any broadcast address from the Internet, or as a regular non-broadcast packet. So in many cases you can filter out any source of 0.0.0.0 - 0.255.255.255, and also 255.255.255.255.
Link-local addresses are reserved for zeroconf addressing and are private on a given lan, if used at all. So these addresses are not vald sources from other networks: 169.254.0.0 - 169.254.255.255
192.0.2.0/24 block is reserved for TEST-NET, to be used in examples and documentation.
192.88.99.0/24 - This block is allocated for use as 6to4 relay anycast addresses, according to [RFC3068]. So if you don’t use IPv6 then you shouldn’t see these.
198.18.0.0/15 - This block has been allocated for use in benchmark tests of network interconnect devices. Its use is documented in [RFC2544].
Any unallocation addresses. You can check IANA and the various RARs (e.g., ARIN) to see which blocks are currently unassigned. No legal packet should have such a source address. But be careful! New allocations are made all the time so you would have to carefully monitor those and frequently update your firewall. (I don’t know of any site that provides you will alerts on this, but it would be a good idea!)
Any known problem networks/hosts. You can simply drop all packes that come from problem sites, provided those sites aren’t also used for legitimate purposes. A business must balance the extra security against lost of customers. (An alterniative is to rate limit packets from those sites.)
Limiting Sources and Services
In many cases you can limit some types of traffic to only be legal from a small number of source IPs.. For example SSH (port 22) access to a production server should only be allowed from a few places: inside the company LAN, and perhaps a few remote sites that have administrative access.
You can also drop traffic based on source port. Legitimate packets for services such as mail or web will have a source port in the unregistered (dynamic or private) range of 49152 through 65535. While there may be exceptions you will need to allow (e.g., SMB) in general source ports in the range 0 to 49151 (and especially the well-known ports of 0 to 1023.
At this point is is just a matter of adding rules for the holes you with to allow. For example to allow access to a web service (port 80):
-A INPUT -m state --state NEW -p tcp --dport 80 -j ACCEPT
Don’t forget to allow related ports, such as DNS, IPP, MTA, POP, HTTPS, etc.
In the end you may wish to add a rule to drop the packets. The purpose is to be able to see the accounting statistics on packets dropped. To troubleshoot your system you may also add LOG rules. (Show log from yborstudent.)
Egress
Filtering
Many sites assume no local evil users or security problems and simply allow any outgoing packet (set the policy on the OUTPUT chain to ACCEPT and add no rules).
A better approach it to limit outgoing packets to ones with a correct source IP address (and source port), and that are part of an established session. A production server will rarely if ever initiate out-going connections, it should just respond to incoming ones. (There are exceptions, e.g. a mail server using a real-time black list or an FTP server.) If you do allow out-going sessions then limit where they go by destination port (i.e., only allow the MTA to connect to the RTBL-DNS at sbl‑xbl.spamhaus.org, or SSH to specific servers.)
Filtering examples and gotchas
When you have multiple NICs the system may not detect them in the same order every time. So “eth0” and “eth1” may be different. Try to give your NICs better (stable) names (like INTERNET or DMZ or PRIVATE-LAN, and use those names in iptables rules.
To allow remote X window GUI access can be dangerous. ssh can be used to provide a more secure tunnel for X, POP/ IMAP, etc. To allow remote X for the local LAN only is still dangerous (because a black hat may spoof the IP address of some server on your LAN and open windows on your server or do other more nasty things). X sessions start at port 6000 (for session 0), 6001, (for IP:1), etc. Blocking all ports from 6000 – 6009 is often done to stop X but unfortunately this range overlaps other registered services, so you must be careful. You might allow access to ports 6000 – 6004 to localhost (or the local LAN) only.
There was a posting about preventing SSH dictionary attacks on SlashDot, and several people posted iptables methods of dealing with this, using the “recent” rule.
“Rundown on SSH Brute Force Attacks” at http://it.slashdot.org/article.pl?sid=05/07/16/1615233 This is what was posted (there was a more complicated one that allowed for ssh IP white-listing too):
-A PREROUTING -p tcp
-d $EXTERNAL --dport 22 -m recent --rcheck \
--hitcount 3 --seconds 600 -j LOG
--log-prefix "SSH attack: "
-A PREROUTING -p tcp -d $EXTERNAL --dport 22 -m
recent --rcheck \
--hitcount 3 --seconds 600 -j DROP
-A PREROUTING -p tcp
-d $EXTERNAL --dport 22 -m recent --set \
-j DNAT --to-destination $INTERNAL:22
# ???
-A OUTPUT -p tcp
-d $EXTERNAL --dport 22 -j DNAT \
--to-destination $INTERNAL:22
# ???
A simpler approach is to use the limit match extension. The following lines block SSH connections from the beginning:
iptables
-A INPUT -i eth0 -p tcp --dport 22 -m state \
--state ESTABLISHED -j ACCEPT
iptables -A INPUT -i eth0 -p tcp --dport 22 -m state --state NEW -m limit \
--limit 5/min -j ACCEPT
iptables -A INPUT -i eth0 -p tcp --dport 22 -j DROP
With these three rules, incoming SSH connections are limited to five, established connections are unaffected and otherwise the packets are dropped.
The hashlimit match extension (run "iptables -m hashlimit --help" for more information on it) allows you to rate-limit traffic with unique limits based on source IP address (among other things). For example:
# iptables
-A INPUT -m hashlimit -p tcp
--dport 22 --hashlimit
1/min \
--hashlimit-mode srcip
--hashlimit-name ssh -m
state --state NEW -j ACCEPT
# iptables -A INPUT -p tcp --dport 22 -m state --state NEW -j DROP
# cat
/proc/net/ipt_hashlimit/ssh
9 64.12.26.80:0->0.0.0.0:0 9600000 9600000 1920000
9 127.0.0.1:0->0.0.0.0:0 259392 9600000 1920000
Transparent HTTP Proxy Example
This last example comes from the Transparent Proxy with Linux and Squid How‑to, from the Linux Documentation Project. Here we have a Linux box used as a router, with eth0 connected to the “outside-net” (Parameter) network (i.e., the connection to your ISP and the Internet), eth1 connected to the “inside-net” network. (Aside: networks can be assigned names in /etc/networks.) The IP address of eth1 is “router-inside”.
In the inside-net is the squid proxy server, with IP address of “squid-server”. It listens for traffic on port 3128.
On the router you need these commands:
iptables -t mangle -A PREROUTING -p tcp --dport 80 -s squid-server -j ACCEPT
iptables -t mangle -A PREROUTING -p tcp --dport 80 -j MARK --set-mark 3
ip rule add fwmark 3 table 2
ip route add default via squid-box dev eth1 table 2
Note that the choice of firewall mark (3) and routing table (2) was arbitrary. If you are already using policy routing or firewall marking for some other purpose, make sure you choose different numbers here.
The first rule tells the router to accept TCP packets going to port 80 of the squid server. The second rule marks all incoming TCP packets to port 80 except those going to the squid server. The order of these two rules is significant and a common source of error and confusion.
The last two commands set up a routing policy for marked packets.
The first thing we do is to select the packets we want. Thus, all packets to port 80, except those coming from squid-server itself, are MARKed. Then, when the kernel goes to make a routing decision the MARKed packets aren’t routing using the normal routing table that you access with the “route” command, but with a special table. Together these commands route all marked packets to the squid server.
Next the squid-server needs one rule:
iptables -A PREROUTING -t nat -i eth0 -p tcp --dport 80 \
-j REDIRECT --to-port 3128
This rule uses DNAT (destination NAT) to change the destination port number of TCP packets arriving in from eth0 (on the squid server, not the router) to port 3128.
An HTTP proxy such as squid works as follows: A user on a workstation uses a web browser to visit www.example.com (which uses port 80 by default). The browser determines the IP address of www.example.com, creates an HTTP request packet, and sends it there.
For non-transparent proxying, the browser is configured with the IP address and port number of the proxy server (in our example squid-server:3128). Squid reads the HTTP headers to determine the real destination IP. It then sends the HTTP request, caches the reply, and finally returns the HTTP reply to the original workstation.
For transparent proxy, no workstations need any special configuration. Instead you have the router do all the work.