Unix/Linux Administration
Logical Volume Management Guide
©2005-2018 Wayne Pollock, Tampa Florida USA.
Adapted from the LVM How-to
page
from The Linux Documentation Project
Adapted from the LVM How-to
from The Linux Documentation Project
In the olden days computer disks were small compared to the data set sizes that were needed. A solution is to make several physical disks appear virtually (or logically) as a single much larger disk. A large filesystem could then be created on that virtual disk.
Later hard disk sizes grew large enough that it made sense to do the opposite: make one physical disk appear as several virtual disks. Each virtual disk holds a filesystem independently of the others. Today such virtual disks are called disk "partitions".
Now we have come full circle. Large data warehouse applications require very large filesystems to hold the database data files. To support this sort of application the old idea of combining several disks into one has been resurrected. Novell Netware supported this feature since the 1990s. The physical disk (or selected disk partitions) are formatted to be "physical volume segments". All added physical volume segments become part of a single large virtual disk. The administrator can then create logical "volumes", that is, a filesystem. The exciting part is that if some volume is low on space, you can extend the virtual disk by adding another physical volume segment to it, and then increase the (logical) volume's size. This operation is fast and doesn't disturb the existing data or other partitions (or volumes)!
The modern Unix (and Linux) version of this idea is called "Logical Volume Management" (or "LVM"). LVM allows the administrator to
Linux also supports software RAID, which, like LVM, can be used to provide disk striping. The two systems are independent of each other. So you can use RAID to provide striping and use that RAID volume as a physical volume for LVM. There is no reason to use both software RAID and LVM, although it can be done. However it does make good sense to use hardware RAID and LVM together.
Modern LVM can do more than just stripping (RAID level 0). It can support many RAID levels, using the MD driver that always provided software RAID. See the lvmraid(7) man page for details.
As a quick example of what can be done, suppose you need to grow some
filesystem by 500 MB.
Without LVM, you must either have a spare 500 MB on the same
physical disk or the entire filesystem must be moved to another (larger)
disk.
Even if you have the space, all the other partitions (and their filesystems)
must be moved, so the 500 MB is at the end of the partition you wish
to grow.
Then all the data must be backed up, the partition changed, and the
old data restored.
While today there are tools such as parted that can manage
this for regular partitions (not LVs),
using LVM you can quickly and safely grow a filesystem
in this simple way:
  root# umount /dev/vg1/lv1
  root# e2fsadm /dev/vg1/lv1 -L+500M
  root# mount /dev/vg1/lv1
The free space can be anywhere, even on another disk!
LVM for Linux has had two major versions (so far). Both have many more features and controls than the older Novell scheme. While the additional controls and features aren't always needed, you still must understand them in order to setup and manage LVM. LVM is also available in recent Solaris and other Unix systems, however different terms may be used for the same concepts.
| Term | Meaning |
|---|---|
| PE | Physical Extent |
| LE | Logical Extent |
| PV | Physical Volume |
| VG | Volume Group |
| LV | Logical Volume |
Table 1: LVM Acronyms
Table 1 summarizes the acronyms used.
With LVM, physical volume segments are simply called
"physical volumes"
(or "PVs").
These PVs are usually entire disks, but may be disk partitions.
The PVs in turn are combined to create one or more large virtual disks
called "volume groups"
(or "VGs").
While you can create many VGs, one may be sufficient.
A VG can grow or shrink by adding or removing PVs from it.
VGs appear to be block devices, similar to other disks such as
/dev/hda.
In fact each VG can be referred to by its name, such as
"/dev/VG_name".
Once you have one or more volume groups you can create one or more
virtual partitions called "logical volumes"
(or "LVs").
Note each LV must fit entirely within a single VG.
LVs appear to be block devices similar to disk partitions
such as /dev/hda1, with entries named
"/dev/VG\
_name/LV_name".
LVs have a number of parameters that can be set (and later most
can be changed) that can affect disk I/O performance,
including extent size, chunk size, stripe size and stripe set size,
and read-ahead.
These are discussed below.
Finally, you can create any type of filesystem you wish on the
logical volume, including as swap space.
Note that some filesystems are more useful with LVM than others.
For example not all filesystems support growing and shrinking.
ext2, ext3, ext4,
XFS, and Reiserfs do support such
operations and would be good choices.
(XFS only supports growing.)
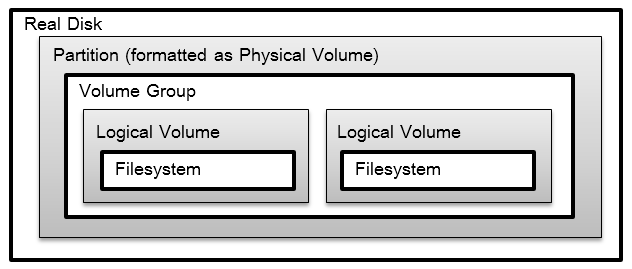
The relationship between disks and partitions, and PVs,
VGs, and LVs, is
illustrated in figures 1 and 2.
![[relationship of PVs, VGs, and LVs]](LVM-Fig1.gif)
When creating a volume group from one or more physical volumes, you must specify the size of the "extents" of each of the physical volumes that make up the VG. Each extent is a single contiguous chunk of disk space, typically 4M in size, but can range from 8K to 16G in powers of 2 only. (Extents are analogous to disk blocks or clusters.) The significance of this is that the size of logical volumes are specified as a number of extents. Logical volumes can thus grow and shrink in increments of the extent size. A volume group's extent size cannot be changed after it is set.
The system internally numbers the extents for both logical and physical volumes. These are called logical extents (or LEs) and physical extents (or PEs), respectively. When a logical volume is created a mapping is defined between logical extents (which are logically numbered sequentially starting at zero) and physical extents (which are also numbered sequentially).
To provide acceptable performance the extent size must be a multiple of the actual disk cluster size (i.e., the size of the smallest chunk of data that can be accessed in a single disk I/O operation). In addition some applications (such as Oracle database) have performance that is very sensitive to the extent size. So setting this correctly also depends on what the storage will be used for, and is considered part of the system administrator's job of tuning the system.
LVM can be use with RAID. LVM can be used to hold all filesystems. However special considerations apply when using LVs for the boot and root filesystems. This is because the BIOS code in the ROM of the motherboard of your computer must be able to locate and load the kernel. So if the boot partition was a LV, the BIOS would need to know about PVs, VGs, and LVs, and it probably doesn't. Unless you are using some custom BIOS you must not make the bootable partition an LV.
The root partition (if it isn't also the boot partition)
may be a logical volume.
However this means the kernel must access the root partition
before it can load any (e.g., LVM) kernel modules.
Thus the modules for LVM must be compiled into the kernel.
This is rarely the case with standard distributions!
(There is a similar issue with
SCSI
drivers, as most kernels only compile in the
IDE drivers.)
For this reason, as well as allowing a filesystem to be accessed
by another operating system (yes there are ext2 drivers
available for Windows), some system administrators prefer to make
the root filesystem on a regular partition rather than
on a logical volume.
Note in this case you can make a single
root+boot partition.
The solution to using a logical volume for your root
filesystem (as it is with SCSI) is either to build a custom kernel
with the correct drivers compiled in, or to make sure
the system loads a RAM
disk initially, known as initrd,
which contains all the correct modules.
This RAM disk then loads the system as normal, and goes away.
Creating a ramdisk on Linux is simple using the mkinitrd
script.
Just run this command (as root). You need to know the kernel version,
and then you must update grub.conf to use the ramdisk:
/root# KERNEL_VERSION=`uname -r`
/root# mkinitrd -v initrd.$KERNEL_VERSION $KERNEL_VERSION
/root# mv initrd.$KERNEL_VERSION /boot
/root# vi /boot/grub/grub.conf  # or /boot/grub/menu.lst
Before logical volumes can be mounted, the LVM driver
must be loaded (or compiled in) to the kernel.
Next all physical volumes on all available drives must be found
and examined, in order to determine all the volume groups.
Finally the volume groups must be activated, which causes
the kernel to recognize the various block devices.
Only then can the filesystems within logical volumes be mounted.
So most systems add code similar to the following to the boot up
scripts (typically the rc.sysinit script):
# LVM2 initialization
if [ -x /sbin/lvm.static ]  # Check for LVM v2
then
   # make sure device mapper (LVM2) kernel module is loaded:
   if ! grep -q "device-mapper" /proc/devices 2>/dev/null
   then
      modprobe dm-mod >/dev/null 2>&1
   fi
   # Cleanup and then recreate device mapper control file:
   /bin/rm -f /dev/mapper/control
   echo "mkdmnod" | /sbin/nash --quiet >/dev/null 2>&1
   if [ -c /dev/mapper/control ]  # if LVM2 is loaded:
   then  # Check for any physical volumes:
      if /sbin/lvm.static vgscan > /dev/null 2>&1
      then
         echo "Setting up Logical Volume Management:"
         # Activate volume groups and re-create all /dev entries:
         /sbin/lvm.static vgchange -a y && /sbin/lvm vgmknodes
      fi
   fi
fi
You may want to edit the file /etc/init.d/halt
to deactivate the volume groups at shutdown.
However this shouldn't be necessary when using LVM version 2.
To deactivate volume groups, insert the following near the
end of this file (just after the filesystems are mounted read-only
and before the comment that says "Now halt or reboot"):
# Deactivate LVM:
if [ -x /sbin/lvm.static ]  # Check for LVM v2
then
   echo "Deactivating LVM volume groups:"
   /sbin/lvm.static vgchange -a n
fi
Like all storage devices data may become corrupted over time.
LVM provides a command "vgck" you can use to
periodically check the consistency of your volume groups.
It may pay to add this command to the bootup scripts.
Let's suppose we have a volume group called VG1,
and this volume group has a physical
extent size of 4M.
Suppose too this volume group is composed of one disk partition
/dev/hda1 and one whole disk /dev/hdb.
These will become physical volumes PV1 and
PV2 (more meaningful names for a particular scenario
can be given if desired).
The PVs are different sizes and we get 99 (4M)
extents in PV1 and 248 extents in PV2,
for a total of 347 extents in VG1.
Now any number of LVs of any size can be created from the VG,
as long as the total number of extents of all LVs sums to no
more than 347.
To make the LVs appear the same as regular disk partitions to the
filesystem software, the
logical extents are numbered sequentially within the LV.
However some of these LEs may be stored in the PEs on PV1
and others on PV2.
For instance LE[1] of some LV in VG1 could map onto
PE[51] of PV1, and thus data written
to the first 4M of the LV is in fact written to the 51st extent of
PV1.
When creating LVs an administrator can choose between two general strategies for mapping logical extents onto physical extents:
PV1's PEs,
and LE 100–347 map onto PV2's
PEs). When using striped mapping, all PVs in the same stripe set need to be the same size. So in our example the LV can be no more than 198 (99 + 99) extents in size. The remaining extents in PV2 can be used for some other LVs, using linear mapping.
The size of the stripes is independent of the extent size, but
must be a power of 2 between 4K and 512K.
(This value n is specified as a power of 2
in this formula:
(2^n) × 1024 bytes, where
2 ≤ n ≤ 9.)
The stripe size should also be a multiple of the disk sector size,
and finally the extent size should be a multiple of this stripe size.
If you don't do this, you will end up with fragmented extents (as
the last bit of space in the extent will be unusable).
Tables 2 and 3 below illustrate the differences between linear and striped mapping. Suppose you use a stripe size of 4K, an extent size of 12K, and a stripe set of 3 PVs (PVa, PVb, and PVc), each of which is 100 extents. Then the mapping for an LV ( whose extents we'll call LV1, LV2, ...) to PVs (whose extents we'll call PVa1, PVa2, ..., PVb1, PVb2, ..., PVc1, PVc2, ...) might look something like the following. (In this table the notation means volume_name extent_number . stripe_number):
|
|
Tables 2 and 3: Linear versus Striped Mapping
In certain situations striping can improve the performance of the logical volume but it can be complex to manage. However note that striped mapping is useless and will in fact hurt performance, unless the PVs used in the stripe set are from different disks, preferably using different controllers.
(In version 1 of LVM LVs created using striping cannot be extended past the PVs on which they were originally created. In the current version (LVM 2) striped LVs can be extended by concatenating another set of devices onto the end of the first set. However this could lead to a situation where (for example) a single LV ends up as a 2 stripe set, concatenated with a linear (non-striped) set, and further concatenated with a 4 stripe set!
One of the features you get with LVM is a snapshot.
This allows an administrator to create a new logical volume which is
an exact copy of an existing logical volume (called the
original), frozen at some point in time.
This copy is usually read-only (although read-write is possible).
A common use includes when a backup needs to be performed on the logical volume,
but you don't want to halt a live system that is changing the data.
Another use is just performing some system maintenance; if that doesn't
work out, you can rollback the system to the snapshot.
(If it does work out, you can easily find and diff all the
files that were changed.
When done with the snapshot, the system administrator can just unmount it and then remove it. This facility does require that the snapshot be made at a time when the data on the logical volume is in a consistent state, but the time the original LV must be off-line is much less than a normal backup would take to complete.
In addition the copy typically only needs about 20% or less of the disk space of the original. Essentially, when the snapshot is made nothing is copied. However as the original changes, the updated disk blocks are first copied to the snapshot disk area before the original LV is written with the changes. The more changes are made to the original, the more disk space the snapshot will need.
When creating logical volumes to be used for snapshots, you must specify the chunk size. This is the size of the data block copied from the original to the snapshot volume. For good performance this should be set to the size of the data blocks written by the applications using the original volume. While this chunk size is independent of both the extent size and the stripe size (if striping is used), it is likely that the disk block (or cluster or page) size, the stripe size, and the chunk size should all be the same. Note the chunk size must be a power of 2 (like the stripe size), between 4K and 1M. (The extent size should be a multiple of this size.)
You should remove snapshot volumes as soon as you are finished with them, because they take a copy of all data written to the original volume and this can hurt performance. In addition, if the snapshot volume fills up errors will occur.
The lvm command permits the administrator to perform
all LVM operations using this one interactive command, which
includes built-in help and will remember command line arguments
used from previous commands for the current command.
However each LVM command is also available as a stand-alone
command (that can be scripted).
These are discussed briefly below, organized by task.
See the man page for the commands (or use the built-in help
of lvm) for complete details.
Disk I/O is often the determining factor in overall system performance. If your system has multiple disks and controllers, the correct strategy is to have them all used in parallel (that is, simultaneously) as much of the time as possible. In addition you should aim to place files in such a way as to minimize disk head movement (and thus minimize seek time).
While the performance improvements are real they often aren't significant. Whether or not to worry about these issues depends upon the current performance, file size, type, and access patterns, and which applications are running. Some ways to maximize performance are:
boot, root, /var/log, swap)
on one disk and the rest of the system on another, so the system's
disk I/O doesn't interfere with the service's I/O. /proc/sys/vm.) Other factors affect the disk I/O performance. Often these other factors overshadow any performance gains from careful disk layout. One example is the disk scheduler in the kernel. The 2.6 version of the Linux kernel comes with two different schedulers you can select between. In addition the kernel supports features such as read-ahead independently of any LVM settings.
Another issue is the disk controller settings.
Sometimes the disk schedules disk I/O regardless of the kernel.
Disks also have configurable settings, including DMA, buffering, etc.
These can be changed with "hdparam" and other utilities.
Other factors that affect performance include bus type and speed, and what other devices are attached to that bus.
To initialize a disk or disk partition as a physical volume you
just run the "pvcreate" command on the whole disk.
For example:
pvcreate /dev/hdb
This creates a volume group descriptor at the start of the second IDE disk. You can initialize several disks and/or partitions at once. Just list all the disks and partitions on the command line you wish to format as PVs.
Sometimes this procedure may not work correctly, depending on
how the disk (or partition) was previously formatted.
If you get an error that LVM can't initialize a disk with a
partition table on it, first make sure that the disk you are
operating on is the correct one!
Once you have confirmed that /dev/hdb is
the disk you really want to reformat, run the following
dd command to erase the old partition table:
# Warning DANGEROUS!
# The following commands will destroy the partition table on the
# disk being operated on.  Be very sure it is the correct disk!
dd if=/dev/zero of=/dev/hdb bs=1k count=1 blockdev \
    --rereadpt /dev/hdb
For partitions run "pvcreate" on the partition:
pvcreate /dev/hdb1
This creates a volume group descriptor at the start
of the /dev/hdb1 partition.
(Note that if using LVM version 1 on PCs with DOS partitions,
you must first set the partition type to "0x8e"
using fdisk or some other similar program.)
Use the "vgcreate" program to group selected PVs into
VGs, and to optionally set the extent size (the default is 4MB).
The following command creates a volume group named "VG1"
from two disk partitions from different disks:
vgcreate VG1 /dev/hda1 /dev/hdb1
Modern systems may use "devfs" or some similar
system, which creates symlinks in /dev for detected
disks.
With such systems names like "/dev/hda1" are actually
the symlinks to the real names.
You can use either the symlink or the real name in the LVM commands,
however the older version of LVM demanded you use the real device names,
such as /dev/ide/host0/bus0/target0/lun0/part1
and /dev/ide/host0/bus0/target1/lun0/part1.
You can also specify the extent size with this command using the
"-s size"
option, if the 4Mb default not what you want.
The size is a value followed by one of
k (for kilobytes), m (megabytes), g (gigabytes), or t (terabytes).
In addition you can put some limits on the number of physical or
logical volumes the volume can have.
You may want to change the extent size for performance, administrative
convenience, or to support very large logical volumes.
(Note there may be kernel limits and/or application limits on the size
of LVs and files on your system.
For example Linux 2.4 kernel has a max size of 2TB.)
The "vgcreate" command adds some information to the
headers of the included PVs.
However the kernel modules needed to use the VGs as disks aren't
loaded yet, and thus the kernel doesn't "see" the VGs you created.
To make the VGs visible you must activate them.
Only active volume groups are subject to changes and allow access
to their logical volumes.
To activate a single volume group VG1, use the command:
vgchange -a y /dev/VG1
("-a" is the same as "--available".)
To active all volume groups on the system use:
vgchange -a y
Creating a logical volume in some VG is the most complex part of LVM setup, due to the many options available. The basic command syntax is:
lvcreate options size VG_name
Where size is either
"-l num_extents"
or
"-L num_bytes", where num_bytes
is a number followed by one of k, m, g, or t.
If this second form is used you may not get an LV of that
exact size, as LVs are always a whole number of extents.
You can also use "--extents" for "-l" or
"--size" for "-L".
One of the most commonly used options is "-n name"
(you can use "--name" for "-n")
to specify a name for the logical volume.
If you don't use this option than the LVs are named automatically
"lvol1", "lvol2", "lvol3", etc.
Other options include "-C y" (or
"--contiguous y") to create an LV with
contiguous allocation,
"-i num_stripes -I stripe_size"
to create an LV with striped mapping (stripe_size is a number
between 2 and 9, as described above),
and "-r num_sectors"
(or "--readahead num_sectors") to set
the amount of read ahead to a value between 2 and 120.
Another form of this command is used to create snapshot volumes. This will be discussed below.
Some examples of creating logical volumes LV1
and LV2 from the volume group VG1:
# To create a 20GB linear LV named "LV1" for some VG named
# "VG1" and its block device special file "/dev/VG1/LV1":
lvcreate -L 20g -n LV1 VG1

# To create a LV of 100 extents with 2 stripes and stripe size 4 KB:
lvcreate -i 2 -I 4 -l 100 -n LV2 VG1
If you want to create an LV that uses the entire VG, use
the "vgdisplay" command to
find the "Total PE" size, then use that when running lvcreate.
Once the LVs have been created you can format them with filesystems
(or as swap space) using standard tools such as
"mkfs".
If the new filesystem can be successfully mounted, a final step is
to edit the /etc/fstab file and possibly the
rc.sysinit file, so that the volumes are mounted
automatically at boot time.
It may also be necessary to setup an initial ramdisk for booting
(if the "root" filesystem is built on a logical volume).
A snapshot LV is a copy of some existing LV at some point in time. This is done very efficiently using COW (Copy on Write) techniques to copy the original disk block to the space reserved for the snapshot, before the original block is written.
To create a snapshot of some existing LV, a form of the
lvcreate command is used:
root# lvcreate size option -s -n name existing_LV
where size is as discussed previously (snapshots
are a very good reason to keep some space free in a volume group),
"-s" (or "--snapshot") indicates a snapshot LV,
"-n name"
(or "--name name") says to call the snapshot
LV name.
One option allowed is "-c chunk_size"
(or "--chunksize chunk_size"), where
chunk_size is specified as a power of 2 in this formula:
(2^chunk_size) × 1024 bytes, where
2 ≤ chunk_size ≤ 10.)
Suppose you have a volume group VG1 with a logical volume LV1 you wish to backup using a snapshot. you can estimate the time the backup will take, and the amount of disk writes that will take place during that time (plus a generous fudge factor), say 300MB. Then you would run the command:
root# lvcreate -L 300m -s -n backup LV1
to create a snapshot logical volume named /dev/VG1/backup
which has read-only access to the contents of the original logical volume
named /dev/VG1/LV1 at point in time the snapshot was created.
Assuming the original logical volume contains a file system, you now
mount the snapshot logical volume on some (empty)
directory, then backup the mounted snapshot while
the original filesystem continues to get updated.
When finished, unmount the snapshot and delete it (or it will continue
to grow as LV1 changes, and eventually run out of space).
Note: If the snapshot is of an XFS filesystem, the
xfs_freeze command should
be used to quiesce the filesystem before creating the snapshot
(if the filesystem is mounted):
/root# xfs_freeze -f /mnt/point;
/root# lvcreate -L 300M -s -n backup /dev/VG1/LV1
/root# xfs_freeze -u /mnt/point
Warning	Full snapshot are automatically disabled
(For most other filesystem types, this is done automatically by the Linux kernel.) Now create a mount-point (an empty directory) and mount the volume:
/root# mkdir /mnt/dbbackup
/root# mount /dev/VG1/backup /mnt/dbbackup
mount: block device /dev/ops/dbbackup is write-protected, mounting read-only
If you are using XFS as the filesystem you will need to add the "nouuid" option to the mount command as follows:
/root# mount /dev/VG1/backup /mnt/dbbackup -o nouuid,ro
Do the backup, say by using tar to some tape backup device:
/root# tar -cf /dev/rmt0 /mnt/dbbackup
tar: Removing leading `/' from member names
When the backup has finished you unmount the volume and remove it from the system:
root# umount /mnt/dbbackup
root# lvremove /dev/VG1/backup
lvremove -- do you really want to remove "/dev/VG1/backup"? [y/n]: y
lvremove -- doing automatic backup of volume group "VG1"
lvremove -- logical volume "/dev/VG1/backup" successfully removed
A great use for snapshots (besides backups) is to experiment with something
that may not work correctly, for example, setting up single sign-on.
If the experiment works, you delete the snapshot with lvremove.
If the experiment did not work, you can roll-back the filesystem
to the version when the snapshot was taken,
using the lvconvert --merge command.
Here's a demo:
# lvcreate -L 1G -n lv_test vg
  Logical volume "lv_test" created.
# mkfs -t ext4 /dev/mapper/vg-lv_test
mke2fs 1.43.5 (04-Aug-2017)
Creating filesystem with 262144 4k blocks and 65536 inodes
Filesystem UUID: 4ec2eb07-709c-4d89-b3ff-6580dd5235c0
Superblock backups stored on blocks:
	32768, 98304, 163840, 229376

Allocating group tables: done
Writing inode tables: done
Creating journal (8192 blocks): done
Writing superblocks and filesystem accounting information: done

# mkdir /test /snap
# mount /dev/mapper/vg-lv_test /test
# echo hello > /test/foo
# lvcreate -s /dev/mapper/vg-lv_test -L 1G -n snap
  Using default stripesize 64.00 KiB.
  Logical volume "snap" created.
# mount /dev/mapper/vg-snap /snap
# echo good-bye > /test/bar
# ls -l /test
total 24
-rw-r--r--. 1 root root     9 Feb 27 23:24 bar
-rw-r--r--. 1 root root     6 Feb 27 23:23 foo
drwx------. 2 root root 16384 Feb 27 23:22 lost+found/
# ls -l /snap
total 20
-rw-r--r--. 1 root root     6 Feb 27 23:23 foo
drwx------. 2 root root 16384 Feb 27 23:22 lost+found/
# lsblk
NAME                GROUP  SIZE MOUNTPOINT
sda                 disk    50G
├─sda1              disk     1G /boot
└─sda2              disk  48.2G
  ├─vg-lv_root      disk    21G /
  ├─vg-lv_swap      disk   2.2G [SWAP]
  ├─vg-lv_home      disk    20G /home
  ├─vg-lv_test-real disk     1G
  │ ├─vg-lv_test    disk     1G /test
  │ └─vg-snap       disk     1G /snap
  └─vg-snap-cow     disk     1G
    └─vg-snap       disk     1G /snap
sr0                 cdrom 55.2M
# umount /test
# umount /snap
# date
Tue Feb 27 23:25:52 EST 2018
# lvconvert --merge /dev/mapper/vg-snap  # rollback lv_test!
  Merging of volume vg/snap started.
  vg/lv_test: Merged: 99.99%
  vg/lv_test: Merged: 100.00%
# date  # Notice it takes a while.
Tue Feb 27 23:26:20 EST 2018
# lsblk
NAME           GROUP  SIZE MOUNTPOINT
sda            disk    50G
├─sda1         disk     1G /boot
└─sda2         disk  48.2G
  ├─vg-lv_root disk    21G /
  ├─vg-lv_swap disk   2.2G [SWAP]
  ├─vg-lv_home disk    20G /home
  └─vg-lv_test disk     1G
sr0            cdrom 55.2M
# mount /dev/mapper/vg-lv_test /test
# ls -l /test  # Notice file bar is gone.
total 20
-rw-r--r--. 1 root root     6 Feb 27 23:23 foo
drwx------. 2 root root 16384 Feb 27 23:22 lost+found/
# umount /test
In the example above, we created a small test LV, formatted it, then
mounted it and added a file.
Next we made a snapshot of that LV and mounted that too.
Then I ran my “experiment” (created a file bar).
You can see that the test LV has both file, but the snapshot LV only has
the first file.
After unmounting both LVs, I did the rollback (the lvconvert command).
Notice that took about 30 seconds even in this tiny example.
After mounting the test LV, we can see that it did indeed rollback to
the original state.
Also note that once the roll-back (the merge) finished, the snapshot LV was
automatically deleted.
To see information about some VG use:
vgdisplay some_volume_group
vgs some_volume_group
To see information about some PV use the command:
pvdisplay some_disk_or_partition # e.g., /dev/hda1
pvs some_disk_or_partition
To see information about some LV use:
lvdisplay some-logical-volume
lvs some-logical-volume
The man pages for these commands provides further details.
To grow a filesystem, you must install a new hard disk (unless you have free space available), format it as a PV,add that PV to your VG, then add the space to your LV, and finally use the filesystem tools to grow it. (Not all filesystem allow or come with tools to grow and shrink them!)
VGs are resizable (spelled in Linux as "resizeable") by adding or removing PVs from them. However by default they are created as fixed in size. To mark a VG as resizable use the command:
root# vgchange -x y #or --resizeable y
Once this is done add a PV (say "hdb2") to some VG (say "VG1") with the command:
root# vgextend VG1 /dev/hdb2
Next, extend an LV with the "lvextend" command.
This command works almost the same as the "lvcreate"
command, but with a few different options.
When specifying how much to increase the size of the LV,
you can either specify how much to grow the LV with "+size"
or you can specify the new (absolute) size
(by omitting the plus sign).
So to extend the LV "LV1" on VG "VG1" by 2GB, use:
root# lvextend -L +2G /dev/VG1/LV1
You could also use:
root# lvresize -L +2G /dev/VG1/LV1
It would be a good idea to use the same mapping as the original LV, or you will have strange performance issues! Also note this command can be used to extend a snapshot volume if necessary.
After you have extended the logical volume the last step is to increase the file system size. How you do this depends on the file system you are using. Most filesystem types come with their own utilities to grow/shrink filesystems, if they allow that. These utilities usually grow to fill the entire partition or LV, so there is no need to specify the filesystem size.
Some common filesystem utilities are
(assume we are expanding the /home filesystem
in LV1 on VG1):
root# umount /home # /home is the mount point for /dev/VG1/LV1
root# fsck -f /home # required!
root# resize2fs /dev/VG1/LV1 # grow FS to fill LV1.
root# mount /home
umount
and afterward mount the filesystem.
For online resizing just use: root# resize_reiserfs -f /dev/VG1/LV1
root# xfs_growfs /home
mount command has an option that can be used: root# mount -o remount,resize /home
In some cases the exact number of blocks must be specified. (A kernel bug in some older Linux versions prevents the LV size from being determined automatically.) For example to resize a JFS file system that has a 4KB block size (the default) to 4GB, you must use 1M 4KB-blocks. Now "1M" is 2 raised to the power of 20 (=1048576), so use:
root# mount -o remount,resize=1048576 /home
To shrink a filesystem, you perform the same steps for growing one but in reverse order. You first shrink the filesystem, then remove the space from the LV (and put it back into the VG). Other LVs in the same VG can now use that space. To use it in another VG, you must remove the corresponding PV from the one VG and add it to the other VG.
To shrink a LV you must first shrink the filesystem in that LV.
This can be done with the resize2fs for EXT2/3,
or resize_reiserfs for ReiserFS
(doing this off-line is safer but not required).
There are similar tools for other filesystem types.
Here's an example of shrinking /home by 1 GiB:
# df
Filesystem            Size  Used Avail Use% Mounted on
/dev/sda1             145M   16M  122M  12% /boot
/dev/mapper/vg01-lv01  49G  3.7G   42G   9% /home
...
# umount /home
# fsck -f /home # required!
fsck 1.38 (30-Jun-2005)
e2fsck 1.38 (30-Jun-2005)
Pass 1: Checking inodes, blocks, and sizes
Pass 2: Checking directory structure
Pass 3: Checking directory connectivity
Pass 4: Checking reference counts
Pass 5: Checking group summary information
/home: 32503/6406144 files (0.3% non-contiguous), 1160448/12845056 blocks
# resize2fs -p /dev/vg01/lv01 48G
resize2fs 1.38 (30-Jun-2005)
Resizing the filesystem on /dev/vg01/lv01 to 12799788 (4k) blocks.
Begin pass 3 (max = 9)
Scanning inode table          XXXXXXXXXXXXXXXXXXXXXXXXXXXXXXXXXXXXXXXX
The filesystem on /dev/vg01/lv01 is now 12799788 blocks long.
Currently XFS and JFS filesystem types do not support shrinking.
If a newer version of these filesystems will support this,
mount may have
been updated to support these filesystem types.
(And if not a new tool may be released.)
For such filesystems you can resize them the hard way:
Backup the data using some archive tool (e.g., cpio,
tar, star,
or you can copy the data to some other disk).
Then delete the filesystem in the LV, then shrink the LV,
then recreate the new (smaller) filesystem,
and finally restore the data.
Once the filesystem has been shrunk it is time to shrink the
logical volume.
You can use either the lvreduce command or the
lvresize command.
Continuing from the example above:
# lvresize -L -1G /dev/vg01/lv01
  Rounding up size to full physical extent 96.00 MB
  WARNING: Reducing active logical volume to 48 GB
  THIS MAY DESTROY YOUR DATA (filesystem etc.)
Do you really want to reduce lv01? [y/n]: y
  Reducing logical volume lv01 to 48 GB
  Logical volume lv01 successfully resized
# mount /home
To shrink a VG (say "VG1"),
a PV (say "hdc") can be removed
from it if none of that PV's extents (the PEs) are in use
by any LV.
Run the command:
root# vgreduce VG1 /dev/hdc
You might want to do this to upgrade or replace a worn-out disk.
If the PV is in use by some LV, you must first migrate the data to
another available PV within the same VG.
To move all the data from a PV (say "hdb2")
to any unused, large enough PV within that VG, use the command:
root# pvmove /dev/hdb2
A logical volume (say "LV3" on the volume group
"VG2")
must be unmounted before it can be removed.
The steps for this are simple:
root# umount /dev/VG2/LV3
root# lvremove /dev/VG2/LV3
Before a volume group (say "VG2") is removed you must first
deactivate it.
This is done with the command:
root# vgchange -a n VG2
Now the VG can be removed. This of course will destroy all LVs within it. The various PVs that made up that VG can then be re-assigned to some other VGs. Remove (a non-active) volume group with:
root# vgremove VG2
In the following examples assume that LVM2 is installed and up to date, and the boot scripts have been modified already if needed. The first example includes some commentary and some command output; the second is much shorter but uses the long option names just for fun.
In this example we will create a logical volume to
hold the "/home" partition for a multi-media
development system.
The system will use a standard EXT3 filesystem of 60 GB,
built using 3 25GB SCSI disks (and no hardware RAID).
Since multi-media uses large files it makes sense to use
stripe mapping and read-ahead.
We will call the volume group "vg1"
and the logical volume "home":
/root# vgcreate vg1 /dev/sda /dev/sdb /dev/sdc
/root# vgdisplay
vgdisplay
--- Volume Group ---
VG Name	          vg1
VG Access             read/write
VG Status             available/resizable
VG #                  1
MAX LV                256
Cur LV                0
Open LV               0
MAX LV Size           255.99 GB
Max PV                256
Cur PV                3
Act PV                3
VG Size               73.45 GB
PE Size               4 MB
Total PE              18803
Alloc PE / Size       0 / 0
Free  PE / Size       18803/ 73.45 GB
VG UUID               nP2PY5-5TOS-hLx0-FDu0-2a6N-f37x-0BME0Y
/root# lvcreate -i 3 -I 4 -L 60G -n home vg1
lvcreate -- rounding 62614560 KB to stripe boundary size 62614560 KB / 18803 PE
lvcreate -- doing automatic backup of "vg1"
lvcreate -- logical volume "/dev/vg1/home" successfully created
/root# mkfs -t ext3 /dev/vg1/home
/root# mount /dev/vg1/home /mnt
/root# df | grep /mnt
/root# umount /dev/vg1/home
/etc/fstab with the revised entry for
/home.
In this example we will create 2 LVs for an Oracle database.
Oracle manages its own striping and read-head/caching, so
we won't use these LVM features.
However using hardware RAID is useful, so we will use
two RAID 10 disks, hdb and hdc.
The tables will use one logical volume called "tables"
on one disk and the indexes and control files will be on
a second LV called "indexes" on the other disk.
Both LVs will exist in the VG called "db".
Both filesystems will be XFS, for good performance for large
database files:
/root# pvcreate /dev/hdb /dev/hdc
/root# vgcreate db /dev/hdb /dev/hdc
/root# lvcreate --size 200G --name tables db
/root# lvcreate --size 200G --name indexes db
/root# mkfs -t xfs /dev/db/tables
/root# mkfs -t xfs /dev/db/indexes
/root# vi /etc/fstab
/root# vi ~/system-journal