If you accidentally corrupt the class repo, you should notify your instructor as soon as possible.
Using your preferred IDE, complete the steps shown below for your IDE to setup a Git project. Then edit the shared Java program, test it, commit your change(s), and finally, push your changes back to the class repository (merging if necessary).
The first step is to make sure your IDE includes the latest Git plug-ins. It almost surely includes Git support by default but if not, see your IDE's documentation to see how to add plug-ins. (You can add some other extras if you wish, but until you are comfortable with your basic IDE features, I suggest you resist the temptation to install much extra.) You should also check for IDE updates, and install any found.
Next you need to create an account on GitHub.com. This is easy, fast, and free. When you have completed this step, you can create your own repositories there for practice. I strongly suggest you create one (or more) and practice using them with your preferred IDE before attempting any changes to the project's repo! (When done, you can delete any of your GitHub repos from their “Settings” screen.)
GitHub currently (1/2021) allows users to use passwords, but is phasing that out. To use HTTPS in the future, you must use a personal access token. (If using SSH, you don't need this.) See Creating a personal access token from the GitHub.com site.
You must send an email containing your GitHub account name to your instructor. Only those listed as collaborators on GitHub.com can push changes to the COP-2805C-2021 repo there, and I need to add your account name to the list. Once you are added by me, you will receive an email message from GitHub with an “invitation” to collaborate; you need to accept that before you are a collaborator.
There are Windows GUI and command line tools for working with Git and/or GitHub. They are not full IDEs however; you view your repos, create new ones, and with some of these tools, add files or commit new versions of files. As the Git plug-ins for most IDEs includes a full version of Git, you don't need any other tool. (That is, this step is optional). Still, it is handy to be able to run various Git commands outside of an IDE, especially when trying to learn.
I would suggest installing “Git for Windows” from
git-scm.com.
Git for Windows includes a sub-set of the command line Linux tools, just
the ones you would need to work with Git at the command line.
(It also includes a Git GUI, but it doesn't do much.)
Windows 10 includes Linux, which includes Git.
Installing Git for Windows is probably your easiest choice.
I recommend configuring it (during the install) to allow you to run
git from a DOS command line.
Configure the other choices as you wish, but sticking to the defaults
is generally safest.
After completing the IDE-specific steps below, don't forget to continue with the remaining steps of the project.
Step by Step Directions for Eclipse IDE:
- Start Eclipse.
- (Optional step) Close any currently open projects.
- Next you should configure Eclipse with some settings.
(If you don't, the Git settings will cause a dialog box to appear when
you make your first commit.)
Go to the Windows menu and select
Preferences→Team→Git→Configuration.
Add entries for “
user.name” with your full name, and “user.email” with a working email address (such as your HCC Hawkmail address). This information will be automatically included with every commit.If the email address you used is unknown to GitHub, your commits will not be linked to your GitHub account name! This is because GitHub accepts commits if you know a username and password (or use an appropriate SSH key), but labels commit objects by the email address in the commit. You can list several email addresses in your GitHub account and then your commits will be recognized from any of them. Follow these directions to add additional email addresses to your GitHub account.
From Preferences→Team→Git, you can set a default location for all your Git repos. (I use
...\Documents\GitRepos.)From Preferences→General→Workspace: Set the default text file encoding to UTF-8.
It's not required to change this setting for our project, but the “Package Explorer” hides many files by default. In particular, it hides the “
.gitignore” and similar files. To fix that, click on the tiny downward-pointing triangle on the right of the Package Explorer tab bar, and click on “Filters and Customization”. Now un-check “.* resources”. To re-hide the Eclipse project files, select “Name filter patterns” at the top, and enter “.classpath, .project, .git, JRE*” (without the quotes) in the box. Hide other files if you wish, or hide nothing at all — it's your choice. - It isn't required, but you can use the SSH protocol and keys instead of passwords to access remote repos, including on GitHub. If you wish to use keys, see Setting up SSH keys below.
- With Eclipse all set up, you are ready to start work.
(You could install additional software to add nice features to Eclipse, but
I recommend you keep it simple until you know Eclipse better.)
Since you are contributing to an existing project, you will import it:
- Select “File→Import...”,
then select “Maven→Check out Maven Projects from
SCM”, then click Next.
To allow Eclipse to easily import Maven projects, you may need to update the Eclipse Maven-Git connector, as the version that you get by default with Eclipse may be too old (a bug in Eclipse in 2019). If you have any problems importing Maven projects (such as ours on GitHub), this may be the reason, and you should get the latest version:
- Go to the menu item Help → Install New Software. Click on the “Manage...” button.
- Make sure all the sites listed are selected. (Often, “Latest Eclipse Release” is not selected.)
- Next click on the “Add...” button.
Enter something for the name (I chose
“Maven SCM Handler for EGit v0.15.1”), and
“https://repo1.maven.org/maven2/.m2e/connectors/m2eclipse-egit/0.15.1/N/LATEST/”
for the location (without the quotes).
(This is the latest version as of 1/2020. You can check for
a newer version by looking in https://repo1.maven.org/maven2/.m2e/connectors/m2eclipse-egit/
for a newer version.
If you find one, the correct URL is the same but with
the newer number (instead of “
0.15.1”.) Click the Add button, then the Apply and Close button. - Back at the Install New Software dialog, select the site you just added. A single item, Maven SCM Handler for EGit should appear. Click the checkbox to select it, click Next button, and proceed to click through the rest of the install process.
- Enter the correct URL for the remote repo.
You can do this easily with GitHub by opening the repo in your web
browser.
The correct repo for this project is named
https://GitHub.com/profwpollock/COP-2805C-2021, but that's
not the URL to use.
On the right of this repo's web page, you will find a “Clone
or Download” button:
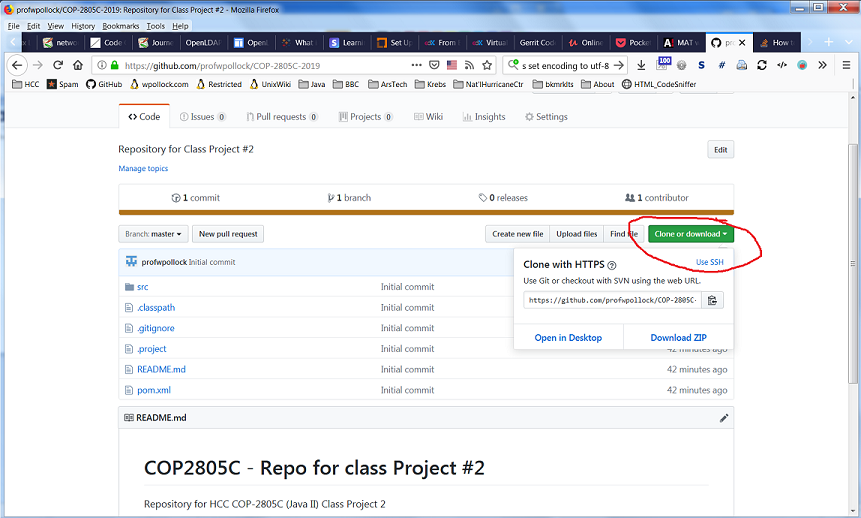
- If using SSH (skip this step if using HTTPS): Click the “SSH” link, to change the URL from HTTPS to the SSH protocol, since you are using SSH. (Only authenticated users can push their commits to the class' GitHub repos, so you must either use HTTPS (with a password or access token) or use SSH.)
- Click the copy button.
- Back in the Eclipse import wizard, paste the URL you copied.
- If using SSH (skip this
step if using HTTPS):
Select “SSH” from the
“Protocol” drop-down list.
Don't change the username; it should be
“
git” and not your GitHub name. - Click Finish.
The new imported project should appear in the project explorer
window.
If all is well, you have cloned that Git repo locally too. You are now ready to complete the project.
- Select “File→Import...”,
then select “Maven→Check out Maven Projects from
SCM”, then click Next.
Step by Step Directions for NetBeans IDE:
- Make sure you have the latest version of Apache NetBeans installed. (Many people mistakenly install a very old version from Netbeans.org.) Then start NetBeans.
- Make sure you've installed the Git and the Maven plug-ins.
(They may be installed by default.)
Also useful (but not required) are the following plug-ins:
Display README files in project view Git Toolbar - Next you should configure NetBeans with some settings.
(If you don't, the default Git settings will cause the wrong user name and
especially, the wrong email address to be used, when you make commits.)
Go to Team→Git→Open Global Configuration.
Add entries for “
user.name” with your full name, and “user.email” with a working email address (such as your HCC Hawkmail address). This information will be automatically included with every commit. The resulting.gitconfigfile (in your HOME directory) should then look something like this (the file may have additional entries too):[user] name = Hymie Piffl email = hpiffl@hawkmail.hccfl.edu(Of course, you need to use your actual name and email address.)
If the email address you used is unknown to GitHub, your commits will not be linked to your GitHub account name! This is because GitHub accepts commits if you know a username and password (or use an appropriate SSH key), but labels commit objects by the email address in the commit. You can list several email addresses in your GitHub account and then your commits will be recognized from any of them. Follow these directions to add additional email addresses to your GitHub account.
Set the default file encoding to UTF-8. You can change the file encoding for any one project by right-clicking on the project name (in the Projects tab), selecting Properties, and changing it there. To change the default for all new projects, follow these directions from StackOverflow.com.
- With NetBeans all set, it's time to create your project by cloning the class project from GitHub. Copy the correct Repository URI for the remote repo. You can do this easily with GitHub by opening the repo in your web browser. On the right side of the repo's web page (https://github.com/profwpollock/COP-2805C-2021), you will find a “Clone or Download” button; click it.
- If using SSH (skip this step if using HTTPS): Click the “SSH” link, to change the URL from HTTPS to the SSH protocol, since you are using SSH. (Only authenticated users can push their commits to the class' GitHub repos, so you must use either HTTPS (with a password or access token) or SSH.)
- Click the copy button.
- Back in NetBeans, from the “Team” menu, select “Git→Clone...”.
- Paste the URL into the NetBeans dialog box.
- If using SSH (skip this
step if using HTTPS):
The copied SSH URI won't work in NetBeans!
You have to add the correct protocol to the front, and change the first
colon to a forward-slash.
For our project, the copied URI of
“
git@github.com:profwpollock/COP-2805C-2021.git” should be changed to “ssh://git@github.com/profwpollock/COP-2805C-2021.git”. Next, browse to locate your private key file, created outside of NetBeans. (Or just use HTTPS and a password or access token.) Make sure the URI is correct; if using SSH, make sure the Username field is filled with “git”. - After filling out the URI (and either your GitHub username and password, or your SSH key setup), click Next. Make sure the “Master” branch is selected, and click Next.
- Click Next to create a clone of the repo (under the NetBeans projects folder). This should also scan for projects.
- NetBeans will recognize this as a Maven project, so no further steps are required. You can however rename your project by right-clicking on it.
- That's it!
You should now have a local repo, and a NetBeans project linked with it.
You are now ready to complete the project.
Unlike Eclipse, NetBeans integrates Maven. Right-click on the project, and see the menu options (Build, Clean and Build, Clean, etc.). Each call the corresponding Maven command when clicked. Additionally, you can custom goals to the menu.
Step by Step Directions for IntelliJ IDEA IDE:
- Start IntelliJ IDEA.
- Configure your IDE with some settings. Open File→Settings→Editor→File Encodings. If you plan on following my advice, set all encodings to “UTF-8”. (Or you can just set this later, once you've downloaded the repo and setup your local project.)
- Go to “File→Other Settings→Structure for New Projects...” and make sure the “Project SDK” shows the correct JDK version you have installed. Below that, choose the matching Program Language Level. (For example, for version 13.0.2 of Java, the language level should be “13 - No new language features”.)
- If using SSH (skip this
step if using HTTPS):
Go to Settings→Version Control→Git.
Make the “Path to Git executable”
is set correctly and working.
(Of course, you did already install Git for Windows, right?)
Next go to Settings→Version Control→GitHub and
check the box to “Clone git repositories using ssh”.
Like NetBeans, IntelliJ IDEA can use SSH but cannot manage your SSH keys. The initial setup of SSH keys is more complex than with Eclipse (which can manage keys) or NetBeans. See below for details.
- If using HTTPS (skip this step if using SSH), you can have IntelliJ IDEA remember your GitHub credentials. Go to Settings→Version Control→GitHub to enter in your info. GitHub will generate a token for your IDE to use. If the token expires or is missing, click “Log in” to generate a new one.
- With IntelliJ IDEA all set, it's time to create your project by cloning the class project from GitHub. Copy the correct Repository URI for the remote repo. You can do this easily with GitHub by opening the repo in your web browser. On the right side of the repo's web page (https://github.com/profwpollock/COP-2805C-2021), you will find a “Clone or Download” button; click it.
- If using SSH (skip this step if using HTTPS): Click the “SSH” link, to change the URL from HTTPS to the SSH protocol, since you are using SSH. (Only authenticated users can push their commits to the class' GitHub repos, so you must either use HTTPS (with a password or access token) or use SSH.)
- Click the copy button.
- Back in IntelliJ IDEA, from the Welcome window select
“Check out from Version Control→Git”.
Paste in the URL and click Clone.
Say yes to open the IntelliJ IDEA project.
A notification appears about needing to import Maven projects.
Either say yes, or just enable “auto-import” (my choice).
You should be able to run the main or the test by selecting an appropriate Run configuration, or from the Maven menu (double-click Install from the lifecycle list, then to run your program (if it built successfully), double-click on exec:java from the Plugins list).
- That's it! If all is well, you have a local project and Git repo as well. You are now ready to complete the project.
Complete the Project Using any IDE:
- At this point, you should have a local copy of the project.
You should start by reading any README or license files included with
the project.
(It may be easier to view those from the GitHub site directly.)
Open the
src→main→java→mypkgpackage (folder) to see the “SayHello.java” file. - Run the application, to make sure it works. If not, you can either fix the issue yourself or create an “Issue” on the GitHub site for the repo. You can also add to the repo's Wiki. Note, each IDE has different methods for running projects, especially Maven ones. Eclipse has separate run and test buttons from the various Maven buttons. NetBeans integrates its run and test buttons with the correct Maven actions, so there's no separate Maven buttons. IntelliJ IDEA has separate run configurations from Maven, but has the best Maven tools of all IDEs. However, you may have to configure the Maven actions (and the normal run and test actions) the first time. In all cases, you can find addons/plugins/extensions that can make it easier to run Maven projects or execute Git commands.
- Edit
SayHello.javaand add your code. Make sure the code will compile and run, and displays your greeting along with the other greetings from your fellow classmates. Save your work. -
At this point, you are only changing and saving your project's
(Git's working directory) copy.
Next you need to update your local repo with the changes.
Commit your changes to save your work to your local repository. Enter a comment for your commit (called either a log message or commit message) describing your update. (To receive full credit, you must include an appropriate commit message.) Before committing, make sure your commit includes
SayHello.javaand does not include any other files. Not all IDEs ignore the configuration files, even if listed in the.gitignorefile, so double-check before making the commit.In short, make sure your commit ONLY includes your few added lines to SayHello.java, and does not touch other lines in that file and does not include any other files. If you are uncertain if your commit is correct, send a screen-shot showing the changes to your instructor (or a fellow student) before making the commit.
If using IntelliJ IDEA, it is at this point you need to enter your email address (the one you told GitHub about) and your name. This is because the other IDEs store a single name and email in their settings, and automatically use that. But IDEA allows multiple people to work on the same computer and commit, so it keeps a drop-down list of previous committers and there is no prior configuration needed. Simply add your name and email in the “Author:” box in the commit dialog. The format should match this example:
Hymie Piffl <hpiffl@example.com>
Either click in the box and type control+space to see the list, or just start typing the name and it will auto-fill the box.
- As stated above, examine your commit and note the changes it makes.
The changes should make sense to you: they should show you added just a few
lines and didn't delete or change any other lines.
If they do not show that, you've probably made a mistake.
For example, if the whole file shows as deleted and replaced, you probably
have a problem with your line ending settings in your IDE.
The proper settings are stated in the README.md file.
If this happens after you make the commit, you can delete
(“revert”) your commit and try again after fixing
your settings.
(If you cannot figure that out, delete your (on your PC)
project, fix the settings, then try the edit and the commit again.)
Note that only the Master branch of the class' GitHub repo will be graded. So if you did your change in a branch, be sure to merge your commit into your master branch before proceeding with a push. When finished with this project, you should close the project in your IDE. (This should help prevent “accidents”!)
- Push your commit(s) from your local repo's master branch to the “origin” (the GitHub class repo's master branch). If this fails to work due to a conflict, consider yourself lucky: you get to practice doing a merge! See the merge information below for general info, but most likely you will need to read or watch a Git merge tutorial for your IDE.
- Next, create a patch, sometimes called a pull request.
How you do this depends on which IDE you use, or if you
simply want to create one directly on GitHub.
(Using GitHub directly is often best, but does require you to have the
repo cloned on GitHub and not just locally on your computer.)
You will make a local pull request (patch) you can email to someone.
Such a request is often just a patch file: a text file
that shows the differences between what the repo has and what you think
it should have.
With Eclipse, right-click on your project and select “Show in History”. The Master branch's HEAD should be the commit with your change in it. Right-click on that commit in the history, and select “Create Patch...”. Click on
Fileto save your patch (a pull request) in a file; the default name of the file defaults to the first line of your commit message, but you can change that if you wish. Click Next. Now you can choose a patch file format. Eclipse can only apply patches made in the “Eclipse workspace” format, but for this project use the standard “Git (e-mail header)” format.With NetBeans, with the
SayHello.javafile showing, click on Team→Show History. The Master branch's HEAD should be the commit with your change in it. Click on the box with the plus-sign, to expand your choices. Now click on “Export Commit...” to make a patch file (a pull request). Save it someplace (say, on your desktop) with a descriptive name, something like “hpiffl pull request”.With IntelliJ IDEA, if you haven't made a commit yet, click the Git→Create patch from local changes... menu item. Add a commit message and save the patch as a file (the commit message is used to name the file). This won't work if you've committed your changes already! In this case, click Git→Show Git log. The log should appear showing all the commits. Select one (or control-click to select multiple) commits whose changes you wish to include in a patch. Finally, right-click the selection and click on "Create patch...".
You should examine your patch file in a text editor. See if you can understand the format; someday you may wish to tweak one of these files before sending off the email. (It is common to add a paragraph at the top to explain the patch.) Your IDE can show it to you with color and syntax highlights; that may help you understand the format.
(View an Email containing a patch.)
Merge Information
If you opened the project a while ago, others may have made changes since you downloaded the files. In this case, Git may not be able to automatically push or merge the changes since both changes were to the same file. (The error message will say something about fast-forward failed.) You must fetch the new commit(s) into your local repo, then merge your changes with those (locally). All three IDEs have nice merging tools; they work best with a wide-screen monitor. You should definitely review your IDE's tutorial for Git merging before trying this out! After reconciling the differences (and testing to make sure the code still runs), you complete the merge with a commit. Then you can push that merge commit to GitHub without problems.